ford smax bonnet release cable replace
Discussion


Bonnet opened OK but then wouldn't close. Did a search and its common problem. Cable corrodes near catch end, frays gets stuck holding the catch open. I then wiggled the leaver lots and it snapped completely. Good thing is the bonnet is open.. do not close it now ;-)
couldn't find any instructions on how to fix it so here are my instructions of what I did, I hope this helps someone else.
the repair took me around 2 hours. but I am slow and I had to work out what I was doing at every step..
bought new cable from ford £21, also bought new catch £31 just in case, did not use it, kept old catch.
1)remove catch:-
Take off plastic cover above radiator around catch
Two 10 mm bolts on back of catch release metal cover and catch.
Disconnect electrical plug( bonnet open/closed switch)
Disconnect old release cable. confirmed it was snapped.
2)remove battery and battery box:-
pull front part of battery box off
undo battery clamp and remove clamp(1*8mm bolt)
pull battery forward, disconnect positive(be V careful with spanner),
pull battery even further forward, disconnect negative
pull battery out pushing pipes down below as you do it
you can now unclip the top part of the battery box and remove it. its difficult.
I removed bottom of battery box(3x8mm bolts) but I don't think it is necessary.
3) you can now release cable from the big clip on the inner wing of the car. I used a screw driver
4) remove lever in passenger foot well
removed the corner piece of plastic trim (round door opening ) I used force which broke clips off but it went back in ok later, not sure if there is a nice way to do this ?
pull carpet back over lever.
two star pattern screws hold lever to side wall. (can't remember size).
not sure if this is necessary but I released three of the sound proofing fasteners, they are the round black plastic things which are also used to cable tie cables too. easy to remove.. cut cable tie and then they unscrew. I did this to free up the cable for when I pulled in the new one.
5) pull new cable through using old cable.
I deliberated which way to pull cable through for a long time.. catch end has a nasty formed 90 degree bend in it that I thought would make it difficult to pull through. I then realised that it is possible to disconnect lever from the other end leaving you with just the small metal lump on the end. So I pulled from lever end feeding the new cable in at catch end.
cut the 90 degree bend off the latch end of OLD cable.
temporarily remove lever from new cable. un-clip lug and then outer cable pulls out of lever boddy (needs a good pull)
tape new cable (lever end) to old cable (catch end). I used lots of electrical tape.
I then fed the cable through the first part I.e. around the corner of the radiator and left the slack before the bulk head.
Then from the passenger foot well I gave a healthy tug which pulled the rubber bung from the bulk head.
After this it was easier to pull through until I got to the new rubber bung on the new release cable. You can tell when you are at this point becasue the tape join will be near the lever position.
6) attach cable back to lever
and then in Haynes manual style . reassemble in reverse order ;-)
The main points here are you have to remove the battery and box, and that I think it is best to pull the cable through the way I describe. The job is quite a challenge...
If you want to correct any of the above please feel free, I wont be offended. I am just trying to help. If you find the above useful and do this job, please say so below.
Cheers
Jamie
Hi, thanks for writing this all down. Have just had the same problem with my S-max. I bought a replacement cable from eBay for 24 quid and have now replaced it with the help of your excellent instructions.
The only bit I didn't understand before changing the cable was that the end that needs to be pulled thro the bulkhead (detached from the handle end) would be pulling the rubber conical grommet the wrong way through the bulkhead hole. When it came to doing this, the answer was to do as you describe, then pull the conical grommet right through the bulkhead hole and then pull it back again so that it can sit correctly in place.
I just thought I'd comment in case anyone else was having the same dilemma.
Thanks again, Pete
jambonoo7 said:
Bonnet opened OK but then wouldn't close. Did a search and its common problem. Cable corrodes near catch end, frays gets stuck holding the catch open. I then wiggled the leaver lots and it snapped completely. Good thing is the bonnet is open.. do not close it now ;-)
couldn't find any instructions on how to fix it so here are my instructions of what I did, I hope this helps someone else.
the repair took me around 2 hours. but I am slow and I had to work out what I was doing at every step..
bought new cable from ford £21, also bought new catch £31 just in case, did not use it, kept old catch.
1)remove catch:-
Take off plastic cover above radiator around catch
Two 10 mm bolts on back of catch release metal cover and catch.
Disconnect electrical plug( bonnet open/closed switch)
Disconnect old release cable. confirmed it was snapped.
2)remove battery and battery box:-
pull front part of battery box off
undo battery clamp and remove clamp(1*8mm bolt)
pull battery forward, disconnect positive(be V careful with spanner),
pull battery even further forward, disconnect negative
pull battery out pushing pipes down below as you do it
you can now unclip the top part of the battery box and remove it. its difficult.
I removed bottom of battery box(3x8mm bolts) but I don't think it is necessary.
3) you can now release cable from the big clip on the inner wing of the car. I used a screw driver
4) remove lever in passenger foot well
removed the corner piece of plastic trim (round door opening ) I used force which broke clips off but it went back in ok later, not sure if there is a nice way to do this ?
pull carpet back over lever.
two star pattern screws hold lever to side wall. (can't remember size).
not sure if this is necessary but I released three of the sound proofing fasteners, they are the round black plastic things which are also used to cable tie cables too. easy to remove.. cut cable tie and then they unscrew. I did this to free up the cable for when I pulled in the new one.
5) pull new cable through using old cable.
I deliberated which way to pull cable through for a long time.. catch end has a nasty formed 90 degree bend in it that I thought would make it difficult to pull through. I then realised that it is possible to disconnect lever from the other end leaving you with just the small metal lump on the end. So I pulled from lever end feeding the new cable in at catch end.
cut the 90 degree bend off the latch end of OLD cable.
temporarily remove lever from new cable. un-clip lug and then outer cable pulls out of lever boddy (needs a good pull)
tape new cable (lever end) to old cable (catch end). I used lots of electrical tape.
I then fed the cable through the first part I.e. around the corner of the radiator and left the slack before the bulk head.
Then from the passenger foot well I gave a healthy tug which pulled the rubber bung from the bulk head.
After this it was easier to pull through until I got to the new rubber bung on the new release cable. You can tell when you are at this point becasue the tape join will be near the lever position.
6) attach cable back to lever
and then in Haynes manual style . reassemble in reverse order ;-)
The main points here are you have to remove the battery and box, and that I think it is best to pull the cable through the way I describe. The job is quite a challenge...
If you want to correct any of the above please feel free, I wont be offended. I am just trying to help. If you find the above useful and do this job, please say so below.
Cheers
Jamie
This is an old post, but it certainly helped me get the job done.couldn't find any instructions on how to fix it so here are my instructions of what I did, I hope this helps someone else.
the repair took me around 2 hours. but I am slow and I had to work out what I was doing at every step..
bought new cable from ford £21, also bought new catch £31 just in case, did not use it, kept old catch.
1)remove catch:-
Take off plastic cover above radiator around catch
Two 10 mm bolts on back of catch release metal cover and catch.
Disconnect electrical plug( bonnet open/closed switch)
Disconnect old release cable. confirmed it was snapped.
2)remove battery and battery box:-
pull front part of battery box off
undo battery clamp and remove clamp(1*8mm bolt)
pull battery forward, disconnect positive(be V careful with spanner),
pull battery even further forward, disconnect negative
pull battery out pushing pipes down below as you do it
you can now unclip the top part of the battery box and remove it. its difficult.
I removed bottom of battery box(3x8mm bolts) but I don't think it is necessary.
3) you can now release cable from the big clip on the inner wing of the car. I used a screw driver
4) remove lever in passenger foot well
removed the corner piece of plastic trim (round door opening ) I used force which broke clips off but it went back in ok later, not sure if there is a nice way to do this ?
pull carpet back over lever.
two star pattern screws hold lever to side wall. (can't remember size).
not sure if this is necessary but I released three of the sound proofing fasteners, they are the round black plastic things which are also used to cable tie cables too. easy to remove.. cut cable tie and then they unscrew. I did this to free up the cable for when I pulled in the new one.
5) pull new cable through using old cable.
I deliberated which way to pull cable through for a long time.. catch end has a nasty formed 90 degree bend in it that I thought would make it difficult to pull through. I then realised that it is possible to disconnect lever from the other end leaving you with just the small metal lump on the end. So I pulled from lever end feeding the new cable in at catch end.
cut the 90 degree bend off the latch end of OLD cable.
temporarily remove lever from new cable. un-clip lug and then outer cable pulls out of lever boddy (needs a good pull)
tape new cable (lever end) to old cable (catch end). I used lots of electrical tape.
I then fed the cable through the first part I.e. around the corner of the radiator and left the slack before the bulk head.
Then from the passenger foot well I gave a healthy tug which pulled the rubber bung from the bulk head.
After this it was easier to pull through until I got to the new rubber bung on the new release cable. You can tell when you are at this point becasue the tape join will be near the lever position.
6) attach cable back to lever
and then in Haynes manual style . reassemble in reverse order ;-)
The main points here are you have to remove the battery and box, and that I think it is best to pull the cable through the way I describe. The job is quite a challenge...
If you want to correct any of the above please feel free, I wont be offended. I am just trying to help. If you find the above useful and do this job, please say so below.
Cheers
Jamie
I wanted to add some more detail too..
Mines an 09 S-MAX. 2.0L TDCI
Before getting to #2 I had to remove the air filter, not hard but not that easy either.
Remove the 6 (ish) screws, jubilee clip and sensor lead.
Get the rubber hose off the back of the filter lid, remove the filter its self.
Remove the base of the filter box by uncliping / pulling out of its mounts.
Then onto the battery...
- 2 Definetly remove the battery box with the 2 8mm screws and 1 8mm bolt.
This is where the headache began.
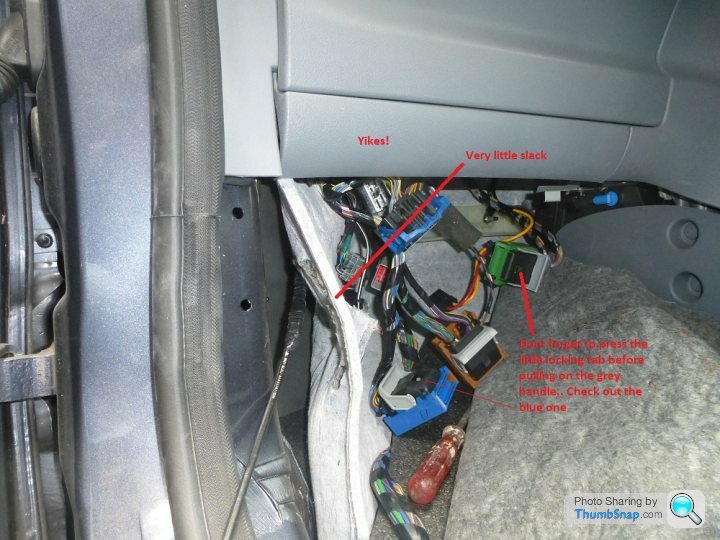
The footwell of this model (dont know about others) is filled with wiring loom. So you cant actually see the bulkhead where the bonnet cable goes through.
I ended up unplugging everything from the big fuse box (slightly broke one clip, its fine honest)
This allowed me to at least get a finger up to the bulkhead (oo err).
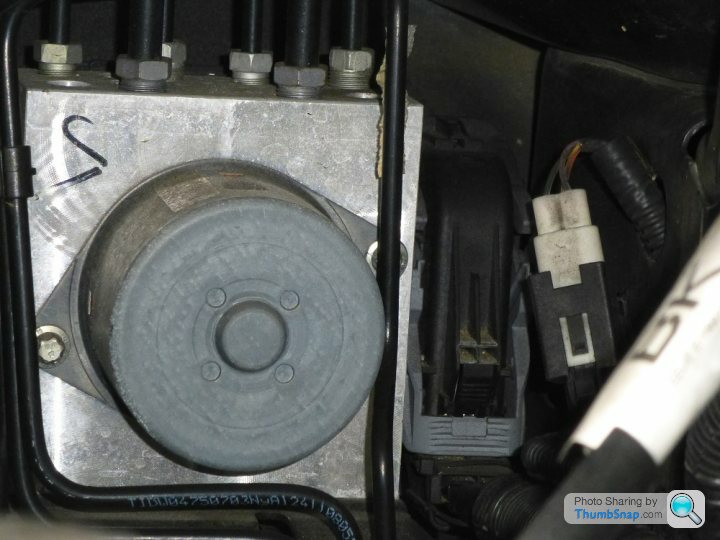
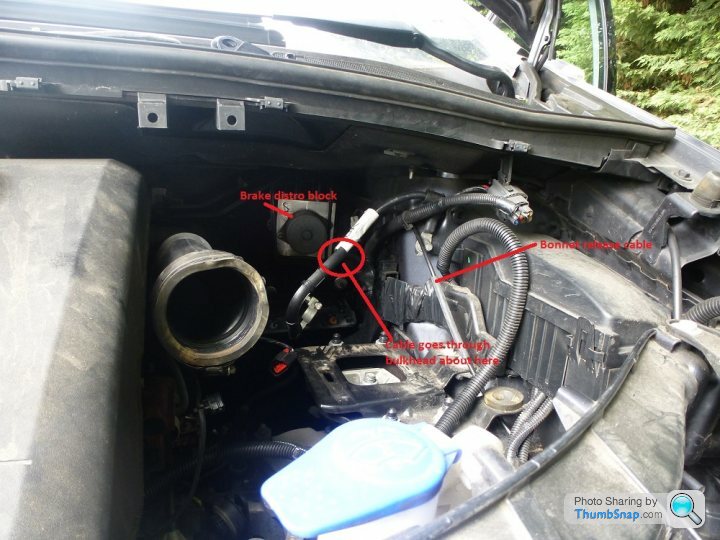
On the engine bay side.. you also cant see where the cable goes through. Its directly behind what looks like a brake distribution block. Not something you want to be touching.
So to get the new cable in follow the advice above. Cut then end off the old cable. Tape it to the new (really well) and thread it through the same route as the original.
When it comes to pulling it through the bulkhead just pull from the footwell side on the old cable, having ensured there is sufficient slack on the engine bay side.
I did it single handed but 2 pairs of hands would make it easier.
To pull the grommet through just keep pulling. then work it back again to try to bung the hole up.
Again.. i couldnt see up there so it may not be in properly.. do your best.
Attaching some pics to show some of this.
Brake fluid distribution block:
Footwell:
Edited by Cha0sEngine on Sunday 3rd May 20:40
@jambonoo7 @Cha0sEngine Thanks for the detailed step-by-step information. Much appreciated. I have just replaced the cable on my '09 SMax TDCi, and would have bailed early on if I'd not been following your instructions.
I took a risk and didn't pull back much of the carpet inside the vehicle and fortunately it worked without problems. Almost certain the rubber grommet is not in the correct place (it was moving on the cable, so I had low confidence it was going to pull through the bulkhead). Leaving carpet in place saved a fair bit of time.
I took a risk and didn't pull back much of the carpet inside the vehicle and fortunately it worked without problems. Almost certain the rubber grommet is not in the correct place (it was moving on the cable, so I had low confidence it was going to pull through the bulkhead). Leaving carpet in place saved a fair bit of time.
If your outer looks OK (as mine does) there's a company making an inner only that you can thread through the outer. MUCH simpler - and a bit cheaper
I'm going to try it on mine and see how it lasts.
My worry is the little grub screw working loose and the nipple coming off the end. which would be a right PITA.
I'm going to try it on mine and see how it lasts.
My worry is the little grub screw working loose and the nipple coming off the end. which would be a right PITA.
Gassing Station | Ford | Top of Page | What's New | My Stuff