Ford Racing Puma - Goes Racing
Discussion


Hi guys.
I thought i would share my latest project with you to see if anyone is interested.
This story is patched together from a number of other updates, so forgive me if it doesn't flow very well. you will see the UPDATE then a date, which shows when it was originally written, hope that makes sense. Its a pretty long read, so go grab a coffee if you feel like going through it.
thanks for your interest an i hope you enjoy it.
IN THE BEGINNING! - JAN 2012:
FIRST
Hi all
Well this is the story of a new project ive recently started. Only last week I sold one of the best cars ive ever owned (FRP 441) to help fund a new venture which I'm really excited about.
In recent years I've been lucky enough to take a Racing Puma out on a few trackdays, and even to themighty Nurburgring, and realise just how good these little cars are, they have so much grip, don't get tired and just keep giving.
I always thought they still had more to give, could be even better if someone was brave enough to try, and one day i was in the right place at the right time and managed to secure another FRP to play with.
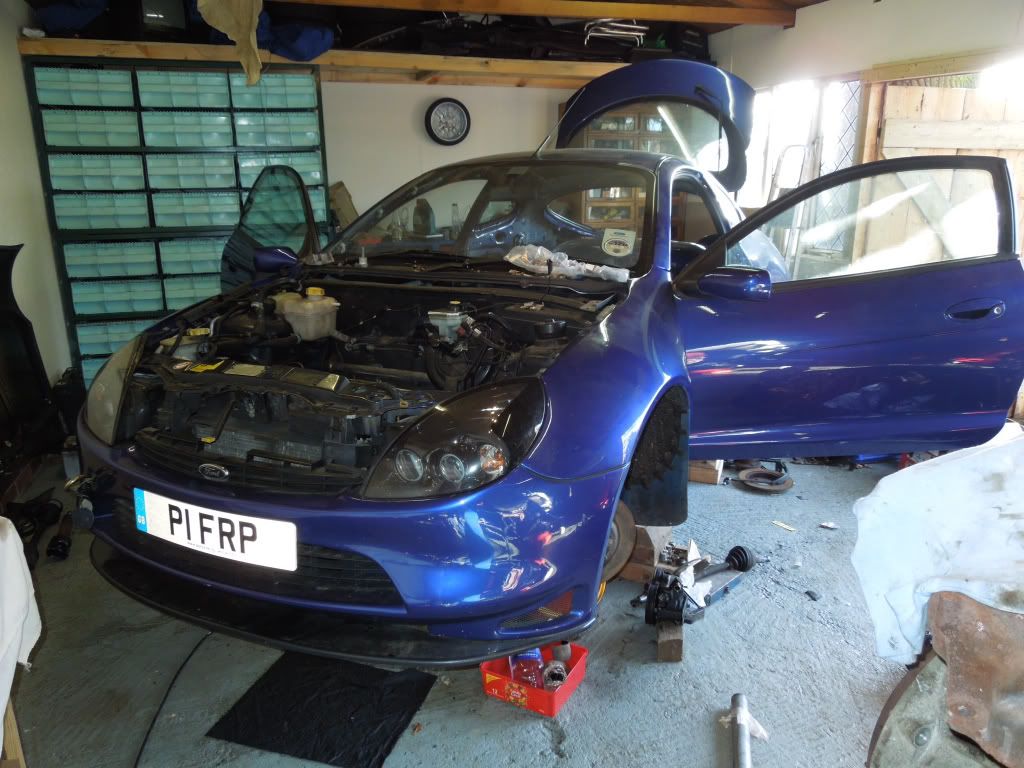
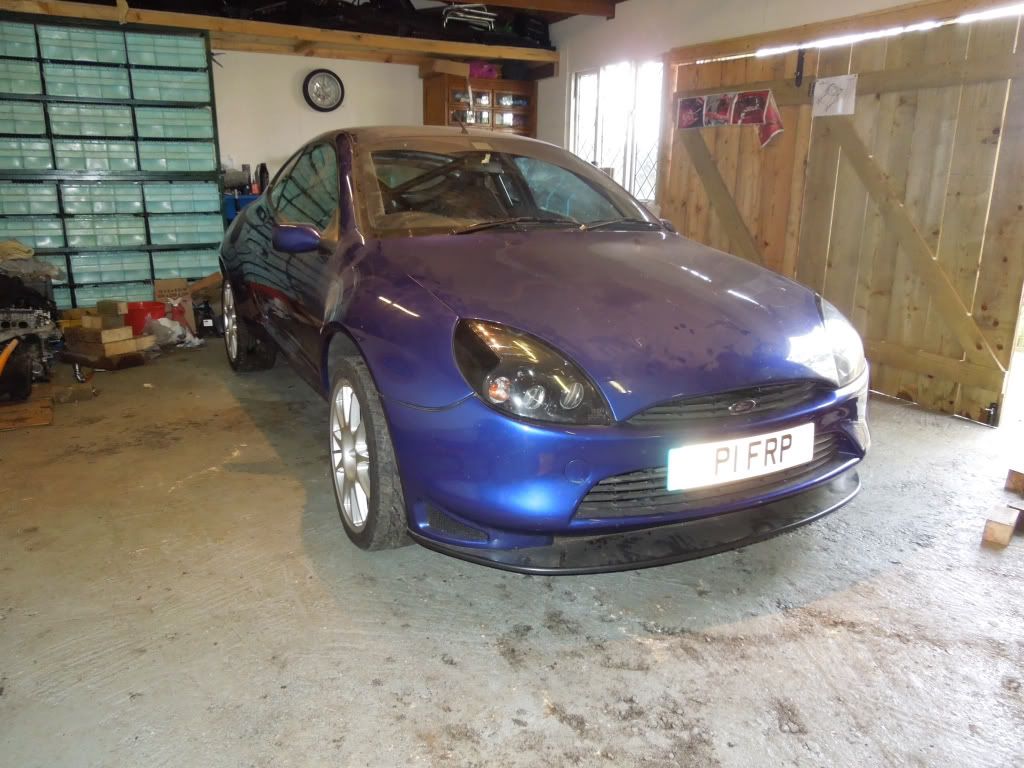
Last year I contacted a guy who was selling FRP 70, or P1 FRP as some of you may know it. The guy was at the end of his tether trying to get the car fixed after it had suffered a snapped cambelt. I step in with a small bundle of cash and away I go with a new toy!
Here it is as I found it:
on the way home
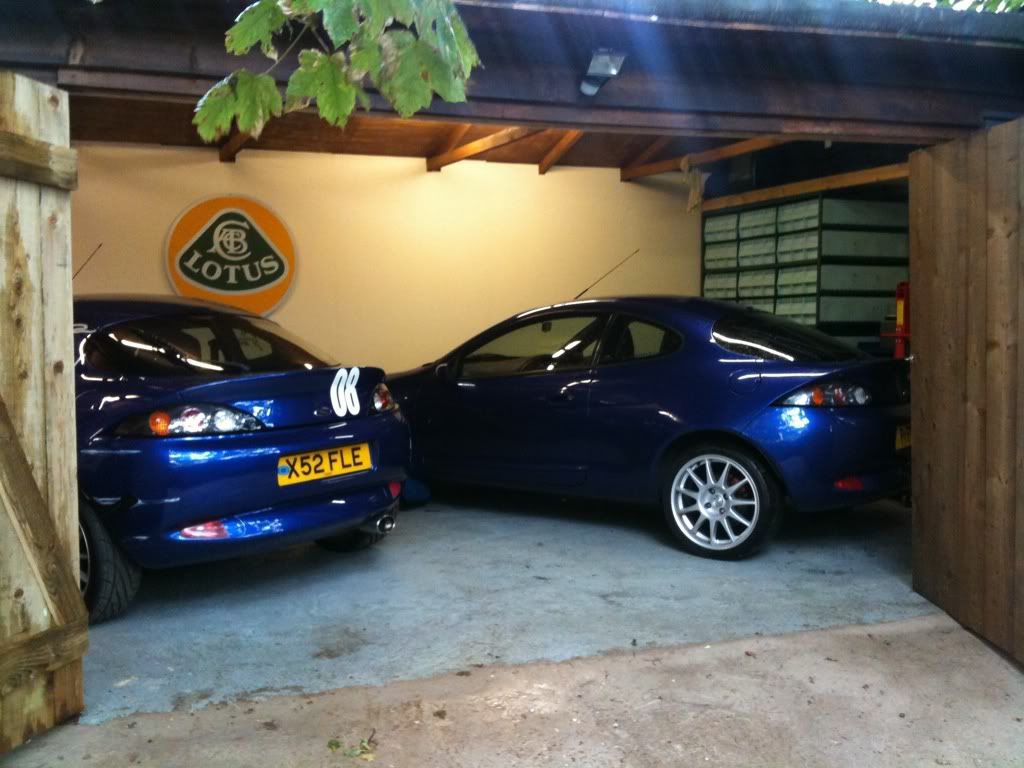
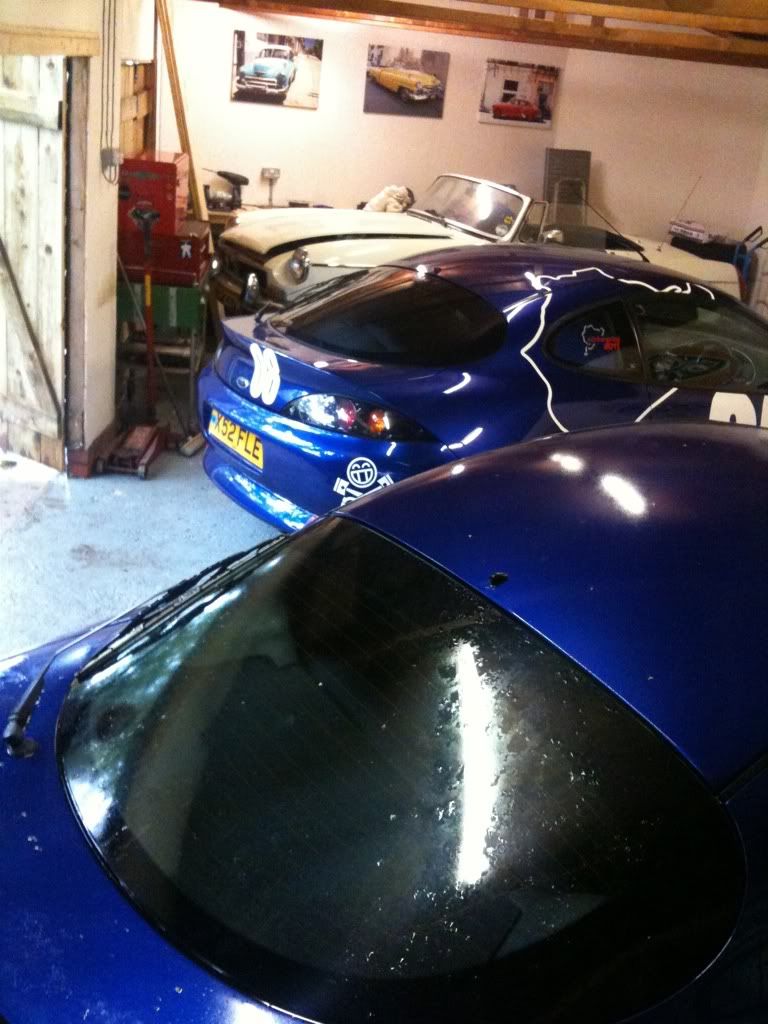
so for a short period of time I was lucky enough to own two FRPs!
Various stories came from the garage i brought it from, of titanium valves having been fitted, but not being able to get the right tappets (even though the engine was built up!!), but as it turns out they simple got a spare cylinder head, swapped the cams over and tried to rebuild the engine. Where they went wrong was by firstly not firing the belt tensioner properly (loose belt) and secondly not using the right timing tool.
So FRP 70 is a good base for a project. The car has been loved in the past, with a large folder full of receipts, its been resprayed by Pumabuild at some point and was a cherished example up until about 5 years ago, when it became a daily hack and was a bit neglected, until it eventually died.
Close inspection of the engine also shows the bottom end was knackered, its been run dry of oil (either as a result of the garage running it with no oil in it, or it was prior damage) so the engine was caput. It lasted over 100,000 miles so that's not bad going.
So, we need to broach the subject of modifying an FRP. There is a school of thought out there they we shouldn't change or modify these superb cars because only 500 were built, and only 350ish still exist. That is a very good reason not to mess with them, and one I agree with on the whole. My previous FRP (441) was on its way to becoming a prime example of a superb, original, FRP and I would never have messed it up.However, where FRP70 is concerned, it was a mess when I got it, it would have been either patched up (badly), and run into the ground, or broken for parts and vanished forever. Therefore I don't feel bad about 'messing' with this one. It will become a fantastic car, will be for filling its potential, and most importantly, still be around for many years to come!
Glad that's out the way! Now onto the good stuff!
Here's a short list of jobs to do:
Sort the engine – Port the cylinder head – fit Fiesta ST clutch – Strip interior completely – fit rollcage – replace all worn bushes in suspension – fit decent coilovers – renew /replace anything that's worn out – remove windows and fit polycarb ones – full race seats and harnesses – GO RACING!
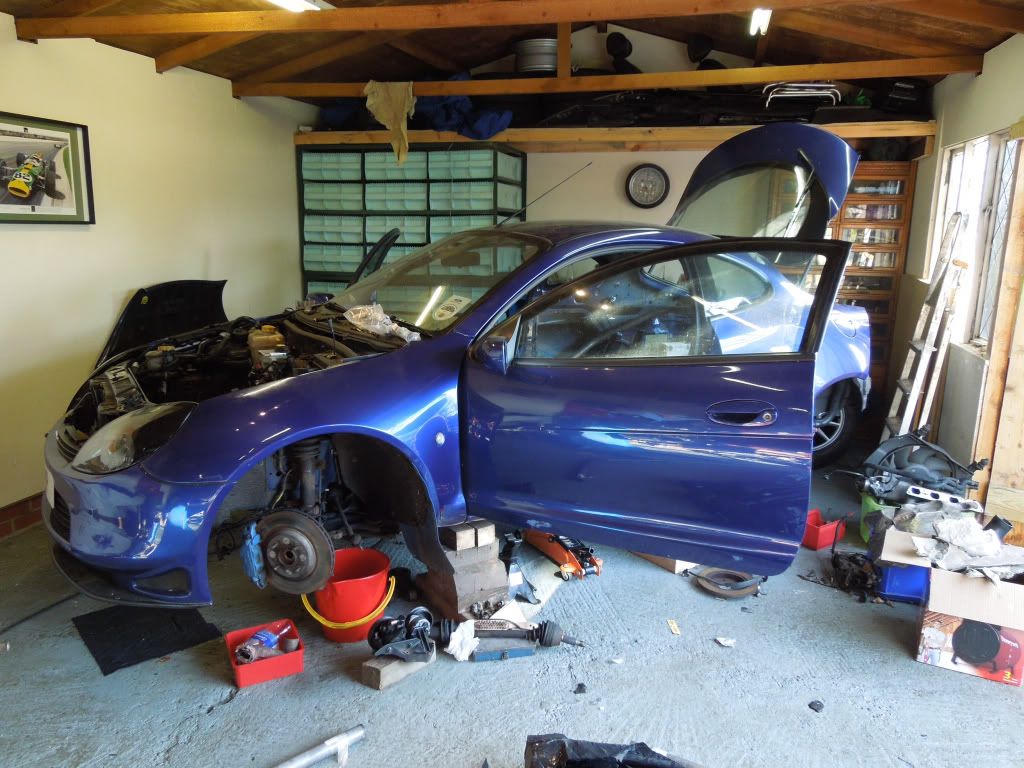
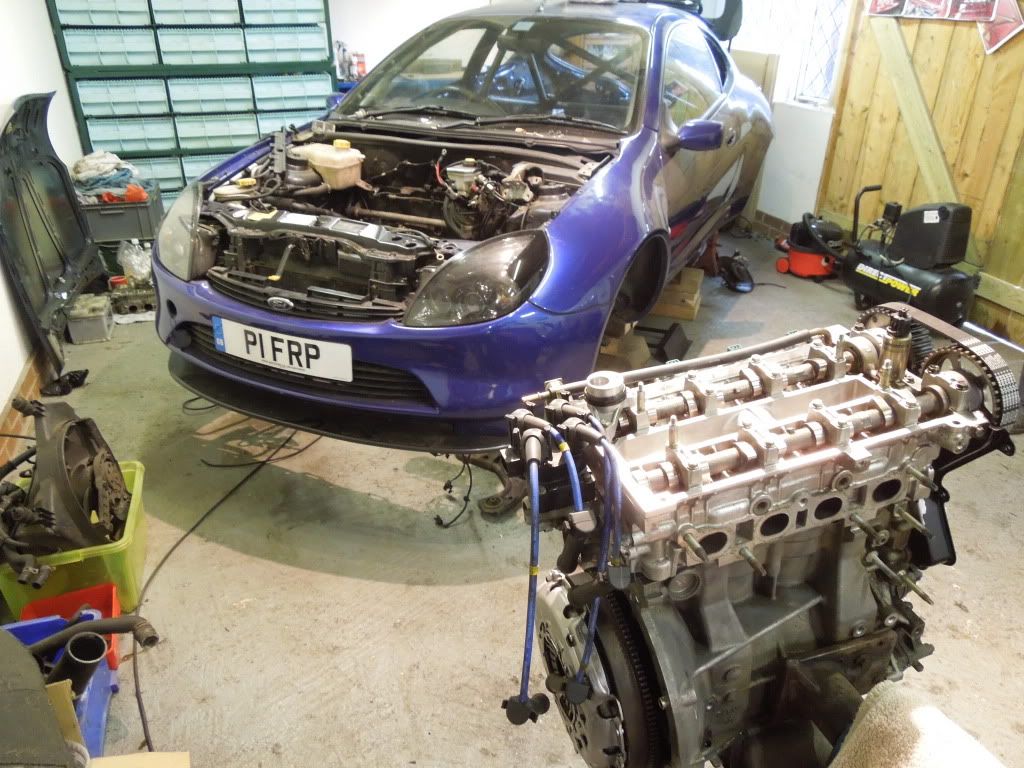
So, since getting the car home, the engine has been removed, a new one with 48k miles has been sourced and a full engine rebuild/refresh is taking place.
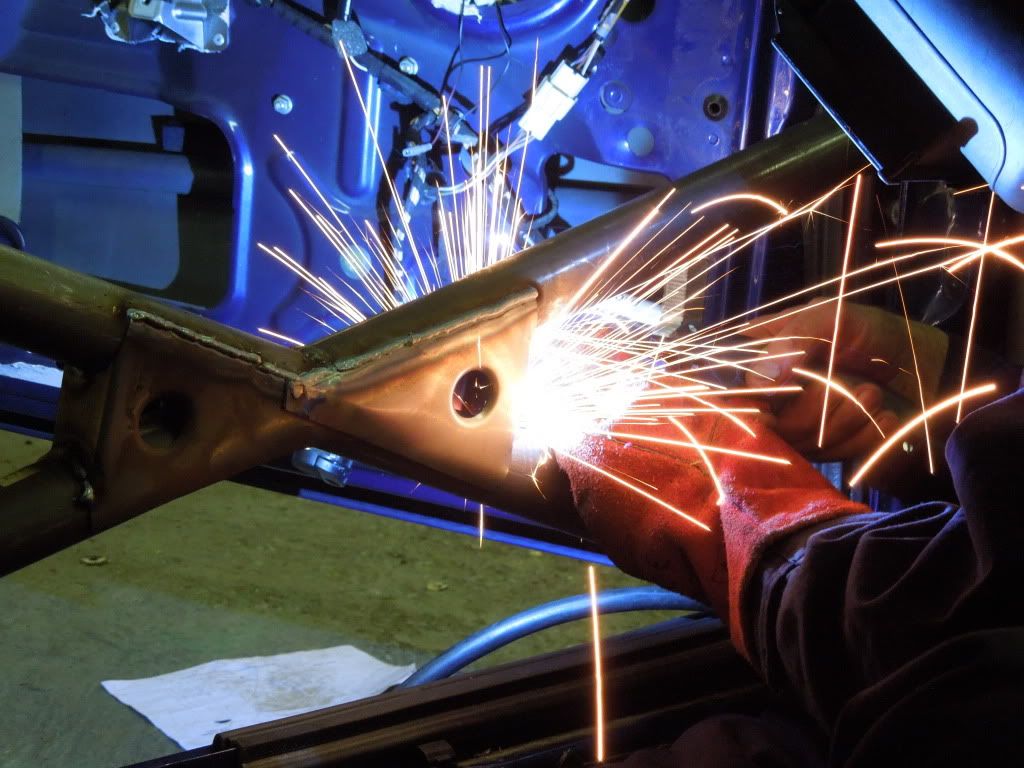
A full weld in CustomCages roll cage has been ordered and is in the process of being fitted
the fitting will take a couple of weeks, then the engine will be back in and the rest of the project will continue
the aim for this year is to take the car to the Nurburgring at the end of may, so I don't have long to get all this sorted!
I will keep this thread up to date with all the progress and let you know how I get on.
Cheers
Ross
[B]
UPDATE 19-02-12[/B]
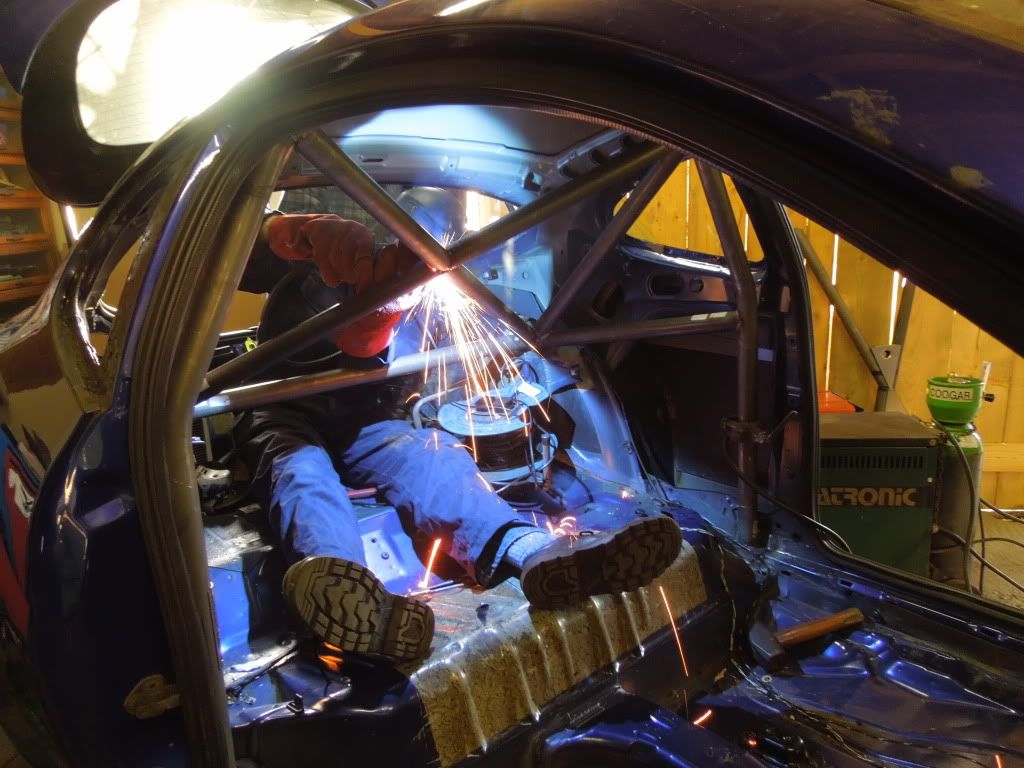
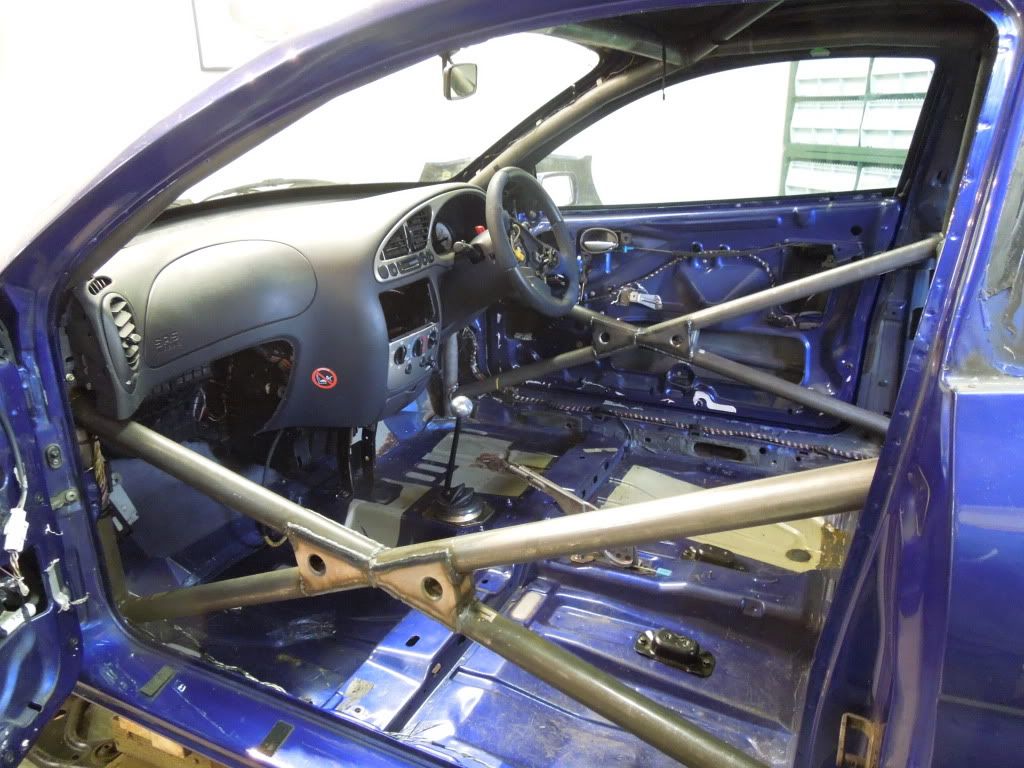
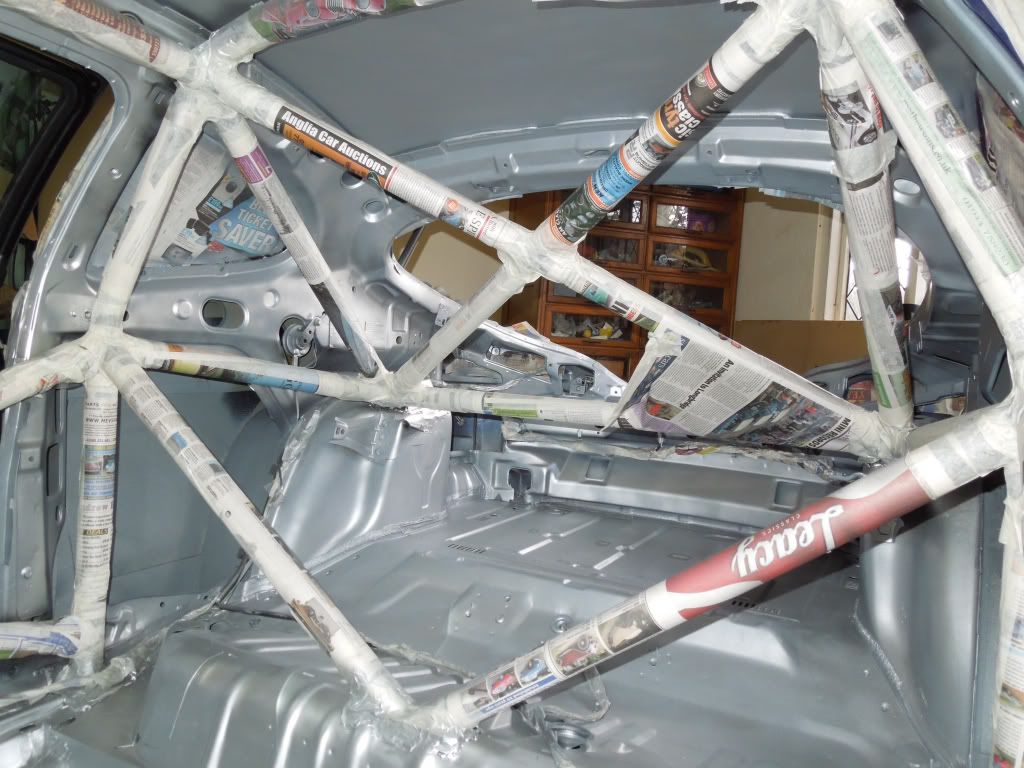
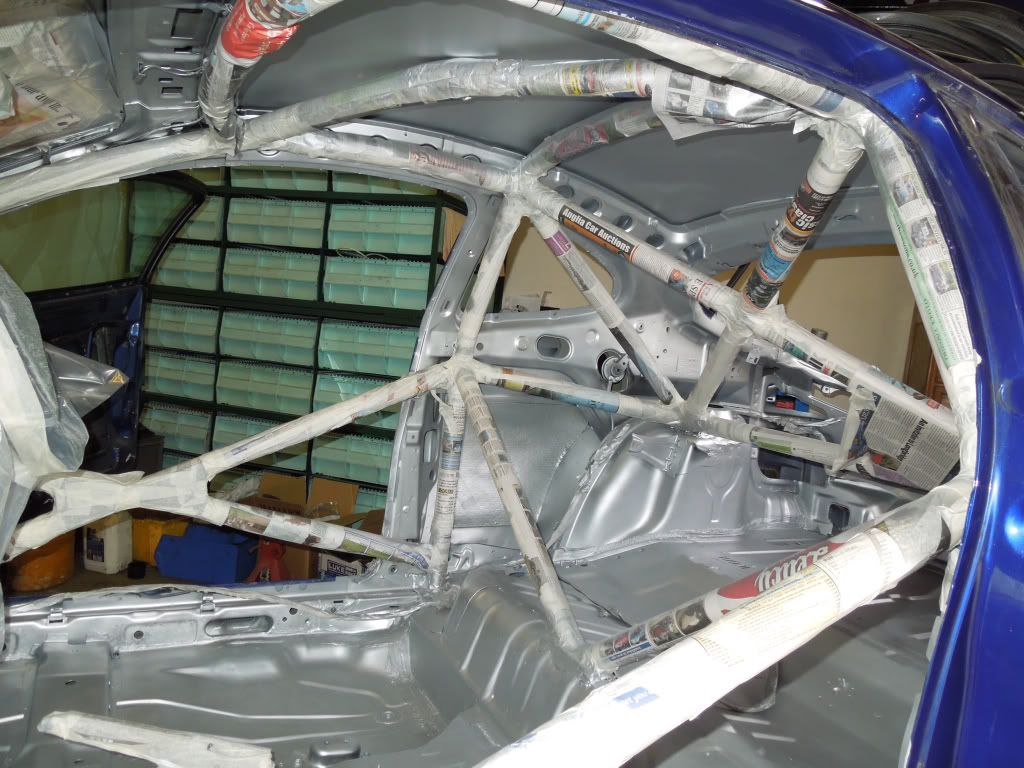
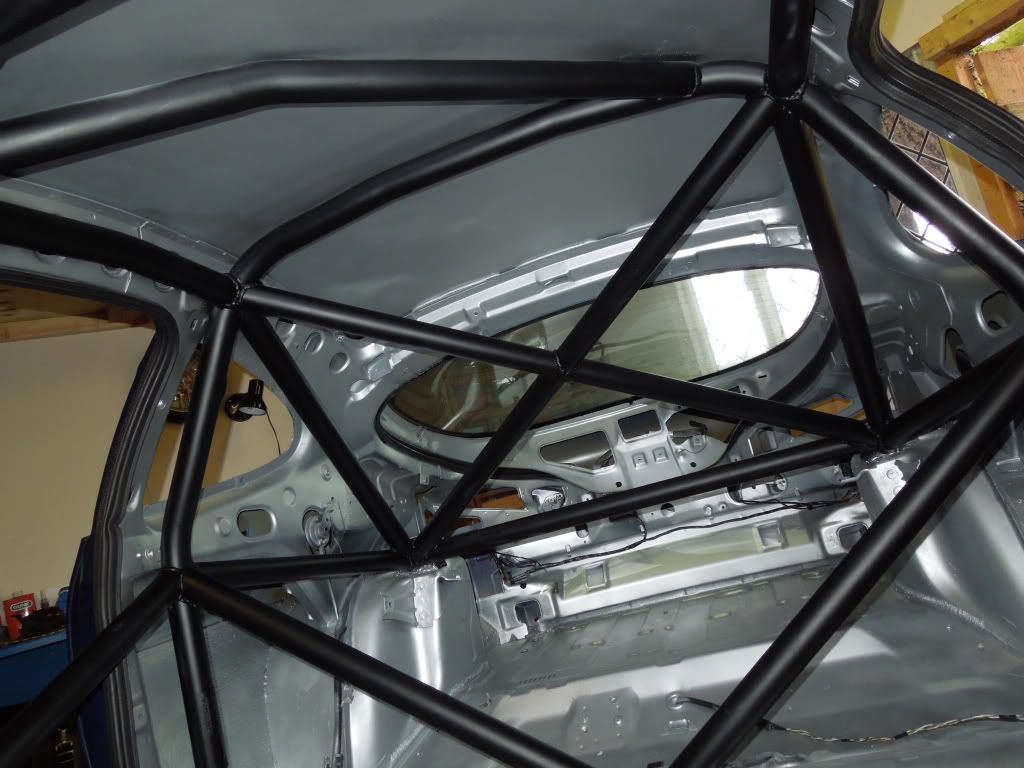
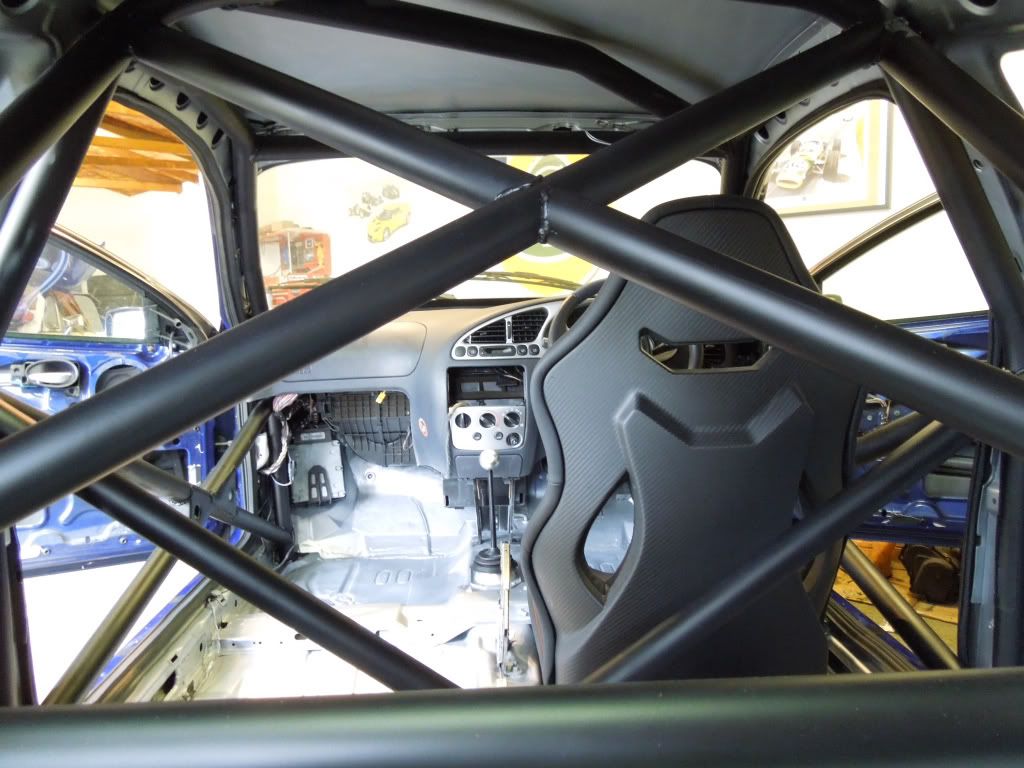
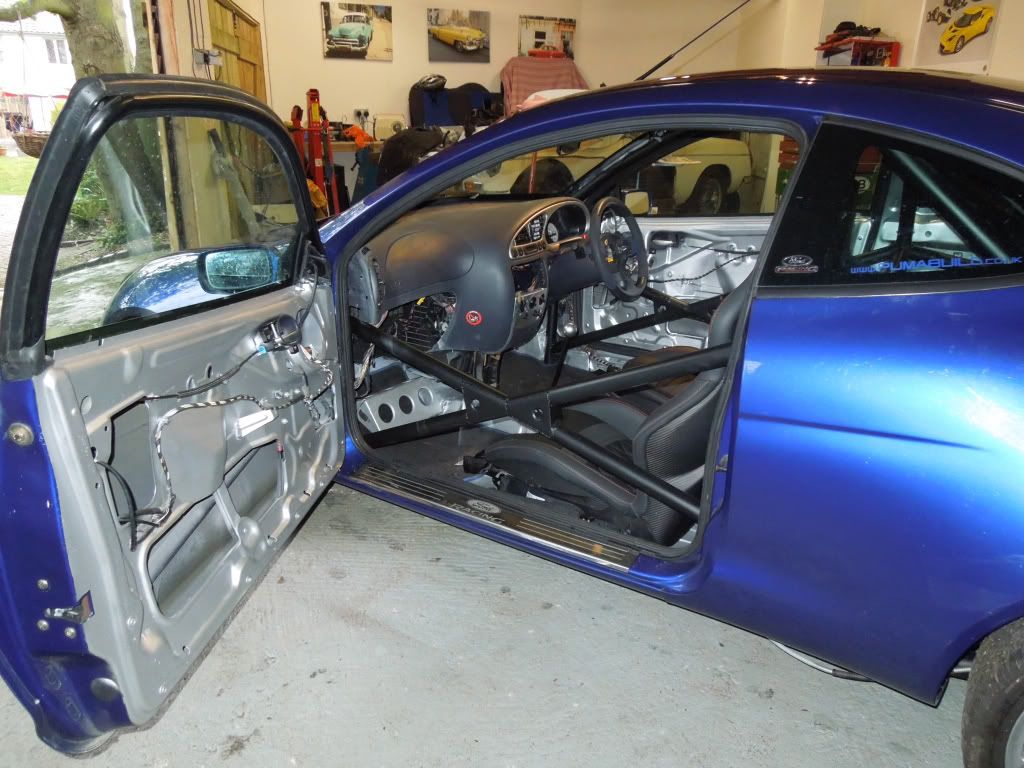
Afternoon all, its been a productive weekend. the dash is out, and the cage is in place. only held in with tape and zip ties at the moment, but good news is it all seems to fit pretty well.
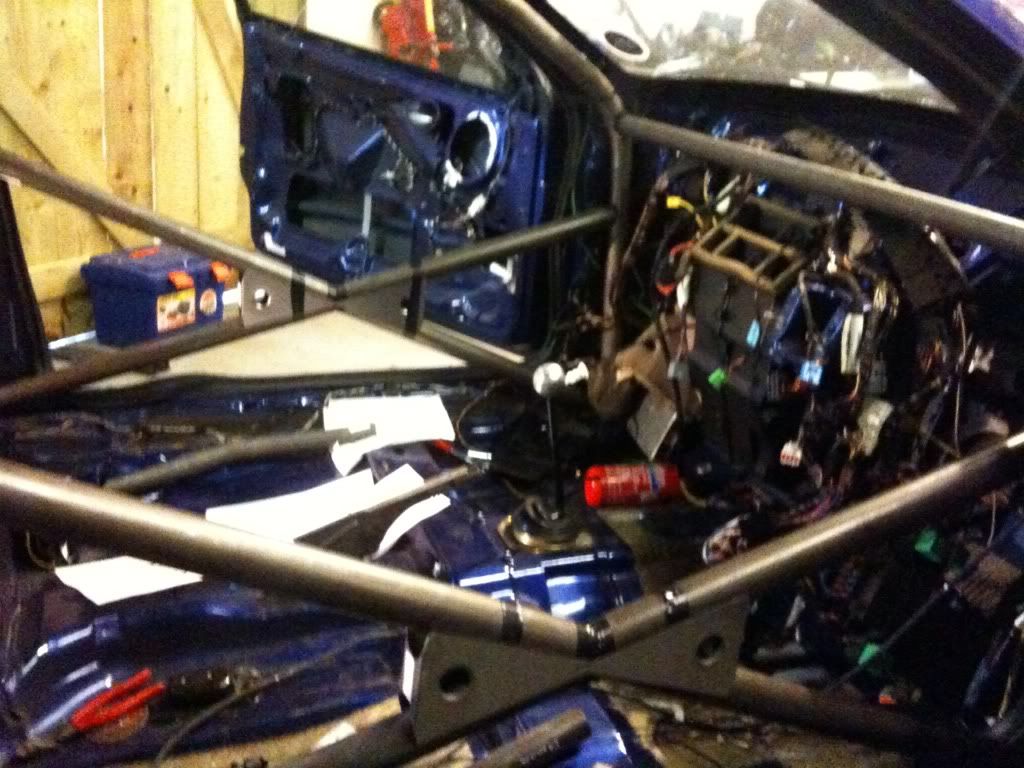
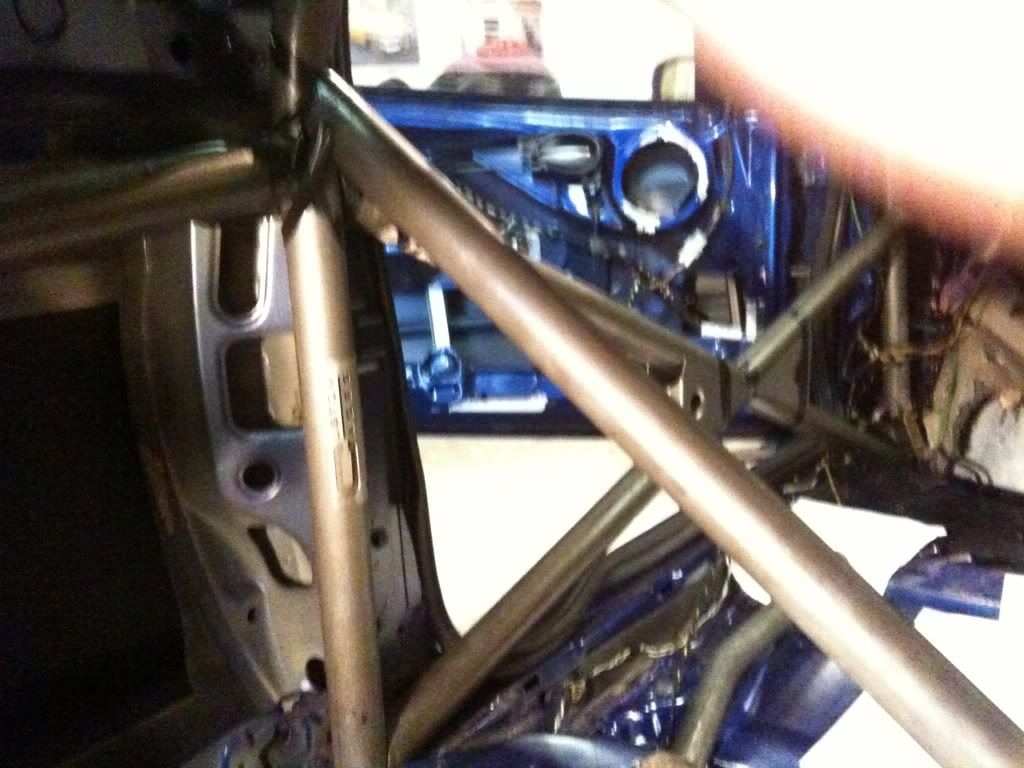
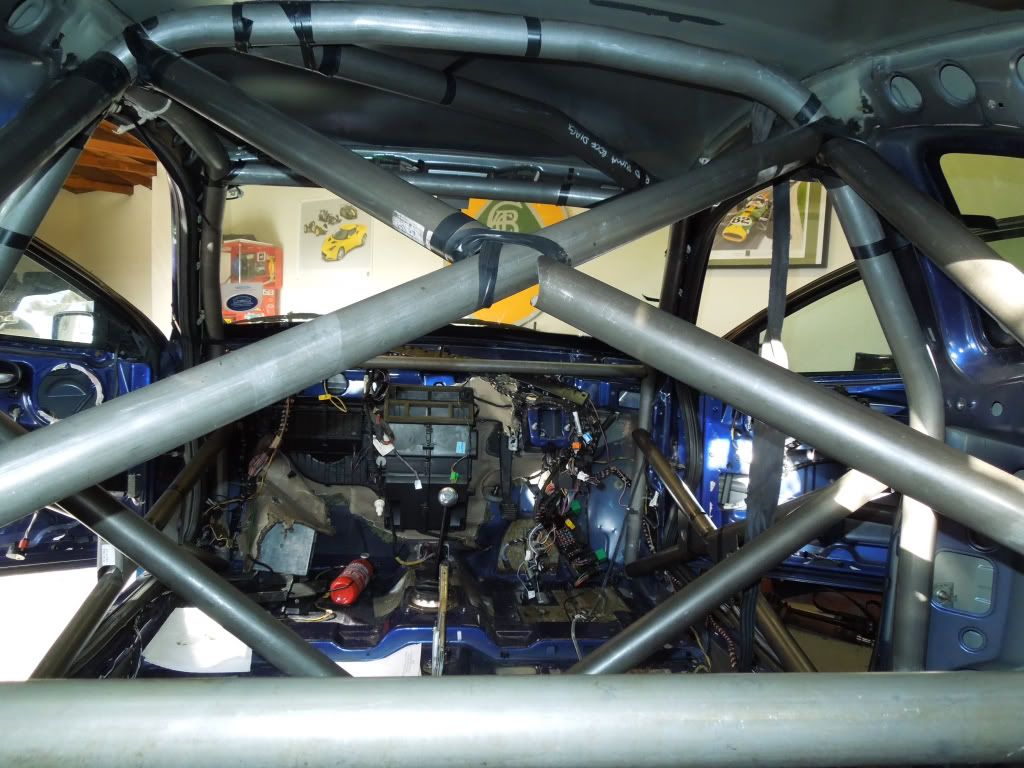
it will be welding in properly over the next couple of weeks, but these pics give an idea of how it will look.
more next week!
cheers
ross
05-03-12 UPDATE
Hi All
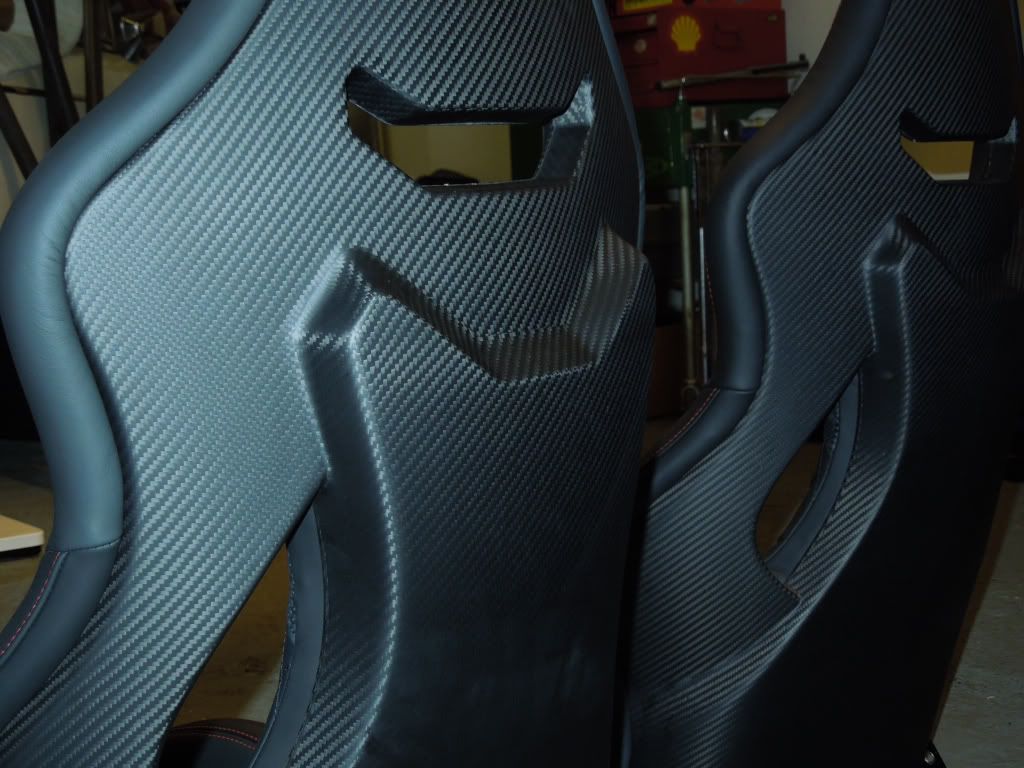
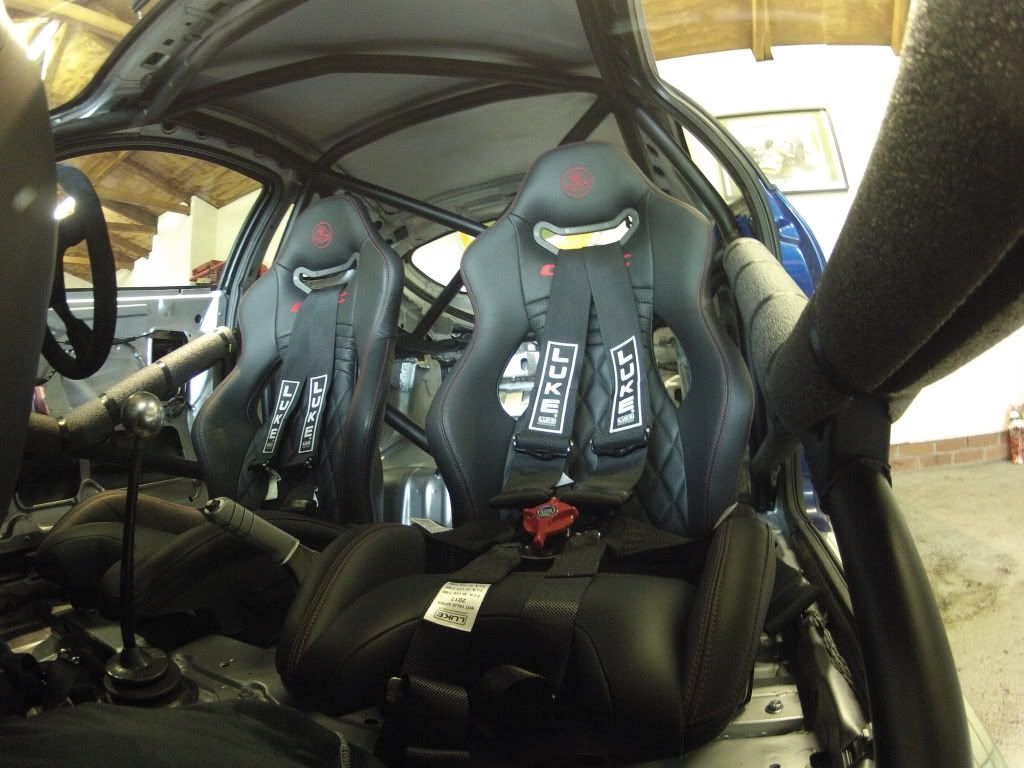
Well its been a busy weekend. P1 FRP is now really coming on and starting to take shape. Ive spent most of the weekend in the workshop with my dad and his mate welding in my roll cage. its looking awesome. But before we get to that some other news is that I've now got myself some awesome new seats. Im lucky enough to work for Lotus Cars, and occasionally they scrap off parts they no longer need. I stumbled across some brand new carbon fibre seats. So I bagsyed them, and they will be pride of place in my FRP!
Im sure it will make the car unique, surely it will be the only FRP in the world to have hand crafted, carbon fibre seats from a super car?! Plus i weighed these new seats, and they weigh 8kg each! the Old Sparco FRP seats weighed in at 21kg each! what a saving!
I'm obviously really chuffed with these!
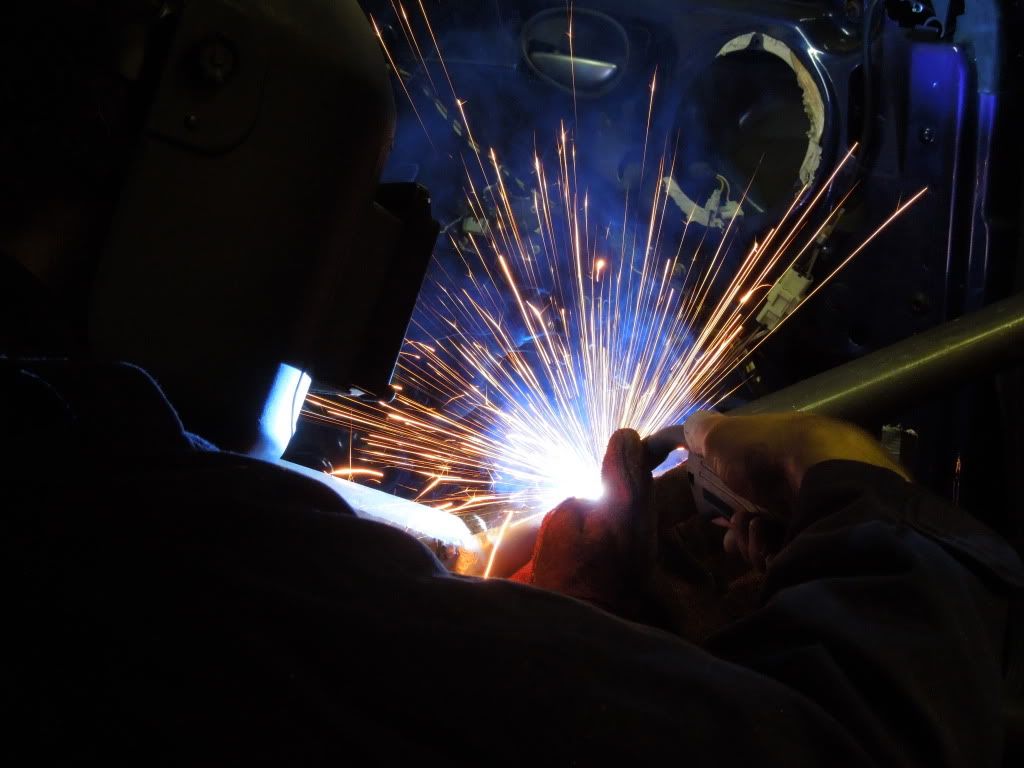
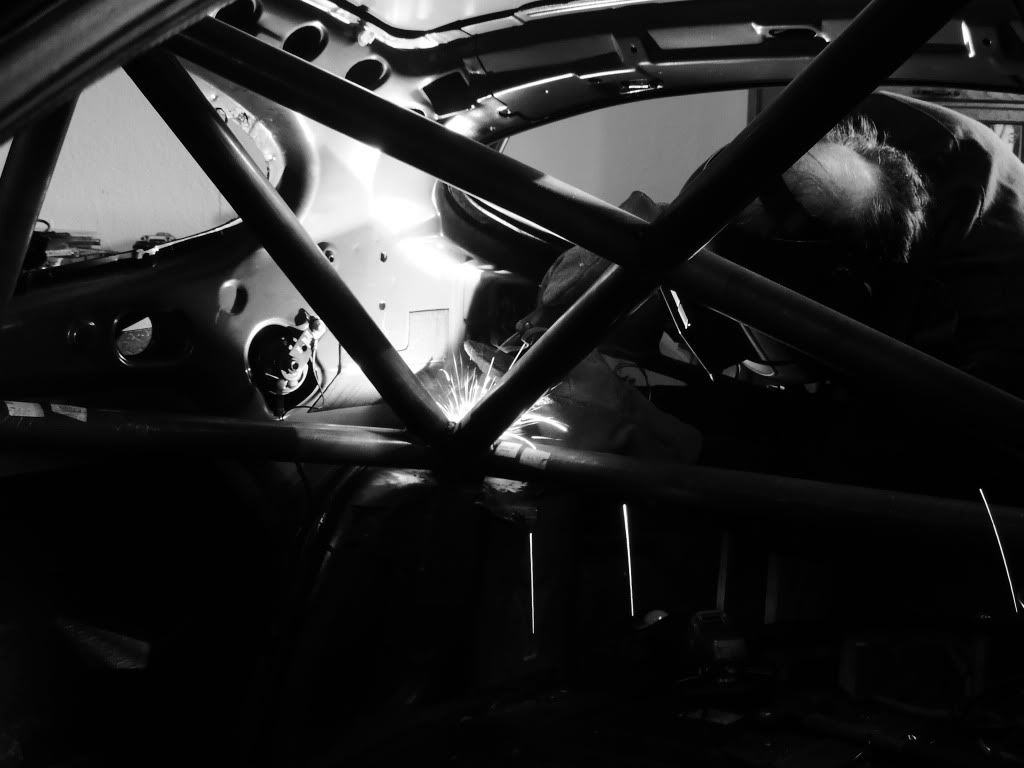
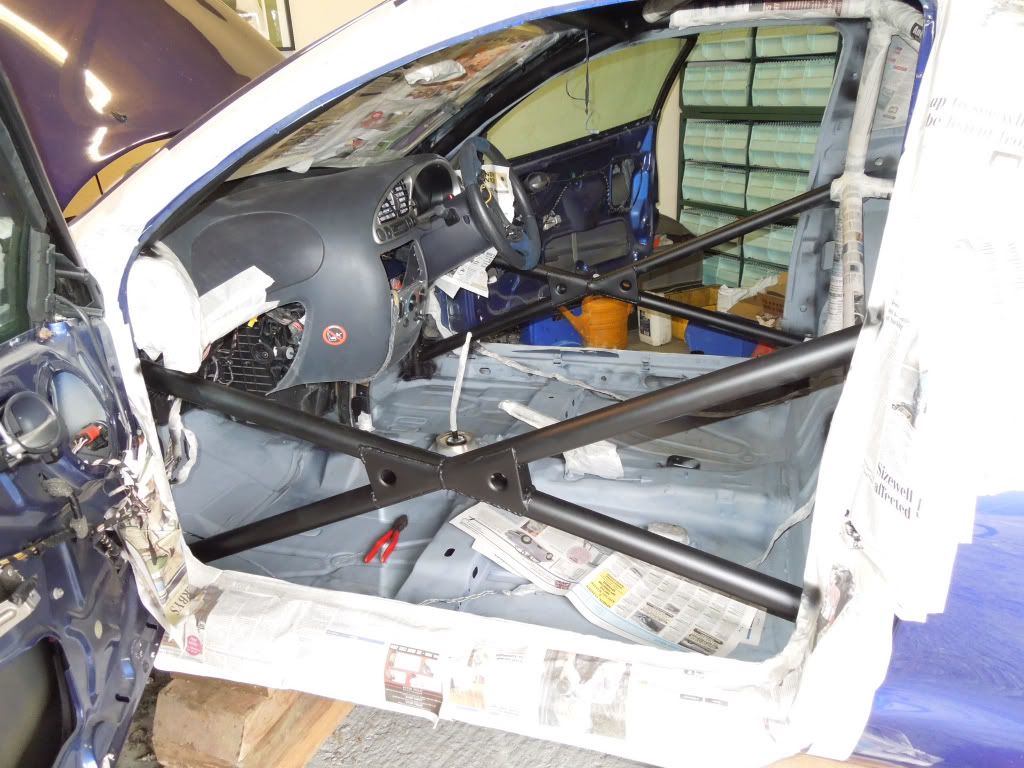
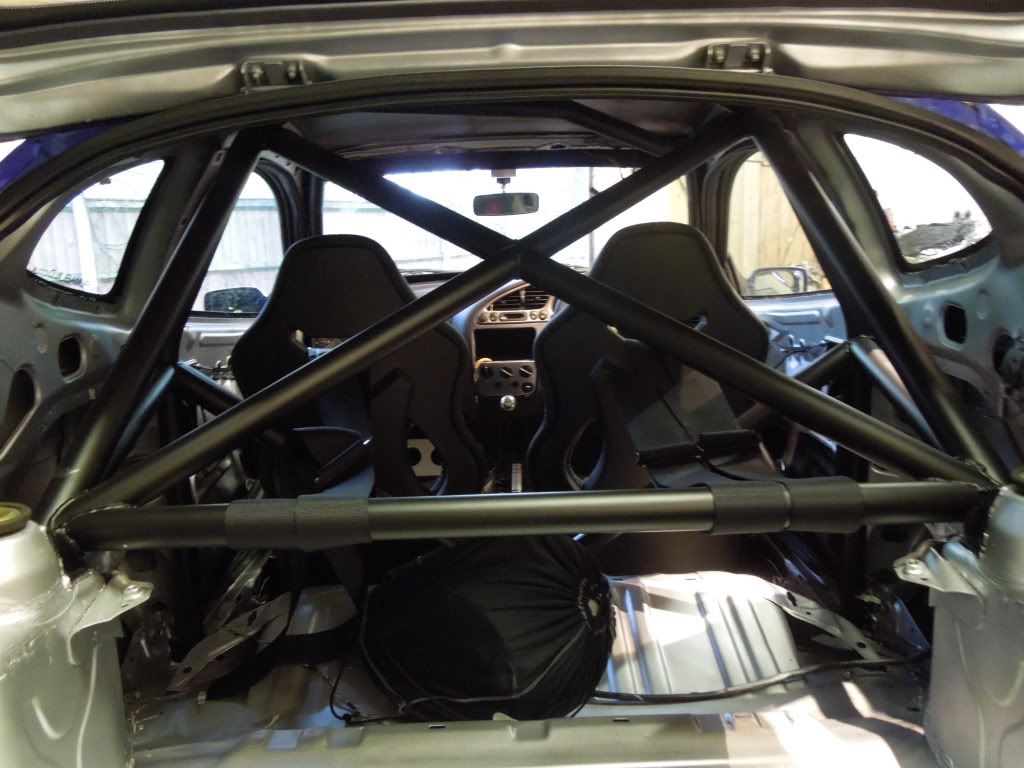
Anyway, this weekend the whole cage was finally welded in, and looks great:
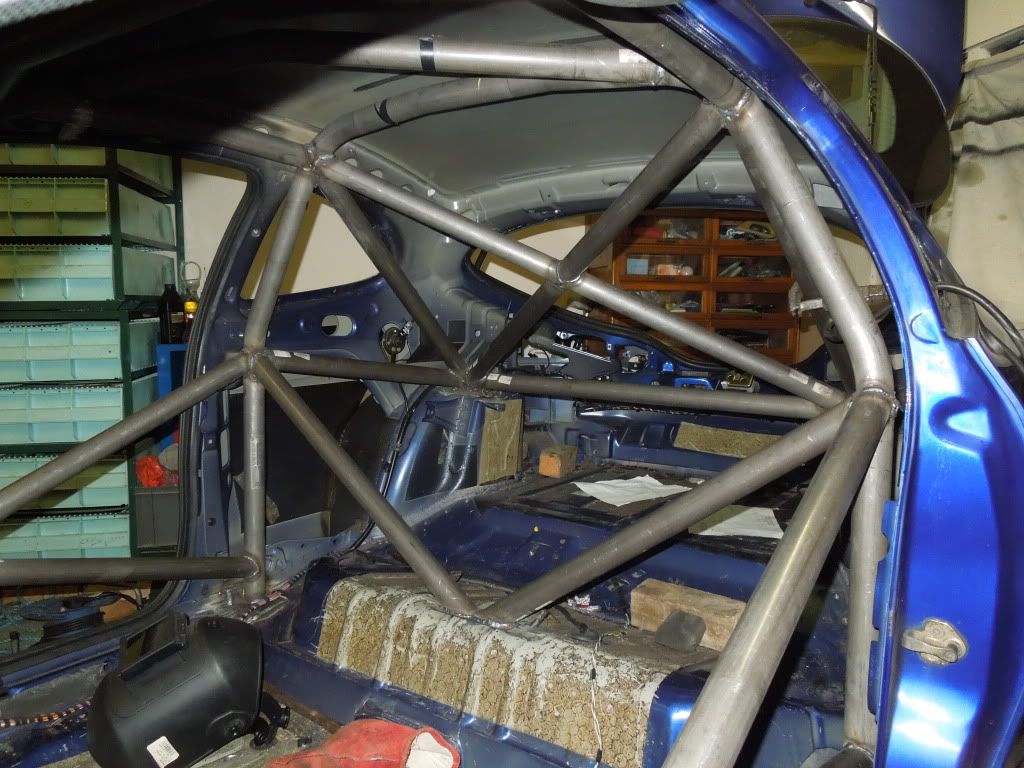
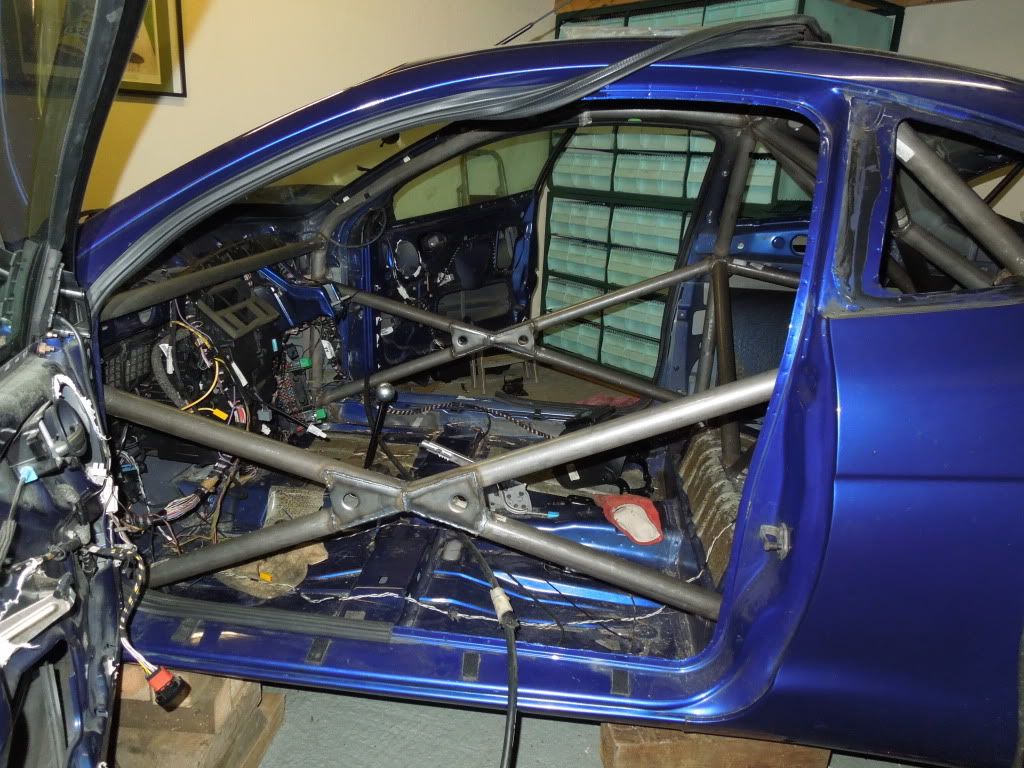
Some action shots!
So thats it for now. Ive got a plan, and only 8 weeks left until the first track day is booked at Snetterton in May, so its all systems go.
Next up is having the cylinder head ported, fitting a Tran-X LSD, and generally rebuild.
thanks for looking
Ross
UPDATE - 18-03-12
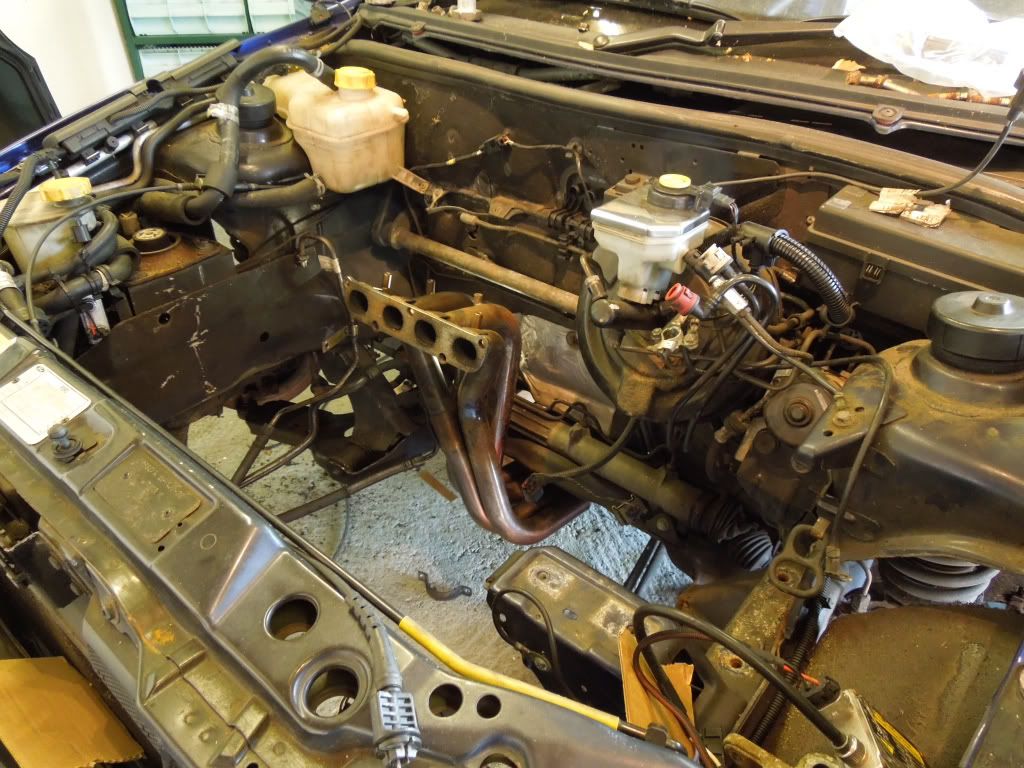
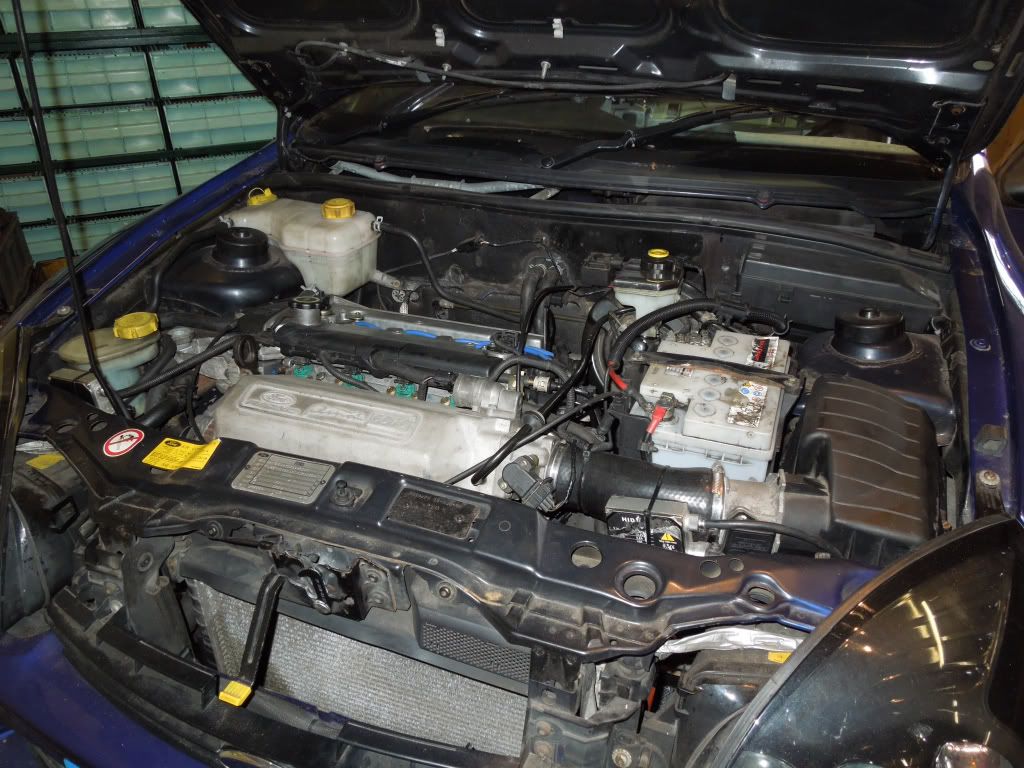
Quick update on my project. This weekend has been mostly about the engine. Its now back together and almost ready to go. Its a new (to the car) unit that i brought from ebay recently, had a verified 42,000 miles on the clock and was absolutely mint when we stripped it back. We've done quite a lot to it:
• Full strip down, and a paraffin clean of EVERYTHING!
• Cylinder head has been ported, polished and flowed by a highly experienced guy at Lotus
• New cylinder head bolts
• New head gasket
• New cam belt
• New belt tensioner
• New thermostat
• New water pump
• New accessory belt, pulley and idler
• All new gaskets and hardware
• New oil filter
• Plus the cams have been timed up properly using a new FRP timing tool, and double checked with a DTI.
• A brand new Fiesta ST clutch (with brand new puma master cylinder)

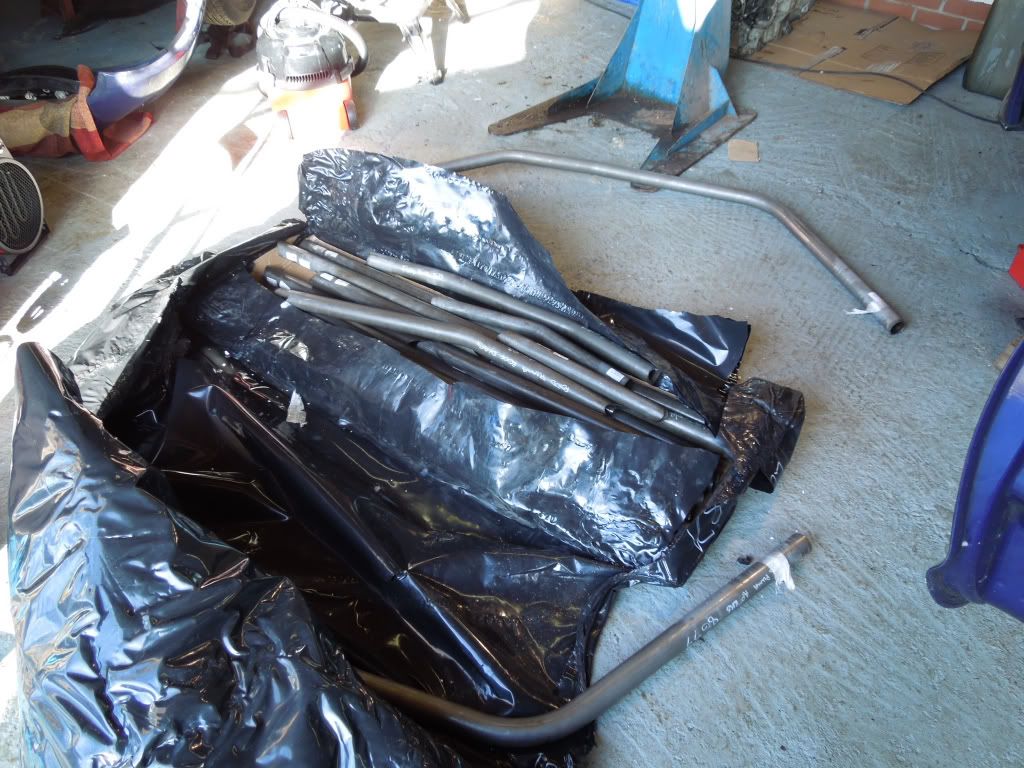
Thats taken most of the weekend. However the rest of the project is progressing well. Ive recently ordered a whole host of new parts, most of which are waiting to be fitted, including:
• A brand new FRP gearbox with a brand new Quaife LSD from pumabuild. this is due any day now, so the car will also benefit brand new transmission.
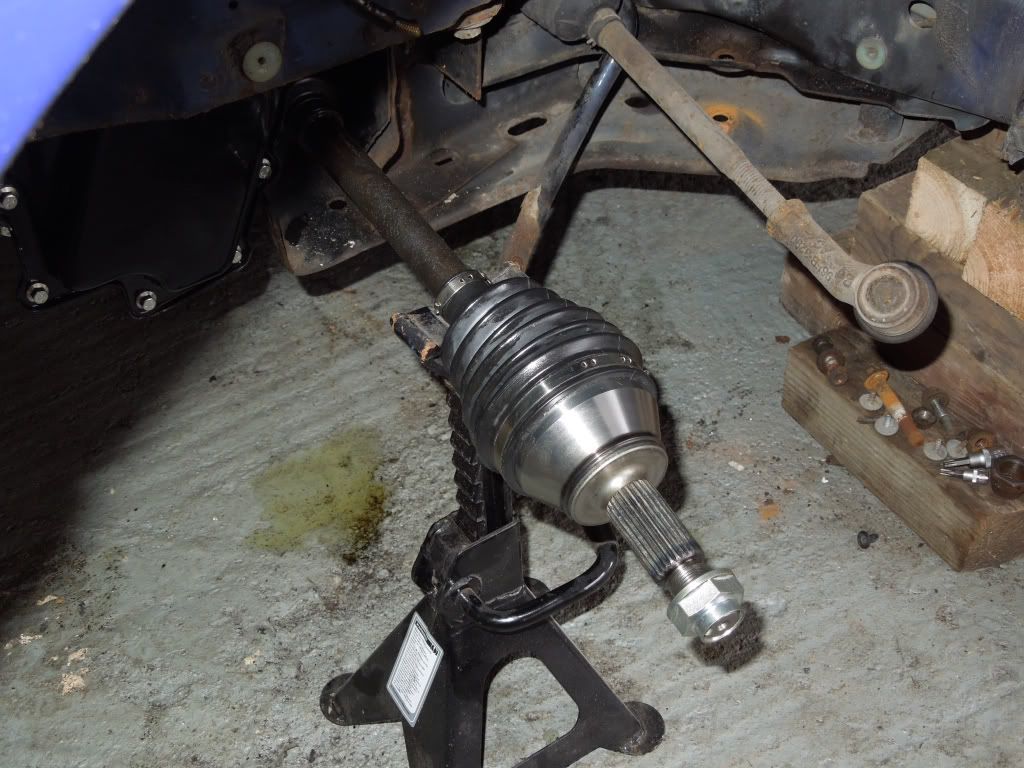
• New driveshafts (including the FRP unique blue one)
• New CV joints
• New wheel bearings (front and back)
• New brake lines
• New Fiesta ST clutch (with Puma master cylinder)
• New heater control valve
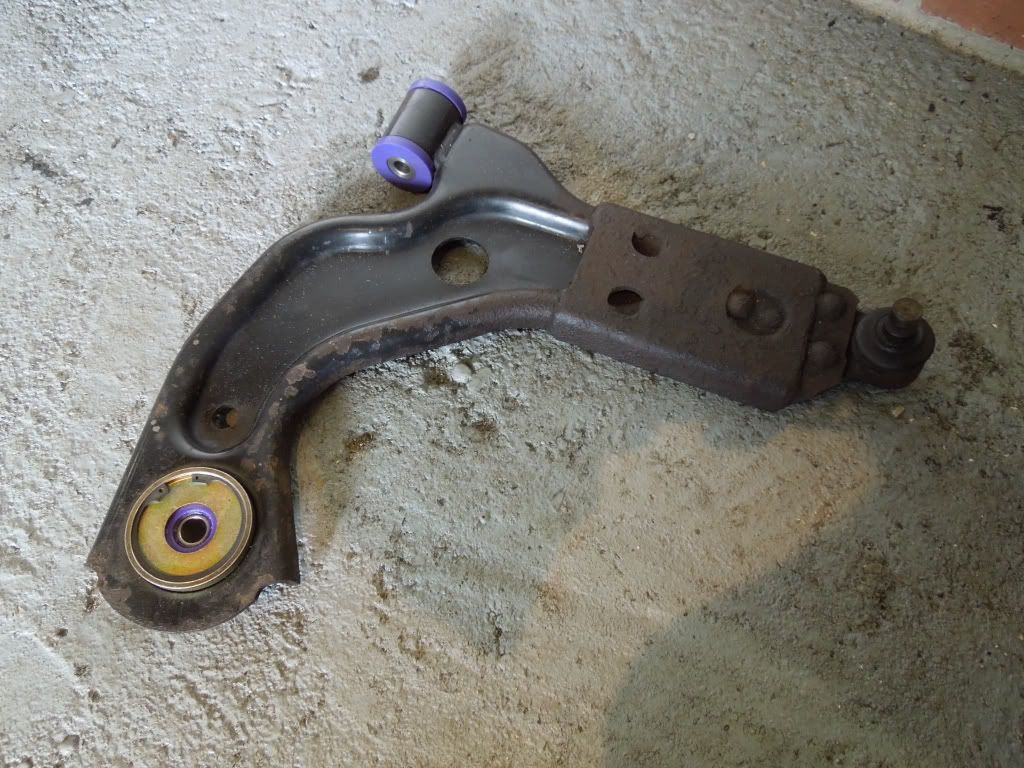
• A complete set of Powerflex bushes (both wishbone bushes, antiroll bar and rear beam)
• New front damper strut tops
• New drop links
• New track rod ends
Most of these bits are sitting in the workshop waiting to be fitted, along with my seats, so its like a parts dealer round mine at the moment!
Its a good feeling to be finally bolting things back onto the car though rather then taking stuff off. I can't wait to get the thing running though, that will be a great day!
The next big job is the roll cage, I'm deciding what colour to paint it. Im definitely going for a dark grey interior (floor, roof etc) but can't decide whether to have a Red, Orange, White, Grey or Blue cage. What do you thing???
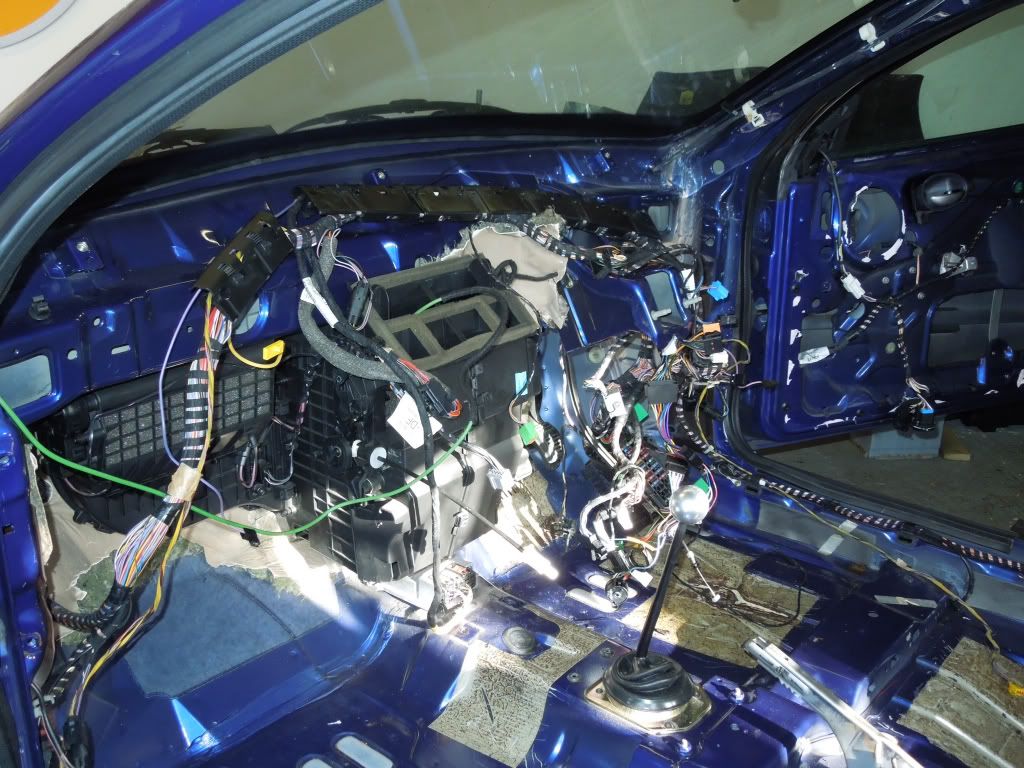
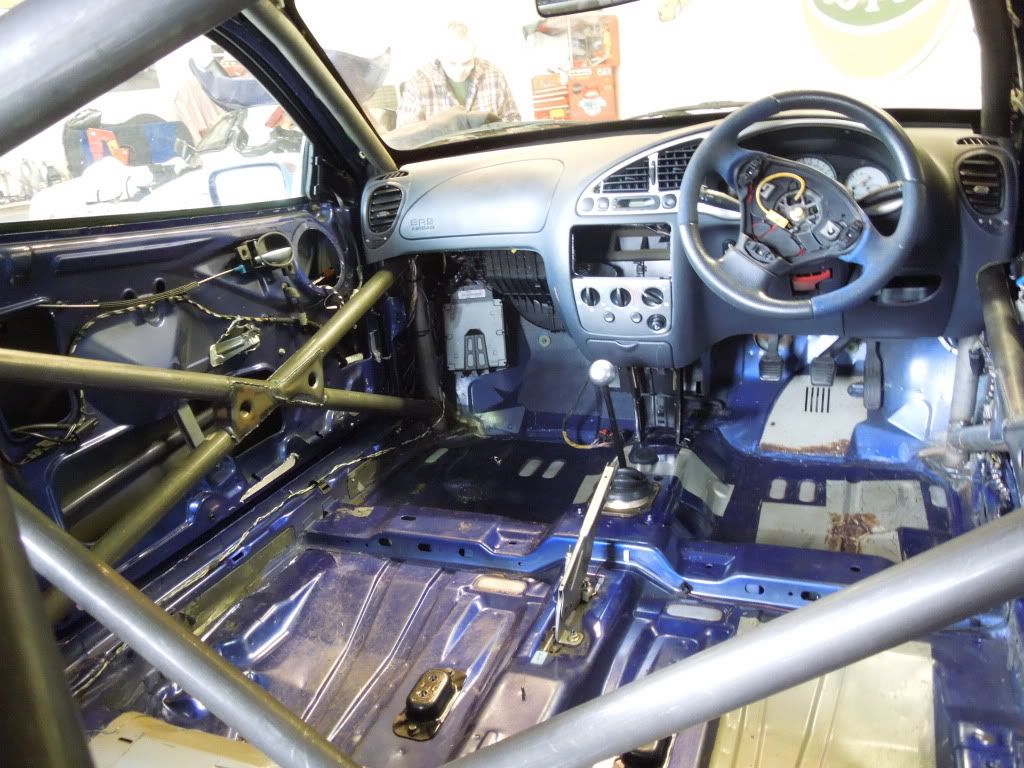
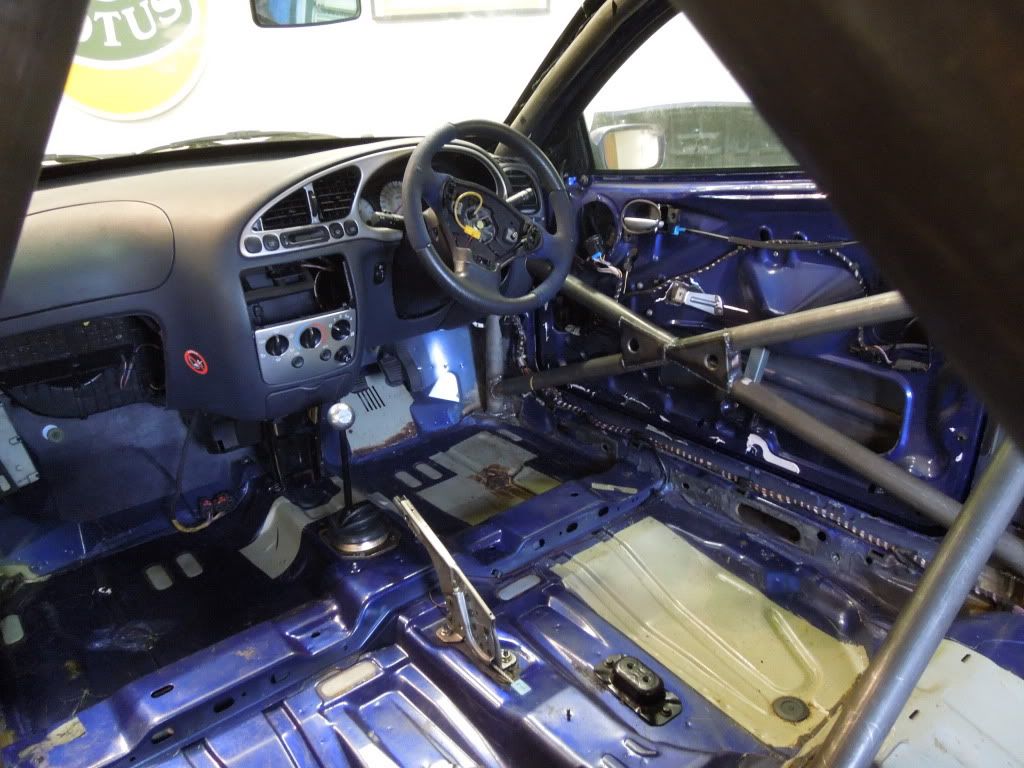
Also, last weekend we spent a great deal of time refitting the dash board. I took lots of the dash away, including all the metal framework as the roll cage replaces most of this. I reckon its saved at least 10kg of weight. Also i finally finished the lovely job of removing all the sound deadening, and cleaning all the gunk that it leaves behind. Its looking quite good now though, ready for paint. Here it is:
So thats all for now. Its certainly getting there, but with only 6 weeks left until the MOT there is no time to waste!
cheers
Ross
Update 01-04-12
Hi All. well its been a good weekend once again. Got quite a lot done and things are really moving on nicely now.
Firstly the engine. This is now fully built up and ready. We've checked the cylinder pressures and port vacuums and they are all absolutely spot on. We did have an issue with one of the ports having not seated properly in the head (which showed up with a lesser vacuum value then the others) so the head was taken apart again, the valve re-lapped and the whole thing rebuilt until it was perfect.
Also my new gearbox arrived, which is a new FRP box from Pumabuild, which also has a new Quaife LSD fitted to it
And so, on friday we started to put the whole engine together and after a couple of hours it looked like this:
So the rest of the weekend was spent putting the engine back in to the car. And after lots and lots of effort by my good old dad it now looks like this:
Whilst dad was hard at work I was in the car cleaning up the welds and prepping for paint.
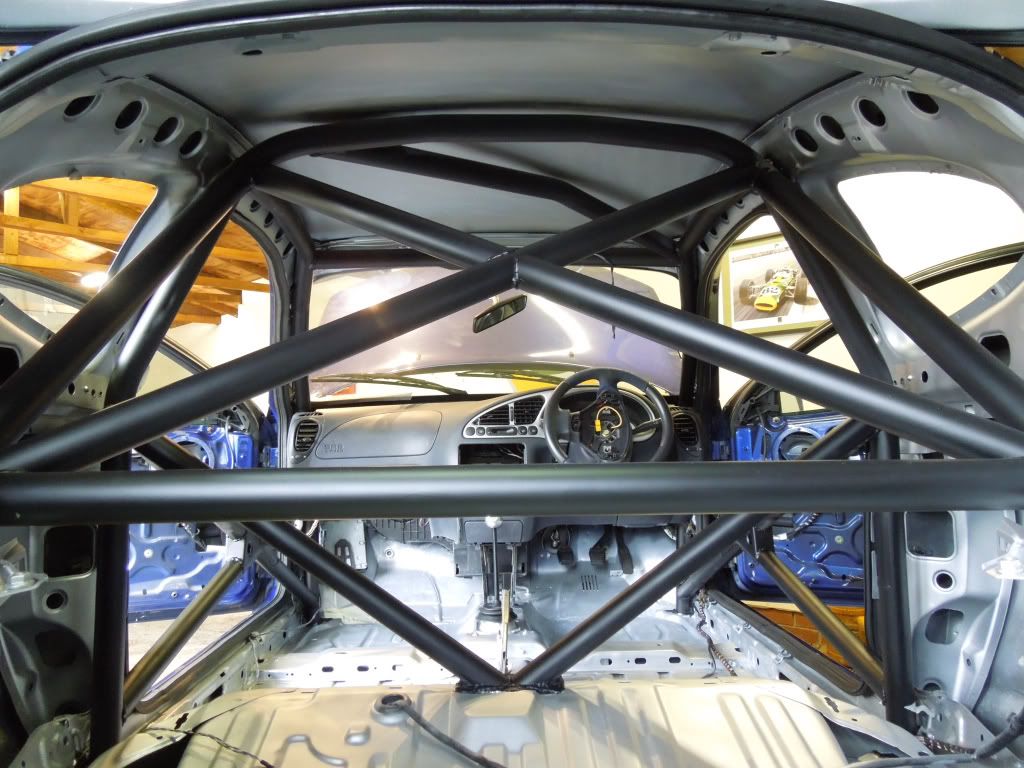
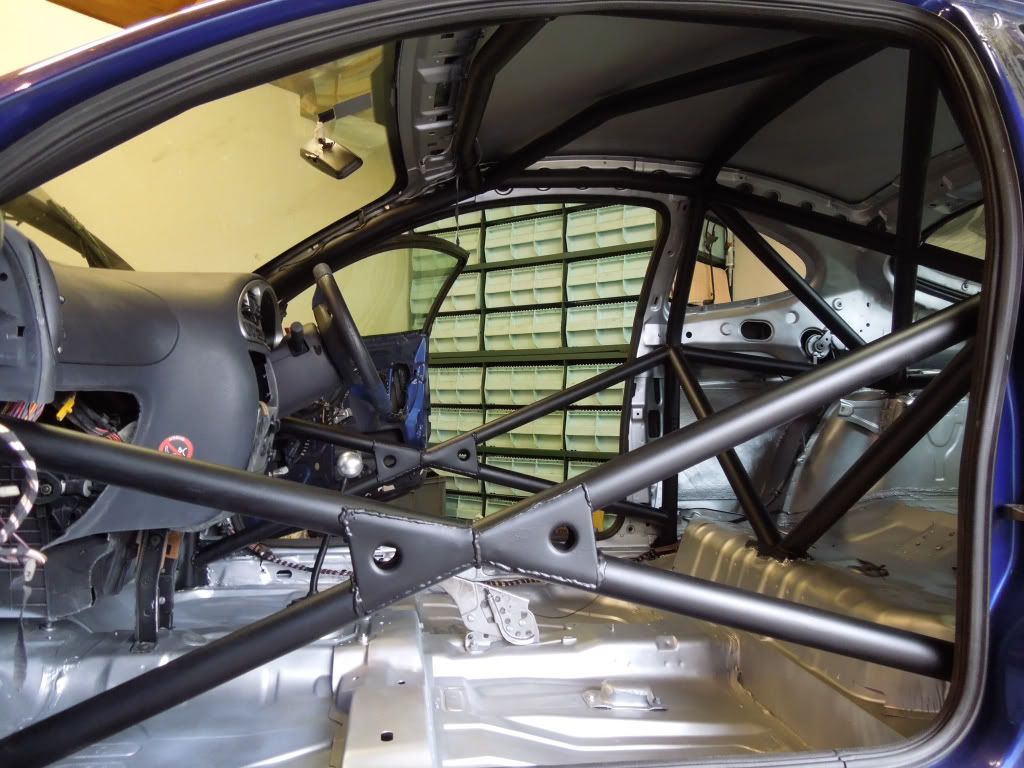
The really good news is that my Roll Cage installation has been given the official certification by custom cages so I've got the go ahead to paint it.
Here is this weekends progress on the interior. After a good clean up and de-burring the welds:
Then after lots of masking:
And then as time was running out i had one can of primer, so thought id do the rear of the car, which now looks like this:
So there we go, the engine is back in, its almost all connected and next week it will be fired up (fingers crossed!) and the interior is clean, masked up, and painting has begun. Next weekend i hope to have the whole interior painted. (Matte black cage, satin grey interior)
Its really coming together now! These are the good days, when the effort you put in starts to make a big difference!
Cheers
Ross
UPDATE 09-04-12
Well its been a brilliant bank holiday weekend, with me and my dad spending most of it in the workshop. And we've achieved loads more then i thought we could.
At the start of the weekend the car had its engine in but not fully plumbed in and not running, and the interior masked up and half painted with primer. Its amazing to see it now.
First job, primer the interior which went from this:
to this
here its all primer'ed and I've masked up the cage ready to paint the interior silver. At this stage I've already painted the cage matte black which looks really cool. here is the cage painted in matte black, before the interior was painted
once the cage was painted i masked it up

and began painting the interior metallic silver. at the end of yesterday it looked like this:
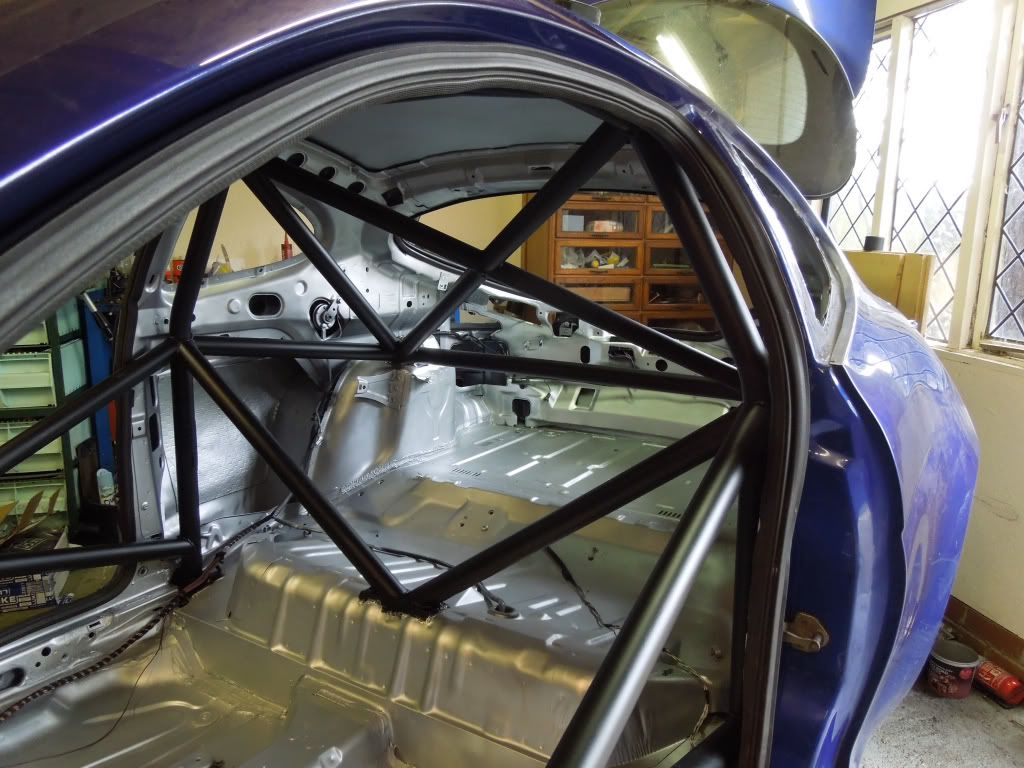
I'm really chuffed. its the first time I've done anything like this before and its come out really well.
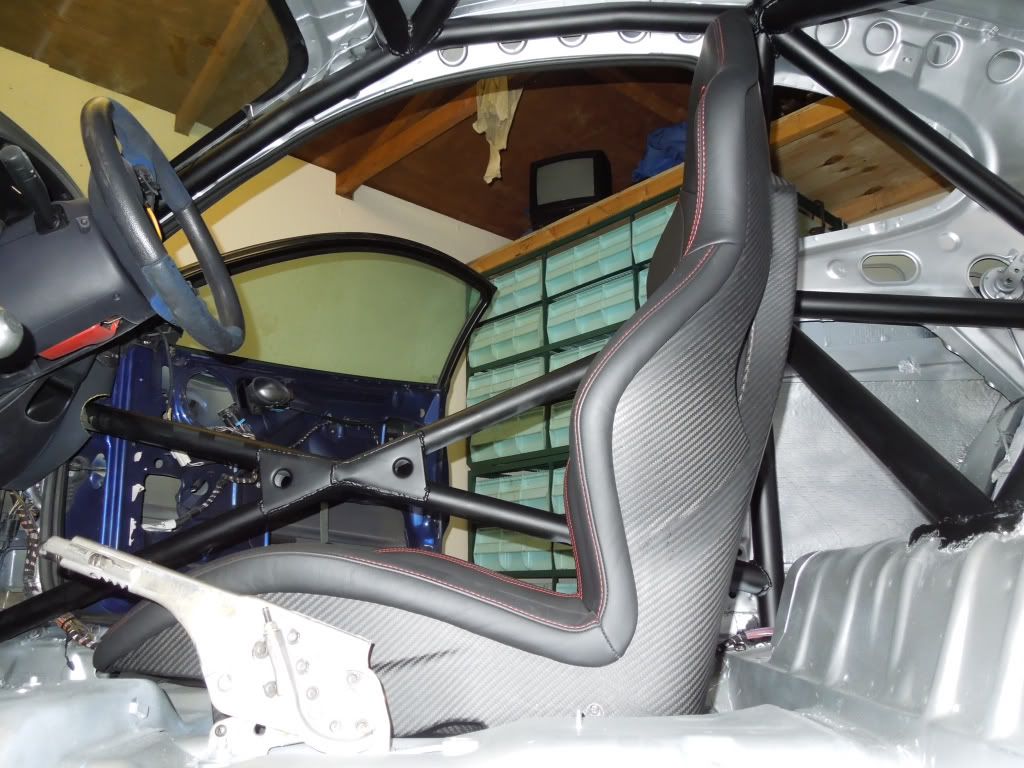
next job was to put a seat in to see how its would fit, heres a sneak peak:

plus i trial fitted my new 6 point Luke harnesses which look amazing. no pics of these yet though.
So the interior is really getting there now. Onto the mechanics.
The engine is now in the car and is RUNNING it sounds sweeeeet, idles really well and is great.
We also got both driveshafts built up, both have brand new CV joints, and the right hand side blue shaft is also brand new.
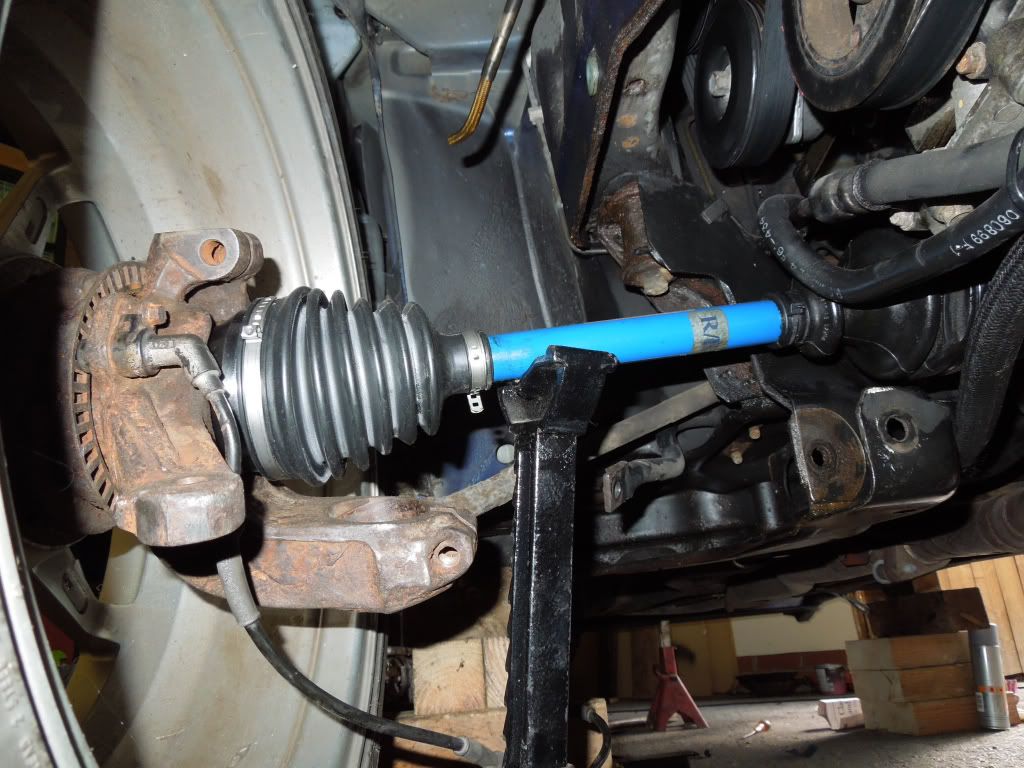
Also, we fitted new wheel bearings in the front hubs, and fitted new powerflex bushes in the front LCAs
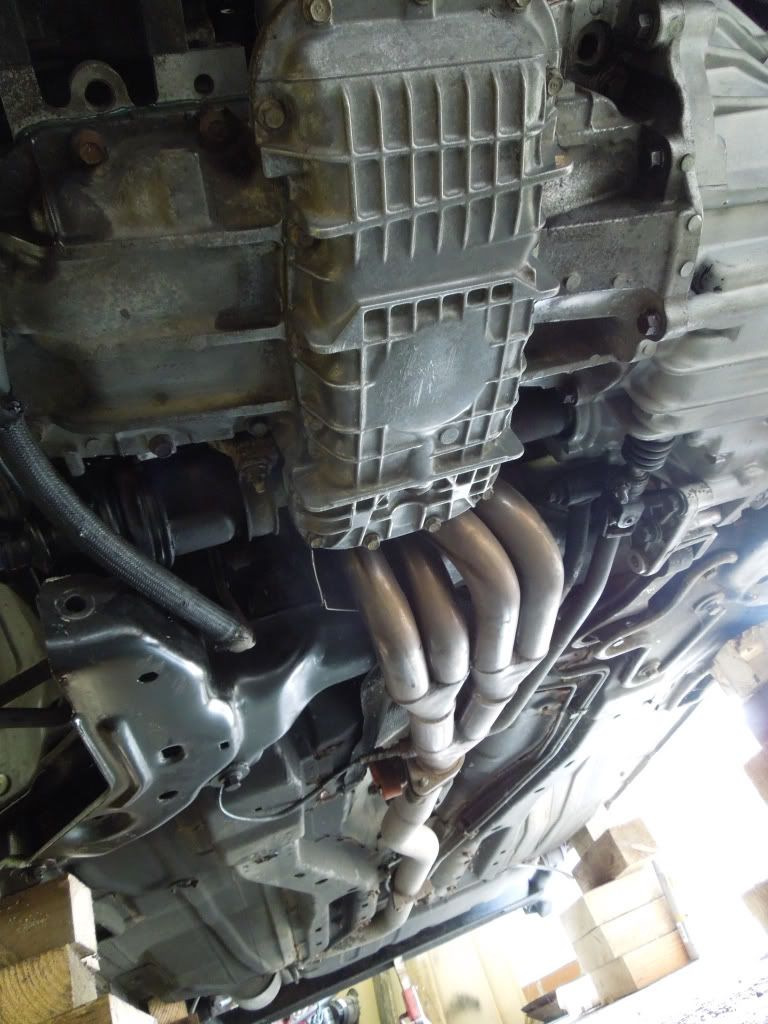
also, heres a pic of my shiny new gearbox (complete with new Quaife LSD) fitted to the engine, with a new 4 branch manifold
So all in all a pretty good weekends work, in summary since thursday night me and my dad have:
• painted the whole interior in primer
• painted the roll cage matte black
• painted the interior metallic silver
• wired/plumbed in the engine and got it running with no issues
• fitted new wheel bearings in front hubs
• changed CV joints in LHS drive shaft and build up a brand new RHS drive shaft complete with a new CV joint
• rebuilt the front end drive line
• measured up and installed the front drivers seat
• refitted the bonnet
I'm pretty pleased with that! still lots to do, and only one month today until the track day at snetterton, so its still a tight schedule but with progress like this I'm certain we can do it!
more updates next week.
cheers
Ross

[B]
UPDATE 15-04-12[/B]
Evening all.
Well yet another weekend in the workshop with my good old dad sees some more decent progress. Focus has been on the drivetrain and the seats. We've got the whole front end built up now and finished, and the driver seat in mounted (on custom built mounts) and the drivers harness is mounted in the car as well. so pretty good really.
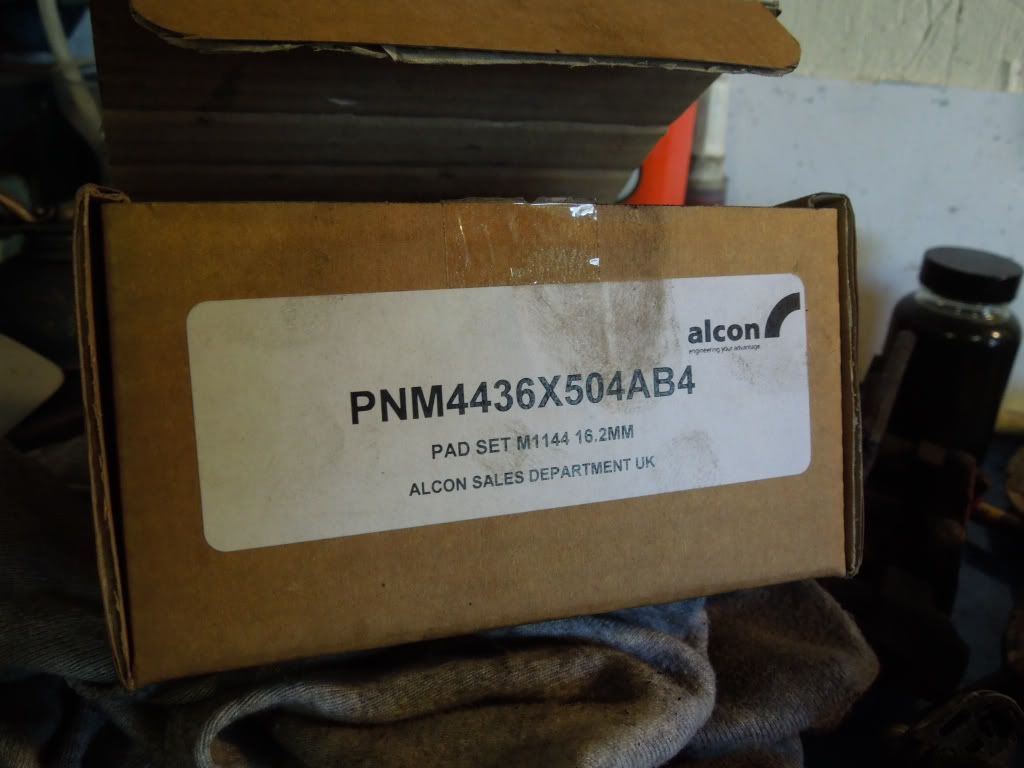
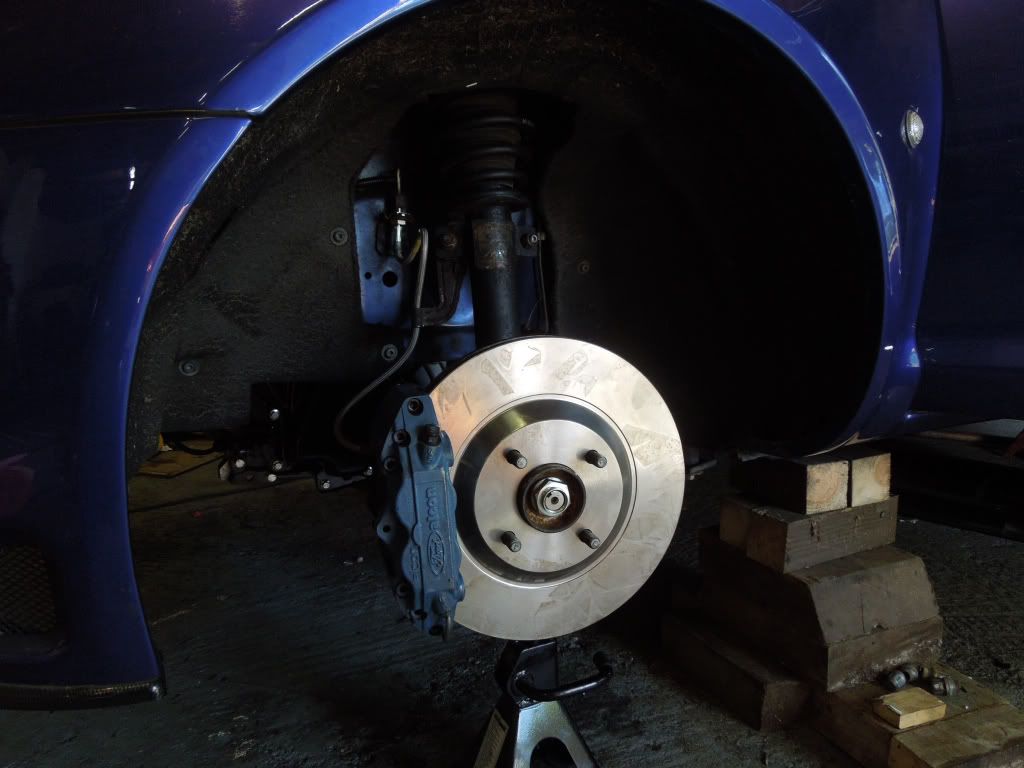
On the front end, it was time to build up the brakes, so the callipers have been refurbished and cleaned and it was time to dig out some special parts id been saving. Time to get these out of the drawer!

and these
and get everything built up
Regarding the suspension, i was lucky enough to have 2 sets of FRP dampers. both had been used, with one set covering 70k miles, and the other 95k miles. So i needed to decide which set to install on the car. Now I'm lucky enough to have a job which involves suspension tuning, and have access to a machine which can rate dampers and show there performance. so i took my four front dampers to work (at Lotus) and rated them.
so, i chose damper number 1 and number 4 as they were the most closely matched. and these are now on the car.
Regarding the interior my dad designed and made some custom mounts for the seats, and these are now installed. The seat is very low in the car now, much lower than the standard seat. its practically bolted to the floor (though some 1 inch box section), so its a really awesome driving position. We are also in the process of lowering the steering column as well (bracket designed) and this will make it just perfect.
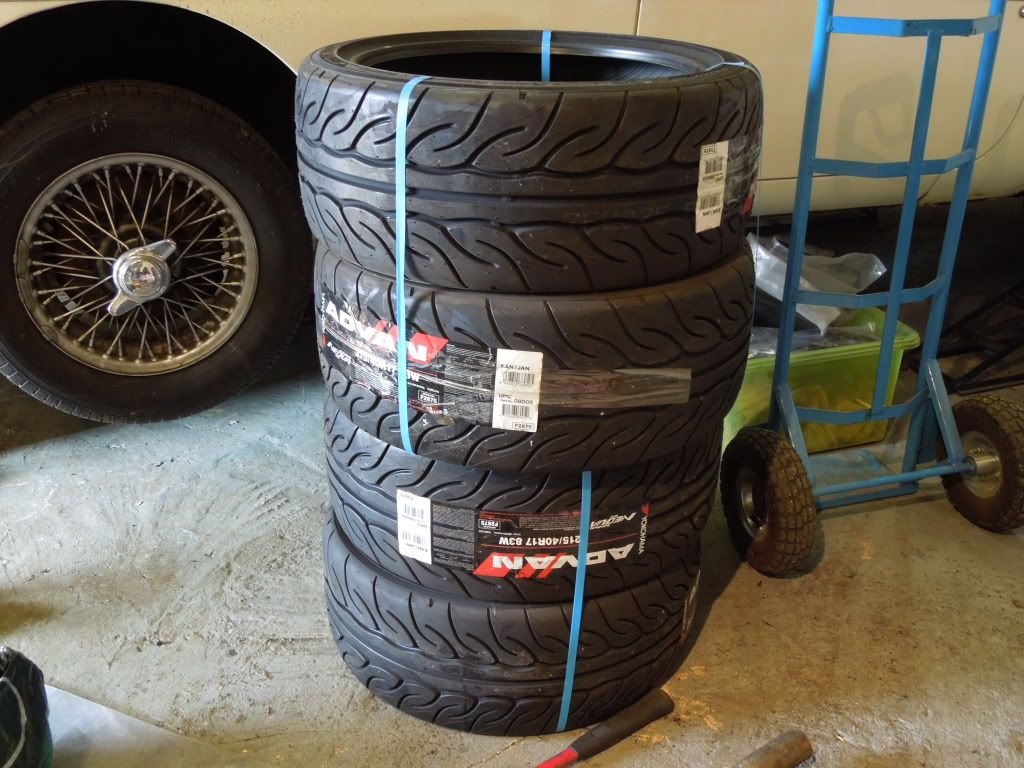
Also, i splashed my final budget on some sticky tyres. I decided to go for Yokohama Advan AD08 in the correct size. I'm sure they will be great, one things for sure they look awesome!
So thats about it for now.
Next weekend the other seat will go in, and the rear beam will be out back together (once the new wheel bearings are in the hubs)
Only 3 weeks until the MOT, and 4 weeks until the track day, so not long to go. I can not wait to drive this thing!
thanks for reading.
Ross
UPDATE 24-04-12
Hello All. Its been a couple of weeks since my last update so i thought id share my progress.
Quite a lot has been done since last time. Now all the rear end is built up and the car is back on its wheels. The rear beam has had Powerflex bushes fitted, new rear brake discs and pads fitted, new wheel bearings, and all rebuilt.
So the car was looking like this:
On the inside the passenger seat has now been properly fitted along with the other harness, and I've painted the door skins silver to match the rest of the interior, its looking sharp.
So it was finally time to give the old girl a wash. After being sat in pour workshop for 6 months, and in the workshop we brought it from for a further 10 months it was pretty dusty! To make matters worse it didn't look like its had been polished much in the past either so the paint was knackered.
It started off looking like this:
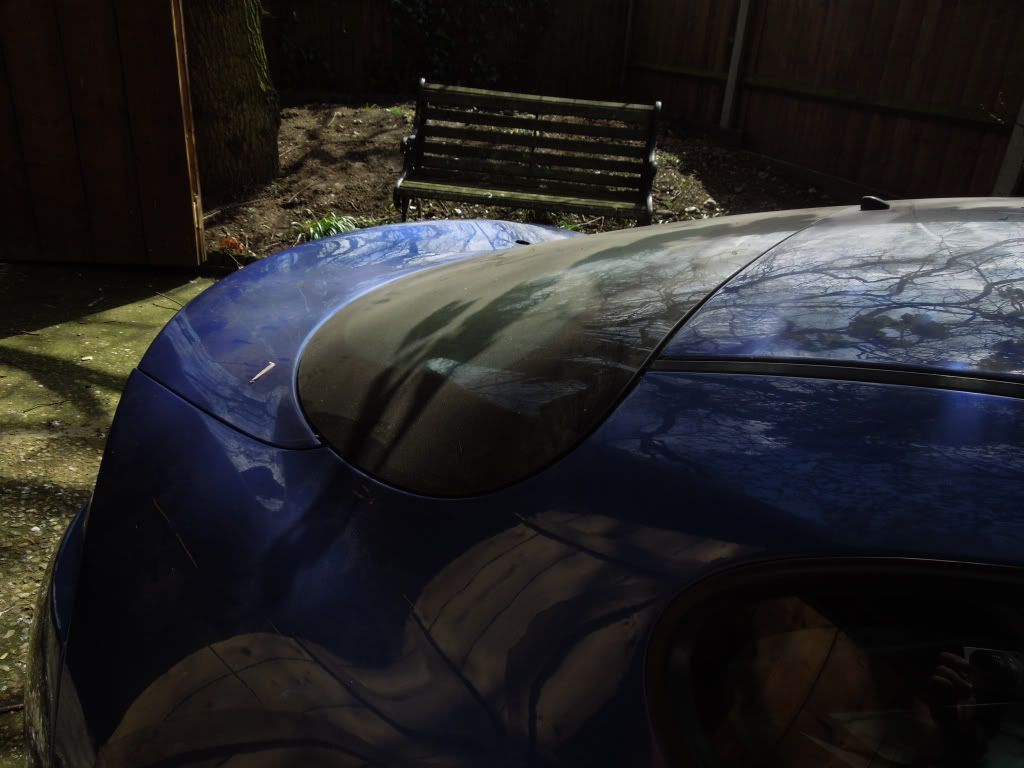
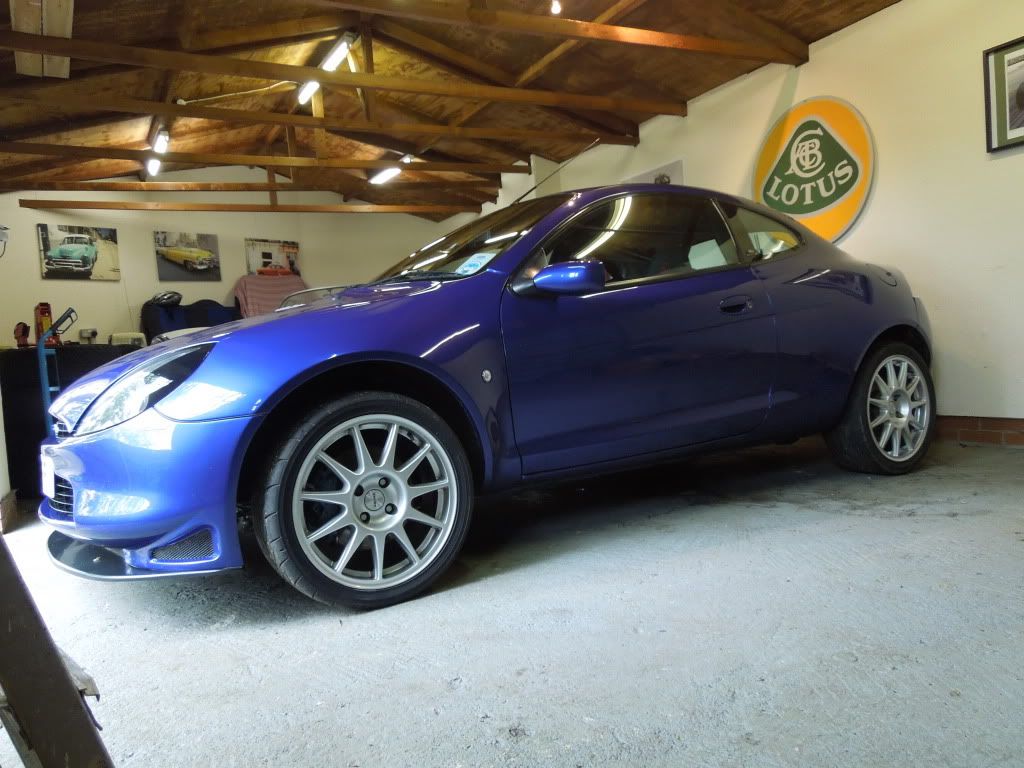
and after a lot of washing, polishing, clay-bar, machine polishing, and waxing, it now looks like this!

I'm really pleased with it, but to be honest it needs a lot more TLC before the paint is anywhere near perfect. I really need to repeat the whole process a couple more times as there are still lots of swirl marks and scratches that will eventually polish out, but for now its a start.
Big news is MOT DAY ON SATURDAY! Thats going to be nerve racking, not sure if it will pass yet or not, but still have a couple of weeks until the track day so thats cool.
I also got my insurance sorted out today. I went with Adrian Flux in the end, got a good deal (in my eyes). Declared the full list of mods (cage, harnesses, exhaust, seats, etc etc) They recognise it as a proper FRP, 3000 miles a year, full breakdown cover including recovery from anywhere in Europe, all in for £500. Not bad considering its a modified and rare car.
Anyway thats it for now, i'll post more when i have an MOT and the car is out in the real world! (Cant wait!)
cheers for reading.
Ros
UPDATE - 07-05-12
Well its been an interesting couple of weeks. P1 passed its MOT first time last weekend, and I've driven it for 200 miles since then. I LOVE this car, its just awesome!
The noise it makes is incredible, it certainly can be a bit deafening, but its a good sound.
It feels much more powerful then my old FRP, you can now really feel when the VCT kicks in, and the whole car feels more urgent.
The new gearbox is really sweet and the Quaife is more more refined then the other ford fitted LSD, it doenst tug or torque steer as much, but the way it drags you around corners is just amazing. I honestly think its much better than the Ford unit.
So the idea was to run the car on the road for 200 miles to iron out any bugs, and I certainly found one. There was a big problem with the ABS, which was kicking in as sson as the car was driven over 35mph, even if you hadn’t touched the brakes. After lots of searching we eventually found the OSR ABS sensor pickup ring was slightly warped, probably as a result of the wheel bearing change. So this was replaced and not the ABS is perfect.
I also took the car to work and put it on a Hunter wheel aligner to sort the geometry out. This is now set perfectly and the car drives so wheel as a result. Whilst I was at work I also put the car on a set of corner scales to see how much it weighed. From looking around on the internet I struggled to see the exact weight of a standard FRP, any one know? The figure I eventually came to was 1174kg, kerb weight (ie no passengers, full tank of fuel)
Anyway, I weighed my car, and it came in at 1034kg, which im really chuffed with. It was also empty of passengers, and had the fuel tank brimmed to the top.
Here is a picture of the scale machine to prove it!
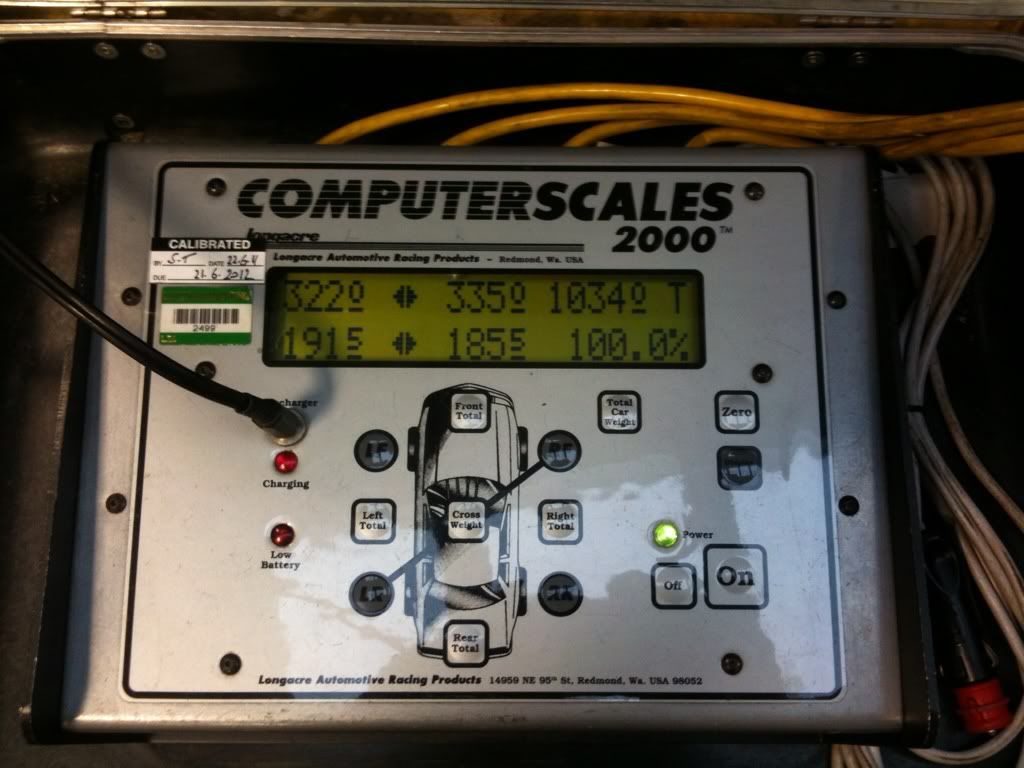
This shows front left as 322kg, front right as 335kg, rear left as 191.5kg, rear right as 185.5kg. and total weight 1034kg.
So, with everything in the interior removed, but the roll cage and all fitted, its still a whopping 140kg lighter then standard!

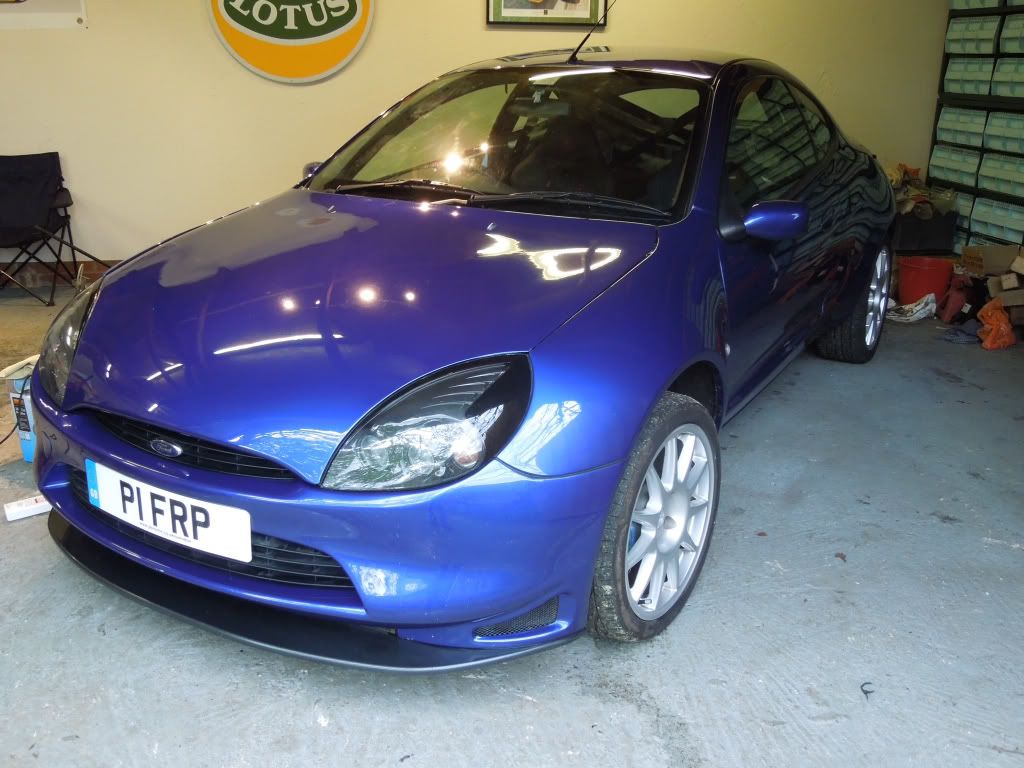
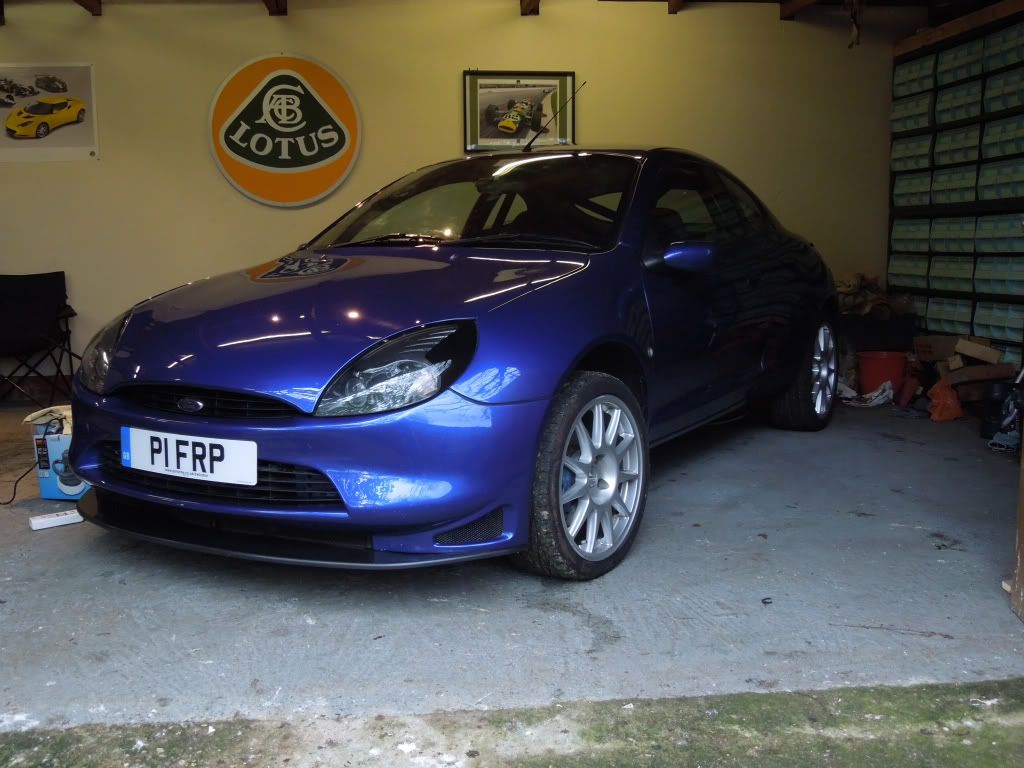
So, with the car suspension geometry aligned, the car weighed, and the new Yokohama Advan AD08 tyres fitted it is now finally complete!
I spent some time this weekend cleaning it. It looks just about as shiny as its possible to get it!
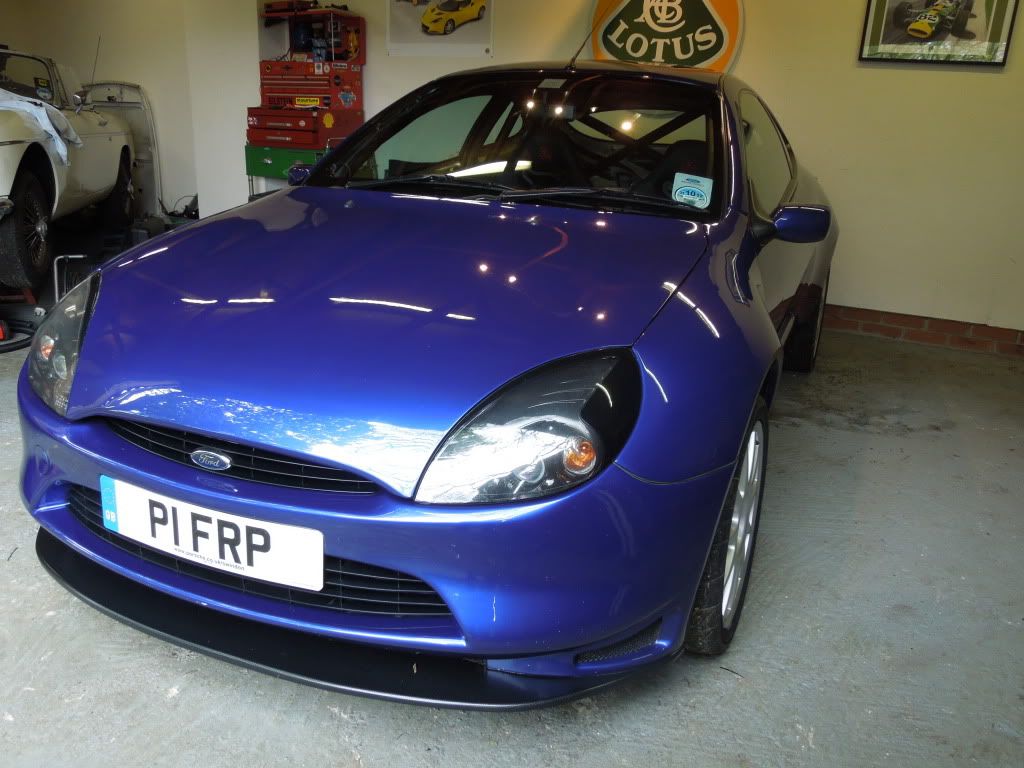

So there you have it, its finished!
On Wednesday im taking it to Snetterton for a full day on track, and at the end of may we are off to the Nurburgring for a week! Its gonna be a tough time for P1 but im fairly certain she can take it!
In other news ive brought myself a GoPro Hero 2 camcorder, so I will be filming a lot of track work and posting it on here.
Ive had a go at making my first film of P1, it’s a bit rubbish! But if your interested them feel free to have a look
http://youtu.be/fNXxgF-6gjU
Thanks for all your support over the past few months, getting good feedback is always a moral booster in the tough times.
Big thanks to my dad as well, who spent many hours on this one!
Cheers
Ross
UPDATE 10-05-12
Well here is a video from yesterdays very wet Snetterton session. For the best laps skip on a few minutes as the first lap i was trying to get some heat in the tyres.
the camera angle is a bit rubbish, its good to give you an idea of what it was like being inside the car, but not so great for seeing out the windows. plus the fact that the window was steaming up cos of the rain (and the heated screen didn't work!) means you can see much of the track. I will change this for the next time, bringing the camera forward in the car.
http://youtu.be/kkCJ8fMYrnA
All set now for the Nurburgring in two weeks
I thought i would share my latest project with you to see if anyone is interested.
This story is patched together from a number of other updates, so forgive me if it doesn't flow very well. you will see the UPDATE then a date, which shows when it was originally written, hope that makes sense. Its a pretty long read, so go grab a coffee if you feel like going through it.
thanks for your interest an i hope you enjoy it.
=====
IN THE BEGINNING! - JAN 2012:
FIRST
Hi all
Well this is the story of a new project ive recently started. Only last week I sold one of the best cars ive ever owned (FRP 441) to help fund a new venture which I'm really excited about.
In recent years I've been lucky enough to take a Racing Puma out on a few trackdays, and even to themighty Nurburgring, and realise just how good these little cars are, they have so much grip, don't get tired and just keep giving.
I always thought they still had more to give, could be even better if someone was brave enough to try, and one day i was in the right place at the right time and managed to secure another FRP to play with.
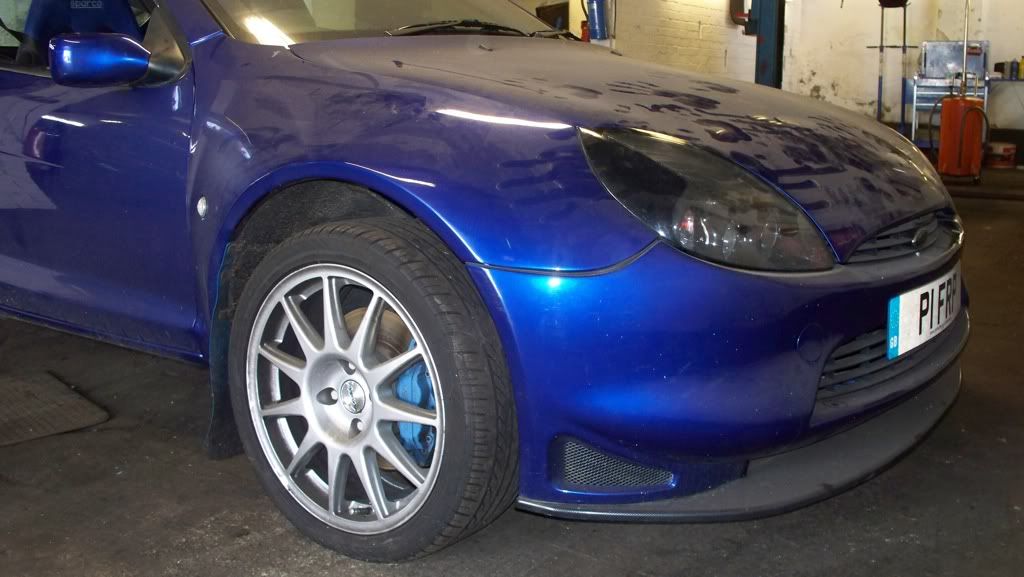
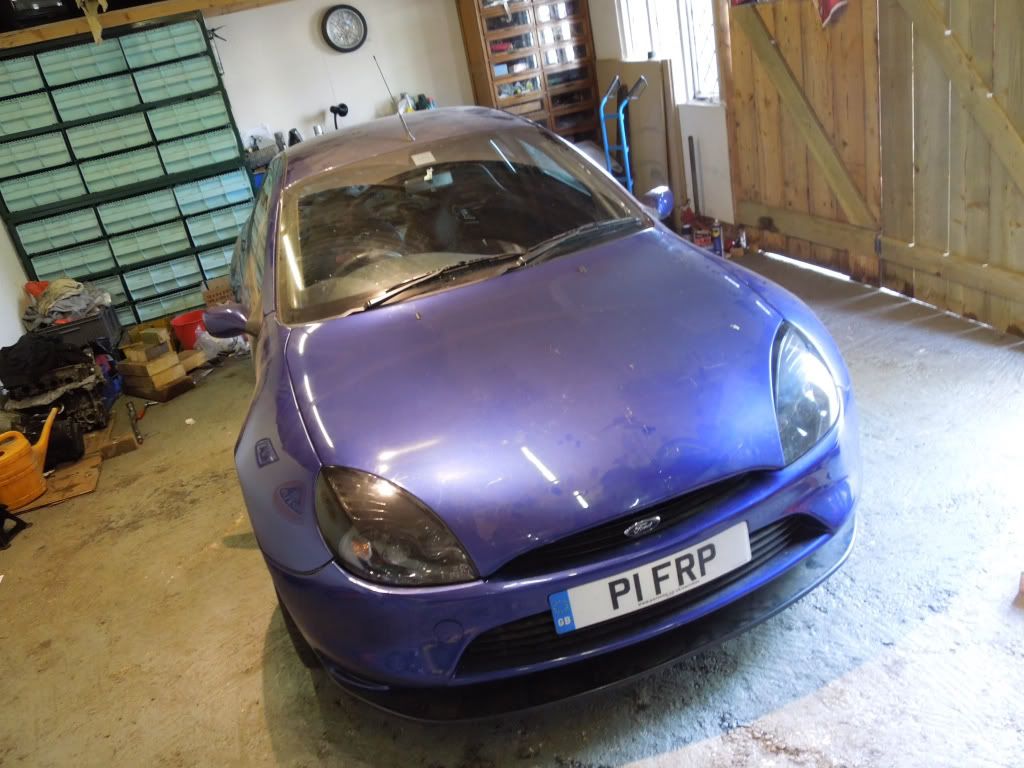
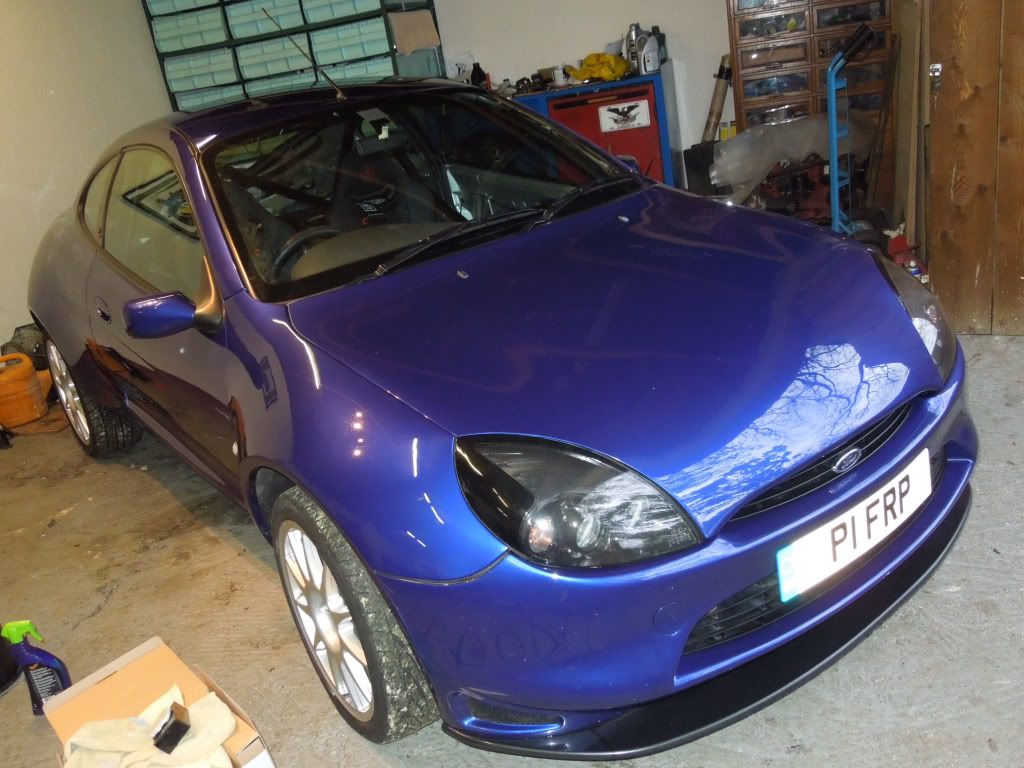
Last year I contacted a guy who was selling FRP 70, or P1 FRP as some of you may know it. The guy was at the end of his tether trying to get the car fixed after it had suffered a snapped cambelt. I step in with a small bundle of cash and away I go with a new toy!
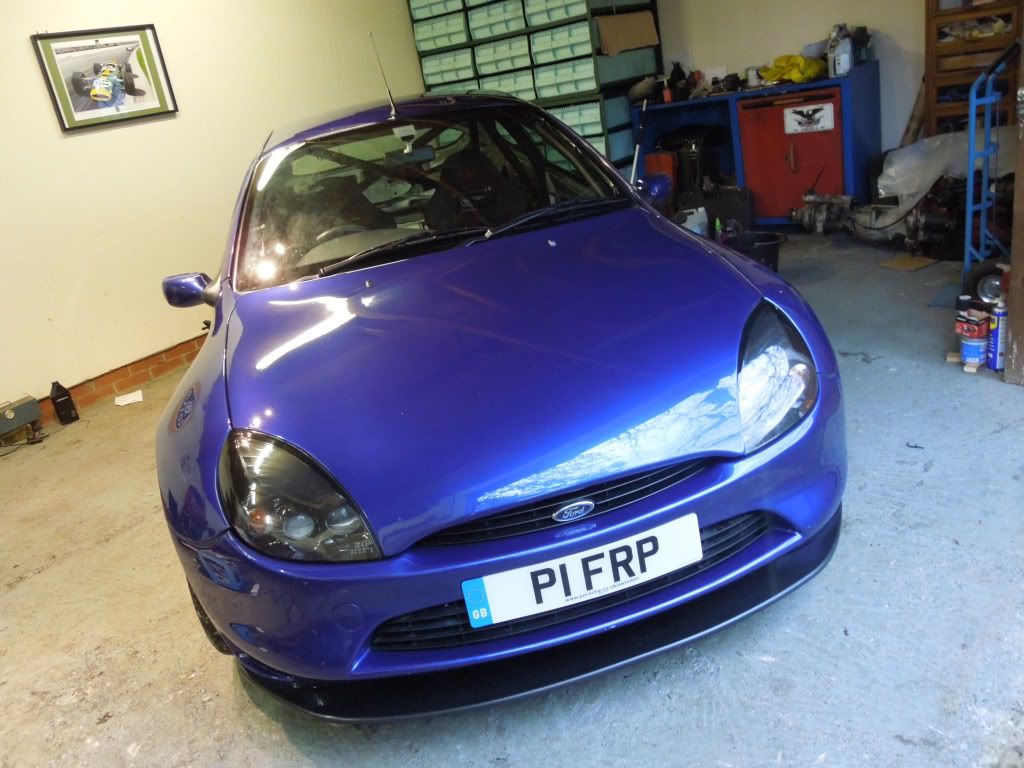
Here it is as I found it:
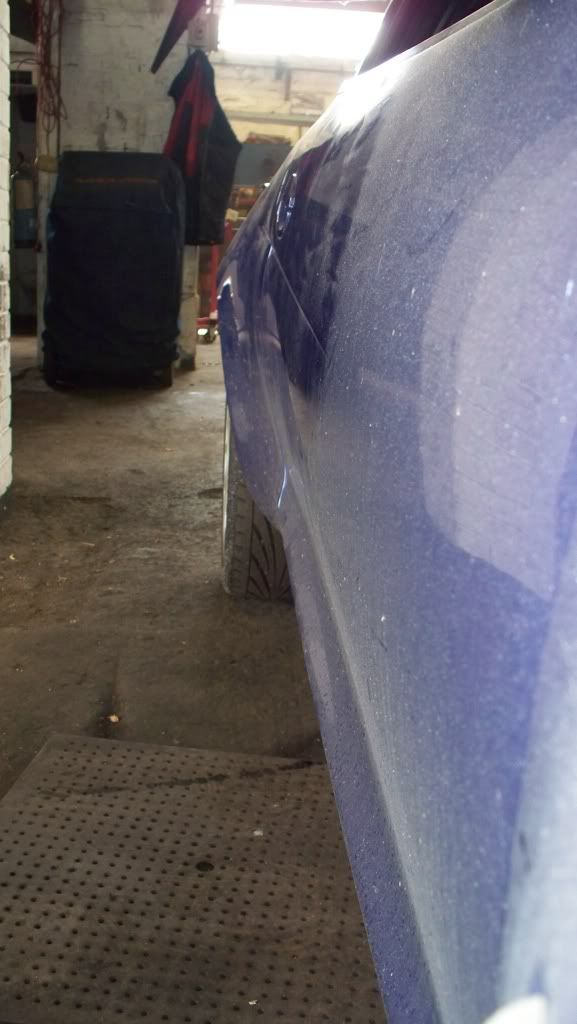
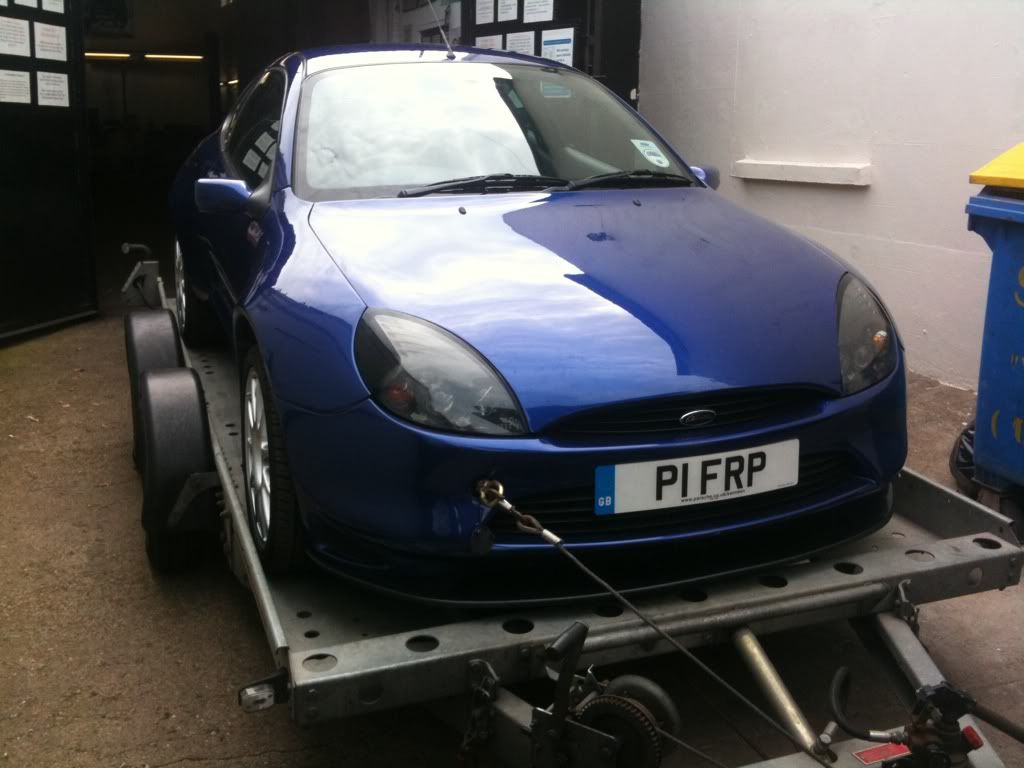
on the way home
so for a short period of time I was lucky enough to own two FRPs!
Various stories came from the garage i brought it from, of titanium valves having been fitted, but not being able to get the right tappets (even though the engine was built up!!), but as it turns out they simple got a spare cylinder head, swapped the cams over and tried to rebuild the engine. Where they went wrong was by firstly not firing the belt tensioner properly (loose belt) and secondly not using the right timing tool.
So FRP 70 is a good base for a project. The car has been loved in the past, with a large folder full of receipts, its been resprayed by Pumabuild at some point and was a cherished example up until about 5 years ago, when it became a daily hack and was a bit neglected, until it eventually died.
Close inspection of the engine also shows the bottom end was knackered, its been run dry of oil (either as a result of the garage running it with no oil in it, or it was prior damage) so the engine was caput. It lasted over 100,000 miles so that's not bad going.
So, we need to broach the subject of modifying an FRP. There is a school of thought out there they we shouldn't change or modify these superb cars because only 500 were built, and only 350ish still exist. That is a very good reason not to mess with them, and one I agree with on the whole. My previous FRP (441) was on its way to becoming a prime example of a superb, original, FRP and I would never have messed it up.However, where FRP70 is concerned, it was a mess when I got it, it would have been either patched up (badly), and run into the ground, or broken for parts and vanished forever. Therefore I don't feel bad about 'messing' with this one. It will become a fantastic car, will be for filling its potential, and most importantly, still be around for many years to come!
Glad that's out the way! Now onto the good stuff!
Here's a short list of jobs to do:
Sort the engine – Port the cylinder head – fit Fiesta ST clutch – Strip interior completely – fit rollcage – replace all worn bushes in suspension – fit decent coilovers – renew /replace anything that's worn out – remove windows and fit polycarb ones – full race seats and harnesses – GO RACING!
So, since getting the car home, the engine has been removed, a new one with 48k miles has been sourced and a full engine rebuild/refresh is taking place.
A full weld in CustomCages roll cage has been ordered and is in the process of being fitted
the fitting will take a couple of weeks, then the engine will be back in and the rest of the project will continue
the aim for this year is to take the car to the Nurburgring at the end of may, so I don't have long to get all this sorted!
I will keep this thread up to date with all the progress and let you know how I get on.
Cheers
Ross
[B]
UPDATE 19-02-12[/B]
Afternoon all, its been a productive weekend. the dash is out, and the cage is in place. only held in with tape and zip ties at the moment, but good news is it all seems to fit pretty well.
it will be welding in properly over the next couple of weeks, but these pics give an idea of how it will look.
more next week!
cheers
ross
05-03-12 UPDATE
Hi All
Well its been a busy weekend. P1 FRP is now really coming on and starting to take shape. Ive spent most of the weekend in the workshop with my dad and his mate welding in my roll cage. its looking awesome. But before we get to that some other news is that I've now got myself some awesome new seats. Im lucky enough to work for Lotus Cars, and occasionally they scrap off parts they no longer need. I stumbled across some brand new carbon fibre seats. So I bagsyed them, and they will be pride of place in my FRP!
Im sure it will make the car unique, surely it will be the only FRP in the world to have hand crafted, carbon fibre seats from a super car?! Plus i weighed these new seats, and they weigh 8kg each! the Old Sparco FRP seats weighed in at 21kg each! what a saving!
I'm obviously really chuffed with these!
Anyway, this weekend the whole cage was finally welded in, and looks great:
Some action shots!
So thats it for now. Ive got a plan, and only 8 weeks left until the first track day is booked at Snetterton in May, so its all systems go.
Next up is having the cylinder head ported, fitting a Tran-X LSD, and generally rebuild.
thanks for looking
Ross
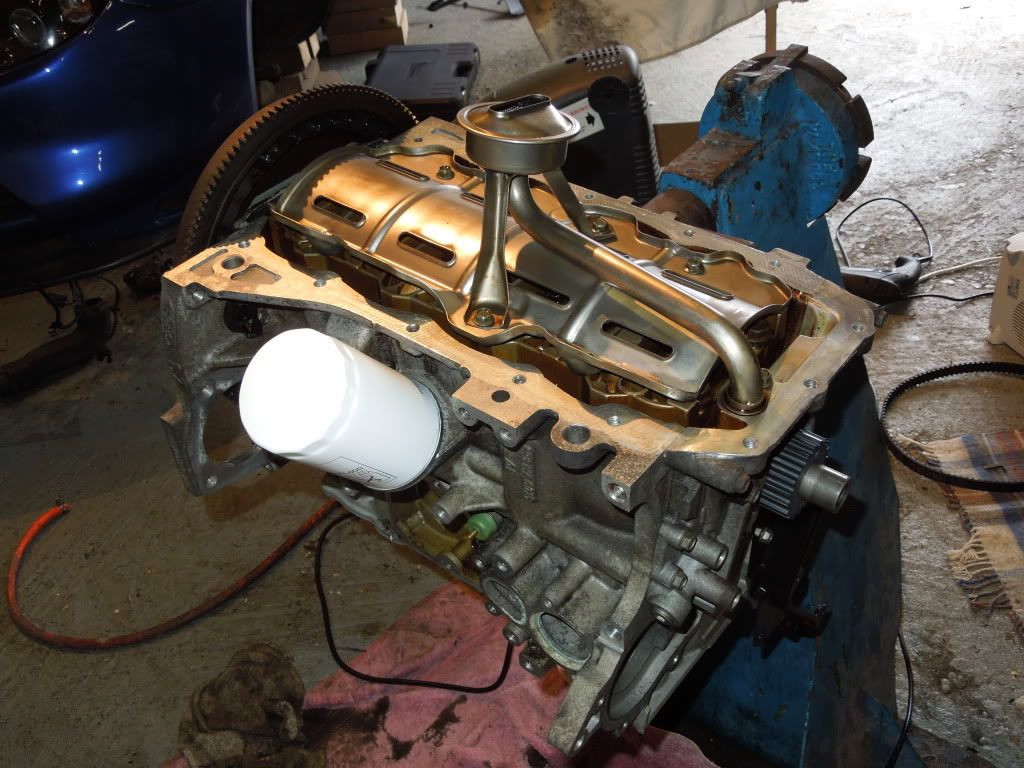
UPDATE - 18-03-12
Quick update on my project. This weekend has been mostly about the engine. Its now back together and almost ready to go. Its a new (to the car) unit that i brought from ebay recently, had a verified 42,000 miles on the clock and was absolutely mint when we stripped it back. We've done quite a lot to it:
• Full strip down, and a paraffin clean of EVERYTHING!
• Cylinder head has been ported, polished and flowed by a highly experienced guy at Lotus
• New cylinder head bolts
• New head gasket
• New cam belt
• New belt tensioner
• New thermostat
• New water pump
• New accessory belt, pulley and idler
• All new gaskets and hardware
• New oil filter
• Plus the cams have been timed up properly using a new FRP timing tool, and double checked with a DTI.
• A brand new Fiesta ST clutch (with brand new puma master cylinder)
Thats taken most of the weekend. However the rest of the project is progressing well. Ive recently ordered a whole host of new parts, most of which are waiting to be fitted, including:
• A brand new FRP gearbox with a brand new Quaife LSD from pumabuild. this is due any day now, so the car will also benefit brand new transmission.
• New driveshafts (including the FRP unique blue one)
• New CV joints
• New wheel bearings (front and back)
• New brake lines
• New Fiesta ST clutch (with Puma master cylinder)
• New heater control valve
• A complete set of Powerflex bushes (both wishbone bushes, antiroll bar and rear beam)
• New front damper strut tops
• New drop links
• New track rod ends
Most of these bits are sitting in the workshop waiting to be fitted, along with my seats, so its like a parts dealer round mine at the moment!
Its a good feeling to be finally bolting things back onto the car though rather then taking stuff off. I can't wait to get the thing running though, that will be a great day!
The next big job is the roll cage, I'm deciding what colour to paint it. Im definitely going for a dark grey interior (floor, roof etc) but can't decide whether to have a Red, Orange, White, Grey or Blue cage. What do you thing???
Also, last weekend we spent a great deal of time refitting the dash board. I took lots of the dash away, including all the metal framework as the roll cage replaces most of this. I reckon its saved at least 10kg of weight. Also i finally finished the lovely job of removing all the sound deadening, and cleaning all the gunk that it leaves behind. Its looking quite good now though, ready for paint. Here it is:
So thats all for now. Its certainly getting there, but with only 6 weeks left until the MOT there is no time to waste!
cheers
Ross
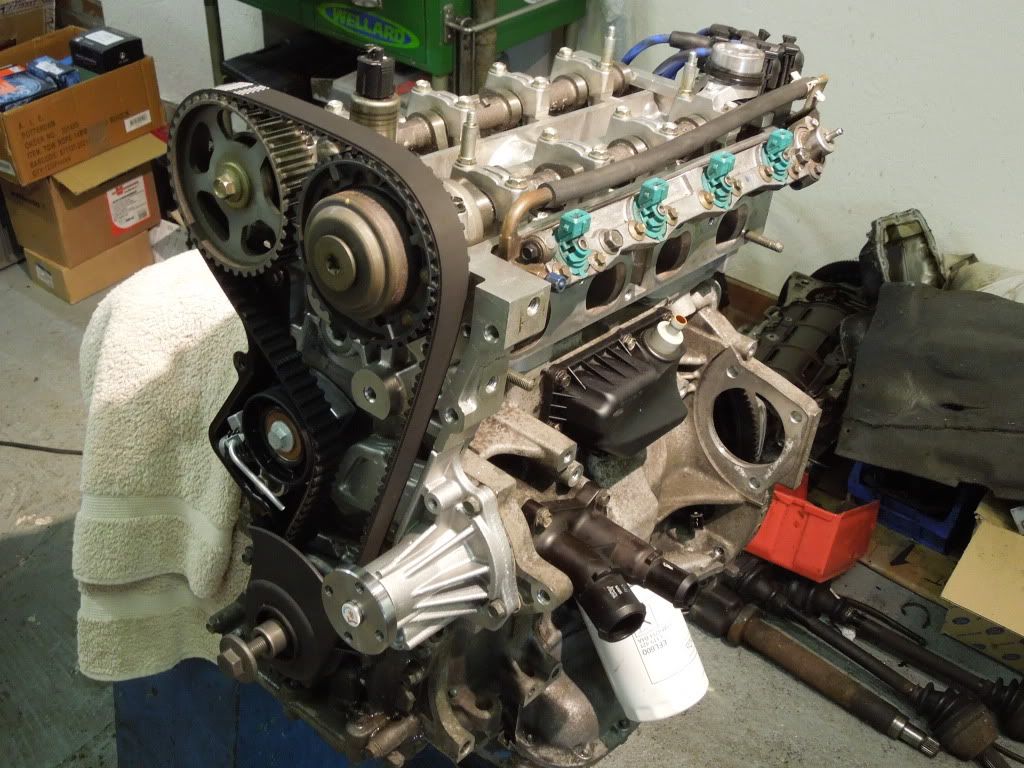
Update 01-04-12
Hi All. well its been a good weekend once again. Got quite a lot done and things are really moving on nicely now.
Firstly the engine. This is now fully built up and ready. We've checked the cylinder pressures and port vacuums and they are all absolutely spot on. We did have an issue with one of the ports having not seated properly in the head (which showed up with a lesser vacuum value then the others) so the head was taken apart again, the valve re-lapped and the whole thing rebuilt until it was perfect.
Also my new gearbox arrived, which is a new FRP box from Pumabuild, which also has a new Quaife LSD fitted to it
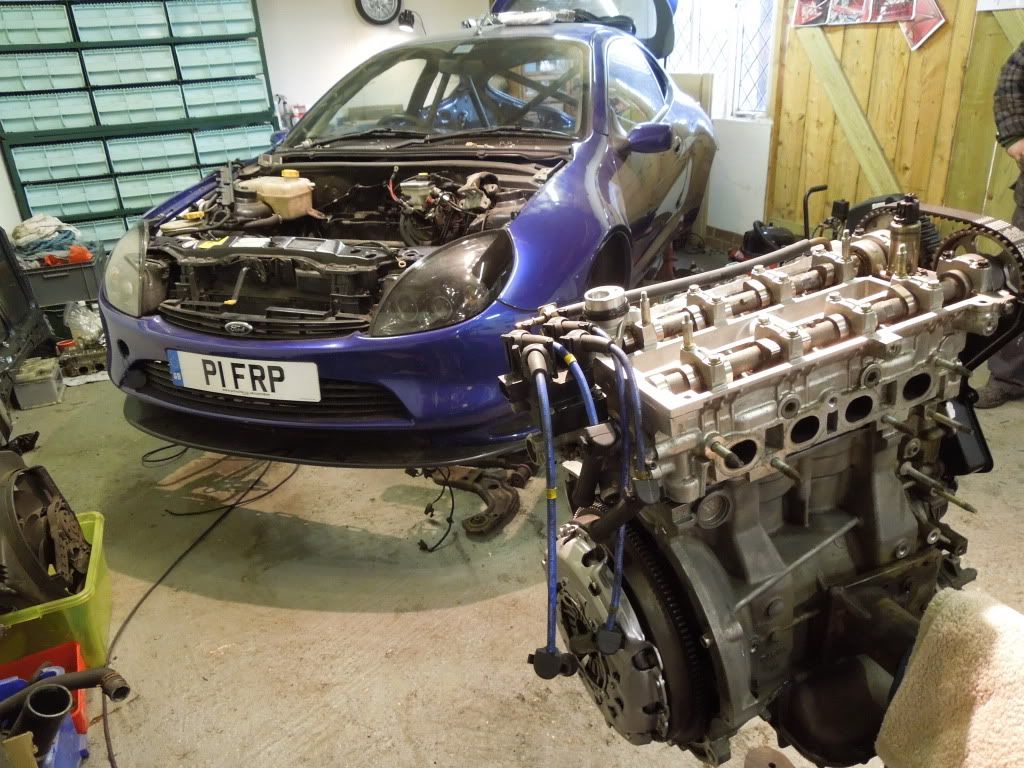
And so, on friday we started to put the whole engine together and after a couple of hours it looked like this:
So the rest of the weekend was spent putting the engine back in to the car. And after lots and lots of effort by my good old dad it now looks like this:
Whilst dad was hard at work I was in the car cleaning up the welds and prepping for paint.
The really good news is that my Roll Cage installation has been given the official certification by custom cages so I've got the go ahead to paint it.
Here is this weekends progress on the interior. After a good clean up and de-burring the welds:
Then after lots of masking:
And then as time was running out i had one can of primer, so thought id do the rear of the car, which now looks like this:
So there we go, the engine is back in, its almost all connected and next week it will be fired up (fingers crossed!) and the interior is clean, masked up, and painting has begun. Next weekend i hope to have the whole interior painted. (Matte black cage, satin grey interior)
Its really coming together now! These are the good days, when the effort you put in starts to make a big difference!
Cheers
Ross
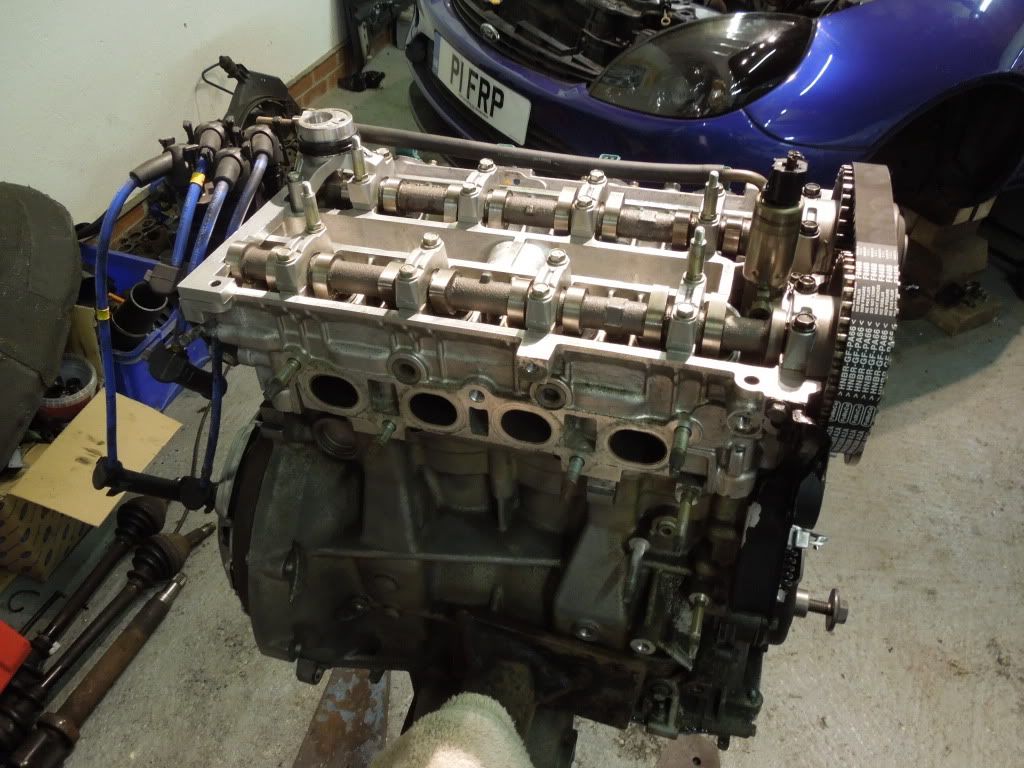
UPDATE 09-04-12
Well its been a brilliant bank holiday weekend, with me and my dad spending most of it in the workshop. And we've achieved loads more then i thought we could.
At the start of the weekend the car had its engine in but not fully plumbed in and not running, and the interior masked up and half painted with primer. Its amazing to see it now.
First job, primer the interior which went from this:
to this
here its all primer'ed and I've masked up the cage ready to paint the interior silver. At this stage I've already painted the cage matte black which looks really cool. here is the cage painted in matte black, before the interior was painted
once the cage was painted i masked it up
and began painting the interior metallic silver. at the end of yesterday it looked like this:
I'm really chuffed. its the first time I've done anything like this before and its come out really well.
next job was to put a seat in to see how its would fit, heres a sneak peak:
plus i trial fitted my new 6 point Luke harnesses which look amazing. no pics of these yet though.
So the interior is really getting there now. Onto the mechanics.
The engine is now in the car and is RUNNING
it sounds sweeeeet, idles really well and is great. We also got both driveshafts built up, both have brand new CV joints, and the right hand side blue shaft is also brand new.
Also, we fitted new wheel bearings in the front hubs, and fitted new powerflex bushes in the front LCAs
also, heres a pic of my shiny new gearbox (complete with new Quaife LSD) fitted to the engine, with a new 4 branch manifold
So all in all a pretty good weekends work, in summary since thursday night me and my dad have:
• painted the whole interior in primer
• painted the roll cage matte black
• painted the interior metallic silver
• wired/plumbed in the engine and got it running with no issues
• fitted new wheel bearings in front hubs
• changed CV joints in LHS drive shaft and build up a brand new RHS drive shaft complete with a new CV joint
• rebuilt the front end drive line
• measured up and installed the front drivers seat
• refitted the bonnet
I'm pretty pleased with that! still lots to do, and only one month today until the track day at snetterton, so its still a tight schedule but with progress like this I'm certain we can do it!
more updates next week.
cheers
Ross
[B]
UPDATE 15-04-12[/B]
Evening all.
Well yet another weekend in the workshop with my good old dad sees some more decent progress. Focus has been on the drivetrain and the seats. We've got the whole front end built up now and finished, and the driver seat in mounted (on custom built mounts) and the drivers harness is mounted in the car as well. so pretty good really.
On the front end, it was time to build up the brakes, so the callipers have been refurbished and cleaned and it was time to dig out some special parts id been saving. Time to get these out of the drawer!
and these
and get everything built up
Regarding the suspension, i was lucky enough to have 2 sets of FRP dampers. both had been used, with one set covering 70k miles, and the other 95k miles. So i needed to decide which set to install on the car. Now I'm lucky enough to have a job which involves suspension tuning, and have access to a machine which can rate dampers and show there performance. so i took my four front dampers to work (at Lotus) and rated them.
so, i chose damper number 1 and number 4 as they were the most closely matched. and these are now on the car.
Regarding the interior my dad designed and made some custom mounts for the seats, and these are now installed. The seat is very low in the car now, much lower than the standard seat. its practically bolted to the floor (though some 1 inch box section), so its a really awesome driving position. We are also in the process of lowering the steering column as well (bracket designed) and this will make it just perfect.
Also, i splashed my final budget on some sticky tyres. I decided to go for Yokohama Advan AD08 in the correct size. I'm sure they will be great, one things for sure they look awesome!
So thats about it for now.
Next weekend the other seat will go in, and the rear beam will be out back together (once the new wheel bearings are in the hubs)
Only 3 weeks until the MOT, and 4 weeks until the track day, so not long to go. I can not wait to drive this thing!
thanks for reading.
Ross
UPDATE 24-04-12
Hello All. Its been a couple of weeks since my last update so i thought id share my progress.
Quite a lot has been done since last time. Now all the rear end is built up and the car is back on its wheels. The rear beam has had Powerflex bushes fitted, new rear brake discs and pads fitted, new wheel bearings, and all rebuilt.
So the car was looking like this:
On the inside the passenger seat has now been properly fitted along with the other harness, and I've painted the door skins silver to match the rest of the interior, its looking sharp.
So it was finally time to give the old girl a wash. After being sat in pour workshop for 6 months, and in the workshop we brought it from for a further 10 months it was pretty dusty! To make matters worse it didn't look like its had been polished much in the past either so the paint was knackered.
It started off looking like this:
and after a lot of washing, polishing, clay-bar, machine polishing, and waxing, it now looks like this!
I'm really pleased with it, but to be honest it needs a lot more TLC before the paint is anywhere near perfect. I really need to repeat the whole process a couple more times as there are still lots of swirl marks and scratches that will eventually polish out, but for now its a start.
Big news is MOT DAY ON SATURDAY! Thats going to be nerve racking, not sure if it will pass yet or not, but still have a couple of weeks until the track day so thats cool.
I also got my insurance sorted out today. I went with Adrian Flux in the end, got a good deal (in my eyes). Declared the full list of mods (cage, harnesses, exhaust, seats, etc etc) They recognise it as a proper FRP, 3000 miles a year, full breakdown cover including recovery from anywhere in Europe, all in for £500. Not bad considering its a modified and rare car.
Anyway thats it for now, i'll post more when i have an MOT and the car is out in the real world! (Cant wait!)
cheers for reading.
Ros
UPDATE - 07-05-12
Well its been an interesting couple of weeks. P1 passed its MOT first time last weekend, and I've driven it for 200 miles since then. I LOVE this car, its just awesome!
The noise it makes is incredible, it certainly can be a bit deafening, but its a good sound.
It feels much more powerful then my old FRP, you can now really feel when the VCT kicks in, and the whole car feels more urgent.
The new gearbox is really sweet and the Quaife is more more refined then the other ford fitted LSD, it doenst tug or torque steer as much, but the way it drags you around corners is just amazing. I honestly think its much better than the Ford unit.
So the idea was to run the car on the road for 200 miles to iron out any bugs, and I certainly found one. There was a big problem with the ABS, which was kicking in as sson as the car was driven over 35mph, even if you hadn’t touched the brakes. After lots of searching we eventually found the OSR ABS sensor pickup ring was slightly warped, probably as a result of the wheel bearing change. So this was replaced and not the ABS is perfect.
I also took the car to work and put it on a Hunter wheel aligner to sort the geometry out. This is now set perfectly and the car drives so wheel as a result. Whilst I was at work I also put the car on a set of corner scales to see how much it weighed. From looking around on the internet I struggled to see the exact weight of a standard FRP, any one know? The figure I eventually came to was 1174kg, kerb weight (ie no passengers, full tank of fuel)
Anyway, I weighed my car, and it came in at 1034kg, which im really chuffed with. It was also empty of passengers, and had the fuel tank brimmed to the top.
Here is a picture of the scale machine to prove it!
This shows front left as 322kg, front right as 335kg, rear left as 191.5kg, rear right as 185.5kg. and total weight 1034kg.
So, with everything in the interior removed, but the roll cage and all fitted, its still a whopping 140kg lighter then standard!
So, with the car suspension geometry aligned, the car weighed, and the new Yokohama Advan AD08 tyres fitted it is now finally complete!
I spent some time this weekend cleaning it. It looks just about as shiny as its possible to get it!
So there you have it, its finished!
On Wednesday im taking it to Snetterton for a full day on track, and at the end of may we are off to the Nurburgring for a week! Its gonna be a tough time for P1 but im fairly certain she can take it!
In other news ive brought myself a GoPro Hero 2 camcorder, so I will be filming a lot of track work and posting it on here.
Ive had a go at making my first film of P1, it’s a bit rubbish! But if your interested them feel free to have a look
http://youtu.be/fNXxgF-6gjU
Thanks for all your support over the past few months, getting good feedback is always a moral booster in the tough times.
Big thanks to my dad as well, who spent many hours on this one!
Cheers
Ross
UPDATE 10-05-12
Well here is a video from yesterdays very wet Snetterton session. For the best laps skip on a few minutes as the first lap i was trying to get some heat in the tyres.
the camera angle is a bit rubbish, its good to give you an idea of what it was like being inside the car, but not so great for seeing out the windows. plus the fact that the window was steaming up cos of the rain (and the heated screen didn't work!) means you can see much of the track. I will change this for the next time, bringing the camera forward in the car.
http://youtu.be/kkCJ8fMYrnA
All set now for the Nurburgring in two weeks
Edited by RESTELL on Sunday 24th June 12:21
dude you need to set your go pro to "spot meter" look in the instructions it will tell you how
http://gopro.com/files/English-HD-HERO-Instruction...
http://gopro.com/files/English-HD-HERO-Instruction...
FRP is one of my must have cars, Im a big fan of pumas/zetec-s (owned a few of each). My current daily drive is a puma millenium, was the most exclusive puma/fiesta I could afford lol. But I will have an FRP one day (and never sell!)
Will follow this thread with interest & cool seats.
Will follow this thread with interest & cool seats.

Thanks for all the good comments!
The car is a real hoot on the track, it has so much grip on the corners now, and that little bit of extra power helps to hang onto the coat tails of the things that used to drive away from me on the straights now too!
The car is a real hoot on the track, it has so much grip on the corners now, and that little bit of extra power helps to hang onto the coat tails of the things that used to drive away from me on the straights now too!
marmite monster said:
dude you need to set your go pro to "spot meter" look in the instructions it will tell you how
Thanks for this Marmite, i hadnt spotted this feature and to be honest i was a little dissapointed with cameras performance, so im sure this will help. I will reposition the cam next time to be lower and further forward as well. Thanks again for the good comments. Its always nice to get good feedback from a project thats taken a good chunk of time to complete.
You can ignore this guy below though, he's just some buffoon who sits opposite me at work!
You can ignore this guy below though, he's just some buffoon who sits opposite me at work!
The Wookie said:
Unfortunately on that journey took it via the Nurburgring... 
FWDRacer, i completely agree, the FRP will be a classic in a few years time and i expect values to go up massively from where they are at the moment. I will no doubt one day hugely regret not simply restoring the car back to a nice FRP, but as you say, this was more of a project to bring a tired old car back to life and show off its full potential. I do intend to keep the car for as long as i possibly can, would love to have it indefinitely, so maybe it will retain most of its value in the long run. FWDRacer said:
Will one day own an FRP. Modern Ford Classic-no doubt about it. Many will lament what you've done - I think it has been about breathing new life into a tired car. Top work.
Another Fluffer (thats quite a name!) - well i got the car cheap because of its condition, as a none runner. i paid £2k for it, and have since spent roughly another £6k, but that is an ever increasing number! Another Fluffer said:
Amazing car!
How much was the initial cost? If you don't mind me asking
cheers all. i will add some new pics taken whilst on the track at Snetterton shortly, so watch this space. How much was the initial cost? If you don't mind me asking
Wow! This is mega. I always wanted to do something like this to my old one but it was too good to tinker with so fair play for starting with a dead un' and those seats..WOW!
Only had a quick scan through but are you thinking of racing it, or just track car etc?
As you've gone to a massive effort of weight saving and stripping could it be possible to get the original rear 3/4 panel out, as from what I remember thats essentially still on the car underneath the wider section?
But either way, love it!
FWDRacer said:
Modern Ford Classic-no doubt about it.
I was at FMC when these came out. People were buying them, expecting them to be the next RS and hold their money. In the end, the values have just continued to drop.One of my former line managers bought one new and put it in storage. No idea if it's still there, or been sold on since.

Nice and loud inside! What did you do for the exhaust, looks like a 4 branch manifold onto a straight pipe, any silencers before the exhaust tip? Custom fabricated or off the shelf?
Awesome car btw - totally agree with the idea of modifying a rough one rather than attempting to preserve it, save the minters for the museum pieces.
Awesome car btw - totally agree with the idea of modifying a rough one rather than attempting to preserve it, save the minters for the museum pieces.
Gassing Station | Readers' Cars | Top of Page | What's New | My Stuff