997/987 Amplifier fix reccomendation
Discussion


I recently had an issue with the ASK amplifier on my 2006 C4S. This is the "Sound Package Plus" system which is the standard fitting on all 997 models, part number 997.645.331.01 (but similar part numbers exist for 987 Boxsters and, I believe, 996/986s too). This is not the optional BOSE system.
Anyways, I had it fixed for a very reasonable sum by Tore Bergvill in Norway. You send him the amp, he fixes it and sends it back in a few days and he will warrant his work to (IIRC for 5 years!). As a 993 owner he is a fellow Porsche enthusiast too!
So, this is just a small plug for the guy as I was very pleased with his work, his communication and his cost, not to mention the satisfaction of fixing something as opposed to just replacing.
If you're interested, you can contact Tore through his website: http://www.bergvillfx.com
I hope this doesn't contravene any forum rules, if it does please let me know so I can edit my post
I hope you don't me crashing your topic, but I have had an issue with my 2011 987.2 Sound Plus amp and have a very frustrating time getting accurate info on how to sort the issue - so hopefully someone else can benefit from my experience:
THE ISSUE:
The sound on the stereo (and SatNav, Bluetooth, etc.) basically stopped intermittently, usually on starting the engine. After a few weeks it went dead altogether (i.e. no sound at all), but the head unit continued to work perfectly.
LOCATING THE AMP:
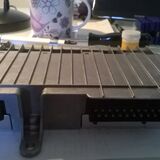
Dead easy if you know where to look - in earlier Boxsters it is located in the front luggage compartment ("frunk" in American) behind the toolkit. However, on my car it has moved under the right hand seat (driver side if you're in the UK). You basically have to pump up the seat to the highest setting and slide the seat forwards and you will see the amp.
REMOVING THE AMP:
1) Remove the amp fuse - fuse box is in the right hand foot well and there should be a diagram showing which fuse to remove. Do not proceed unless you have removed the amplifier fuse.
2) Disconnect the 2 leads connected to the amp
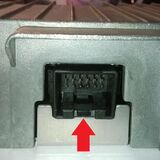
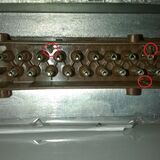
a) the smaller left hand connector has a tongue which has to be depressed (pushed up - see picture 2) to remove it. It should disconnect easily - if you have to use any force, you are doing something wrong!
b) the larger right hand connector has a C-shaped clip around it, which has to slide to the left approx. 15-20mm. When in the left-most position, the connector should again come away easily.
c) The wiring loom is also clipped to the right hand side of the amp - you should just be able to pull this clip away with a gentle tug - do NOT pull on the wires!
3) The amp is secured with 2 x 10mm hex bolts and 1 x 10mm nut on a threaded stud. The 2 bolts are at the front of the amp and you will need to slide the seat back to remove them. Then slide the seat forwards again to remove the nut at the back.
4) With the seat at its highest position, you should be able to simply lift out the amp from the back of the seat.
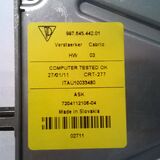
If you turn the amp over, you will see a yellow label - this has the Porsche part # on it:
- 987.645.442.01 = 987.2 Boxster
- 987.645.441.01 = Cayman Gen II
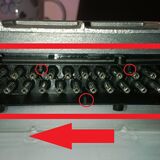
The two amps above look identical at first glance, but the larger 20-pin connectors are subtly different - see pictures 3 and 5c. If you remove the locating lugs, either part will fit, BUT:
A) You run the risk of connecting it up the wrong way up and blowing the amp
B) The Cayman amp has more channels on it, which are wired in a different order than the Boxster one - so the stereo doesn't sound right
YOUR 3 CHOICES:
1) Buy a new amp - $400 new in the US or a second hand one (if you can find one)
2) Send your amp to be repaired - Highly recommended if you don't have the tools, soldering skills, time, patience or inclination
3) Try repairing the amp yourself - the most likely cause is a dodgy relay. Replacing the relay will take you around an hour if you know what you're doing.
I made the mistake of buying a second-hand Cayman amp in the belief it would fit/work in my Boxster... guess how I worked out point B above! (And no, I didn't blow the amp.)
REPLACING THE RELAY:
So, if you feel inclined to try option #3, here's how - IF IN DOUBT, GET PROFESSIONAL HELP:
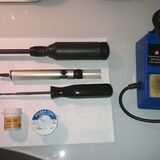
1) Gather your tools - you will need (picture #6):
- Torx T10 screwdriver
- Small flat-blade screwdriver
- Small needle-nose pliers
- Soldering iron
- Solder sucker
- Some solder
- Some heatsink paste (MUST be white silicon i.e. NOT the silver coloured stuff)
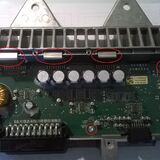
2) Turn the amp bottom up and remove the 7 torx screws securing the cover. Remove the cover.
- NOTE: If there any signs of burning, damaged components, etc. then DO NOT PROCEED - you will need a new amp! If everything looks pristine (like picture #7), then changing the relay is worth the punt!
3) Remove the 3 spring clips on the back edge of the amp, gently levering them off with the flat-blade screwdriver (see picture #7)
4) Remove the 5 torx screws holding the circuit board into the case (see picture #7)
5) Remove the circuit board from the case. You might want to clean some of the heatsink paste from the 3 integrated circuits (ICs) which were clipped to the case. You will only get covered in the stuff if you don't wipe it away.
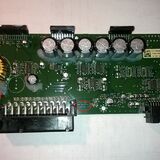
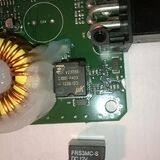
6) Locate the relay in the bottom left of the circuit board - the part number is marked on top of the case (see pictures #8, 11 and 12)
- In my case, the blown relay was part FRS3MC-S. What I discovered was that the part in my replacement Cayman amp was Tyco Electronics V23086-C1001-A403, which is readily available on E-bay for about £3.
- If your part numbers are different, it may be worth checking the circuit board revision (picture #8, circled in middle) - if it says "ASK Industries 2120100000-06", the Tyco part above should fit OK.
7) Flip the board over (pictures #9 and #10) - the relay is held in with 5 solder joints. You need to de-solder these 5 joints to release the relay. THIS IS DIFFICULT AND NEEDS REAL CARE NOT TO DAMAGE THE CIRCUIT BOARD.
- Basically, don't attempt this if you are not good with a soldering iron - find someone to help you!
8) The replacement relay should drop straight in and you can re-solder all 5 joints (picture #11).
9) Put some new heatsink compound on the 3 ICs and drop the board back into the case. Fix the 5 x Torx screws back in place.
10) Push the 3 x spring clip back in place, which should secure the 3 ICs to the back of the case. Some of the heatsink compound should squidge out, but it should NOT cover everything - just a small bead around the edges of the ICs.
11) Check everything looks OK - no leftover screws inside the case, etc. (Turn it upside down and give it a shake.)
12) Place the cover back onto the case and refit the 7 x Torx screws to hold it in place.
That's it - job done! Refitting to the car is the reverse of steps 1-4 in the removal procedure. Be careful when refitting the fuse - be on the lookout for any signs of problems e.g. fuse blowing, smoke, etc.
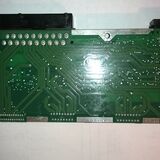
Picture #1
Picture #2
Picture #3
Picture #4

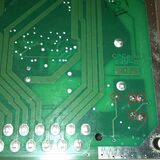
Picture #5a
Picture #5b

Picture #5c
Picture #6
Picture #7
Picture #8
Picture #9
Picture #10
Picture #11
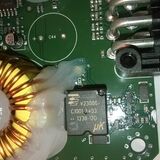
Picture #12
THE ISSUE:
The sound on the stereo (and SatNav, Bluetooth, etc.) basically stopped intermittently, usually on starting the engine. After a few weeks it went dead altogether (i.e. no sound at all), but the head unit continued to work perfectly.
LOCATING THE AMP:
Dead easy if you know where to look - in earlier Boxsters it is located in the front luggage compartment ("frunk" in American) behind the toolkit. However, on my car it has moved under the right hand seat (driver side if you're in the UK). You basically have to pump up the seat to the highest setting and slide the seat forwards and you will see the amp.
REMOVING THE AMP:
- ** CAUTION: You do this entirely at your own risk - it is dangerous to mess with the car electrics unless you have some idea what you're doing. Messing around with the electrics under the seat can trigger the airbags in some cars! ****
1) Remove the amp fuse - fuse box is in the right hand foot well and there should be a diagram showing which fuse to remove. Do not proceed unless you have removed the amplifier fuse.
2) Disconnect the 2 leads connected to the amp
a) the smaller left hand connector has a tongue which has to be depressed (pushed up - see picture 2) to remove it. It should disconnect easily - if you have to use any force, you are doing something wrong!
b) the larger right hand connector has a C-shaped clip around it, which has to slide to the left approx. 15-20mm. When in the left-most position, the connector should again come away easily.
c) The wiring loom is also clipped to the right hand side of the amp - you should just be able to pull this clip away with a gentle tug - do NOT pull on the wires!
3) The amp is secured with 2 x 10mm hex bolts and 1 x 10mm nut on a threaded stud. The 2 bolts are at the front of the amp and you will need to slide the seat back to remove them. Then slide the seat forwards again to remove the nut at the back.
4) With the seat at its highest position, you should be able to simply lift out the amp from the back of the seat.
If you turn the amp over, you will see a yellow label - this has the Porsche part # on it:
- 987.645.442.01 = 987.2 Boxster
- 987.645.441.01 = Cayman Gen II
The two amps above look identical at first glance, but the larger 20-pin connectors are subtly different - see pictures 3 and 5c. If you remove the locating lugs, either part will fit, BUT:
A) You run the risk of connecting it up the wrong way up and blowing the amp
B) The Cayman amp has more channels on it, which are wired in a different order than the Boxster one - so the stereo doesn't sound right
YOUR 3 CHOICES:
1) Buy a new amp - $400 new in the US or a second hand one (if you can find one)
2) Send your amp to be repaired - Highly recommended if you don't have the tools, soldering skills, time, patience or inclination
3) Try repairing the amp yourself - the most likely cause is a dodgy relay. Replacing the relay will take you around an hour if you know what you're doing.
I made the mistake of buying a second-hand Cayman amp in the belief it would fit/work in my Boxster... guess how I worked out point B above! (And no, I didn't blow the amp.)
REPLACING THE RELAY:
So, if you feel inclined to try option #3, here's how - IF IN DOUBT, GET PROFESSIONAL HELP:
1) Gather your tools - you will need (picture #6):
- Torx T10 screwdriver
- Small flat-blade screwdriver
- Small needle-nose pliers
- Soldering iron
- Solder sucker
- Some solder
- Some heatsink paste (MUST be white silicon i.e. NOT the silver coloured stuff)
2) Turn the amp bottom up and remove the 7 torx screws securing the cover. Remove the cover.
- NOTE: If there any signs of burning, damaged components, etc. then DO NOT PROCEED - you will need a new amp! If everything looks pristine (like picture #7), then changing the relay is worth the punt!
3) Remove the 3 spring clips on the back edge of the amp, gently levering them off with the flat-blade screwdriver (see picture #7)
4) Remove the 5 torx screws holding the circuit board into the case (see picture #7)
5) Remove the circuit board from the case. You might want to clean some of the heatsink paste from the 3 integrated circuits (ICs) which were clipped to the case. You will only get covered in the stuff if you don't wipe it away.
6) Locate the relay in the bottom left of the circuit board - the part number is marked on top of the case (see pictures #8, 11 and 12)
- In my case, the blown relay was part FRS3MC-S. What I discovered was that the part in my replacement Cayman amp was Tyco Electronics V23086-C1001-A403, which is readily available on E-bay for about £3.
- If your part numbers are different, it may be worth checking the circuit board revision (picture #8, circled in middle) - if it says "ASK Industries 2120100000-06", the Tyco part above should fit OK.
7) Flip the board over (pictures #9 and #10) - the relay is held in with 5 solder joints. You need to de-solder these 5 joints to release the relay. THIS IS DIFFICULT AND NEEDS REAL CARE NOT TO DAMAGE THE CIRCUIT BOARD.
- Basically, don't attempt this if you are not good with a soldering iron - find someone to help you!
8) The replacement relay should drop straight in and you can re-solder all 5 joints (picture #11).
9) Put some new heatsink compound on the 3 ICs and drop the board back into the case. Fix the 5 x Torx screws back in place.
10) Push the 3 x spring clip back in place, which should secure the 3 ICs to the back of the case. Some of the heatsink compound should squidge out, but it should NOT cover everything - just a small bead around the edges of the ICs.
11) Check everything looks OK - no leftover screws inside the case, etc. (Turn it upside down and give it a shake.)
12) Place the cover back onto the case and refit the 7 x Torx screws to hold it in place.
That's it - job done! Refitting to the car is the reverse of steps 1-4 in the removal procedure. Be careful when refitting the fuse - be on the lookout for any signs of problems e.g. fuse blowing, smoke, etc.
Picture #1
Picture #2
Picture #3
Picture #4
Picture #5a
Picture #5b
Picture #5c
Picture #6
Picture #7
Picture #8
Picture #9
Picture #10
Picture #11
Picture #12
Edited by BrokenCar on Monday 4th August 23:48
Hi,
I recently bought a 2004 997 and the sound from the standard head unit is pretty bad, worse than expected. there is no low end what so ever. I turned up the bass and it seems that the lower speakers in each door are not producing any sound. The rest of the speakers in the car seem to work, but obviously they are only producing treble.
Could the ASK amp be the problem? Does it amplify all the signals to the speakers, or does it amplify the lower door ones only and simply act as a high pass crossover for the others?
Any help on this would be great.
Gassing Station | Porsche General | Top of Page | What's New | My Stuff