Ultegra Di2 6770 internal Cerveo project
Discussion


After a morning of dismantling, drilling, fishing for string and general tinkering I think I'm most of the way to internally fitting Ultegra Di2 to my Cervelo RS. The hole drilling turned out to be the least of my problems, but I took my time and I think it all worked out.
The bits:
Ultegra Di2 6770 shifters, front and rear mech
Custom made internal wiring harness (e-tube) with internal seatpost battery (eapathome from ebay - although I picked up in person from LA)
Dremel 4000 (essential!)
Hairdryer!
Patience
I picked up the kit from Eugene (eapathome) whilst in LA on business, it was custom made as I didn't fancy cutting holes in my bottom bracket internal chamber (which is the normal method), instead Eugene built me a 4 piece harness that could be threaded through and stored inside the seatpost with cables running up the downtube, down the chainstay and down the seattube for the front mech. I ended up only needing to drill one hole into carbon(under the top tube) and enlarging one hole at the end of the chainstay (alu)
Here is the kit:

My main fear was drilling the hole in the top tube, but Eugene let me have a practice go on a frame off-cut in his workshop and once you've done one (and have the right tools - Demel drill bit and tile grout removal bit) its dead easy.
Not too bad:

After drilling I dismantled and removed the forks and headset and threaded a brake cable through the hole in the chainstay up to the headset (with the bike upside-down so the cable went over the BB. I then pulled through some string using the cable. I then fished the string up the seatpost with a coathanger so I now had string going to the headset and rear derailleur. I also threaded another down the seatpost and out a hole on the back of my BB that was there already and used for the old front mech.
Then I fed through the cables with some cable ties attached to reduce rattles and heatshrunk all the connections with a hairdryer. Added some grommets - put everything back together and its looking pretty decent:
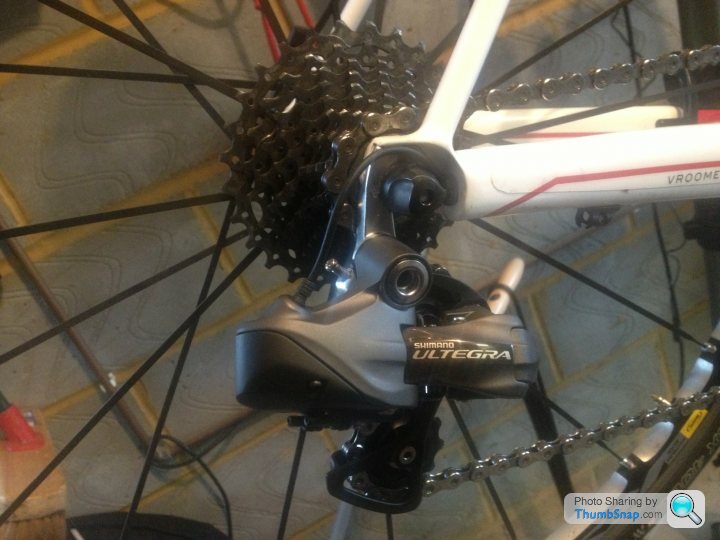

The photos make the mechs look HUGE, but its just the camera angle - I'm very happy.
Gear-change is nothing short of perfect, its neat and no bulky battery All I need is some bar tape and a few finished touches and I'm all sorted.
The bits:
Ultegra Di2 6770 shifters, front and rear mech
Custom made internal wiring harness (e-tube) with internal seatpost battery (eapathome from ebay - although I picked up in person from LA)
Dremel 4000 (essential!)
Hairdryer!
Patience
I picked up the kit from Eugene (eapathome) whilst in LA on business, it was custom made as I didn't fancy cutting holes in my bottom bracket internal chamber (which is the normal method), instead Eugene built me a 4 piece harness that could be threaded through and stored inside the seatpost with cables running up the downtube, down the chainstay and down the seattube for the front mech. I ended up only needing to drill one hole into carbon(under the top tube) and enlarging one hole at the end of the chainstay (alu)
Here is the kit:
My main fear was drilling the hole in the top tube, but Eugene let me have a practice go on a frame off-cut in his workshop and once you've done one (and have the right tools - Demel drill bit and tile grout removal bit) its dead easy.
Not too bad:
After drilling I dismantled and removed the forks and headset and threaded a brake cable through the hole in the chainstay up to the headset (with the bike upside-down so the cable went over the BB. I then pulled through some string using the cable. I then fished the string up the seatpost with a coathanger so I now had string going to the headset and rear derailleur. I also threaded another down the seatpost and out a hole on the back of my BB that was there already and used for the old front mech.
Then I fed through the cables with some cable ties attached to reduce rattles and heatshrunk all the connections with a hairdryer. Added some grommets - put everything back together and its looking pretty decent:
The photos make the mechs look HUGE, but its just the camera angle - I'm very happy.
Gear-change is nothing short of perfect, its neat and no bulky battery
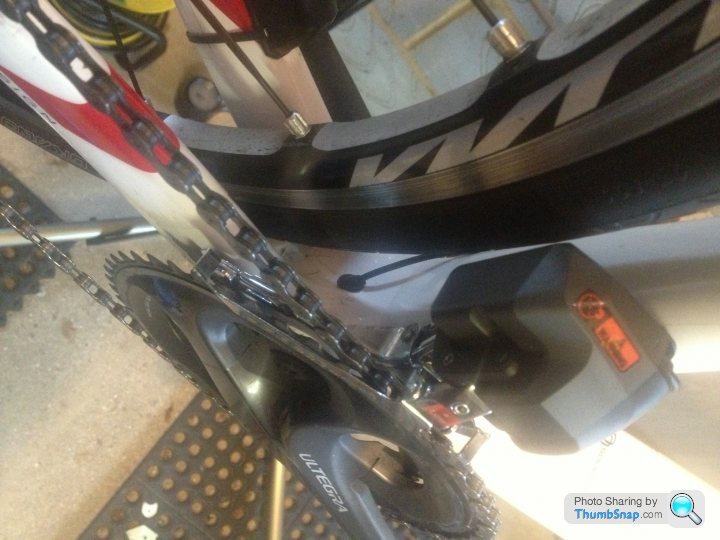
All I need is some bar tape and a few finished touches and I'm all sorted.interesting, not sure I can afford it and I'm certainly not brave enough to do it myself but it looks like a nice job. Was there anything preventing you from bringing the cable out at the top of the chainstay, it looks tight by the quick release for the rear mech?
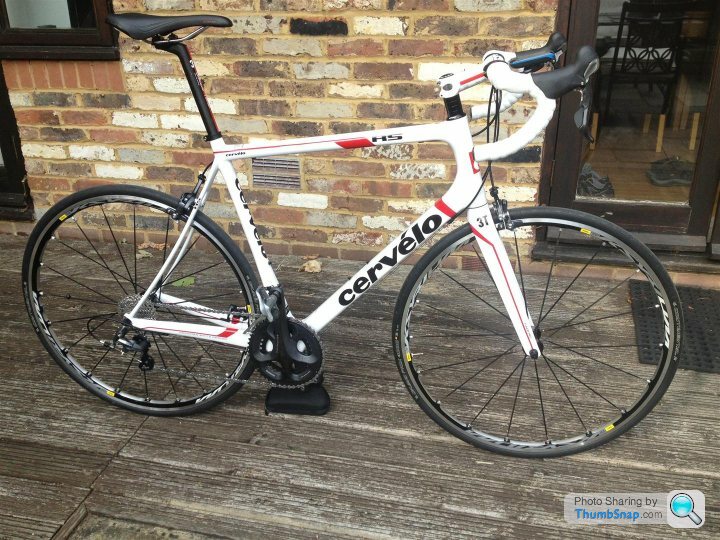
On a side note, how many spacers are on that steerer tube?!...
On a side note, how many spacers are on that steerer tube?!...
pablo said:
interesting, not sure I can afford it and I'm certainly not brave enough to do it myself but it looks like a nice job. Was there anything preventing you from bringing the cable out at the top of the chainstay, it looks tight by the quick release for the rear mech?
On a side note, how many spacers are on that steerer tube?!...
That was an option, but I didn't fancy compromising the chainstay as there is already a hole almost big enough in the alu section at the end which I just opened up a bit. I will definitely need to be careful fitting the rear wheel, and am looking into some kind of solution to 'armor' the cable as it exits. I really don't fancy having to replace that bit of cable as it will be a right PITA to thread and connect back up.On a side note, how many spacers are on that steerer tube?!...
As for the spacers, the photo makes it look worse than it actually is - although it is on the limit of the fork. The fame is probably a smidge small for me (6"3) although the next size up was too big:
This is before conversion with my old 6deg 3T stem
LotusMartin said:
As for the spacers, the photo makes it look worse than it actually is - although it is on the limit of the fork. The fame is probably a smidge small for me (6"3) although the next size up was too big:
I never really understand people's obsession with commenting on spacers. On bikeradar it's the first thing people say. It's not like they are stabilisers.I had a bike fit and they moved the stem up and I also have 4 underneath mine. As a result I'm comfortable when I ride (and therefore go further) and I can use the drops more (and therefore go faster).
I'm not a pro with a slammed stem. I'm a bloke with a bike who enjoys riding it.
pablo said:
Its simply making people aware that having a significant length of steerer tube unsupported can fracture under stress, particularly if you pull on the bars whilst climbing. Its not meant to be sarcastic.
My bike was set up by a Cervelo authorised dealer during a 3 hour long bike fitting session. Have you seen the thickness of the carbon in the steering tube? I hit a pot hole the other day during a decent at nearly 50mph and it seemed to hold up ok, and given I'm 100kg+ I think that says a lot - but thanks for your concern 
LotusMartin said:
After a morning of dismantling, drilling, fishing for string and general tinkering I think I'm most of the way to internally fitting Ultegra Di2 to my Cervelo RS. The hole drilling turned out to be the least of my problems, but I took my time and I think it all worked out.
The bits:
Ultegra Di2 6770 shifters, front and rear mech
Custom made internal wiring harness (e-tube) with internal seatpost battery (eapathome from ebay - although I picked up in person from LA)
Dremel 4000 (essential!)
Hairdryer!
Patience
I picked up the kit from Eugene (eapathome) whilst in LA on business, it was custom made as I didn't fancy cutting holes in my bottom bracket internal chamber (which is the normal method), instead Eugene built me a 4 piece harness that could be threaded through and stored inside the seatpost with cables running up the downtube, down the chainstay and down the seattube for the front mech. I ended up only needing to drill one hole into carbon(under the top tube) and enlarging one hole at the end of the chainstay (alu)
Here is the kit:
My main fear was drilling the hole in the top tube, but Eugene let me have a practice go on a frame off-cut in his workshop and once you've done one (and have the right tools - Demel drill bit and tile grout removal bit) its dead easy.
Not too bad:
After drilling I dismantled and removed the forks and headset and threaded a brake cable through the hole in the chainstay up to the headset (with the bike upside-down so the cable went over the BB. I then pulled through some string using the cable. I then fished the string up the seatpost with a coathanger so I now had string going to the headset and rear derailleur. I also threaded another down the seatpost and out a hole on the back of my BB that was there already and used for the old front mech.
Then I fed through the cables with some cable ties attached to reduce rattles and heatshrunk all the connections with a hairdryer. Added some grommets - put everything back together and its looking pretty decent:
The photos make the mechs look HUGE, but its just the camera angle - I'm very happy.
Gear-change is nothing short of perfect, its neat and no bulky battery All I need is some bar tape and a few finished touches and I'm all sorted.
Eugene Poyorena here...The bits:
Ultegra Di2 6770 shifters, front and rear mech
Custom made internal wiring harness (e-tube) with internal seatpost battery (eapathome from ebay - although I picked up in person from LA)
Dremel 4000 (essential!)
Hairdryer!
Patience
I picked up the kit from Eugene (eapathome) whilst in LA on business, it was custom made as I didn't fancy cutting holes in my bottom bracket internal chamber (which is the normal method), instead Eugene built me a 4 piece harness that could be threaded through and stored inside the seatpost with cables running up the downtube, down the chainstay and down the seattube for the front mech. I ended up only needing to drill one hole into carbon(under the top tube) and enlarging one hole at the end of the chainstay (alu)
Here is the kit:
My main fear was drilling the hole in the top tube, but Eugene let me have a practice go on a frame off-cut in his workshop and once you've done one (and have the right tools - Demel drill bit and tile grout removal bit) its dead easy.
Not too bad:
After drilling I dismantled and removed the forks and headset and threaded a brake cable through the hole in the chainstay up to the headset (with the bike upside-down so the cable went over the BB. I then pulled through some string using the cable. I then fished the string up the seatpost with a coathanger so I now had string going to the headset and rear derailleur. I also threaded another down the seatpost and out a hole on the back of my BB that was there already and used for the old front mech.
Then I fed through the cables with some cable ties attached to reduce rattles and heatshrunk all the connections with a hairdryer. Added some grommets - put everything back together and its looking pretty decent:
The photos make the mechs look HUGE, but its just the camera angle - I'm very happy.
Gear-change is nothing short of perfect, its neat and no bulky battery
All I need is some bar tape and a few finished touches and I'm all sorted.Nice work Martin, not sure I could have done better, just to let people know if they want to contact me directly they can visit me on Facebook at Di2 Seat Post battery kits, and retrofits or email me at Di2diy@gmail.com
LotusMartin said:
My bike was set up by a Cervelo authorised dealer during a 3 hour long bike fitting session. Have you seen the thickness of the carbon in the steering tube? I hit a pot hole the other day during a decent at nearly 50mph and it seemed to hold up ok, and given I'm 100kg+ I think that says a lot - but thanks for your concern
I thought part of the concern was that not having a spacer on to increases the stress further.I'm lucky enough to be relatively flexible - my stem is flipped and slammed (albeit on a cheater sportive geo'd bike). I look well pro, despite be slow and old.
Gassing Station | Pedal Powered | Top of Page | What's New | My Stuff