Tuscan respray and spoiler/splitter adding (care pic heavy)
Discussion


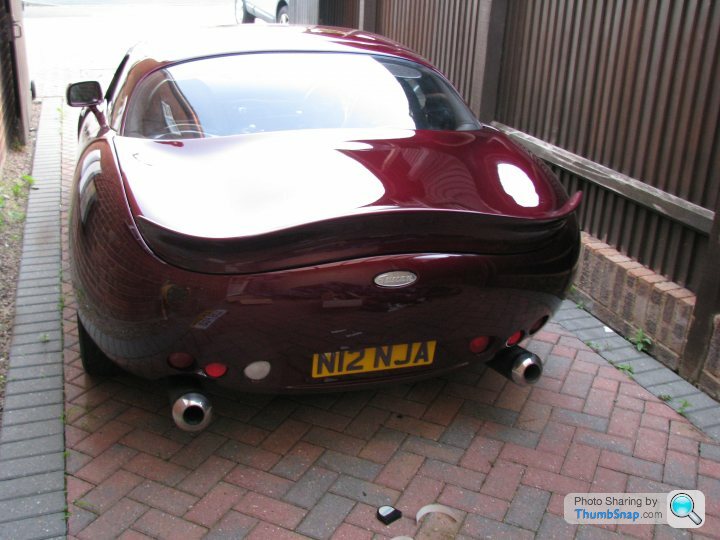
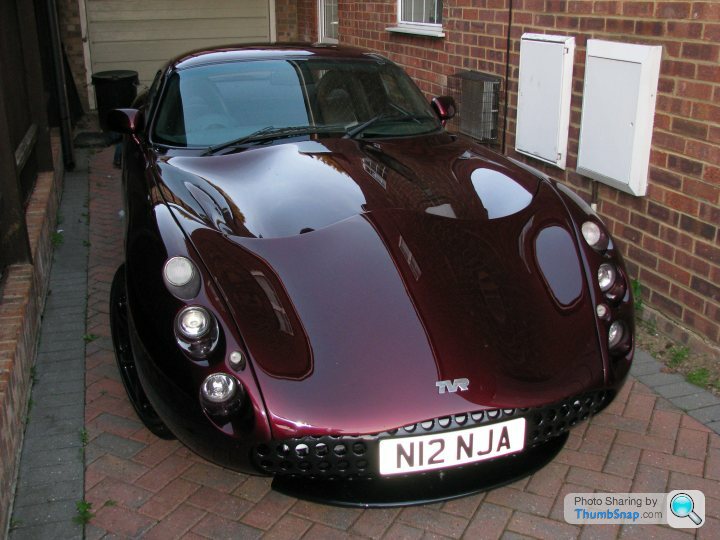
Hi guys - a few mentioned to put a thread for this so anyhow - after buying my first TVR last September (a Tuscan mk1 - non s as I preferred the lights/and more sparse rear) with the intention of trying to get the Tuscan 2 s spoiler fitted on it (as I love the flamboyance and continuing the theme of keeping the flowing lines along the rear). Fitted the standard splitter at the front as again I find it more flowing than the wingtips. Obviously this is a personal choice and I'm sure lots would prefer the standard s look and that's great because variety is the spice of life!
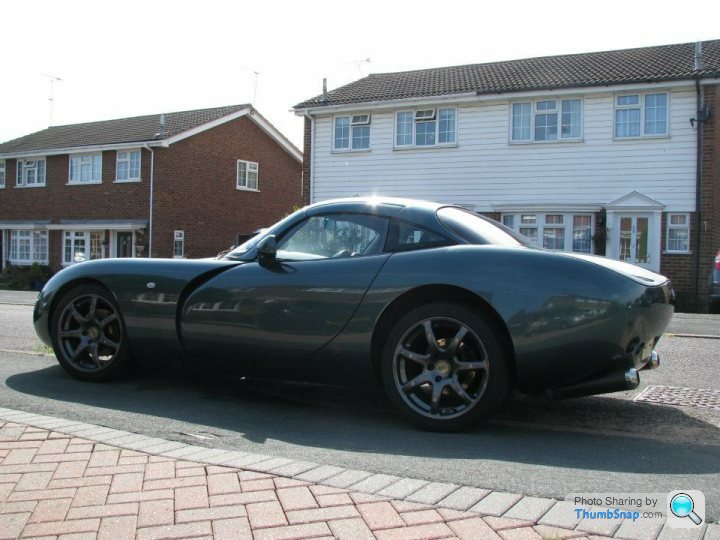
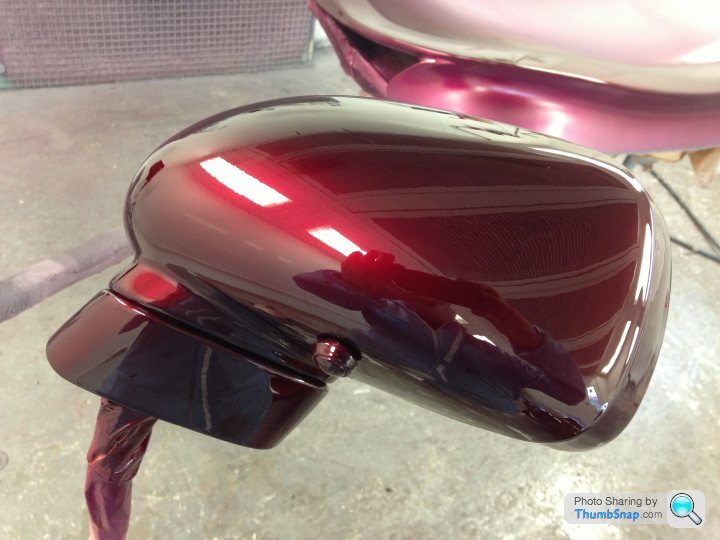
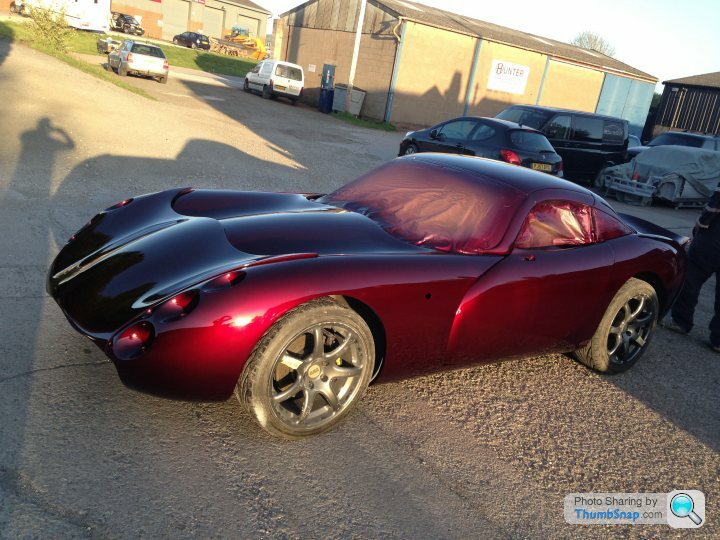
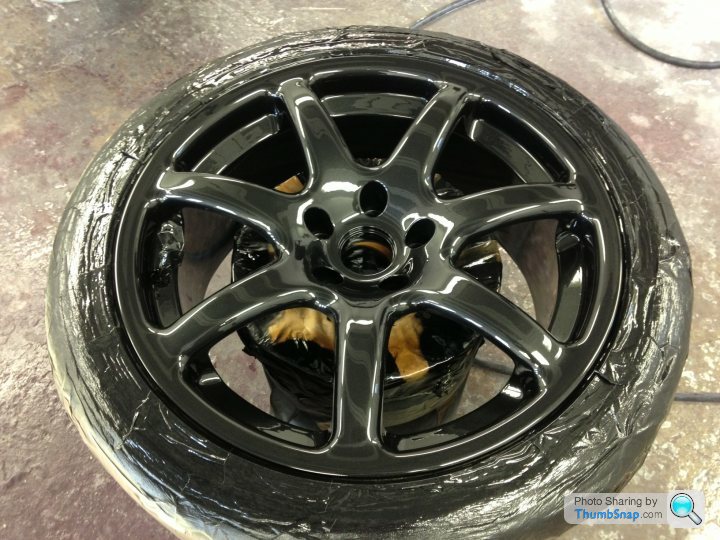
The colour I wanted was a dark red candy so it goes down to almost black in shadow and red in light again to emphasize curves. I then wanted to keep the pepperpot (as I like it's bullet hole style connotations makes it seem aggressive) - but to change it to anthracite/same with the front splitter and wheels so they'd all match.
After doing some research I found Ryan at SP Automotive was highly thought of and he then set about spraying out some 30 odd samples of varies candy combinations until I found the one I was looking for (closest I could liken it to to describe what I was imagining to others was "Iron Man" red, which then kinda stuck.
Anyhow some pics ~
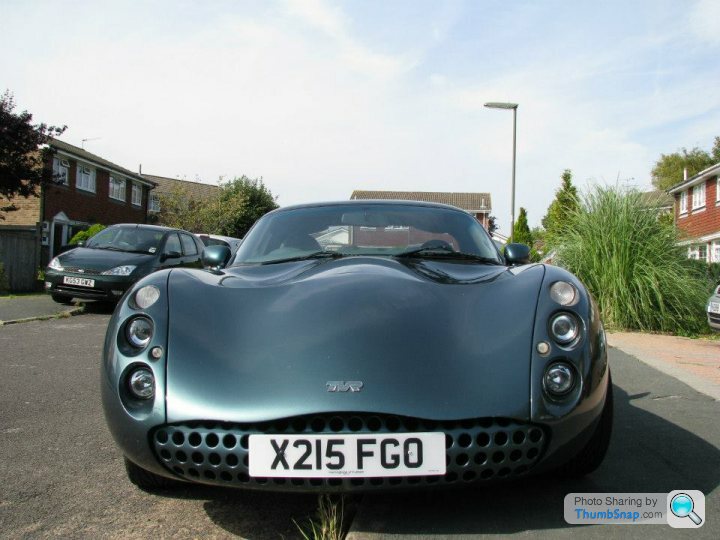
Before
Me trying to poorly photoshop an idea of how I wanted it - with the normal badge position filled in so the spoiler is all smooth
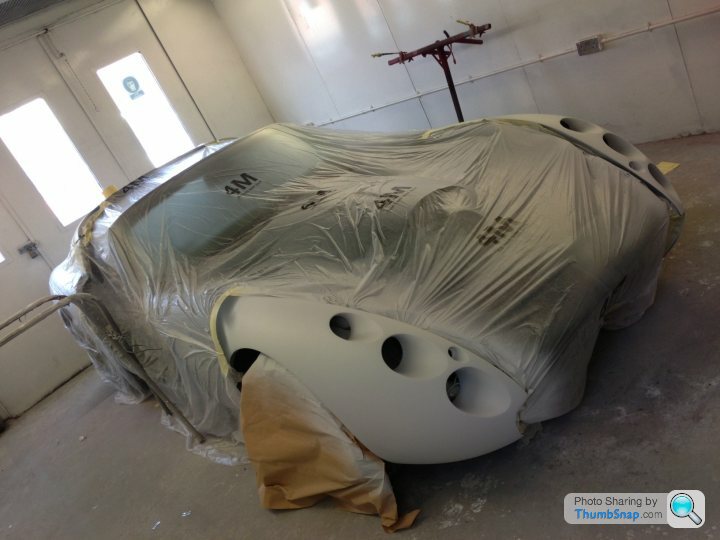
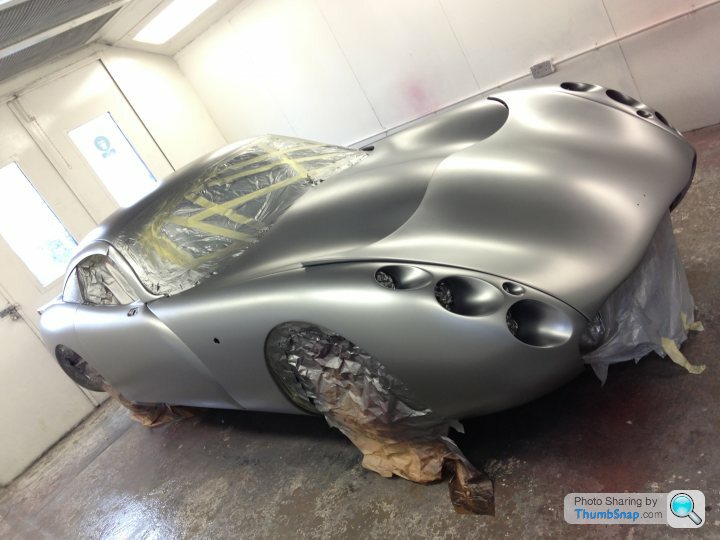
The operation begins!
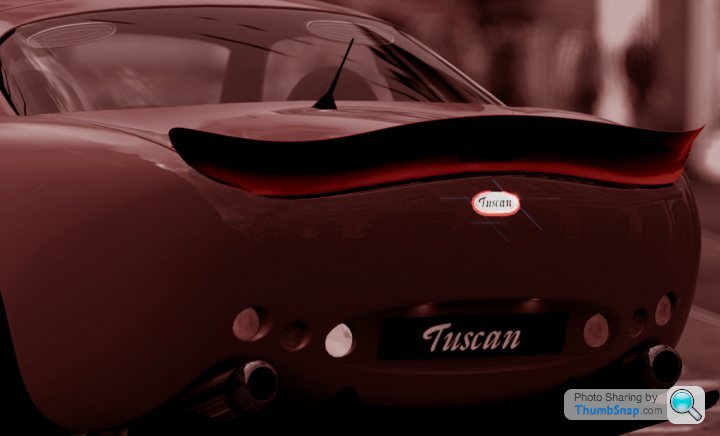
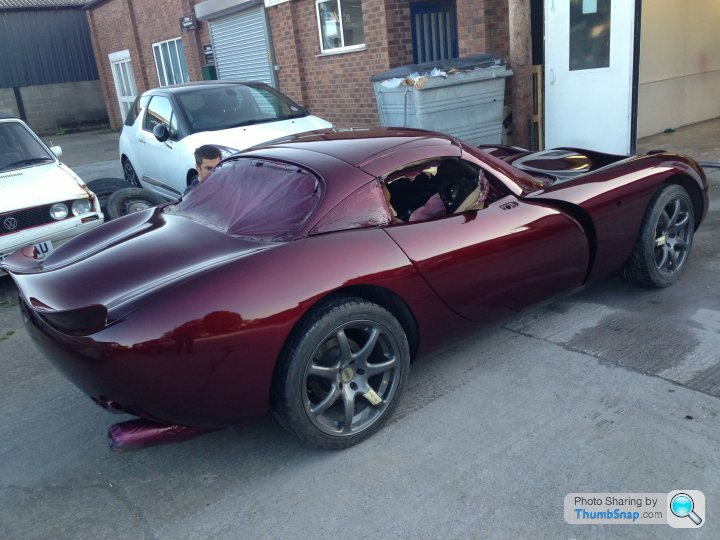
Was first trying to source a 2 s bootlid but this proves super hard - and noone seems to have the mould for one. In the end TVR power managed to get hold of just the spoiler part.
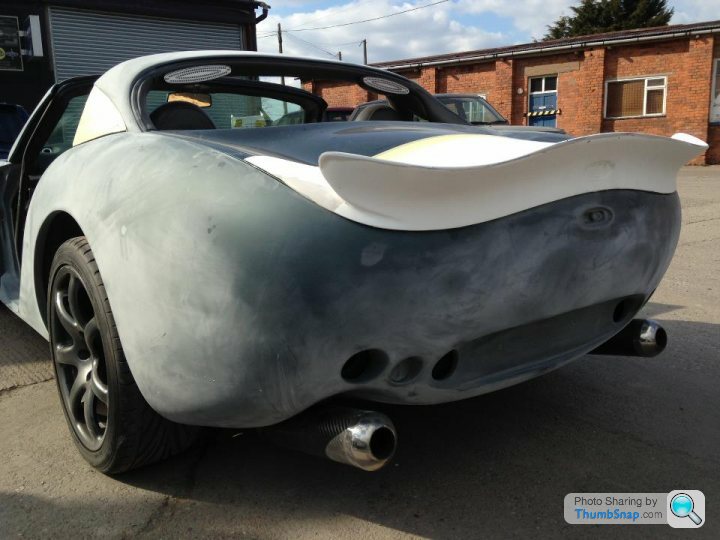
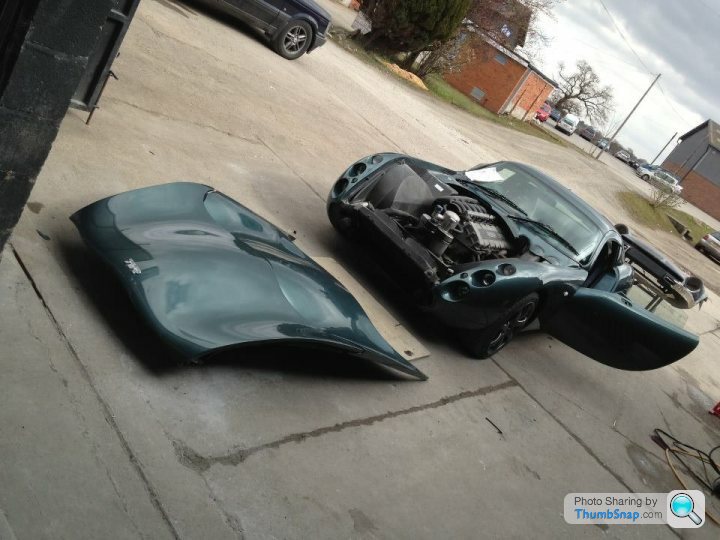
All the filling begins! This took quite a bit of Ryan's time - I didn't realise the filling/sanding wasn't included in respray price so be sure to budget for it if anyone else is planning to respray (came to approx 1k extra not including spoiler work)
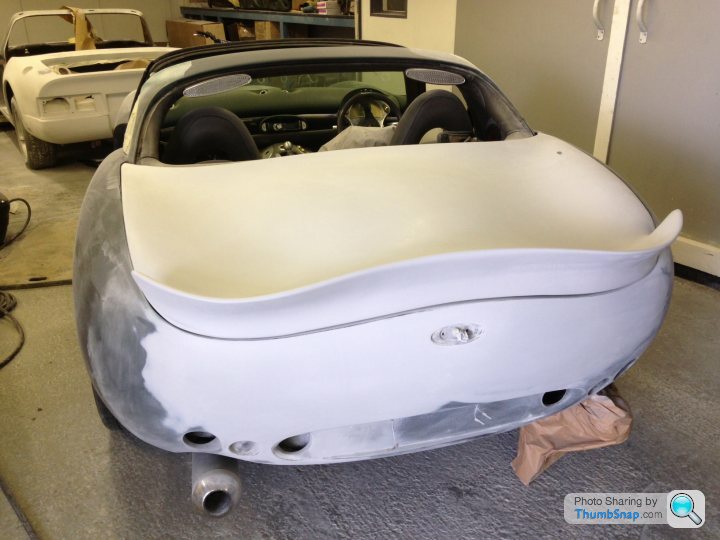
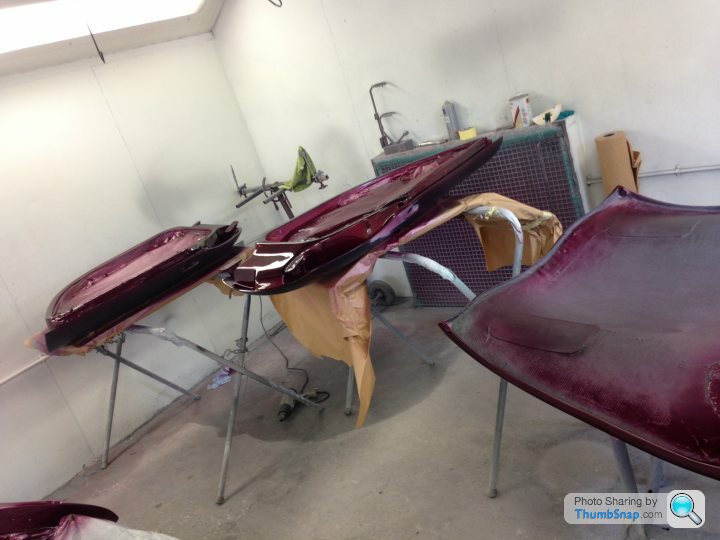
At this point I realised normal anthracite was not dark enough for the depth of colour being achieved so the plan switched to a darker anthracite that luckily Ryan had to hand.
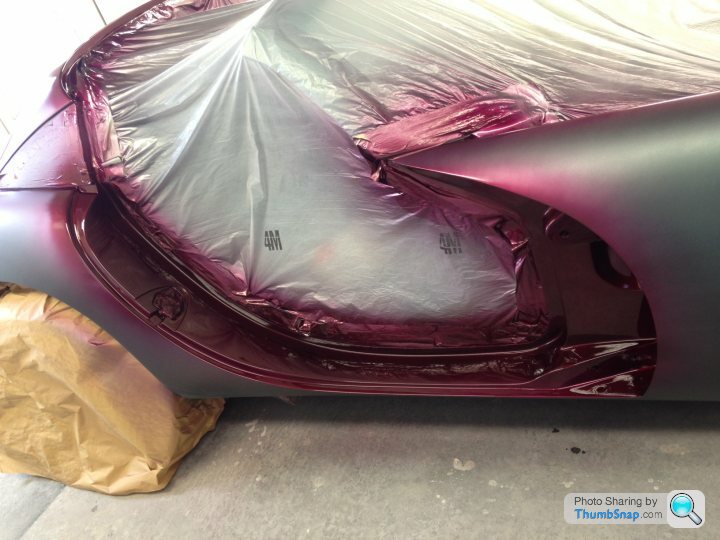
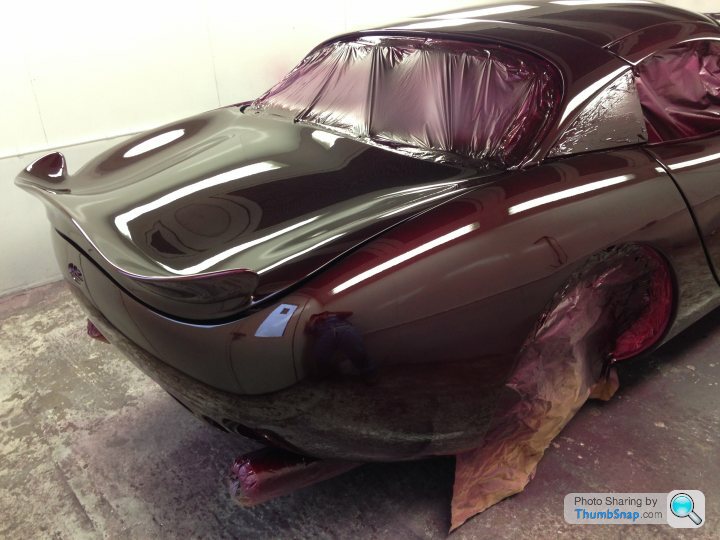
Avengers Assemble ~
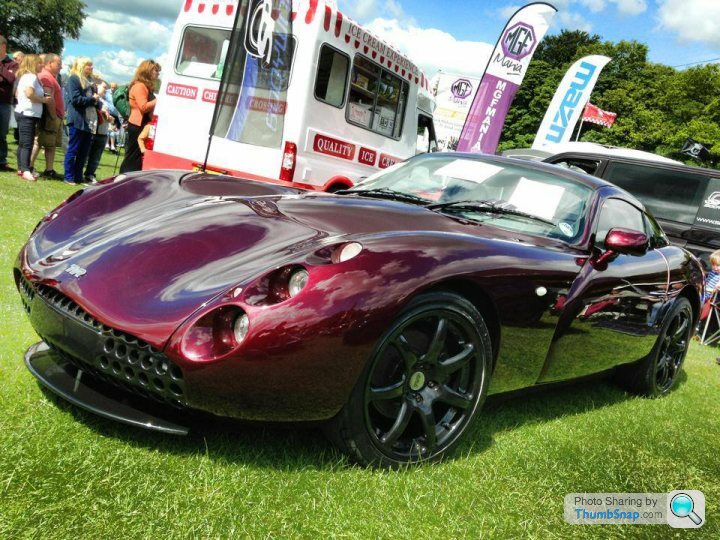
And finally popped my plate on it (I'm into martial arts..it's just a bit of fun and makes me smile, for those who are so opposed to personalised plates, sorry - try not to have a seizure
Unfortunately Ryan's normal detailer was unavailable so I need to polish it up to remove cobwebs and give it a nice wax + get it in the sunlight (was setting by the time I got home).
Anyhow hope to see you all around and hope you enjoyed the pics! =)
Now I just have to sort out my interior!
The colour I wanted was a dark red candy so it goes down to almost black in shadow and red in light again to emphasize curves. I then wanted to keep the pepperpot (as I like it's bullet hole style connotations makes it seem aggressive) - but to change it to anthracite/same with the front splitter and wheels so they'd all match.
After doing some research I found Ryan at SP Automotive was highly thought of and he then set about spraying out some 30 odd samples of varies candy combinations until I found the one I was looking for (closest I could liken it to to describe what I was imagining to others was "Iron Man" red, which then kinda stuck.
Anyhow some pics ~
Before
Me trying to poorly photoshop an idea of how I wanted it - with the normal badge position filled in so the spoiler is all smooth
The operation begins!
Was first trying to source a 2 s bootlid but this proves super hard - and noone seems to have the mould for one. In the end TVR power managed to get hold of just the spoiler part.
All the filling begins! This took quite a bit of Ryan's time - I didn't realise the filling/sanding wasn't included in respray price so be sure to budget for it if anyone else is planning to respray (came to approx 1k extra not including spoiler work)
At this point I realised normal anthracite was not dark enough for the depth of colour being achieved so the plan switched to a darker anthracite that luckily Ryan had to hand.
Avengers Assemble ~
And finally popped my plate on it (I'm into martial arts..it's just a bit of fun and makes me smile, for those who are so opposed to personalised plates, sorry - try not to have a seizure
Unfortunately Ryan's normal detailer was unavailable so I need to polish it up to remove cobwebs and give it a nice wax + get it in the sunlight (was setting by the time I got home).
Anyhow hope to see you all around and hope you enjoyed the pics! =)
Now I just have to sort out my interior!
 king awesome! What a colour!
It looks SUPERB, love the colour and the spoiler.
But
How the hell can you quote a price for a respray and then say the preparation and sanding was extra!!! And then get a bill for a grand more than you were expecting.
It looks like a cracking job but if I collected my car and got hit for an extra £1K I wasn't expecting it would leave a bad taste.
But
How the hell can you quote a price for a respray and then say the preparation and sanding was extra!!! And then get a bill for a grand more than you were expecting.
It looks like a cracking job but if I collected my car and got hit for an extra £1K I wasn't expecting it would leave a bad taste.
Dischordant said:
The normal prep and sanding of the paint was included but my bodywork had some cracks in it/sanding exposed holes in places so alot of time had to be spent filling/drying/sanding/..new cracks found to have appeared then prime, more cracks exposed etc.
I had the same when Ryan did mine. Looks fantastic!

Dischordant said:
hmm - it would have been nice for him to mention before there will be a cost between x and y for bodywork. How long did yours take s6? I had some problems with slipping deadlines. We were meant to go through paint samples between December and February (before I dropped off the car) but he didn't send me any until March once he had the car. That then delayed everything that followed. The colour ended up being decided by 8 weeks ago - then picked the car up today.
Probably best to discuss offline if you want to know.

Repaint 2800
Wheels 260
Glassing on spoiler 475
Fibreglass Repairs/fitting front splitter Approx 1000
Total:4600 SP Auto
Spoiler from TVR Power 232
Front Splitter and bracket from TVR Power 190 (thought it would be cheaper than this)
Total:422 TVR Power
Approx 500 for paint.
Grand Total..5500 ..youch! Never fun math to do but hopefully helpful to others to budget accordingly! =)

His fibreglass work is literally top notch/factory standard imo. 5* (of 5)
Painting is very good imo 4.5* - he had some issues with continuity on the candy paint (candies are much more difficult to paint than most colours, as they aren't actual paints just a thin clear dye that goes over paint)- he finds the tvr colours flip paints easy enough though and normal paint jobs would be childsplay to him) - as a result he had to paint over with black on some of joining sections that you can't see from outside (so thin line of black just inside doors - under service bonnet etc.). There is a bit of overspray I need to remove from just under my door mirrors - no orange peel on the car panels you can see - tiny bit below rear (out of sight) and behind number plate on rear. Some small bubbles have formed on the scuttle panel on the right hand side.
Cost 4.5* - Good value for money - I'm very happy with the final result - didn't charge for some things he could have done if he was purely in it for the money.
Transparency of costs 4* - should let people know of additional cost of his filling etc. before the job - though again - he does spend alot of time doing this and has incredibly high standards for it so he probably spends more time on this than many places would.
Project Management 2 - Mine was fiddly due to issues with the colour I wanted basically not existing before - had to find the right combination of base coat/ candy / number of layers of candy until it was what I was after. Quite a few deadlines kept slipping and others have found the same can happen so ensure you leave plenty of time.
Personability 5* - Top chap.
Hope this seems fair/non bannable!
Oh and yes all prices include vat! (seriously how many people don't have to pay vat?!)
Yes interior next (once I can afford it - already mentioned to Dave about getting the carpets done) but first I need to get her to Str8six for a major service to ensure everything is ok mechanically.
I'm in the process of creating some carbon fibre/stainless steel TVR wheel centres - will post how it goes in another thread once I've created them incase anyone else interested.
Edited by Dischordant on Thursday 6th June 14:22
Edited by Dischordant on Thursday 6th June 21:02
Wow - you went all out with your interior - looks brill! I'm going to be going the cheap route - probably have a go at dying it using furnitureclinic so it matches the dark anthracite as the leather is fine quality wise just needs scuff repair and redye.
Carpets though I don't want the headache of doing myself, it just doesn't seem worth it!
Carpets though I don't want the headache of doing myself, it just doesn't seem worth it!
Gassing Station | Tuscan | Top of Page | What's New | My Stuff