Penny resin floor
Discussion


Funnily enough was thinking this when considering my bathroom. I said to Mrs Paolow - what about this - look this guys done it.
Her - yeah - "I like it but it wont go with the light chrome/light grey/dark grey colour scheme"
Me - "true (joking) well lets use 10p pieces then"
Her - "erm - yeah that would work"
Me "..."
I think I might be onto something.....
Edit:
Fag packet maths - wed need 2500 10p pieces which would hardly break the bank when you consider the Amtico etc route wed otherwise go down....
Food for thought - will make up a box and put ten pees in and cover in resin to see what it looks like...
Edited by paolow on Wednesday 1st April 18:38

As Tonker has said, I have done it.
You will need:
- black masonry paint
- lots of pennies (don't try and clean them)
- black silicone to stick them down
- UV stable epoxy resin as featured in this guide http://www.elichem.co.uk/images/document/Hippodrom...
Thoroughly clean the floor, paint it with black masonry paint, stick the pennies down with a tiny dab of black silicone.
The pouring of the resin is the critical bit as it has to be done in one hit, therefore you need to be absolutely sure you have enough to get sufficient depth. The suppliers told me I needed a certain amount but it didn't seem anywhere near enough according to my maths, so I am glad I ordered more. It is poured in on do and self levels eventually. You need to baby sit it with a blow torch to get any air bubbles to rise to the surface and pop. Just don't get the blowtorch too close or it will burn it.
Providing you do everything properly it needs no further finishing and we have found it to be very hard wearing after a year. I think it looks great and it makes a real feature of the room, a big talking point.
The pennies for ours worked out at about £44 and the resin was about £220, for an area of about 1.5m2, so it is actually quite expensive at around £125 per square meter. On a small floor it's well worth it. On a large floor area it will get expensive and will become more difficult. You would have to make sure the floor was perfectly level, that you had enough resin to use in one hit and getting the bubbles out will be difficult (I had to use a blow torch mounted on a stick)
Let me know if you need any more tips.
http://www.elichem.co.uk/p-15-general-purpose-clea...
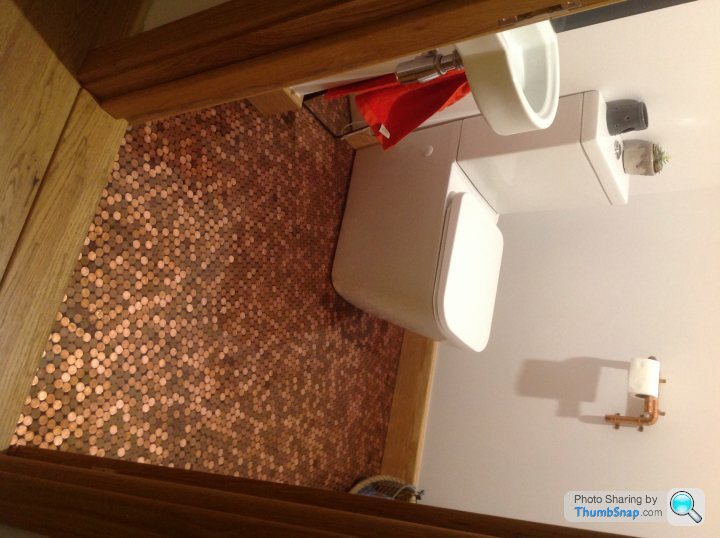
That's the stuff I used.
Here's what it looks like, excuse the poor quality, it's from the iPad.
That's the stuff I used.
Here's what it looks like, excuse the poor quality, it's from the iPad.
Muncher said:
As Tonker has said, I have done it.
You will need:
- black masonry paint
- lots of pennies (don't try and clean them)
- black silicone to stick them down
- UV stable epoxy resin as featured in this guide http://www.elichem.co.uk/images/document/Hippodrom...
Thoroughly clean the floor, paint it with black masonry paint, stick the pennies down with a tiny dab of black silicone.
The pouring of the resin is the critical bit as it has to be done in one hit, therefore you need to be absolutely sure you have enough to get sufficient depth. The suppliers told me I needed a certain amount but it didn't seem anywhere near enough according to my maths, so I am glad I ordered more. It is poured in on do and self levels eventually. You need to baby sit it with a blow torch to get any air bubbles to rise to the surface and pop. Just don't get the blowtorch too close or it will burn it.
Providing you do everything properly it needs no further finishing and we have found it to be very hard wearing after a year. I think it looks great and it makes a real feature of the room, a big talking point.
The pennies for ours worked out at about £44 and the resin was about £220, for an area of about 1.5m2, so it is actually quite expensive at around £125 per square meter. On a small floor it's well worth it. On a large floor area it will get expensive and will become more difficult. You would have to make sure the floor was perfectly level, that you had enough resin to use in one hit and getting the bubbles out will be difficult (I had to use a blow torch mounted on a stick)
Let me know if you need any more tips.
Muncher. That looks fantastic.You will need:
- black masonry paint
- lots of pennies (don't try and clean them)
- black silicone to stick them down
- UV stable epoxy resin as featured in this guide http://www.elichem.co.uk/images/document/Hippodrom...
Thoroughly clean the floor, paint it with black masonry paint, stick the pennies down with a tiny dab of black silicone.
The pouring of the resin is the critical bit as it has to be done in one hit, therefore you need to be absolutely sure you have enough to get sufficient depth. The suppliers told me I needed a certain amount but it didn't seem anywhere near enough according to my maths, so I am glad I ordered more. It is poured in on do and self levels eventually. You need to baby sit it with a blow torch to get any air bubbles to rise to the surface and pop. Just don't get the blowtorch too close or it will burn it.
Providing you do everything properly it needs no further finishing and we have found it to be very hard wearing after a year. I think it looks great and it makes a real feature of the room, a big talking point.
The pennies for ours worked out at about £44 and the resin was about £220, for an area of about 1.5m2, so it is actually quite expensive at around £125 per square meter. On a small floor it's well worth it. On a large floor area it will get expensive and will become more difficult. You would have to make sure the floor was perfectly level, that you had enough resin to use in one hit and getting the bubbles out will be difficult (I had to use a blow torch mounted on a stick)
Let me know if you need any more tips.
How much did the floor raise when you had finished?
How long did the resin take to dry and how long did you have to babysit it?
Thanks
N
About 10mm. It is touch dry after 24 hours from memory but I left it about 5 days just to be on the safe side. You need to make sure it is free of dust and you will need some brand new clean buckets to mix the epoxy in. The two ratios need to be exact or it won't set.
I babysat it for about an hour, spot a bubble, heat it with the blowtorch, it rises to the surface and pops, then on to another.
I saw on Pinterest a really smart diamond pattern using pennies which looked good.
I forgot to mention you need to make sure it doesn't escspe when poured so I made a watertight well with silicone.
Muncher said:
About 10mm. It is touch dry after 24 hours from memory but I left it about 5 days just to be on the safe side. You need to make sure it is free of dust and you will need some brand new clean buckets to mix the epoxy in. The two ratios need to be exact or it won't set.
I babysat it for about an hour, spot a bubble, heat it with the blowtorch, it rises to the surface and pops, then on to another.
I saw on Pinterest a really smart diamond pattern using pennies which looked good.
I forgot to mention you need to make sure it doesn't escspe when poured so I made a watertight well with silicone.
SuperI babysat it for about an hour, spot a bubble, heat it with the blowtorch, it rises to the surface and pops, then on to another.
I saw on Pinterest a really smart diamond pattern using pennies which looked good.
I forgot to mention you need to make sure it doesn't escspe when poured so I made a watertight well with silicone.
Thanks Muncher for your help!

Gassing Station | Homes, Gardens and DIY | Top of Page | What's New | My Stuff