A Stitch in time ... MG ZS 120+ Cylinder Head Gasket Renewal
Discussion


A STITCH IN TIME ~ SAVES NINE !!
A favourite saying of my old granny who used to say it to me over fifty years ago when I was a little nine year old lad. She died shortly after that but, her advice was very good and has stood me in good stead on many an occasion.
I bought this MG ZS 120+ new back in May 2003 ~ close on six years ago. Recently, there has been a progressive loss of coolant requiring ever more frequent topping up but, not large amounts of coolant needed to be added. No obvious signs of Cylinder Head Gasket ( CHG ) damage anywhere or other reason for coolant loss despite frequent checks. The car has only covered 41,500 miles, mostly driven by my wife Linda. So, as the car is six years old, and in the absence of any positive signs that the gasket is damaged, I decided to adopt the stitch in time advice and change it anyway ~ I've done many cylinder head gasket renewals over the years on various cars and even a few motorcycles. I've changed a 16 valve K-Series CHG before when a friend's car needed it and found the job an easy one. Indeed, the K-series for a number of reasons is one of the easiest 16 valve engines to work on, particularly for the non~professional with limited resources. So I made a start. The following assumes such things as timing belt replacement 'how to' advice and guides are available elsewhere so will not be covered in any great detail. However, before starting work, get the engine in a 'safe' working condition. That is with the index on the CRANKshaft pulley at the 12 O'Clock index position. Then all four pistons will be halfway up/down the bores with no. 1 piston at 90 degrees before top dead centre ( BTDC). All this is described in much better detail elsewhere here on RT.net
So let's make a start:~

Coil pack cover removal ~ each of the two coil packs are held by two 8mm bolts. The plug covers were a very tight fit over the spark plugs and needed careful power to remove.
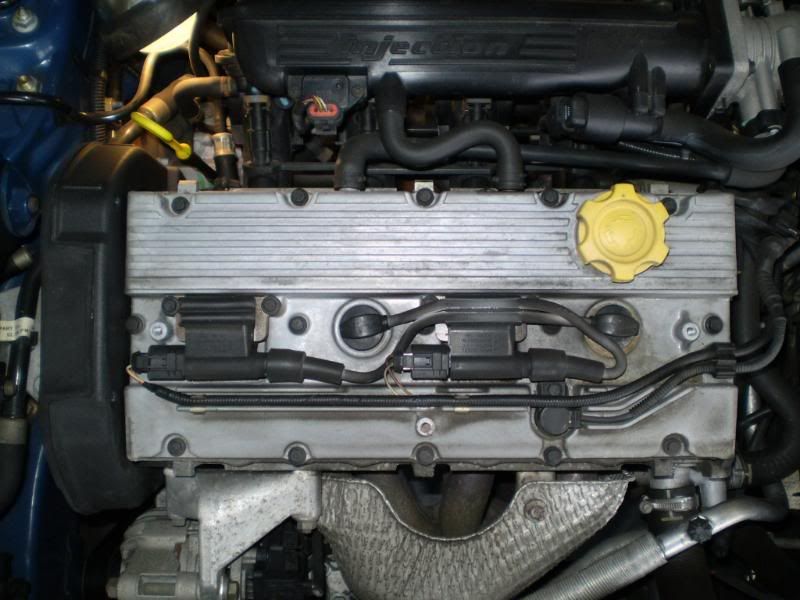
Fifteen 8mm Bolts hold the camshaft cover and baffle plate/gasket in place. Note where the heat has lifted much of the paint near the hotter exhaust side of the baffle plate. Not nice ~ the car has never overheated so that is not suitable paint for that area.
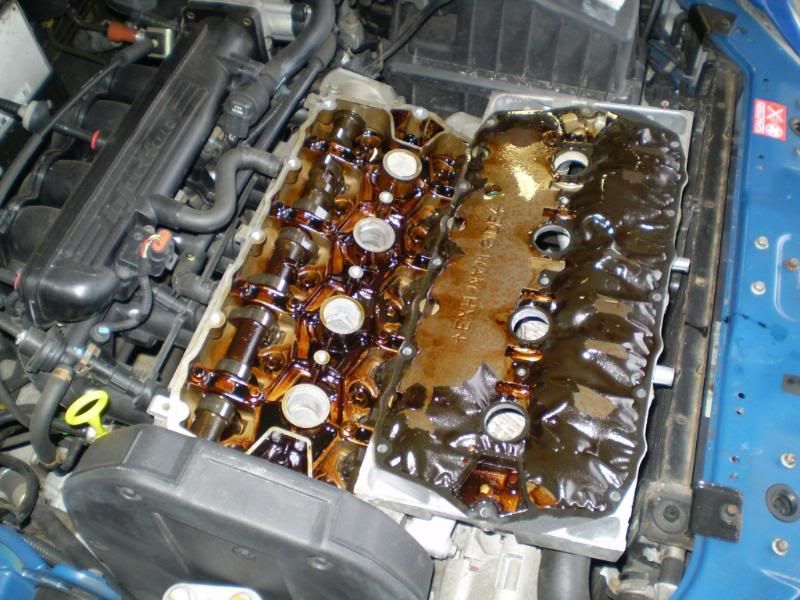
Five 8mm bolts secure the top of the timing cover ~ all need to be removed.
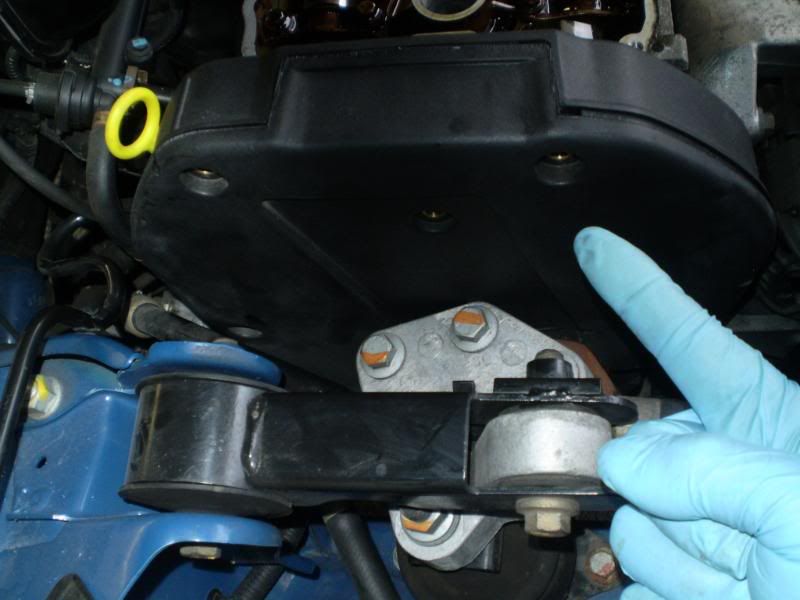
The bottom of the timing cover is secured by a single 10mm bolt which only needs to be undone three turns or so as the hole it's located in is a downward facing slot, not and enclosed hole. Then the cover can be lifted but, it's a very tight fit and needs careful persuasion to lift out without damage. This one was such a tight fit that I removed the engine mount assembly there to allow more access ~ having supported the engine with a jack and blocks of wood other wise it will drop down. With the timing cover removed and the Camshaft Pulley locking tool inserted, I undone the two 17mm bolts securing the cam pulleys and prised them off the cam shafts. There are two more small ( 8mm) bolts holding the [u]inside[/u] timing belt cover to the head ~ remove those ~ they were covered by the camshaft pulleys.

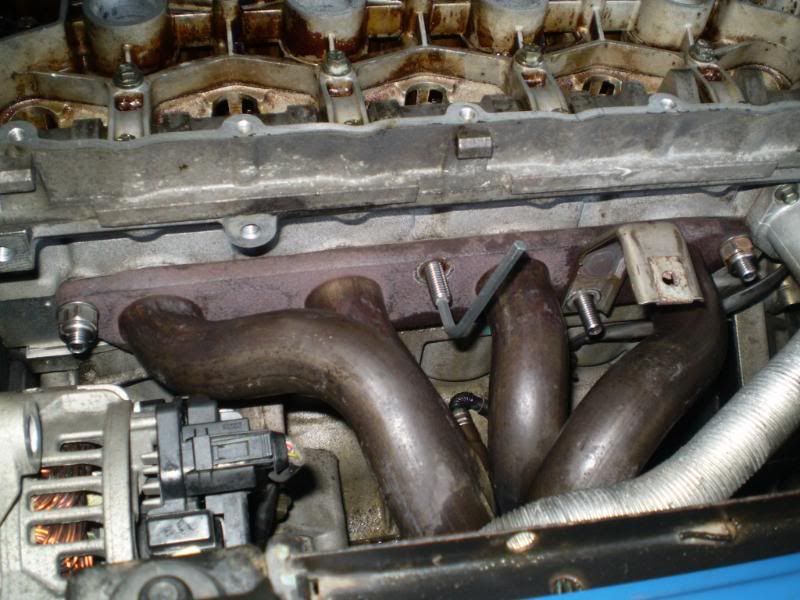
I started to remove the five exhaust manifold stud nuts ~ all five were corrosion seized on their studs and so came out as one piece ~ which saved me the job of removal as they were to be replaced by stainless steel allen key studs with locking nuts I got off ebay for £16.50p incl. p/p ... money well spent as they are superior to the OE jobbies which are more difficult to fit with the engine still in the car. Fitted them to a few cars now ~ much better job and money well spent. Pictures later on.
The ten through bolts were all removed and stored in sequence as shown in the next picture.


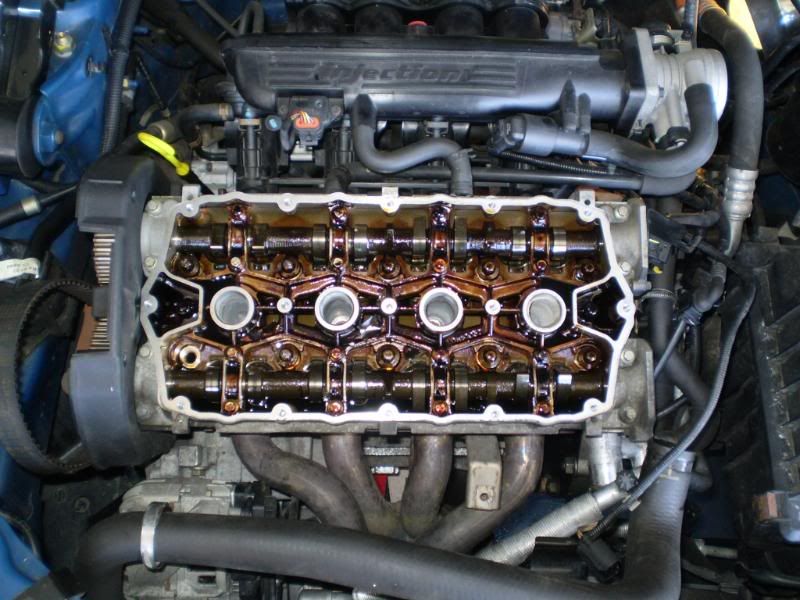
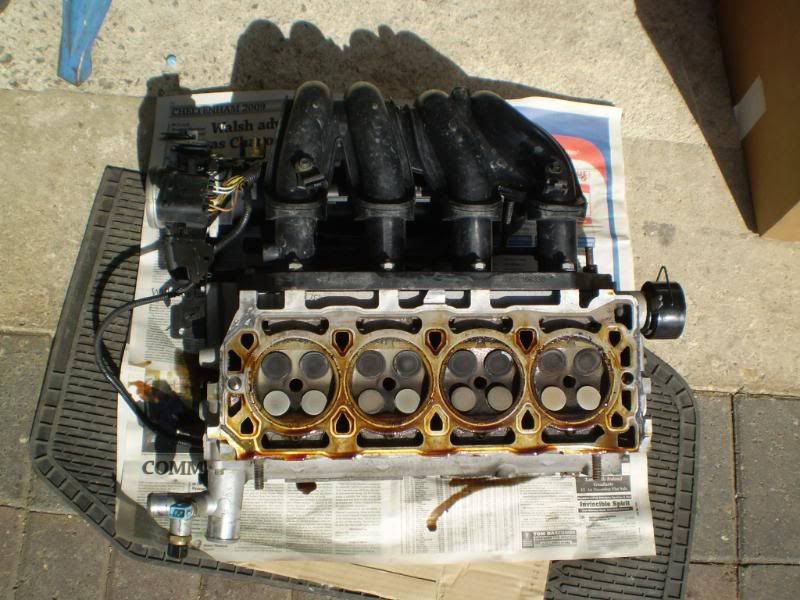
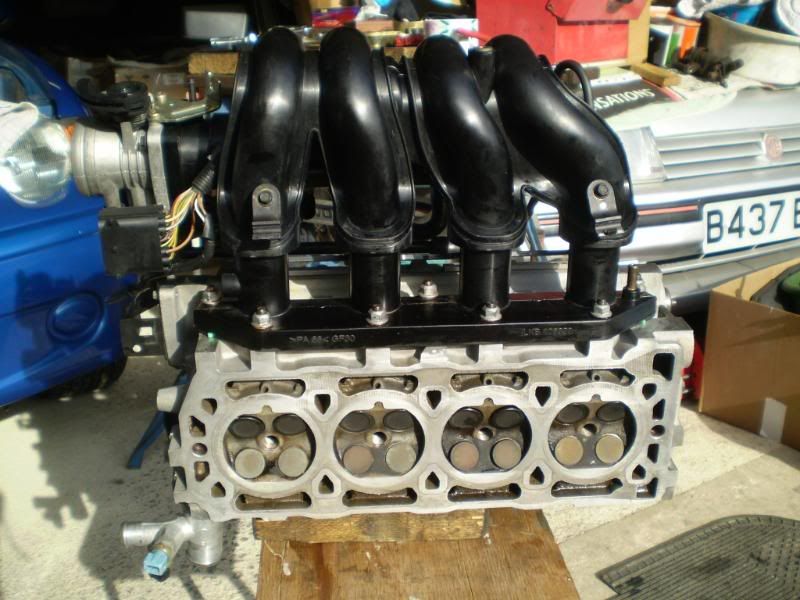
After disconnecting all the hoses, fuel supply, throttle cable, brake vacuum hose and all various electrical connectors, a hefty lift and up came the cylinder head assembly with the inlet plenum still attached. the main advantage with these plastic inlet plenums is lightness. I would not attempt that with the equivalent much heavier T16 engine assembly without a lifting crane. My back wouldn't take it..
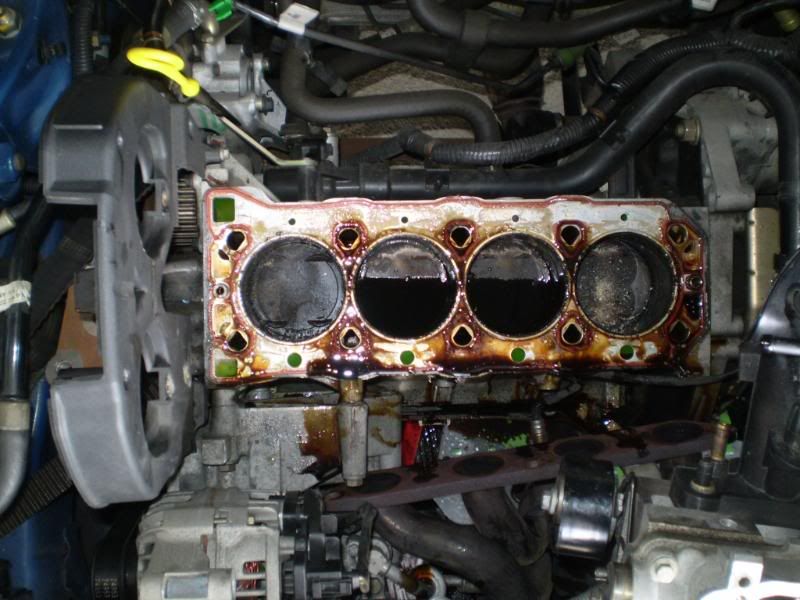
The old gasket was in very good condition ~ only slight evidence of damage around two of the elastomer seals which enclose the through bolt holes. Two of these small five sided seals were 'disturbed' a little, sufficient to allow coolant down the through bolt holes ~ the threads at the bottom of these two through bolts were filled with the yellowish 'mayonnaise' ~ emulsified coolant and oil. That was the only evidence of coolant-oil mix. The cooling system and engine coolant passageways had almost no evidence of emulsification. I spent half an hour cleaning the block surface. Then turned my attention to the cylinder head giving that a really good clean, using a powerful garden hose to flush out all that flaking gasket paint after soaking the whole in engine degreasant using a mist sprayer obtained from a local garden centre ~ about £2 .. I boiled up two kettles of water and poured that over the head after more engine degreasant spraying and it came up really well.
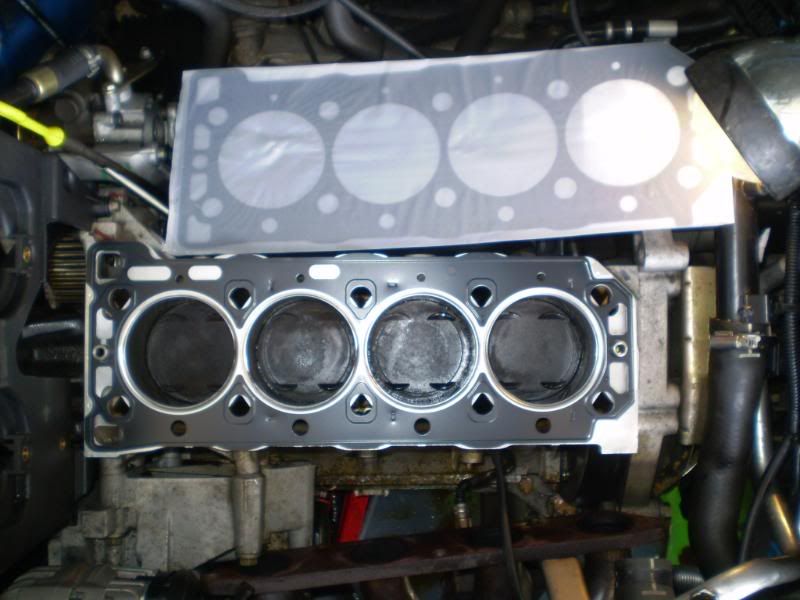
I always use the MLS CHG and head saver shim now ~ so does my son on his and friends' K series cars. No problems so far. It is VERY important to thoroughly clean up the block and head interfaces on any engine prior to fitting a new CHG. Even a small bit of dirt there can undo all your good work so be thorough with the cleaning. It pays dividends in the long run.

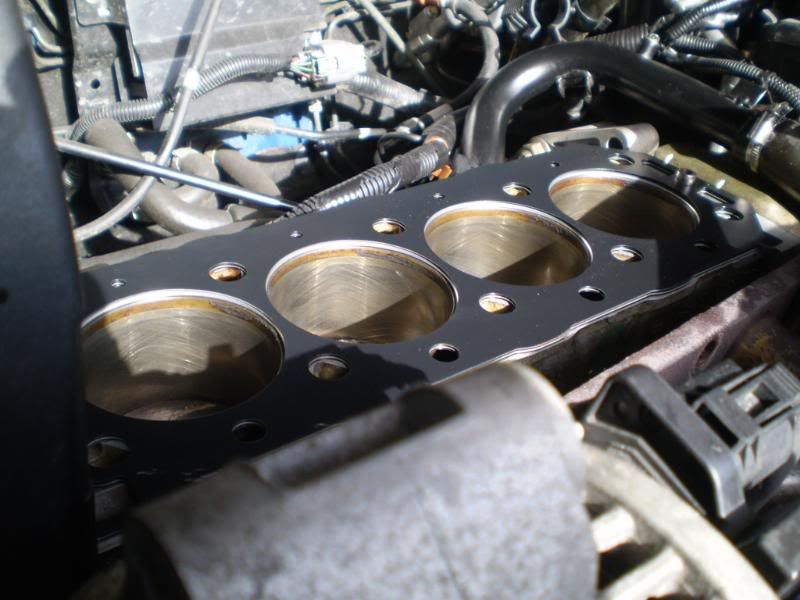
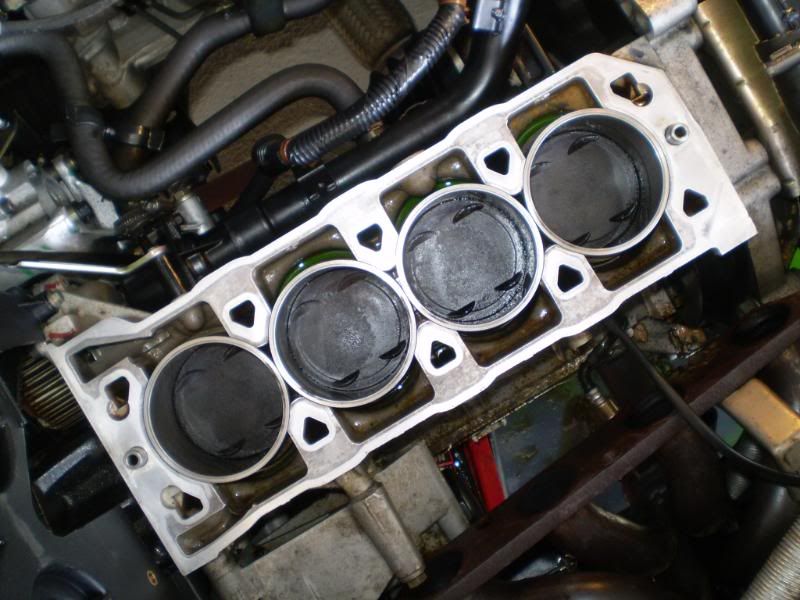
I took this picture to show the honing still very apparent in the bores even after 41,500 miles!
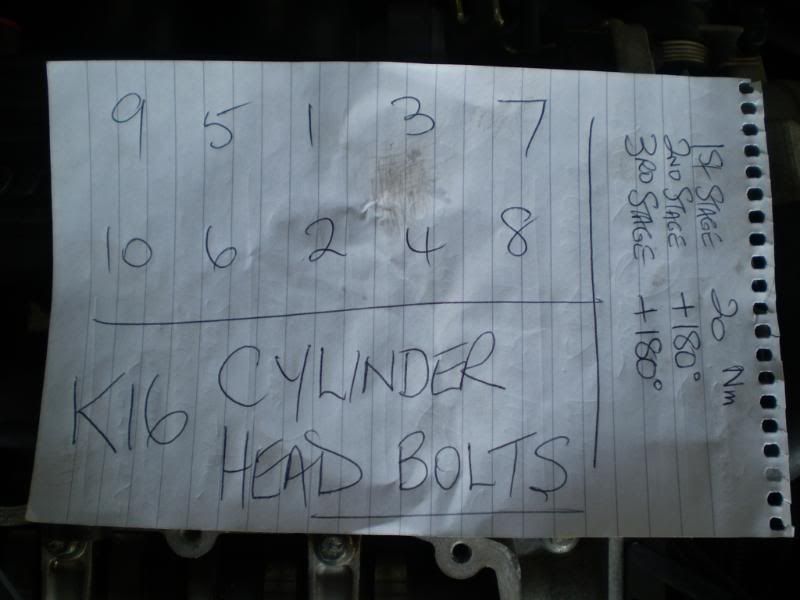
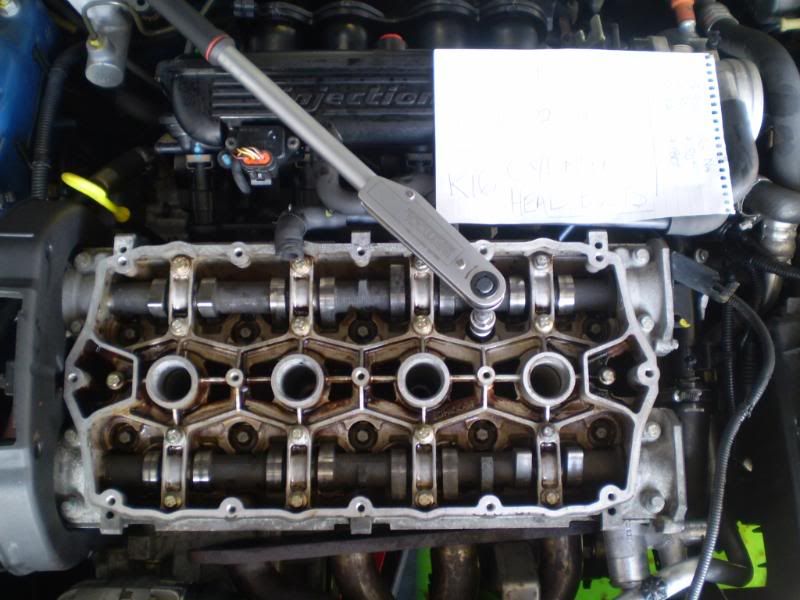
I used this torque setting and tightening sequence for the through bolts on reassembly.
These are the stainless steel exhaust manifold studs used to replace the corrosion welded OE ones.
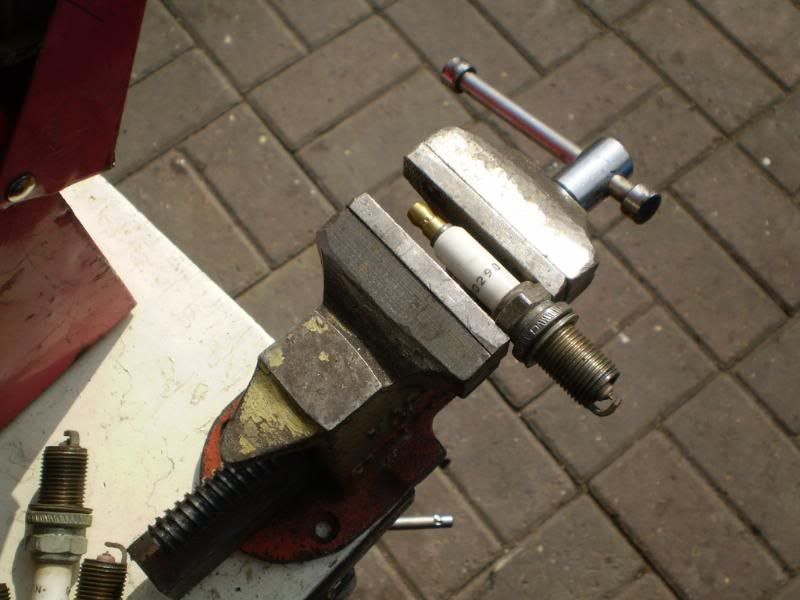
I also cleaned up the four spark plugs ~ they were the type with the very fine pin central electrode. Looked in perfect condition so were not replaced.
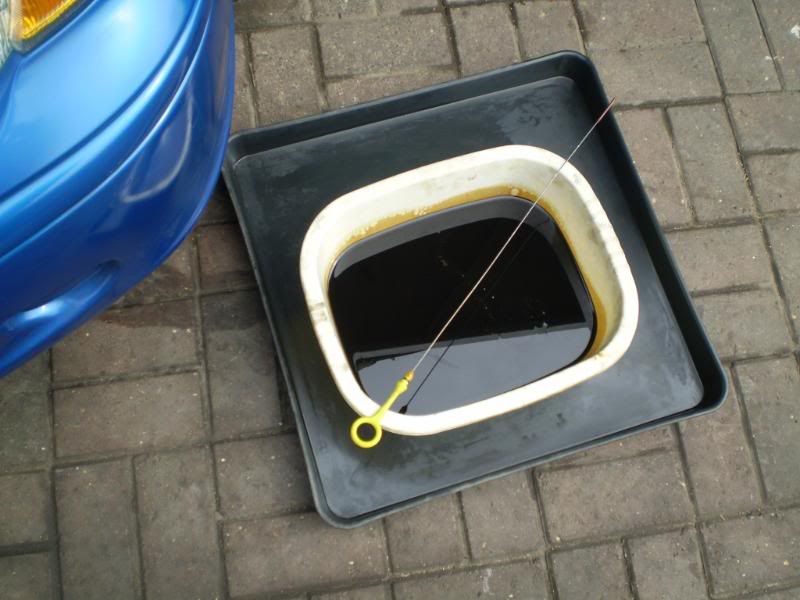
I also drained the engine oil ~ it was about 5,000 miles old and as can be seen from this picture, the oil was still in good condition with no sign of any cross contamination with engine coolant.
WARNING ~ do not replace and align the timing belt in poor light conditions ~ that's a recipe for mistakes and I made one. What I did do right was turn the engine over manually by hand with a 22mm socket on the crankshaft pulley bolt at least three times ~ all clear with no metal contact or noises. However, somehow in the poor light, I got one of the pulleys 180 degrees out so when I turned the fully assembled engine over on the starter confident of a first time start, the engine simply spun over and did not run. I knew immediately what I may have done wrong and so it proved. One further hour later, with both CAMshaft pulleys correctly indexed and aligned with the CRANKshaft pulley and timing belt fitted, this time it did start immediately.
It was so dark by the time I had finished that a fine Brimstone moth came into the garage and settled on a tyre. I caught it in a clean jam jar and released it into the garden. I like my cars and am a keen car enthusiast, but, my main interests in life apart from my family, is Natural History... I took a picture of the moth before capture and release in a dark part of the garden ~ pretty thing:~

I completed the whole job working at a leisurely pace over the Easter weekend. I took my time as I cleaned all the stuff as I worked including a thorough flush of the whole cooling system ~ all this preparation takes time but, it makes for a much better job. I used OAT Coolant from my local MG-Rover spares dept. which in Gloucester is the main Ford dealership now ~ Bristol Street Motors in Bristol road. I use a 50-50 dilute with the OAT ( Original Acid Technology ) coolant and carefully bled the system. Took the car next day for a ten mile spin ~ it ran fine ~ allowed it to cool right down and topped up the coolant which had settled a little. Done about fifty miles since then and the coolant level is perfectly stable ~ all good signs so far and my wife is convinced the car runs better which may well be the case as she knows it better than I do.
Working carefully and checking things, I noticed that one of the heater hoses had been in contact with the sharp points on the bolt head which is a bleed screw for a nearby steel coolant tube. Over the years, vibration had worn a small hole in the hose above the bolt. I checked it was still coolant tight ~ fortunately, MG-R in their wisdom had put a protective rubber sheath there and only that had been damaged by the nearby sharp edges of the bleed bolt. I used a cable tie to hold the pipe clear of the bolt's sharp edges. There were one or two other things discovered that needed some adjustment. All this additional work is annoying to discover and consumes further time but, I sorted each there and then ... my old Granny's words still fresh and relevant in my ears ... A stitch in time really can save nine ... not to mention a nice few quid later too! ....

A favourite saying of my old granny who used to say it to me over fifty years ago when I was a little nine year old lad. She died shortly after that but, her advice was very good and has stood me in good stead on many an occasion.
I bought this MG ZS 120+ new back in May 2003 ~ close on six years ago. Recently, there has been a progressive loss of coolant requiring ever more frequent topping up but, not large amounts of coolant needed to be added. No obvious signs of Cylinder Head Gasket ( CHG ) damage anywhere or other reason for coolant loss despite frequent checks. The car has only covered 41,500 miles, mostly driven by my wife Linda. So, as the car is six years old, and in the absence of any positive signs that the gasket is damaged, I decided to adopt the stitch in time advice and change it anyway ~ I've done many cylinder head gasket renewals over the years on various cars and even a few motorcycles. I've changed a 16 valve K-Series CHG before when a friend's car needed it and found the job an easy one. Indeed, the K-series for a number of reasons is one of the easiest 16 valve engines to work on, particularly for the non~professional with limited resources. So I made a start. The following assumes such things as timing belt replacement 'how to' advice and guides are available elsewhere so will not be covered in any great detail. However, before starting work, get the engine in a 'safe' working condition. That is with the index on the CRANKshaft pulley at the 12 O'Clock index position. Then all four pistons will be halfway up/down the bores with no. 1 piston at 90 degrees before top dead centre ( BTDC). All this is described in much better detail elsewhere here on RT.net
So let's make a start:~
Coil pack cover removal ~ each of the two coil packs are held by two 8mm bolts. The plug covers were a very tight fit over the spark plugs and needed careful power to remove.
Fifteen 8mm Bolts hold the camshaft cover and baffle plate/gasket in place. Note where the heat has lifted much of the paint near the hotter exhaust side of the baffle plate. Not nice ~ the car has never overheated so that is not suitable paint for that area.
Five 8mm bolts secure the top of the timing cover ~ all need to be removed.
The bottom of the timing cover is secured by a single 10mm bolt which only needs to be undone three turns or so as the hole it's located in is a downward facing slot, not and enclosed hole. Then the cover can be lifted but, it's a very tight fit and needs careful persuasion to lift out without damage. This one was such a tight fit that I removed the engine mount assembly there to allow more access ~ having supported the engine with a jack and blocks of wood other wise it will drop down. With the timing cover removed and the Camshaft Pulley locking tool inserted, I undone the two 17mm bolts securing the cam pulleys and prised them off the cam shafts. There are two more small ( 8mm) bolts holding the [u]inside[/u] timing belt cover to the head ~ remove those ~ they were covered by the camshaft pulleys.
I started to remove the five exhaust manifold stud nuts ~ all five were corrosion seized on their studs and so came out as one piece ~ which saved me the job of removal as they were to be replaced by stainless steel allen key studs with locking nuts I got off ebay for £16.50p incl. p/p ... money well spent as they are superior to the OE jobbies which are more difficult to fit with the engine still in the car. Fitted them to a few cars now ~ much better job and money well spent. Pictures later on.
The ten through bolts were all removed and stored in sequence as shown in the next picture.
After disconnecting all the hoses, fuel supply, throttle cable, brake vacuum hose and all various electrical connectors, a hefty lift and up came the cylinder head assembly with the inlet plenum still attached. the main advantage with these plastic inlet plenums is lightness. I would not attempt that with the equivalent much heavier T16 engine assembly without a lifting crane. My back wouldn't take it..
The old gasket was in very good condition ~ only slight evidence of damage around two of the elastomer seals which enclose the through bolt holes. Two of these small five sided seals were 'disturbed' a little, sufficient to allow coolant down the through bolt holes ~ the threads at the bottom of these two through bolts were filled with the yellowish 'mayonnaise' ~ emulsified coolant and oil. That was the only evidence of coolant-oil mix. The cooling system and engine coolant passageways had almost no evidence of emulsification. I spent half an hour cleaning the block surface. Then turned my attention to the cylinder head giving that a really good clean, using a powerful garden hose to flush out all that flaking gasket paint after soaking the whole in engine degreasant using a mist sprayer obtained from a local garden centre ~ about £2 .. I boiled up two kettles of water and poured that over the head after more engine degreasant spraying and it came up really well.
I always use the MLS CHG and head saver shim now ~ so does my son on his and friends' K series cars. No problems so far. It is VERY important to thoroughly clean up the block and head interfaces on any engine prior to fitting a new CHG. Even a small bit of dirt there can undo all your good work so be thorough with the cleaning. It pays dividends in the long run.
I took this picture to show the honing still very apparent in the bores even after 41,500 miles!
I used this torque setting and tightening sequence for the through bolts on reassembly.
These are the stainless steel exhaust manifold studs used to replace the corrosion welded OE ones.
I also cleaned up the four spark plugs ~ they were the type with the very fine pin central electrode. Looked in perfect condition so were not replaced.
I also drained the engine oil ~ it was about 5,000 miles old and as can be seen from this picture, the oil was still in good condition with no sign of any cross contamination with engine coolant.
WARNING ~ do not replace and align the timing belt in poor light conditions ~ that's a recipe for mistakes and I made one. What I did do right was turn the engine over manually by hand with a 22mm socket on the crankshaft pulley bolt at least three times ~ all clear with no metal contact or noises. However, somehow in the poor light, I got one of the pulleys 180 degrees out so when I turned the fully assembled engine over on the starter confident of a first time start, the engine simply spun over and did not run. I knew immediately what I may have done wrong and so it proved. One further hour later, with both CAMshaft pulleys correctly indexed and aligned with the CRANKshaft pulley and timing belt fitted, this time it did start immediately.
It was so dark by the time I had finished that a fine Brimstone moth came into the garage and settled on a tyre. I caught it in a clean jam jar and released it into the garden. I like my cars and am a keen car enthusiast, but, my main interests in life apart from my family, is Natural History... I took a picture of the moth before capture and release in a dark part of the garden ~ pretty thing:~
I completed the whole job working at a leisurely pace over the Easter weekend. I took my time as I cleaned all the stuff as I worked including a thorough flush of the whole cooling system ~ all this preparation takes time but, it makes for a much better job. I used OAT Coolant from my local MG-Rover spares dept. which in Gloucester is the main Ford dealership now ~ Bristol Street Motors in Bristol road. I use a 50-50 dilute with the OAT ( Original Acid Technology ) coolant and carefully bled the system. Took the car next day for a ten mile spin ~ it ran fine ~ allowed it to cool right down and topped up the coolant which had settled a little. Done about fifty miles since then and the coolant level is perfectly stable ~ all good signs so far and my wife is convinced the car runs better which may well be the case as she knows it better than I do.
Working carefully and checking things, I noticed that one of the heater hoses had been in contact with the sharp points on the bolt head which is a bleed screw for a nearby steel coolant tube. Over the years, vibration had worn a small hole in the hose above the bolt. I checked it was still coolant tight ~ fortunately, MG-R in their wisdom had put a protective rubber sheath there and only that had been damaged by the nearby sharp edges of the bleed bolt. I used a cable tie to hold the pipe clear of the bolt's sharp edges. There were one or two other things discovered that needed some adjustment. All this additional work is annoying to discover and consumes further time but, I sorted each there and then ... my old Granny's words still fresh and relevant in my ears ... A stitch in time really can save nine ... not to mention a nice few quid later too! ....
Edited by MGJohn on Wednesday 15th April 14:13

MGJohn said:
I always use the MLS CHG and head saver shim now ~ so does my son on his and friends' K series cars. No problems so far. It is VERY important to thoroughly clean up the block and head interfaces on any engine prior to fitting a new CHG. Even a small bit of dirt there can undo all your good work so be thorough with the cleaning. It pays dividends in the long run.
You really should have checked the liner heights as well. The MLS gaskets work very well if the liner heights are even and within spec, but the Payen type gasket with pinned elastomer seal is a much safer bet on engines where the liner heights are out of spec.Mr2Mike said:
MGJohn said:
I always use the MLS CHG and head saver shim now ~ so does my son on his and friends' K series cars. No problems so far. It is VERY important to thoroughly clean up the block and head interfaces on any engine prior to fitting a new CHG. Even a small bit of dirt there can undo all your good work so be thorough with the cleaning. It pays dividends in the long run.
You really should have checked the liner heights as well. The MLS gaskets work very well if the liner heights are even and within spec, but the Payen type gasket with pinned elastomer seal is a much safer bet on engines where the liner heights are out of spec.So, unless I was very unlucky, the liner heights should not be a problem. Even so, although I did not mention it, I ran my fingers over the liners and all four were proud of the surrounding block but, I did not measure that as I was confident they would not have been disturbed.
I also did not mention that a check of the cylinder head surface after a thorough clean showed no trace of fire ring indentation. That sometimes happens when an engine overheats and the driver drives on instead of stopping immediately for whatever reason. The overheating if severe can soften alloys and other metals or worse. This happens frequently as several work colleagues have done and admitted just that in their cars ~ driven on ~ not all K-Series Rovers either ~ BMWs and Toyotas. This can mean more than a damaged cylinder head gasket ~ a complete replacement cylinder head being necessary damaged by severe overheating following coolant loss. Some folks driving on to the next Motorway exit when things are obviously seriously wrong with the car. Others never lift their car's bonnets to check things as recommended by all manufacturers unless something goes wrong ~ guess what ~ something goes wrong.
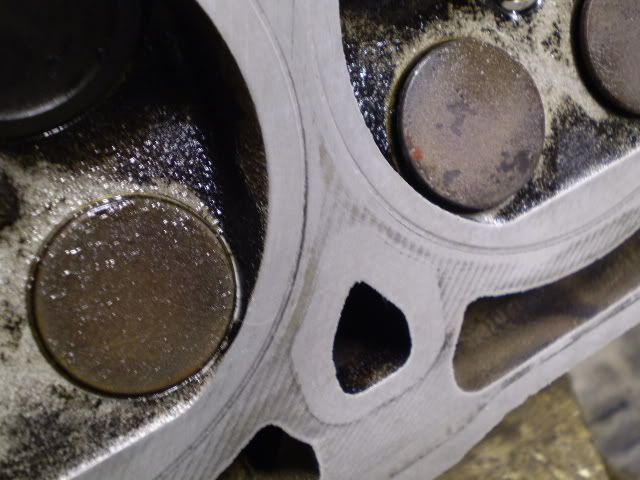
Fire ring indentation occurs usually near the hotter exhaust valves which become even hotter following coolant loss. Here's a close up of a friend's K-Series cylinder head showing fire ring indentation. This is not a severe example ~ it can be much worse and destroy the component rendering it scrap metal.
Having seen what can happen to a car's engine if these things are not spotted and rectified in good time ~ on ANY car incidentally ~ my "stitch in time" ploy saves a lot of time not to mention money.
I mention these things for the benefit of those car users who may have such bad "car maintenance" habits. There's a lot of those who share the raods with us. Never too late to change and doing so could save not just a nice few quid, it can also be a life saver.
.
Hi John looks like an easy job to do, reminds me of the old A series we used to do in the good old days. I have heard loads of horror stories about changing K series head gaskets, like the sump dropping off when you take the through bolts out but you made it look very easy.
Quick question for you, my ZR 160 is also using very small amounts of water and so I thought of pre-empting a major HGF with a change now, as you did. Is the ZR 160 gasket change just as straight forward or are there any other considerations and could the average diy'er do this job?
Cheers Ian
Quick question for you, my ZR 160 is also using very small amounts of water and so I thought of pre-empting a major HGF with a change now, as you did. Is the ZR 160 gasket change just as straight forward or are there any other considerations and could the average diy'er do this job?
Cheers Ian
Ebo100 said:
Hi John looks like an easy job to do, reminds me of the old A series we used to do in the good old days. I have heard loads of horror stories about changing K series head gaskets, like the sump dropping off when you take the through bolts out but you made it look very easy.
Quick question for you, my ZR 160 is also using very small amounts of water and so I thought of pre-empting a major HGF with a change now, as you did. Is the ZR 160 gasket change just as straight forward or are there any other considerations and could the average diy'er do this job?
Cheers Ian
Hi Ian,Quick question for you, my ZR 160 is also using very small amounts of water and so I thought of pre-empting a major HGF with a change now, as you did. Is the ZR 160 gasket change just as straight forward or are there any other considerations and could the average diy'er do this job?
Cheers Ian
Try and find out where that coolant is being lost if possible. There's an inlet manifold gasket which can allow loss of coolant and plenty of K-Series head gaskets have been changed when they did not need doing. Look for tell tale leak signs around and below the manifold interface with the cylinder head. That gasket costs about a fiver and can be DIY changed in about and hour including cleaning the area.
My Rover mad son has recently fitted a K-Series 1.8 VVC engine similar to the one in your car into his Rover Metro plaything ...
Whilst the engine was out of the car ( it was ex-MGF VVC ), he took the opportunity to replace the cylinder head gasket with the MLS style one as I used in my MG ZS. He also used the head saver shim as I did. The process was identical to the non-VVC HG replacement on my MG ZS. I have replaced two K-Series cylinder head gaskets now and I find the K-Series one of the easiest to do mainly because it is so small with very light alloy components and thus so much easier to handle. Thus, for the non-professional DIY spanner twirler like my son and I, is a bonus. Apart from the extra bits and bobs involved with the variable valve control (VVC) which do not need to be disturbed, the process is identical. Just double check the indexes on the CRANKshaft and CAMshaft pulleys are correctly lined up. If you have any questions ~ please do not hesitate to ask ~ also, if you've not already done so, subscribe to Rovertech.net and MG-Rover.org. There's a wealth of information and experience on those sites and a quick search will usually provide an answer to anything Rover or MG related. Those VVC motors are a hoot to drive and like all K-Series, punch well above their weight. Here's the one my son has fitted to his Rover Metro project:~
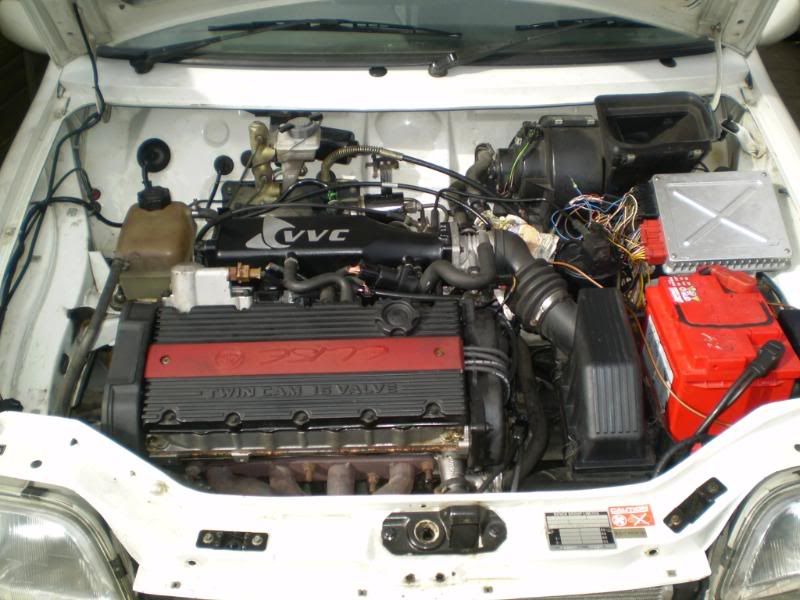
The car previously had a 1.8 Non-VVC engine from a Lotus Elise ~ hence the red Elise plug cover. I bought this Rover Metro car new back in 1993. It was a 1.1 Carb spec car and my son still has that original 1.1 engine still on original head gasket.
You mention the A-series. Yes, an even easier engine to work on. I could change a head gasket on one of those in less than an hour ... Happy days gorn forever... My son has several cars including an MG Metro 1300 with an A-Series. That little car is actually a year older than he is. When he was only six days old, I brought him and his Mum home in an MG Metro we bought new in 1983. His first ever car journey ...

I also changed the CHG in a lady friend's Rover 25 which had been bodged previously and suffered an immediate repeat. Have a read of this for the full SP. It contains more detail of the process.
http://forums.mg-rover.org/showthread.php?t=234493...
Good luck.
therex2001 said:
Hi,I am looking at changing the head gasket on my 2004 MG ZS 1800cc,could you tell me if the head bolts need tobe replaced? The bolts are the long ones. Many thank's for your time and reply..
Colin..
Hi Colin,Colin..
Just spotted your 21st Jan query hence this partial thread revival. Your car's engine is identical to mine.
Provided those through bolts are in good condition, all those on the four cars I've now worked on were fine, I had no hesitation to reuse the originals. In fact after clean up and close examination, they all looked like new. I think pro-workshops renew them on a "belts and braces" basis with warranty in mind as it should reduce the possibilities of a repeat. In my experience, several 'repeats' were simply down to poor work, not quality of materials.
I have now done four cylinder head gasket replacements on Rover K-Series, two in the last couple of months with a Rover 25, for my youngest son's first car; the other a tidy Rover 45 for my own use for a while. Both cars bought with known cylinder head gasket failures and thus involved relatively inexpensive initial outlay. Both cars are now running very nicely following my repairs. In each case the cause of the overheating was identified following repair as coolant loss was still present after my best efforts. The Rover 25s coolant loss was simply due to a worn Water Pump. In my experience these water pumps start to show signs of wear after six or seven years. Time related rather than mileage. They are probably responsible for a large number of so called 'failures' when the worn pumps were not identified in good time before other damage is done from resulting coolant loss.
The Rover 45 had recently been serviced in previous ownership and for some reason, someone has loosened the two 8mm bolts which secure the Coolant Outlet Elbow to the cylinder head. Both cars showed coolant under their engines after my work ....
 Quite a lot of coolant under the timing side of the Rover 25's engine is the usual signs of a worn Water Pump on the K-Series. The Rover 45 had coolant on the gearbox side of the engine. At first glance it appeared to be running down along the interface of the Head-Block which was sickener to first observe. However, I soon identified the source of the escaping coolant running down the head and block. Closer examination revealed the two finger tight 8mm bolts which secure the Coolant Outlet elbow to the cylinder head. What a relief. carefully tightened those two bolts and immediate cure. Delighted with both cars. Fortunately, both previous owners were wise enough NOT to use these cars once they realised all was not well as the first signs of overheating and coolant loss appeared. That way only the cylinder head gasket suffered, not any of the rest of the engine.
Update on my MG ZS 120+ the original subject of this thread. During replacing the cylinder head gasket as described, in so doing I removed what appeared to be a perfectly sound old CHG ...
Sometime later I discovered the real cause of the coolant loss on my car. Progressive wear of the Water Pump allowing coolant to escape until completely worn allowing a pool of bright coloured coolant under the timing side of the engine to alert me.I quite enjoy doing this work on these little K-Series engined cars. Almost theraputic and so far so good. As well as being a very inexpensive way to obtain a half-decent, economical and competent means of getting about, they're quite easy to live with as daily drivers. Even so, always nice to get back into my Rover 620ti....
..
EDIT to add @ 23:43 Why would anyone loosen those two coolant elbow bolts and only finger tight. think I know why. If replacing an old hose clamped to the elbow, because of age and numerous heat cold cycles from the engine, the hose can be very difficult to remove from the elbow. Thus by undoing the elbow it can be twisted to break the grip of the hose. Fit new hose and finger tighten bolts, phone rings and they do not get tightened up properly. Who knows... it was almost certainly the reason for the coolant loss which damaged the gasket from the resulting overheating.
There's always a reason for these things. Thing is finding it which can take a lot of time. failure to find the original cause will almost certainly result in a 'repeat'. This applies to any car of course.
Edited by MGJohn on Thursday 3rd February 23:43
Hi John,
Many thank's for your information it has been very helpful,I will be refitting the head tomorrow so fingers crossed and everything else,all goes well. I have changed the water pump as it seemed a good idea as I don't know why the head gasket went in the 1st place..I have bought the uprated gasket as per your advice..
Once again Many thank's
Regards
Colin.
Thought I'd resurrect this thread instead of starting a new one.
I currently have a VVC K-series with HGF failure. I've removed the head and I'm a bit concerned about a few things.
First being slight indentation to the head from the fire rings (I think that is the correct term).

Second being, the liners are sitting very nearly flush with the block. I can get a steel rule to rock ever so slightly towards the block.
What are my options? The car owes me nothing, so I'm not afraid to scrap it. But it is a rather nice car in pretty good nick, bar the smallest amount of rust in two places, so I'd like to get it running again.

I currently have a VVC K-series with HGF failure. I've removed the head and I'm a bit concerned about a few things.
First being slight indentation to the head from the fire rings (I think that is the correct term).
Second being, the liners are sitting very nearly flush with the block. I can get a steel rule to rock ever so slightly towards the block.
What are my options? The car owes me nothing, so I'm not afraid to scrap it. But it is a rather nice car in pretty good nick, bar the smallest amount of rust in two places, so I'd like to get it running again.
Still such a good, handy and informative thread!
And as for the flush liners, you can always use the original style beaded gasket for this, preferably a PAYEN manufactured one. These beaded gakets allow for a bit more tolerance on an engine with sunken/ flush liners moreso than the MLS which needs the liners to sit just proud of the block edge to get a decent seal.
Unfirtunately I'm not sure about the fire ring indentation I'm afraid someone will be along shortly to help with any luck
And as for the flush liners, you can always use the original style beaded gasket for this, preferably a PAYEN manufactured one. These beaded gakets allow for a bit more tolerance on an engine with sunken/ flush liners moreso than the MLS which needs the liners to sit just proud of the block edge to get a decent seal.
Unfirtunately I'm not sure about the fire ring indentation I'm afraid
someone will be along shortly to help with any luck Rickyy-if you can catch the fire ring indentations with your nail, it's a pretty good indication that the head may have had its chips...
The best thing to do is to get the head hardness tested (this is very important!) and if it passes skimmed by an engineering company who know the K-Series well. Hardness testing is important as if the head has gone soft then a skim won't help, it'll only delay the process of re-failure.
If the worst comes to the worst, I'm removing a good 55k 1.8 MPI engine from a friend's car in the next few weeks-he's having a VVC conversion done to his ZS 120.
Gassing Station | MG | Top of Page | What's New | My Stuff