Help me build an aluminium racing toboggan....
Discussion


No idea where to put this thread, so thought I'd start in here and see where it gets moved to!
So, last season, a good friend of mine spent a couple of weeks out in the alps with me, and we got quite in to, and a little competitive, at tobogganing. This is 'proper' tobogganing, on a dedicated course, getting a ski lift up, and coming down through the pathways. About 4-6km runs. Also done at night.
We started of hiring toboggans, as most places have standard wooden things to hire. Although perfectly serviceable, they don't 'alf bruise the inside of your knees when you go over the bumps, which puts you out of action for a couple of days. At one mountain (Gaisberg in Kirchberg), they also hired 'racing' toboggans, made of aluminium, and don't give you bruises.

At 12 euros a time, this got a bit expensive, so we went shopping to buy one each. 300 Euros! Even a wooden one was at least 160 Euros.
So, plans were made to make one ourselves for next year. It's now October, and mate having recently split from his long term gf, has decided to come out to the alps for a month.
We both had quite different ideas on what makes a good toboggan for the courses we'll be on, so again, we've got a bit competitive.
Rules are;
1) No professional design to be used, and no 'paid-for' fabrication services (he knew I'd pay somebody else to do it professionally).
2) Maximum budget of £70 for materials only (not to include any shipping costs for materials, or any fabrication sundries such as paint, welding wire, etc.).
3) Three shakedown days to fettle, followed by three races on three separate courses.
So, I started looking at other designs for inspiration, and immediately hit on a rather nice looking model;

500 Euros plus shipping.
So last weekend, my old office was cleared out, I bought a second hand TIG welder on ebay, a mountain bike suspension unit, and bought some aluminium tubing and box section, and have made a start.

Office very roughly cleared for action. Note the Ikea table on the left, being used for a flat surface to make the jig. The green thing on the floor is the TIG welder.
Next up was to make some sort of bending jig to make sure the aluminium runners were the same shape (or near enough) left and right (and also top/bottom). I looked around for inspiration, and noticed the corner desks were just the right curve....

Some offcut CLS timber screwed together, with a perfect curve.
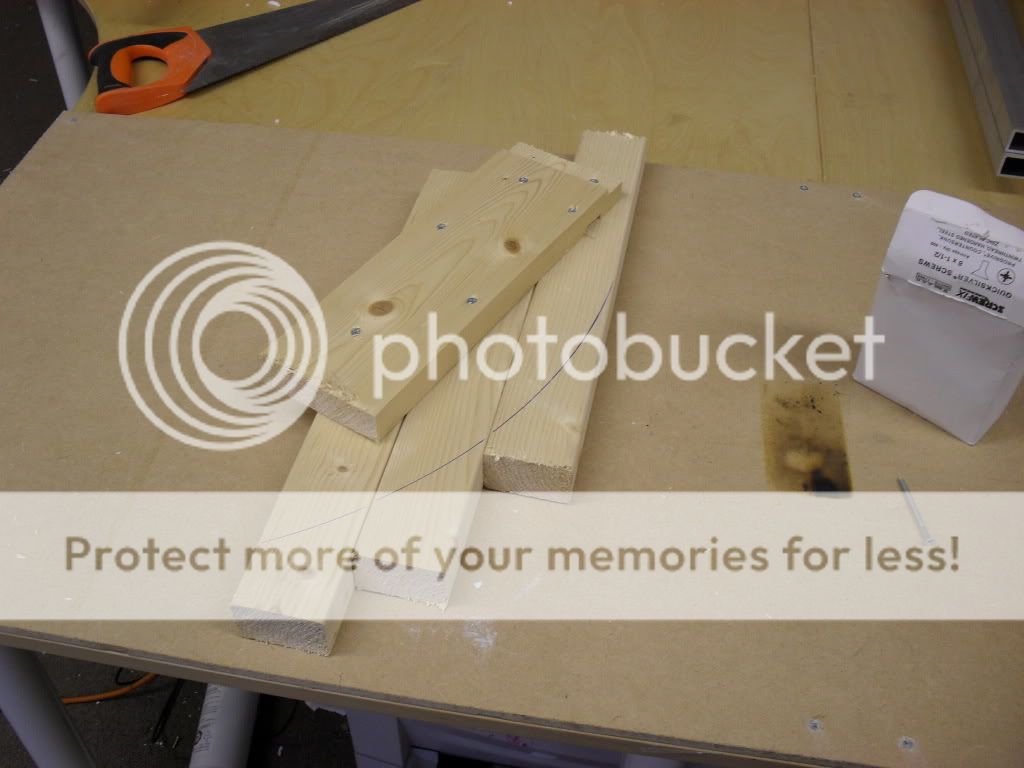
Screw the whole lot down firmly to the workbench, screw an anchor to the top end, and it's ready for bending.

I've also been getting a bit of welding practice in, with mixed success!
More to follow.....
So, last season, a good friend of mine spent a couple of weeks out in the alps with me, and we got quite in to, and a little competitive, at tobogganing. This is 'proper' tobogganing, on a dedicated course, getting a ski lift up, and coming down through the pathways. About 4-6km runs. Also done at night.
We started of hiring toboggans, as most places have standard wooden things to hire. Although perfectly serviceable, they don't 'alf bruise the inside of your knees when you go over the bumps, which puts you out of action for a couple of days. At one mountain (Gaisberg in Kirchberg), they also hired 'racing' toboggans, made of aluminium, and don't give you bruises.
At 12 euros a time, this got a bit expensive, so we went shopping to buy one each. 300 Euros! Even a wooden one was at least 160 Euros.
So, plans were made to make one ourselves for next year. It's now October, and mate having recently split from his long term gf, has decided to come out to the alps for a month.
We both had quite different ideas on what makes a good toboggan for the courses we'll be on, so again, we've got a bit competitive.
Rules are;
1) No professional design to be used, and no 'paid-for' fabrication services (he knew I'd pay somebody else to do it professionally).
2) Maximum budget of £70 for materials only (not to include any shipping costs for materials, or any fabrication sundries such as paint, welding wire, etc.).
3) Three shakedown days to fettle, followed by three races on three separate courses.
So, I started looking at other designs for inspiration, and immediately hit on a rather nice looking model;
500 Euros plus shipping.
So last weekend, my old office was cleared out, I bought a second hand TIG welder on ebay, a mountain bike suspension unit, and bought some aluminium tubing and box section, and have made a start.
Office very roughly cleared for action. Note the Ikea table on the left, being used for a flat surface to make the jig. The green thing on the floor is the TIG welder.
Next up was to make some sort of bending jig to make sure the aluminium runners were the same shape (or near enough) left and right (and also top/bottom). I looked around for inspiration, and noticed the corner desks were just the right curve....
Some offcut CLS timber screwed together, with a perfect curve.
Screw the whole lot down firmly to the workbench, screw an anchor to the top end, and it's ready for bending.
I've also been getting a bit of welding practice in, with mixed success!
More to follow.....
You're going to throw yourself down a ski run on a sledge built by someone with no aluminium welding experience with a large compressed spring under your arse? Sounds like something I'd do, although I prefer just throwing myself down a run on one of those cheap plastic spade looking things.
Awesome project though, I'd love to have the time/cash to do something similar.
Good luck. Keep us updated.
Awesome project though, I'd love to have the time/cash to do something similar.
Good luck. Keep us updated.
Edited by W00DY on Saturday 6th November 12:50

You may have found this out by now, but I can't see any B way you are going to bend that box section at all (without some pretty serious kit, never mind round some bits of wood.) Even with heat I'm not sure it'll bend.
Either cut Vs out of it, but then you'll have a threepenny bit shape not a smooth curve, or get some strip, bend that and weld it to a supporting frame.
What's the TIG? I thought you needed an AC one for Ali which were all hugely expensive? Maybe someone's invented a cheaper one that'll work?
Either cut Vs out of it, but then you'll have a threepenny bit shape not a smooth curve, or get some strip, bend that and weld it to a supporting frame.
What's the TIG? I thought you needed an AC one for Ali which were all hugely expensive? Maybe someone's invented a cheaper one that'll work?
Edited by john2443 on Saturday 6th November 12:55
Edited by john2443 on Saturday 6th November 13:01
Having built sledges before; give serious thought to cross bracing. The weak spot is always lateral load on the base of the runs folding the two sides in and under. For the runners you would be better off with tubular steel which will form to a curve quite readily and will be stronger.
Edited by 911motorsport on Saturday 6th November 13:30
Bends done, about 95% successful.
Have started some of the non-structural welding (putting caps on the end middle piece) to get some more practice in, before I start on the serious stuff.
It's got to be all aluminium rather than a mix, as I can't weld aluminium to steel. Just have to be careful in the cross braces, and maybe add extra support if it's required later.
I've run out of aluminium filler rods from too much practice, just off to pick up some more so I can get going again!
Pics to follow.

Should you want to impress in a "one I made earlier" type of way Porsche did make a really robust one. I ordered a couple but despie constant chasing and not ordering it in a non standard spec  it didn't turn up until well after the season had finished and we stopped going to resort by train so I didn't go ahead.
Short sighted and I regret that now having read your post as I'm sure it was way less than £500 more the £200 mark; going to have to find them again now......
it didn't turn up until well after the season had finished and we stopped going to resort by train so I didn't go ahead. Short sighted and I regret that now having read your post as I'm sure it was way less than £500 more the £200 mark; going to have to find them again now......
OK, update from last night close of play.
The person above was right about my bending base not being strong enough, and I had to modify it a bit to make it work. It would have been better to use 18mm ply as it's a lot stronger, but it's soooo expensive, so made-do-and-mend was the way forward. Got there in the end. The little bit of distortion in the ends of the box section doesn't matter too much, as this will be lopped off when I weld on the front 'hinge' section. Both runners are pretty much (near enough) the same shape and bend, with only a very small amount of distortion on the top of the box. The bottom will have a stainless runner on it, so doesn't matter too much.
You can also see my attempts at playing with the welder to try and get the settings right!

I then moved on to making my angle brackets for the jig. A bit of offcut, Pythagoras, and a tape measure, and some careful sawing and sanding, to give me a set of 4 x 24 degree angle blocks.

Installed these on the jig, and glued some centre pieces on to hold the middle cross member in place for welding.

To make sure the bottom bars had the same angle on the bottom, I cut the whole length of two, marked the centre, and cut at an angle so they were both (approximately) the same.

Then I changed my mind on the track of the runners, they just looked too far apart, and that would just place more pressure on the bottom supporting bars, so a change of plan, moved the angle blocks further in, and changed my centre welding support to a more simple design. The 'track' is now 440mm outside edges, which looks similar to other racing designs.

Lastly, I cut the front of the supporting bars to butt up against the centre section. The centre section is purposely angled so that the force of the suspension unit pushes almost directly in to the rear bars, which (should) reduce the pressure on any single bar.

Now, with the rear bars welded in place, I started on the front ones, and the suspension unit bracket that will be fitted to the front of the centre support section. It's all cut, test fitted, and ready for welding. Unfortunately, I ran out of welding rods yesterday, and the only ones I could get locally were too thin for this sort of work, so I'll have to pick some up next week before I can get back to work.

At the moment, I've been working on the design of the front 'hinge', and I think I might have a solution....
The top and bottom sections can be cut 'square', and welded on to an aluminium tube, but I wasn't sure how to make it firm, until somebody suggested using car suspension bushes. Very good idea.
So, the plan now, is to get some 1", 1 1/4" or 1 1/2" very thick aluminium tubing, weld a 4" piece on either bottom runner (which will also act as a foot peg), and another centre piece in the middle, welded to the 'top' section (seat). Putting rubber bushes on the inside/outside of each will give a bit of flex, and put a threaded rod through the whole lot, with a locking nut on either end.
So, my problem now, is depending on which thickness of 'hinge' I go for, depends on the internal diameter that needs to fit the bushes. At the moment, the internal dimensions are;
1" - 12.7mm internal
1 1/4" - 19.05mm internal
1 1/2" - 25.4mm internal
At the moment, the 1 1/4" would be best, as I can use an offcut of the rods I already have here to use as 'sleeving' inside the sections to stop the bushes being pushed too far in to the tube.
I need to find a bush like this type, with a metal centre sleeve, and a diameter of 19mm if possible;

Budget is against me on this one, poly bushes would be excellent, but they're far too expensive. I need a set of six, ideally from a 'cheap' car like a Clio / old Mini / etc.
I could start machining the tube to fit a different type of bush, but that's going to take time I don't have, and cost money I don't want to spend!
So, any ideas chaps?
The person above was right about my bending base not being strong enough, and I had to modify it a bit to make it work. It would have been better to use 18mm ply as it's a lot stronger, but it's soooo expensive, so made-do-and-mend was the way forward. Got there in the end. The little bit of distortion in the ends of the box section doesn't matter too much, as this will be lopped off when I weld on the front 'hinge' section. Both runners are pretty much (near enough) the same shape and bend, with only a very small amount of distortion on the top of the box. The bottom will have a stainless runner on it, so doesn't matter too much.
You can also see my attempts at playing with the welder to try and get the settings right!
I then moved on to making my angle brackets for the jig. A bit of offcut, Pythagoras, and a tape measure, and some careful sawing and sanding, to give me a set of 4 x 24 degree angle blocks.
Installed these on the jig, and glued some centre pieces on to hold the middle cross member in place for welding.
To make sure the bottom bars had the same angle on the bottom, I cut the whole length of two, marked the centre, and cut at an angle so they were both (approximately) the same.
Then I changed my mind on the track of the runners, they just looked too far apart, and that would just place more pressure on the bottom supporting bars, so a change of plan, moved the angle blocks further in, and changed my centre welding support to a more simple design. The 'track' is now 440mm outside edges, which looks similar to other racing designs.
Lastly, I cut the front of the supporting bars to butt up against the centre section. The centre section is purposely angled so that the force of the suspension unit pushes almost directly in to the rear bars, which (should) reduce the pressure on any single bar.
Now, with the rear bars welded in place, I started on the front ones, and the suspension unit bracket that will be fitted to the front of the centre support section. It's all cut, test fitted, and ready for welding. Unfortunately, I ran out of welding rods yesterday, and the only ones I could get locally were too thin for this sort of work, so I'll have to pick some up next week before I can get back to work.
At the moment, I've been working on the design of the front 'hinge', and I think I might have a solution....
The top and bottom sections can be cut 'square', and welded on to an aluminium tube, but I wasn't sure how to make it firm, until somebody suggested using car suspension bushes. Very good idea.
So, the plan now, is to get some 1", 1 1/4" or 1 1/2" very thick aluminium tubing, weld a 4" piece on either bottom runner (which will also act as a foot peg), and another centre piece in the middle, welded to the 'top' section (seat). Putting rubber bushes on the inside/outside of each will give a bit of flex, and put a threaded rod through the whole lot, with a locking nut on either end.
So, my problem now, is depending on which thickness of 'hinge' I go for, depends on the internal diameter that needs to fit the bushes. At the moment, the internal dimensions are;
1" - 12.7mm internal
1 1/4" - 19.05mm internal
1 1/2" - 25.4mm internal
At the moment, the 1 1/4" would be best, as I can use an offcut of the rods I already have here to use as 'sleeving' inside the sections to stop the bushes being pushed too far in to the tube.
I need to find a bush like this type, with a metal centre sleeve, and a diameter of 19mm if possible;
Budget is against me on this one, poly bushes would be excellent, but they're far too expensive. I need a set of six, ideally from a 'cheap' car like a Clio / old Mini / etc.
I could start machining the tube to fit a different type of bush, but that's going to take time I don't have, and cost money I don't want to spend!
So, any ideas chaps?
 Fantastic effort!
Gassing Station | Homes, Gardens and DIY | Top of Page | What's New | My Stuff