Discussion


loughran said:
Good evening RS, the mechanisms are made by the Swiss company Hawa, I'm using their Concepta 25 range.
I've designed it so the scissor actions are fitted to panels that sit inside the cabinet and are moveable/removable even with the door attached so I can get at all the various adjustments.
Here's a panel ready for fitting. It's a bit difficult to see but there's a walnut battern in the bottom corner of the cabinet and one at the top to fix the panel to, forming a pocket for the door to run into. There's an installation app. You feed in the width x depth x thickness and weight of the door and the amount you want the door to retract and the app tells you how long to trim each element and where to mount everything on the panel.

Then the the door is hung on the mechanism and it opens and closes like a normal cabinet door.

When the door is opened it can then be pushed back into the pocket which is around 55mm wide. The door is drawn back into the pocket by a sprung reel and there are dampers to arrest its short journey.

The table repair went well and everyone is happy.

It's been a lovely job to make and install. Some cabinets grey, some black and some white, all lined in walnut to match the kitchen table. The granite is going to be (tastefully) spectacular and will pull everything together but that will come in time. We leave tomorrow and look forward to flying back at the end of the month to dot the eyes and cross the tees.


Next time one of our installers moans about pocket doors that come part assembled and the doors all pre drilled I will show them this. Great work btw. I've designed it so the scissor actions are fitted to panels that sit inside the cabinet and are moveable/removable even with the door attached so I can get at all the various adjustments.
Here's a panel ready for fitting. It's a bit difficult to see but there's a walnut battern in the bottom corner of the cabinet and one at the top to fix the panel to, forming a pocket for the door to run into. There's an installation app. You feed in the width x depth x thickness and weight of the door and the amount you want the door to retract and the app tells you how long to trim each element and where to mount everything on the panel.
Then the the door is hung on the mechanism and it opens and closes like a normal cabinet door.
When the door is opened it can then be pushed back into the pocket which is around 55mm wide. The door is drawn back into the pocket by a sprung reel and there are dampers to arrest its short journey.
The table repair went well and everyone is happy.
It's been a lovely job to make and install. Some cabinets grey, some black and some white, all lined in walnut to match the kitchen table. The granite is going to be (tastefully) spectacular and will pull everything together but that will come in time. We leave tomorrow and look forward to flying back at the end of the month to dot the eyes and cross the tees.
Edited by loughran on Monday 29th April 06:48
Just catching up - lovely work as always Loughran, glad the table could be rescued in situ, it's a long way to bring it home.
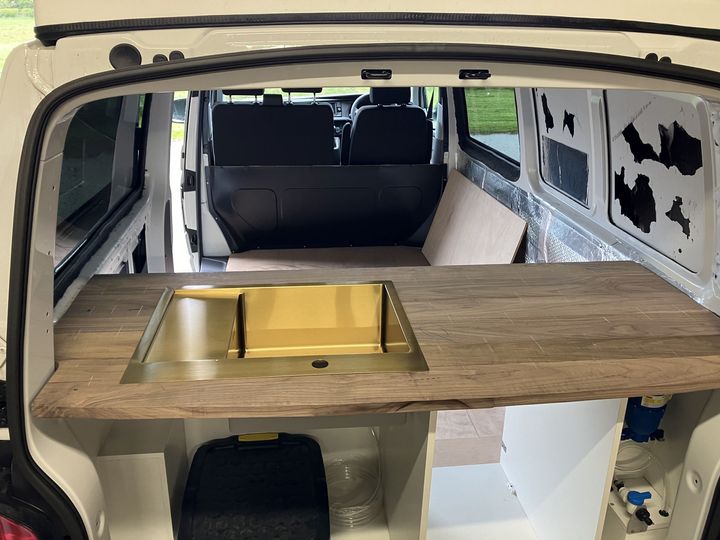
My camper van walnut worktop is ready for finishing, I joined individual lengths with a Domino jointer (what a joy to use) and cut each to fit the profile of the van. It's a long process but we plan to keep this van for a long time, so we want it 'right' rather than just 'finished'. I like working with walnut, it planes so nicely.
I have a temporary workshop set up at a unit, about a mile from the house. It means I have room to store the van and work on it, which wouldn't be possible in a domestic garage but it does mean I don't have my workbench.
Bit annoyed that one length came out darker than the rest, I didn't notice at the time, I think I was more interested in grain than colour. I've started to stain the worktop, so hopefully I can disguise the difference a little.

Worktop in situ, when I was working out the plumbing for the sink, you can see the markings for the Dominos, a white pencil from my daughters colouring set made this a lot easier on walnut.
My camper van walnut worktop is ready for finishing, I joined individual lengths with a Domino jointer (what a joy to use) and cut each to fit the profile of the van. It's a long process but we plan to keep this van for a long time, so we want it 'right' rather than just 'finished'. I like working with walnut, it planes so nicely.
I have a temporary workshop set up at a unit, about a mile from the house. It means I have room to store the van and work on it, which wouldn't be possible in a domestic garage but it does mean I don't have my workbench.
Bit annoyed that one length came out darker than the rest, I didn't notice at the time, I think I was more interested in grain than colour. I've started to stain the worktop, so hopefully I can disguise the difference a little.
Worktop in situ, when I was working out the plumbing for the sink, you can see the markings for the Dominos, a white pencil from my daughters colouring set made this a lot easier on walnut.
EmBe said:
Just catching up - lovely work as always Loughran, glad the table could be rescued in situ, it's a long way to bring it home.
My camper van walnut worktop is ready for finishing, I joined individual lengths with a Domino jointer (what a joy to use) and cut each to fit the profile of the van. It's a long process but we plan to keep this van for a long time, so we want it 'right' rather than just 'finished'. I like working with walnut, it planes so nicely.
I have a temporary workshop set up at a unit, about a mile from the house. It means I have room to store the van and work on it, which wouldn't be possible in a domestic garage but it does mean I don't have my workbench.
Bit annoyed that one length came out darker than the rest, I didn't notice at the time, I think I was more interested in grain than colour. I've started to stain the worktop, so hopefully I can disguise the difference a little.
Worktop in situ, when I was working out the plumbing for the sink, you can see the markings for the Dominos, a white pencil from my daughters colouring set made this a lot easier on walnut.
Walnut worktop and a gold sink looks very bling in a campervan. Best keep an eye on how much weight you're adding though.My camper van walnut worktop is ready for finishing, I joined individual lengths with a Domino jointer (what a joy to use) and cut each to fit the profile of the van. It's a long process but we plan to keep this van for a long time, so we want it 'right' rather than just 'finished'. I like working with walnut, it planes so nicely.
I have a temporary workshop set up at a unit, about a mile from the house. It means I have room to store the van and work on it, which wouldn't be possible in a domestic garage but it does mean I don't have my workbench.
Bit annoyed that one length came out darker than the rest, I didn't notice at the time, I think I was more interested in grain than colour. I've started to stain the worktop, so hopefully I can disguise the difference a little.
Worktop in situ, when I was working out the plumbing for the sink, you can see the markings for the Dominos, a white pencil from my daughters colouring set made this a lot easier on walnut.
I've been giving my head a good old scratch, but I'm still no nearer an answer.
How would you remove the waste from this piece?
It's a table leg, 1 of a planned 8, hardwood and 45x45mm square. The top piece of waste is around 25x25x20, and the lower 'slot' is 6x6x15mm, the top/end grain of the leg will be visible so needs to be pretty clean.

How would you remove the waste from this piece?
It's a table leg, 1 of a planned 8, hardwood and 45x45mm square. The top piece of waste is around 25x25x20, and the lower 'slot' is 6x6x15mm, the top/end grain of the leg will be visible so needs to be pretty clean.
As above, take the waste out with chisels.
Start the process with saw cuts. For the top cube removal, make three saw cuts on the waste side of your lines then start to remove the waste from above with a chisel, working with the grain. A mallet, or a hammer with a plastic handled chisel, is the way to go, chopping out gently to remove the areas the saw hasn't relieved.
Similarly with the lower slot, two saw cuts, then remove the waste with a mallet and chisel of suitable width.
Work slowly to start with, feel your way as you go. The timber will split easily along the grain and put up more of a fight across the grain. Work to the waste side of your lines and then as Mr Wolfracesonic says, finish of by pairing down to the line with a sharp chisel.
Enjoy the process, it will be time consuming but then the sharper your chisel, the more enjoyable it will be. Securing the workpiece securely is imperative.
(Consider signing up for a Japanese joinery course... eh Mr Greshamst ? )
)
Start the process with saw cuts. For the top cube removal, make three saw cuts on the waste side of your lines then start to remove the waste from above with a chisel, working with the grain. A mallet, or a hammer with a plastic handled chisel, is the way to go, chopping out gently to remove the areas the saw hasn't relieved.
Similarly with the lower slot, two saw cuts, then remove the waste with a mallet and chisel of suitable width.
Work slowly to start with, feel your way as you go. The timber will split easily along the grain and put up more of a fight across the grain. Work to the waste side of your lines and then as Mr Wolfracesonic says, finish of by pairing down to the line with a sharp chisel.
Enjoy the process, it will be time consuming but then the sharper your chisel, the more enjoyable it will be. Securing the workpiece securely is imperative.
(Consider signing up for a Japanese joinery course... eh Mr Greshamst ?
)Thanks for the info guys, - I think you've just about confirmed what I'd been thinking. I was hoping there would be some little gadget or widget that I'd never heard of, that spins silently and very quickly, probably, and does it while I'm asleep, but never mind. As L says, it should be satisfying work once all set up, I'll probably have a dry run or two on some spare timber.
Great work on that last box btw Wolfie.
Great work on that last box btw Wolfie.
Excellent progress !
Spinning widget ?
Has sir considered a morticing machine ? The machine that drills square holes.
Available on a range of scales, from behemoth to bench top.


Or an attachment if you have a pillar drill.
https://www.axminstertools.com/morticing-attachmen...
Spinning widget ?
Has sir considered a morticing machine ? The machine that drills square holes.
Available on a range of scales, from behemoth to bench top.
Or an attachment if you have a pillar drill.
https://www.axminstertools.com/morticing-attachmen...

Nothing too exciting tbh. In a bid to ensure my grand kids exercise their motor skills, I thought I'd draw and knock up a hobby table.
It's around 55cms square, or will be once finished, with the top sitting in a rebate cut into the sides and legs. The top will flip over, with a smooth hardwood finish on one side for general stuff and a 50x50 Lego base on the other. The top will sit over a base (the smaller rebate) giving about a 100mm depth to store bits and pieces. Half eaten sandwiches, small dead animals etc.
That's the plan anyway, with one in birch and the other in ash. It's occurred to me that the lid, once removed, or in mid flip, will make an effective weapon against a younger sibling, or any other small person within range. I might need to attach a warning.
Those mortising machines look great L, I was 'browsing' on the Axminster site the other day, shortly before having my knuckles rapped with a ruler.
loughran said:
Make sure your workpiece is clamped very firmly if you use one of these, otherwise it might make a mess of the piece and the operator.Guess how I know.....
Looking for some advice I have a metal sign which I want to mount onto a piece of oak. My initial plan was to follow the outline of the sign and drill through on the corners but it's suggested to leave more wood so that it doesn't split. My thinking was if I pre-drill it shouldn't be an issue. Currently it is a 2mm hole which I will need to drill out for the screw but the centre sits approx 7mm from the edge of the corner radius (approx 10mm)
Gassing Station | Homes, Gardens and DIY | Top of Page | What's New | My Stuff