Terry's tale. (S3 resto ++)
Discussion


No, my S3 project hasn't fell by the wayside, its just that this retirement malarkey is very time consuming !!
What with proper holidays plus short breaks, added to those there are such things as sorting my brother's brakes out, finding the brother in law a new car, project managing the neighbours garage conversion, etc etc. And now I'm readying my Panther Kallista to be show ready for this weekends NEC classic car show.
However some S progress has been made...
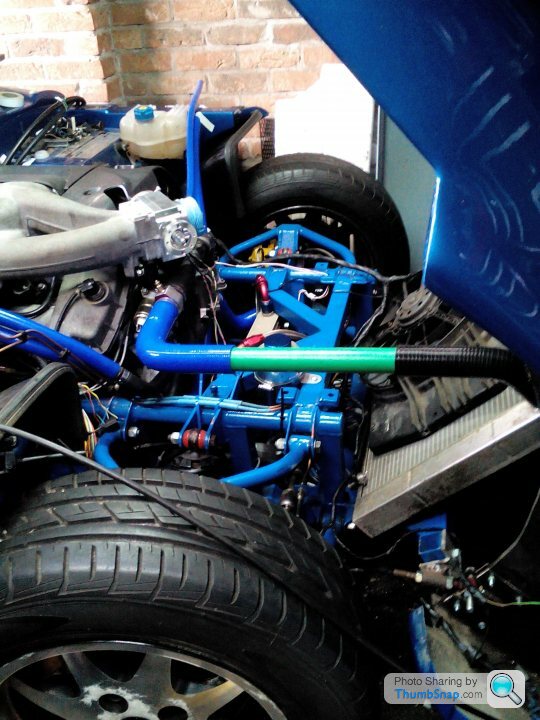
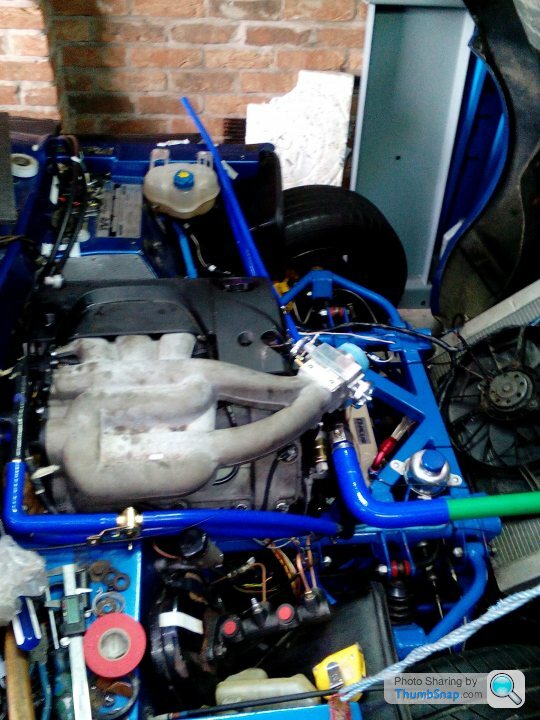
All new/modified brake parts now fitted & piped up (left dry for now).
Remote oil filter & oil cooler fitted
The Jag V6 now has a full water cooling system in place (left dry for now).
I didn't intend it being blingy blue, but no stockist could supply everything it needed in black.. Oh, the green plastic pipe is just a mockup until I get some alloy pipe swagged.
Mondeo V6 main cooling fan added engine side of the alloy radiator.
Pas rack now fully piped up (left dry for now).
Modified bonnet hinges fabricated & fitted to give wide opening.
Of course, there's still plenty to do through the winter..
Next to do is positioning the new fuel regulator & associated fuel hose to the engine, although I have already renewed the tank hoses through the new filter & pump up to the engine bay.
Then there's concluding the rest of the engine bay wiring to the sensors etc.
After that Haha, I might treat myself to a change of scenery... By working inside the cockpit, loads of cosmetic upgrade work to do there...
The work continues...
TerryB.
What with proper holidays plus short breaks, added to those there are such things as sorting my brother's brakes out, finding the brother in law a new car, project managing the neighbours garage conversion, etc etc. And now I'm readying my Panther Kallista to be show ready for this weekends NEC classic car show.
However some S progress has been made...
All new/modified brake parts now fitted & piped up (left dry for now).
Remote oil filter & oil cooler fitted
The Jag V6 now has a full water cooling system in place (left dry for now).
I didn't intend it being blingy blue, but no stockist could supply everything it needed in black.. Oh, the green plastic pipe is just a mockup until I get some alloy pipe swagged.
Mondeo V6 main cooling fan added engine side of the alloy radiator.
Pas rack now fully piped up (left dry for now).
Modified bonnet hinges fabricated & fitted to give wide opening.
Of course, there's still plenty to do through the winter..
Next to do is positioning the new fuel regulator & associated fuel hose to the engine, although I have already renewed the tank hoses through the new filter & pump up to the engine bay.
Then there's concluding the rest of the engine bay wiring to the sensors etc.
After that Haha, I might treat myself to a change of scenery... By working inside the cockpit, loads of cosmetic upgrade work to do there...
The work continues...
TerryB.
Very interesting project and meticulous work  Respect.
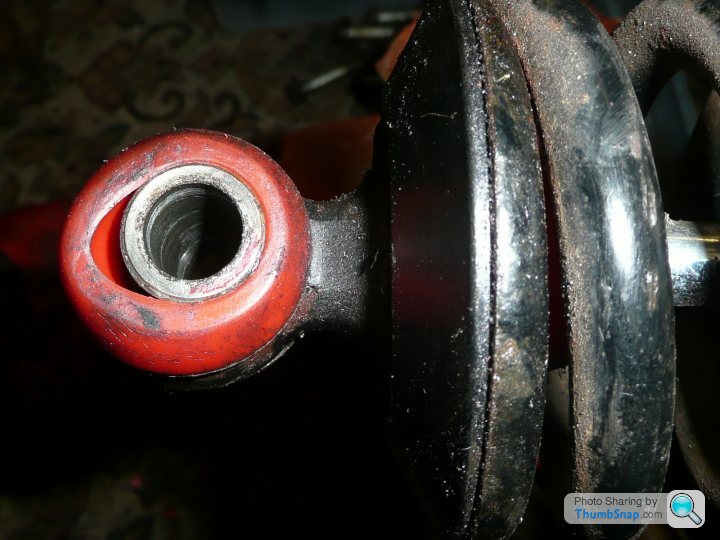
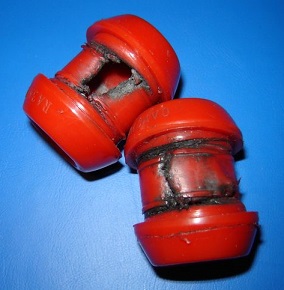
I just notice a detail : Why did you change the damper bushes on front dampers by new ones, instead of replace it by spherical bearing ? (thanks to Phillpot)
https://www.pistonheads.com/gassing/topic.asp?h=0&...
My bushes were destroyed after just few hundreds miles. I think the problem comes from the S front suspension geometry design. There is not the same problem on rear dampers. Rear bushes seem to survive much longer.
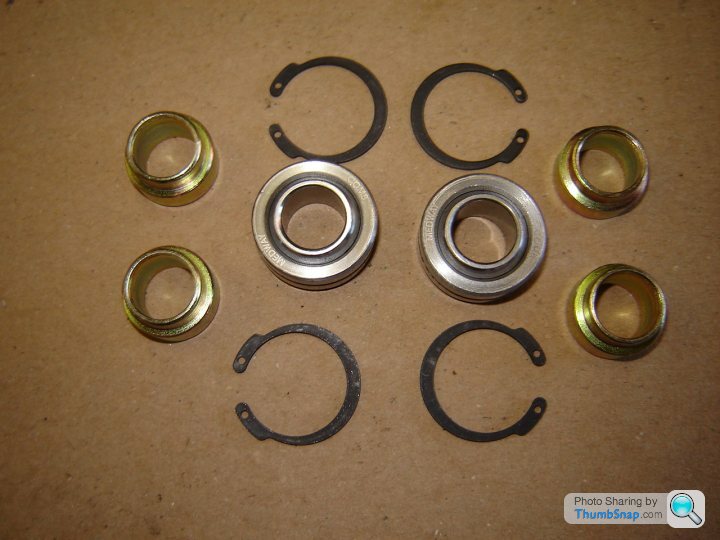
I bought 4 COM8T bearing for less than 15 pounds. For the spacers, you can cut the bush axles to 1/2' length (8 times). And you also need 8 internal circlips for 1 inch hole.
Respect.I just notice a detail : Why did you change the damper bushes on front dampers by new ones, instead of replace it by spherical bearing ? (thanks to Phillpot)
https://www.pistonheads.com/gassing/topic.asp?h=0&...
My bushes were destroyed after just few hundreds miles. I think the problem comes from the S front suspension geometry design. There is not the same problem on rear dampers. Rear bushes seem to survive much longer.
I bought 4 COM8T bearing for less than 15 pounds. For the spacers, you can cut the bush axles to 1/2' length (8 times). And you also need 8 internal circlips for 1 inch hole.
Edited by Fefeu52 on Tuesday 6th November 18:14
Fefeu52 said:
My bushes were destroyed after just few hundreds miles. I think the problem comes from the S front suspension geometry design. There is not the same problem on rear dampers. Rear bushes seem to survive much longer.
Funny, it was my rears that failed before the front. Avo blamed it on poor suspension geometry, I reckon they're just crap bushes and not helped by the circlip grooves cutting into them?An old post on the subject.......... AVO bushes
Edited by phillpot on Tuesday 6th November 18:23
In direct reply to fefeu52...
Simply put, it was due to my ignorance that such spherical bushes are available as replacements for the AVO poly bushes.
At that time I just did the obvious (to me anyway) in contacting AVO to order 'same as' replacements.
But of course, now knowing this new info, I will be swooping over to spherical bushes as soon as the poly bushes show any signs of wear etc.
Thank you for that info.
Oh, the rears are GAZ with spherical bearings !
TerryB.
phillpot said:
Funny, it was my rears that failed before the front. Avo blamed it on poor suspension geometry, I reckon they're just crap bushes and not helped by the circlip grooves cutting into them?
An old post on the subject.......... AVO bushes
Those bushes have been rotating in the bore of the housing on the damper body. It'd kill any bush, as they're not supposed to do that. The crush tube is supposed to rotate inside the bush itself.An old post on the subject.......... AVO bushes
Blue 30 said:
Hi Damian...
My engine unit is a 2006 spec (with only 1200 miles recorded) so has the later type inlet manifold including IMTs. These are plumbed into the ecu. I bought an unbranded 65mm TB, it just needed the fixing holes modifying a little. Original Jag fbw tb was 60mm-ish, Ford 3.0 duratec used 62mm, with popular modified tb's being 65mm, so that's why I used that one, as it'll keep air velocity good (on standard cams).
TerryB.
Hi Terry - how about an update please My engine unit is a 2006 spec (with only 1200 miles recorded) so has the later type inlet manifold including IMTs. These are plumbed into the ecu. I bought an unbranded 65mm TB, it just needed the fixing holes modifying a little. Original Jag fbw tb was 60mm-ish, Ford 3.0 duratec used 62mm, with popular modified tb's being 65mm, so that's why I used that one, as it'll keep air velocity good (on standard cams).
TerryB.

I copied the text above as I took note and junked the Jag inlet completely and gone Alfa with it's 70mm fbw tb. My original Jag (year 2000) had a 75mm tb!!!
No idea as to whether a good or bad idea but once on a rolling road I'll find out.
Yes, you're right about doing an update... So here it is.
Thanks for the reminder.
Nov18.. Went to the Nec classic show (Panther stand attendee).
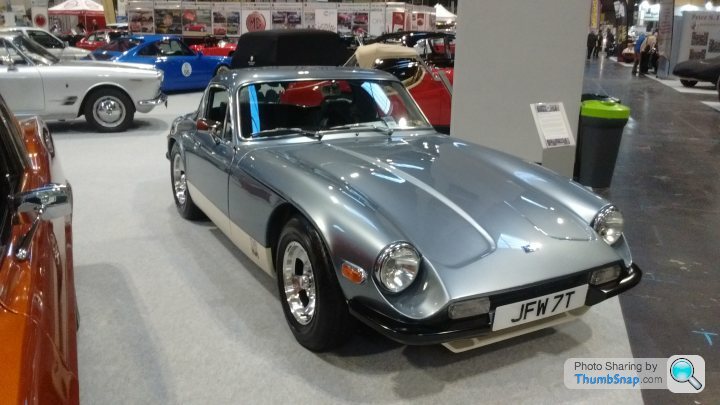
My Panther Kallista on show, mainly to get it sold.

Then I saw this... Simply stunning. It tells me I should get back to working on my S.
Jan19... My Panther has sold. So that's a bit less to think about...
Jan19... Converted our neighbours garage into a dance studio for their daughters.
Feb19... Went on winter holiday.
Feb/March 19... Completed a total strip/refit of our bathroom.
Back in time credit now, so car work comes next...
TerryB
TerryB
Thanks for the reminder.
Nov18.. Went to the Nec classic show (Panther stand attendee).
My Panther Kallista on show, mainly to get it sold.
Then I saw this... Simply stunning. It tells me I should get back to working on my S.
Jan19... My Panther has sold. So that's a bit less to think about...
Jan19... Converted our neighbours garage into a dance studio for their daughters.
Feb19... Went on winter holiday.
Feb/March 19... Completed a total strip/refit of our bathroom.
Back in time credit now, so car work comes next...
TerryB
TerryB
March/April... Now I can see into my garage, it needs an urgent cleanse.
Panther parts get sold on, storage shelves rebuilt into a storage/work bench, with down lighting, a vice, and a pillar drill no less. I've never had such an organised facility, but will I be able to find anything !!!
Now I've got the S outside, and we're into the spring. It might as well stay out, and I can work in the sun & fresh air.
Oh, that's also because our 20yr old Merc Slk needs some TLC, on the 4-post.
So doing all that we're now at the end of May19...
The Merc's underbelly... Pretty clean eh ?
June19...
As I said previously, I wanted to work outside on the S, so that I could complete the front brakes, the steering set up, and the suspension.
But guess what... Our great British summer bites back, and decides to pee down.
Oh well, back into the garage the S goes.
But on shifting it, there's a puddle on the floor !!
There are no fluids in the engine, so ??
Its one of the AVO front shocks (they were on the car when I bought it in 2014).
So they come off the car (again). And now they're with AVO to repair/refurb.
Okay,
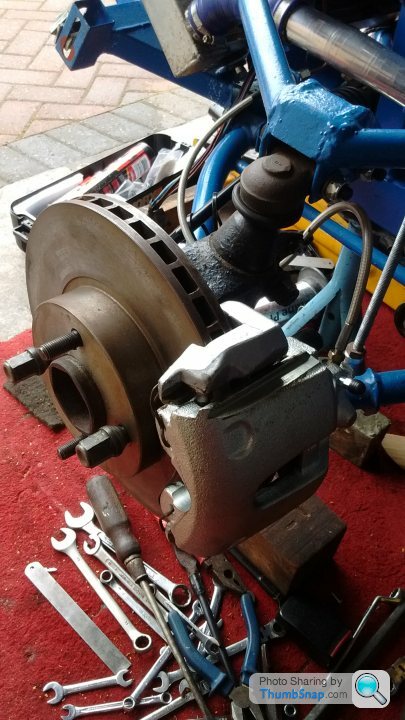
I'll finish off the front brakes (557/8 calipers & 278mm discs). I had bolted those on a while back. The calipers were used, but in good order. So now its time to add the pads, tighten down the hoses etc, and get ready to add fluid and bleed. The back already been fitted with new parts. And then I break off a bleed nipple !!!!
Every trick tried to extract the remains. Nope.
But thanks to Mick P, for suggesting a drill out, re thread, add an insert repair kit. The only thing is the cost (around £60). Mmmm.
So I do some searching for a another caliper. Used ones currently on eBay look pretty grotty. But there is a trader selling new ones in pairs (non OE) for around £70. But it didn't exactly list them for Fiesta ST150 fitment. So I made direct contact, still no good as they work from Reg or Vin No's... Only I ain't got either of those...
Light bulb moment... Find ST150 for sale, give them that Reg, and we're onto a winner... Fingers crossed.
Anyway they arrive PDQ, and they're spot on.
So that's one job down...
As I said previously, I wanted to work outside on the S, so that I could complete the front brakes, the steering set up, and the suspension.
But guess what... Our great British summer bites back, and decides to pee down.
Oh well, back into the garage the S goes.
But on shifting it, there's a puddle on the floor !!
There are no fluids in the engine, so ??
Its one of the AVO front shocks (they were on the car when I bought it in 2014).
So they come off the car (again). And now they're with AVO to repair/refurb.
Okay,
I'll finish off the front brakes (557/8 calipers & 278mm discs). I had bolted those on a while back. The calipers were used, but in good order. So now its time to add the pads, tighten down the hoses etc, and get ready to add fluid and bleed. The back already been fitted with new parts. And then I break off a bleed nipple !!!!
Every trick tried to extract the remains. Nope.
But thanks to Mick P, for suggesting a drill out, re thread, add an insert repair kit. The only thing is the cost (around £60). Mmmm.
So I do some searching for a another caliper. Used ones currently on eBay look pretty grotty. But there is a trader selling new ones in pairs (non OE) for around £70. But it didn't exactly list them for Fiesta ST150 fitment. So I made direct contact, still no good as they work from Reg or Vin No's... Only I ain't got either of those...
Light bulb moment... Find ST150 for sale, give them that Reg, and we're onto a winner... Fingers crossed.
Anyway they arrive PDQ, and they're spot on.
So that's one job down...

And there's more...
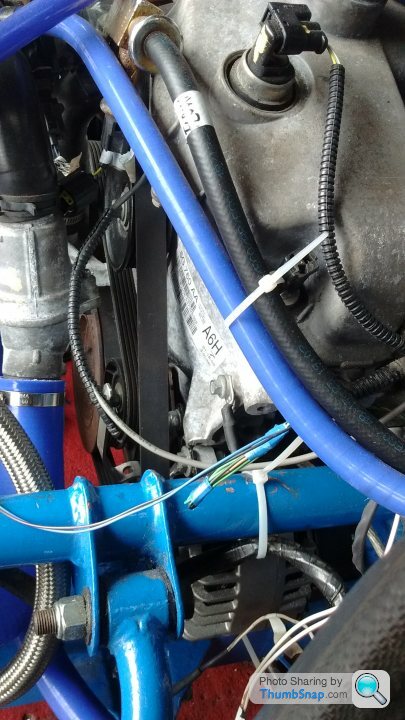
For those who have/are following the two other guys doing the AJ30 conversion (plus mine). You will have noted that they have fitted the alternator on the drivers side. By doing such, this leaves room to create a bespoke n/side engine mount close to the front of the engine on the n/side, as that's where there are conveniently placed threaded holes in the block !
As I have fitted the Pas pump on the o/side, the alternator has to go on the n/side. Both very tight in space terms as they intrude into the chassis spaces. Plus my n/side engine mount is much further back, using the original (swine to get at) chassis plate.
Pas pump.
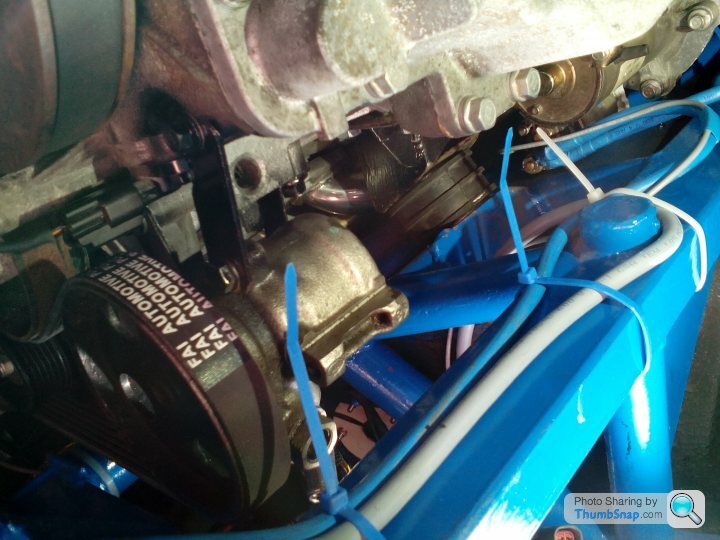
Alternator.
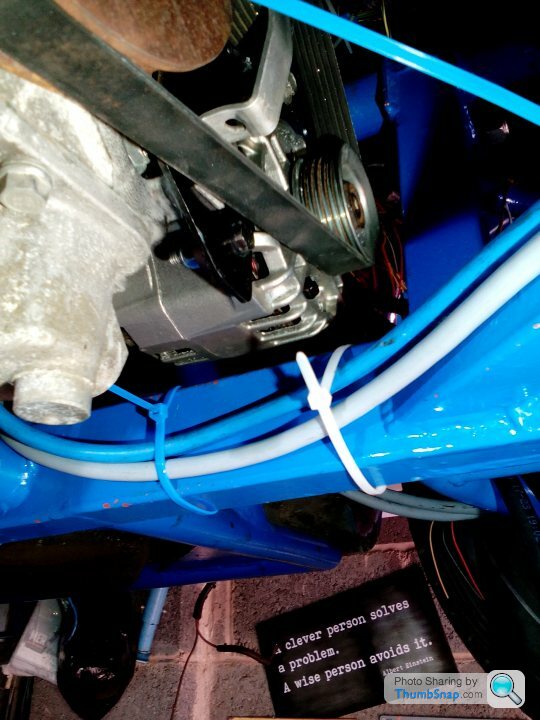
The drive belt arrangement on the jag is a complex one, including a spring loaded tensioner/idle wheel. The other guys have removed that, where the alternator now does the tensioning (old skool style). I had to delete my jag tensioner/idle wheel too, but I can't get enough 'swing' on the alternator. Therefore I introduced my own manual sliding idler wheel. That took a whole load of time to design/create, and make sure all the pulleys aligned correctly. Only time will tell once its in service.
TerryB.
For those who have/are following the two other guys doing the AJ30 conversion (plus mine). You will have noted that they have fitted the alternator on the drivers side. By doing such, this leaves room to create a bespoke n/side engine mount close to the front of the engine on the n/side, as that's where there are conveniently placed threaded holes in the block !
As I have fitted the Pas pump on the o/side, the alternator has to go on the n/side. Both very tight in space terms as they intrude into the chassis spaces. Plus my n/side engine mount is much further back, using the original (swine to get at) chassis plate.
Pas pump.
Alternator.
The drive belt arrangement on the jag is a complex one, including a spring loaded tensioner/idle wheel. The other guys have removed that, where the alternator now does the tensioning (old skool style). I had to delete my jag tensioner/idle wheel too, but I can't get enough 'swing' on the alternator. Therefore I introduced my own manual sliding idler wheel. That took a whole load of time to design/create, and make sure all the pulleys aligned correctly. Only time will tell once its in service.
TerryB.
The Pas pump & alternator photos above are from underneath, so you'll have to pretend you're under the car !
Here is a snap of the current state from up above. Its getting there, some things (wiring, pipes, hoses etc) have been deliberately left loose, so that I can trial test, and rectify/tidy up as required.... When I eventually get to that stage.
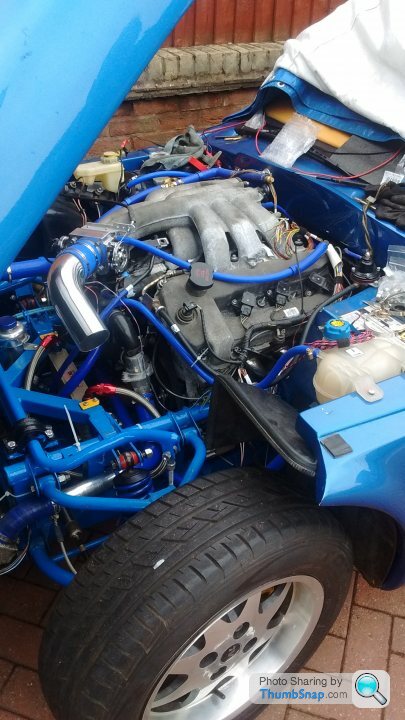
Currently as I am waiting on the front shocks return from AVO, there's not much I can do at the front end, plus the car is on axle stands.
Oh, from the photo above you might be able to ID the new sitting of the Arb, a bit of work to do on the extended drop links still to do.
So, as I'm at a loose end... Lol.
Remembering that my project is not only a drive train conversion, but it is a general restoration too (as it was a crap car example that I bought, albeit knowingly).
I might as well start another job.
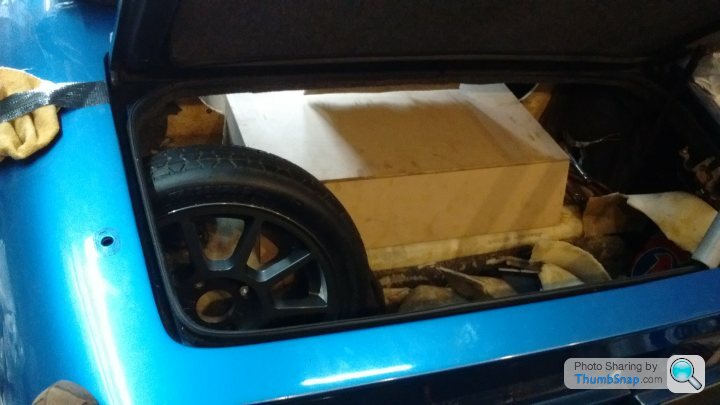
Here is the state of play with my roof panel 'arse' introduction.
The box being left open in the cockpit, where the panels will slide into.
And I think you're just about up to date...
TerryB
Here is a snap of the current state from up above. Its getting there, some things (wiring, pipes, hoses etc) have been deliberately left loose, so that I can trial test, and rectify/tidy up as required.... When I eventually get to that stage.
Currently as I am waiting on the front shocks return from AVO, there's not much I can do at the front end, plus the car is on axle stands.
Oh, from the photo above you might be able to ID the new sitting of the Arb, a bit of work to do on the extended drop links still to do.
So, as I'm at a loose end... Lol.
Remembering that my project is not only a drive train conversion, but it is a general restoration too (as it was a crap car example that I bought, albeit knowingly).
I might as well start another job.
Here is the state of play with my roof panel 'arse' introduction.
The box being left open in the cockpit, where the panels will slide into.
And I think you're just about up to date...
TerryB
Pas steering rack... If you don't mind I'll hold back on that info. As I wouldn't want anyone to buy or start any work based on my unfinished/untested/life threatening conversion. I promise I'll reveal all as soon as the system is trial tested.
Alternator weather shield... Yes, its under consideration.
Thanks both for your interest.
If you're passing by South Staffs, you're more than welcome to drop in.
TerryB.
Alternator weather shield... Yes, its under consideration.
Thanks both for your interest.
If you're passing by South Staffs, you're more than welcome to drop in.
TerryB.
Blue 30 said:
Pas steering rack... If you don't mind I'll hold back on that info. As I wouldn't want anyone to buy or start any work based on my unfinished/untested/life threatening conversion. I promise I'll reveal all as soon as the system is trial tested.
Alternator weather shield... Yes, its under consideration.
Thanks both for your interest.
If you're passing by South Staffs, you're more than welcome to drop in.
TerryB.
Thank you very much for your kind offer, unfortunately I'm in Dire Straits over this.....you're "so far away from me", I've moved country.Alternator weather shield... Yes, its under consideration.
Thanks both for your interest.
If you're passing by South Staffs, you're more than welcome to drop in.
TerryB.
Going back a few years I wouldn't have hesitated in taking you up on your offer and no doubt would have thoroughly enjoyed the viewing. There is so much to see
Good luck in getting the build completed
Today's excitement was to carry on with the roof panel storage box. On my car there was an added difficulty in so much as the rear bulkhead had a couple of huge speakers cut into it. So I screwed & glued a piece of 4mm marine ply boot side. Now the box hole has been cut through both the ply and the grp, I simply cut two speaker shaped blanks to infill the holes
Both sides will be re carpeted of course.
I will have some boot grey carpet surplus, but don't ask just yet.
As that is all clamped up & drying, I thought I might as well have a look at the roof panels.
As I have a new material roof waiting to fit, & gathering dust.
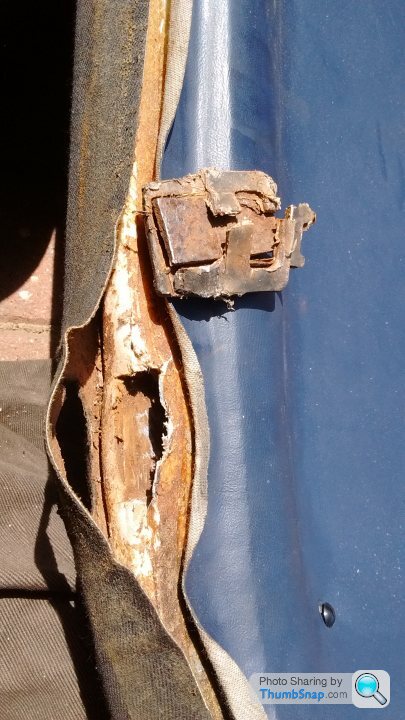
X4 tangs on one panel are corroded through. X1 on the other. There are plenty of threads on the forum covering those, so I won't bother documenting it here..
Here's an example.
Both sides will be re carpeted of course.
I will have some boot grey carpet surplus, but don't ask just yet.
As that is all clamped up & drying, I thought I might as well have a look at the roof panels.
As I have a new material roof waiting to fit, & gathering dust.
X4 tangs on one panel are corroded through. X1 on the other. There are plenty of threads on the forum covering those, so I won't bother documenting it here..
Here's an example.
Gassing Station | S Series | Top of Page | What's New | My Stuff