Terry's tale. (S3 resto ++)
Discussion


You have done a neat job, any tips on hood install I’m sure would be appreciated on here.
[/quote]
https://tvr-s-series.net/images/downloads/Karosser...
Been there done that
Many thanks for finding and posting the link, as I was struggling to find it again.
Yes, it's a great foundation in doing a new hood fitting.
I would emphasize...
Measuring, and marking various points with tailor's chalk. That's well before you attempt to glue anything.
Buy/use 4-6 strong plastic spring clamps.
(Got mine from Wilkinsons). You will find them very useful.
When fixing the hood to the rear rail, DO make sure the hood seam points down, as tension will try to pull it away from the body contact ( mine did).
Also, insert the rear rail fixing bolts before glueing the hood to the rail, as they're a bugger to get back in if you don't. I put a little rubber O-ring around each bolt to stop em dropping back.
Try to remove your old covers in one piece, take note of all folds and cutting. And keep the old covers for reference until you're fully finished.
If you're fitting new alloy over-centre bars, leave em until after you have done the new hood. Otherwise you are trying to do x2 jobs at once.
Lastly... Don't even consider doing a new hood fit, let alone actually buying it, unless you have plenty of patience, and very good hand/eye coordination.
Lastly lastly... Buy best quality high temp aerosol upholstery spray glue, and/or contact adhesive. (Martrim).
T.
chiefyo said:
You have done a neat job, any tips on hood install I’m sure would be appreciated on here.
https://tvr-s-series.net/images/downloads/Karosserie/verdeck/Soft_Top_Installation_S.pdfBeen there done that
.
Edited by 88S1 on Monday 17th August 22:18
Edited by 88S1 on Monday 17th August 22:20
Blue 30 said:
Many thanks for finding and posting the link, as I was struggling to find it again.
Yes, it's a great foundation in doing a new hood fitting.
I would emphasize...
Measuring, and marking various points with tailor's chalk. That's well before you attempt to glue anything.
Buy/use 4-6 strong plastic spring clamps.
(Got mine from Wilkinsons). You will find them very useful.
When fixing the hood to the rear rail, DO make sure the hood seam points down, as tension will try to pull it away from the body contact ( mine did).
Also, insert the rear rail fixing bolts before glueing the hood to the rail, as they're a bugger to get back in if you don't. I put a little rubber O-ring around each bolt to stop em dropping back.
Try to remove your old covers in one piece, take note of all folds and cutting. And keep the old covers for reference until you're fully finished.
If you're fitting new alloy over-centre bars, leave em until after you have done the new hood. Otherwise you are trying to do x2 jobs at once.
Lastly... Don't even consider doing a new hood fit, let alone actually buying it, unless you have plenty of patience, and very good hand/eye coordination.
Lastly lastly... Buy best quality high temp aerosol upholstery spray glue, and/or contact adhesive. (Martrim).
T.
Thanks Terry. Some great pointers there. Already have the hood, and a warehouse at work where I can take my time with plenty of space and In the dry/good lighting. And of course can do as much cursing as I want without upsetting the neighbours. I’ve got a lot to do before I get to that point yet though. Yes, it's a great foundation in doing a new hood fitting.
I would emphasize...
Measuring, and marking various points with tailor's chalk. That's well before you attempt to glue anything.
Buy/use 4-6 strong plastic spring clamps.
(Got mine from Wilkinsons). You will find them very useful.
When fixing the hood to the rear rail, DO make sure the hood seam points down, as tension will try to pull it away from the body contact ( mine did).
Also, insert the rear rail fixing bolts before glueing the hood to the rail, as they're a bugger to get back in if you don't. I put a little rubber O-ring around each bolt to stop em dropping back.
Try to remove your old covers in one piece, take note of all folds and cutting. And keep the old covers for reference until you're fully finished.
If you're fitting new alloy over-centre bars, leave em until after you have done the new hood. Otherwise you are trying to do x2 jobs at once.
Lastly... Don't even consider doing a new hood fit, let alone actually buying it, unless you have plenty of patience, and very good hand/eye coordination.
Lastly lastly... Buy best quality high temp aerosol upholstery spray glue, and/or contact adhesive. (Martrim).
T.
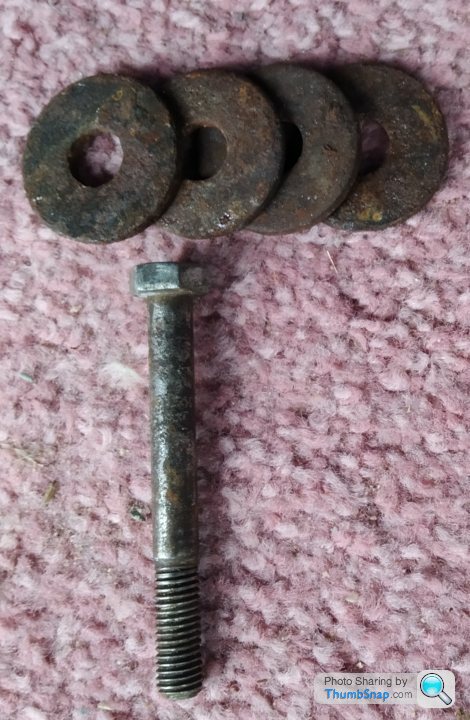
Another point to note if you are going to remove the main hoop from the car to clean it up from old glue etc (which saves the mess going inside the car). Beware the condition of the old hinge bolts and spacers.
These were mine (spacers hiding inside a bit of converluted plastic hose). They were all rust welded together, a real mess. Now replaced with s/steel bolts and alloy spacers.
T.
These were mine (spacers hiding inside a bit of converluted plastic hose). They were all rust welded together, a real mess. Now replaced with s/steel bolts and alloy spacers.
T.
Blue 30 said:
Another point to note if you are going to remove the main hoop from the car to clean it up from old glue etc (which saves the mess going inside the car). Beware the condition of the old hinge bolts and spacers.
These were mine (spacers hiding inside a bit of converluted plastic hose). They were all rust welded together, a real mess. Now replaced with s/steel bolts and alloy spacers.
T.
Mine must have been the same as the hoop connection to the body is ripped out of the hoop, another job on my endless list of things to do. These were mine (spacers hiding inside a bit of converluted plastic hose). They were all rust welded together, a real mess. Now replaced with s/steel bolts and alloy spacers.
T.
Edited by 88S1 on Wednesday 19th August 21:05

And another job 3/4 finished....
That's the battery relocation (to the boot) including a plastic cover that was surplus from a previous resto. Just a bit of tidying to do.
The yellow wire on the boot lid latch is a temporary addition to prevent any lockouts !
You can also just about see a master switch that I have introduced.
T.

That's the battery relocation (to the boot) including a plastic cover that was surplus from a previous resto. Just a bit of tidying to do.
The yellow wire on the boot lid latch is a temporary addition to prevent any lockouts !
You can also just about see a master switch that I have introduced.
T.
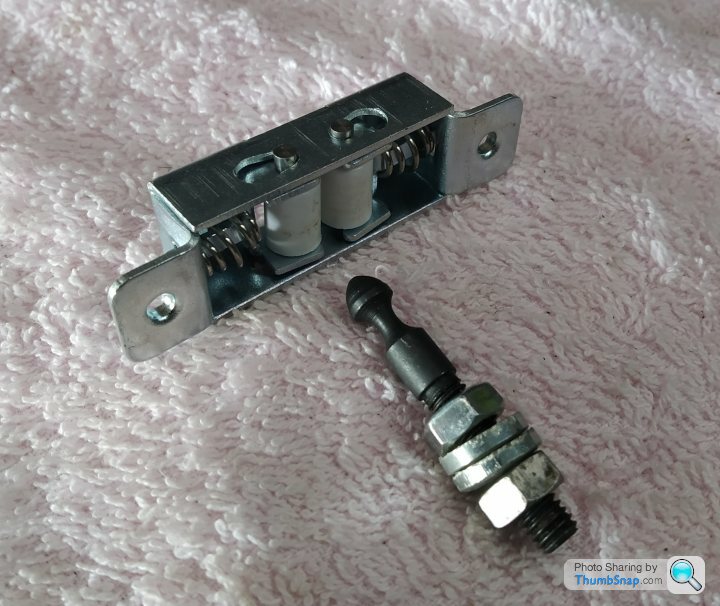

It's just an oven door catch. The 2 white rollers are spring loaded, they grab the pin as it engages with the rollers.
I'm replacing the key lock catch on the glovebox with it. The pin will be on the door, central on a 'L' bracket pointing up. The roller assembly will be behind the dash above the door where the lock tab used to engage.
So to open the door,it will be just a sharp pull down, and a slam to close.
I know, nothing of value to be left in the glovebox... Ever !
T.
Edited by Blue 30 on Tuesday 25th August 15:36
88S1 said:
Very nice indeed. You must be virtually complete now, have you much to do. How did the hood turn out eventually, what I’d seen so far looked good, I have mine to do (eventually).
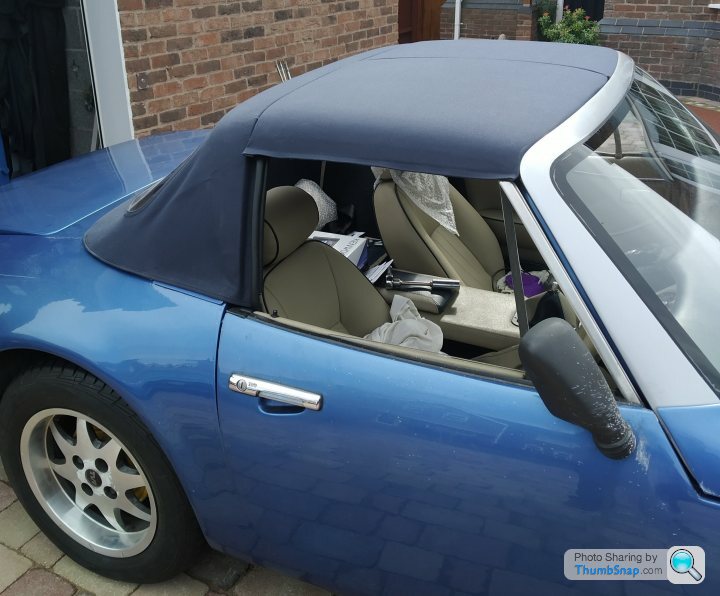
So... It had to come out of the garage today to be turned around. And it did it all under its own power. The pas is working & made the manoeuvring much easier.... Found a union leak though 
Here are some pictures of the finished hood and targas. I haven't done the targa to door glass seals yet.
T.
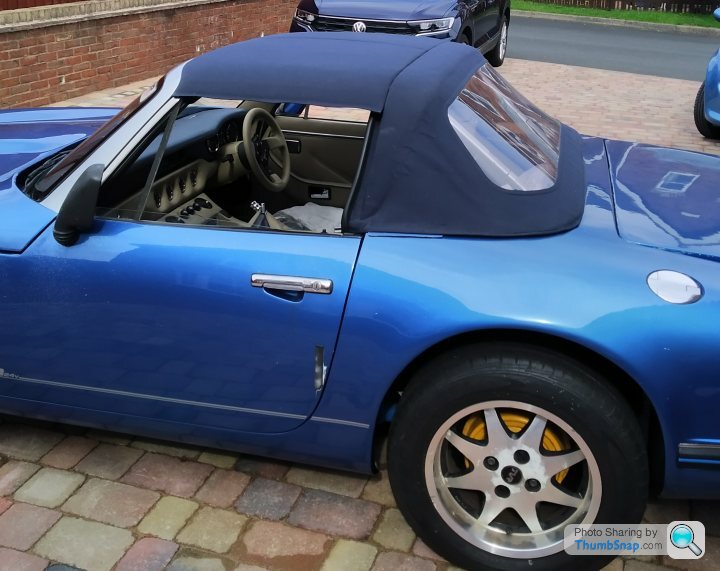


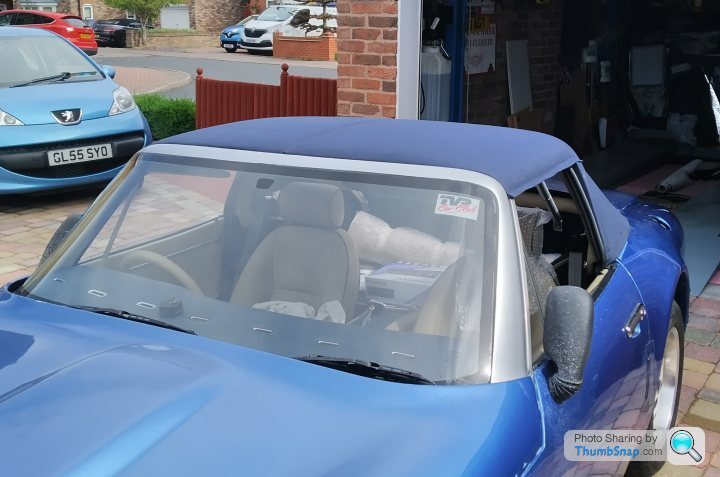
Oh, yes the car IS pretty grubby, as I have started to mop the paintwork. It flicks everywhere, including on me !
T.
PAS mod...
I will do soon.
But in the meantime have a read of this to familiarise yourself with relevant bits & pieces.
https://www.pistonheads.com/gassing/topic.asp?h=0&...
But don't go buying anything or doing any detailed mods !!
TB.
I will do soon.
But in the meantime have a read of this to familiarise yourself with relevant bits & pieces.
https://www.pistonheads.com/gassing/topic.asp?h=0&...
But don't go buying anything or doing any detailed mods !!
TB.
Edited by Blue 30 on Thursday 24th September 10:52
Thanks Terry
I was guessing you had gone the Subaru route. This is something I have had in mind for a while and a rack and pump are actually already sitting in the garage. So my curiosity is to see how you tackled fitting this to an S and maybe save myself some trial and error.
Ta
Dave
I was guessing you had gone the Subaru route. This is something I have had in mind for a while and a rack and pump are actually already sitting in the garage. So my curiosity is to see how you tackled fitting this to an S and maybe save myself some trial and error.
Ta
Dave
PAS mod...
So now you have had chance to read & digest the Chim pas mod article as per the link above.
Here is my version of the same, but on my 1990 2.9 S3.
But don't forget, this is how I did it, and I am NOT instructing how you should go about it.
That's up to you... Not me !
The rack is from a 90's classic Subaru Impreza, I think that is referred to as the GC8 model.
My used rack looked pretty sad, ripped bellows and very floppy control arms. But once they were stripped off, the rack appeared okay.
By luck the replacement arms (ICP brand) had slightly longer thread sections, and the shaft wasn't waisted, so extra thread could be cut on, if required (mine didn't). I researched and found that 90's Toyota Corolla track rod ends were the correct thread, the correct taper, and the correct length for tracking adjustments.
The rack lock to lock travel is a little less than the tvr rack, but nothing that concerns me. Oh, the Impreza rack, is the standard one, not the quick rack.
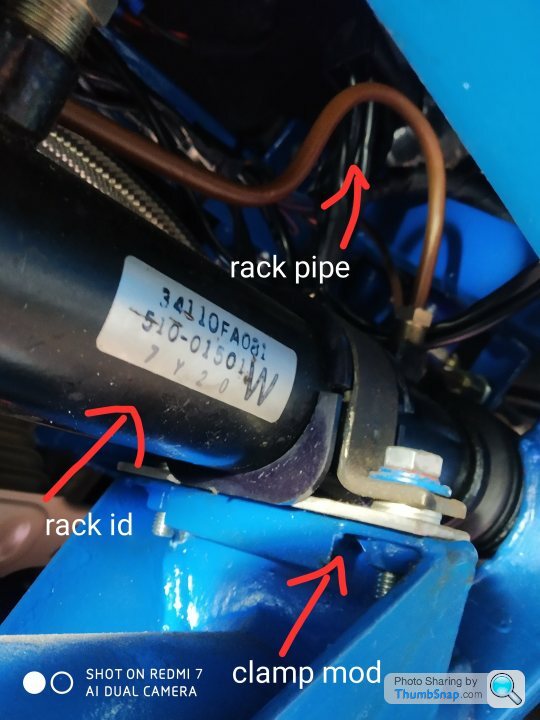
Mounting the rack is very similar to what is noted on the Chim rack fitting. New or modified mounting clamps, a chassis plate cutaway for pinion valve block & pipe clearance. And the rack pinion valve block does need to be rotated 180o.
So that's the rack bolted down and connected to the wheel stub axle uprights.
There are 2 pipes from valve block to the rack tube, mine were missing, so I made new ones. I'm not sure if the Subaru originals would have to be re bent or replaced to suit the S.
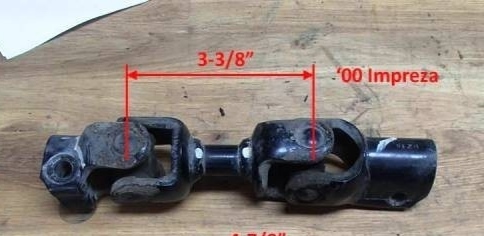
I obtained an impreza steering column lower u/j to u/j unit. Only one u/j end is required to link up to the rack input pinion. Cut the other u/j off & discard then 'graft' the u/j with the stub onto the tvr column shaft.
How you do that is your choice.... It's your life that will depend on it !!!!
So no messing about with pinion spline cutting & grinding to get ANother u/j to fit (such as described on the Chim article)
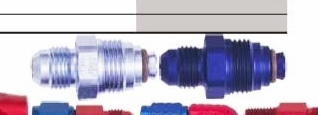
The oil pressure feed & return pipes screw into the rack valve block. The M14 is the high pressure flow. The M16 is the return. The unions are specific type of unions. I used a specific Pas union to AN-6 adaptor on the high pressure input. Some of the guys on the Chim article had problems getting that to seal properly, mine is okay so far. An alternative (better ?) union adaptor is a Bump Tube Adaptor as sold by JLS Motorsport in Birmingham. You might get the Impreza original pipes with your rack, which might be able to be modified and reused. Pump arrangements are to suit your engine size/layout. Or you could opt for an electric/hydraulic pump such as used on some VX Astras, Citroen, or the BMW mini type. Your choice.
And I think that's the essentials covered...
I'm sure you will say, if I've missed anything out....
Photos to follow, as it's getting late.
T.
So now you have had chance to read & digest the Chim pas mod article as per the link above.
Here is my version of the same, but on my 1990 2.9 S3.
But don't forget, this is how I did it, and I am NOT instructing how you should go about it.
That's up to you... Not me !
The rack is from a 90's classic Subaru Impreza, I think that is referred to as the GC8 model.
My used rack looked pretty sad, ripped bellows and very floppy control arms. But once they were stripped off, the rack appeared okay.
By luck the replacement arms (ICP brand) had slightly longer thread sections, and the shaft wasn't waisted, so extra thread could be cut on, if required (mine didn't). I researched and found that 90's Toyota Corolla track rod ends were the correct thread, the correct taper, and the correct length for tracking adjustments.
The rack lock to lock travel is a little less than the tvr rack, but nothing that concerns me. Oh, the Impreza rack, is the standard one, not the quick rack.
Mounting the rack is very similar to what is noted on the Chim rack fitting. New or modified mounting clamps, a chassis plate cutaway for pinion valve block & pipe clearance. And the rack pinion valve block does need to be rotated 180o.
So that's the rack bolted down and connected to the wheel stub axle uprights.
There are 2 pipes from valve block to the rack tube, mine were missing, so I made new ones. I'm not sure if the Subaru originals would have to be re bent or replaced to suit the S.
I obtained an impreza steering column lower u/j to u/j unit. Only one u/j end is required to link up to the rack input pinion. Cut the other u/j off & discard then 'graft' the u/j with the stub onto the tvr column shaft.
How you do that is your choice.... It's your life that will depend on it !!!!
So no messing about with pinion spline cutting & grinding to get ANother u/j to fit (such as described on the Chim article)
The oil pressure feed & return pipes screw into the rack valve block. The M14 is the high pressure flow. The M16 is the return. The unions are specific type of unions. I used a specific Pas union to AN-6 adaptor on the high pressure input. Some of the guys on the Chim article had problems getting that to seal properly, mine is okay so far. An alternative (better ?) union adaptor is a Bump Tube Adaptor as sold by JLS Motorsport in Birmingham. You might get the Impreza original pipes with your rack, which might be able to be modified and reused. Pump arrangements are to suit your engine size/layout. Or you could opt for an electric/hydraulic pump such as used on some VX Astras, Citroen, or the BMW mini type. Your choice.
And I think that's the essentials covered...
I'm sure you will say, if I've missed anything out....
Photos to follow, as it's getting late.
T.
Edited by Blue 30 on Thursday 24th September 10:53
Edited by Blue 30 on Thursday 24th September 11:00
Edited by Blue 30 on Thursday 24th September 19:42
Impreza column U/J to U/J
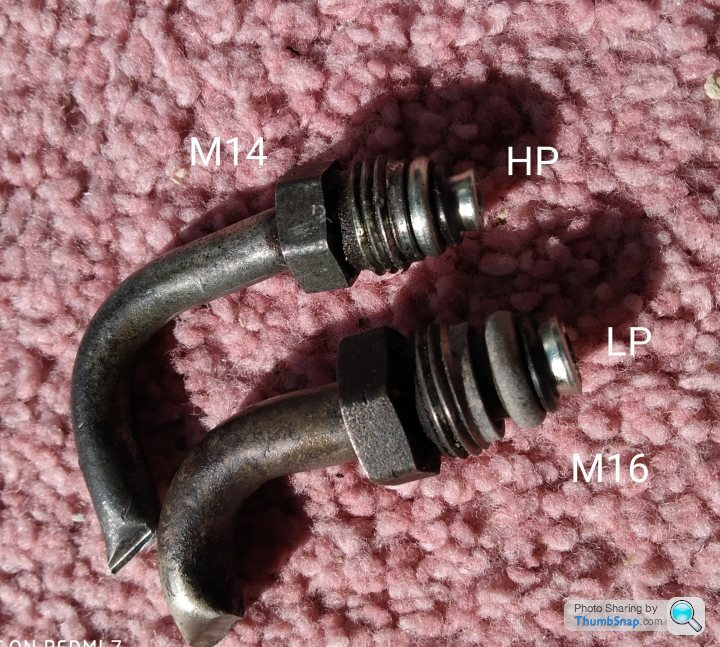
Original Impreza flow & return pipe unions.
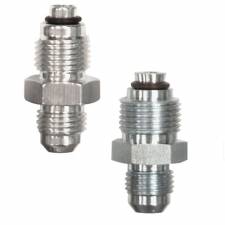
Replacement Pas to AN-6 unions.
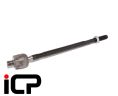
Replacement Impreza control arm.
Edited by Blue 30 on Thursday 24th September 19:48
Bump Tube adaptors.
Edited by Blue 30 on Thursday 24th September 20:05
Edited by Blue 30 on Thursday 24th September 20:05

PAS mod...
I had better point out that as of today's date & time, I have only turned the steering wheel under the cars own power, from lock to lock, to turn the car around 180o, to be driven back into my garage.
So all I can report is, that it works and feels like what a Pas steering setup should feel like.
And now the car is back on the lift, I find a blxxdy oil leak on the diff !!!!
It appears to be coming from the driver's side output, plus there is some lift evident at the output shaft flange.
I bought the diff from a Sierra used parts supplier some 3yrs ago. It is supposed to be a rebuilt 3.14 LSD diff !
I can't be bothered with going through any possible hassle with that supplier (my lack of faith). So today I make a call to Bara Motorsports to see if they can deal with it.
Anyway, it's on the garage floor, ready to go.(and I thought I was getting towards conclusion).
Back soon...
T.
Gassing Station | S Series | Top of Page | What's New | My Stuff