Fiesta Mk4/5 Trailing Arm Bush Replacement
Discussion


The Mk4/5 Fiesta is the 1995-2002 model.
I started this replacement job a few weeks ago, but because the bushes were well and truly seized in, I only had time to do one side. I tackled the other side today and decided to take a few pictures and do this "how to" write up in case anyone else might find it useful.
I am a DIY mechanic. According to the Haynes manual this is a three spanner job. It wasn't very difficult in itself except getting the actual bushes out.
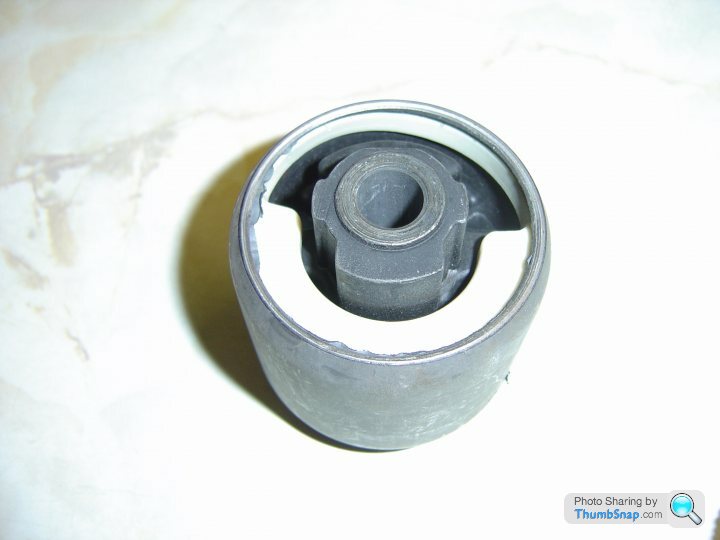
Firstly here is a brand new shiny bush. You can get these via the internet or your local motor factor. I prefer the local motor factor because they are just down the road and if you find you have the wrong part it's easy to pop back down there and change it.
To start
1) Slacken the wheel nuts on both rear wheels
2) Put the car in gear
3) Chock the front wheels
4) Jack up the rear of the car and support on stands. Don't put the stands under the rear beam, arms or any other part of the suspension, as this needs to be lowered. I used the rear jacking points.
5) Once up on the stands remove the wheels.
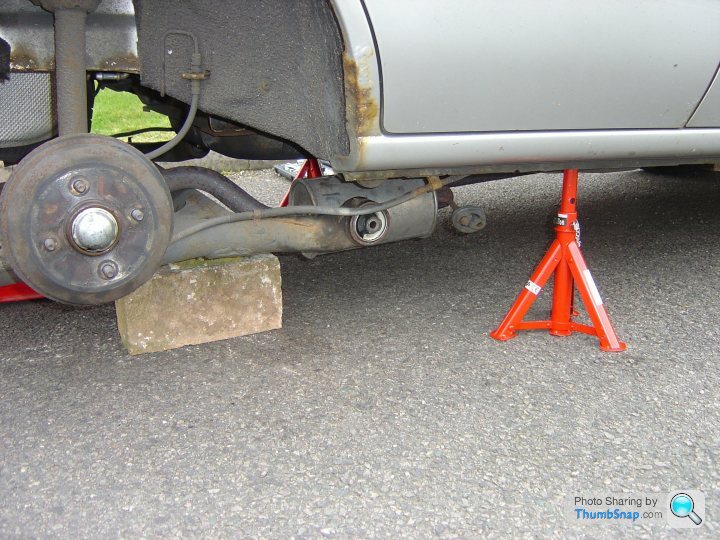
You can see the car on the stands here. I have already unbolted the arms and lowered the rear beam. It is supported on two large blocks/bricks. You could use another pair of stands if you have them. This is the side I have already done so the bush you can see is a new one.
To disconnect the arms and rear beam.
1) from the rear of the car slide your jack under the car until it's under the rear beam. Raise the jack until it's just touching the beam.
2) Place blocks or stands under the beam to support it when you lower the jack in a short while. Remember that it has to come down enough for the ends of the arms where the bushes are to be accessible, so it will need to drop about 6 inches. Set the stands or select blocks accordingly.
3) Undo the clips holding the handbrake cable to the sill. This is the same on both sides of the car. This will allow you to move the cable around and give you better access to the bolts passing through the arm and mounting bracket. This is a 10mm socket.
Here is a closer view of the car with the beam and arms already down. You can see the clip that holds the handbrake cable.

Next you need to remove the bolts that pass through the mounting bracket and the arms/bushes.
The nut is 19mm and the head of bolt is 15mm. The bolts come in from the center of the car and the nut is between the bracket and sill.
On the drivers side you can get better access if you disconnect the exhaust and slide it out of the way. It will rest on the rear beam so don't worry about it dropping. There are four rubbers to remove. These just slide over mounting hooks.
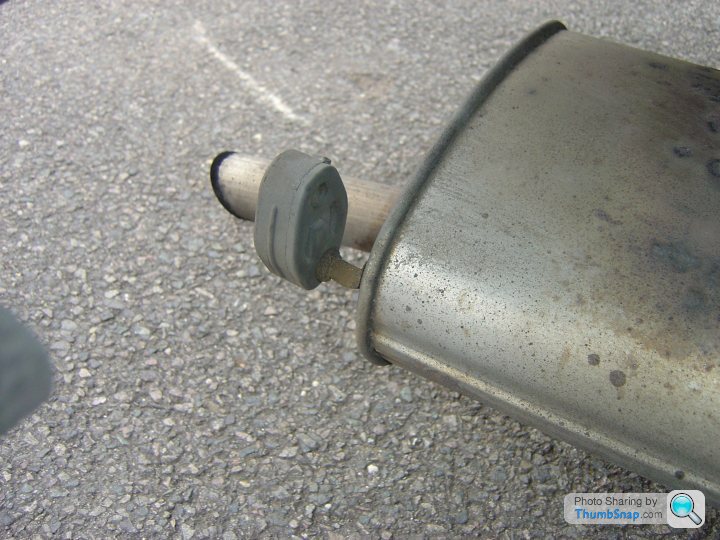
Here you can see one of the rubbers at the rear of the exhaust.
Here you can see the bracket that the arm fits into. You can also see two more of the exhaust mounting hooks - one behind the center of the bracket and one to the right of it. The fourth is just out of shot in front of the bracket. You can just see the exhaust resting on the beam in the right of the photo.

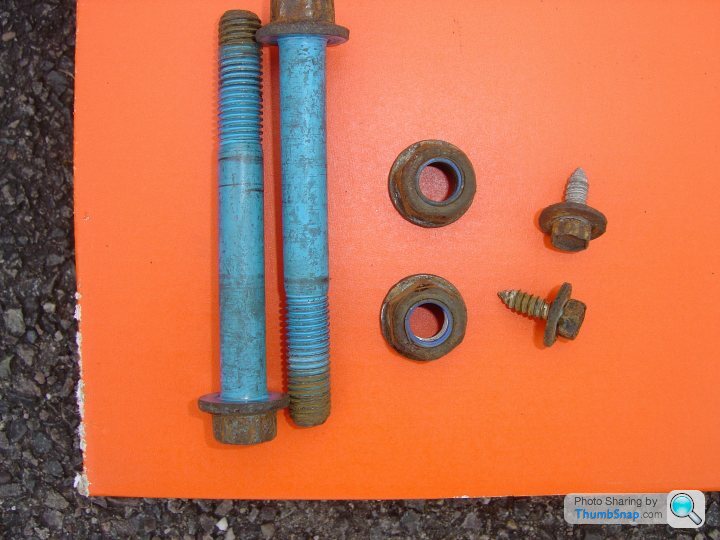
Here are the nuts, bolts and two small bolts holding the handbrake cable clips.
Once the bolts have been removed lower the jack so that the rear beam and arms lower down and come to rest on you stands or bricks.
Congratulations - it's time for a cup of coffee.
So suitably charged up with caffeine, let's resume.
Here is a close up of the new bush on the side I have already done

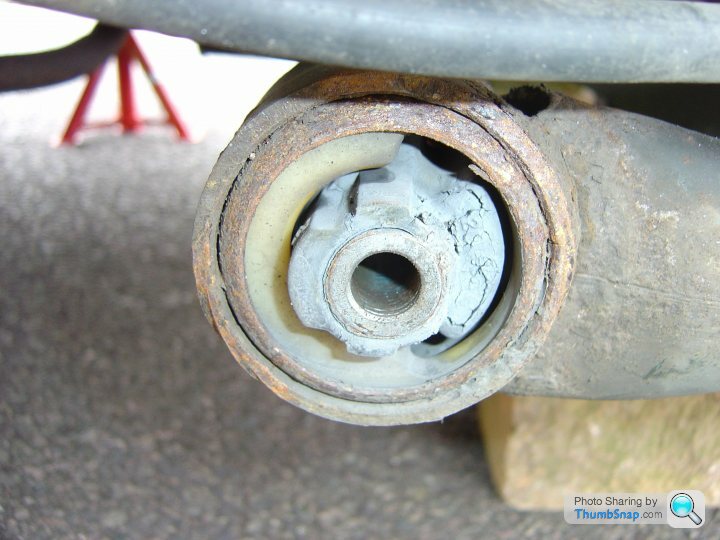
And just for comparison here is the other side - the one I am about to replace.
Now I do have a bush puller but these bushes are well and truly seized in and will not budge so I had to resort to old fashioned brute force. (The pullers can be found quite cheaply on a well known internet auction site).
Note - before removing the bush make sure you see how it is aligned as the new one needs to go in the same way. A photo or quick sketch will help, or refer to the other side of the car.
The brute force method with hand tools
1) Using a junior hacksaw (a large hacksaw blade will not fit yet) pass the blade through the centre of the bush and cut the through the inner metal collar. This may take a while. In the picture above aim for the gap between the rubber and white plastic between 4 and 5 o'clock.
2) Once through the inner collar you should be able to insert a larger hacksaw blade and switch to a larger saw. Cutting through the rubber really drags on the blade so give the blade regular squirts of WD40 or other lubricant to keep it running free. Keep going and cut through the outer metal sleeve, being careful not to go too far and cut into the actual arm. If space is tight you can mount the hacksaw blade pointing into the saw and do a pull cut.
3) At this point I took a hammer and metal chisel and smacked the outer sleeve in towards the center of the bush on both sides of the cut.
4) Then is used the puller. The combination of the above had freed it and released enough pressure for the puller to pop out the bush
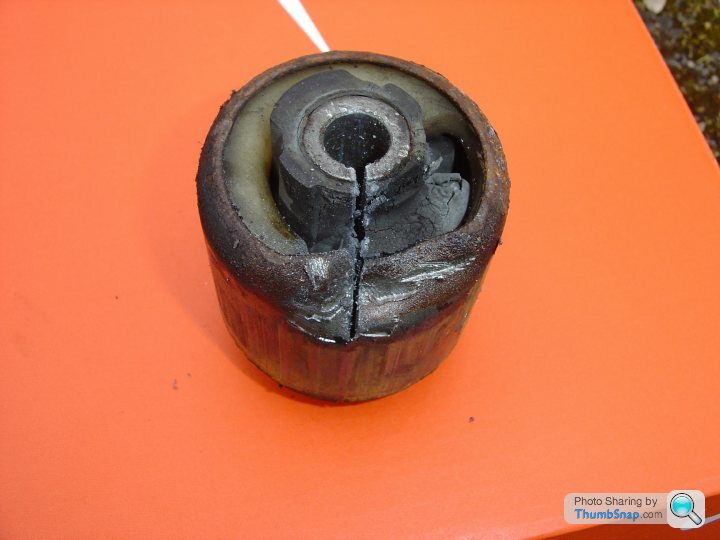
Here is the removed bush suitably savaged. You can clearly see the cuts and my chisel work.
Nearly there but probably a good time to stop for another cup of coffee.
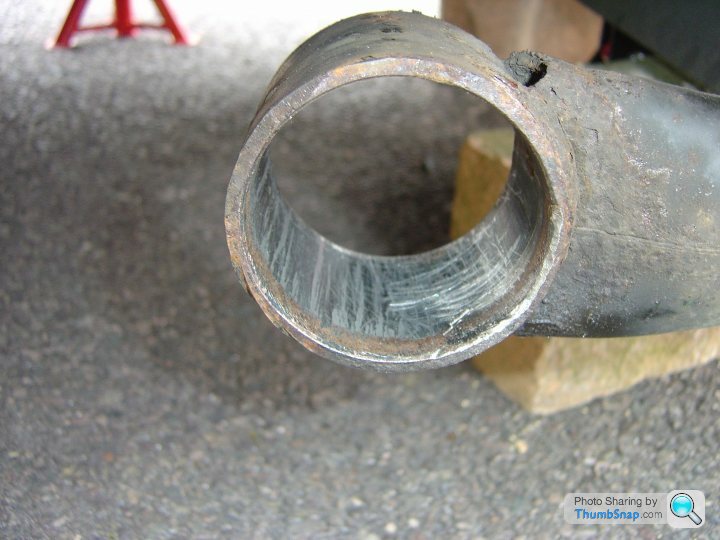
Next I lightly ran a file around the inside of the arm and gave it a good going over with a wire brush to remove any rust or other crud. Then I slapped a good splash of grease all around the inside of the hole.
The puller then came into its own as in reverse it's also an inserter. I wound in the new bush (still surprisingly tight) into place.
Now it's time for reassembly. An extra pair of hands on the jack might be helpful for a few minutes.
Slowly raise the jack so the rear beam and arms start to lift. A bit of lateral adjustment (a light shove to you and me) might be needed to get the arms to align with the brackets. Keep raising the jack so the arms move back into the bracket. While you are under the car the other person needs to make fine adjustments on the jack so you can line up the holes and get the bolts back through.
If you are on your own there is a bit of getting up and down as you have to do both jobs yourself.
Once the bolts are through on both sides refit the nuts and tighten up.
Reposition the handbrake cable and refit the fixing brackets to the sill.
Refit the exhaust by pushing all four rubbers back over the mounting hooks.
Refit the wheels.
Raise car to remove stands, lower and fully tighten the wheel nuts.
And that's it.
I started this replacement job a few weeks ago, but because the bushes were well and truly seized in, I only had time to do one side. I tackled the other side today and decided to take a few pictures and do this "how to" write up in case anyone else might find it useful.
I am a DIY mechanic. According to the Haynes manual this is a three spanner job. It wasn't very difficult in itself except getting the actual bushes out.
Firstly here is a brand new shiny bush. You can get these via the internet or your local motor factor. I prefer the local motor factor because they are just down the road and if you find you have the wrong part it's easy to pop back down there and change it.
To start
1) Slacken the wheel nuts on both rear wheels
2) Put the car in gear
3) Chock the front wheels
4) Jack up the rear of the car and support on stands. Don't put the stands under the rear beam, arms or any other part of the suspension, as this needs to be lowered. I used the rear jacking points.
5) Once up on the stands remove the wheels.
You can see the car on the stands here. I have already unbolted the arms and lowered the rear beam. It is supported on two large blocks/bricks. You could use another pair of stands if you have them. This is the side I have already done so the bush you can see is a new one.
To disconnect the arms and rear beam.
1) from the rear of the car slide your jack under the car until it's under the rear beam. Raise the jack until it's just touching the beam.
2) Place blocks or stands under the beam to support it when you lower the jack in a short while. Remember that it has to come down enough for the ends of the arms where the bushes are to be accessible, so it will need to drop about 6 inches. Set the stands or select blocks accordingly.
3) Undo the clips holding the handbrake cable to the sill. This is the same on both sides of the car. This will allow you to move the cable around and give you better access to the bolts passing through the arm and mounting bracket. This is a 10mm socket.
Here is a closer view of the car with the beam and arms already down. You can see the clip that holds the handbrake cable.
Next you need to remove the bolts that pass through the mounting bracket and the arms/bushes.
The nut is 19mm and the head of bolt is 15mm. The bolts come in from the center of the car and the nut is between the bracket and sill.
On the drivers side you can get better access if you disconnect the exhaust and slide it out of the way. It will rest on the rear beam so don't worry about it dropping. There are four rubbers to remove. These just slide over mounting hooks.
Here you can see one of the rubbers at the rear of the exhaust.
Here you can see the bracket that the arm fits into. You can also see two more of the exhaust mounting hooks - one behind the center of the bracket and one to the right of it. The fourth is just out of shot in front of the bracket. You can just see the exhaust resting on the beam in the right of the photo.
Here are the nuts, bolts and two small bolts holding the handbrake cable clips.
Once the bolts have been removed lower the jack so that the rear beam and arms lower down and come to rest on you stands or bricks.
Congratulations - it's time for a cup of coffee.
So suitably charged up with caffeine, let's resume.
Here is a close up of the new bush on the side I have already done
And just for comparison here is the other side - the one I am about to replace.
Now I do have a bush puller but these bushes are well and truly seized in and will not budge so I had to resort to old fashioned brute force. (The pullers can be found quite cheaply on a well known internet auction site).
Note - before removing the bush make sure you see how it is aligned as the new one needs to go in the same way. A photo or quick sketch will help, or refer to the other side of the car.
The brute force method with hand tools
1) Using a junior hacksaw (a large hacksaw blade will not fit yet) pass the blade through the centre of the bush and cut the through the inner metal collar. This may take a while. In the picture above aim for the gap between the rubber and white plastic between 4 and 5 o'clock.
2) Once through the inner collar you should be able to insert a larger hacksaw blade and switch to a larger saw. Cutting through the rubber really drags on the blade so give the blade regular squirts of WD40 or other lubricant to keep it running free. Keep going and cut through the outer metal sleeve, being careful not to go too far and cut into the actual arm. If space is tight you can mount the hacksaw blade pointing into the saw and do a pull cut.
3) At this point I took a hammer and metal chisel and smacked the outer sleeve in towards the center of the bush on both sides of the cut.
4) Then is used the puller. The combination of the above had freed it and released enough pressure for the puller to pop out the bush
Here is the removed bush suitably savaged. You can clearly see the cuts and my chisel work.
Nearly there but probably a good time to stop for another cup of coffee.
Next I lightly ran a file around the inside of the arm and gave it a good going over with a wire brush to remove any rust or other crud. Then I slapped a good splash of grease all around the inside of the hole.
The puller then came into its own as in reverse it's also an inserter. I wound in the new bush (still surprisingly tight) into place.
Now it's time for reassembly. An extra pair of hands on the jack might be helpful for a few minutes.
Slowly raise the jack so the rear beam and arms start to lift. A bit of lateral adjustment (a light shove to you and me) might be needed to get the arms to align with the brackets. Keep raising the jack so the arms move back into the bracket. While you are under the car the other person needs to make fine adjustments on the jack so you can line up the holes and get the bolts back through.
If you are on your own there is a bit of getting up and down as you have to do both jobs yourself.
Once the bolts are through on both sides refit the nuts and tighten up.
Reposition the handbrake cable and refit the fixing brackets to the sill.
Refit the exhaust by pushing all four rubbers back over the mounting hooks.
Refit the wheels.
Raise car to remove stands, lower and fully tighten the wheel nuts.
And that's it.
Edited by over_the_hill on Friday 6th April 22:21
Getting the new bush in is the major problem with this job, they are so tight to fit. Not everyone has a bush puller and I doubt if some bush pullers would do the job either, also they are very expensive. In the repair shop they are put in with an hydraulic press. So I'd caution anyone attempting this job and recommend poly`bushes instead. Bear in mind with poly bushes you will get a harsher ride.
A slightly quicker method is to use a holesaw to cut through the rubber section so the middle falls out, then use the hacksaw to cut through just the very outer metal part, put two cuts in about 10mm apart and then drift out this 10mm section. Once that's out the bush will just fall out with a small tap.
If you're replacing the bushes with std then I use a length of threaded bar, large socket and thick washers to draw the new bush in, if replacing with two piece Powerflex or the like then they just slip in using the copper grease provided. I can do Mk3/4/5 Fiesta/Puma bushes in under an hour from wheels on the ground to back again.
If you're replacing the bushes with std then I use a length of threaded bar, large socket and thick washers to draw the new bush in, if replacing with two piece Powerflex or the like then they just slip in using the copper grease provided. I can do Mk3/4/5 Fiesta/Puma bushes in under an hour from wheels on the ground to back again.
I am posting this as an update long after the initial post so as to relate my experience and possibly help others contemplating doing this job themselves. I found this thread very useful before tackling the job myself as a DIY home mechanic. I found the tip about using a hole saw to cut out the centre of the bush and sawing through the outer case very useful when extracting the old bushes.
I had various pieces of metal in my garage which enabled me to make my own bush inserter. I bought an M12 by 180mm stainless steel bolt and M12 stainless extended nut. Anything less would not have been sufficient. The Haynes manual says you can use suitable washers to extract and insert the bushes is an extreme understatement.
Inserting the offside bush which I did first, started off well, but soon the bush went extremely tight about a quarter of the way in. I did not think my inserter was up to the job and I would need the help of someone with a portable hydraulic press to come to my home and complete the job. However, I persevered and I managed to get the bush in with my home-made inserter by applying as much tension on the bolt as possible until it made a creaking sound (hence the extended nuts are essential as they are 3x the length of a standard nut). Then under tension and using an appropriate sized tube over the bolt and nut, I used a 5lb lump hammer with hefty force to shock both the bush and inserter. The result was that by repeated tightening and whacks with the lump hammer I got the bush inserted, but only just. As the bush in inserted deeper, the resistance increases.
On the nearside, I made things slightly easier by first of all thoroughly cleaning inside the bush housing (better than shown in the pictures in the opening post). To do this, I used a flapper sanding wheel and drill. The size of the flapper wheel just fitted nicely inside the bush housing. This made the inside of the housing extremely clean (even if all the original paint was removed) and would have made the opening a thousand of an inch or so wider. I then used silicone lubricant (hoping it was better than oil or grease) when inserting the new pivot bush. The bush went in about half-way until real resistance was met. I then had to revert to using my lump hammer while the bush was under tension pushing it into the housing. The result was much easier than the first bush I inserted.
I hope this helps anyone else contemplating doing this job themselves at home. I did not have the luxury of a gas welding torch to rapidly heat the housing to expand it. Maybe using in inserter bought off the internet will do the job, but one might still have to consider using a lump hammer and appropriate sized tube to give that extra force required to creep the bush into the housing.
There is one very important peice of information missing , and that is the orentation of the device , I searched and could not find the correct device orentation, so ended up taking the device along the the sub frame to a ford dealership workshop, who informed me of the correct orentation of the device. The device that I purchased was aftermarket (patten) and had a plasic looking horseshoe looking section. I am informed that this should be inline with the arm, making the horseshoe shape at the bottom like a U shape. The first pic in the tutorial shows the correct device orentation. Most of the write ups state to mark the device or sketch so as to replace the device in the same way, thats ok providing the one being replaced has been fitted correctly. Grate write up I used this to carry out replacements the only decent instuction I could find. Thanks to the originator
It is extremely difficult to drive these bushes in. I used improvised tools, and snapped the m12 threaded bar.(8.8 quality). Then I bought a nice silentbearing mounting set, but I also snapped the m12 threaded bar. I ended up solving the problem by taking two worn out brake discs to create parallel pulling bars to improve the strength of the tools. In the end i needed 5 Threaded bars in parallel to get the bush in place! I ended up spending € 170,- on tools, and the job took me a week, but hey, I can fix my car myself!
Gassing Station | Ford | Top of Page | What's New | My Stuff