Chimera to be put back to form
Discussion


I have decided to put my 4 lt chimera back to form I have had her for 17 yrs but last had here on the road in 2007 I have stripped all the front and rear suspension and have re powder coated all the arms purchased loads of bits from race tech and racing green to replace all suspension and steering had the wheels refurbed by pristine wheels superb job and had new tyres fitted by the good lads at Adams and page in high Wycombe still had the original from 1996 fitted but it had only done 18 k when I last used her I could do with any help and advise to see me through the process of re commissioning my old girl
Great news, another one ‘coming back’
How long has the brakes been off the car.
I’d change all the fluids
Fuel filter
New fuel lines
Re commission it as in give it a full service including grease nipples etc
I’d be inclined to want the engine flushed of old oil personally.
How has the car been stored.
When was the last time you fired her up
Very low mileage so still like new inside.
Good on you
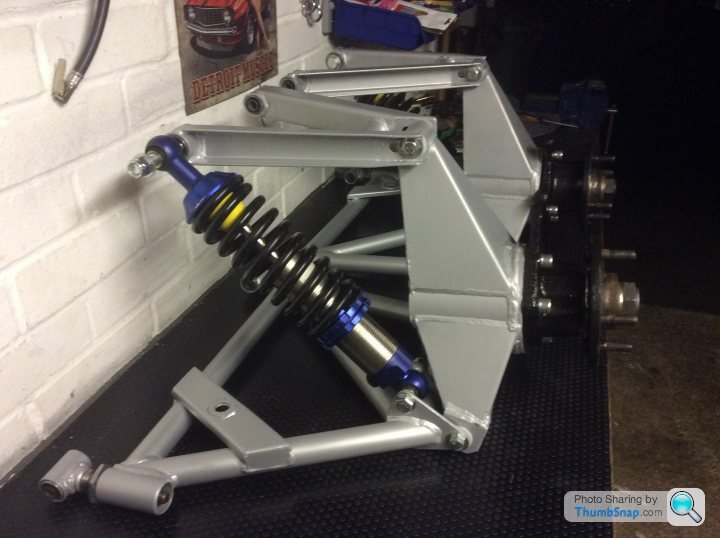
Sorry for the spelling first off chassis is spot on I have though stripped all of the suspension arms and had them blasted and re coated new complete bushes lower and upper ball joints track rod arms all knew wheel bearings knew drop links and anti roll bar bushes.
Had wheels repainted and knew tyres as it still had the original tyres on I will be replacing all the fluids and filters car was started about 2 yrs ago I am sure that I will encounter more problems that I will may need help with along the way with putting her back on the road and thank you all in advance for any help that you may be able to give me the car is generally in great condition but have decided that I want to make her a great original example I have to day managed to source for example every single nut and bolt so as to not use the old which are not in that bad a condition but I want her to be at her best the car has always been stored in a garage and in 17 yrs of ownership has not been out in the wet .
Getting a little carried away though spending money on her roll on summer though looking forward to remembering why I brought it in the first place.
Have you got any recant pictures Jas
Really interesting story and she sounds like a beaut
I have to ask,,,,;)
Why did you buy it and store it for so long.
You’ll really enjoy it when you do drive it,
The reasons should all come flooding back, roof off massive V8 sound, lots of power and looks, big boot
Perfect soft top street creeper
Massively capable grand tourer
Hi classic chim
I brought her many years ago after selling a group A saloon race car as I could not afford the costs to race it any more so with the proceeds I bought the chimaera my daughter loved it always wanting a Sunday afternoon run and because of this i vowed I would never sell it .
I have however not been able to spend the time running her over the last 10 yrs or so but am now committed ounce more I started in the garage at 8 this morning and have just finished had some good points today and some bad bent the bed on the press and had to refabricate a knew bed to press in the bushes in all done now phew .
Fitted knew bearings to rear hubs really need to know the torque settings for hub nuts if you can help also can anybody help with the best way of separating the ends from the drive shafts so that I can fit knew drive shaft boots i am fairly practical but would love to have a good manual any ideas for the best and where to purchase one from .
Please excuse me as I am not that good at computer stuff but would like to show pics of progress any pointers how I do this would be helpful soz I am a good Buider and not a lot else
Hi Jas.
first off I’m the worst possible person to ask about computers
So don’t be sorry.
Great to hear your back on the car and here you will find many of the answers to your problems.
Photos
When you reply to a comment etc you’ll see ( upload an image ( beta) just above on the right hand side, press that and follow the instructions.
It can take awhile for the images to upload.
I’ve helped replace a differential which is easy to disconnect from the drive shafts but I’ve not actually changed the gators on the Cv joints so I’ll let someone else advise you on that one.
Front and rear hub retaining nuts
229-258 ft lb
310-350 Nm
Most set then to 260 ft lb.
Group A saloon race car. Lovely bubberly.
There’s the book written by Steve Heath called the Chimaera/Griffith ( Bible) which has a lot of tech details but searching on here usually gets you the same info. Each car was built with what they had so the Bible is more an outline of what you have rather than being a Haynes manual but it’s still useful.
Most jobs on these cars have been tackled by some talented bloke or other on here so keep posting and you’ll get the help you need.
Congratulations on keeping the car and for all the right reasons so onwards and upwards.
These cars today are even more poignant than when they came out, very few cars are as mad and capable as these things.
If you’ve pressed in wishbone bushes you’ll be ok, what a pain that is.
once you have the shafts of the car there are 2 ways to replace the boots 1)clean all the old grease of and you will see retaining clips which sometimes are circlips which need removing then the cvj will slide off and some have a split ring in which case leave it in place and knock the shaft through the cvj method 2) clean off all the grease cut off the old boot borrow or hire a boot stretching tool and pass the boot over the cvj. with everything still in place.
https://www.youtube.com/watch?v=oEKY0uFlBpc
john
https://www.youtube.com/watch?v=oEKY0uFlBpc
john
Classic Chim said:
Hi Jas.
first off I’m the worst possible person to ask about computers
So don’t be sorry.
Great to hear your back on the car and here you will find many of the answers to your problems.
Photos
When you reply to a comment etc you’ll see ( upload an image ( beta) just above on the right hand side, press that and follow the instructions.
It can take awhile for the images to upload.
I’ve helped replace a differential which is easy to disconnect from the drive shafts but I’ve not actually changed the gators on the Cv joints so I’ll let someone else advise you on that one.
Front and rear hub retaining nuts
229-258 ft lb
310-350 Nm
Most set then to 260 ft lb.
Group A saloon race car. Lovely bubberly.
There’s the book written by Steve Heath called the Chimaera/Griffith ( Bible) which has a lot of tech details but searching on here usually gets you the same info. Each car was built with what they had so the Bible is more an outline of what you have rather than being a Haynes manual but it’s still useful.
Most jobs on these cars have been tackled by some talented bloke or other on here so keep posting and you’ll get the help you need.
Congratulations on keeping the car and for all the right reasons so onwards and upwards.
These cars today are even more poignant than when they came out, very few cars are as mad and capable as these things.
If you’ve pressed in wishbone bushes you’ll be ok, what a pain that is.
first off I’m the worst possible person to ask about computers
So don’t be sorry.
Great to hear your back on the car and here you will find many of the answers to your problems.
Photos
When you reply to a comment etc you’ll see ( upload an image ( beta) just above on the right hand side, press that and follow the instructions.
It can take awhile for the images to upload.
I’ve helped replace a differential which is easy to disconnect from the drive shafts but I’ve not actually changed the gators on the Cv joints so I’ll let someone else advise you on that one.
Front and rear hub retaining nuts
229-258 ft lb
310-350 Nm
Most set then to 260 ft lb.
Group A saloon race car. Lovely bubberly.
There’s the book written by Steve Heath called the Chimaera/Griffith ( Bible) which has a lot of tech details but searching on here usually gets you the same info. Each car was built with what they had so the Bible is more an outline of what you have rather than being a Haynes manual but it’s still useful.
Most jobs on these cars have been tackled by some talented bloke or other on here so keep posting and you’ll get the help you need.
Congratulations on keeping the car and for all the right reasons so onwards and upwards.
These cars today are even more poignant than when they came out, very few cars are as mad and capable as these things.
If you’ve pressed in wishbone bushes you’ll be ok, what a pain that is.
jas brad said:
Licking my lips here
Keep em coming, it inspires many who probably watch but don’t post much.
Might be a bugger getting the wishbones in the chassis lugs all assembled.
I do enjoy seeing stuff assembled like this, great stuff.
That cars great man,, wow what a cool tale this is.
Did you say it’s only done 17,000 miles from new. How many on her when you got it as it wasn’t new I assume.
You know your stuff
It’s amazing to think one of these old girls can sleep that long and still look the business.
We are always talking about the cars faults on here, as an owner from way back and your car is obviously rather well looked after do you remember any shunting from the car.
Shunting at the risk of being boring is something that causes some owners problems, namely and usually below 2000 revs in a high gear the car will not run very smoothly at these lower revs and causes clunking and jerking through the engine gearbox and diff.
Was your car easy to drive or did you need to use clutch to iron out this shunting around town.
I’d be inclined to consider a sump gasket change before running her up, you’ll likely have oil leaks even with a new gasket but an old one might be rotten by now and defo leak.
I was really lucky to get a late car with low mileage, 38,000 which now with plenty of mods feels like a new car. Yours is almost a new car. My cars done 75,000 now and feels like new go on for ever these cars will. Are you going to keep it when it’s re commissioned as it’s probably worth 20,000 by the look of it.
Get them all singing and dancing and no amount of money can replace them.
Did you say it’s only done 17,000 miles from new. How many on her when you got it as it wasn’t new I assume.
You know your stuff
It’s amazing to think one of these old girls can sleep that long and still look the business.
We are always talking about the cars faults on here, as an owner from way back and your car is obviously rather well looked after do you remember any shunting from the car.
Shunting at the risk of being boring is something that causes some owners problems, namely and usually below 2000 revs in a high gear the car will not run very smoothly at these lower revs and causes clunking and jerking through the engine gearbox and diff.
Was your car easy to drive or did you need to use clutch to iron out this shunting around town.
I’d be inclined to consider a sump gasket change before running her up, you’ll likely have oil leaks even with a new gasket but an old one might be rotten by now and defo leak.
I was really lucky to get a late car with low mileage, 38,000 which now with plenty of mods feels like a new car. Yours is almost a new car. My cars done 75,000 now and feels like new
go on for ever these cars will. Are you going to keep it when it’s re commissioned as it’s probably worth 20,000 by the look of it. Get them all singing and dancing and no amount of money can replace them.

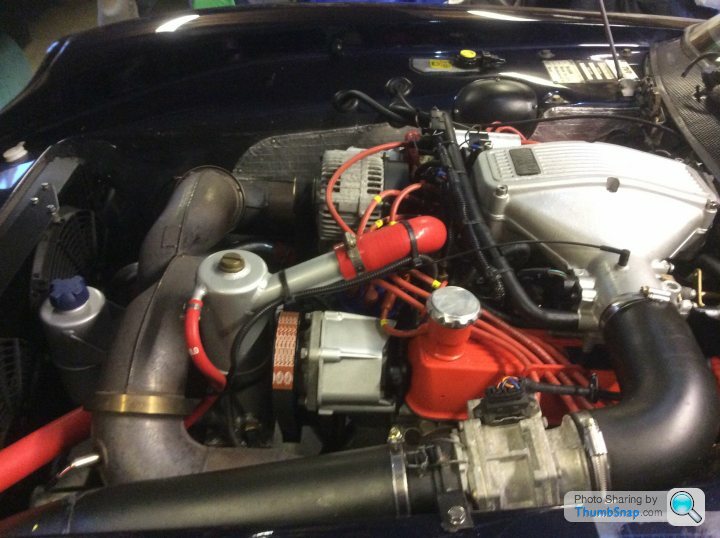
Don’t remember any shunting did have a problem when I did the engine work changed the coil for a Lucas gold and the engine would not rev past about 3800 rpm did not know at the time if I recall correctly that my car has a balance resisted loom so could not provide enough voltage to the coil .
She has done 18,300 miles when I got here she had done 16,000 miles so as you can see I have been largely lazy of using her over my ownership time to change this as i now have more time .
Time for the rear end to go back in then strip the front end and start the whole process again will service the whole car before starting change all fluids and filters have already purchased all items for this can any one help I have always used as per original spec mobile 1 oil is this still the best ?? For the car is this now outdated I have added one more photo of her on the stands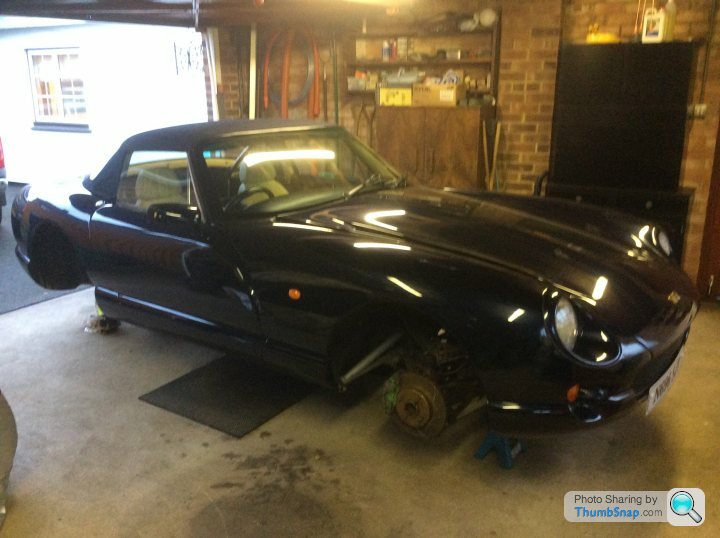
Look at that nice tight roof.
Any good quality 10/40semi synthetic will do the job unless your thrashing it around tracks.
Often things like temp sensors play up with these cars so as yours has stood for such a long time some of these might be seized, thermostat etc. New coolant and a good clean and lube your stepper motor and relay connections, stuff like that will probably be good medicine. Is is power assisted steering, same goes with that fluid as the steering racks are precious.
Stripped out all the front end suspension this weekend ready for all knew parts after hours of trying to remove the rear bushes I thought a much easier method of removing them must be on the cards . Tried all the various methods read on line all seemed time consuming problem I found was keeping everything square either in a press or a large vice so I turned a little bespoke tool for the job this has a central pin for locating with a top anvil which I have turned out in the center to accommodate the center bush sleeve took 30 mins on a lathe but a little rusty on using one but the results were worth it managed to remove all eight bushes tonight in 25 minutes using a large vice and a extension bar for the winding arm shoulders may ache in the morning though would recommend this little gadget though for removing and refitting though after many hours doing the rears I have attached pics as the front arms were a little rusty certainly worse than the rears I had already done 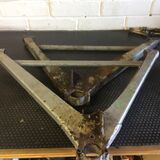
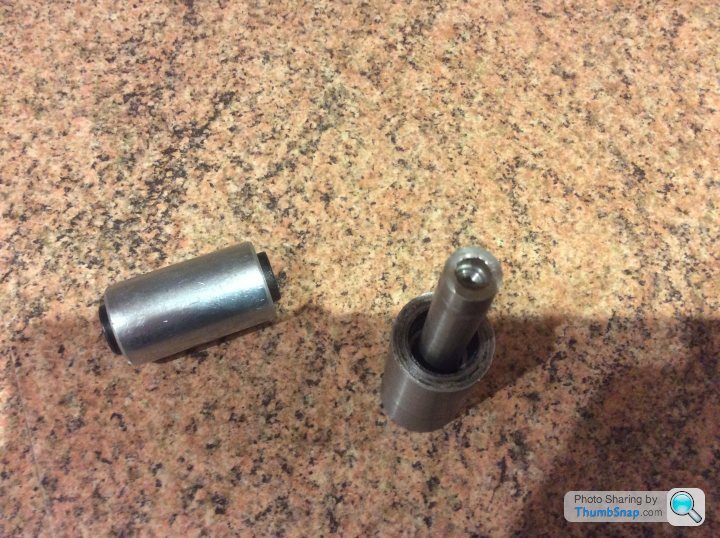
Stripped out all the front end suspension this weekend ready for all knew parts after hours of trying to remove the rear bushes I thought a much easier method of removing them must be on the cards . Tried all the various methods read on line all seemed time consuming problem I found was keeping everything square either in a press or a large vice so I turned a little bespoke tool for the job this has a central pin for locating with a top anvil which I have turned out in the center to accommodate the center bush sleeve took 30 mins on a lathe but a little rusty on using one but the results were worth it managed to remove all eight bushes tonight in 25 minutes using a large vice and a extension bar for the winding arm shoulders may ache in the morning though would recommend this little gadget though for removing and refitting though after many hours doing the rears I have attached pics as the front arms were a little rusty certainly worse than the rears I had already done
Gassing Station | Chimaera | Top of Page | What's New | My Stuff