Driver’s door card wiring
Discussion


Hi ya folks.
I had a quick look in the driver’s door the other day. I was short of time and replaced a couple of connectors and a broken wire.
The bit that puzzled me though, was the door card itself. The diagram shows 11 wires going to it, which was correct. I found Two 5 wire connectors in there. A wire had snapped out of one of them, and I could see a previous repair had bypassed that connector.
But the 11th wire was basically on a bullet connector.
Has anyone else had a look in there’s.
Is the factory fit, Two 5 wire connectors and a bullet connector?
RUSSELLM said:
Hi ya folks.
I had a quick look in the driver’s door the other day. I was short of time and replaced a couple of connectors and a broken wire.
The bit that puzzled me though, was the door card itself. The diagram shows 11 wires going to it, which was correct. I found Two 5 wire connectors in there. A wire had snapped out of one of them, and I could see a previous repair had bypassed that connector.
But the 11th wire was basically on a bullet connector.
Has anyone else had a look in there’s.
Is the factory fit, Two 5 wire connectors and a bullet connector?
I don't remember every having to undo a bullet connector to get the card off.I had a quick look in the driver’s door the other day. I was short of time and replaced a couple of connectors and a broken wire.
The bit that puzzled me though, was the door card itself. The diagram shows 11 wires going to it, which was correct. I found Two 5 wire connectors in there. A wire had snapped out of one of them, and I could see a previous repair had bypassed that connector.
But the 11th wire was basically on a bullet connector.
Has anyone else had a look in there’s.
Is the factory fit, Two 5 wire connectors and a bullet connector?
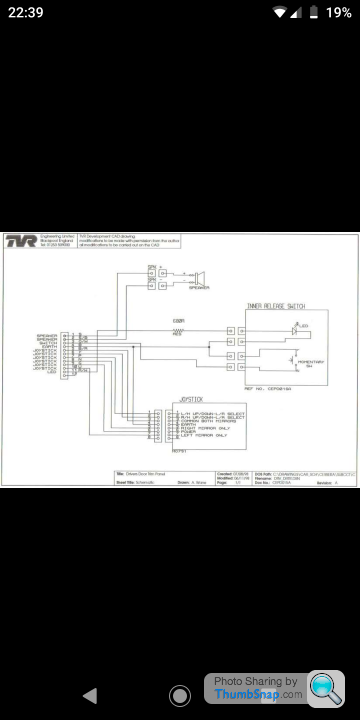

From: http://tvr-cerbera.co.uk/ all wiring diagrams here plus other useful stuff.
Can't remember mine having a bullet connector. I've a 12 pin plug for the door buttons and mirror that has to have the pins regularly cleaned, that I must replace with a modern plug someday, but I worry how dirty the wire is for soldering now.
There's a smaller plug that feeds into it for the door mag switch..
All the wires have been oxidised thus far. Some, I’ve just stripped the ends off and found clear copper. Some wires look knackered throughout.
I’ve still popped new connectors on, but the door really needs wiring at some point.
On my passenger window, I also proved the cabin harness can’t carry a decent load, so I suspect that needs doing too
I’ve still popped new connectors on, but the door really needs wiring at some point.
On my passenger window, I also proved the cabin harness can’t carry a decent load, so I suspect that needs doing too
Edited by RUSSELLM on Tuesday 15th June 11:54
I ended up building new looms for my doors. Initially I put new superseals on but I still found the doors unreliable.
The oxidised wires can be treated - I think I made up a solution of vinegar and salt to steep the bared ends in and then cleaned them with bicarbonate of soda. I guess contact cleaner solution would do the same. That allowed me to tin the clean ends with solder before putting on the new terminals.
The oxidised wires can be treated - I think I made up a solution of vinegar and salt to steep the bared ends in and then cleaned them with bicarbonate of soda. I guess contact cleaner solution would do the same. That allowed me to tin the clean ends with solder before putting on the new terminals.
Door card... No, as you’ll occasionally need to remove it.
Door wiring... Wiring direct to the components, like a modern car ? It would be tricky. There’s a magnetic contact, a micro switch, motorised mirror, mirror heater element, external door opening button, window mechanism.
None of them items have connector sockets unfortunately. They’re either pre wired or soldered on. I think it would be a nuisance, especially when it came to replacing faulty items.
Door wiring... Wiring direct to the components, like a modern car ?
It would be tricky. There’s a magnetic contact, a micro switch, motorised mirror, mirror heater element, external door opening button, window mechanism.None of them items have connector sockets unfortunately. They’re either pre wired or soldered on. I think it would be a nuisance, especially when it came to replacing faulty items.
RUSSELLM said:
Door card... No, as you’ll occasionally need to remove it.
Door wiring... Wiring direct to the components, like a modern car ? It would be tricky. There’s a magnetic contact, a micro switch, motorised mirror, mirror heater element, external door opening button, window mechanism.
None of them items have connector sockets unfortunately. They’re either pre wired or soldered on. I think it would be a nuisance, especially when it came to replacing faulty items.
I agree - It's tricky otherwise. I did run my speaker cable as an uniterupted cable and it's a bit of a fidget having to open up the speaker and unhook the cable to it, if I'm looking to take the door card away completely. Door wiring... Wiring direct to the components, like a modern car ?
It would be tricky. There’s a magnetic contact, a micro switch, motorised mirror, mirror heater element, external door opening button, window mechanism.None of them items have connector sockets unfortunately. They’re either pre wired or soldered on. I think it would be a nuisance, especially when it came to replacing faulty items.
At the A-Post there is a connector block bringing the door loom into the main harness. That's a good place to do some fault finding from. Just peel the door seal and carpet at the hinge area and the connector is accessible.
On my car I'd concluded that there were possibly fractured wires where the loom flexes as the door opens and closes. I did the passenger loom first, as it was simpler and made a good test. Overall it was a straightforward job to do.
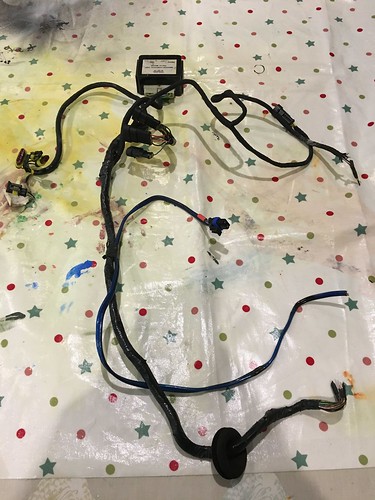
Here are some photos from different stages of my loom update:
Original drivers door loom with mirror control box. This had additional speaker cabling added in at some stage
Completed passenger door loom

Drivers door loom part way through being made.
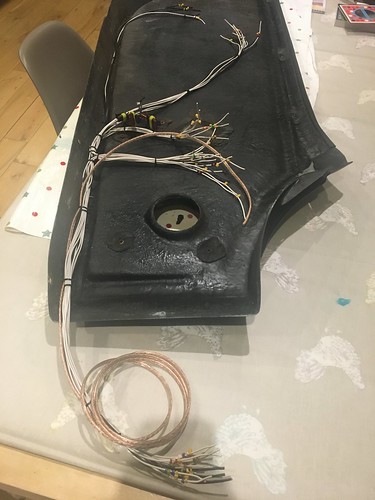
I used white wire for power and black for the ground. On the white wires I fitted coloured markers to match the original wiring, which works well enough. Trying to buy the correct colour wires to create an exact copy was simply an expensive undertaking for little benefit given the size of the loom and it's 'reasonable' accesibility.
Fitting the new grommets into the door and A-post was a proper fiddle, but possible. I ended up bending a long screw driver to help manipulate the grommets into place.
The other positive was that I solved my water ingress issues as I realised that the csk allen socket screws that hold the interior door trim to the main moulding needed sealed up with Tiger Seal. That's solved that issue.
I've got the reed switch on each door soldered in as I've not seen a compact enough (decent quality) connector that will pass through the hole in the door. All the other items, microswitch etc are now on superseal connectors.
I added connectors to the window wiring at A-post to allow the window relays to be added at a later point.
That may be sooner rather than later.
The crowning glory would be to add something to the door to make the 'clank' when it closes a little less tinny sounding.
Edited to add:
The earth cable is heavier as it is spliced - the TVR schematics show these spliced connections
The electric window cables are heavier - these are the two black cables at the a-post connection.
Edited by Bogsye on Wednesday 16th June 15:46
Bogsye said:
I ended up building new looms for my doors. Initially I put new superseals on but I still found the doors unreliable.
The oxidised wires can be treated - I think I made up a solution of vinegar and salt to steep the bared ends in and then cleaned them with bicarbonate of soda. I guess contact cleaner solution would do the same. That allowed me to tin the clean ends with solder before putting on the new terminals.
I looked this up and found these instructions...The oxidised wires can be treated - I think I made up a solution of vinegar and salt to steep the bared ends in and then cleaned them with bicarbonate of soda. I guess contact cleaner solution would do the same. That allowed me to tin the clean ends with solder before putting on the new terminals.
This process uses two solutions, one is regular table salt and vinegar. Any kind of vinegar will work, from balsamic, to rice, to white vinegars. Its the acidity and corrosiveness of the salt and vinegar together that you want. The other solution is Sodium Bicarbonate, or baking soda, and water. This is used to neutralize the corrosive properties of the other solution, and to further clean the wires.
Step 1: Strip the wires to be cleaned.
Step 2: Get 2 containers, one for each solution. They can be paper cups, plastic, glass, bowls, whatever you can find. I have vials, because I am a professional electronics installer and I use these solutions out in the field.
Step 3: Get 1 tablespoon of raw salt, and put it in one of the containers. Fill up the rest of the container with vinegar, and stir the both together. As a general rule of thumb, put as much salt in the vinegar as will dissolve.
Step 4: Get 1 tablespoon of Sodium Bicarbonate, (baking soda) and add it to the other container. Fill up the rest with water, and stir well. Add more baking soda to make it cloudy. The amount is not important, as long as it is alkaline to cancel the acid of the vinegar solution.
Step 5: Put the stripped end of the wire in the vinegar solution, and stir the solution with the wire. any wire you want cleaned needs to be under the solution. Movement of the wire in the liquid speeds up the process.
Step 6: After 2 minutes or so, the wire will look very shiny and new in the vinegar solution. The acid and salt in the solution is etching away the oxides, exposing the bare metal. Make sure the metal is uniformly shiny. Leave it in longer if it is not perfectly clean throughout.
Step 7: Once the wire is satisfactorily clean, remove the wire from the vinegar, and plunge it into the baking soda solution to neutralize the acid's corrosive properties. If the wire was exposed to the air, without neutralizing the acid first, it would quickly corrode again. The baking soda keeps it clean and shiny. Swish the wire around in the baking soda water for about 10 seconds, and then you are done!! Shiny new wire ready for soldering, and conducting once again!!
https://www.instructables.com/How-to-perfectly-cle...
Thanks Byker - That's pretty much what I did. It generally gave a good clean surface to then tin with solder. I was in a bit of rush yesterday when I posted my message, so that is really useful info for everyone.
It worked best if the wire ends were splayed a little to help the solution work around them more effectively.
If using putting new conenctors on the ideal would then be to crimp them and then add a little solder in to make a nice complete connection. However, the Superseal's have their seal crimped, so I guess the heat would damage them. I've gone on the basis that the seal does a good job and reduces the chance of oxidations.
Reagrds Superseals. I'd be careful about using thin wall wire. It might be too small a diameter for the seal that fits onto the wire, and allow moisture in. Care would need to be taken when ordering these - easier to spec when ordering via a proper electrical component seller, but not as easy on the eBay ones.
Where I had a Superseal with a spare connector ie 5 wires into a 6 wire connector, I used a seal with a piece of o-ring fitted into it to blank the spare 'bay'. I think actual blanking plugs are available, but this was a cheap/quick way to do it.
Bogsye said:
RUSSELLM said:
Door card... No, as you’ll occasionally need to remove it.
Door wiring... Wiring direct to the components, like a modern car ? It would be tricky. There’s a magnetic contact, a micro switch, motorised mirror, mirror heater element, external door opening button, window mechanism.
None of them items have connector sockets unfortunately. They’re either pre wired or soldered on. I think it would be a nuisance, especially when it came to replacing faulty items.
I agree - It's tricky otherwise. I did run my speaker cable as an uniterupted cable and it's a bit of a fidget having to open up the speaker and unhook the cable to it, if I'm looking to take the door card away completely. Door wiring... Wiring direct to the components, like a modern car ?
It would be tricky. There’s a magnetic contact, a micro switch, motorised mirror, mirror heater element, external door opening button, window mechanism.None of them items have connector sockets unfortunately. They’re either pre wired or soldered on. I think it would be a nuisance, especially when it came to replacing faulty items.
Bogsye said:
Regarding Superseals. I'd be careful about using thin wall wire. It might be too small a diameter for the seal that fits onto the wire, and allow moisture in. Care would need to be taken when ordering these
Good pointThin wall cable is also much stiffer than PVC and likely to break sooner
Bogsye said:
Thanks Byker - That's pretty much what I did. It generally gave a good clean surface to then tin with solder. I was in a bit of rush yesterday when I posted my message, so that is really useful info for everyone.
It worked best if the wire ends were splayed a little to help the solution work around them more effectively.
If using putting new conenctors on the ideal would then be to crimp them and then add a little solder in to make a nice complete connection. However, the Superseal's have their seal crimped, so I guess the heat would damage them. I've gone on the basis that the seal does a good job and reduces the chance of oxidations.
Reagrds Superseals. I'd be careful about using thin wall wire. It might be too small a diameter for the seal that fits onto the wire, and allow moisture in. Care would need to be taken when ordering these - easier to spec when ordering via a proper electrical component seller, but not as easy on the eBay ones.
Where I had a Superseal with a spare connector ie 5 wires into a 6 wire connector, I used a seal with a piece of o-ring fitted into it to blank the spare 'bay'. I think actual blanking plugs are available, but this was a cheap/quick way to do it.
Well, I'm going to have to try it now... It worked best if the wire ends were splayed a little to help the solution work around them more effectively.
If using putting new conenctors on the ideal would then be to crimp them and then add a little solder in to make a nice complete connection. However, the Superseal's have their seal crimped, so I guess the heat would damage them. I've gone on the basis that the seal does a good job and reduces the chance of oxidations.
Reagrds Superseals. I'd be careful about using thin wall wire. It might be too small a diameter for the seal that fits onto the wire, and allow moisture in. Care would need to be taken when ordering these - easier to spec when ordering via a proper electrical component seller, but not as easy on the eBay ones.
Where I had a Superseal with a spare connector ie 5 wires into a 6 wire connector, I used a seal with a piece of o-ring fitted into it to blank the spare 'bay'. I think actual blanking plugs are available, but this was a cheap/quick way to do it.

Penelope - Thanks - I'm sure the photo and lighting conditions flatter it. It beats the time as a teenager that I used the back of a snooker table to nail the loom of my AH-Sprite onto for it's update and refresh 
Byker - Got for it - It was quite a nice task to do through winter, sat at the kitchen table, rather than any of the usual tasks that involve getting hypothermia out in the garage
Byker - Got for it - It was quite a nice task to do through winter, sat at the kitchen table, rather than any of the usual tasks that involve getting hypothermia out in the garage
Gassing Station | Cerbera | Top of Page | What's New | My Stuff