Exige S1 over-winter Refresh
Discussion
Right now, I've had this thread running over on SELOC for a while, but since a good few of you aren't bi-communal, I thought I'd post it here as well. First post is huge as it's basically a combination post of work to date but worth the read if you're into tidying your car up. It's pic-heavy, but the pics are used to good effect  Pretty much a tale of my rebuild to date and it might provide some useful info/motivation/demotivation to people who have thought to do the same thing. Please forgive some of the over-explanation in some of the posts as I cross-post this build-diary on non-Lotus forums so I occasionally explain things in more basic terms than you guys would need
Background on the car is that I imported it (to New Zealand) from Edinburgh, Scotland September '07 after it had spent its first 6 years on this earth with its first owner in London and Edinburgh. It arrived in NZ along with another for another NZ owner to beat the emissions laws that would ban their importing as of Jan 1 2008. There were no others in the country and to this day remain the only two.
Now the Exige S1 is pretty much similar to an Elise S1 under the skin, basically just being a racing version thereof. Given that the Exige was derived from a competition car though, many of the peripheral items were low-volume bits (they only ever made 601 Exige S1s) and as such many of the bits and pieces had little or no rustproofing on them. As a result, after a few winters on salty UK roads they do start to look tired under the skin.
My car was in superb condition throughout compared to many but it was always my intention to spend its first NZ winter stripping it back, giving it a good look-over and pretty much bringing it back to new condition underneath. This meant replacing all the bushes, balljoints, rod ends and cleaning up all the steelwork beneath as well as the chassis and all its hardpoints (which, because they're in aluminum, stay in pretty good nick).
Given that the clutch was starting to show signs of wear and started slipping badly after NZ Autocar magazine had it to do their 0-60 tests for the magazine, this would be replaced at the same time. Also, given that the front pulleys made a bid for freedom off the end of the crankshaft in November, it was decided the front end of the engine would get all new pulleys and cam-drive to be on the safe side. This would be easiest done with the engine out, and we'd also use this time to diagnose a clatter that had started in the engine over the Easter break... we suspected something amiss in the valvetrain of the mightily fragile Rover K16-VHPD lump.
Anyway... on with the show!
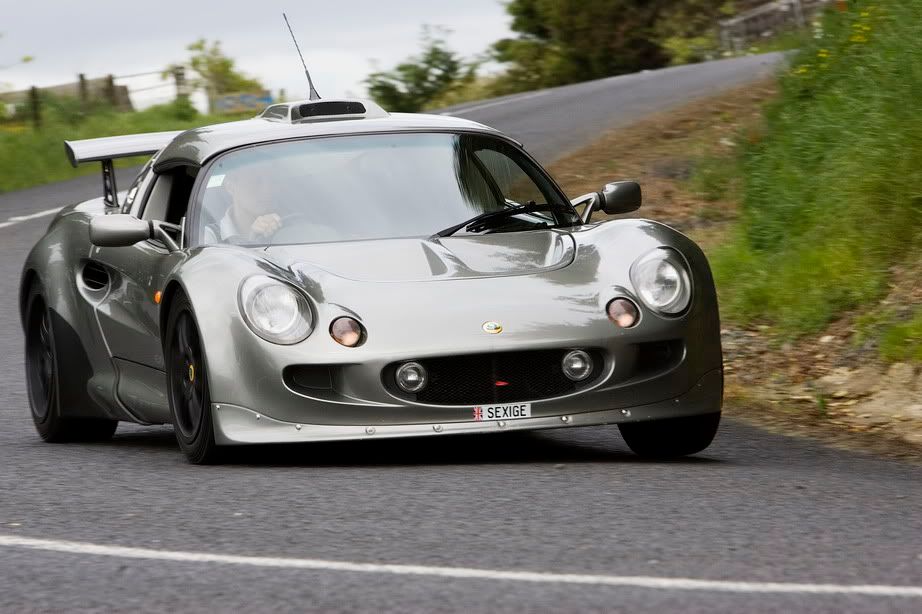
20 Apr '08
Well I'm embarking on a winter rebuild for the Exige to freshen it up, and basically return it to as-new condition under the skin. Lotuses don't tend to age in the dry, salt-free environment of NZ so I want to get it right so it'll be many many years before it needs any further care under the skin.
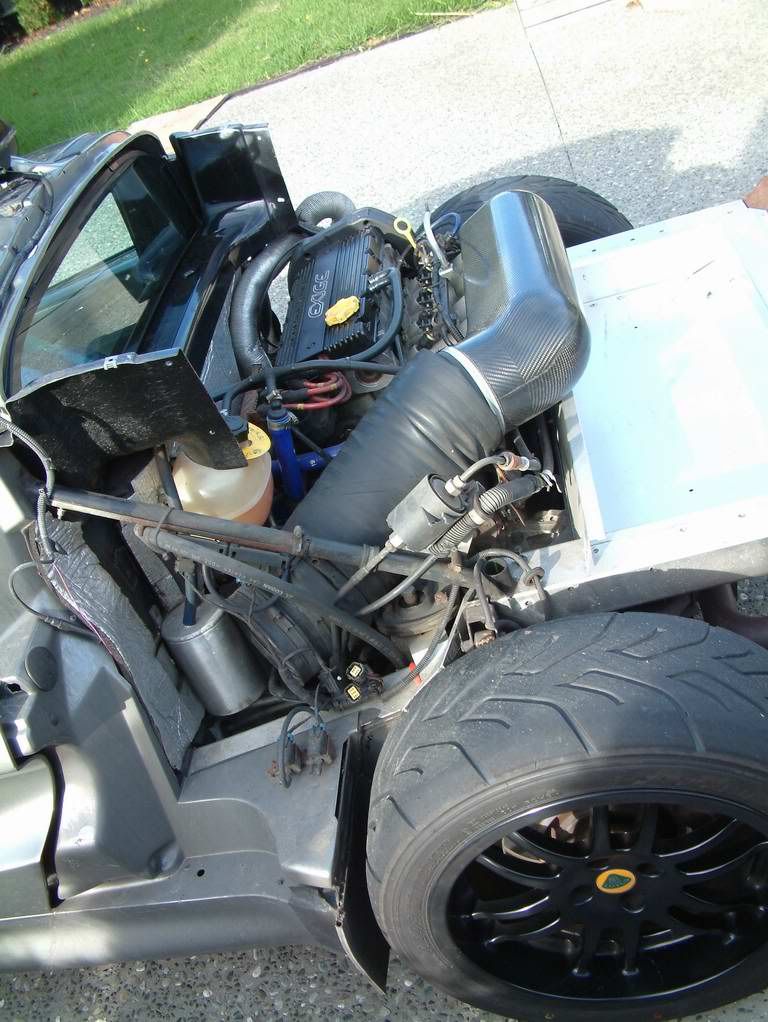
First step's been stripping the car back, removing the bodywork, which was finished today. Car's to be trailered into KW Historics this week to have the engine removed and then stripped down and inspected before being rebuilt. The rolling chassis will come back here in the meantime to be stripped and refurbished, before hopefully getting it all back together in time for spring
Introducing the new lightweight, no-frills SEXIGE:
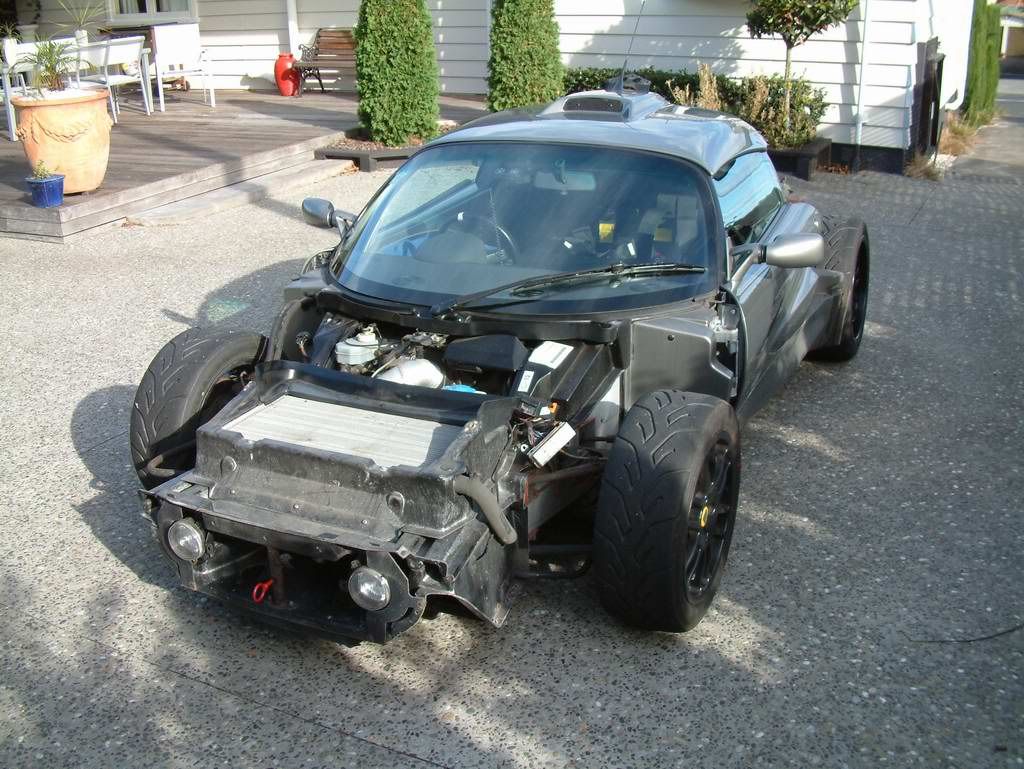
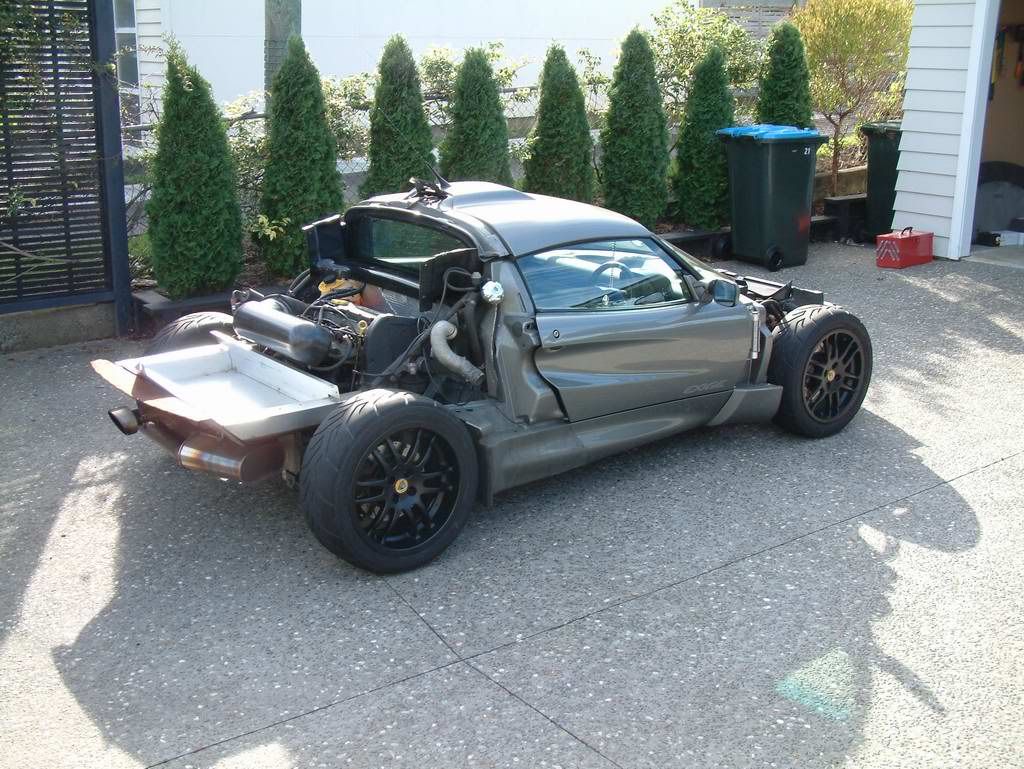
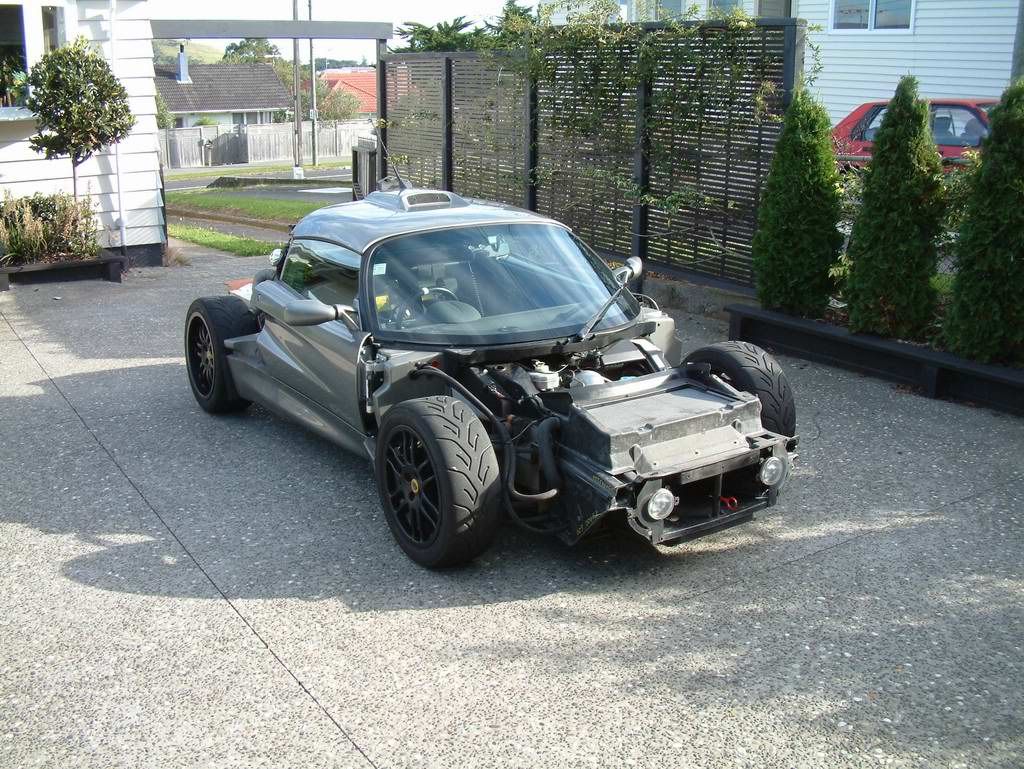
01 Jun '08
Little progress to be seen in May really... much of May was taken at Lotus getting the engine out.
Got the back brakes off yesterday, will get all the suspension and brakes off today then should be able to start separating hubs and balljoints etc.
Not looking too pretty at the moment
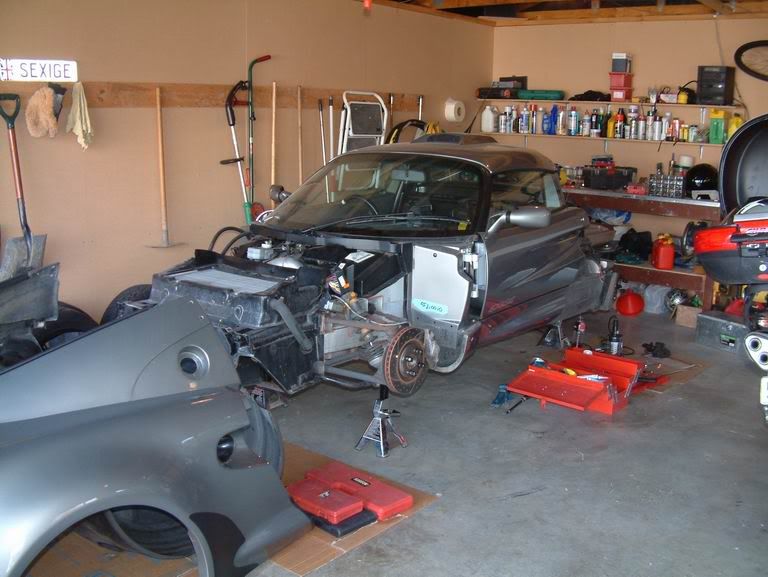
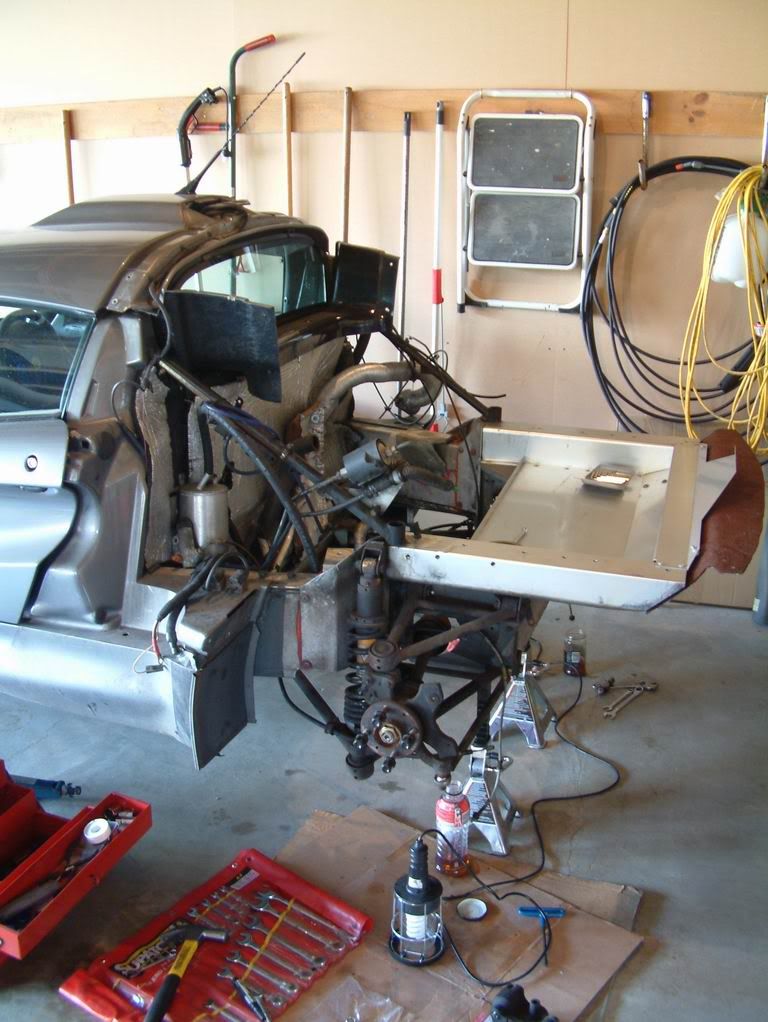
02 Jun '08
MOAR PICS!!!!!
Suspension's all off now Was a bit of a nightmare getting some of the more corroded bits apart but the good news is that there's nothing that'll not clean up as good as new once I've thrown some money and elbow grease at it
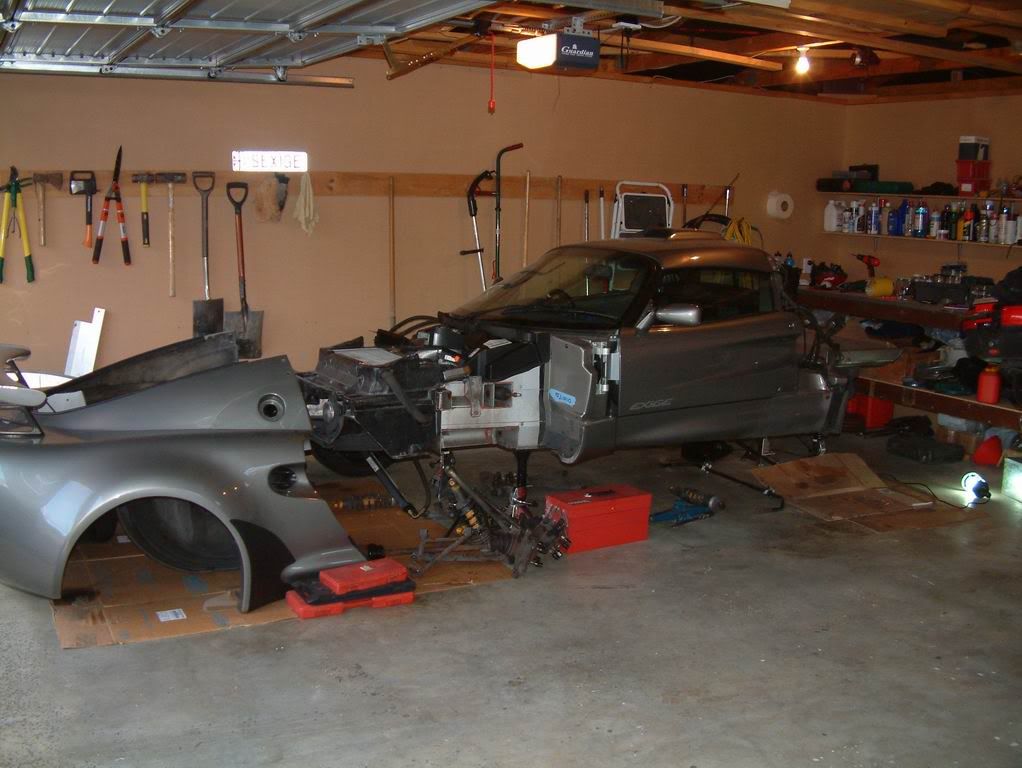
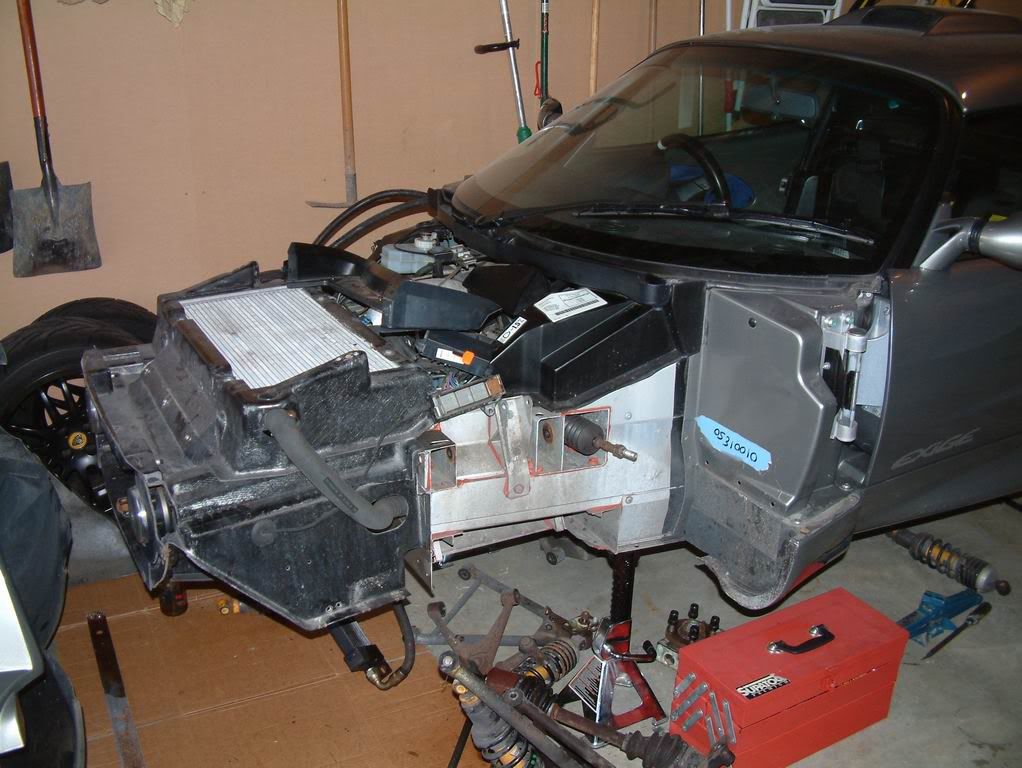
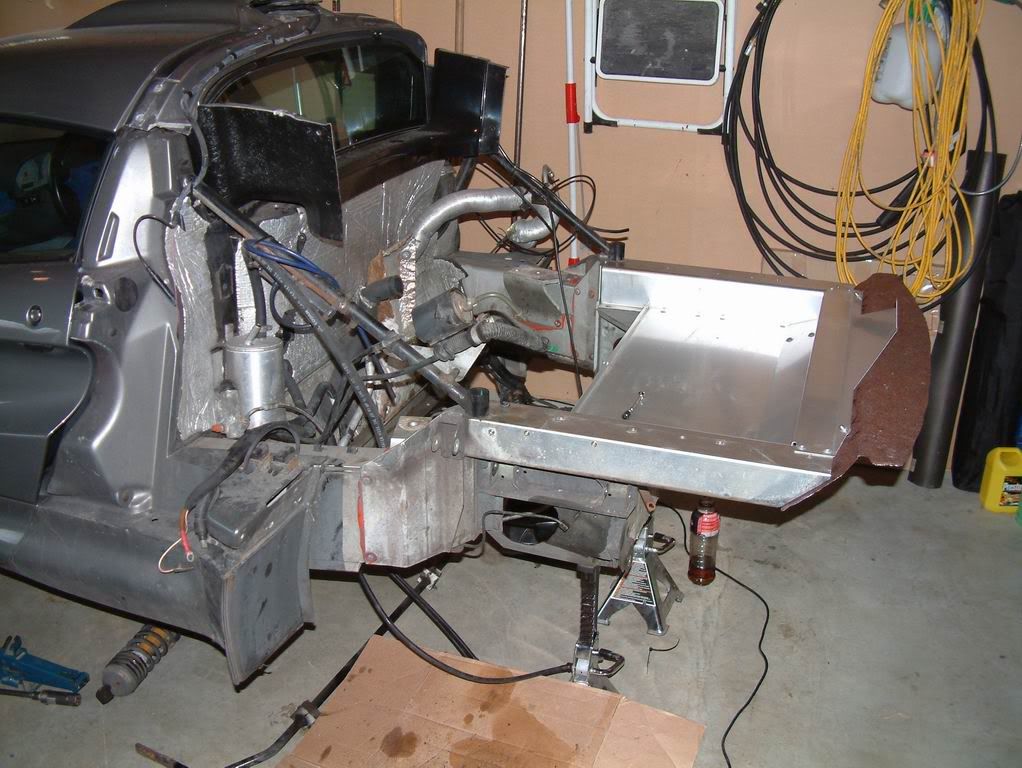
I was actually surprised how good it is. Most of the "rust" has turned out to be caked on brake dust. One of the wishbones has a little flaking on it, but this is very minor and should media-blast up to virgin metal pretty easily and will look like new when re-plated. The chassis has stood up impeccably. It REALLY needs a clean and it'll get a bit of a light buff with AutoSol in places and maybe an undercoating of ACF50 to keep it from any further damage but once it's back together and in a salt-free NZ climate (and under my careful ownership), it should look as good in 20 years time as it does when I'm done
09 Jul '08
Well it's been VERY slow progress lately... working 100 hour weeks hasn't helped, but hopefully as winter really sets in I'll be making some good progress.
The engine is being stripped, currently have no indication of what the noise was though... hope to find this out in the next day or two.
All the suspension is now off the car and awaiting cleaning up and repainting. All the hubs etc are all split and the old bushes and balljoints have been binned.
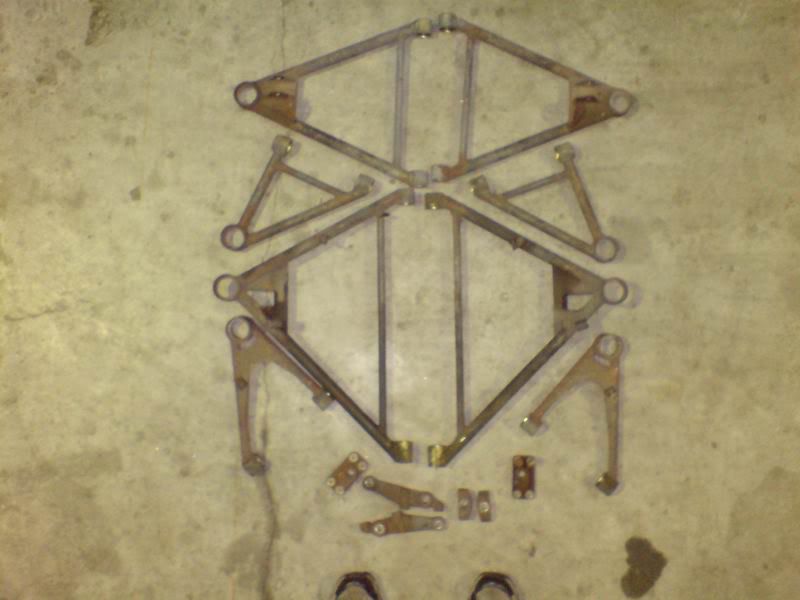
Here you can see the wishbones as they've been removed from the car. I plan to have these bead-blasted and re-plated/passivated to the same finish they had when new. I'm intending to get the platers to do a debrittle treatment on them too as I've heard the welds can crack if this is not done... pays to be on the safe side I guess.
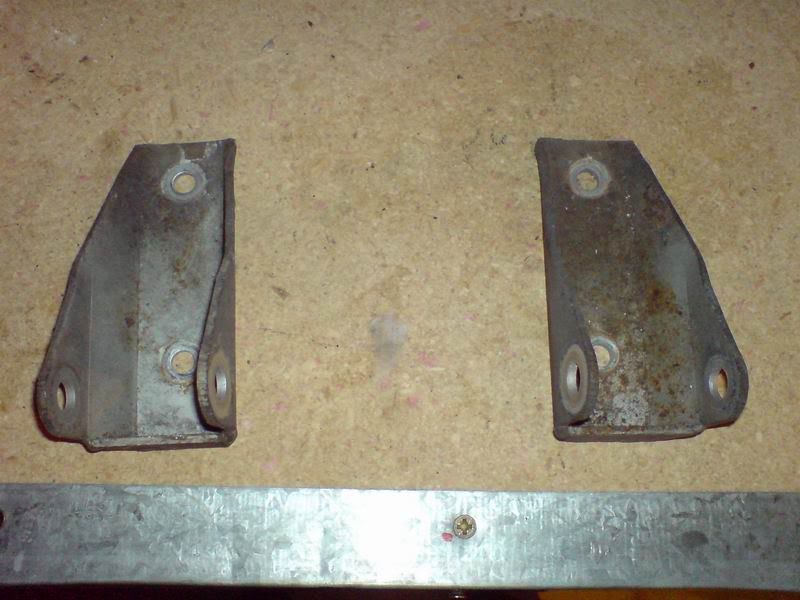
Here are the upper shock mounts (rear). They're not too bad, but the plating (looks like hot-dip galvanising or electrogalv) has seen better days. I'll probably leave the front ones as they look okay, but the rears will be replated all shiny and new.
I'd love to replate the rear subframe as well as the galv has blackened here, but still appears to be intact. due to the hassle involved with removing and re-galving it, I'll probably not bother. It's not exposed to the elements and the galv still seems to be doing its job.
Pretty much ready to send the lot of stuff out for blasting/plating. There may be a second batch of odds and ends, but this will cover off 95% of the stuff I think.
I've also had a go at cleaning up the hubs. They weren't too bad, but have seen better days. It looks like they were just plain, unprotected cast iron and as the photos show they've cleaned up not bad (see before/after). Some pitting is still evident, but that doesn't bother me too much. I'll probably give these a degrease and mask them up and give them a spray-lacquer (clear) on the exposed surfaces... should keep them in good enough nick for the next dozen years or so.
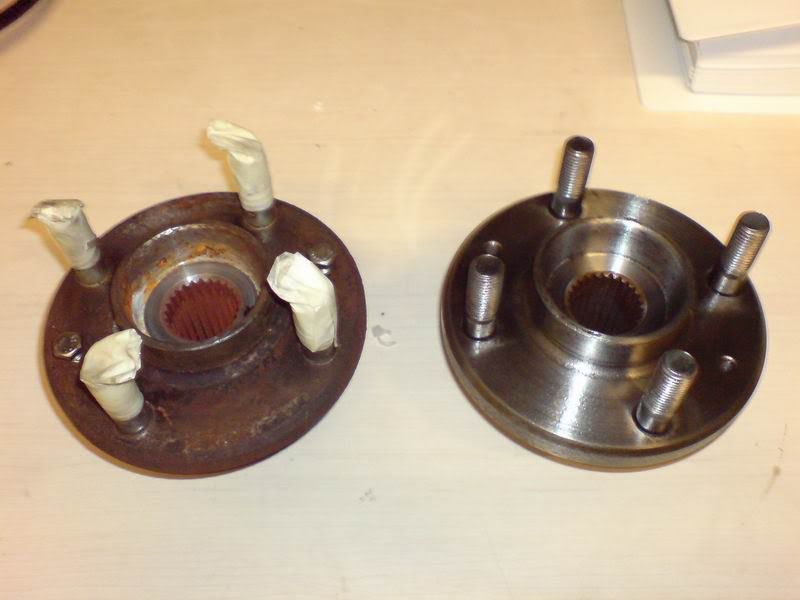
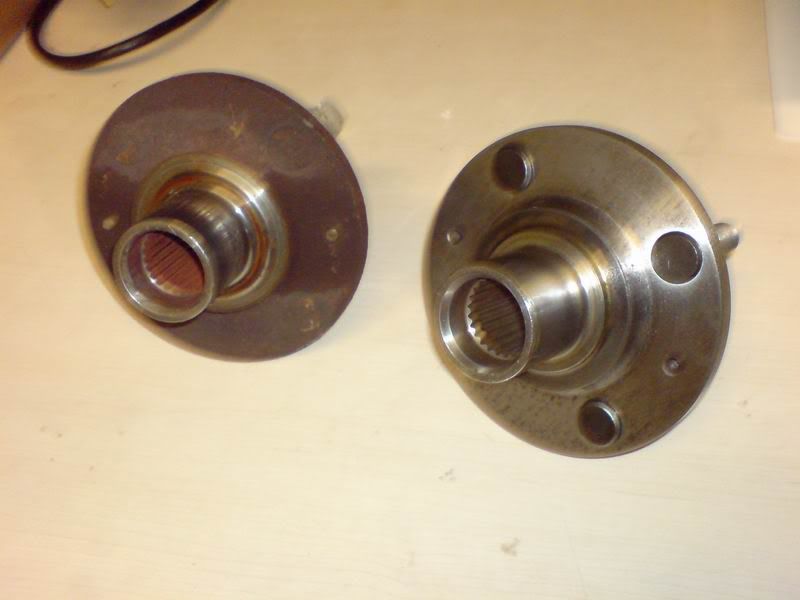
Will do the other two hubs this weekend and will start to clean up the ali uprights also. Will get the blasting/plating sent off during the week, so hopefully that will progress pretty quickly. I'll then be on to cleaning up various bits on the tub/engine bay and onto cleaning up the driveshafts/CVs as I reckon we can make these a bit prettier before giving these a coat of something to keep them looking semi-okay. That should keep me busy for a few weekends and hopefully by then I'll know more about the state of the engine and can plan the reassembly
13 Jul '08
This weekend's efforts have involved doing the remaining two hubs, which have come up okay as well as pulling a few more bits off the car and masking for sandblasting. Hope to get this all off for blasting/plating this week! Smiley
I've started on the cleanup of the front uprights too, have one cleaned now and am halfway through the other... the pics show comparison between the two. Once they're both cleaned, they'll be buffed up with some autosol to protect them then probably finished off with a good coating of ACF50 protectant to keep them free from corrosion.
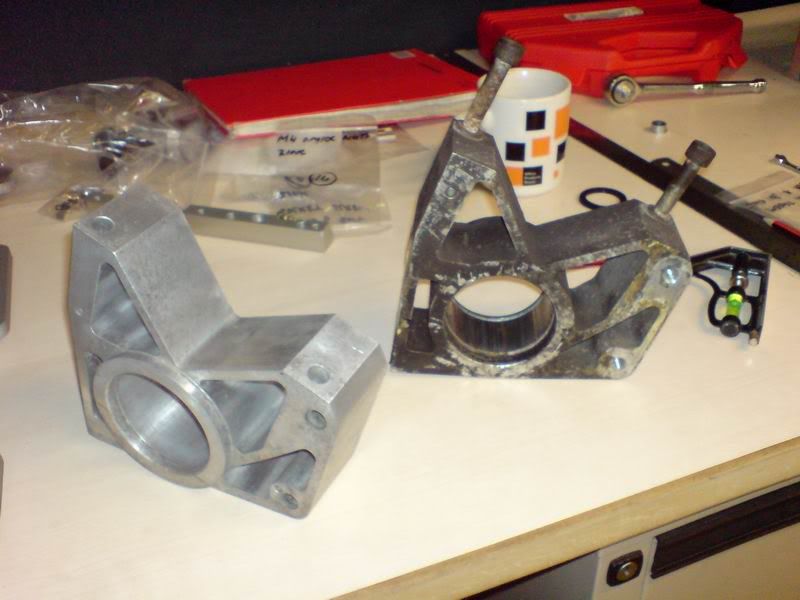
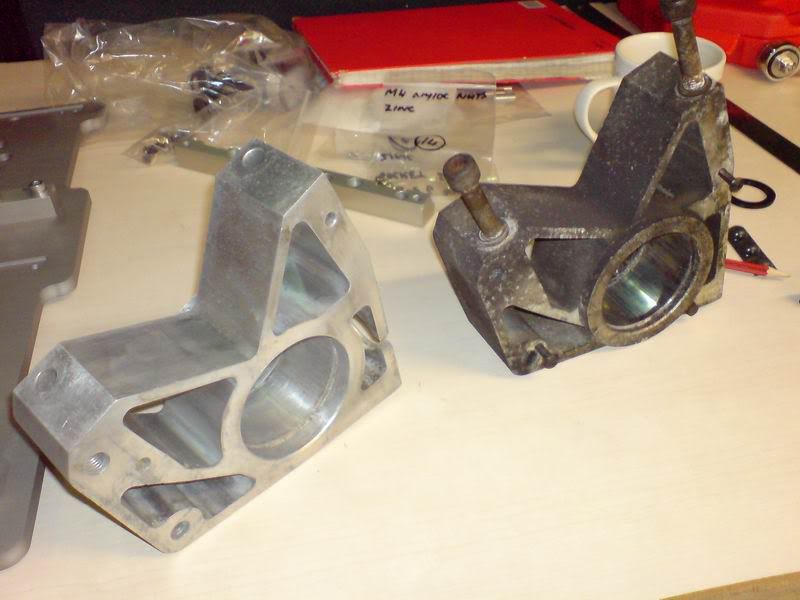
20 Jul '08
Today's job was to begin stripping and refurbishing the Driveshafts and CV joints. These, like the hubs, were heavily corroded thanks to being unprotected and exposed to salt splash. I decided to only do one side at a time so that I've got less parts sitting around in bits to lose/mess up.
I started off with the Nearside driveshaft assembly, it looked like this.... rather scungy.
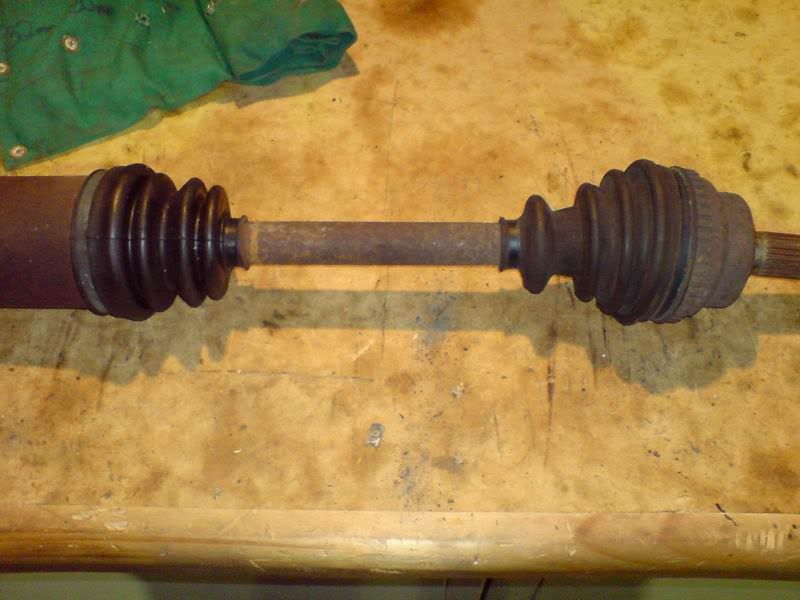
I ditched the boots (new ones on the way from the UK) and split the joints from the shaft. Took about 2 hours to get both the CV joint end and the tripod joint end all degreased and meticulously cleaned and inspected for wear. They look good with minimal signs of wear so they're worth refurbishing rather than getting completely new ones.
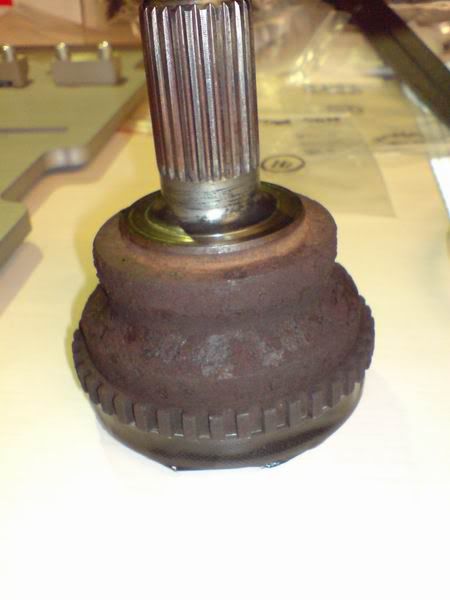
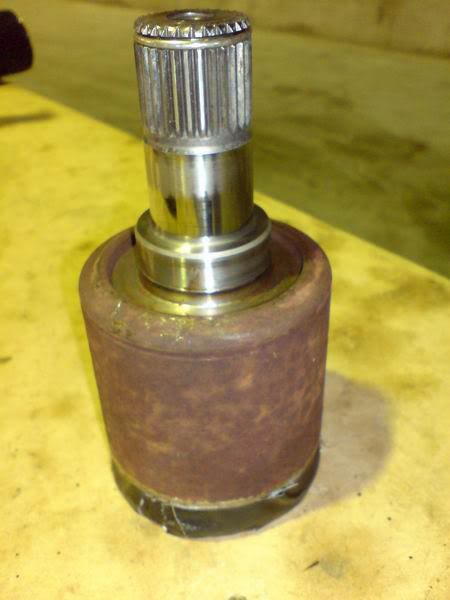
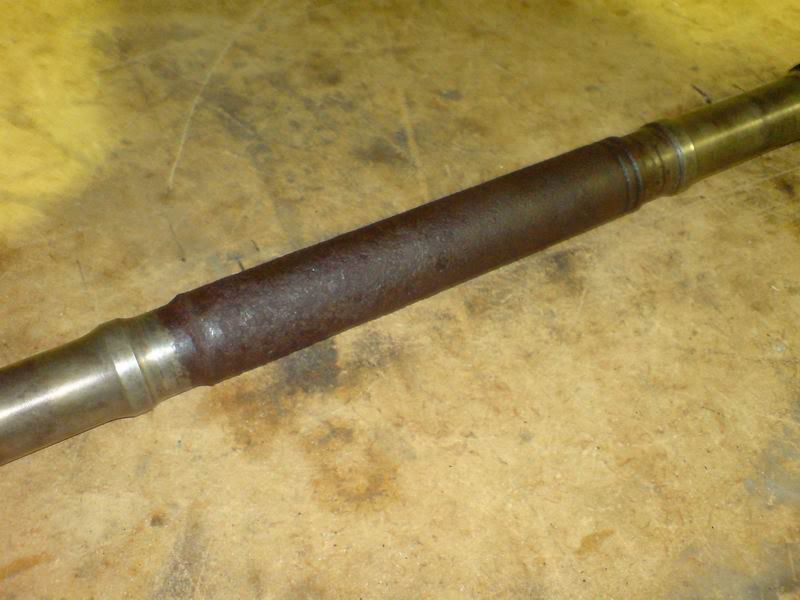
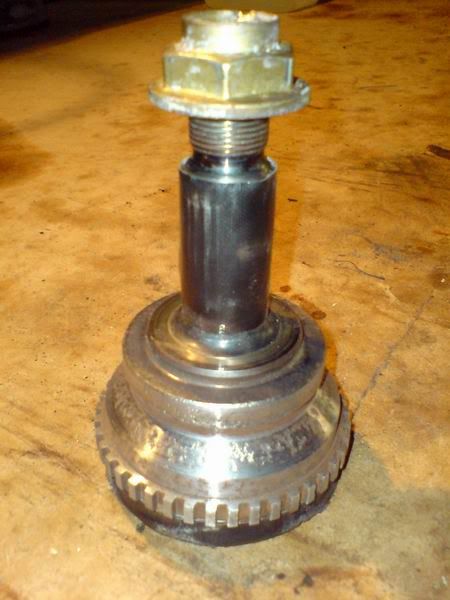
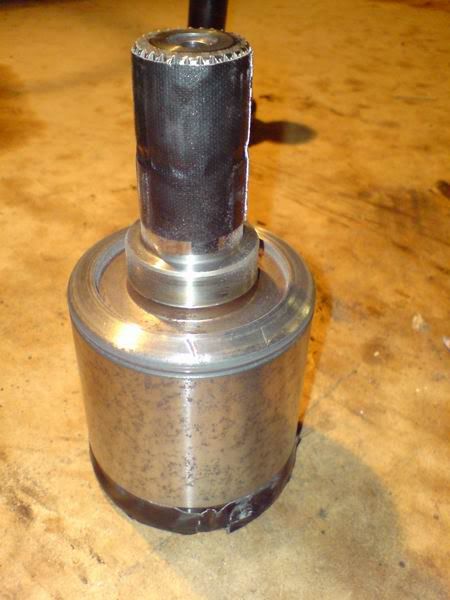
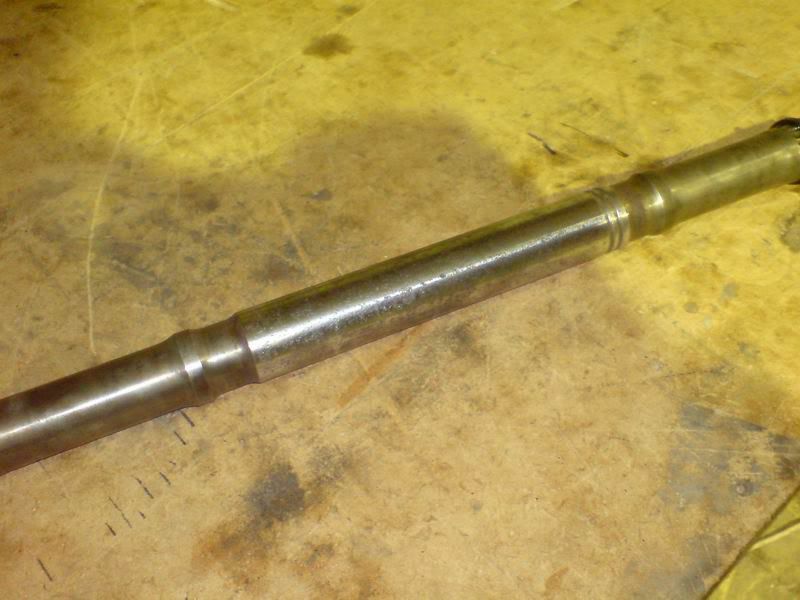
Next task was to mask them up with duct tape so prevent the ingress of dust/grit and also to protect the engagement splines. Pics show the Outboard and inboard joints respectively before they were cleaned up. Corrosion is worse on the outboard end because it's more exposed. Note the trigger wheel for the ECU speed sensor... corrosion on this was causing some ECU faults, so carefully cleaning this up would be a priority. Pic also shows the bare driveshaft.
20 Jul '08
What followed next was a couple of hours of cleaning up with the wire brush, the brass brush, the emery and the polish in the lathe. They're not 100% complete here but it shows a bit of an improvement.
The outboard CV is mostly cleaned here with just some fiddly hand-work to do with the emery between the trigger wheel teeth. The Inboard CV cleaned up really nice and required minimal work, while the driveshaft took a little more work but came up well.
Due to the heaviness of the corrosion on some of the bits there's still some evidence of some pitting, but this doesn't bother me too much, they don't need to be prefect, I just don't want them to look like they've been sitting on the bottom of the ocean for 10 years!
This week I'm going to track myself down the POR15 supplier in Auckland and get some of their kits. They do a clear coat now I believe, so this will be used on the outside of the CV joints and hubs to keep them looking reasonable after being exposed to the weather. The driveshaft will be painted gloss black along the centre (left uncoated at the ends where the boots fit over as that's grease-filled and needs no protection).
Next weekend I aim to finish off polishing the uprights I started last weekend (may look at getting these anodised after some recommendations from the SELOC guys... will take them to the anodisers this week to enquire (won't bother if they're not going to come up really nice) and I will do the same as what I've done today with the offside driveshaft and CV joints. Now that I've done one side, the second should be very easy. I also hope to FINALLY get my lot of suspension off for sandblasting and to chase up my STILL undiagnosed engine.... still, if I get all that done, as well as procure my POR 15, by the end of next weekend I should be well on the way!
21 Jul '08
Got to the bottom of the engine clatter today! Apparently there was a heat-shield that may or may not have been vibrating against the exhaust manifold at certain revs from resonance. Given that we had to bend a few things to get to the alternator when we rebuilt it, and the knocking started immediately after that, it's very very plausible that this could be the cause of the noise.
Still, I wouldn't mind inspecting the inside of the engine, perhaps replacing things like the valve-guides, main and big end bearings. Will take some advice from the UK K-series gurus though and see whether this is worth doing or whether I'm best leaving it all alone (if it ain't broke....)
26 Jul '08
Today I got the other (Offside) CVs split and cleaned up as per the nearside CVs in the pic. These are ready for clearcoating and reassembly now (after some finishing work I'll do prior to clearcoating).
The engine's having its head removed and inspected this week, as tempting as it was to just reassemble it without removing the head and sticking it back in the car, I'd rather just have a looksee so I can inspect bores, pistons and the top end. The engine's a bit thirsty for oil at high RPM (a common VHPD trait) so we'll see if we can't get to the bottom of it.
Big news this week is that the blasting's been done on all the suspension and I picked it up yesterday. No pics of yet as I'm keeping it locked up in the hot water cupboard, warm and dry until I tackle them tomorrow to remove the masking plugs I've put in all the bores. Will snap a photo then. They'll be off to the electroplaters on Monday. Tomorrow I hope to finish off polishing the front alloy uprights as well.... FINALLY some progress... might get this thing finished after all.
Hoping my package of rebuild parts will be here from the UK early next week, that'll enable me to start putting things back together ASAP as hopefully it won't be long before I can start tackling cleaning up the chassis one corner at a time and re-hanging the suspension.
27 Jul '08
Well more progress this weekend!
Got the second CV joint/driveshaft all split down, cleaned out and scrubbed up. Looks pretty much the same as the first, not perfect, but more than good enough, and a SHED load better than before.
I've also finished polishing up my front extruded alloy suspension uprights and they look uber bling now. I've just buffed them up by hand with a rag and Autosol, so they're not perfect, but they're not designed to look bling, I just wanted them polished so they'll resist corrosion a little better in future. I'm going to look into anodising them too, will take them in to Anodising Industries during the week and have a chat to them... so we'll see.
But anyway beholdeth bling:
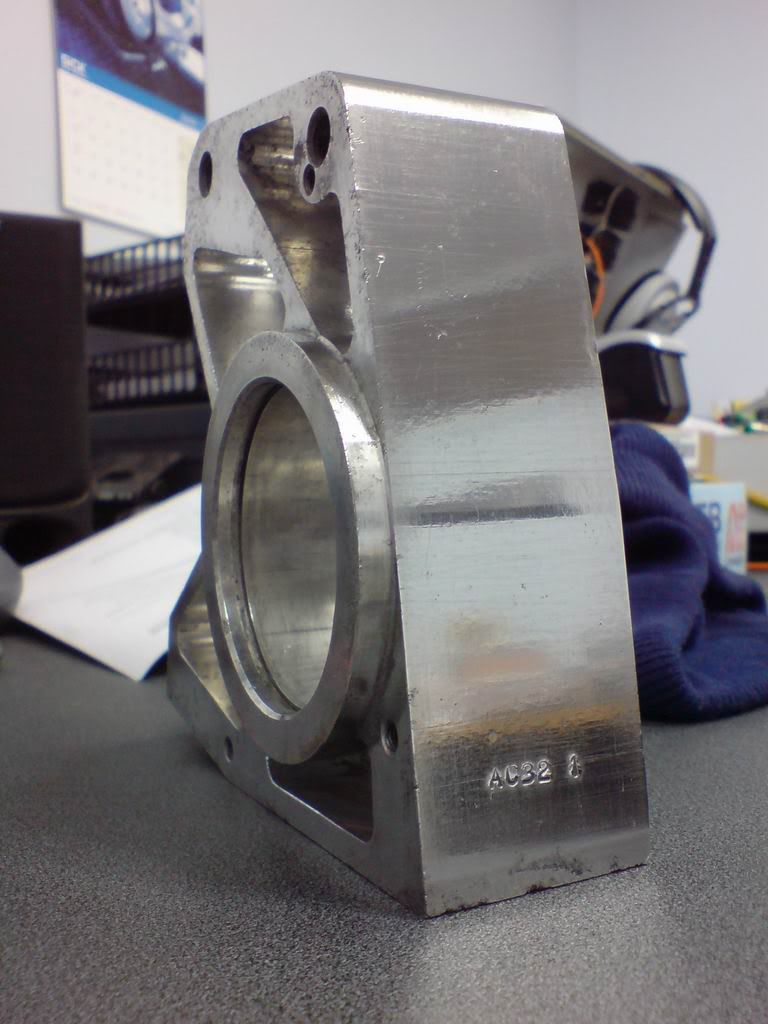
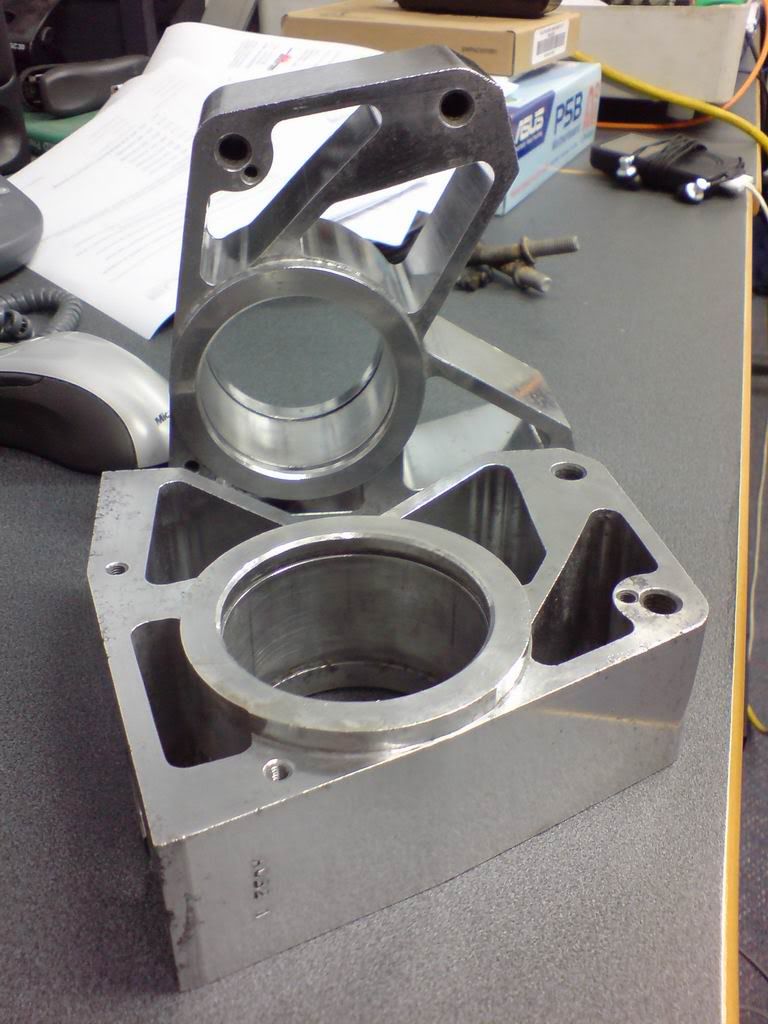
Compare those to the DIRY one in the pic taken from a few weeks ago and you'll see it's a small improvement

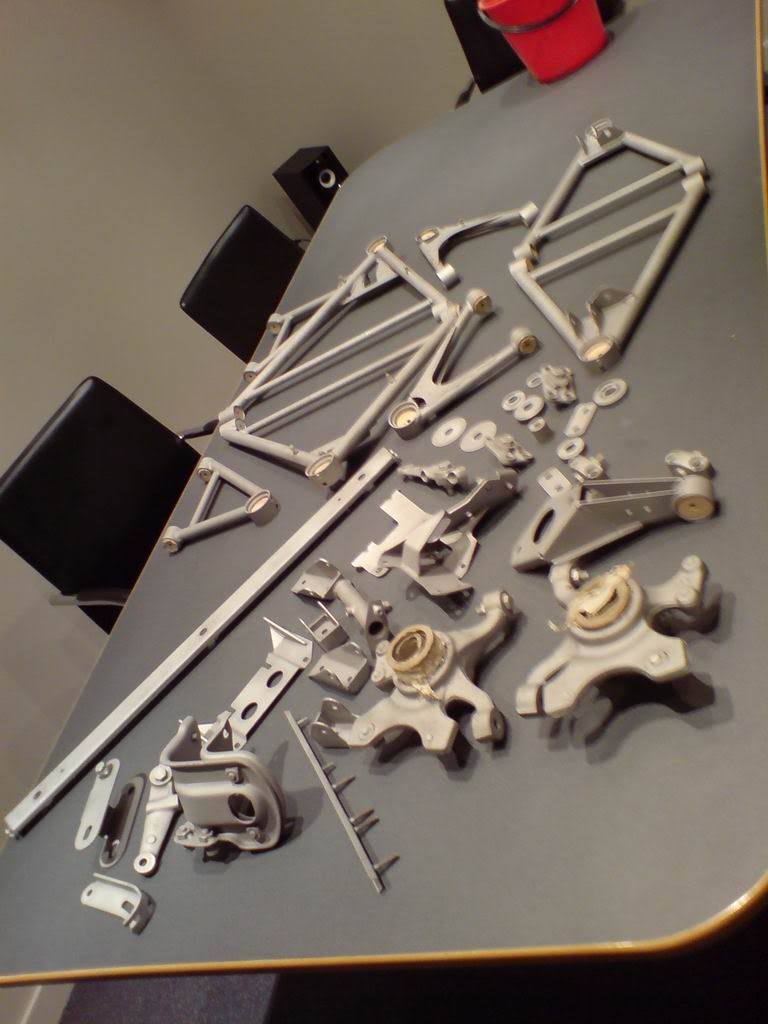
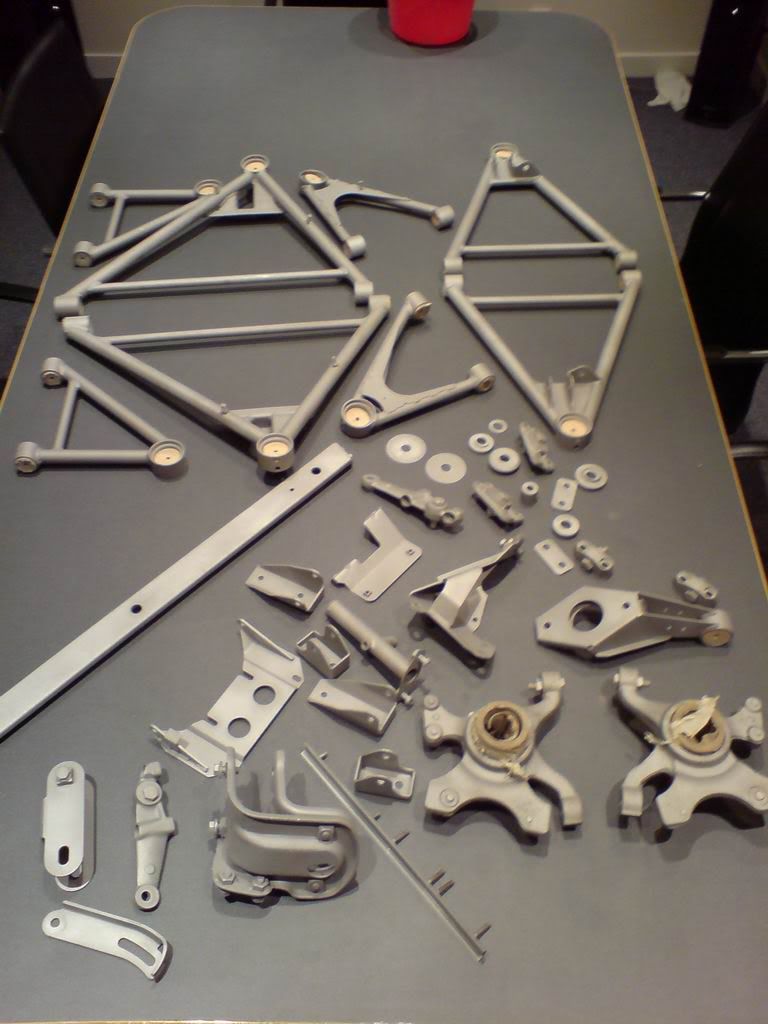
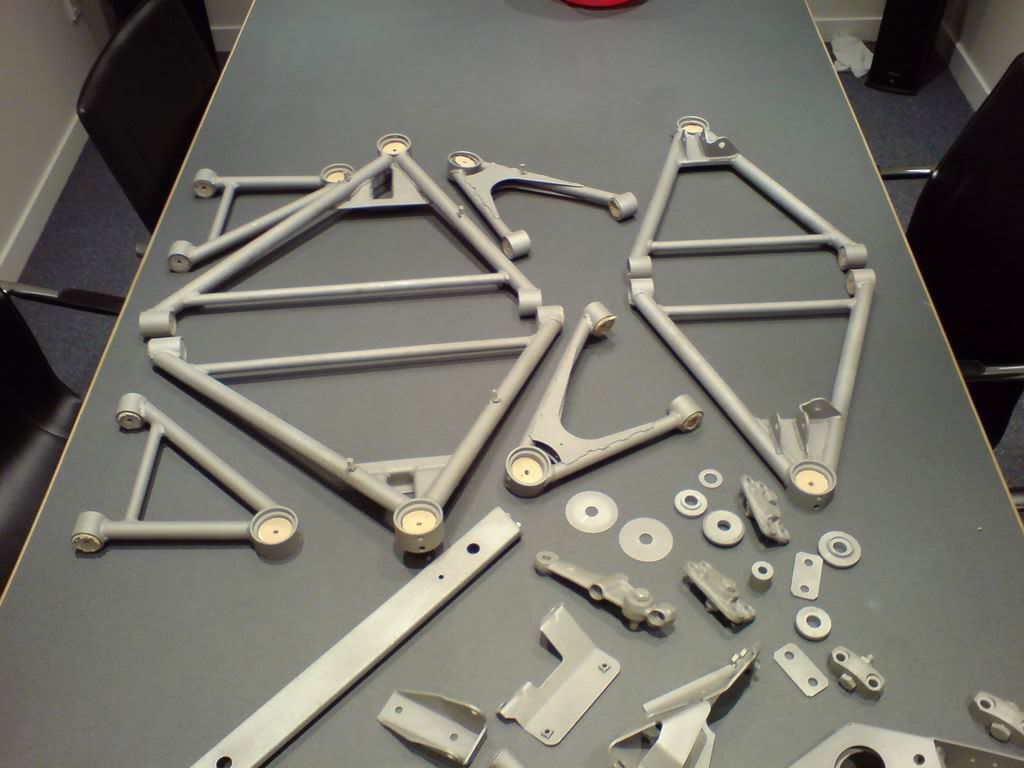
Also snapped some photos of all my sandblasting stuff. All of the wishbones, steering arms, balljoint mounts, engine mounts, forged steel rear uprights and miscellaneous bits and bobs have spent this weekend in the hot water cupboard. Because they're now bare steel, I've been trying to keep them from getting moisty and rusting until I can get them into the platers tomorrow
Compare them to the earlier photos above of the suspension wishbones on the floor and you'll see it's a million times better. Can't wait to see them all plated up and looking shiny gold and/or powdercoated
Beholdeth more bling!
So yeah, productive weekend
03 Aug '08
More progress.... some background first:
Now, With the Series 1 and early Series 2 Elises (and S1 Exiges) Lotus had a bit of a nightmare with the floorpans, they made rather an elemntary cock-up and designed in a rather silly fault.
The Elise chassis is anodised aluminium sections glued together and as such doesn't corrode really at all. This is useful as because it's glued, you can't just cut off and weld in repair sections like you can with a conventional welded steel unibody car.
Now, the car originally came with rubber mats bonded to the footwells... which was all well and good. But invariably, moisture got underneath and used to "sweat". Ordinarily that's not a problem, but given that the mats are rubber and don't breathe, you get a low-oxygen environment , and the stagnant moisture causes crevice corrosion to attack the anodising and then the base metal beneath. This was first discovered by owners in about 2002-2003 when some noticed the mats beginning to go lumpy as the piles of aluminium oxide (white powder). Upon pulling them up it looked like the floor of a cocaine factory. When the powder was scrubbed away, the aluminium was left heavily pitted, discoloured, pinholed and even cirrided completely through.
Now Lotus realised the f k up and issued a recall whereby the rubber mats were removed, the floors cleaned up and breathable synthetic mattiing installed. If the corrosion wasn't serious, then the floors were cleaned then coated with ACF50 (a protectant for aluminium). In more serious cases, the floors were cleaned and a new aluminium sheet was bonded in over the top of the old one hence double-skinning the floor. The floorpan is not structural, it's purely a cosmetic issue and obviously the sort of thing you want to stop before it gets too bad.
NOW.
My car had the floor corrosion/recall done in 2004. My corrosion wasn't too bad by way of pitting with the worst pits being only about 20-30% of the way through the metal. The anodising was knackered though and had blackened badly, hence looking very ugly (see pics). Instead of doing the "B" fix (new panel bonded in) they did the small "A" fix. It really should have had the new floor bonded in but I'm rather glad they didn't as to my mind, while it's COSMETICALLY the best thing to do, it recreates the same issue the rubber mats caused in the first place (a sandwich where moisture can get to).
My floorpans as they were can be seen below.... ugly:
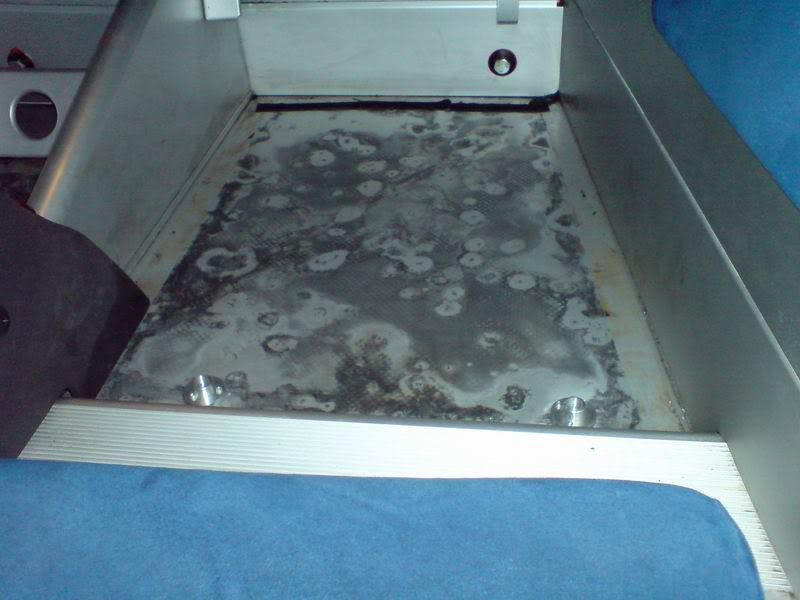
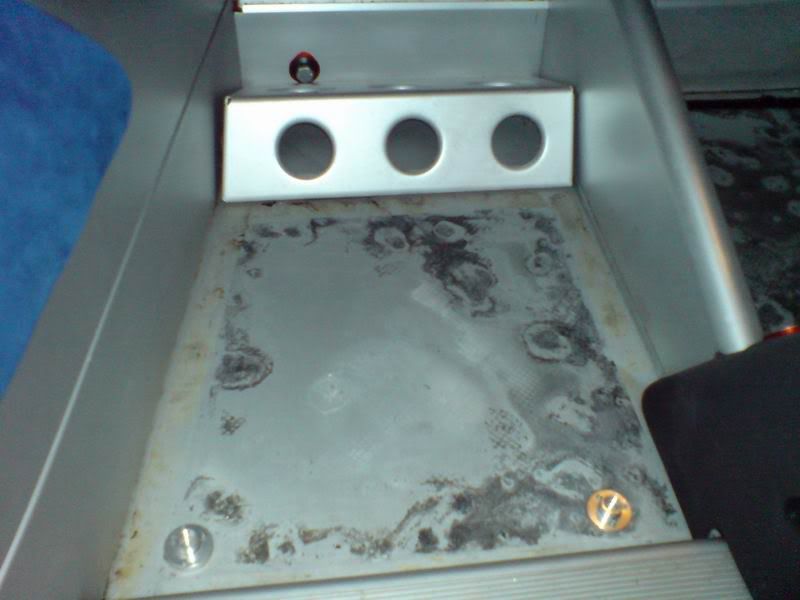
Anyway, I decided that I would clean mine up and would give them some kind of coating (Like Danoul from SELOC has ). I decided on POR15 as I've used this on floorpans of other cars that had corroded and the resultant finish was tough as nails and a complete seal over the metal. This is a special anti-corrosive epoxy paint that dries by sucking moisture out of the air and from the base metal below (it can only be painted on bare metal). It then forms an impermeable seal where Oxygen and moisture cannot get to (it's not porous like conventional paints). Especially given that now POR15 is available in Silver, I thought I'd give it a shot. If I'm not happy with the colour when done, I'll simply be able to over-coat it with a colour-matched conventional paint whilst keeping the POR15 coat in place to protect the metal.
Anyway... the floorpans were meticulously cleaned and prepped this weekend in order to receive the paint. They're already looking a lot better, and the pitting isn't as bad as I'd feared:
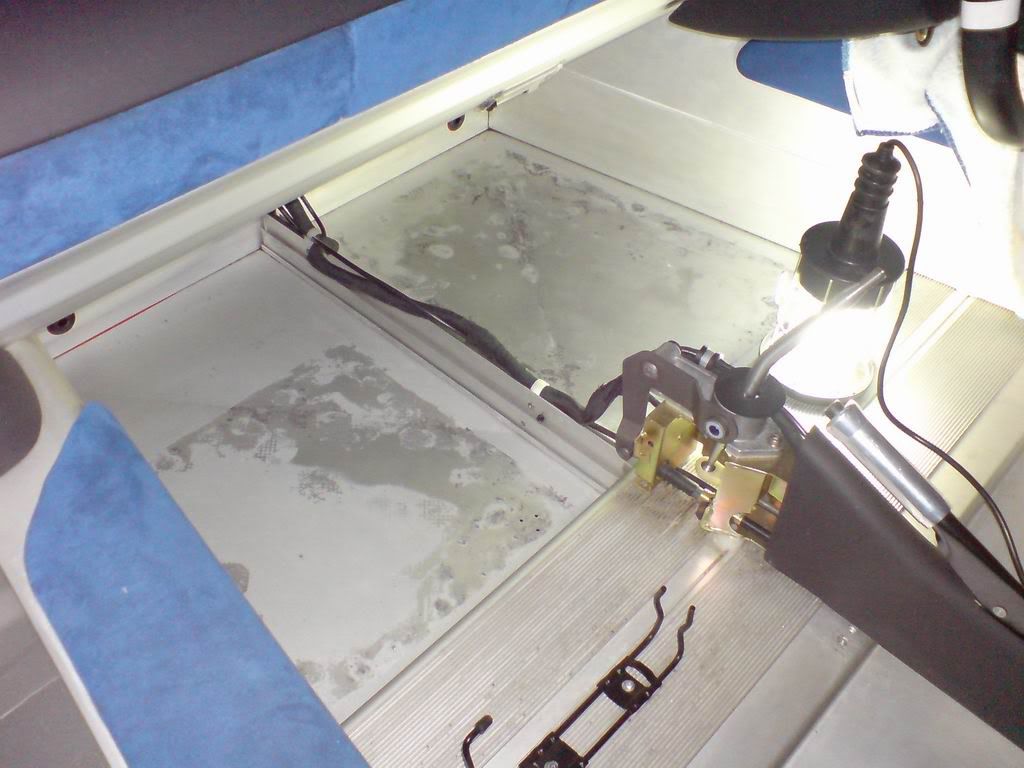
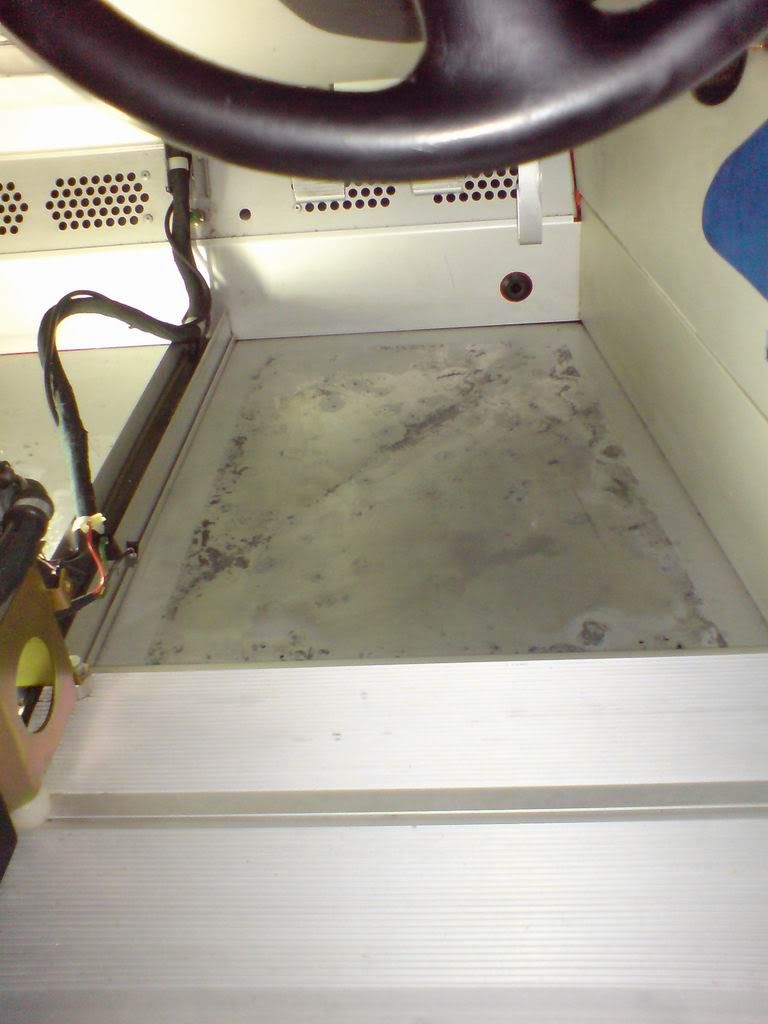
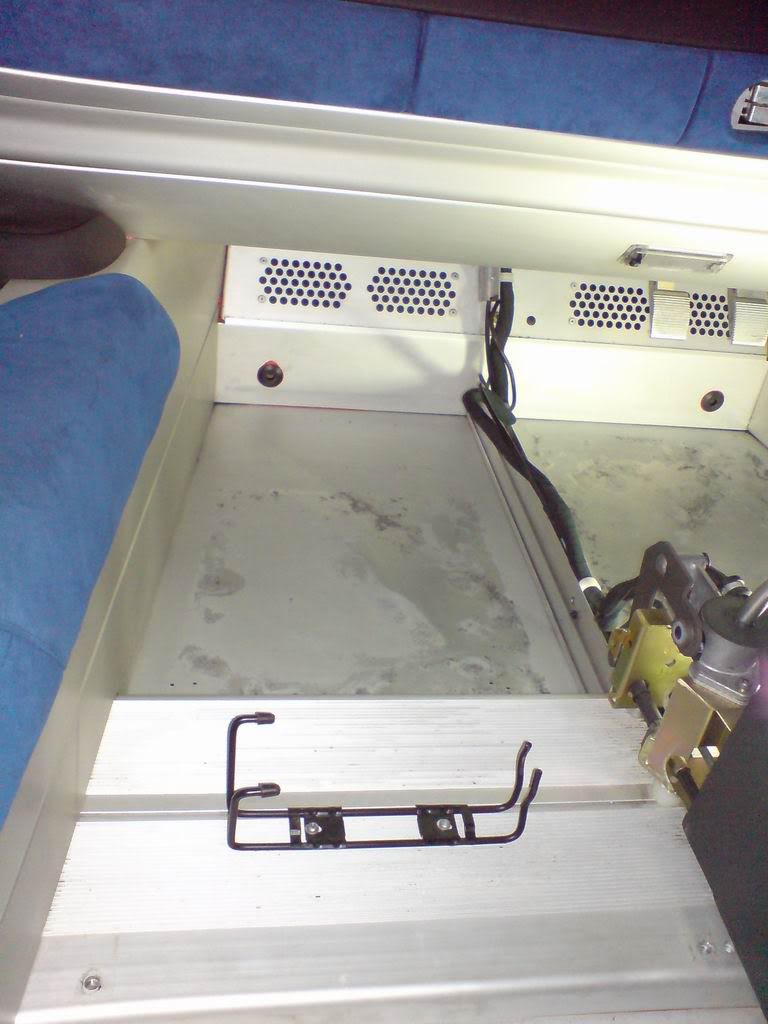
They're now ready for the POR15 which I'll apply later tonight or tomorrow. POR15 works as a filler/primer too so the pitting should be easily filled by the paint. Any pitting evident after coating will be filled on top of the basecoat so that there's no chance of moisture being trapped below the filler.
More pics once there's some paint on!
04 Aug '08
First coat on
Certainly not a perfect finish, but pretty good. second coat should fill most of the pitting and be a little more uniform... as I said, I can do a topcoat at a later stage if I desire... at least for now this'll prevent any corrosion from getting worse... and it don't half look better than before
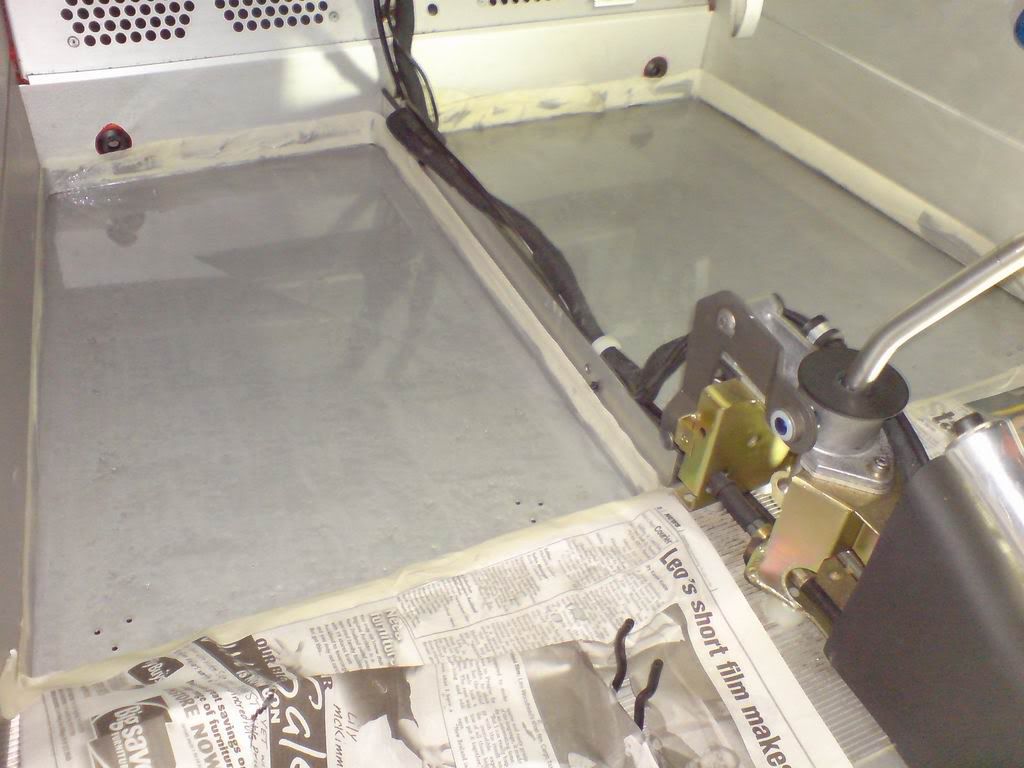
Second coat on now... coverage is much better, colour is actually quite a good match and much more uniform on second coat... pitting pretty much filled in. The gloss level will dull slightly once the paint dries, but other than that should stay looking as good as it does in the pics. The job, as they say, is an orange coloured root vegetable
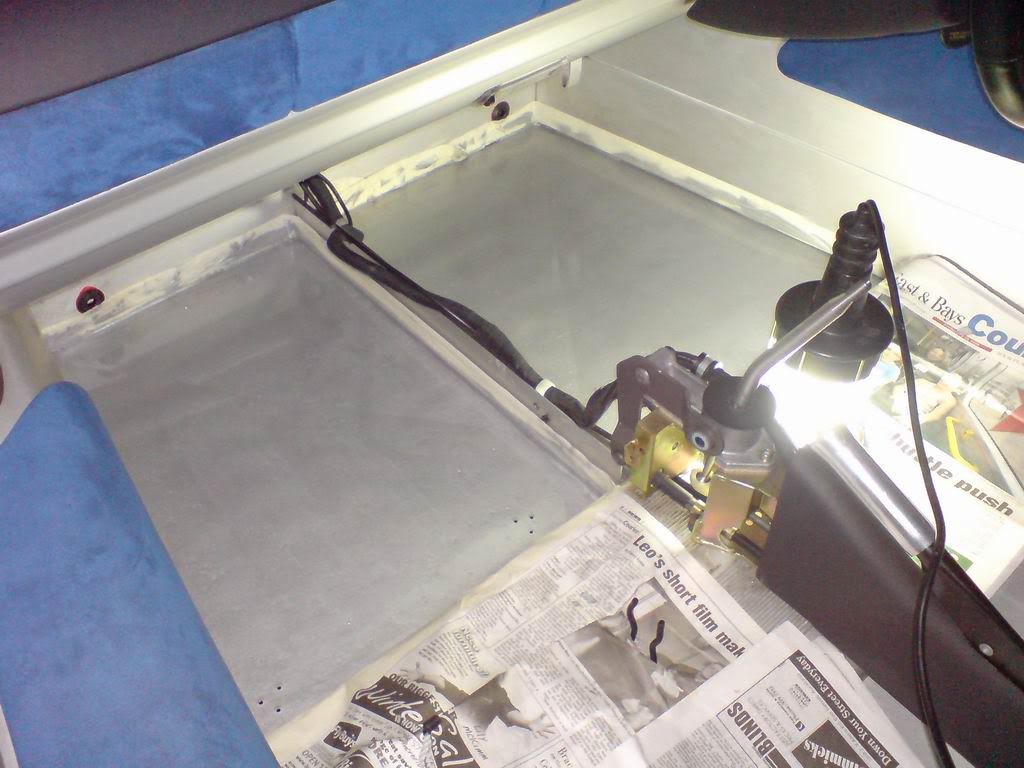
06 Aug '08
Today's update:
Well it's been a mixed day today... taken the decision to bite the bullet and rebuild the engine. I was hoping to avoid this and I could have just slapped it back in the car, but the prevalent oil-consumption would only get worse and the performance would begin to drop off before too long so given it's out and partially stripped I'm going to jump in boots and all and do it. It's outside my budget for the job and it means the car probably won't be finished until the end of the year at the earliest but it's the right thing to do. A little disheartened to be honest
On the plus side, I got the plating back today... all of the sandblasting as seen in a photo a few posts back now looks lovely and plated. Here's a bit of a teaser:
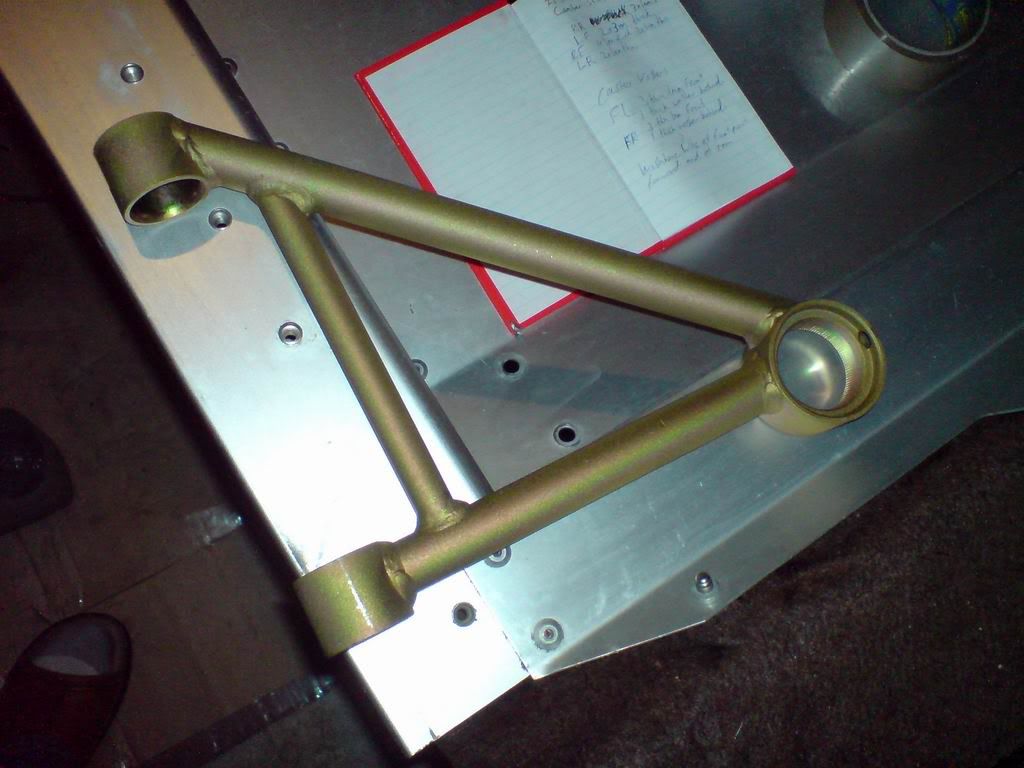
Most of the exposed parts will be overcoated with a POR15 epoxy clearcoat for further protection before they're ready to bolt back on the car... should look a million bucks! Hoping to get the car back on its wheels by early September to allow me to wheel the car around and give me space to work on the engine in there.
12 Aug '08
Not much progress this weekend... the POR15 clear kit I needed to do a bunch of the components didn't arrive so I was a bit hamstrung. Spent much of the weekend in bed with a migraine though and working on my daily driver so not as much Lotus time as I'd like.
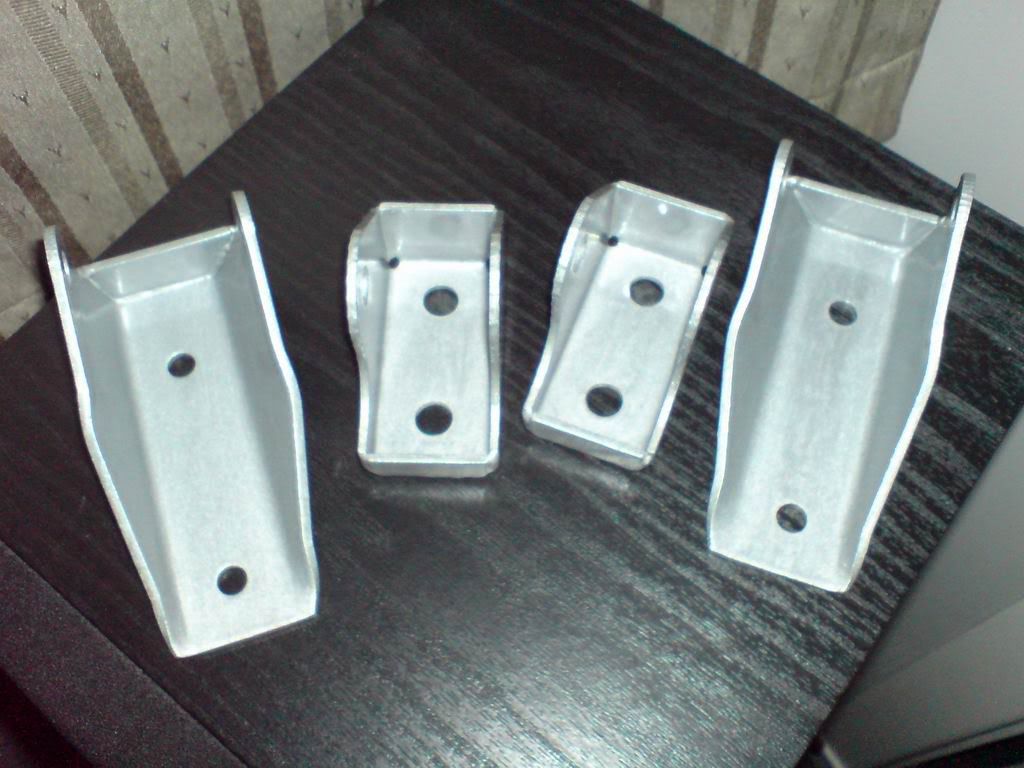
Still, got the upper shock mounts all finished now. The plating place botched up and gold-passivated these too (I was after them bright-zinc plated to better match the OEM hot-dip galv finish) so I figured I'd overcoat them with the left-over POR15 I had from the floor as it'd look slightly better than having them in the gold passivate.
They came out quite good considering it was very cold and the paint was really too thick to do without leaving brush marks... once they were tough-dry, I brought them into my room to sit by the heater.... I can barely move in my room now for car-parts! The hazards of flatting and doing up an old car eh?
Behold shock mount shininess:
17 Aug '08
Right well another weekend and more progress
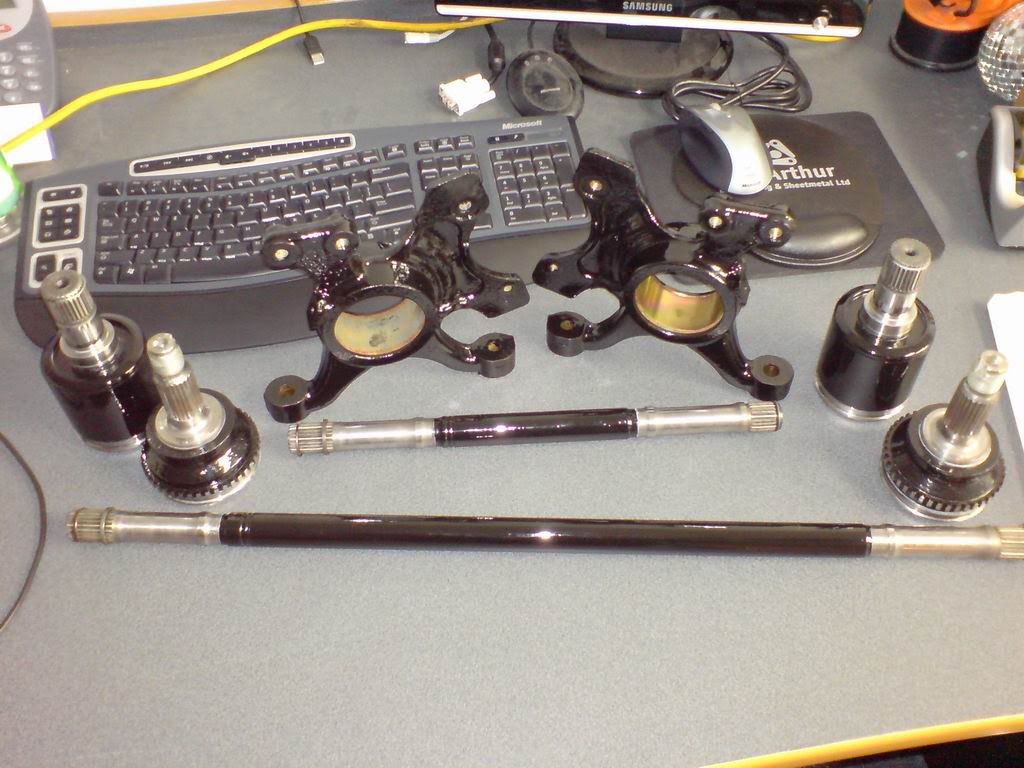
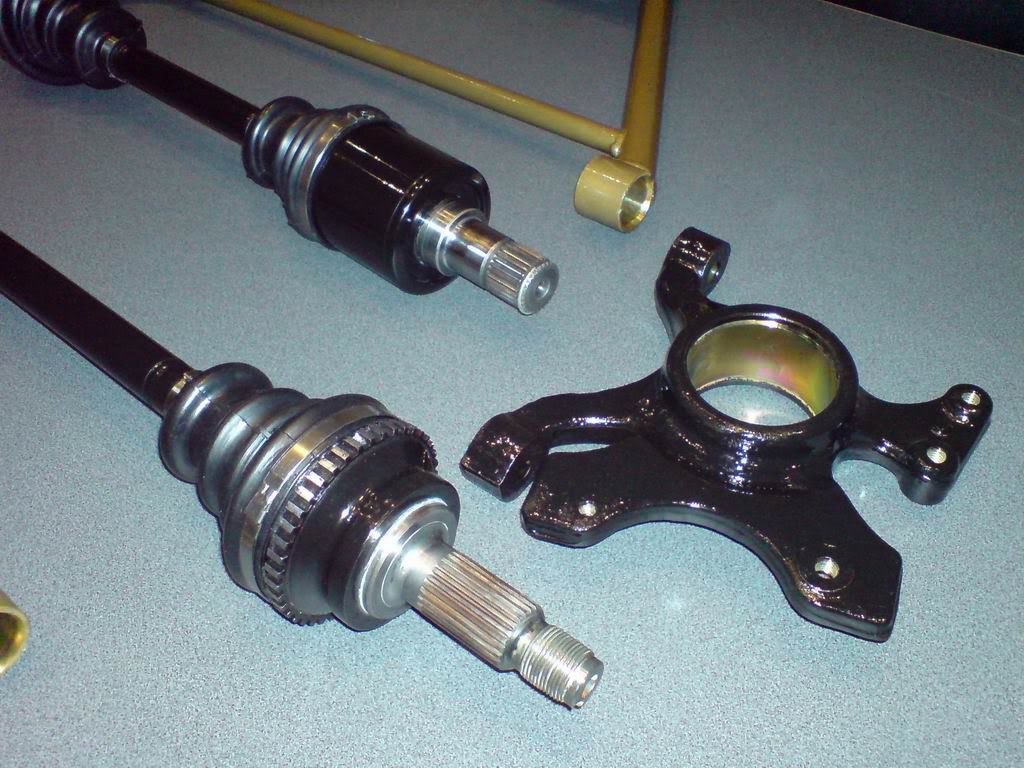
Got the CVs, rear uprights and driveshafts painted. Decided to do CVs black too because the paint prep for the POR15 tarnished the metal quite badly and the CVs would have looked arse in clear. They've come out all very shiny and black, as you'd hope. They'll never rust again. Just need to get some more grease tomorrow then the driveshaft assemblies can go back together again!
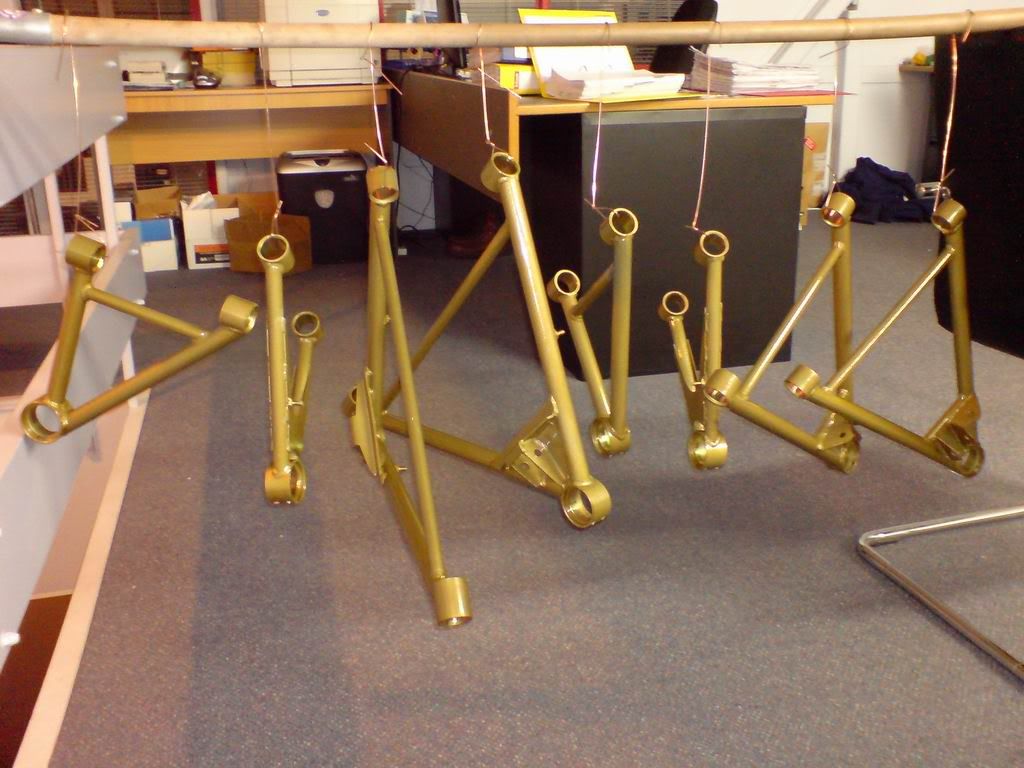
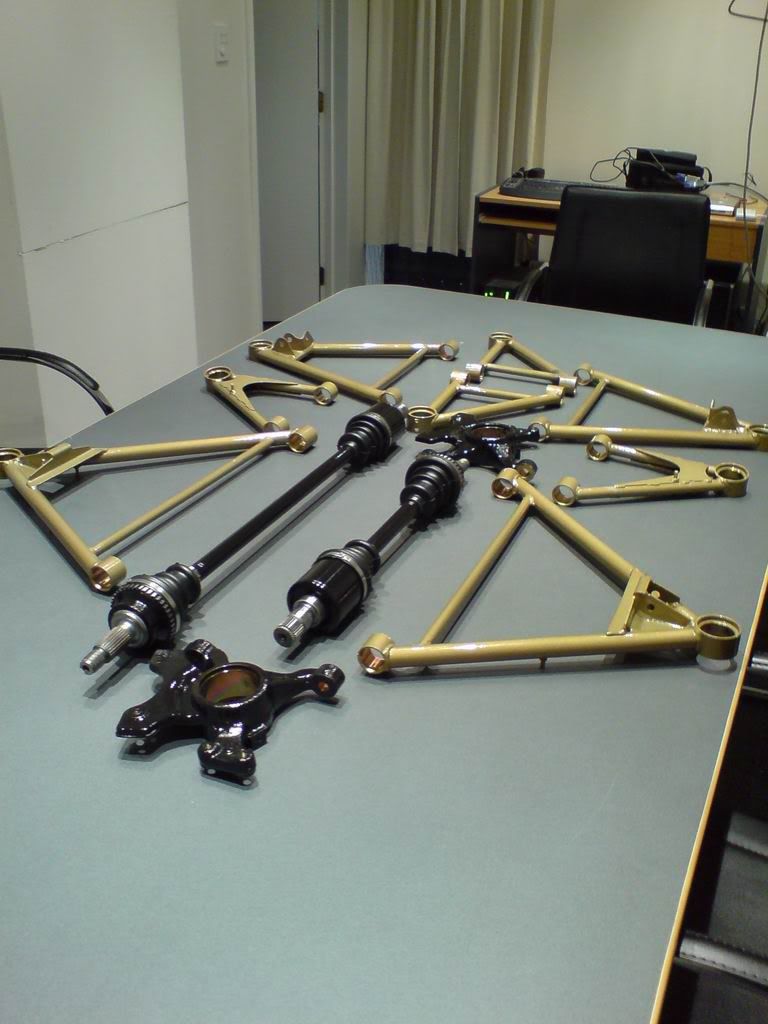
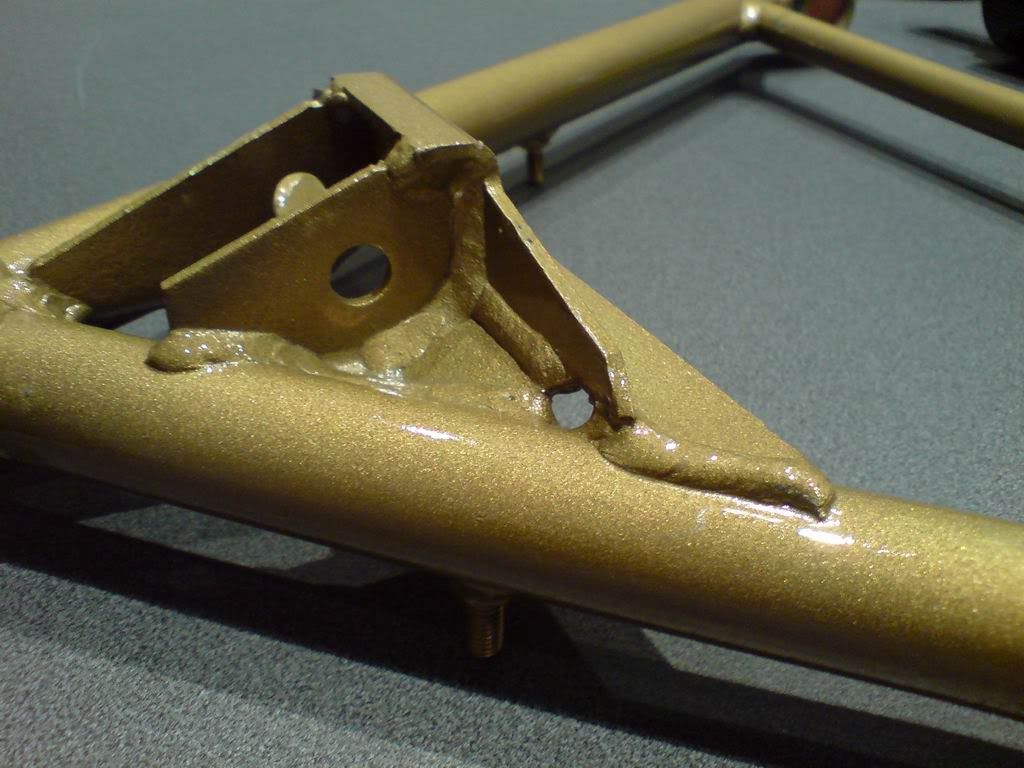
Also got my wishbones all finally coated in POR15 Clearcoat (because it's a sandblasted finish it doesn't need the pre-paint) and they're looking better than I'd hoped. Nice and glossy and new-looking with the gold passivate below looking like some expensive trick pearlescent paint job. The way I've done it they should still look like this in 20 years time. Stoked!
19 Aug '08
MORE EYE CANDIES!
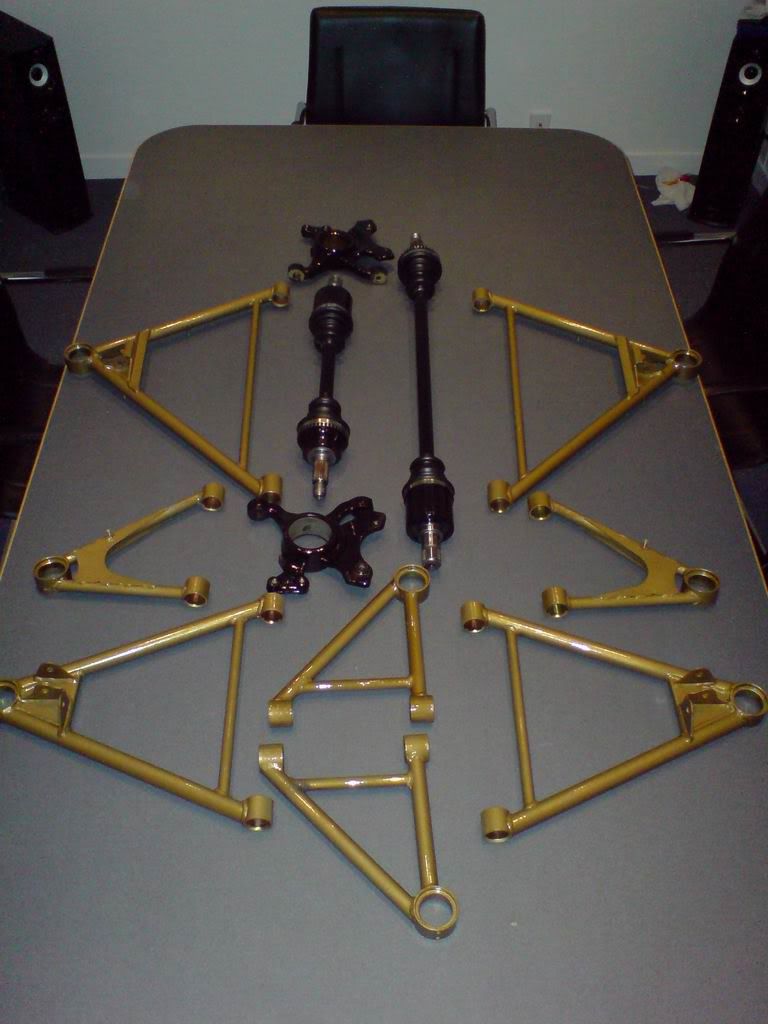
Wishbones are all finished now and ready to accept their new bushes and balljoints (will do this in a few weeks when the car's ready to accept them). Also got the rear driveshafts/CV joints all repacked with nice new grease and fitted with new boots and fully reassembled. Took a bit of faffing around to get them right, but they're together now and ready to go back on the car!
So... on with the pretty shiny pics.... are these not the sexiest wishbones you ever did see?
22 Aug '08
Well thanks to Mark's (M111 on SELOC) advice and also some tips from Phil (Junks), I've decided to bite the bullet and give the rear subframe a birthday too and get it re-galved.
Took it off tonight and over the weekend I'll work at separating the longerons and subframe from eachother without messing anything up.
I've also a few more things to go over with the POR15 coat so this should keep me busy this weekend. Hopefully if I can get the subframe isolated, I'll be able to get the galv turned around within the working week, along with the bulk of the powdercoating/ceramicoating.
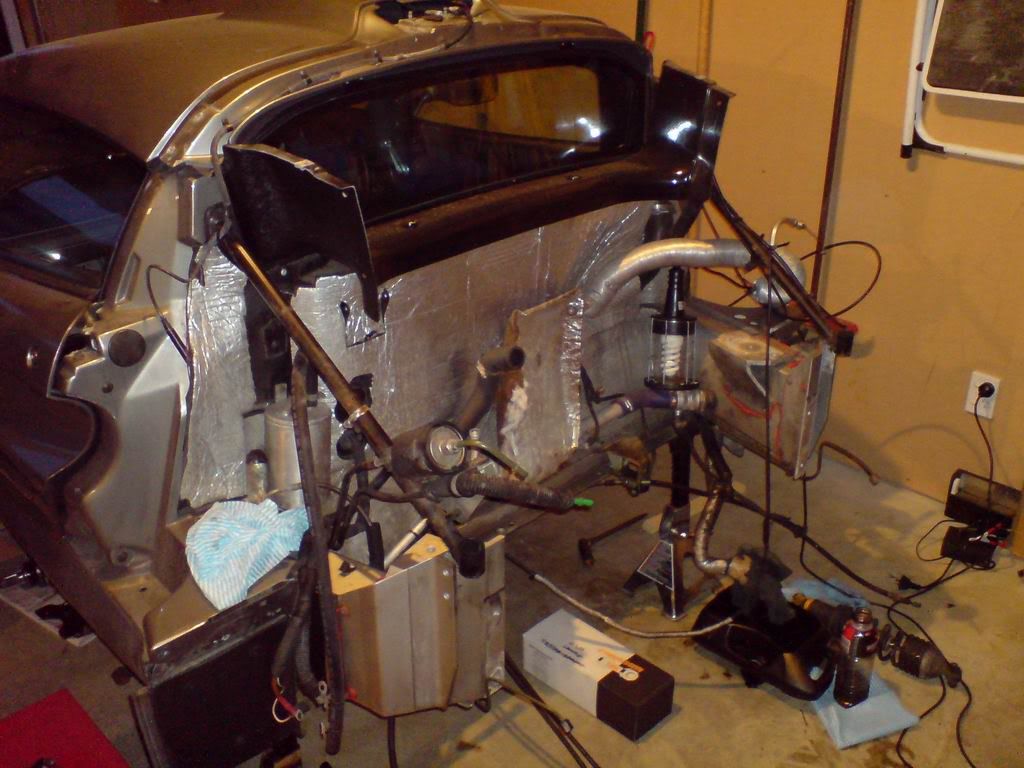
Meanwhile... my poor, forlorn looking car gets even shorter!
 Pretty much a tale of my rebuild to date and it might provide some useful info/motivation/demotivation to people who have thought to do the same thing. Please forgive some of the over-explanation in some of the posts as I cross-post this build-diary on non-Lotus forums so I occasionally explain things in more basic terms than you guys would need
Background on the car is that I imported it (to New Zealand) from Edinburgh, Scotland September '07 after it had spent its first 6 years on this earth with its first owner in London and Edinburgh. It arrived in NZ along with another for another NZ owner to beat the emissions laws that would ban their importing as of Jan 1 2008. There were no others in the country and to this day remain the only two.
Now the Exige S1 is pretty much similar to an Elise S1 under the skin, basically just being a racing version thereof. Given that the Exige was derived from a competition car though, many of the peripheral items were low-volume bits (they only ever made 601 Exige S1s) and as such many of the bits and pieces had little or no rustproofing on them. As a result, after a few winters on salty UK roads they do start to look tired under the skin.
My car was in superb condition throughout compared to many but it was always my intention to spend its first NZ winter stripping it back, giving it a good look-over and pretty much bringing it back to new condition underneath. This meant replacing all the bushes, balljoints, rod ends and cleaning up all the steelwork beneath as well as the chassis and all its hardpoints (which, because they're in aluminum, stay in pretty good nick).
Given that the clutch was starting to show signs of wear and started slipping badly after NZ Autocar magazine had it to do their 0-60 tests for the magazine, this would be replaced at the same time. Also, given that the front pulleys made a bid for freedom off the end of the crankshaft in November, it was decided the front end of the engine would get all new pulleys and cam-drive to be on the safe side. This would be easiest done with the engine out, and we'd also use this time to diagnose a clatter that had started in the engine over the Easter break... we suspected something amiss in the valvetrain of the mightily fragile Rover K16-VHPD lump.
Anyway... on with the show!

20 Apr '08
Well I'm embarking on a winter rebuild for the Exige to freshen it up, and basically return it to as-new condition under the skin. Lotuses don't tend to age in the dry, salt-free environment of NZ so I want to get it right so it'll be many many years before it needs any further care under the skin.
First step's been stripping the car back, removing the bodywork, which was finished today. Car's to be trailered into KW Historics this week to have the engine removed and then stripped down and inspected before being rebuilt. The rolling chassis will come back here in the meantime to be stripped and refurbished, before hopefully getting it all back together in time for spring

Introducing the new lightweight, no-frills SEXIGE:


01 Jun '08
Little progress to be seen in May really... much of May was taken at Lotus getting the engine out.
Got the back brakes off yesterday, will get all the suspension and brakes off today then should be able to start separating hubs and balljoints etc.
Not looking too pretty at the moment


02 Jun '08
MOAR PICS!!!!!
Suspension's all off now
 Was a bit of a nightmare getting some of the more corroded bits apart but the good news is that there's nothing that'll not clean up as good as new once I've thrown some money and elbow grease at it


I was actually surprised how good it is. Most of the "rust" has turned out to be caked on brake dust. One of the wishbones has a little flaking on it, but this is very minor and should media-blast up to virgin metal pretty easily and will look like new when re-plated. The chassis has stood up impeccably. It REALLY needs a clean and it'll get a bit of a light buff with AutoSol in places and maybe an undercoating of ACF50 to keep it from any further damage but once it's back together and in a salt-free NZ climate (and under my careful ownership), it should look as good in 20 years time as it does when I'm done

09 Jul '08
Well it's been VERY slow progress lately... working 100 hour weeks hasn't helped, but hopefully as winter really sets in I'll be making some good progress.
The engine is being stripped, currently have no indication of what the noise was though... hope to find this out in the next day or two.
All the suspension is now off the car and awaiting cleaning up and repainting. All the hubs etc are all split and the old bushes and balljoints have been binned.
Here you can see the wishbones as they've been removed from the car. I plan to have these bead-blasted and re-plated/passivated to the same finish they had when new. I'm intending to get the platers to do a debrittle treatment on them too as I've heard the welds can crack if this is not done... pays to be on the safe side I guess.

Here are the upper shock mounts (rear). They're not too bad, but the plating (looks like hot-dip galvanising or electrogalv) has seen better days. I'll probably leave the front ones as they look okay, but the rears will be replated all shiny and new.

I'd love to replate the rear subframe as well as the galv has blackened here, but still appears to be intact. due to the hassle involved with removing and re-galving it, I'll probably not bother. It's not exposed to the elements and the galv still seems to be doing its job.
Pretty much ready to send the lot of stuff out for blasting/plating. There may be a second batch of odds and ends, but this will cover off 95% of the stuff I think.
I've also had a go at cleaning up the hubs. They weren't too bad, but have seen better days. It looks like they were just plain, unprotected cast iron and as the photos show they've cleaned up not bad (see before/after). Some pitting is still evident, but that doesn't bother me too much. I'll probably give these a degrease and mask them up and give them a spray-lacquer (clear) on the exposed surfaces... should keep them in good enough nick for the next dozen years or so.


Will do the other two hubs this weekend and will start to clean up the ali uprights also. Will get the blasting/plating sent off during the week, so hopefully that will progress pretty quickly. I'll then be on to cleaning up various bits on the tub/engine bay and onto cleaning up the driveshafts/CVs as I reckon we can make these a bit prettier before giving these a coat of something to keep them looking semi-okay. That should keep me busy for a few weekends and hopefully by then I'll know more about the state of the engine and can plan the reassembly

13 Jul '08
This weekend's efforts have involved doing the remaining two hubs, which have come up okay as well as pulling a few more bits off the car and masking for sandblasting. Hope to get this all off for blasting/plating this week! Smiley
I've started on the cleanup of the front uprights too, have one cleaned now and am halfway through the other... the pics show comparison between the two. Once they're both cleaned, they'll be buffed up with some autosol to protect them then probably finished off with a good coating of ACF50 protectant to keep them free from corrosion.


20 Jul '08
Today's job was to begin stripping and refurbishing the Driveshafts and CV joints. These, like the hubs, were heavily corroded thanks to being unprotected and exposed to salt splash. I decided to only do one side at a time so that I've got less parts sitting around in bits to lose/mess up.
I started off with the Nearside driveshaft assembly, it looked like this.... rather scungy.

I ditched the boots (new ones on the way from the UK) and split the joints from the shaft. Took about 2 hours to get both the CV joint end and the tripod joint end all degreased and meticulously cleaned and inspected for wear. They look good with minimal signs of wear so they're worth refurbishing rather than getting completely new ones.
Next task was to mask them up with duct tape so prevent the ingress of dust/grit and also to protect the engagement splines. Pics show the Outboard and inboard joints respectively before they were cleaned up. Corrosion is worse on the outboard end because it's more exposed. Note the trigger wheel for the ECU speed sensor... corrosion on this was causing some ECU faults, so carefully cleaning this up would be a priority. Pic also shows the bare driveshaft.


20 Jul '08
What followed next was a couple of hours of cleaning up with the wire brush, the brass brush, the emery and the polish in the lathe. They're not 100% complete here but it shows a bit of an improvement.
The outboard CV is mostly cleaned here with just some fiddly hand-work to do with the emery between the trigger wheel teeth. The Inboard CV cleaned up really nice and required minimal work, while the driveshaft took a little more work but came up well.
Due to the heaviness of the corrosion on some of the bits there's still some evidence of some pitting, but this doesn't bother me too much, they don't need to be prefect, I just don't want them to look like they've been sitting on the bottom of the ocean for 10 years!
This week I'm going to track myself down the POR15 supplier in Auckland and get some of their kits. They do a clear coat now I believe, so this will be used on the outside of the CV joints and hubs to keep them looking reasonable after being exposed to the weather. The driveshaft will be painted gloss black along the centre (left uncoated at the ends where the boots fit over as that's grease-filled and needs no protection).


Next weekend I aim to finish off polishing the uprights I started last weekend (may look at getting these anodised after some recommendations from the SELOC guys... will take them to the anodisers this week to enquire (won't bother if they're not going to come up really nice) and I will do the same as what I've done today with the offside driveshaft and CV joints. Now that I've done one side, the second should be very easy. I also hope to FINALLY get my lot of suspension off for sandblasting and to chase up my STILL undiagnosed engine.... still, if I get all that done, as well as procure my POR 15, by the end of next weekend I should be well on the way!

21 Jul '08
Got to the bottom of the engine clatter today! Apparently there was a heat-shield that may or may not have been vibrating against the exhaust manifold at certain revs from resonance. Given that we had to bend a few things to get to the alternator when we rebuilt it, and the knocking started immediately after that, it's very very plausible that this could be the cause of the noise.
Still, I wouldn't mind inspecting the inside of the engine, perhaps replacing things like the valve-guides, main and big end bearings. Will take some advice from the UK K-series gurus though and see whether this is worth doing or whether I'm best leaving it all alone (if it ain't broke....)
26 Jul '08
Today I got the other (Offside) CVs split and cleaned up as per the nearside CVs in the pic. These are ready for clearcoating and reassembly now (after some finishing work I'll do prior to clearcoating).
The engine's having its head removed and inspected this week, as tempting as it was to just reassemble it without removing the head and sticking it back in the car, I'd rather just have a looksee so I can inspect bores, pistons and the top end. The engine's a bit thirsty for oil at high RPM (a common VHPD trait) so we'll see if we can't get to the bottom of it.
Big news this week is that the blasting's been done on all the suspension and I picked it up yesterday. No pics of yet as I'm keeping it locked up in the hot water cupboard, warm and dry until I tackle them tomorrow to remove the masking plugs I've put in all the bores. Will snap a photo then. They'll be off to the electroplaters on Monday. Tomorrow I hope to finish off polishing the front alloy uprights as well.... FINALLY some progress... might get this thing finished after all.
Hoping my package of rebuild parts will be here from the UK early next week, that'll enable me to start putting things back together ASAP as hopefully it won't be long before I can start tackling cleaning up the chassis one corner at a time and re-hanging the suspension.
27 Jul '08
Well more progress this weekend!
Got the second CV joint/driveshaft all split down, cleaned out and scrubbed up. Looks pretty much the same as the first, not perfect, but more than good enough, and a SHED load better than before.
I've also finished polishing up my front extruded alloy suspension uprights and they look uber bling now. I've just buffed them up by hand with a rag and Autosol, so they're not perfect, but they're not designed to look bling, I just wanted them polished so they'll resist corrosion a little better in future. I'm going to look into anodising them too, will take them in to Anodising Industries during the week and have a chat to them... so we'll see.
But anyway beholdeth bling:


Compare those to the DIRY one in the pic taken from a few weeks ago and you'll see it's a small improvement


Also snapped some photos of all my sandblasting stuff. All of the wishbones, steering arms, balljoint mounts, engine mounts, forged steel rear uprights and miscellaneous bits and bobs have spent this weekend in the hot water cupboard. Because they're now bare steel, I've been trying to keep them from getting moisty and rusting until I can get them into the platers tomorrow

Compare them to the earlier photos above of the suspension wishbones on the floor and you'll see it's a million times better. Can't wait to see them all plated up and looking shiny gold and/or powdercoated

Beholdeth more bling!


So yeah, productive weekend

03 Aug '08
More progress.... some background first:
Now, With the Series 1 and early Series 2 Elises (and S1 Exiges) Lotus had a bit of a nightmare with the floorpans, they made rather an elemntary cock-up and designed in a rather silly fault.
The Elise chassis is anodised aluminium sections glued together and as such doesn't corrode really at all. This is useful as because it's glued, you can't just cut off and weld in repair sections like you can with a conventional welded steel unibody car.
Now, the car originally came with rubber mats bonded to the footwells... which was all well and good. But invariably, moisture got underneath and used to "sweat". Ordinarily that's not a problem, but given that the mats are rubber and don't breathe, you get a low-oxygen environment , and the stagnant moisture causes crevice corrosion to attack the anodising and then the base metal beneath. This was first discovered by owners in about 2002-2003 when some noticed the mats beginning to go lumpy as the piles of aluminium oxide (white powder). Upon pulling them up it looked like the floor of a cocaine factory. When the powder was scrubbed away, the aluminium was left heavily pitted, discoloured, pinholed and even cirrided completely through.
Now Lotus realised the f
 k up and issued a recall whereby the rubber mats were removed, the floors cleaned up and breathable synthetic mattiing installed. If the corrosion wasn't serious, then the floors were cleaned then coated with ACF50 (a protectant for aluminium). In more serious cases, the floors were cleaned and a new aluminium sheet was bonded in over the top of the old one hence double-skinning the floor. The floorpan is not structural, it's purely a cosmetic issue and obviously the sort of thing you want to stop before it gets too bad.
NOW.
My car had the floor corrosion/recall done in 2004. My corrosion wasn't too bad by way of pitting with the worst pits being only about 20-30% of the way through the metal. The anodising was knackered though and had blackened badly, hence looking very ugly (see pics). Instead of doing the "B" fix (new panel bonded in) they did the small "A" fix. It really should have had the new floor bonded in but I'm rather glad they didn't as to my mind, while it's COSMETICALLY the best thing to do, it recreates the same issue the rubber mats caused in the first place (a sandwich where moisture can get to).
My floorpans as they were can be seen below.... ugly:


Anyway, I decided that I would clean mine up and would give them some kind of coating (Like Danoul from SELOC has
 ). I decided on POR15 as I've used this on floorpans of other cars that had corroded and the resultant finish was tough as nails and a complete seal over the metal. This is a special anti-corrosive epoxy paint that dries by sucking moisture out of the air and from the base metal below (it can only be painted on bare metal). It then forms an impermeable seal where Oxygen and moisture cannot get to (it's not porous like conventional paints). Especially given that now POR15 is available in Silver, I thought I'd give it a shot. If I'm not happy with the colour when done, I'll simply be able to over-coat it with a colour-matched conventional paint whilst keeping the POR15 coat in place to protect the metal.
Anyway... the floorpans were meticulously cleaned and prepped this weekend in order to receive the paint. They're already looking a lot better, and the pitting isn't as bad as I'd feared:


They're now ready for the POR15 which I'll apply later tonight or tomorrow. POR15 works as a filler/primer too so the pitting should be easily filled by the paint. Any pitting evident after coating will be filled on top of the basecoat so that there's no chance of moisture being trapped below the filler.
More pics once there's some paint on!

04 Aug '08
First coat on

Certainly not a perfect finish, but pretty good. second coat should fill most of the pitting and be a little more uniform... as I said, I can do a topcoat at a later stage if I desire... at least for now this'll prevent any corrosion from getting worse... and it don't half look better than before


Second coat on now... coverage is much better, colour is actually quite a good match and much more uniform on second coat... pitting pretty much filled in. The gloss level will dull slightly once the paint dries, but other than that should stay looking as good as it does in the pics. The job, as they say, is an orange coloured root vegetable


06 Aug '08
Today's update:
Well it's been a mixed day today... taken the decision to bite the bullet and rebuild the engine. I was hoping to avoid this and I could have just slapped it back in the car, but the prevalent oil-consumption would only get worse and the performance would begin to drop off before too long so given it's out and partially stripped I'm going to jump in boots and all and do it. It's outside my budget for the job and it means the car probably won't be finished until the end of the year at the earliest but it's the right thing to do. A little disheartened to be honest

On the plus side, I got the plating back today... all of the sandblasting as seen in a photo a few posts back now looks lovely and plated. Here's a bit of a teaser:

Most of the exposed parts will be overcoated with a POR15 epoxy clearcoat for further protection before they're ready to bolt back on the car... should look a million bucks! Hoping to get the car back on its wheels by early September to allow me to wheel the car around and give me space to work on the engine in there.
- sigh*
12 Aug '08
Not much progress this weekend... the POR15 clear kit I needed to do a bunch of the components didn't arrive so I was a bit hamstrung. Spent much of the weekend in bed with a migraine though and working on my daily driver so not as much Lotus time as I'd like.
Still, got the upper shock mounts all finished now. The plating place botched up and gold-passivated these too (I was after them bright-zinc plated to better match the OEM hot-dip galv finish) so I figured I'd overcoat them with the left-over POR15 I had from the floor as it'd look slightly better than having them in the gold passivate.
They came out quite good considering it was very cold and the paint was really too thick to do without leaving brush marks... once they were tough-dry, I brought them into my room to sit by the heater.... I can barely move in my room now for car-parts! The hazards of flatting and doing up an old car eh?

Behold shock mount shininess:

17 Aug '08
Right well another weekend and more progress

Got the CVs, rear uprights and driveshafts painted. Decided to do CVs black too because the paint prep for the POR15 tarnished the metal quite badly and the CVs would have looked arse in clear. They've come out all very shiny and black, as you'd hope. They'll never rust again. Just need to get some more grease tomorrow then the driveshaft assemblies can go back together again!

Also got my wishbones all finally coated in POR15 Clearcoat (because it's a sandblasted finish it doesn't need the pre-paint) and they're looking better than I'd hoped. Nice and glossy and new-looking with the gold passivate below looking like some expensive trick pearlescent paint job. The way I've done it they should still look like this in 20 years time. Stoked!

19 Aug '08
MORE EYE CANDIES!
Wishbones are all finished now and ready to accept their new bushes and balljoints (will do this in a few weeks when the car's ready to accept them). Also got the rear driveshafts/CV joints all repacked with nice new grease and fitted with new boots and fully reassembled. Took a bit of faffing around to get them right, but they're together now and ready to go back on the car!

So... on with the pretty shiny pics.... are these not the sexiest wishbones you ever did see?


22 Aug '08
Well thanks to Mark's (M111 on SELOC) advice and also some tips from Phil (Junks), I've decided to bite the bullet and give the rear subframe a birthday too and get it re-galved.
Took it off tonight and over the weekend I'll work at separating the longerons and subframe from eachother without messing anything up.
I've also a few more things to go over with the POR15 coat so this should keep me busy this weekend. Hopefully if I can get the subframe isolated, I'll be able to get the galv turned around within the working week, along with the bulk of the powdercoating/ceramicoating.
Meanwhile... my poor, forlorn looking car gets even shorter!

Edited by Esprit on Saturday 13th December 01:28
Gad-Westy said:
Looking good mate. You're providing plenty of inspiration. That last picture is a little worrying though. Not sure I'd go that far!
Going that far, especially just for what is essentially just a clean-up is a little extreme... but there's bugger all else to do down here in the long, wet kiwi winters 
It's actually not that bad.... the Elise/Exige is a very simple car to take to bits, everything's in nice little sub-assemblies that are pretty easy to strip/assemble... I'd hate to be given the car as it is now and just put it back together, but since I've just taken my time stripping everything down, it shouldn't be too hard to put it back together.
That's the great thing with these cars, so much info out there about them, you don't really have to leave anything else to chance really.
Thankfully it's not going to get any more stripped down than this (although I remember saying the same thing a few months back!)
Well very little progress this weekend due to me basically being flat on my back in bed with this god forsaken flu.
Anyway, one small thing achieved however, I got the rear subframe stripped down and ready for galvanising.
Here's how it came off the car:
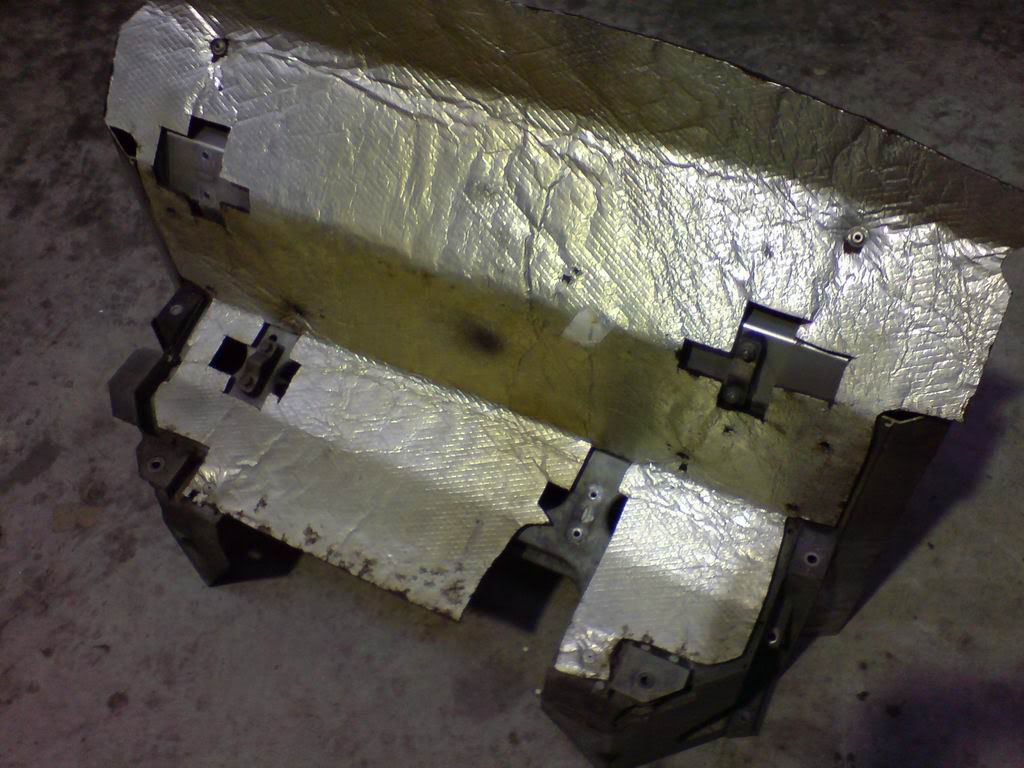
Now the heat shield comes off nice and easy, drill out a few rivets. Then the boot floor and longeron reinforcements have a good few rivets that need drilling. The tricky part was getting the longerons off. The glue holding mine down didn't want to give up too easy, but after an hour or two of swearing at it, heating it and nipping away at it with a gasket scrper-come-chisel and a hacksaw blade, I finally got them both split off. Minimal damage was done to the longerons in the process (according to Lotus you pretty much have to destroy them to get them off) and these will be tidied up as good as new before going back on the car.
Meanwhile, the subframe now looks like this:
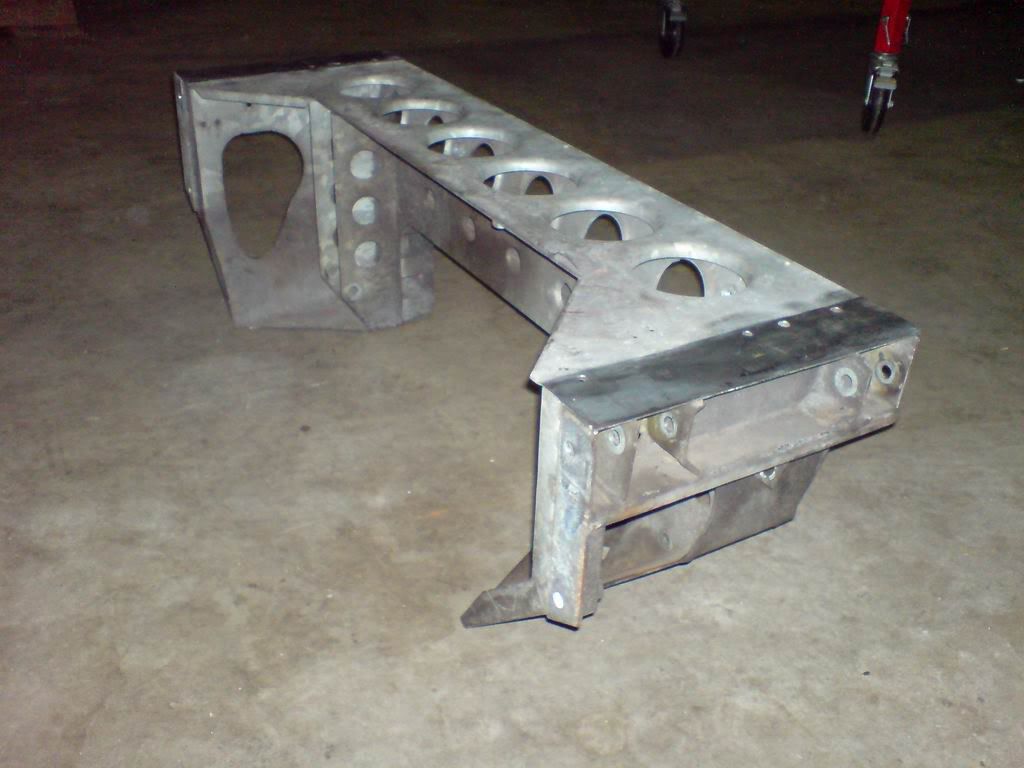
Now just need to find someone who can give it a nice shiny new hot-dip galv finish for me so it's nice and shiny then I can set about reassembling it on the car. Huzzah!
Anyway, one small thing achieved however, I got the rear subframe stripped down and ready for galvanising.
Here's how it came off the car:

Now the heat shield comes off nice and easy, drill out a few rivets. Then the boot floor and longeron reinforcements have a good few rivets that need drilling. The tricky part was getting the longerons off. The glue holding mine down didn't want to give up too easy, but after an hour or two of swearing at it, heating it and nipping away at it with a gasket scrper-come-chisel and a hacksaw blade, I finally got them both split off. Minimal damage was done to the longerons in the process (according to Lotus you pretty much have to destroy them to get them off) and these will be tidied up as good as new before going back on the car.
Meanwhile, the subframe now looks like this:

Now just need to find someone who can give it a nice shiny new hot-dip galv finish for me so it's nice and shiny then I can set about reassembling it on the car. Huzzah!
Edited by Esprit on Sunday 7th December 12:02
Thanks for these posts, the best reading i've had in ages!
I'm contemplating a brake and suspension rebulid this winter myself and wondered about coatings and finishes. Our winter appears to be starting early (!) so i may be taking her to bits sooner than I'd hoped.
I'm guessing you considered these so could give me your thoughts on the following items?
Did you consider chrome plating instead of the yellow zinc on the wishbones? My experience says it'll last a bit better and would normally give a better finish. However I must clarify this point by saying i'd never considered putting clear coat on top of the plating like you've done, and it really looks awesome!
I don't know what calipers you have on your exige, mines got standard elise kit on which i intend keeping after a good overhaul. I considered chrome again for plating the calipers, obviously making sure the pots are kept clear or reaming afterwards to take new pistons & seals. Any thoughts on what you'll be doing with yours?
Sorry to ask for your advice as you've obviously got a lot on at present! Good luck with the rest of it, can't wait to see it come back together.
Hi Steve,
I did look at Chrome plating, but the one thing that put me off is that there's no galvanic protection with it. Given that the area is prone to stone impact, I figured that it wouldn't take long for a small spot of damage to spread and chip off the chrome coating. I chose the yellow passivated zinc because it's what Lotus use on them orginally and on my old '98 Elise that was a NZ-new car, it still looked almost brand new after 9 years on NZ roads (no road salt and drier atmosphere here).
The clearcoat was twofold for me, it adds another layer of protection against stone damage and weathering. It also helps to gloss-up the textured matt finish of the wishbones after grit-blasting. I thought this matt finish might be more prone to scratching on the high points (and giving sites for the zinc coating to be more easily damaged). I also thought it might make the wishbones slightly harder to keep clean given that it would trap grime/brake dust in the low-points on the surface.
The finish after clearcoating has surpassed even my expectations and is a lot more "show-car" than I'd ever intended... I was just shooting for the OEM look really with a nice hard-wearing finish, but the finished result has me well chuffed. I'm also thinking of putting a strip of clear stone-guard tape (like what protects the bodywork just in front of the rear wheels) on the leading edge of the lower wishbones as these are the most prone to stone damage.
My Exige just has the standard callipers on it. I just plan to clean these up and re-fit. They don't weather here in NZ and being aluminium (at least on the front), they're pretty well protected. I'd be reluctant to paint these as I don't think any calliper paint looks good for more than a year or two, and any paint barrier will insulate them and make them less effective at convecting heat away. Chrome plating them would be a good idea, but I'm not sure how you'd get on chrome plating the alloy front callipers, I'm not sure they'd take it well. To my mind, perhaps a clean up of both, and maybe a layer of clear over the rear callipers if you really wanted to get tough on it, but I'd (personally) be reluctant to do much more... of course if you've any more suggestions, I'd love to hear them
Oh, and I'm glad a few people are enjoying reading my ramblings. I've never pulled one of these apart before to this extent and being in NZ there's not many people who have. I'm just hopeful that in doing this I can help others find inspiration to do similar things to theirs (my POR15 floor-fix has already sparked a couple of others to do theirs the same), and I'm also hopeful that as I go through, I may get some useful suggestions on how to do things better (hence my removal of the rear subframe to renew the galvanising). Stay tuned, as I'll be adding more over the coming month as I plod on and do a little more each weekend.
I did look at Chrome plating, but the one thing that put me off is that there's no galvanic protection with it. Given that the area is prone to stone impact, I figured that it wouldn't take long for a small spot of damage to spread and chip off the chrome coating. I chose the yellow passivated zinc because it's what Lotus use on them orginally and on my old '98 Elise that was a NZ-new car, it still looked almost brand new after 9 years on NZ roads (no road salt and drier atmosphere here).
The clearcoat was twofold for me, it adds another layer of protection against stone damage and weathering. It also helps to gloss-up the textured matt finish of the wishbones after grit-blasting. I thought this matt finish might be more prone to scratching on the high points (and giving sites for the zinc coating to be more easily damaged). I also thought it might make the wishbones slightly harder to keep clean given that it would trap grime/brake dust in the low-points on the surface.
The finish after clearcoating has surpassed even my expectations and is a lot more "show-car" than I'd ever intended... I was just shooting for the OEM look really with a nice hard-wearing finish, but the finished result has me well chuffed. I'm also thinking of putting a strip of clear stone-guard tape (like what protects the bodywork just in front of the rear wheels) on the leading edge of the lower wishbones as these are the most prone to stone damage.
My Exige just has the standard callipers on it. I just plan to clean these up and re-fit. They don't weather here in NZ and being aluminium (at least on the front), they're pretty well protected. I'd be reluctant to paint these as I don't think any calliper paint looks good for more than a year or two, and any paint barrier will insulate them and make them less effective at convecting heat away. Chrome plating them would be a good idea, but I'm not sure how you'd get on chrome plating the alloy front callipers, I'm not sure they'd take it well. To my mind, perhaps a clean up of both, and maybe a layer of clear over the rear callipers if you really wanted to get tough on it, but I'd (personally) be reluctant to do much more... of course if you've any more suggestions, I'd love to hear them

Oh, and I'm glad a few people are enjoying reading my ramblings. I've never pulled one of these apart before to this extent and being in NZ there's not many people who have. I'm just hopeful that in doing this I can help others find inspiration to do similar things to theirs (my POR15 floor-fix has already sparked a couple of others to do theirs the same), and I'm also hopeful that as I go through, I may get some useful suggestions on how to do things better (hence my removal of the rear subframe to renew the galvanising). Stay tuned, as I'll be adding more over the coming month as I plod on and do a little more each weekend.
Edited by Esprit on Tuesday 26th August 23:47
Esprit said:
I don't think any calliper paint looks good for more than a year or two, and any paint barrier will insulate them and make them less effective at convecting heat away.
Great post and photos and i respect this quote, brilliant attenton to detail and geniune free thinking, not just slapping paint about willy nilly, real care.bencollins said:
Esprit said:
I don't think any calliper paint looks good for more than a year or two, and any paint barrier will insulate them and make them less effective at convecting heat away.
Great post and photos and i respect this quote, brilliant attenton to detail and geniune free thinking, not just slapping paint about willy nilly, real care.Esprit, many thanks for your comments! I refurbish dampers for rail vehicles so have access to hard chrome plant which allows a much tougher coat than usual decorative chrome plating. I can also leave them in the tank as long as I want and build up the plating to beyond a couple of microns. I think whatever I do a clear coat over the surface treatment will help so I think that's the way to go. I think the plastic film on undersides is a great idea and will really help the protection as the zinc and clear will be prone to chipping.
Whoever did your zinc plating did an excellent job, you do normally get glossy and matt areas depending on the tank set-up, but they look excellent. The matt areas are the weakest but it doesn't look like you have any!
I haven't had my brain engaged when thinking about the calipers! It's obvious they're aluminium (in that wonderful thing called hindsight) but by the look of mine they look like cast steel. Colin Chapman would hate me for my short sightetedness! I guess I'll just get them anodised, and again go for the clear coat. I'd expect the laquer to peel off when extremely heated but won't find out until after a track day. The previous problems have always been on much heavier cars so perhaps the brakes will stay cool enough on the lotus for this not be a problem. Either way they'll be better protected and easier to clean for a while. I know piston seal kits are readily avilable and as it's one of the few things I can easily do myself I'll probably overhaul the brakes evrery couple of years anyway.
I couldn't attempt what you're doing! Good luck with it. Cheers.

bencollins said:
Esprit said:
I don't think any calliper paint looks good for more than a year or two, and any paint barrier will insulate them and make them less effective at convecting heat away.
Great post and photos and i respect this quote, brilliant attenton to detail and geniune free thinking, not just slapping paint about willy nilly, real care.
.jpg)
stinkysteve said:
bencollins said:
Esprit said:
I don't think any calliper paint looks good for more than a year or two, and any paint barrier will insulate them and make them less effective at convecting heat away.
Great post and photos and i respect this quote, brilliant attenton to detail and geniune free thinking, not just slapping paint about willy nilly, real care.Esprit, many thanks for your comments! I refurbish dampers for rail vehicles so have access to hard chrome plant which allows a much tougher coat than usual decorative chrome plating. I can also leave them in the tank as long as I want and build up the plating to beyond a couple of microns. I think whatever I do a clear coat over the surface treatment will help so I think that's the way to go. I think the plastic film on undersides is a great idea and will really help the protection as the zinc and clear will be prone to chipping.
Whoever did your zinc plating did an excellent job, you do normally get glossy and matt areas depending on the tank set-up, but they look excellent. The matt areas are the weakest but it doesn't look like you have any!
I haven't had my brain engaged when thinking about the calipers! It's obvious they're aluminium (in that wonderful thing called hindsight) but by the look of mine they look like cast steel. Colin Chapman would hate me for my short sightetedness! I guess I'll just get them anodised, and again go for the clear coat. I'd expect the laquer to peel off when extremely heated but won't find out until after a track day. The previous problems have always been on much heavier cars so perhaps the brakes will stay cool enough on the lotus for this not be a problem. Either way they'll be better protected and easier to clean for a while. I know piston seal kits are readily avilable and as it's one of the few things I can easily do myself I'll probably overhaul the brakes evrery couple of years anyway.
I couldn't attempt what you're doing! Good luck with it. Cheers.


Would be VERY interested to hear about how you get on with the Chroming. I know Lotus themselves chromed a set of wishbones for the original '95 show chassis, although this was purely cosmetic. Chroming would have the potential yo give a real show-car finish. You'd want to prep your wishbones differently to mine though as I'd imagine chrome over a gritblasted finish (like mine) wouldn't look as nice as chrome over a nice smoth finish. If the finish is chip-resistant and can stand up to salt-spray, then it should hold up well. In any case, if you've the process at your disposal as you say, then rechroming them again shouldn't be an issue should it ever arise. One word of caution, if electroplating the wishbones, (I think Chroming will also suffer a similar fate) then you MUST for safety reasons have a de-embrittlement bake done IMMEDIATELY after plating. This stops hydrogen embrittlement of the welds and HAZ that acn occur as hydrogen diffuses into the metal during plating. Most plating places will know all about this and most will offer an in-house service to do it for a small fee.
You're definitely right Steve, the plating place made a very nice job of my plating. There's a couple of areas that the plating didn't get to on a couple of parts, but these are very minor. Attraction with the Zing plating is that there's galvanic protection there, so these places won't deteriorate too quickly if exposed anyway.
In case anyone is curious about costs, to get the lot gritblasted (as seen all laid out on the table in silver) cost me NZ$150 and the electroplating of all those components cost me $225. I've spent about $60 on a black and clear kit of POR15 that will do most of the components, so that's about $435 all up, which in your money is about 165 quid. Obviously I've done a LOT of prep work in that (making up protective plugs, stripping/degreasing etc, but goes to show you, with some patience and elbow grease, fantastic results can be achieved for not much.
Another weekend and more progress!
Spent yesterday POR15 clearcoating the remainder of the suspension bits I wanted to coat, namely the steering arms, and balljoint plinths. They came out nice and tasty-looking, just like the wishbones. Can't wait to get them on the car and see how bling they look I also coated the front crossmember (oil cooler mount) as well as this had previously corroded quite badly and does seem to catch the worst of the road-spray so just making sure that it's as well protected as can be.
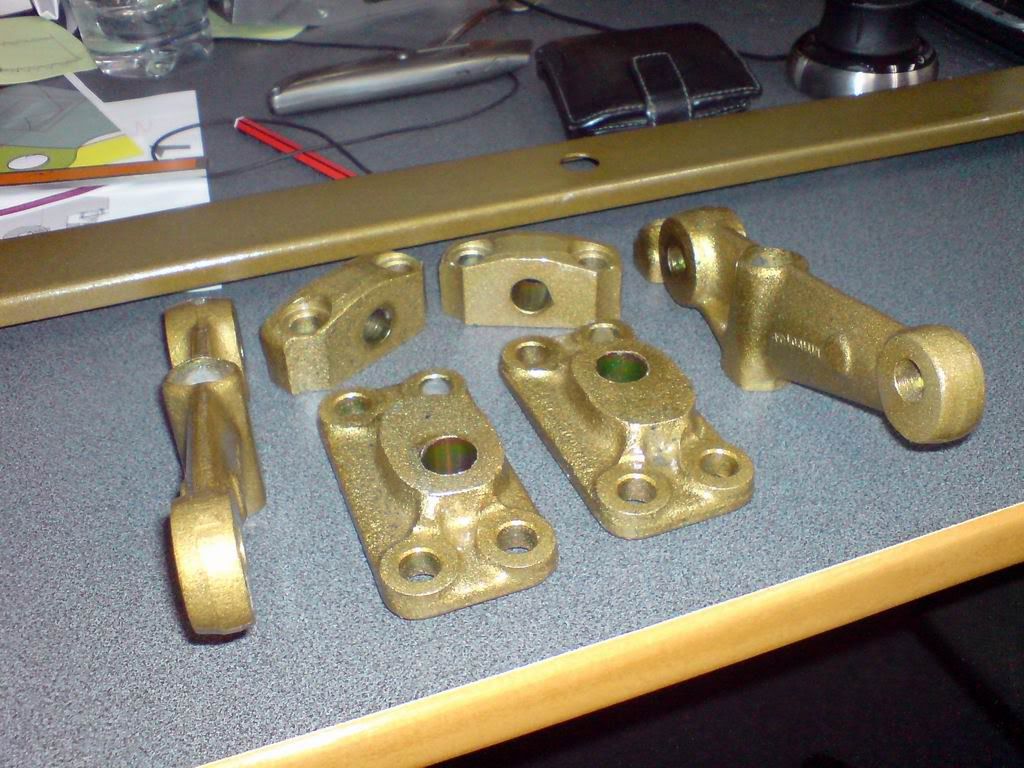
Yesterday, I also took the time to scrub the swaybar back to bare metal in preparation for painting today. This couldn't be blasted with the rest of them as it's heat-treated, high tensile tube. Blasting would have stress-relieved it and it would have lost much of its spring.
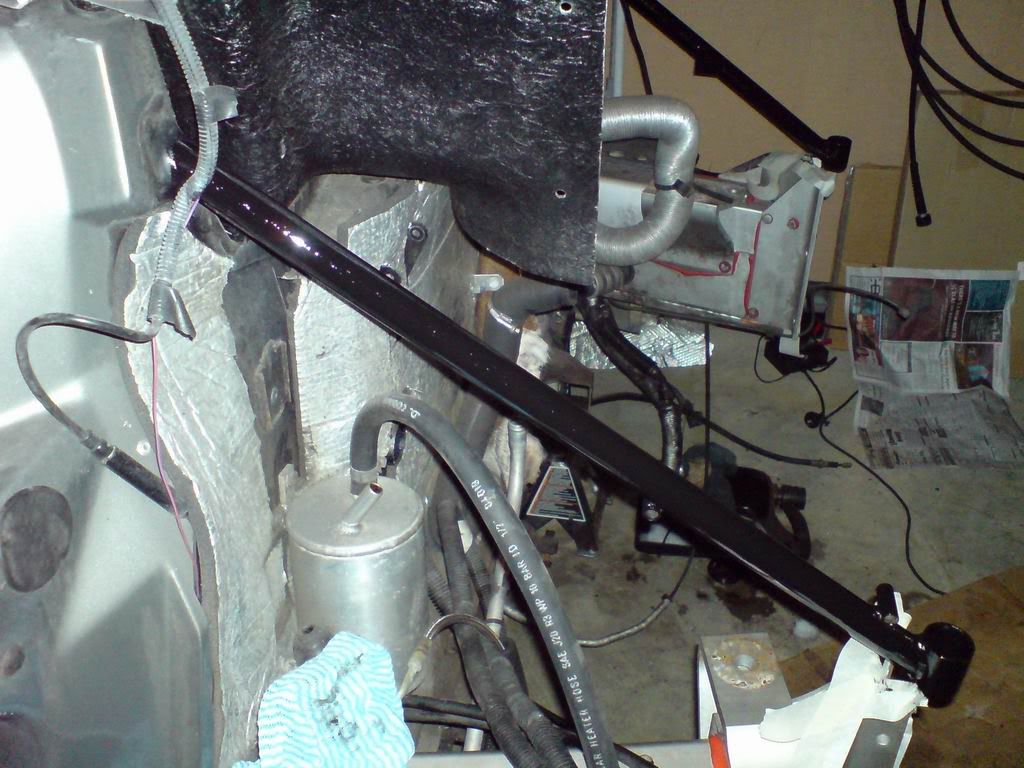
Today I tackled a pig of a job I've been putting off for a while. As part of the engine bay tidy-up, I'd also planned to repaint the rollbar backstays. These were painted/powdercoated black from new but in areas the coating was flaking and surface rust was starting to show. On the S1 these cannot be removed from the car to blast and paint so must be done in situ. This makes the job (particularly the rubbing back part) difficult and time consuming. So today I spent best part of 6 hours rubbing them back until they both looked nice and clean like this:
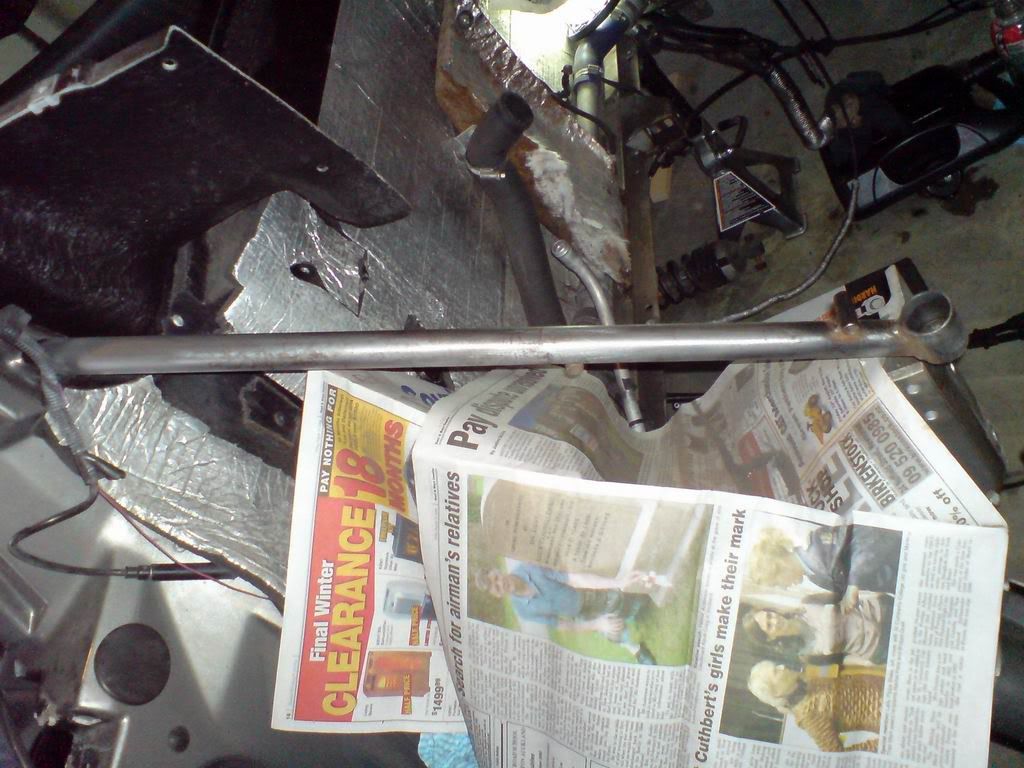
Then it's just been a matter of giving them a coat or two of POR15 black so they look nice and new again. They'll stay looking this good for years to come now
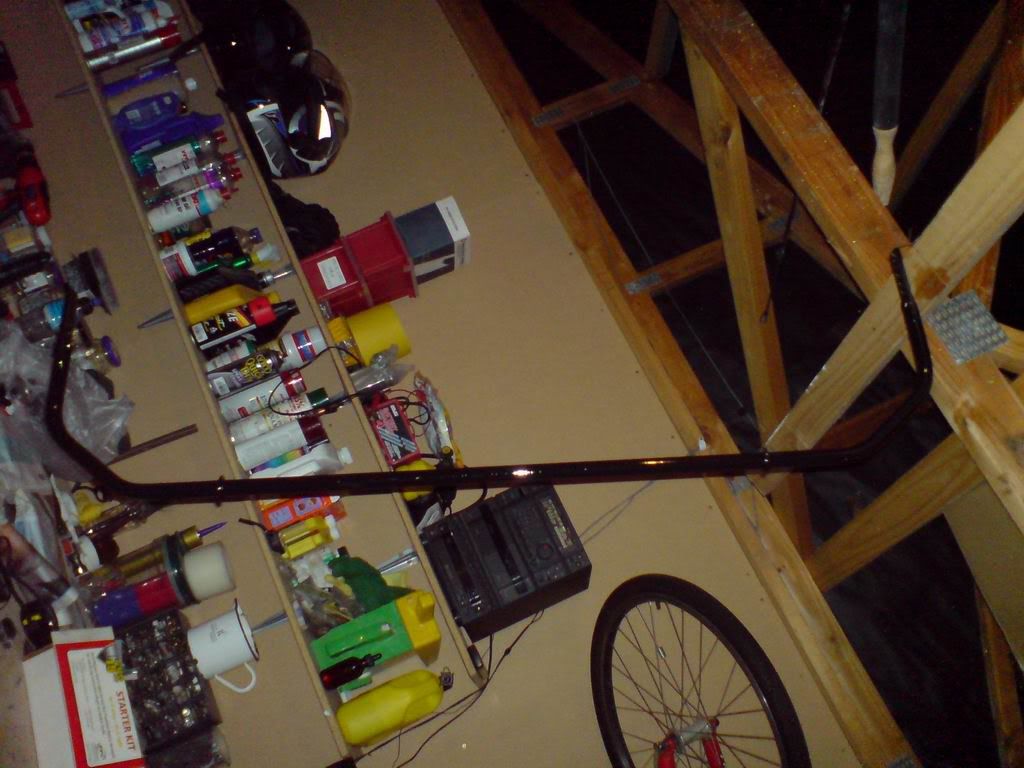
At the same time I also painted up the swaybar that I'd scrubbed up yesterday.
Tasks for the coming week include getting the subframe in for galvanising and getting my bulk-lot of powdercoating in.
I'm also going to be making another trip to the electroplaters. I'd initially planned to leave my toelinks as they were because they looked okay.... but now in the face of how good the wishbones have turned out, they'll end up looking god-awful by comparison, so it's off to be brightened up they go!
Spent yesterday POR15 clearcoating the remainder of the suspension bits I wanted to coat, namely the steering arms, and balljoint plinths. They came out nice and tasty-looking, just like the wishbones. Can't wait to get them on the car and see how bling they look
 I also coated the front crossmember (oil cooler mount) as well as this had previously corroded quite badly and does seem to catch the worst of the road-spray so just making sure that it's as well protected as can be.
Yesterday, I also took the time to scrub the swaybar back to bare metal in preparation for painting today. This couldn't be blasted with the rest of them as it's heat-treated, high tensile tube. Blasting would have stress-relieved it and it would have lost much of its spring.
Today I tackled a pig of a job I've been putting off for a while. As part of the engine bay tidy-up, I'd also planned to repaint the rollbar backstays. These were painted/powdercoated black from new but in areas the coating was flaking and surface rust was starting to show. On the S1 these cannot be removed from the car to blast and paint so must be done in situ. This makes the job (particularly the rubbing back part) difficult and time consuming. So today I spent best part of 6 hours rubbing them back until they both looked nice and clean like this:

Then it's just been a matter of giving them a coat or two of POR15 black so they look nice and new again. They'll stay looking this good for years to come now


At the same time I also painted up the swaybar that I'd scrubbed up yesterday.

Tasks for the coming week include getting the subframe in for galvanising and getting my bulk-lot of powdercoating in.
I'm also going to be making another trip to the electroplaters. I'd initially planned to leave my toelinks as they were because they looked okay.... but now in the face of how good the wishbones have turned out, they'll end up looking god-awful by comparison, so it's off to be brightened up they go!
Edited by Esprit on Sunday 7th December 12:10
shirt said:
hi esprit,
came here via the decently modded cars thread.
hats off to you for this build, seems really well thought out and certainly thorough. i want one!
Cheers Shirt came here via the decently modded cars thread.
hats off to you for this build, seems really well thought out and certainly thorough. i want one!

If you've ever wanted an Exige S1, GET one... they're not getting any cheaper now and prices are starting to edge up, they're becoming collectible.
They're temperamental, grumpy, impractical and hard work to drive.... but every day, even when it's in bits and looks like sh!t, you open the garage door and fall in love all over again.
 It's an itch everyone should scratch.
Gassing Station | Elise/Exige/Europa/340R | Top of Page | What's New | My Stuff


