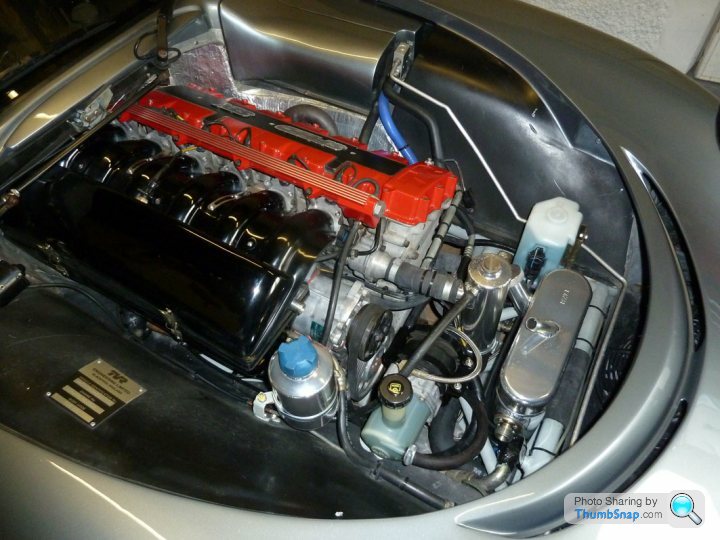
Show us your powder coloured engines
Discussion


Help! I'm trying to remove the fuel rail.
I have removed the air box and removed the 4 cap screws holding the fuel rail in place, is it now just a case of prising it off? If I do, wont fuel come scooshing out? and is there any danger of developing an air pocket when I connect it all back up, I would like to get it to the powder coaters tommorrow as I won't have the opportunity for the next few weeks.
I think I'll get it powder coated black and get the top lines polished, so it looks like the spark plug cover.
Edited by G20RG B on Wednesday 9th February 22:17
Its easy enough if you're careful - just done mine. You'll need to carefully disconnect the fuel pipe from the back end of the rail. Be careful not to twist, heave or yank it, as its only plastic pipe and if you damage it, it goes all the way back to the tank. The rail is a good fit on the injectors using o-rings and simply needs carefully prising off. Fuel pressure regulator needs to come off too, from the front end of the rail. Just take your time.
Refitting is a bit of a fiddle and you'll need to be ready to slide the fourth bolt in as you manoeuvre the rail into place - it can't be popped into the Tam once the rail is installed. I used wet and dry to remove the powder coating from the top fins, and then gave it three coats of clear lacquer to protect the ally. Job done, see below. Oh, and lubricate your o-rings (I was told to use red rubber grease, but opted for electrical silicone grease) before you refit, as it makes them less likely to tear or leak. Rail provides a continuous circuit back to tank, so priming only needs the fuel pump to be activated. (So I am told). It was worth the effort.
Refitting is a bit of a fiddle and you'll need to be ready to slide the fourth bolt in as you manoeuvre the rail into place - it can't be popped into the Tam once the rail is installed. I used wet and dry to remove the powder coating from the top fins, and then gave it three coats of clear lacquer to protect the ally. Job done, see below. Oh, and lubricate your o-rings (I was told to use red rubber grease, but opted for electrical silicone grease) before you refit, as it makes them less likely to tear or leak. Rail provides a continuous circuit back to tank, so priming only needs the fuel pump to be activated. (So I am told). It was worth the effort.
Thanks Geoff,
I managed to get the fuel rail off, it was a bit fiddly, especially getting it of the sixth injector but got there in the end. It did let go of some fuel as I expected but had an old towel at hand to mop it up. I managed to get it to the powder coaters today along with a few brackets which hold the airbox to the body. I should be able to collect it in about ten days or so then start putting it all back together and that wil be me finished all my winter jobs, now just an MOT and a Service in April and I can start to enjoy driving the Cerb again.
I managed to get the fuel rail off, it was a bit fiddly, especially getting it of the sixth injector but got there in the end. It did let go of some fuel as I expected but had an old towel at hand to mop it up. I managed to get it to the powder coaters today along with a few brackets which hold the airbox to the body. I should be able to collect it in about ten days or so then start putting it all back together and that wil be me finished all my winter jobs, now just an MOT and a Service in April and I can start to enjoy driving the Cerb again.

A couple of my work in progress. The plug cover is powder coated with the lettering tops mirror polished. The cam cover and fuel rail are both miror polished, no laquer required. Still a lot more jobs to do under the bonnet when the time allows!


Cheers. Lee.
Cheers. Lee.
Edited by LeeT350c on Saturday 26th March 15:59
That polished one is VERY nice. I had intended to do that to my car having seen the polished cover on the TVR Power 4.3ltr engine bay pic on their website. I never got round to it though but those pics really make me wish I had done.
Of course you now have to do the front cover to match like Graham Varley did!
I wonder how long it will stay looking that shiny though?
Also found a good guide here... http://www.poleringsguide.se/english/
Of course you now have to do the front cover to match like Graham Varley did!
I wonder how long it will stay looking that shiny though?
Also found a good guide here... http://www.poleringsguide.se/english/
LeeT350c said:
Targarama said:
Now that I like - the polished look is so much more classy that painting these parts. Did you have someone do the polishing for you?
Cheers Tref. I could never decide on the right colour to go with my car. I do a lot of work myself but depends on the part and how much time I have. I have a good friend who does some polishing too.For this I bought another cam cover so I could get it polished then just swap it over.
rm55 said:
That polished one is VERY nice. I had intended to do that to my car having seen the polished cover on the TVR Power 4.3ltr engine bay pic on their website. I never got round to it though but those pics really make me wish I had done.
Of course you now have to do the front cover to match like Graham Varley did!
I wonder how long it will stay looking that shiny though?
Also found a good guide here... http://www.poleringsguide.se/english/
Thanks, it should only need a quick go over by hand once every 6 months with some Autosol aluminium polish.Of course you now have to do the front cover to match like Graham Varley did!
I wonder how long it will stay looking that shiny though?
Also found a good guide here... http://www.poleringsguide.se/english/
No point doing the front casing on a T350 as you cant see it with the bonnet on. Also its an engine out job to get it off.
That is a good guide, but be prepared to get a lot messier than it shows!!
Cheers. Lee.
G20RG B said:
Looks Fantastic, well done.
Thanks. If I have the time and enough interest I might start to offer some of these items polished and ready to fit on an exchange basis.I have a spare rocket cover and swirl tank. I just need a fuel rail and a plug cover (I have one of these but one of the black lugs that points to the rail has snapped off).
Will see.
Cheers. Lee.
 . On another note I fitted the shiny stuff today and it looks great, apart from making all surrounding parts look dull dull dull.
BCA said:
Lee, that looks stunning. Interested dependent on price/ tempted to get a spare cover to do myself. 
Cheers. I will be polishing up my spare swirl tank and aluminium washer bottle during next week ready to fit. Will post some before, during and after pics for you.Cheers. Lee.
Gassing Station | Speed Six Engine | Top of Page | What's New | My Stuff