280i duratec V6
Discussion


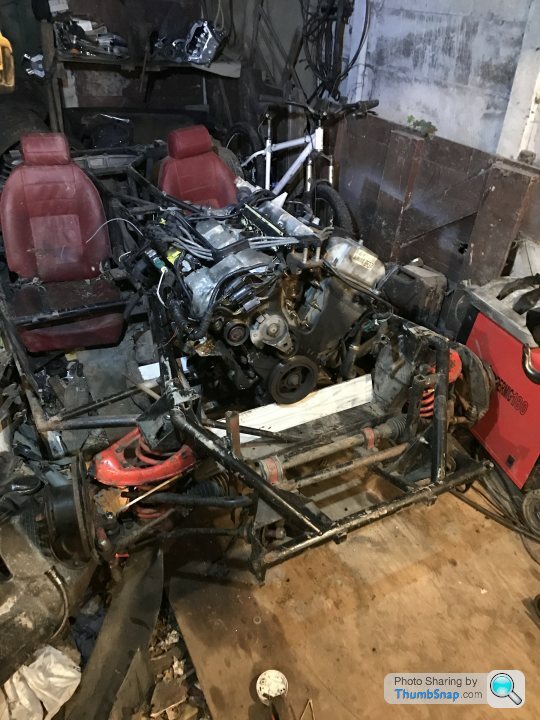
A few of you may remember me shoving the Bmw M52 engine into this car around 8 years ago it was driving and working as it should never got round to mot tho , there was a thread on here somewhere that dried up as I lost interest in the project for a few reasons.
I always felt like the straight 6 although a cracking reliable engine didn’t really stick with the TVR theme at the time,
That amoungst buying an BMW E30 and building it into a rally car then rallying it has occupied most of my time and money in the time the wedge has been off the road …. It’s one of those never ending indecisive projects it seems although I am pretty set on how I want it now.
Since the bmw engine was in it….
It’s in a new shed now , with the e30 , along with the silver shell and now a spare chassis also with no v5 , I’ve acquired quite a few body panels in the time of owning the car in fear of ever crashing it! But I’m pretty confident now I could rebuild it if the worst ever came with what I have.
So the new engine safe to say I’ve had more of a head ache with this then the bmw lump!
I went for a 2.5 mondeo v6 it was cheap and decided it was pretty much a modern version of the original cologne engine, it sat a lot better with me!
Obviously this is a FWD engine and I’ve had quite a few head scratching moments which I will elaborate on later , found that jaguar made a RWD duratec v6 3.0 in the s-type and sourced a gearbox that way, which is a getrag unit again pretty cheap so I had an engine and gearbox and the planning of fitting it was the next mission. (Looking back I should have brought a 3.0 s-type engine!)

After mock fitting the engine and gearbox I faced a couple of problems ,
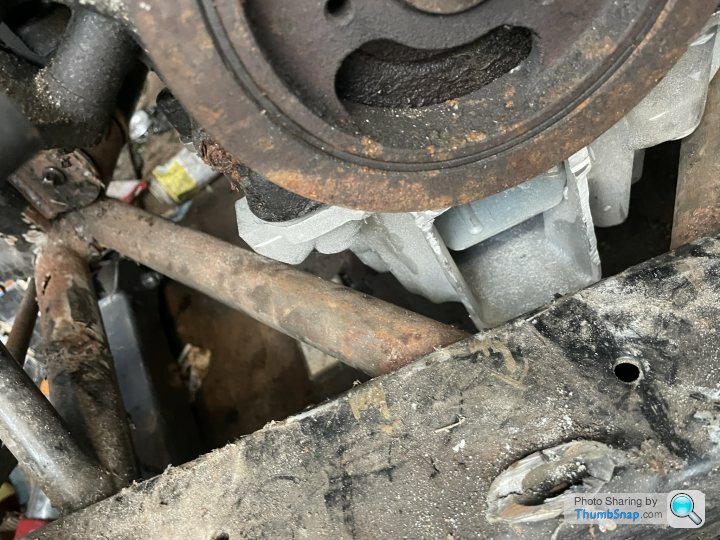
First one was the sump , the engine is obviously tilted in FWD format so this wasn’t much good in a RWD format
Luckily I stumbled across a jaguar stype sump that was actually a brand new jaguar unit for not a lot of money on eBay , once this turned up I faced a new problem this sump has a huge bowl on the front of it that was never going to fit into the chassis

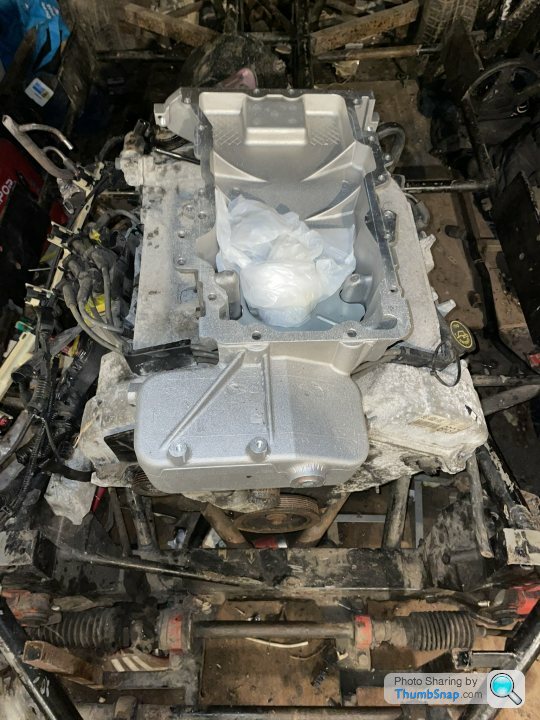
So I was going to be modifying it either way but trying to retain the capacity for now I’ve cut the nose off and I will send it away to be tig welded up
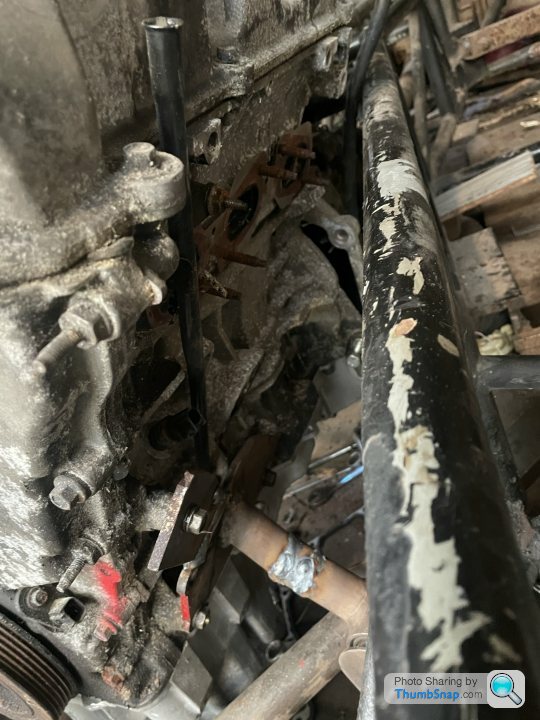
The next problem was the chassis the cross bar under the engine was not in an ideal place so this was braces and removed and then triangulated to allow the engine to sit as low and far back as poss.
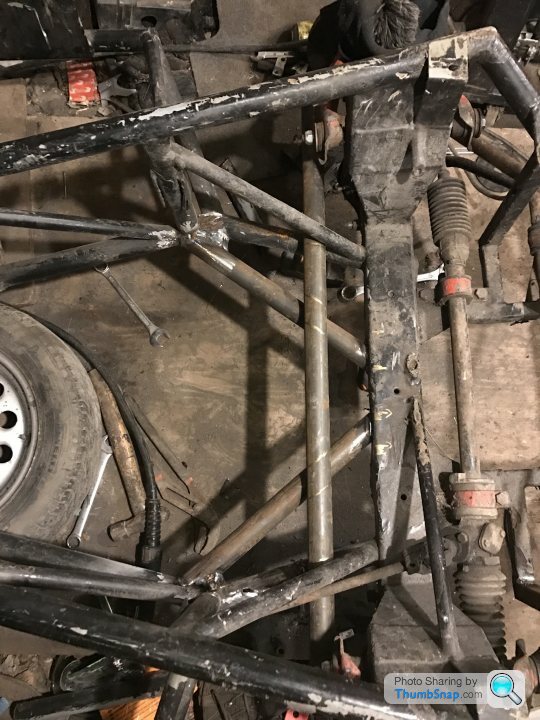
Which allowed the engine to sit where I wanted it to the rear of the front axle.
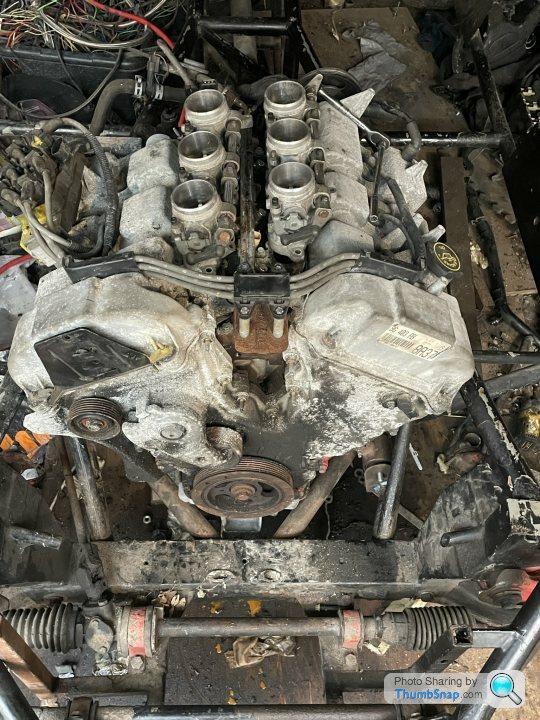
The engine mounts were slightly annoying as the oil filter and exhaust manifold was in the way along with lack of places to bolt on too on the N/S of the engine.
But in the end I’d settled for this on that side I understand it’s abit agricultural at the moment but it’s all prototype stages at the moment.
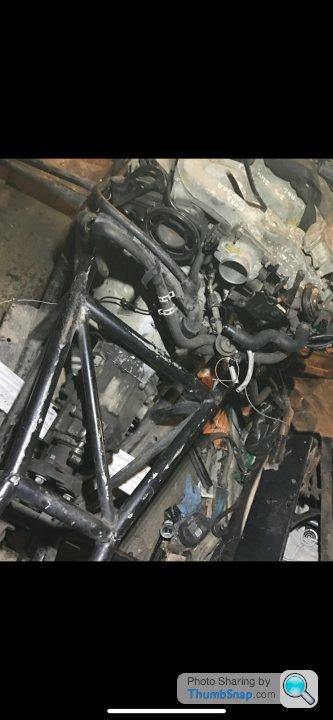
So the engine was now sat in the chassis as I wanted it along with the gearbox and sump , smashing!
(I’ll keep the updates coming I’m a little further along then this at the moment! )
I always felt like the straight 6 although a cracking reliable engine didn’t really stick with the TVR theme at the time,
That amoungst buying an BMW E30 and building it into a rally car then rallying it has occupied most of my time and money in the time the wedge has been off the road …. It’s one of those never ending indecisive projects it seems although I am pretty set on how I want it now.
Since the bmw engine was in it….
It’s in a new shed now , with the e30 , along with the silver shell and now a spare chassis also with no v5 , I’ve acquired quite a few body panels in the time of owning the car in fear of ever crashing it! But I’m pretty confident now I could rebuild it if the worst ever came with what I have.
So the new engine safe to say I’ve had more of a head ache with this then the bmw lump!
I went for a 2.5 mondeo v6 it was cheap and decided it was pretty much a modern version of the original cologne engine, it sat a lot better with me!
Obviously this is a FWD engine and I’ve had quite a few head scratching moments which I will elaborate on later , found that jaguar made a RWD duratec v6 3.0 in the s-type and sourced a gearbox that way, which is a getrag unit again pretty cheap so I had an engine and gearbox and the planning of fitting it was the next mission. (Looking back I should have brought a 3.0 s-type engine!)
After mock fitting the engine and gearbox I faced a couple of problems ,
First one was the sump , the engine is obviously tilted in FWD format so this wasn’t much good in a RWD format
Luckily I stumbled across a jaguar stype sump that was actually a brand new jaguar unit for not a lot of money on eBay , once this turned up I faced a new problem this sump has a huge bowl on the front of it that was never going to fit into the chassis
So I was going to be modifying it either way but trying to retain the capacity for now I’ve cut the nose off and I will send it away to be tig welded up
The next problem was the chassis the cross bar under the engine was not in an ideal place so this was braces and removed and then triangulated to allow the engine to sit as low and far back as poss.
Which allowed the engine to sit where I wanted it to the rear of the front axle.
The engine mounts were slightly annoying as the oil filter and exhaust manifold was in the way along with lack of places to bolt on too on the N/S of the engine.
But in the end I’d settled for this on that side I understand it’s abit agricultural at the moment but it’s all prototype stages at the moment.
So the engine was now sat in the chassis as I wanted it along with the gearbox and sump , smashing!
(I’ll keep the updates coming I’m a little further along then this at the moment! )
Edited by Zacky94 on Monday 30th May 11:19
My next obstacle was the water pump as on these engines for some ridiculous reasons they are driven off the back of the cam on the N/S bank!
After pondering this for a Few weeks I decided and electric pump would be the way to go I can control this quite easily with a stand alone ECU which I already have, an Omex 710 This in theory should allow me to keep a good hold on coolant temp. But that still leaves a pulley on the back of the cam which I don’t really want there but it can stay for now.
So that’s another issue resolved.
The next was the exhaust manifolds as you can imagine space is very limited now with the extra width of the heads being a quad cam engine , I found that the Ford and jaguar units are stainless on one side and cast on the O/S , so I managed to find a N/S manifold to play with for less then £20 found with a bit of butchery I could get it to fit quite snugly leaving enough room to play with.
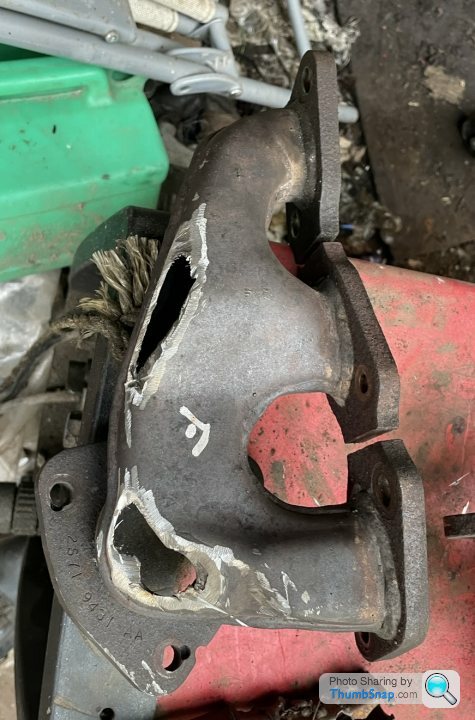
The O/S was another matter again I pondered this for a week or so and decided I could maybe buy another N/S manifold and chop and weld it to fit as the flanges basically mirrored each other , got another one ordered and got to work on playing with that
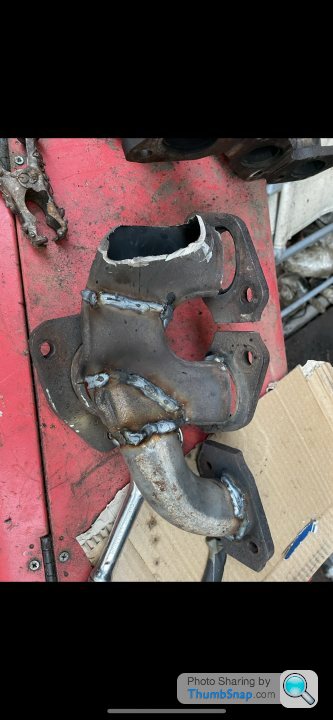
Again pretty agricultural at the moment!
But this is what I have still need a little work but I’m happy they fit and can be worked with easily to work ,from a power point of view I can’t say they will be amazing but I have a mock of what fits to get some decent ones made at a later date which will be the plan.
These are off an ST220 lump.
Next update will be on the oil filter / cooler and starter motor / alternator
After pondering this for a Few weeks I decided and electric pump would be the way to go I can control this quite easily with a stand alone ECU which I already have, an Omex 710 This in theory should allow me to keep a good hold on coolant temp. But that still leaves a pulley on the back of the cam which I don’t really want there but it can stay for now.
So that’s another issue resolved.
The next was the exhaust manifolds as you can imagine space is very limited now with the extra width of the heads being a quad cam engine , I found that the Ford and jaguar units are stainless on one side and cast on the O/S , so I managed to find a N/S manifold to play with for less then £20 found with a bit of butchery I could get it to fit quite snugly leaving enough room to play with.
The O/S was another matter again I pondered this for a week or so and decided I could maybe buy another N/S manifold and chop and weld it to fit as the flanges basically mirrored each other , got another one ordered and got to work on playing with that
Again pretty agricultural at the moment!
But this is what I have still need a little work but I’m happy they fit and can be worked with easily to work ,from a power point of view I can’t say they will be amazing but I have a mock of what fits to get some decent ones made at a later date which will be the plan.
These are off an ST220 lump.
Next update will be on the oil filter / cooler and starter motor / alternator
You could check out these build threads on the S Series page:
Terry's tale. (S3 resto ++)
https://www.pistonheads.com/gassing/topic.asp?h=0&...
and my Cossy sold and Jag bought
https://www.pistonheads.com/gassing/topic.asp?h=0&...
Although both are the Jag 3.0 installs, there is a lot of useful info
Terry's tale. (S3 resto ++)
https://www.pistonheads.com/gassing/topic.asp?h=0&...
and my Cossy sold and Jag bought
https://www.pistonheads.com/gassing/topic.asp?h=0&...
Although both are the Jag 3.0 installs, there is a lot of useful info
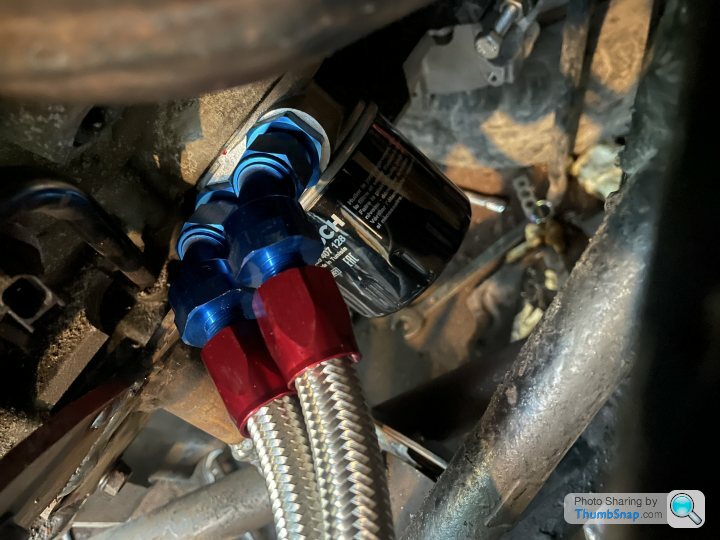
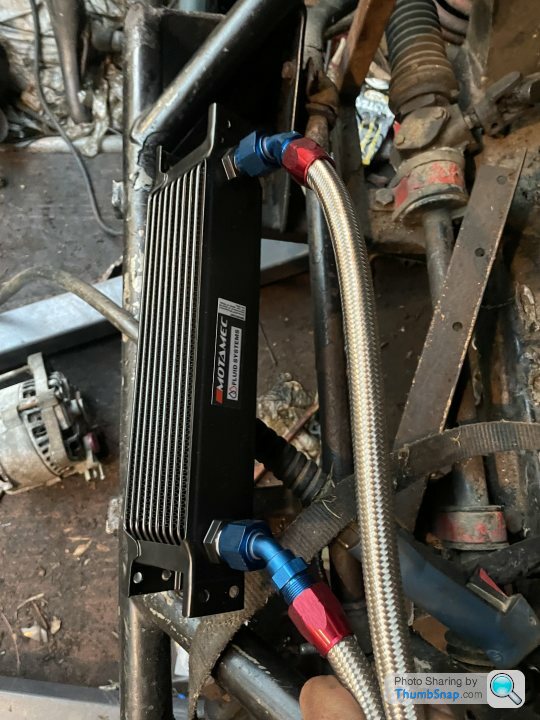
So the oil filter and fittings etc arrived and I’m happy enough with those no adjustments needed!
Motamec 10 row with braided lines long enough to get too the nose cone.
Back on the shelf for now
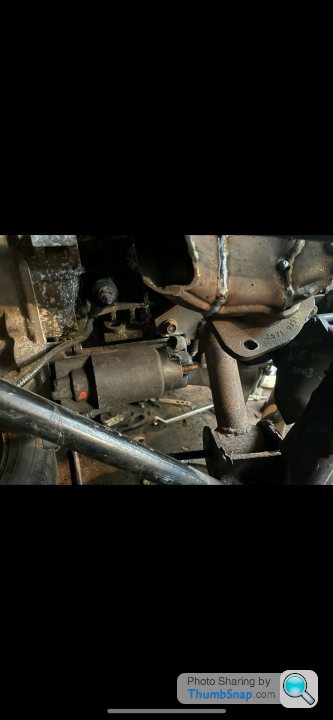
It appears after fitting the starter motor I have manifold issues so back to the drawing board with that again I’ll update in due course! The solenoid is in the way of the down pipe!
Motamec 10 row with braided lines long enough to get too the nose cone.
Back on the shelf for now
It appears after fitting the starter motor I have manifold issues so back to the drawing board with that again I’ll update in due course! The solenoid is in the way of the down pipe!
While I await delivery of parts I decided to make a start on the wiring loom , I had a good look at it and decided I’m best off starting from scratch with various bodges and repairs with crimps over the years, also I can build it how I want with what ever extras I need ie the electric power steering water pump and twin rad fans etc. for a tidier finish. I know the rep tvrs have for electrical gremlins and I’d rather build something I know is going to be reliable and safe. It will most likely take a while and be am in between kind of job so I will update as I go but for now
I Made a start by bunching the front light looms together I’ve gone for 2mm cable rated for about 25a for each dip main and front fog pretty over kill I know but I’m taking into account the drop over the length of the cable and the use of higher wattage bulbs both of these will be operated on relays this will allow the full potential of the bulb to be used with the lower resistance , knowing how crap the lights are , sides and indicators are using 1mm 16,5a again very over kill but I have this cable from other jobs And isn’t costing anything really. With these cables I am absolutely certain the fuse will go before any cable will melt if there is any issues. It is over kill but it’s safe the compromise for weight is a couple of kg over the whole car.
All Colour coded with traces for white = left and slate= right for easy fault finding,
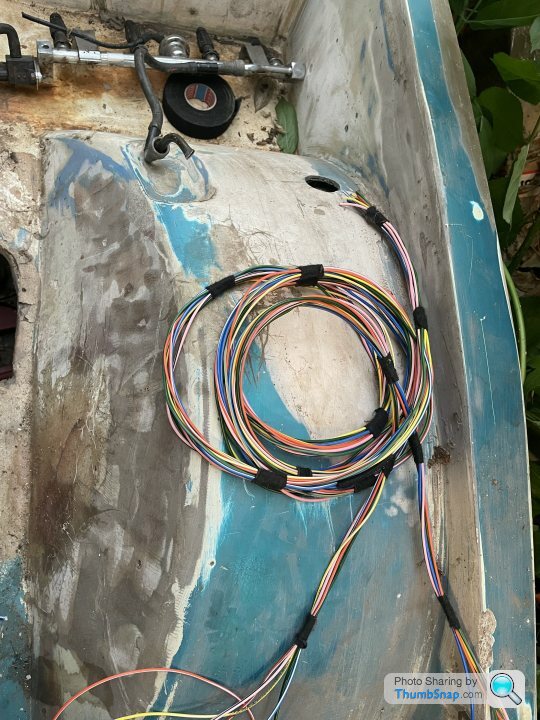
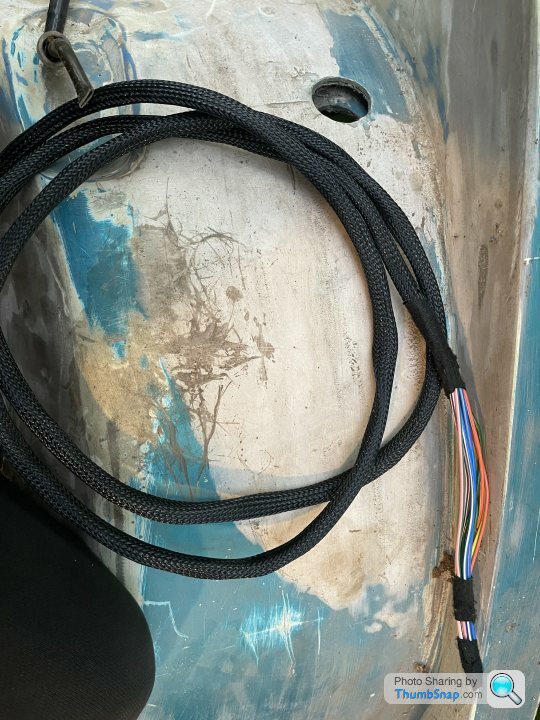
Once together I’ve wrapped them in loom tape and then covered them in a nylon over braid
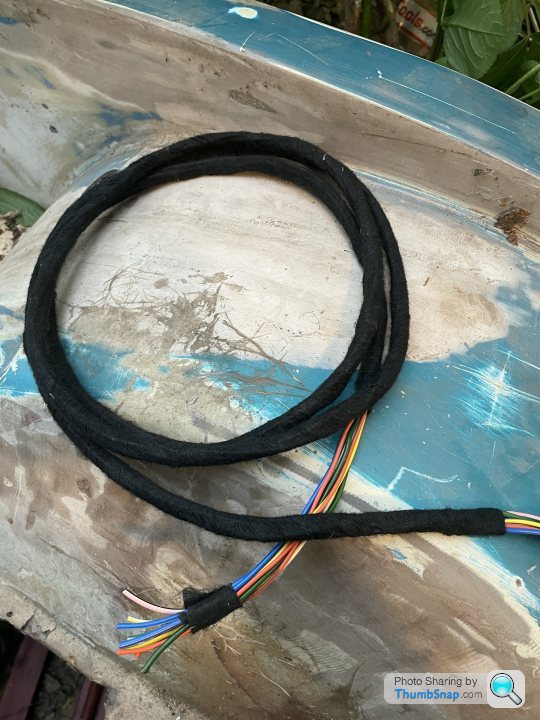
Next was the slightly tedious job of threading the loom through the inside of the n/s wing where they originally sit , leaving plenty of excess in the interior to terminate the new fuse/relay boxes
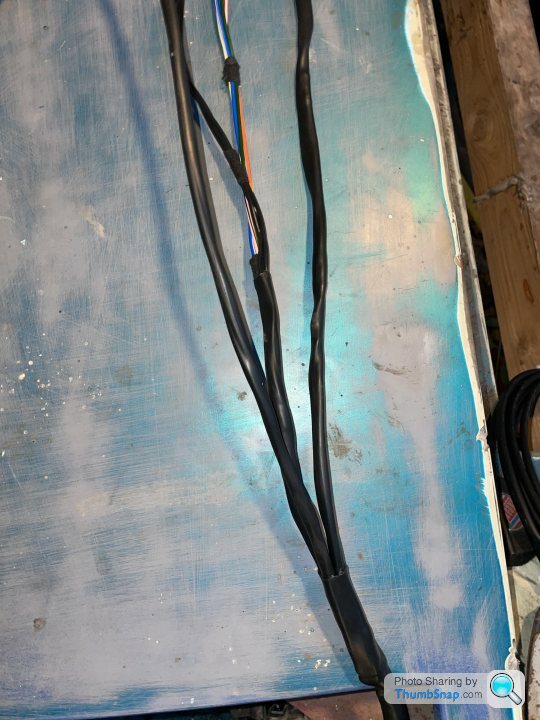
Once this was done I’ve set about adding the earths with plenty of length to put earth points on the chassis , these were added and then the finishing of the ends and branches of the loom, for this I’ve used an adhesive heat shrink which should keep the moisture out quite nicely
And then roughly in place on the n/s

Also the interior where it pokes through where the fuse boxes will be located
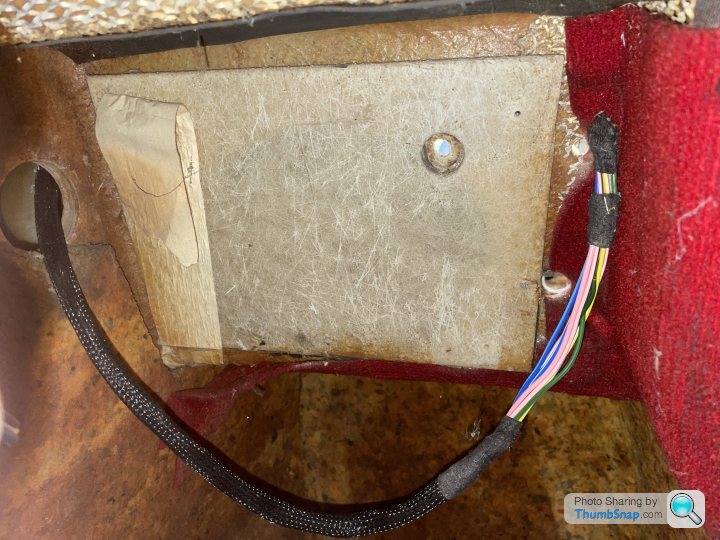
Much happier with it now the old loom was a right state in the front , the engine loom will be going through a water proof aviation connector most likely a Deutsch hdp20 though the bulk head to make maintenance like engine removal a lot easier.
The next run of cable will be for the twin rad fans and water pump and then the light motors separate again I could have put it all in one loom but keeping them separate I believe will make fault finding a lot easier if I ever need too (hopefully not)
I Made a start by bunching the front light looms together I’ve gone for 2mm cable rated for about 25a for each dip main and front fog pretty over kill I know but I’m taking into account the drop over the length of the cable and the use of higher wattage bulbs both of these will be operated on relays this will allow the full potential of the bulb to be used with the lower resistance , knowing how crap the lights are , sides and indicators are using 1mm 16,5a again very over kill but I have this cable from other jobs And isn’t costing anything really. With these cables I am absolutely certain the fuse will go before any cable will melt if there is any issues. It is over kill but it’s safe the compromise for weight is a couple of kg over the whole car.
All Colour coded with traces for white = left and slate= right for easy fault finding,
Once together I’ve wrapped them in loom tape and then covered them in a nylon over braid
Next was the slightly tedious job of threading the loom through the inside of the n/s wing where they originally sit , leaving plenty of excess in the interior to terminate the new fuse/relay boxes
Once this was done I’ve set about adding the earths with plenty of length to put earth points on the chassis , these were added and then the finishing of the ends and branches of the loom, for this I’ve used an adhesive heat shrink which should keep the moisture out quite nicely
And then roughly in place on the n/s
Also the interior where it pokes through where the fuse boxes will be located
Much happier with it now the old loom was a right state in the front , the engine loom will be going through a water proof aviation connector most likely a Deutsch hdp20 though the bulk head to make maintenance like engine removal a lot easier.
The next run of cable will be for the twin rad fans and water pump and then the light motors separate again I could have put it all in one loom but keeping them separate I believe will make fault finding a lot easier if I ever need too (hopefully not)
Edited by Zacky94 on Monday 30th May 12:10
Not Been much going on with it recently as you can see! , but I’ve decided to go down the stainless route with the exhaust manifolds , finally managed to get one that fits nicely on the o/s bank to clear the starter motor! Needs finishing still but it is a mock up of the right shape now at least
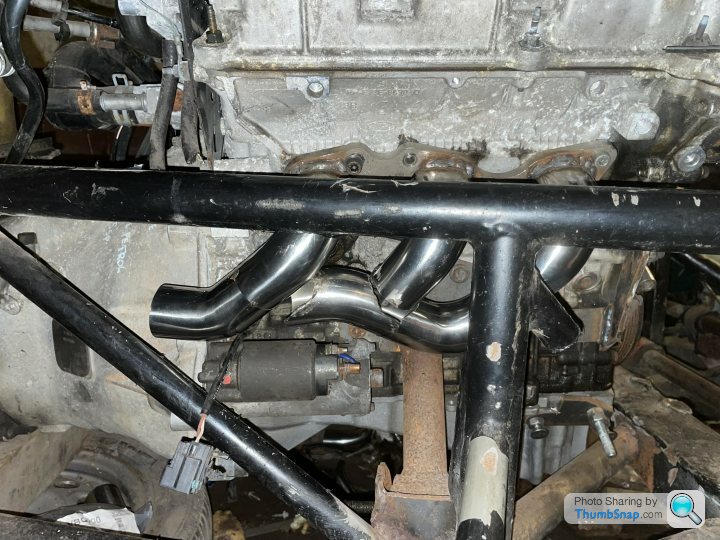
These are noble flanges with 1.75” primaries which will then go into a 2inch system both sides using some 2” v band style clamps for ease of removal , once these are complete I will most likely be putting the body back on to start looking at clearances etc. but yes slow progress at the moment unfortunately , will keep updating as I go
Currently waiting on some exhaust pipe to continue


Gassing Station | TVR Major Mods | Top of Page | What's New | My Stuff