FORD GT40 MKII 1/12TH TRUMPETER
Discussion


NDA said:
It's the equivalent of a beautiful watch - impossible details that will rarely be seen.
A fantastic thing.
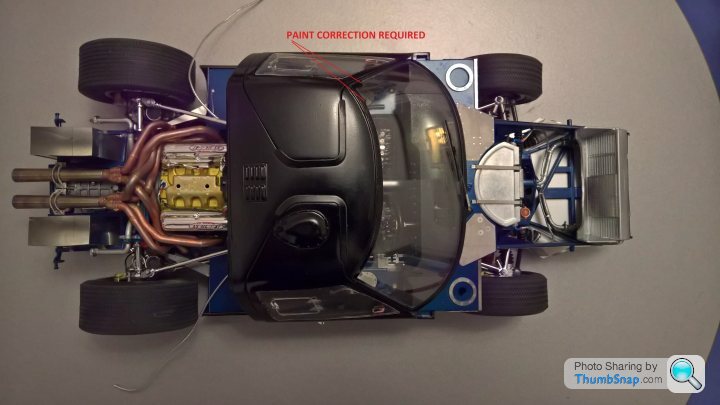
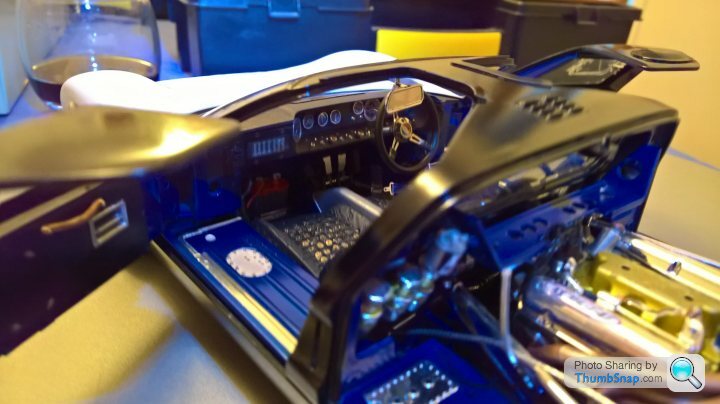
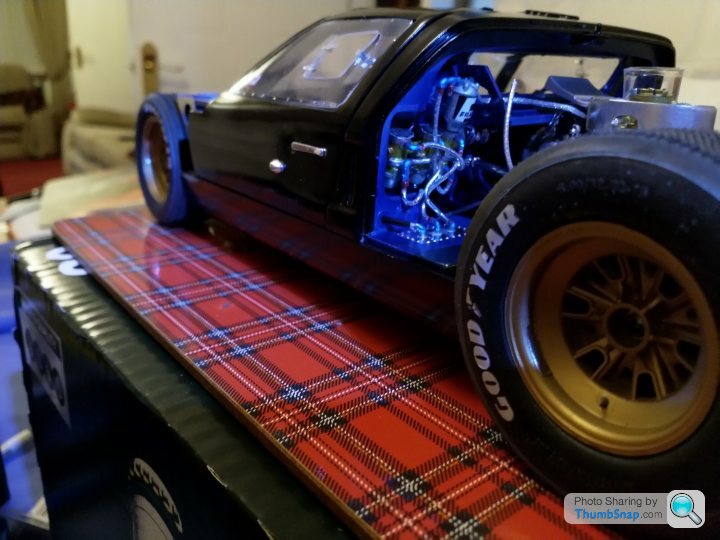
Thankyou very much NDA. One good thing out of this build is the clam shell design of the car allows much more detail to be viewed than a traditional design.A fantastic thing.
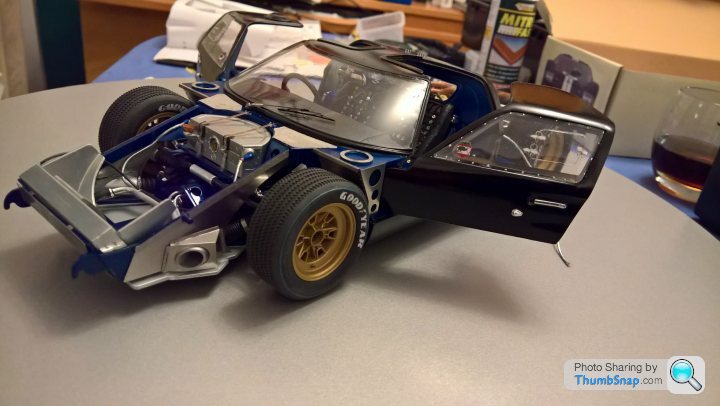
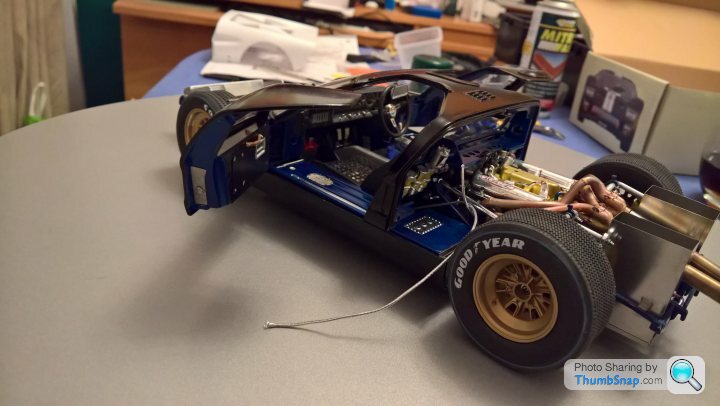
The doors open out at almost 90 degrees exposing most of the interior work, the rear will tilt up the same and the front can be pulled off
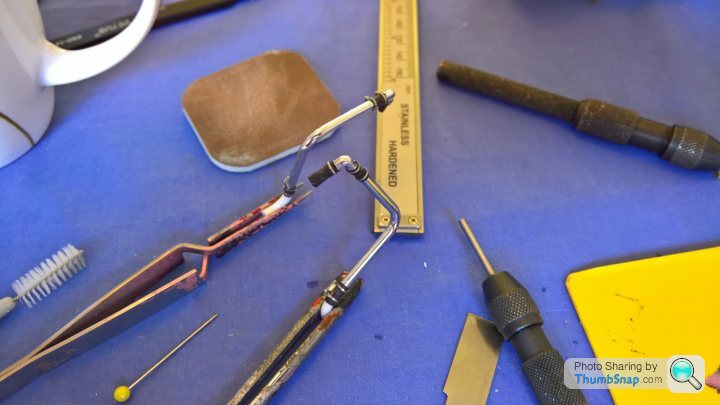
to view all inside. Regarding watches well theres is some watchmakers screws as you know ive used to make up the jubillee clips.
Once again thankyou for your praise. Its now coming together top to bottom. Still a lot of work left to do. I will put some photos on soon.
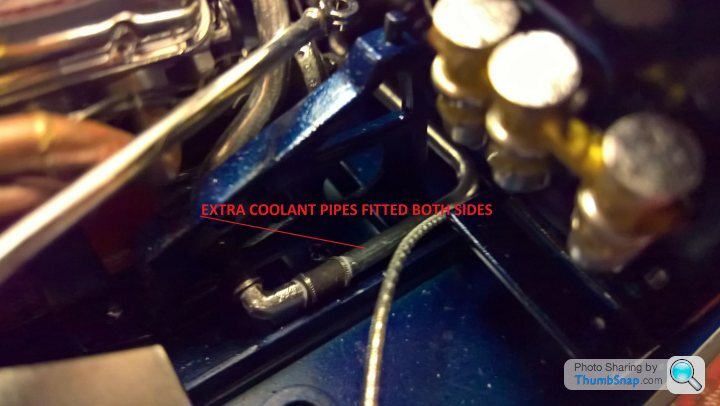
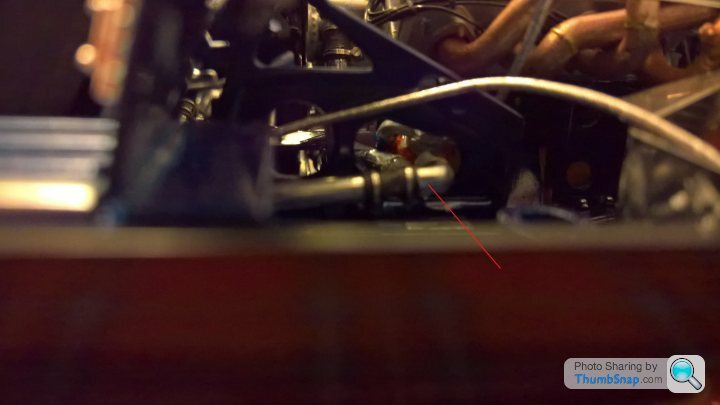
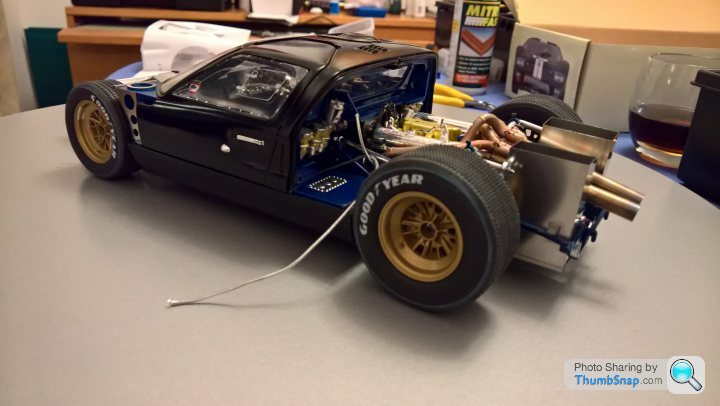
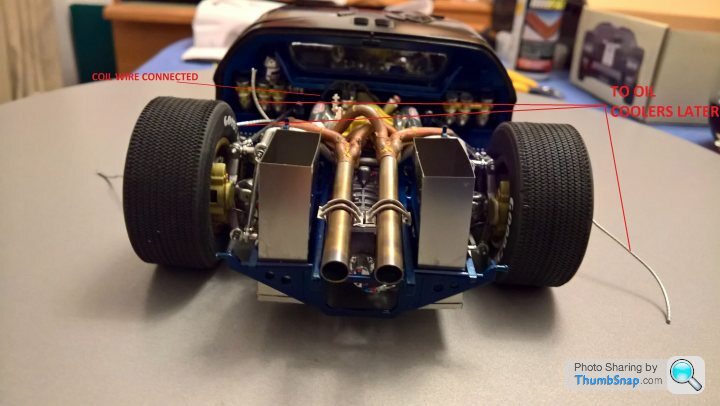
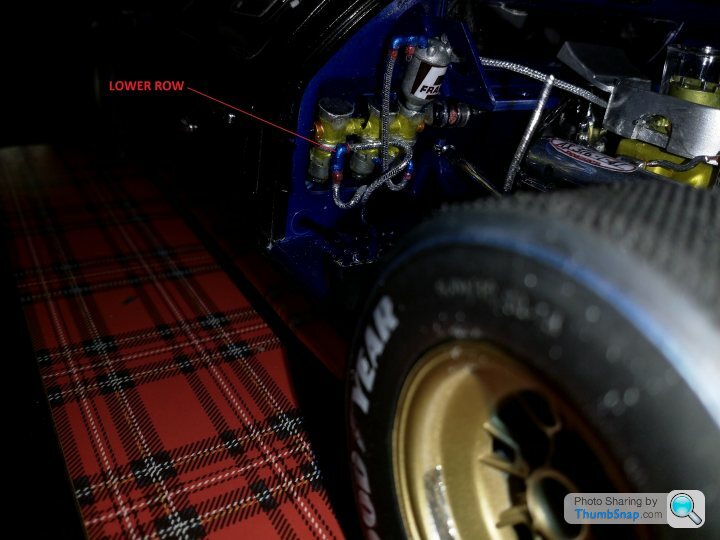
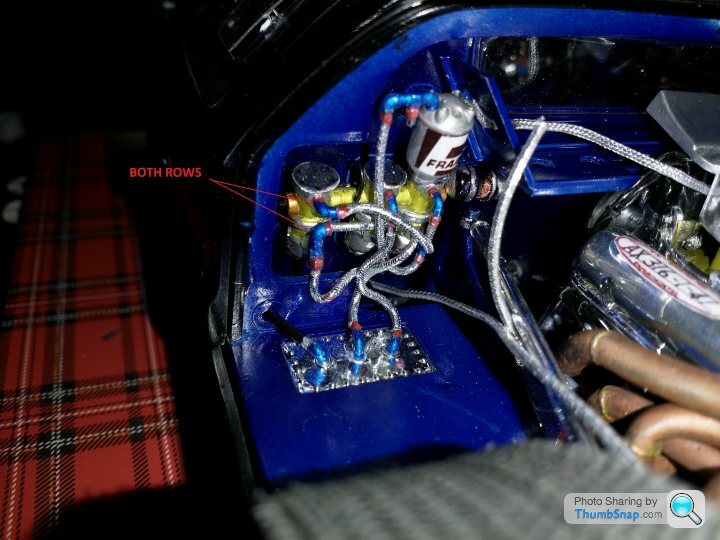
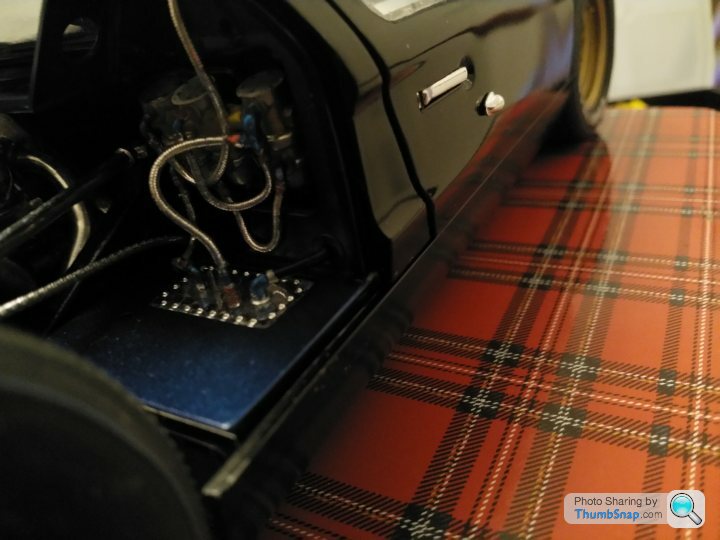
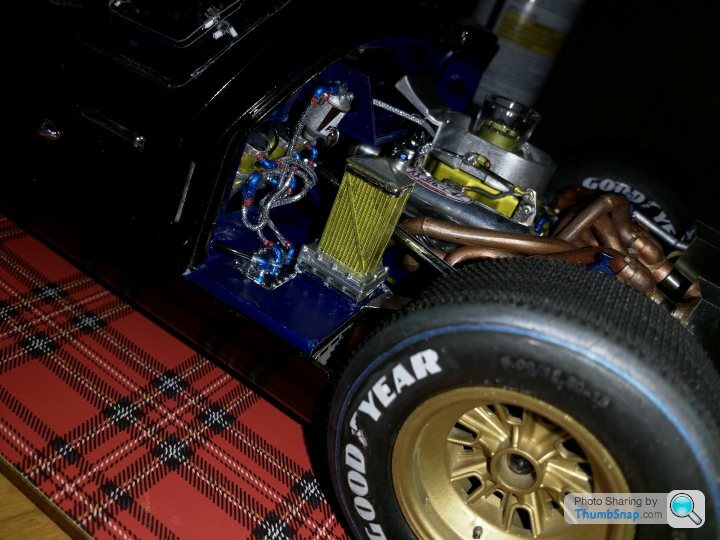
Remember these extra coolant pipes i made a while ago to show the connection between the radiator and engine.
 .
.
Fitted them to the engine and centre tunnel before screwing the top to bottom chassis parts.
 .
.
 .
.
 .
.
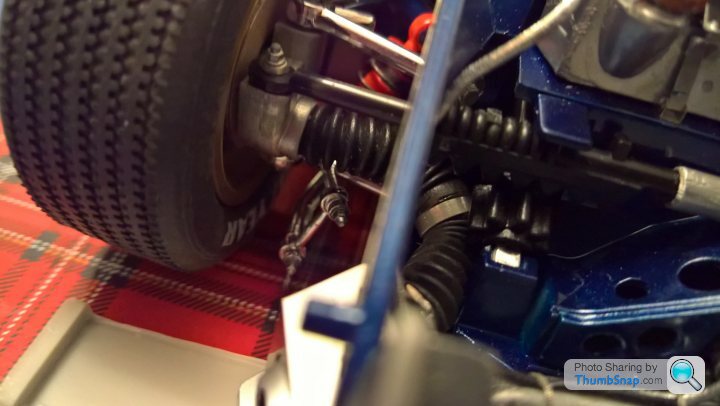
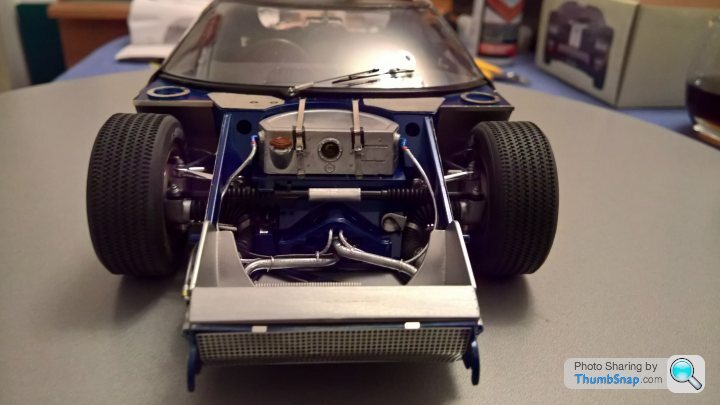
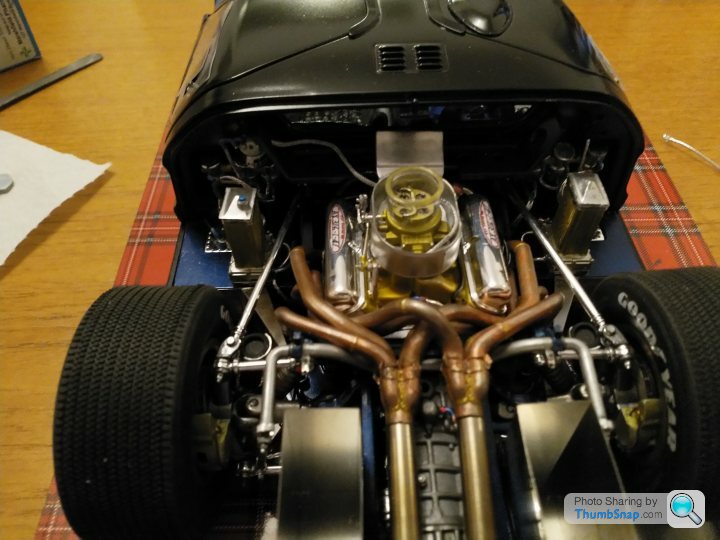
Fitted the steering rack through. The two main assemblies then went together well with 6 screws holding it all together quite nicely without having to use glue. Also will allow dismantling at a later date if necessary.
Connected the brake ducting i made from length guage gaiters that flex very well, connected to the calipers.
 .
.
 .
.
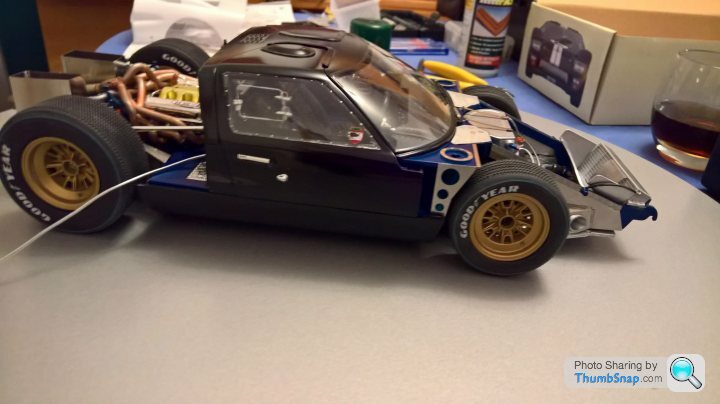
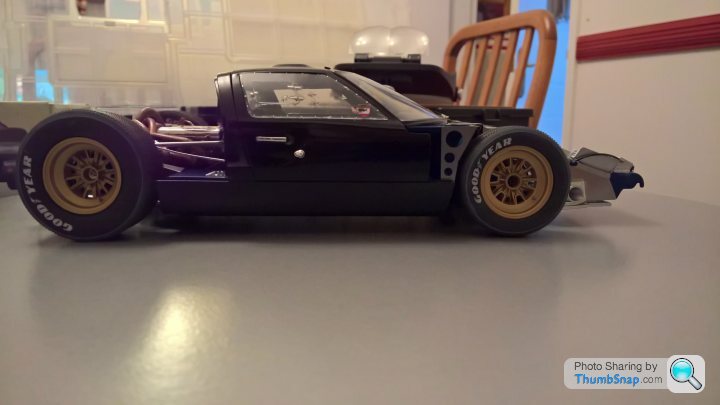
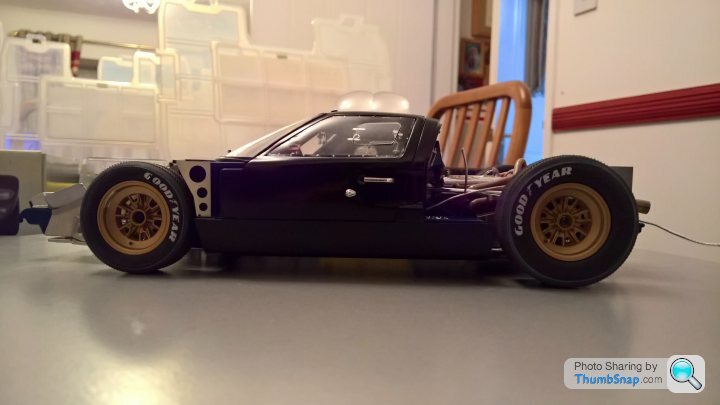
Some photos of the assembly and close ups so far.The doors which were my concearn earlier fitted very nicely after some reforming before painting especially the passenger door.
 .
.
 .
.
 .
.
 .
.
 .
.
 .
.
 .
.
 .
.
 .
.
 .
.
 .
.
 .
.
 .
.
 .
.
Onto the fuel lines, lots of them to make up to the 6 fuel pumps, oil coolers, carb, front and rear bodywork next.
Cheers
.Fitted them to the engine and centre tunnel before screwing the top to bottom chassis parts.
...Fitted the steering rack through. The two main assemblies then went together well with 6 screws holding it all together quite nicely without having to use glue. Also will allow dismantling at a later date if necessary.
Connected the brake ducting i made from length guage gaiters that flex very well, connected to the calipers.
..Some photos of the assembly and close ups so far.The doors which were my concearn earlier fitted very nicely after some reforming before painting especially the passenger door.
..............Onto the fuel lines, lots of them to make up to the 6 fuel pumps, oil coolers, carb, front and rear bodywork next.
Cheers
Henry
Really feeling pleased doing my Tender hornblocks and getting to 10BA with 12 BA heads in the right places, thinking i was getting into micro engineering and you pop up with watchmakers screws for the clip ( you swine lol)
Seriously have you ever thought of putting it on display at a couple of shows? You could get back you expenses by flogging £5.00 'backstage passes' and the use of a quality glass so people can get up close and personal!!!
Ron
silverfoxcc said:
Henry
Really feeling pleased doing my Tender hornblocks and getting to 10BA with 12 BA heads in the right places, thinking i was getting into micro engineering and you pop up with watchmakers screws for the clip ( you swine lol)
Seriously have you ever thought of putting it on display at a couple of shows? You could get back you expenses by flogging £5.00 'backstage passes' and the use of a quality glass so people can get up close and personal!!!
Ron
.Really feeling pleased doing my Tender hornblocks and getting to 10BA with 12 BA heads in the right places, thinking i was getting into micro engineering and you pop up with watchmakers screws for the clip ( you swine lol)
Seriously have you ever thought of putting it on display at a couple of shows? You could get back you expenses by flogging £5.00 'backstage passes' and the use of a quality glass so people can get up close and personal!!!
Ron
Sorry Rob to take away your kudos on the BA screws, but ill give it back as your projects are true engineering compared to my just adding detail.
I dont think i could take it to a show. I would fall apart if the car got damaged in transit or got finger poked at a show. Im not as brave as you lot and Robs trek to a show almost having a accident on the way destroying his diorama was painfull reading.
Cheers
Henry
It is all good fun whatever medium you work in.
With ME CNC has made a difference and when you look at what you can do with kits nowadays is amazing photetching has given it a new dimension
I started of in OO and slowly built my way up. the bigger they got, the 'easier' it became, but parodoxically also harder as you started to look at the small things that could be put on locos and looking at what other people do then you want to add that to your model,
However i run a tight line between trying to get it looking right and keeping it so it will withstand the work it has been built to do
To give you and idea of what standards some guys are reaching now here are a couple of threads both worth reading to get an insight on how it is done
the first is Peters model of an Flying Scotsman
http://modeleng.proboards.com/thread/5733/building...
Now Rogers is on a different planet to most of us on the forum this guy is something else
http://modeleng.proboards.com/thread/8680/help-spe...
And then there is this chap in the car world
https://forums.aaca.org/topic/145354-construction-...
Another chap worth looking up is Gerald Wingrove who was doing stuff like this 40 years ago
apologies if you are already aware of all these
silverfoxcc said:
Henry
It is all good fun whatever medium you work in.
With ME CNC has made a difference and when you look at what you can do with kits nowadays is amazing photetching has given it a new dimension
I started of in OO and slowly built my way up. the bigger they got, the 'easier' it became, but parodoxically also harder as you started to look at the small things that could be put on locos and looking at what other people do then you want to add that to your model,
However i run a tight line between trying to get it looking right and keeping it so it will withstand the work it has been built to do
To give you and idea of what standards some guys are reaching now here are a couple of threads both worth reading to get an insight on how it is done
the first is Peters model of an Flying Scotsman
http://modeleng.proboards.com/thread/5733/building...
Now Rogers is on a different planet to most of us on the forum this guy is something else
http://modeleng.proboards.com/thread/8680/help-spe...
And then there is this chap in the car world
https://forums.aaca.org/topic/145354-construction-...
Another chap worth looking up is Gerald Wingrove who was doing stuff like this 40 years ago
apologies if you are already aware of all these
Yes seen these thankyou , fascinating stuff.It is all good fun whatever medium you work in.
With ME CNC has made a difference and when you look at what you can do with kits nowadays is amazing photetching has given it a new dimension
I started of in OO and slowly built my way up. the bigger they got, the 'easier' it became, but parodoxically also harder as you started to look at the small things that could be put on locos and looking at what other people do then you want to add that to your model,
However i run a tight line between trying to get it looking right and keeping it so it will withstand the work it has been built to do
To give you and idea of what standards some guys are reaching now here are a couple of threads both worth reading to get an insight on how it is done
the first is Peters model of an Flying Scotsman
http://modeleng.proboards.com/thread/5733/building...
Now Rogers is on a different planet to most of us on the forum this guy is something else
http://modeleng.proboards.com/thread/8680/help-spe...
And then there is this chap in the car world
https://forums.aaca.org/topic/145354-construction-...
Another chap worth looking up is Gerald Wingrove who was doing stuff like this 40 years ago
apologies if you are already aware of all these
Cheers
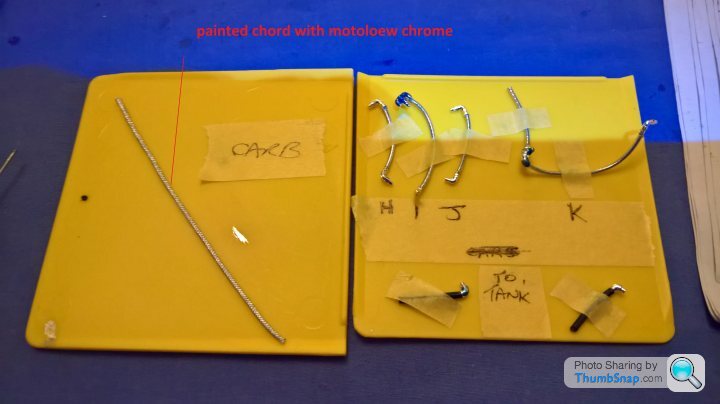
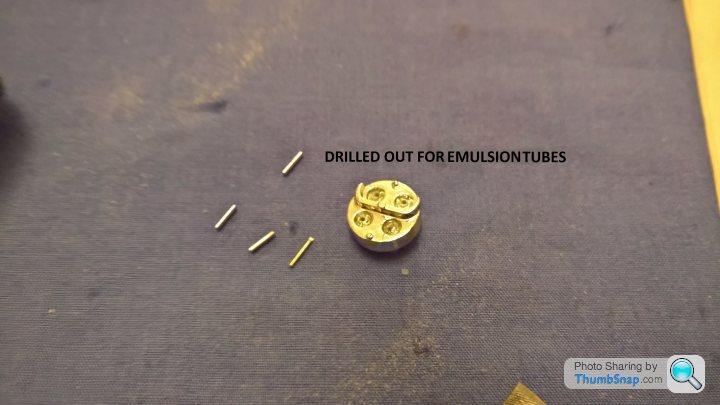
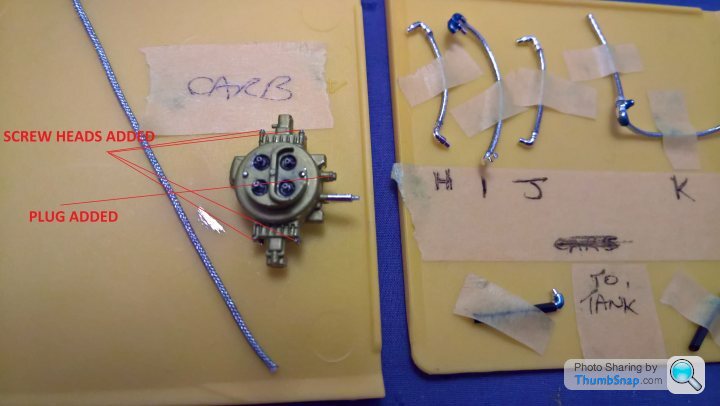
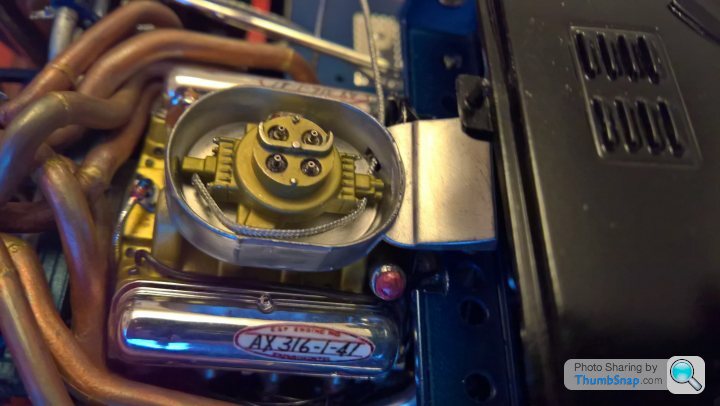
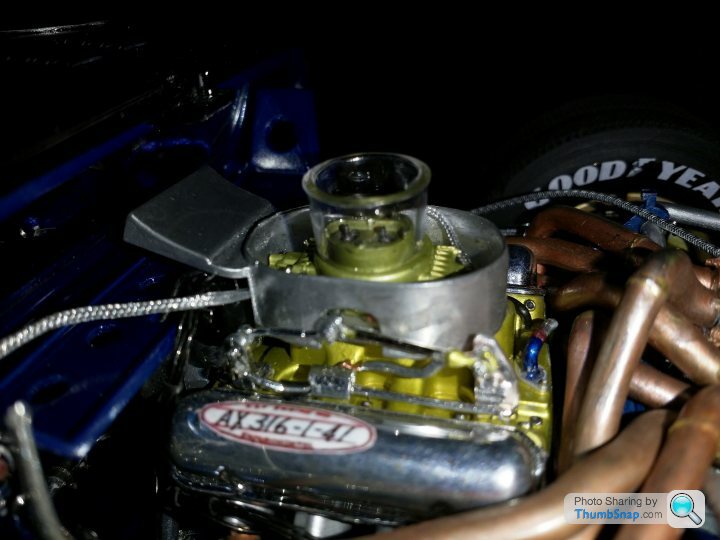
Onto Carb and fuel lines. Used my own stock as the kit braided pipes would kink.Found the right shade for the carb,scribed seperation lines, added some screw heads etc
Drivers side lines.
 .
.
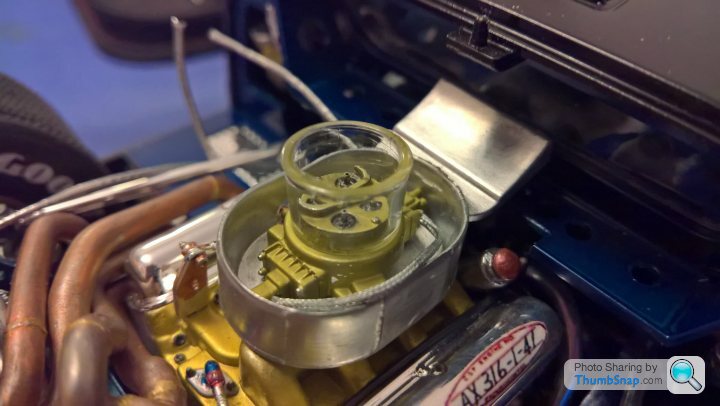
Drilled out and fitted emulsion tubes.
 .
.
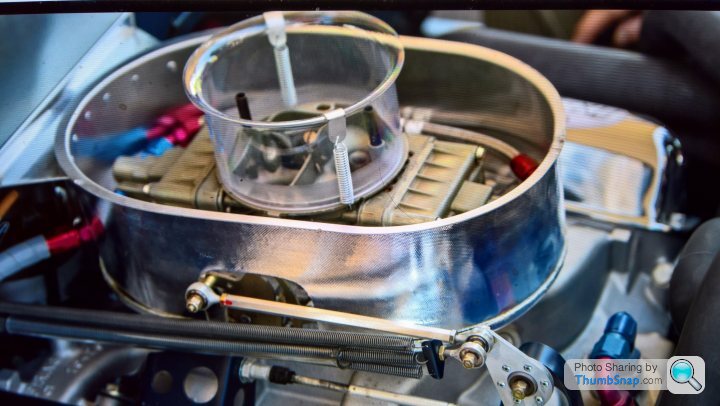
The real thing.
 .
.
 .
.
 .
.
 .
.
 .
.
 .
.
 .
.
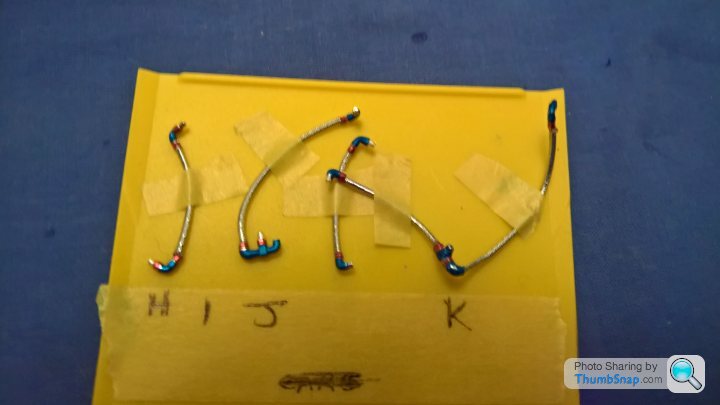
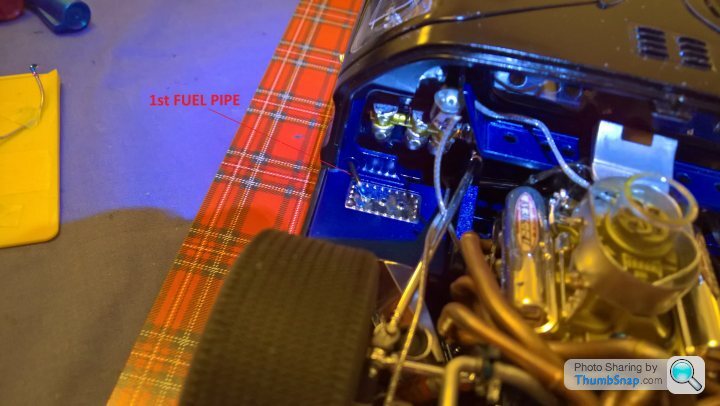
Stages of assembly of the fuel lines.
 .
.
 .
.
 .
.
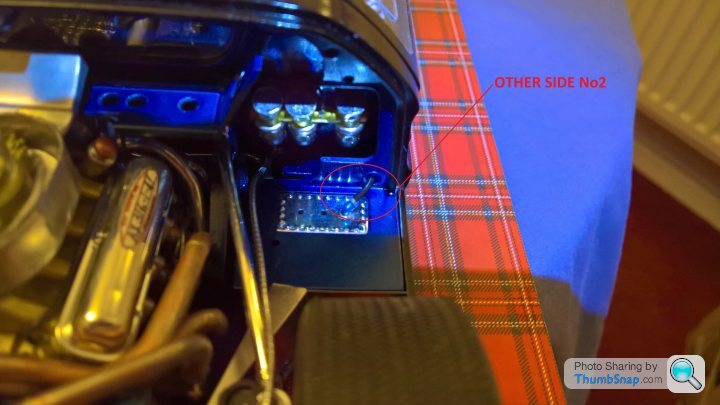
Onto the other side now.
Cheers
Drivers side lines.
.Drilled out and fitted emulsion tubes.
.The real thing.
.......Stages of assembly of the fuel lines.
...Onto the other side now.
Cheers
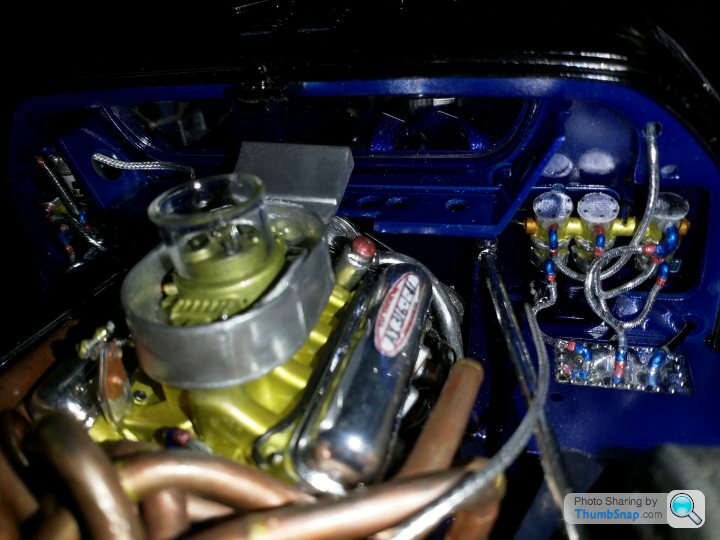
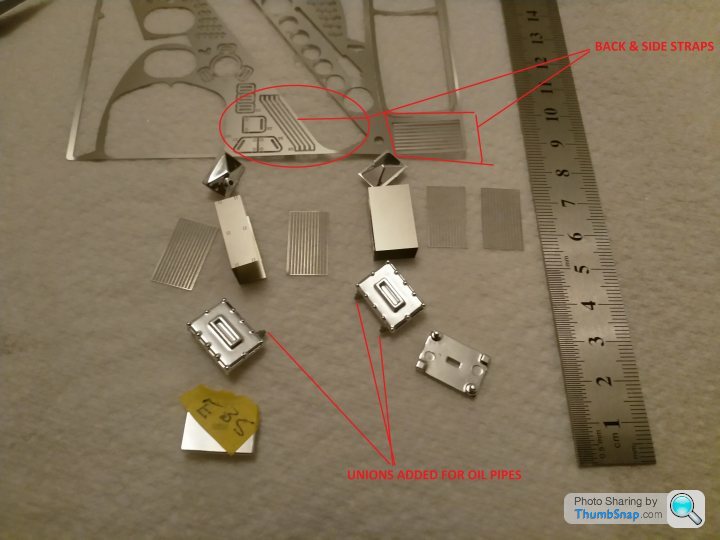
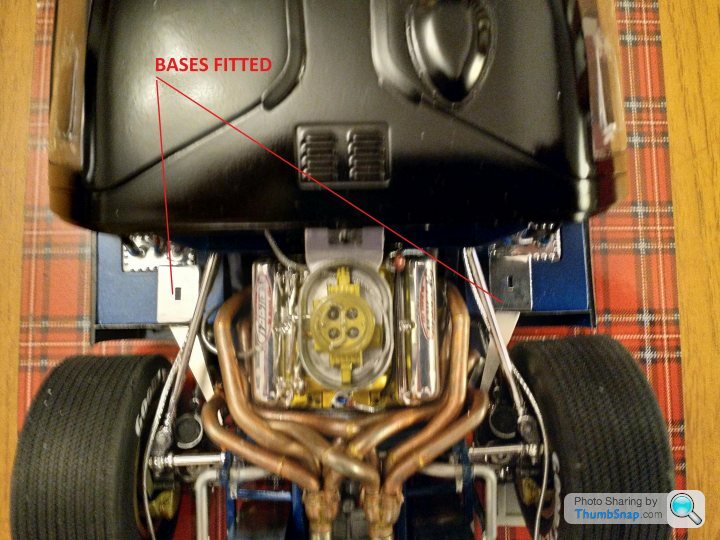
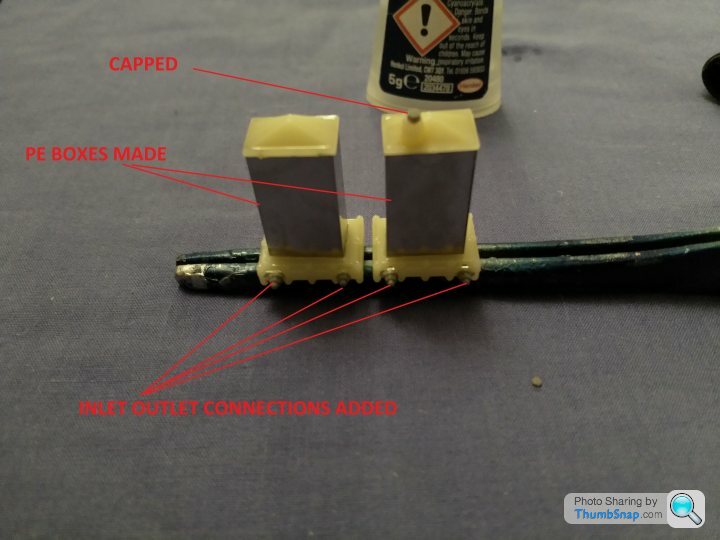
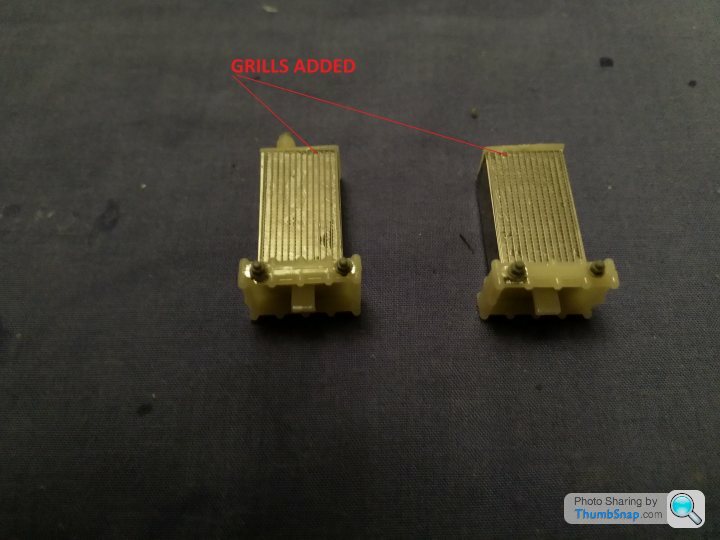
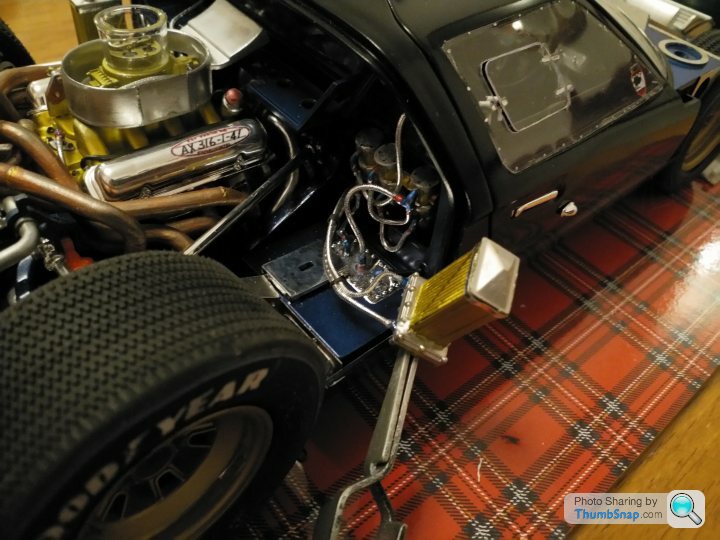
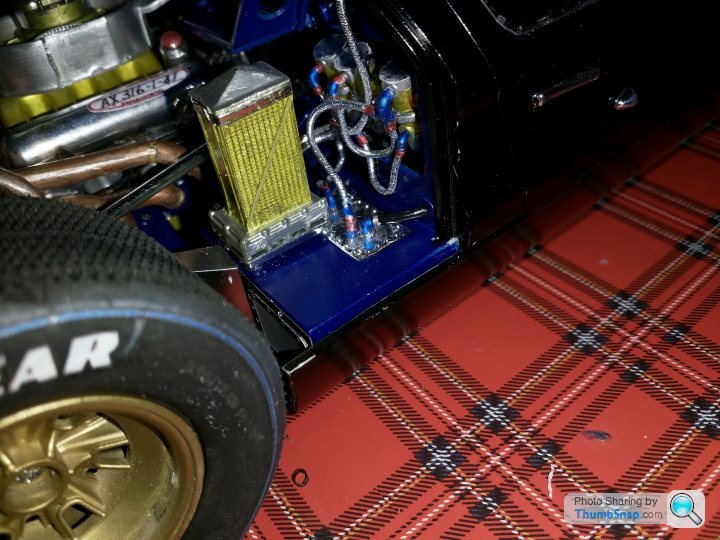
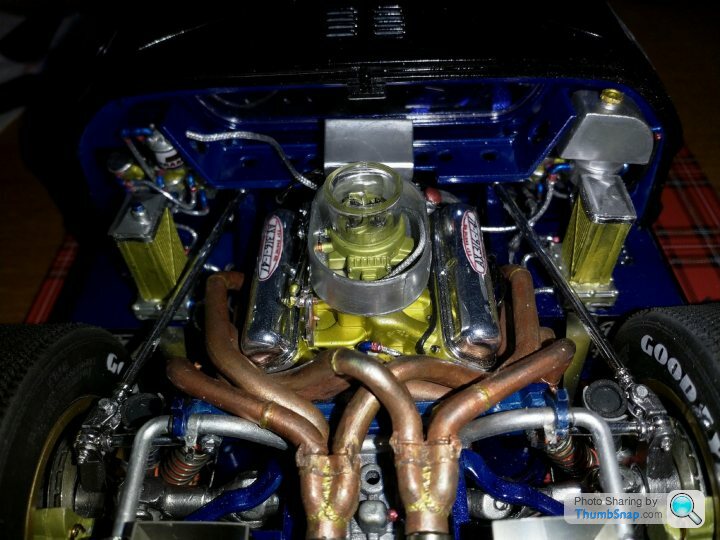
Other side completed, also the throttle linkages and now making up the oil coolers. Using the bases and tops from the kit and leaving the chrome on but using the KA PE parts to build up the radiator cores. Ive also added unions to the bases to be able to run inlet and outlet oil pipes.Also need to touch up the carbs before i go any further
Some photos.
 .
.
 .
.
 .
.
 .
.
Cheers
Some photos.
....Cheers
I changed my mind on the chrome bits for the oil coolers, the only part left chromed is the base plates.Capped off hole with a hex plug for one lid as its not correct, added unions to the base and blued, for the inlet /outlet lines from the oil filter to the coolers to tank made earlier. Anodised/plating look for the radiators, aluminium tops and base. Using the KA detail there are 25 parts in total.I redrilled the position for the oil cooler bases as the bases according to RK,s web site showed a overlap of the fuel tank access plates.
 .
.
 .
.
 .
.
 .
.
 .
.
 .
.
 .
.
 .
.
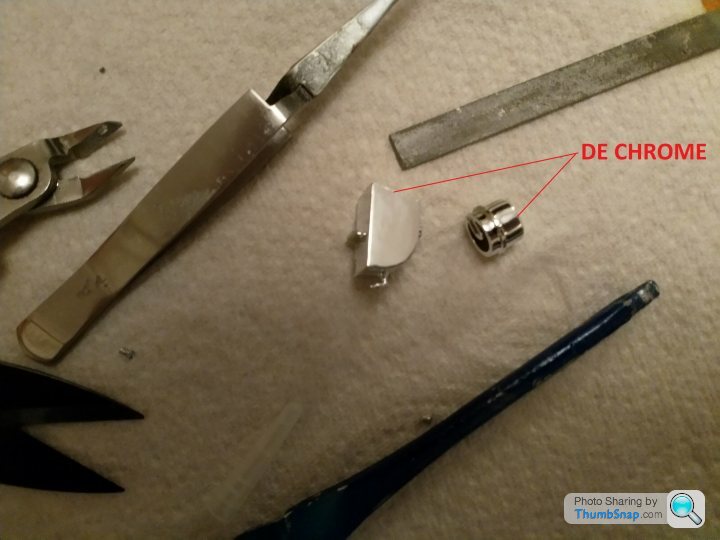
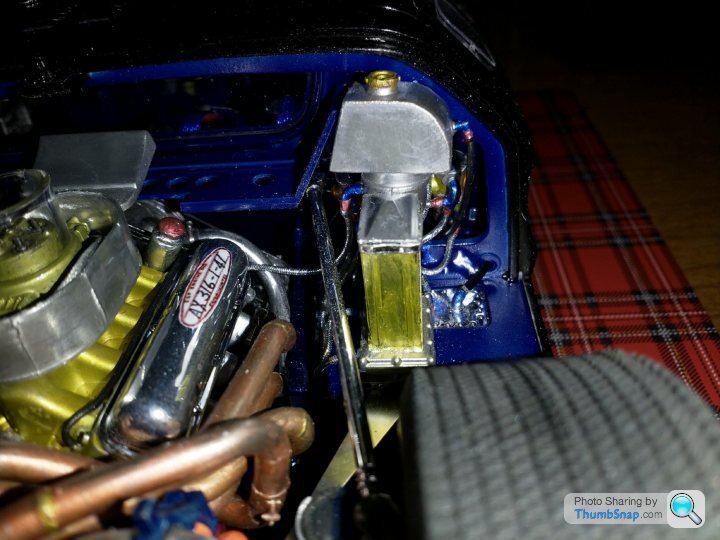
Onto the final part before going onto the front and rear bodywork.Dechroming the water tank, adding weld lines finishing of with aluiminium rub.Ive never taken off so much chrome in a kit before, but worth doing as far as i see.
 .
.
Cheers.
........Onto the final part before going onto the front and rear bodywork.Dechroming the water tank, adding weld lines finishing of with aluiminium rub.Ive never taken off so much chrome in a kit before, but worth doing as far as i see.
.Cheers.


Final part finished Coolant tank, before going onto the bodywork, which is going to take up some time.
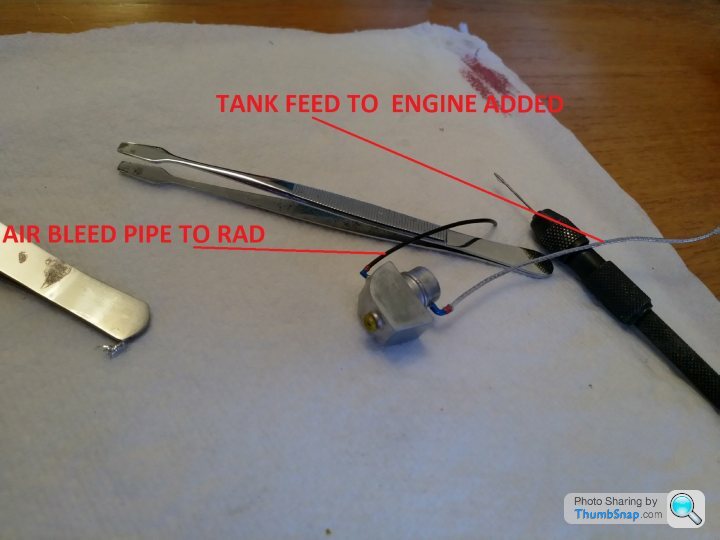 .
.
 .
.
 .
.
 .
.
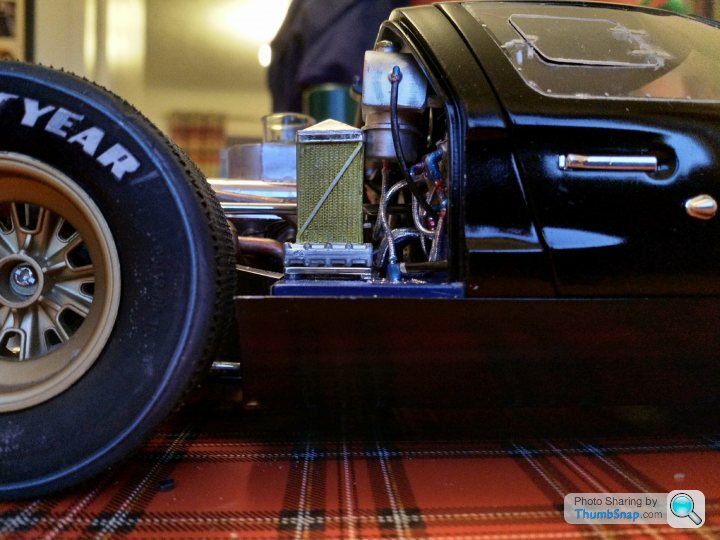
All done. Now onto the body which has many parts, parts that need correcting/adjusting and a lot of photo etched to complete.
Going to take some time.
Thanks to everyone looking so far and commenting and thankyou Can Am for pointing me in the right direction. Ive enjoyed it all very much.
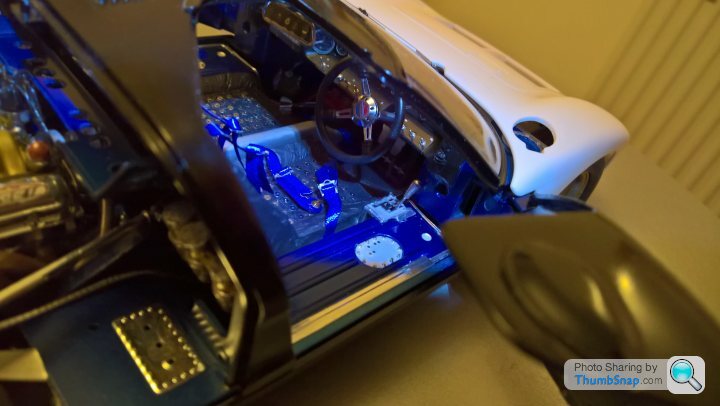
Reaping the rewards to be able to look at most of the small details of this build.Nice thing is the two clam shells expose a lot of the interior details.
Hope i can finish it to a acceptable standard.
Cheers
....All done. Now onto the body which has many parts, parts that need correcting/adjusting and a lot of photo etched to complete.
Going to take some time.
Thanks to everyone looking so far and commenting and thankyou Can Am for pointing me in the right direction. Ive enjoyed it all very much.
Reaping the rewards to be able to look at most of the small details of this build.Nice thing is the two clam shells expose a lot of the interior details.
Hope i can finish it to a acceptable standard.
Cheers
henryk001 said:
Reaping the rewards to be able to look at most of the small details of this build.Nice thing is the two clam shells expose a lot of the interior details.
Hope i can finish it to a acceptable standard.
Cheers
Acceptable? I don't remember seeing the valve springs or tappet shims so i think it'll run a bit rough.Hope i can finish it to a acceptable standard.
Cheers
Gassing Station | Scale Models | Top of Page | What's New | My Stuff