1/8 Ghostbusters Ecto-1 Partwork
Discussion


Mentioned this in show us your models, and there seemed to be some interest in a build thread. Warning this will be a long runner as the parts are delivered monthly, so completion will take 2-3 years no matter how fast I work 
The kit https://bit.ly/2VkFTku
There are a few build series on Youtube which go into the details of construction, World of Wayne is one of the better ones https://www.youtube.com/playlist?list=PL_KUg8g1yx-...
Adam Savage, of Mythbusters fame, is also doing a build with more weathering https://youtu.be/uWpw1NTWBcY
So ordered last Sunday, a box arrived yesterday with this in
 Untitled by MBBlat, on Flickr
which is basically the first 2 single issues and the 2nd monthly drop with 4 packs and one magazine.
First problem, as supplied the bonnet has a small but noticeable chip and a glue run, so will be contacting Eaglemoss for a replacement.
 Untitled by MBBlat, on Flickr
I've also got some better after-market bonnet vents on order.
Will update once the build starts.
The kit https://bit.ly/2VkFTku
There are a few build series on Youtube which go into the details of construction, World of Wayne is one of the better ones https://www.youtube.com/playlist?list=PL_KUg8g1yx-...
Adam Savage, of Mythbusters fame, is also doing a build with more weathering https://youtu.be/uWpw1NTWBcY
So ordered last Sunday, a box arrived yesterday with this in
Untitled by MBBlat, on Flickrwhich is basically the first 2 single issues and the 2nd monthly drop with 4 packs and one magazine.
First problem, as supplied the bonnet has a small but noticeable chip and a glue run, so will be contacting Eaglemoss for a replacement.
Untitled by MBBlat, on FlickrI've also got some better after-market bonnet vents on order.
Will update once the build starts.
Issue 2
 IMG_0783 by MBBlat, on Flickr
Headlight surrounds are metal, rest are chromed plastic. This brings its own problems, namely great big obvious seam lines on all the bumper parts:
 IMG_0787 by MBBlat, on Flickr
So its a case of sand down, prime and try to re-chrome. I'll update this post with the results.
IMG_0783 by MBBlat, on FlickrHeadlight surrounds are metal, rest are chromed plastic. This brings its own problems, namely great big obvious seam lines on all the bumper parts:
IMG_0787 by MBBlat, on FlickrSo its a case of sand down, prime and try to re-chrome. I'll update this post with the results.
So with Issue 2 on hold while I get out the sanding sticks and chrome paint, and Issue on hold while I wait to see if Eaglemoss can supply a new bonnet, its on to Issue 3.
 IMG_0788 by MBBlat, on Flickr
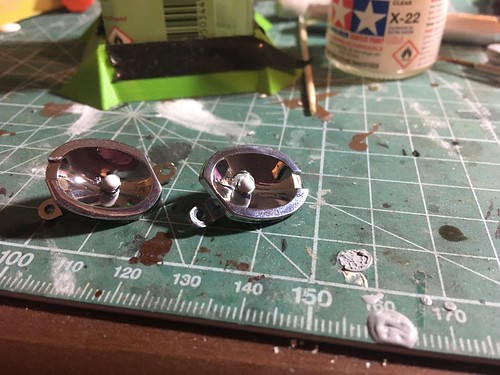
This composes the lower bumper with parking lights. These are causing some controversy amongst builders, as all the promotional material shows these lit, but they are supplied blind with nowhere to put any LEDs. Strangely enough this is screen accurate as nowhere in the first 2 films are these shown lit as they were intended as parking, not fog, lights and were switched so it was either headlights or parking lights, never both.
Anyway did a little mod, a dab of gloss white covered with a layer of gloss varnish to separate the bulbs from the reflectors.
 IMG_0792 by MBBlat, on Flickr
 IMG_0793 by MBBlat, on Flickr
Luckily no viable seem lines in these parts, so going to follow Adam Savage and try an oil wash on them.
IMG_0788 by MBBlat, on FlickrThis composes the lower bumper with parking lights. These are causing some controversy amongst builders, as all the promotional material shows these lit, but they are supplied blind with nowhere to put any LEDs. Strangely enough this is screen accurate as nowhere in the first 2 films are these shown lit as they were intended as parking, not fog, lights and were switched so it was either headlights or parking lights, never both.
Anyway did a little mod, a dab of gloss white covered with a layer of gloss varnish to separate the bulbs from the reflectors.
IMG_0792 by MBBlat, on FlickrIMG_0793 by MBBlat, on FlickrLuckily no viable seem lines in these parts, so going to follow Adam Savage and try an oil wash on them.
I know, but then I have a weakness for big expensive model kits, at least this one I'm paying monthly rather than in one hit.
Ordered some miniature bolts to replace the screws on the engine block. Its a bit like the Pocher Lamborghini, build it stock and you will end up with a nice representation but do some extra painting and a few cheap mods takes it to a different level.
Ordered some miniature bolts to replace the screws on the engine block. Its a bit like the Pocher Lamborghini, build it stock and you will end up with a nice representation but do some extra painting and a few cheap mods takes it to a different level.
Here's where I've got to with the engine for now
 IMG_0832 by MBBlat, on Flickr
 IMG_0833 by MBBlat, on Flickr
 IMG_0834 by MBBlat, on Flickr
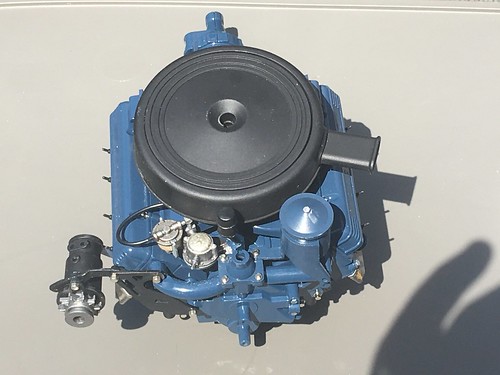
Only done light weathering so far, replaced the visible screws with some scale hardware and picked out the moulded in bolts with molotow chrome pen.
To give a sense of scale, here it is with the Lego Ecto-1
 IMG_0840 by MBBlat, on Flickr
IMG_0832 by MBBlat, on FlickrIMG_0833 by MBBlat, on FlickrIMG_0834 by MBBlat, on FlickrOnly done light weathering so far, replaced the visible screws with some scale hardware and picked out the moulded in bolts with molotow chrome pen.
To give a sense of scale, here it is with the Lego Ecto-1
IMG_0840 by MBBlat, on FlickrIn case anyone's following this here's my progress to date
 IMG_1853 by MBBlat, on Flickr
 IMG_1854 by MBBlat, on Flickr
 IMG_1856 by MBBlat, on Flickr
 IMG_1858 by MBBlat, on Flickr
Underside of left suspension
 IMG_1859 by MBBlat, on Flickr
Engine nearly complete, just need to sort out some better representations of the electrical connections to the dynamo and starter motor, the kit supplied bits look more like hydraulic connections than electrical. Chassis not weathered as I want to wait until its a bit more together to give it all a uniform look.
here's my progress to dateIMG_1853 by MBBlat, on FlickrIMG_1854 by MBBlat, on FlickrIMG_1856 by MBBlat, on FlickrIMG_1858 by MBBlat, on FlickrUnderside of left suspension
IMG_1859 by MBBlat, on FlickrEngine nearly complete, just need to sort out some better representations of the electrical connections to the dynamo and starter motor, the kit supplied bits look more like hydraulic connections than electrical. Chassis not weathered as I want to wait until its a bit more together to give it all a uniform look.
Please continue! Ive watched Adam’s build videos too, looks like it will be pretty impressive when finished.
I was running a thread for my Tamiya truck build, it didn’t get many replies but each time I asked if it was worth carrying on I got some replies saying yes.
It seems these sort of threads get a lot of views but not much feedback
I was running a thread for my Tamiya truck build, it didn’t get many replies but each time I asked if it was worth carrying on I got some replies saying yes.
It seems these sort of threads get a lot of views but not much feedback
Having done several similar blog type threads, something I've always thought is missing from PH is either a "how many people have bookedmarked my thread" statistic, or a "how many people have read my post" or a facebook type thumbs up recognition ... that way you can tell people are reading all your effort without having to 'pollute' the story with 'good job' type posts ... or think that you're posting all alone.
Yes, we're following, incredible job so keep posting please
Yes, we're following, incredible job so keep posting please
Just another example of the ancient forum software needing an update. All of those extras would be very welcome and useful, but the purists seem to hate the idea. Anyway, that’s another subject for another thread.
Back on topic, if you’ve not watched Adam Savage’s weathering videos I’d highly recommend them
Back on topic, if you’ve not watched Adam Savage’s weathering videos I’d highly recommend them
Thanks fro the responses - I'll keep this thread updated.
I've watched Adam Savages videos - link in first post. I'm doing a lighter weathering job though, personal preference.
So this is where I've got to - engine complete and mounted on front frame.
 IMG_1871 by MBBlat, on Flickr
 IMG_1869 by MBBlat, on Flickr
 IMG_1868 by MBBlat, on Flickr
Decals, from ebay, applied. Also replaced the tube from the generator to starter solenoid with wire and tried to make it look more like an electrical connection than the hydraulic connection supplied.
 IMG_1870 by MBBlat, on Flickr
Finished re-chroming the front bumpers and assembled the front grill, replacement magnetic numberplate.
 IMG_1877 by MBBlat, on Flickr
Weathering is there but subtle - two front wheels, upper is as supplied, lowered is weathered using Tamiya brown panel liner.
 IMG_1879 by MBBlat, on Flickr
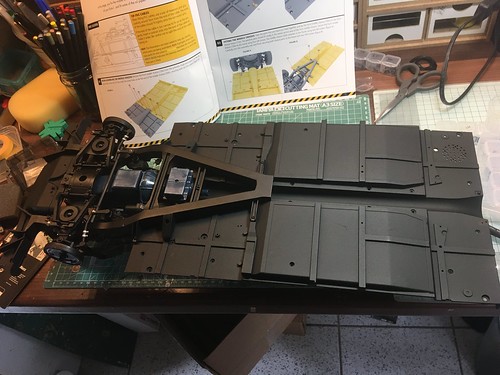
Got the next 4 parts, which mainly comprise building the floor - big pieces, all metal
 IMG_1878 by MBBlat, on Flickr
Its going to be heavy - just the engine and forward frame are over 1kG.
I've watched Adam Savages videos - link in first post. I'm doing a lighter weathering job though, personal preference.
So this is where I've got to - engine complete and mounted on front frame.
IMG_1871 by MBBlat, on FlickrIMG_1869 by MBBlat, on FlickrIMG_1868 by MBBlat, on FlickrDecals, from ebay, applied. Also replaced the tube from the generator to starter solenoid with wire and tried to make it look more like an electrical connection than the hydraulic connection supplied.
IMG_1870 by MBBlat, on FlickrFinished re-chroming the front bumpers and assembled the front grill, replacement magnetic numberplate.
IMG_1877 by MBBlat, on FlickrWeathering is there but subtle - two front wheels, upper is as supplied, lowered is weathered using Tamiya brown panel liner.
IMG_1879 by MBBlat, on FlickrGot the next 4 parts, which mainly comprise building the floor - big pieces, all metal
IMG_1878 by MBBlat, on FlickrIts going to be heavy - just the engine and forward frame are over 1kG.
Drawweight said:
What did you use to chrome the bumpers?
Molotov chrome refill through the airbrush. Only did the upper bumper as they had quite bad visible seem lines in them, its by no means a perfect job but I have trouble getting any gloss paint looking good. I may end up putting a matt coat on anyway as the real car had its chrome dulled so the crew wouldn't show in reflections when filming.Got the floor pans on this afternoon - its getting big and heavy
 IMG_1880 by MBBlat, on Flickr
I used some RC car stands to keep the engine off the desk when its upside down
 IMG_1882 by MBBlat, on Flickr
Had my first real fitment issue, the mid chassis brace had a location pin that was far too long plus some large ejection pin marks that was keeping it from sitting properly, a few minutes work with file and dremmel sorted that.
 IMG_1883 by MBBlat, on Flickr
Still got to do the brake lines - got some copper wire on order to replace the plastic tube supplied, plus trying to decide if its worth spending time and effort tidying up the prop shaft as it will not be very visible on the completed model.
SydneyBridge said:
How long will it take to get all the parts ?
Its 141 issues, 4 issues arrive every 3-4 weeks, so about 2 1/2 years. Its not going to be a quick project.Apparently its possible to up the frequency to every 2 weeks which would drop it down to a year and a half.
Between doing mods and other modelling projects I'm not finding the supply frequency too bad at the moment, I might up the frequency over the winter though.
Got some copper wire to make up the brake lines, and just ordered some Tamiya braided tube from Russy to make the flexible connections.
Gassing Station | Scale Models | Top of Page | What's New | My Stuff