Tamiya Audi Quattro A2
Discussion


Leithen said:
I have an unused set of oldskool HB decals for an S1 Carson shell, I keep meaning to stick them on eBay, or even better, find another shell for them
Edit:
Hmmmm.... tempting!
https://www.ebay.co.uk/itm/112750025429
Edited by Stussy on Wednesday 10th June 20:19
generationx said:
Starfighter said:
Dumb question time...
When building these with the replacement ball-bearing sets, do I still need to apply the grease to the shaft OD per the instruction or leave it dry and let the ball race do its job?
You can leave the axle dry as the bearing does all the work. When building these with the replacement ball-bearing sets, do I still need to apply the grease to the shaft OD per the instruction or leave it dry and let the ball race do its job?
For decals, some simple tips;
- When cutting avoid any angle'd cuts. ie. no Squared-off cuts or cross-cuts. Try to always cut to a radius, as these will be far less likely to lift / catch and end up peeling, they'll stick much better this way.
- Use clean soapy water to position larger decals. This acts as a film on the surface so you can move the decal around until you're happy with the placement. Some people on the internet have complained about washing up liquids which are scented affecting the adhesive, so stick with good ol' Fairy green stuff
- Once positioned, use a hairdryer to get the decal to conform to the shape of the surface. a 10-12 second pass is good on a high heat. Ensure you have a lint-free cloth or microfibre to hand to do the squeegee work and remove any bubbles or trapped air beforehand. Using a thumbnail may be tempting but you'll likely tear / distort the sticker.
Take your time and don't start drinking the beers until you've finished.
I got involved in this little escapade as my first run in to RC cars. I blame you lot for this.
The chassis is built and running but I have a few small issues to deal with
1 - The steering is not as much as I was expecting and also appears to be uneven left to right and toe out on both side. The plan is to get some turnbuckles for the servo to steering arms and also out each side to the hubs. I have already cut away the limiters on the bottom wishbones and the hubs which got me some more throw. It appears that I am catching the stock tie-rods on the diff-housing.
2 - The shocks are bloody awful. No damping to speak of and they barely go to the spring free length when on the wheels. Which oil dampers would be best - Yeah Racing, Fastrax or Tamiya. My local hobby shop has no spares of anything at the moment.
3 - The battery rattles about in the cradle. I will fit some self-adhesive foam in the tray and on the retaining bar to hold it tight. Hobbycraft £1.
4 - The wheel hubs are not held against the drive pin and the pins fallout when the wheels are off. I have applied Loctite to the pin to hold them in place and will try some modifications to the brake disk to allow me to use a 5mm wheel hex with a grub screw. £2.55 from eBay.
5 - I want to fit a JST 2 pin connector to the Tamiya plug on the ESC. What is the best way to remove the pins from the plastic housing so that I can solder on the extra lead?
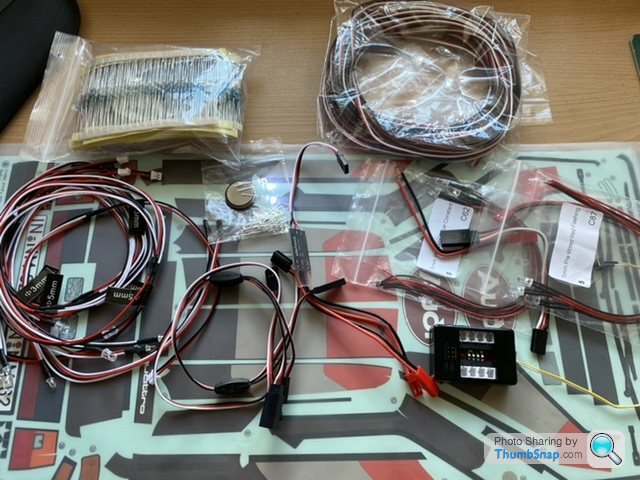
Next job is the body. I plan to use magnets on the body posts so I do not have them exposed and I do not have to drill holes. I also plan to fit a set of LEDs. I have ordered a receiver controlled lighting set on order to head and tail lights, indicators via the steering channel, and brake / reverse lights via the ESC. (eBay £11.99) The front spots will be via a simple switch on channel 3 (eBay £9.65) and have 3mm LEDs in each of the lamps with resistors in series.
On an unrelated topic, does anyone know the easiest way to remove rubber donuts from wood floor?
The chassis is built and running but I have a few small issues to deal with
1 - The steering is not as much as I was expecting and also appears to be uneven left to right and toe out on both side. The plan is to get some turnbuckles for the servo to steering arms and also out each side to the hubs. I have already cut away the limiters on the bottom wishbones and the hubs which got me some more throw. It appears that I am catching the stock tie-rods on the diff-housing.
2 - The shocks are bloody awful. No damping to speak of and they barely go to the spring free length when on the wheels. Which oil dampers would be best - Yeah Racing, Fastrax or Tamiya. My local hobby shop has no spares of anything at the moment.
3 - The battery rattles about in the cradle. I will fit some self-adhesive foam in the tray and on the retaining bar to hold it tight. Hobbycraft £1.
4 - The wheel hubs are not held against the drive pin and the pins fallout when the wheels are off. I have applied Loctite to the pin to hold them in place and will try some modifications to the brake disk to allow me to use a 5mm wheel hex with a grub screw. £2.55 from eBay.
5 - I want to fit a JST 2 pin connector to the Tamiya plug on the ESC. What is the best way to remove the pins from the plastic housing so that I can solder on the extra lead?
Next job is the body. I plan to use magnets on the body posts so I do not have them exposed and I do not have to drill holes. I also plan to fit a set of LEDs. I have ordered a receiver controlled lighting set on order to head and tail lights, indicators via the steering channel, and brake / reverse lights via the ESC. (eBay £11.99) The front spots will be via a simple switch on channel 3 (eBay £9.65) and have 3mm LEDs in each of the lamps with resistors in series.
On an unrelated topic, does anyone know the easiest way to remove rubber donuts from wood floor?
Progress to date. The chassis is complete and I have tidied up the main electrics. The battery is now secure with siticky back foam.

The body is painted. A couple of mask issues but mainly covered by the decals do not bad for a first try.
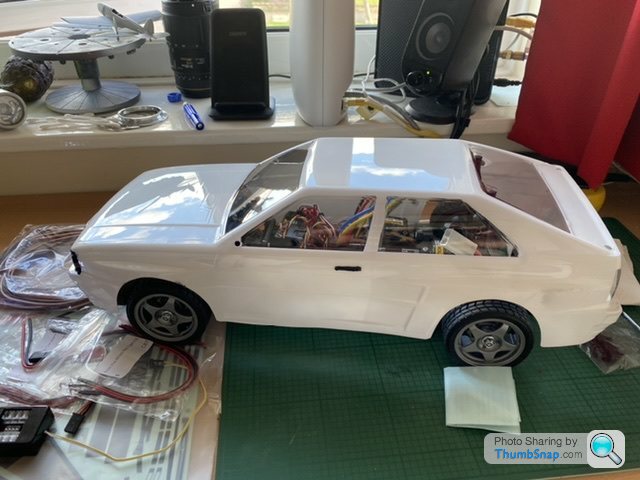
Now I have the LED lighting to sort. Should be fun...
The body is painted. A couple of mask issues but mainly covered by the decals do not bad for a first try.
Now I have the LED lighting to sort. Should be fun...
Starfighter said:
Next job is the body. I plan to use magnets on the body posts so I do not have them exposed and I do not have to drill holes. I also plan to fit a set of LEDs. I have ordered a receiver controlled lighting set on order to head and tail lights, indicators via the steering channel, and brake / reverse lights via the ESC. (eBay £11.99) The front spots will be via a simple switch on channel 3 (eBay £9.65) and have 3mm LEDs in each of the lamps with resistors in series.
What controller are you using for the front spots? I keep buying the wrong thing - I have a simple toggle switch on channel 3 on my receiver, and want to be able to control the headlights on my Tamiya Lunchbox with it. The nearest I have got it a controller that requires the switch to be toggled twice to maybe turn the lights on/off...I have this for the front spot light control.
https://www.ebay.co.uk/itm/193292263077
Connected to channel 3 on my controller which is also a basic in off switch function.
The unit connect to the receiver and has male and female JST 2 pin connectors for power in and out. A blue LED indicates status of the switch. I connected the power in lead to another Futaba connection on the receiver BEC as I am just running 6 off 20mA LEDs and the receives can handle that at 6v. It also means that I don’t need to add a series resistor as the LEDs are rated to 3v drop. I still have to do the circuits for the spots.
The main vehicle lights run on this.
https://www.ebay.co.uk/itm/302491202830
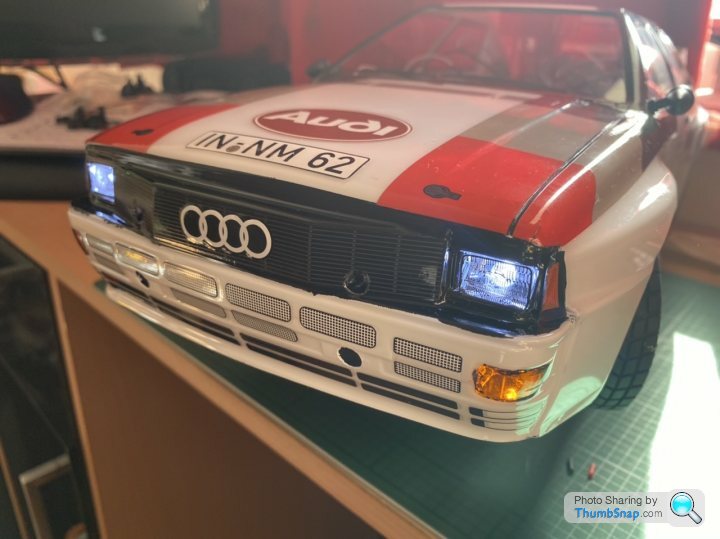
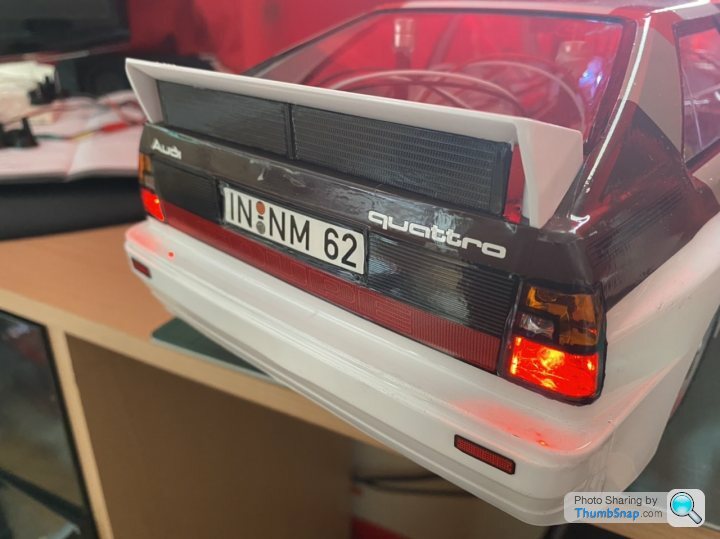
It links and takes power for the receiver on channel 1 and channel 2 to give constant headlights and tail lights and controller dependant turn signals, brake lights and reverse lights. I masked the light clusters when painting and then used a translucent Tamika orange and red to give the correct colours as the decals are to dark.

[url]
 |https://thumbsnap.com/73XGjjnt[/url]
https://www.ebay.co.uk/itm/193292263077
Connected to channel 3 on my controller which is also a basic in off switch function.
The unit connect to the receiver and has male and female JST 2 pin connectors for power in and out. A blue LED indicates status of the switch. I connected the power in lead to another Futaba connection on the receiver BEC as I am just running 6 off 20mA LEDs and the receives can handle that at 6v. It also means that I don’t need to add a series resistor as the LEDs are rated to 3v drop. I still have to do the circuits for the spots.
The main vehicle lights run on this.
https://www.ebay.co.uk/itm/302491202830
It links and takes power for the receiver on channel 1 and channel 2 to give constant headlights and tail lights and controller dependant turn signals, brake lights and reverse lights. I masked the light clusters when painting and then used a translucent Tamika orange and red to give the correct colours as the decals are to dark.
[url]
|https://thumbsnap.com/73XGjjnt[/url]Starfighter said:
Very good. In real life the rear clusters on these are quite a deep red and a very bright orange. They don't have that black framing.In fact... just remembered this pic of these I want to flog
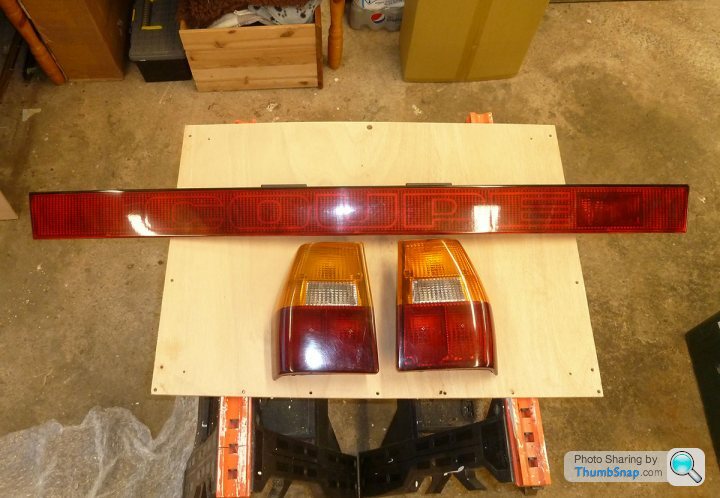
From memory the inboard 'red' is the tail light, and the outboard one is the brake light. Or it might be the other way around.
Gassing Station | Scale Models | Top of Page | What's New | My Stuff