Space Models: Intercity 125
Discussion


Hi
I'm planning on tidying this up a bit and am looking for some advice from those who have experience of these or similar models. I'm not 100% on the construction but it looks like a mixture of wood and foam and is approximately 45 years old.


The only really structural damage is on a couple of the bogies (worst below) I was thinking about reshaping this with car body filler?

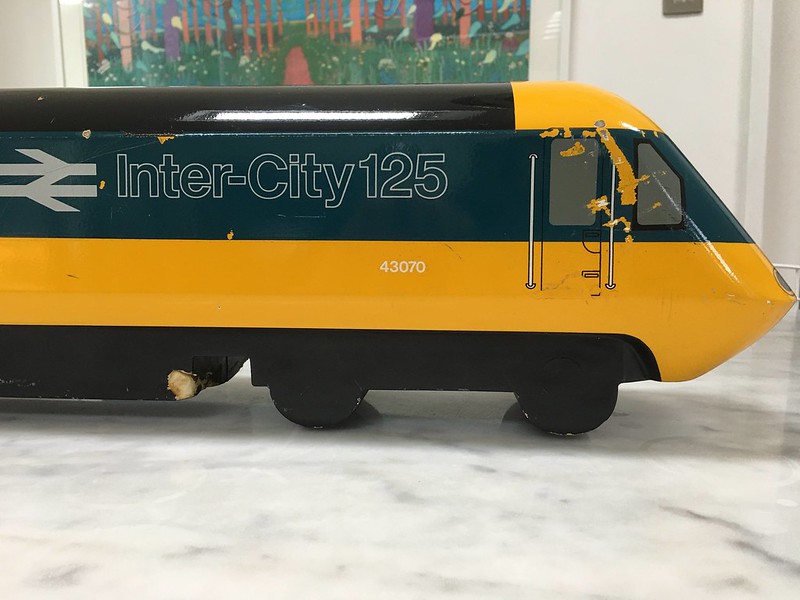
There is also some large paint chips again just looking to tidy up rather than attempt to make perfect, not sure on what paint is best to use or how to match it, is there standard BR colours?


There is also some marks to the paint which I was wondering if a light t cut might help remove or could this damage the paint?
Picture below for scale (approx 1.25m)

If I have suggested anything really terrible don't hesitate to let me know
I'm planning on tidying this up a bit and am looking for some advice from those who have experience of these or similar models. I'm not 100% on the construction but it looks like a mixture of wood and foam and is approximately 45 years old.
The only really structural damage is on a couple of the bogies (worst below) I was thinking about reshaping this with car body filler?
There is also some large paint chips again just looking to tidy up rather than attempt to make perfect, not sure on what paint is best to use or how to match it, is there standard BR colours?
There is also some marks to the paint which I was wondering if a light t cut might help remove or could this damage the paint?
Picture below for scale (approx 1.25m)
If I have suggested anything really terrible don't hesitate to let me know
The official BR paint colours are rail blue, rail yellow and rail grey, but what type of paint you'd actually need to match up on the model I'm not sure. Precision Paints might be able to help you though.
I'd be interested to know how the model came into your possession, they're not easy to find and tend to be hidden away in collections. Models like this one are usually one offs or made in small runs for publicity / display shots etc, it looks pretty good for its age. I'd imagine this one was made to show how the livery should be applied to the real thing, when the first few power cars were built at Crewe in 1975 they were painted black and yellow rather than blue and yellow.
I'd be interested to know how the model came into your possession, they're not easy to find and tend to be hidden away in collections. Models like this one are usually one offs or made in small runs for publicity / display shots etc, it looks pretty good for its age. I'd imagine this one was made to show how the livery should be applied to the real thing, when the first few power cars were built at Crewe in 1975 they were painted black and yellow rather than blue and yellow.

Thanks for the tip, I found the precision paints site and it looks promising, I'm not looking to repaint it entirely just touch up the worst of the damage.
From what I understand they were a promotional piece for use in travel agents throughout the UK there's also an APT which was only for London agents so much rarer , I'm guessing the holes in the top were designed for placing marketing material, Space Models made promotional models and also props for films.
Space Models screen credits included 2001: A Space Odyssey, Thunderbirds, Space 1999, Joe 90, Captain Scarlet, Those Magnificent Men In Their Flying Machines, James Bond movies, Blakes 7 and numerous other TVshows and films.
I've been looking for one for a while now and this appeared on ebay, was an 8hr round trip to get it but I'm over the moon with it.


What a wonderful thing!
I've got a couple of Space Models planes in for light resto and you're going down the right lines...no pun intended....clean up scuffs, marks and discolouration with t-cut (agressive) and maybe Meguiars plast-rx (polishy), body filler, carefully touch-in paint chips with railmatch paints.....and post pics of your efforts!
I've got a couple of Space Models planes in for light resto and you're going down the right lines...no pun intended....clean up scuffs, marks and discolouration with t-cut (agressive) and maybe Meguiars plast-rx (polishy), body filler, carefully touch-in paint chips with railmatch paints.....and post pics of your efforts!
Thanks for the tips. I actually gave it the once over with some Meguairs scratch remover last night, started off gently but by the end I was going full tilt, I was amazed by the hardness and quality of the paint gave a really deep shine and a lot of lighter scuffs came right out.
Be interested to see your planes at some point, I'd love something similar its just finding somewhere to put them.
Not sure if you have seen it but there is a fantastic article here about Space Models
https://www.satkinsoncreativearts.com/thespacemode...
Be interested to see your planes at some point, I'd love something similar its just finding somewhere to put them.
Not sure if you have seen it but there is a fantastic article here about Space Models
https://www.satkinsoncreativearts.com/thespacemode...
Edited by pistolpedro on Tuesday 7th July 19:10
Great to hear you're getting immediate results...good old cellulose!
Thanks for the fascinating link. I don't know of the characters (except Mat Irvine who was mentioned and will be known by us kids of a certain Swapshop age!!) but am familiar with the construction of their prolific output!
Thanks for the fascinating link. I don't know of the characters (except Mat Irvine who was mentioned and will be known by us kids of a certain Swapshop age!!) but am familiar with the construction of their prolific output!
Hmm, in the owner's court whether to protect any value to be attributed to originality of the finish or repair the obvious and detracting damage to better enjoy the wonderful model...
Owners I know of unique and historically significant one-off aero models do value a VERY sympathetic repair/restoration over leaving the original craftsman's model damaged. They're massive enthusiasts foremost but are comfortable that light repair doesn't damage their not-insignificant investments.
'Tis a thing of beauty and I'd touch it in if it were mine without fear of ruining chances of selling-on some day. I suspect the Mona Lisa has had a few facelifts...her stock remains high.
pistolpedro said:
Thanks for the tips. I actually gave it the once over with some Meguairs scratch remover last night, started off gently but by the end I was going full tilt, I was amazed by the hardness and quality of the paint gave a really deep shine and a lot of lighter scuffs came right out.
Be interested to see your planes at some point, I'd love something similar its just finding somewhere to put them.
Not sure if you have seen it but there is a fantastic article here about Space Models
https://www.satkinsoncreativearts.com/thespacemode...
Great link, really interesting. Will give it a proper read through with a cuppa later!Be interested to see your planes at some point, I'd love something similar its just finding somewhere to put them.
Not sure if you have seen it but there is a fantastic article here about Space Models
https://www.satkinsoncreativearts.com/thespacemode...
Edited by pistolpedro on Tuesday 7th July 19:10


You could get some decal paper, spray it with the appropriate colours (and varnish if required), and then apply to the damaged areas. You'll immdediately see if it's a colour match, and if it isn't just remove the decal and try again. You could cut out profiles if necessary, and cut straight lines with a scalpel, before wetting, so no risky masking. Just build up the damaged areas with a patchwork of pre-painted decals. It wouldn't be by any means perfect, but it would be a huge improvement without actually applying paint directly. If you decided afterwards it really didn't look right, it is possible to remove decals by soaking in MicroSol - sometimes.
As with any process on a valuable model though - it's always worth testing it out on a hidden area to make sure there are no nasty reactions with MicroSol or whatever.
As with any process on a valuable model though - it's always worth testing it out on a hidden area to make sure there are no nasty reactions with MicroSol or whatever.
pistolpedro said:
thanks dr_gn, really good tip
Do you have access to a decent quality Inkjet printer and Photoshop (Elements would do) ?As a slight tweak to Dr_gn's tip, get a well lit, no shadow photo of the model and the areas that need doing. Zoom onto the area you want to patch to get it 1:1 scale. Use Photoshop to fill in the scratches etc.
Then print the "repaired" area onto decal paper. Cut out the decals that correspond to the damaged bit and affix.
You can keep printing trials off until you get your printer matching the screen matching the model....in theory colour profiles take out the guess work but IMO there's always some trial and error... But with patience you can get close this way.
As dr_gn notes, you wouldn't be applying paint so the repair would be reversible. Win win.
(You need a sealer on decal paper...Wickes sell a can for £8 that I've found works well).
Murph7355 said:
pistolpedro said:
thanks dr_gn, really good tip
Do you have access to a decent quality Inkjet printer and Photoshop (Elements would do) ?As a slight tweak to Dr_gn's tip, get a well lit, no shadow photo of the model and the areas that need doing. Zoom onto the area you want to patch to get it 1:1 scale. Use Photoshop to fill in the scratches etc.
Then print the "repaired" area onto decal paper. Cut out the decals that correspond to the damaged bit and affix.
You can keep printing trials off until you get your printer matching the screen matching the model....in theory colour profiles take out the guess work but IMO there's always some trial and error... But with patience you can get close this way.
As dr_gn notes, you wouldn't be applying paint so the repair would be reversible. Win win.
(You need a sealer on decal paper...Wickes sell a can for £8 that I've found works well).
If you spray the decal paper with model paint, no sealer is required, and the other advantage is that you can cover the edges of any pre-cut shapes so they become invisible once applied. It would take trial and error to get a match, but careful notes of the proportions of paint youre using would make mixing more quite easy. Getting the sheen right would also take some doing, and of course a clear coat can change the shade of the base colour. Still, less risky than painting directly.
Gassing Station | Scale Models | Top of Page | What's New | My Stuff