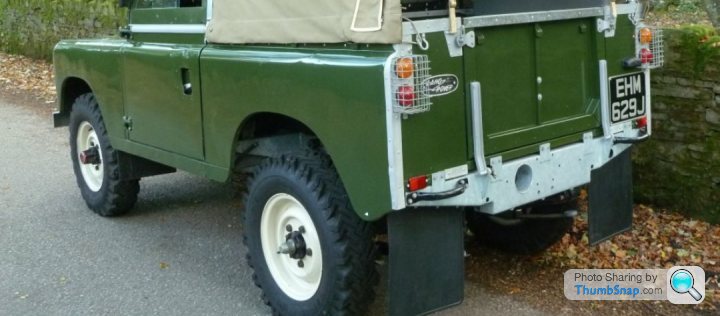
Toylander from scratch (metal chassis and body)
Discussion


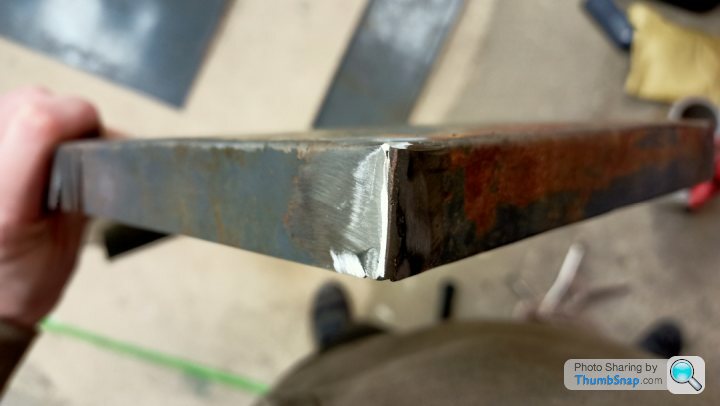
Looking good Jon. I agree on the shape of the front wing, should make all the difference. Your motor mounts certainly aren’t going to bend 
Dash is work in progress, you can just see the etch lines where it will be folded. It will then be covered with some vinyl. I have got a few other bits I want to laser cut which should make good finishing touches.

Dash is work in progress, you can just see the etch lines where it will be folded. It will then be covered with some vinyl. I have got a few other bits I want to laser cut which should make good finishing touches.
Nice Cobain. I wonder if you could slip a bit of 10mm foam behind the vinyl to give it some depth. Mind you, the original cars probably didn'd have nice touches like that!
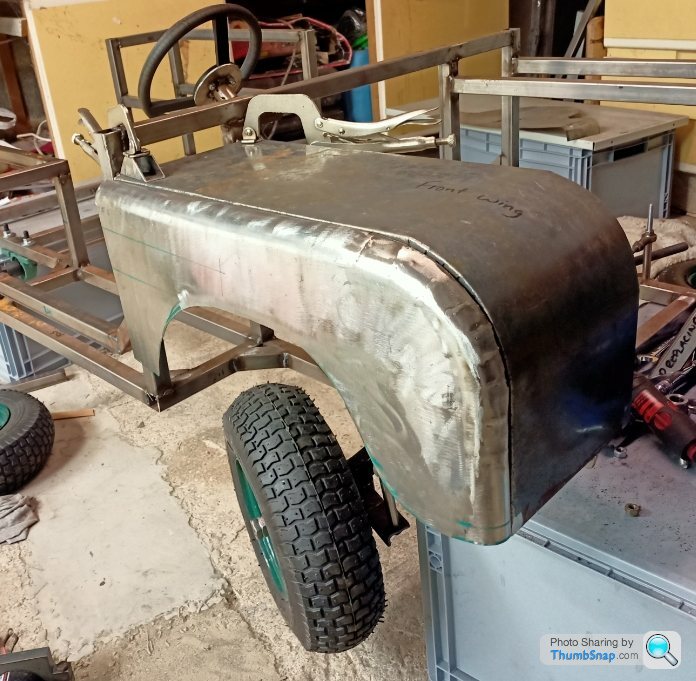
I did a bit more with the dummy wing, which is soon to become the real wing...
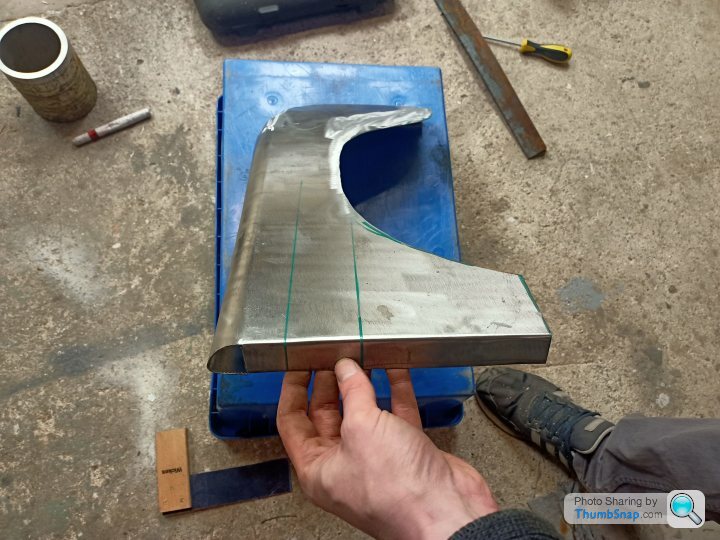
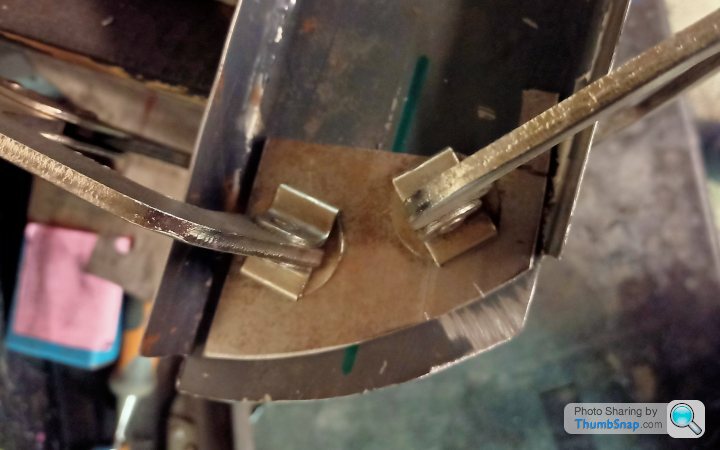
I have created a return on both mounting faces. This will give it a more authentic look rather than two raw edges of sheet metal joining.
I also reshaped the wheel cut out too. There are some differences to the original but that was mainly because I couldn't put the metal back that I had already chopped. Either way, I think it looks a bit better.
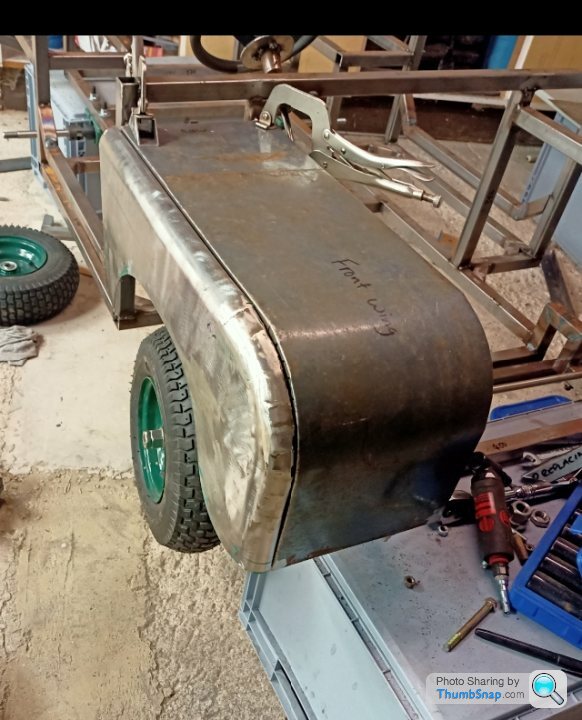
A bit of filler required....
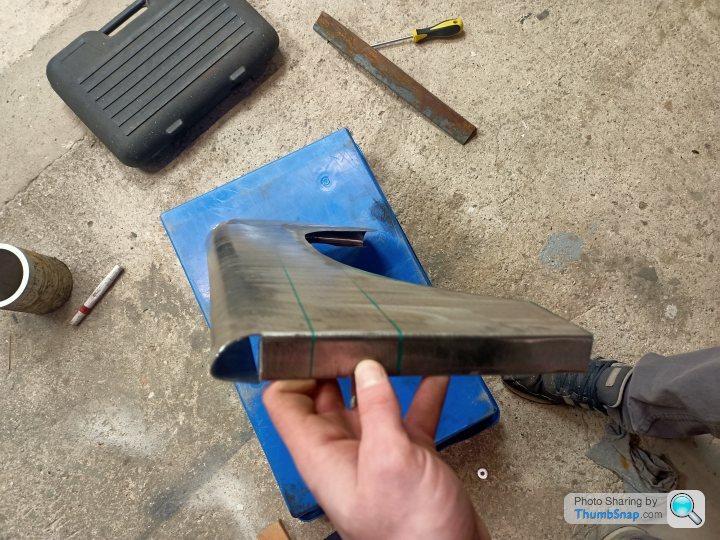
The various returns have stiffened up the panel nicely. I will probably weld on a wheel arch return lip...one day. I also need to trim the front cross member back as described in a previous post. The light in the garage and warmer nights are giving me more enthusiasm.
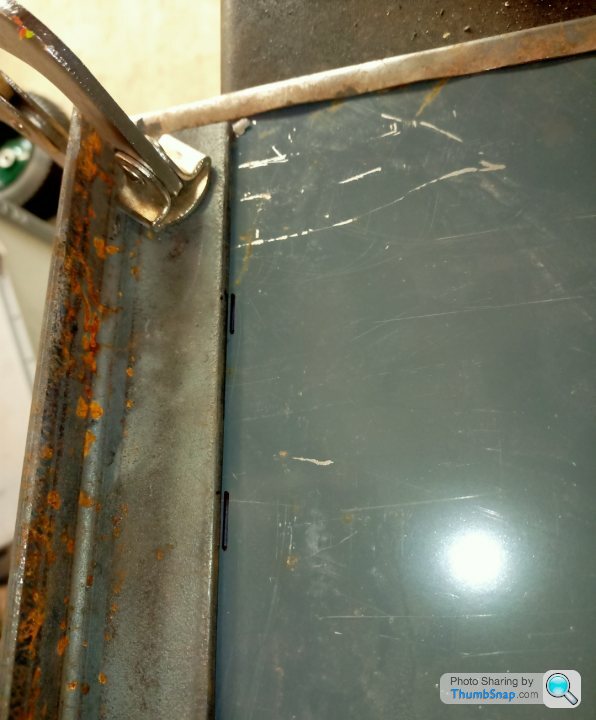
The yellow highlighted part will be a separate sill type panel, as will the bit circled in Red.
I did a bit more with the dummy wing, which is soon to become the real wing...
I have created a return on both mounting faces. This will give it a more authentic look rather than two raw edges of sheet metal joining.
I also reshaped the wheel cut out too. There are some differences to the original but that was mainly because I couldn't put the metal back that I had already chopped. Either way, I think it looks a bit better.
A bit of filler required....
The various returns have stiffened up the panel nicely. I will probably weld on a wheel arch return lip...one day. I also need to trim the front cross member back as described in a previous post. The light in the garage and warmer nights are giving me more enthusiasm.
The yellow highlighted part will be a separate sill type panel, as will the bit circled in Red.
Good work Jon! I’m afraid I would have chucked the towel in with that panel a while ago but it’s getting there now.
Like you say those returns have made such a big difference, should make mounting the panels easier too. If you slot the holes like on the real thing you will have a bit of adjustment too, not that LR we’re ever too fussy about panel gaps!
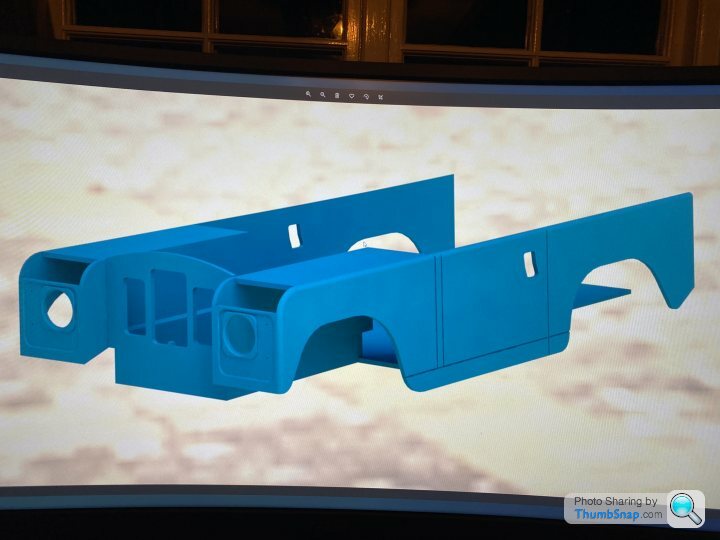
I have started to draw up in half scale, using toylander plans but adapting to 1/2 scale using measurements from my S3. All out of 12mm panels.
Like you say those returns have made such a big difference, should make mounting the panels easier too. If you slot the holes like on the real thing you will have a bit of adjustment too, not that LR we’re ever too fussy about panel gaps!
I have started to draw up in half scale, using toylander plans but adapting to 1/2 scale using measurements from my S3. All out of 12mm panels.
I did a bit more work on it this week.
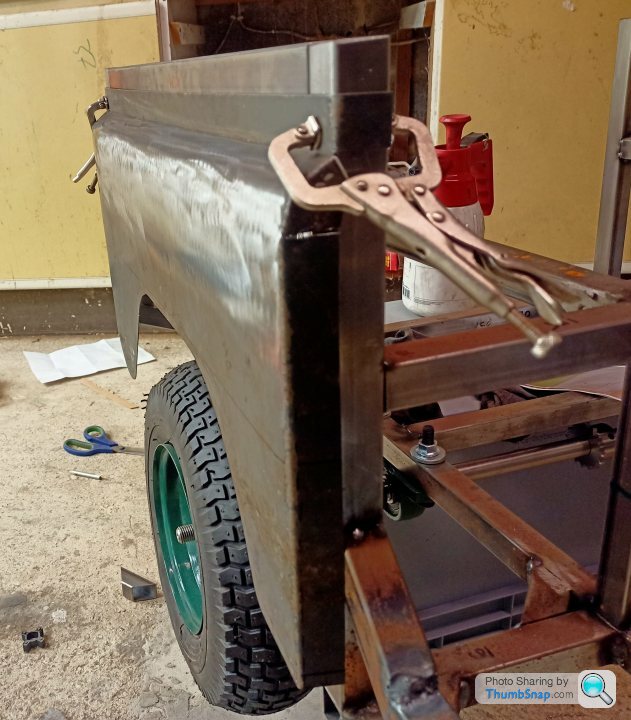
I have adjusted the rear chassis to get a more authentic looking rear panel. The side in the foreground is done and the other side will be done to match shortly.
I also started forming the rear wheel arches at the end of the day yesterday. First I put on the 90 degree fold that will clamp to the chassis and then tried to roll it around the tube (former).
Holy molies, it was difficult. Across that length it really does have some strength. I got the map gas out and warmed it up and it was slightly easier. I was in the workshop alone so couldn't get any help to pull it around whilst giving it a tickle with the hammer. Short story is that I cant get it to stay tight to the former as the material springs back. I changed the former down to 40mm and the result was similar. On my own I got to the limit of force I could apply. I have brought both of them home to check how they compare to the front radius. If there is a difference I could correct/blend it on the B pillar radius or I could man up and take it back and get one of the boys to lend some muscle. I didn't take any photos but you can imagine what it looks like.
I also guillotined and folded up the returns on both B pillars and the front bonnet/wing tops. I'll have to snip the returns when I fold that around the chassis as I don't have a shrinker.
I've ordered a super cheap air nibbler to cut the wheel arches on the rear. I wonder if it will survive a couple of panels...
I also discovered a cock up. Well actually I didn't discover it, my much smarter brother and dad popped around the other day and I was showing them progress on it. Being inquisitive types they picked up the mobility scooter rear axle and discovered it isn't just a differential, but actually a gearbox too. so it's approximately 7/1 which means I need a much bigger sprocket on the axle. I can't believe I didn't check!
That means the following
1) bin existing sprockets
2) buy new sprockets
3) machine adapter for new sprocket as ID is to big for my machined axle
4) move motor outbound as sprocket is going to be in wheel arch well so I don't lose floor height.
1 step forward and 4 back. Ha. It'll still be ready for Christmas...
I have adjusted the rear chassis to get a more authentic looking rear panel. The side in the foreground is done and the other side will be done to match shortly.
I also started forming the rear wheel arches at the end of the day yesterday. First I put on the 90 degree fold that will clamp to the chassis and then tried to roll it around the tube (former).
Holy molies, it was difficult. Across that length it really does have some strength. I got the map gas out and warmed it up and it was slightly easier. I was in the workshop alone so couldn't get any help to pull it around whilst giving it a tickle with the hammer. Short story is that I cant get it to stay tight to the former as the material springs back. I changed the former down to 40mm and the result was similar. On my own I got to the limit of force I could apply. I have brought both of them home to check how they compare to the front radius. If there is a difference I could correct/blend it on the B pillar radius or I could man up and take it back and get one of the boys to lend some muscle. I didn't take any photos but you can imagine what it looks like.
I also guillotined and folded up the returns on both B pillars and the front bonnet/wing tops. I'll have to snip the returns when I fold that around the chassis as I don't have a shrinker.
I've ordered a super cheap air nibbler to cut the wheel arches on the rear. I wonder if it will survive a couple of panels...
I also discovered a cock up. Well actually I didn't discover it, my much smarter brother and dad popped around the other day and I was showing them progress on it. Being inquisitive types they picked up the mobility scooter rear axle and discovered it isn't just a differential, but actually a gearbox too.
so it's approximately 7/1 which means I need a much bigger sprocket on the axle. I can't believe I didn't check!That means the following
1) bin existing sprockets
2) buy new sprockets
3) machine adapter for new sprocket as ID is to big for my machined axle
4) move motor outbound as sprocket is going to be in wheel arch well so I don't lose floor height.
1 step forward and 4 back. Ha. It'll still be ready for Christmas...
Cobain, cad skills look well in advance of mine. I'm afraid that's not much of a compliment! 
Have you got a build thread on here, what are your plans, where about in the job are you?
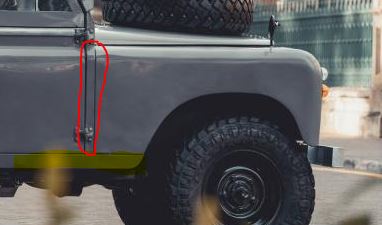
At some point in the next 6 months can you take a photo of the door mechanism on your S3? I'm debating whether to do something like it, or have a replica (or not even have a replica!) and a slide bolt hidden in the cabin.
Have you got a build thread on here, what are your plans, where about in the job are you?
At some point in the next 6 months can you take a photo of the door mechanism on your S3? I'm debating whether to do something like it, or have a replica (or not even have a replica!) and a slide bolt hidden in the cabin.
Haha thanks Jon, I did a bit of solidworks at uni but fairly rusty! It’s not so bad to do as all 12mm MDF panels so all flat parts which are then assembled together. Happy to share any cad or dimensions if it helps.
My mate had his CNC router delivered recently but won’t have it commissioned for a couple of weeks. So at least or month or so from having panels cut. Luckily little one is only 4 months old!
For door handles I believe these are pretty close to what you need, will get some pictures of mine for comparison.
https://www.ebay.co.uk/itm/Metal-Latch-Slam-Lock-w...
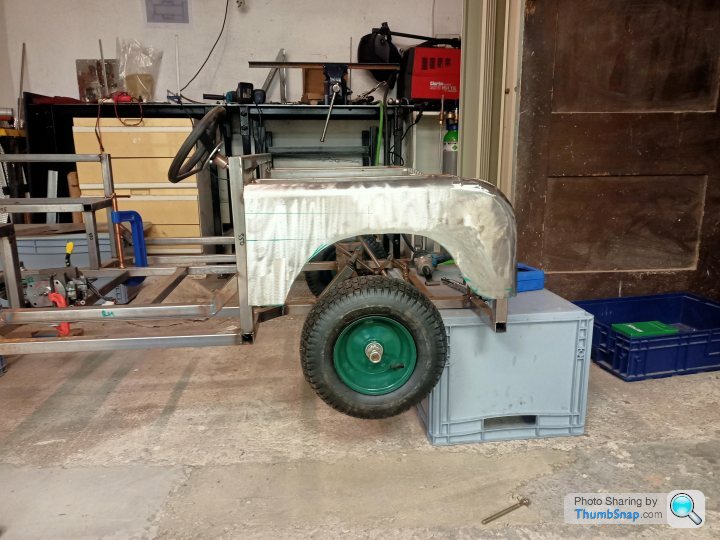
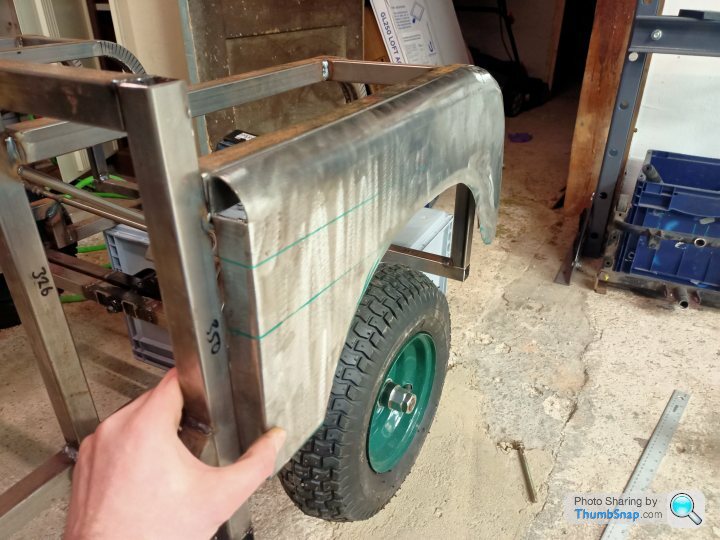
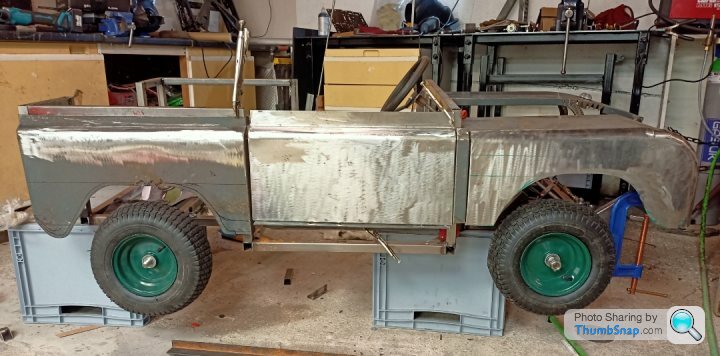
I popped into the garage for a couple of hours this evening. Mission was to try and get the bonnet/wing in place.
Start with these;

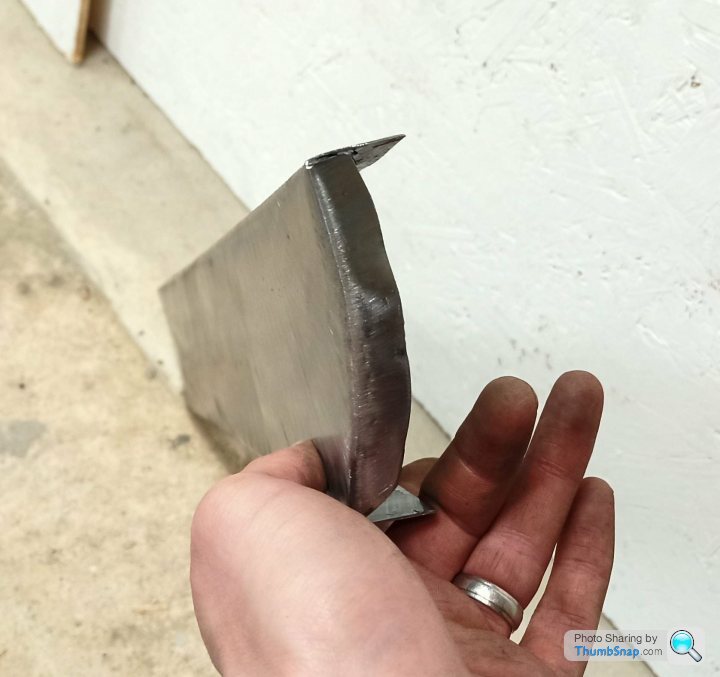
Cut incisions into wing return and create return at the bottom of the panel:
Weld and grind:
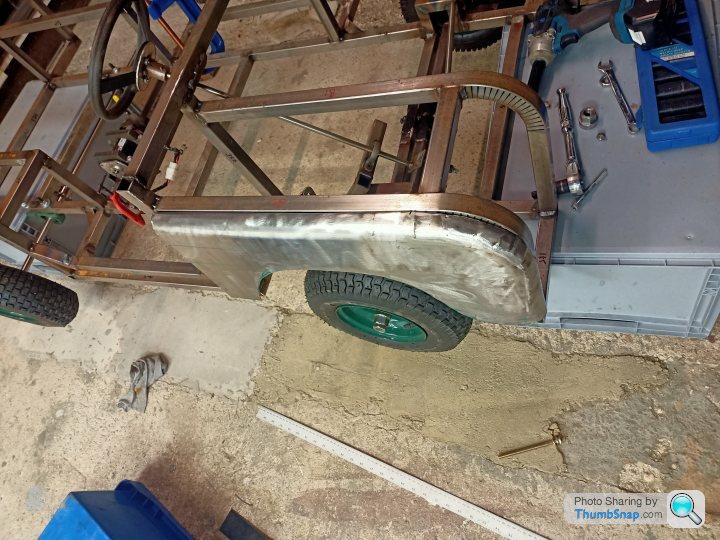
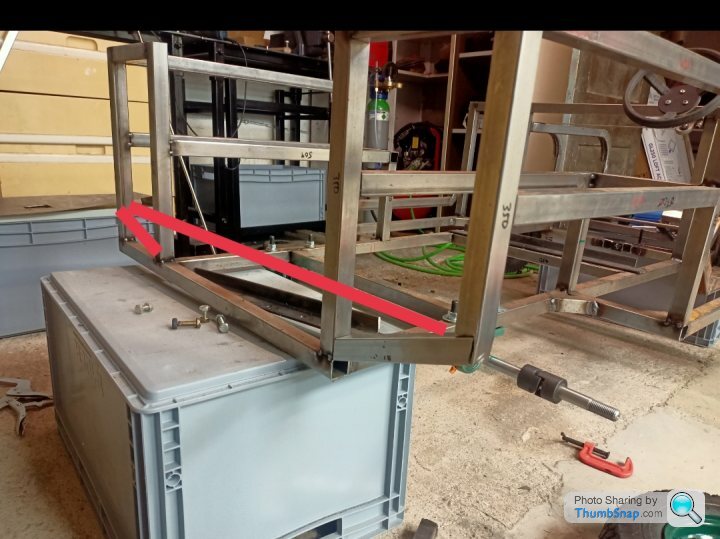
Modify chassis to bring leg upwards. Rh side modified Lh still to do:
Test fit some panels;
Could be worse
I'm almost pleased with myself!
Start with these;
Cut incisions into wing return and create return at the bottom of the panel:
Weld and grind:
Modify chassis to bring leg upwards. Rh side modified Lh still to do:
Test fit some panels;
Could be worse
I'm almost pleased with myself!
Looking great Jon, well done for sticking with it, it’s coming along nicely!
I think it will look much more like a real Landy for the slight panel imperfections, the real thing certainly isn’t perfect!
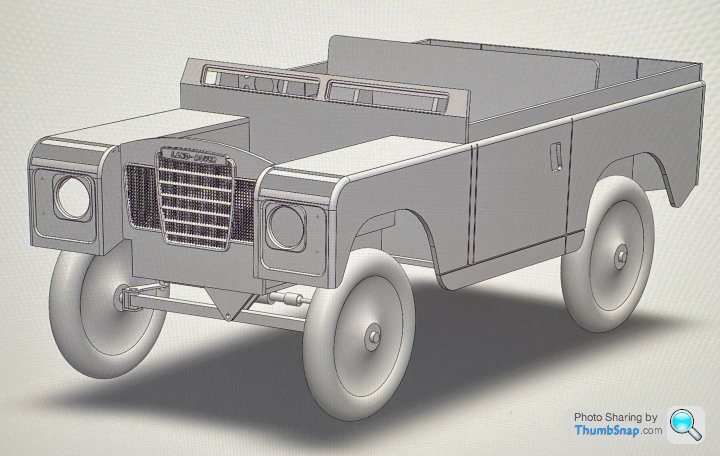
Cad coming along, mobility scooter motor packaged under the seat and think I have the steering geometry worked out with Ackerman, king pin inclination and castor for self alignment!

I think it will look much more like a real Landy for the slight panel imperfections, the real thing certainly isn’t perfect!
Cad coming along, mobility scooter motor packaged under the seat and think I have the steering geometry worked out with Ackerman, king pin inclination and castor for self alignment!
A little bit more progress last night.
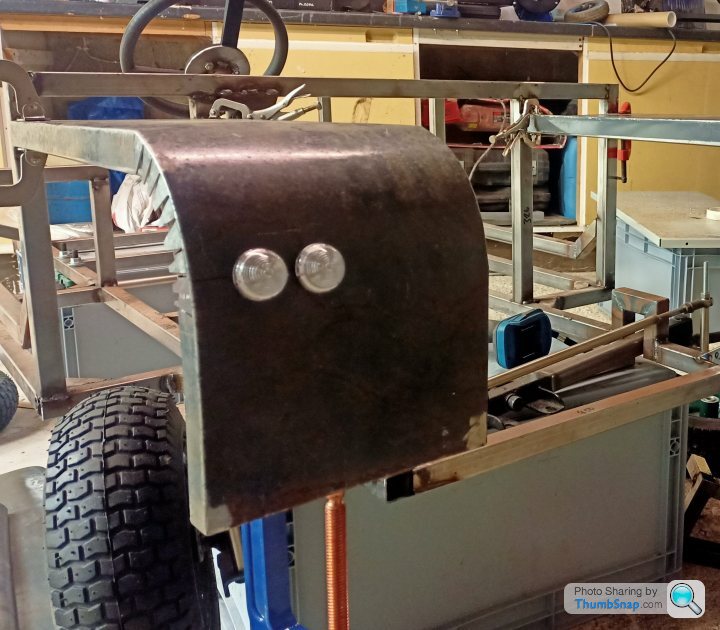
Cut indicator holes to fit £1 eurocarpart specials. The hydraulic tool makes light work of 0.8mm steel.
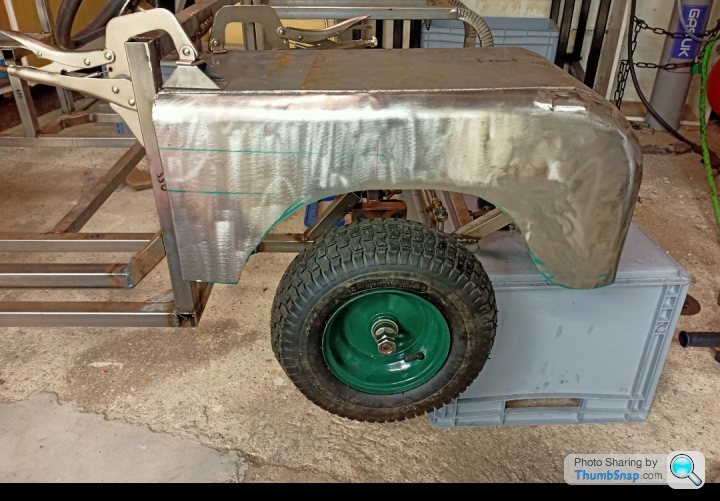
Started work making the rear panels up.

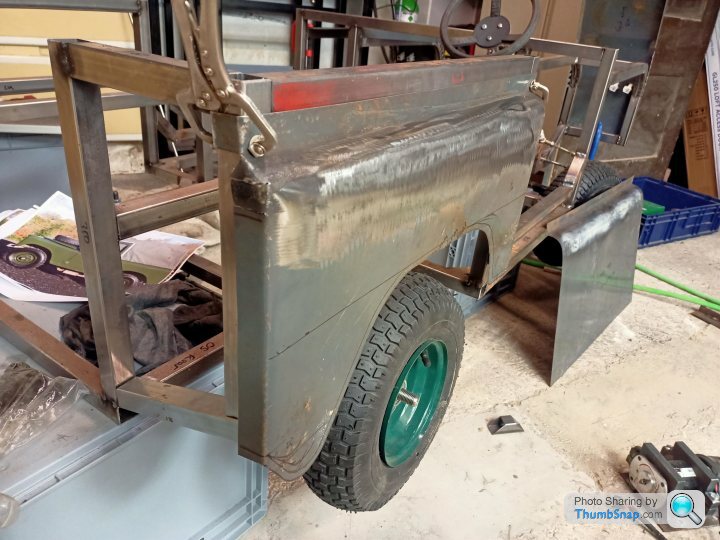
The returns have pulled the panel together nicely. I used the panel from the 40mm tool I had made previously. With some rivets it will hold a nice (enough) shape. I ran out of time to put the bottom wheel arch return lip on. I think I also need to lift up the front edge about 20mm, but need the door made to check that...
If I was doing the panel again, I would have put a 40mm deep straight at the top, so that I can overlap the aluminium cover piece (1" 90 angle). Rather than buy 1" Alu angle, i'll make that myself, so I can have a 30-35mm leg so it overlaps my panel. Or I could drop the upstands down by 1"...
Its starting to look like a thing now.
I have ordered a new large sprocket for the rear axle so I should get that in a week or so. That needs an adapter turned to mount to my axle. Better bring some nice nom nom into work to tempt the machinist.
Cut indicator holes to fit £1 eurocarpart specials. The hydraulic tool makes light work of 0.8mm steel.
Started work making the rear panels up.
The returns have pulled the panel together nicely. I used the panel from the 40mm tool I had made previously. With some rivets it will hold a nice (enough) shape. I ran out of time to put the bottom wheel arch return lip on. I think I also need to lift up the front edge about 20mm, but need the door made to check that...
If I was doing the panel again, I would have put a 40mm deep straight at the top, so that I can overlap the aluminium cover piece (1" 90 angle). Rather than buy 1" Alu angle, i'll make that myself, so I can have a 30-35mm leg so it overlaps my panel. Or I could drop the upstands down by 1"...
Its starting to look like a thing now.
I have ordered a new large sprocket for the rear axle so I should get that in a week or so. That needs an adapter turned to mount to my axle. Better bring some nice nom nom into work to tempt the machinist.
cobain said:
Cobain, great render, love that. Just a thought, I think you need much longer pieces of angle around the "tractor" swinging axle pivot. It looks like there's only a very small amount supported in the middle, and if one wheel goes into a pothole or similar, things are going to bend. You need a good 6" or so supported in the middle with the axle sliding between two longer vertical faces to give it some additional support. Have a nosey at my TL thread if you need pics.That’s looking great Jon, those rear panels look the part. Without sounding rude you can see your panel work skills improving through the build thread!
Hard Drive thanks for the heads up but don’t worry that’s just a filler to set the axle in the right place in CAD so I could get the geometry right etc. and package the rack. I will probably do the real thing in 2D CAD and get it laser cut.
First dabble with 3D printing, I have copied the full size, scaled by half and sent off for printing, fingers crossed!
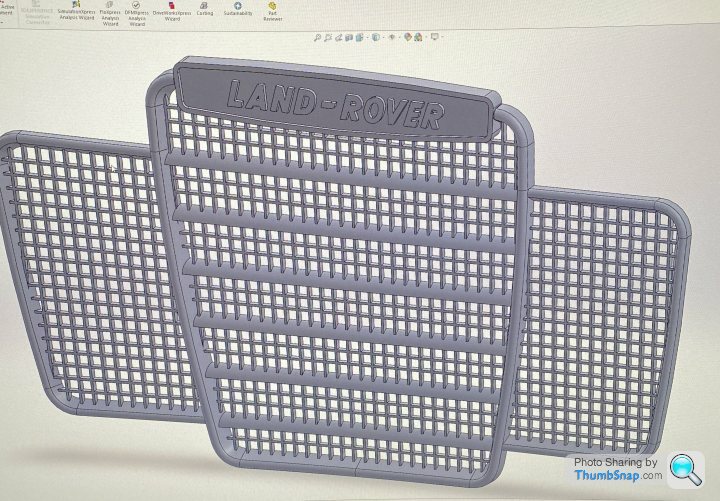
Finishes it off nicely. Also getting a few other bits printed if it goes well.
Hard Drive thanks for the heads up but don’t worry that’s just a filler to set the axle in the right place in CAD so I could get the geometry right etc. and package the rack. I will probably do the real thing in 2D CAD and get it laser cut.
First dabble with 3D printing, I have copied the full size, scaled by half and sent off for printing, fingers crossed!
Finishes it off nicely. Also getting a few other bits printed if it goes well.
Just got in from the garage. One door panel skin done.

I used angle iron to hammer form the edge round on itself. Get a nice 90 on it, but keep checking your angle iron isn't wondering down the panel. Little pen marks help
Some little finishing touches with some cold chisel
Wolah!
I think the real doors are similar with the edges folded around on themselves.
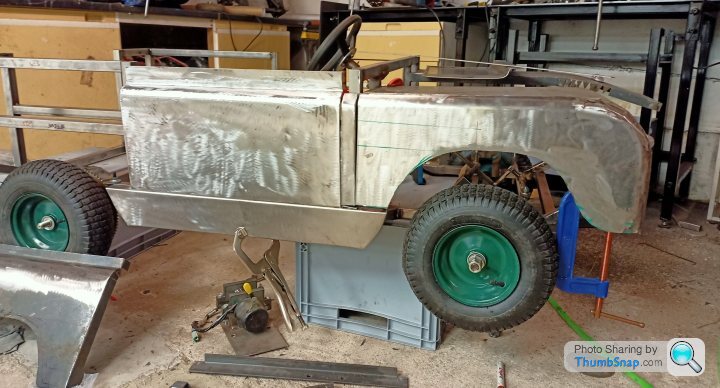
I couldn't resist a fake test fit. Many many issues and alignment to sort but it's looking more like a thing. Bodywork guys, please look away now and don't kill me too hard. Forgive my sins, for I have never done this before.
The b pillar piece needs shrinking in half to get everything in the right sort of place. Easier to start with the fresh piece. Good job I'd already made two up to the original size! The rear panel needs trimming on the front edge, and perhaps the whole cutout needs shifting up a bit.
Still enjoying it..
I used angle iron to hammer form the edge round on itself. Get a nice 90 on it, but keep checking your angle iron isn't wondering down the panel. Little pen marks help
Some little finishing touches with some cold chisel
Wolah!
I think the real doors are similar with the edges folded around on themselves.
I couldn't resist a fake test fit. Many many issues and alignment to sort but it's looking more like a thing. Bodywork guys, please look away now and don't kill me too hard. Forgive my sins, for I have never done this before.
The b pillar piece needs shrinking in half to get everything in the right sort of place. Easier to start with the fresh piece. Good job I'd already made two up to the original size!
The rear panel needs trimming on the front edge, and perhaps the whole cutout needs shifting up a bit.Still enjoying it..
Looking good Jon, those wheels look a lot better than I was expecting. You see a few Toylanders which are out of scale on the wheels and it lets the rest of the build down.
I had four of the toylander "town and country" wheels turn up yesterday and the are lovely, good size and without the sprockets just under £200 for a set of four. They even come in limestone so worth considering.
Don't worry too much about panel alignment, I worked at JLR for a few years and on a tour of Soihull was pleased to see that even on a new Range Rover they still rely on a man hanging all his body weight off an open door to adjust the alignment before giving it a good few slams!
Thank you very much for the offer on the printing. Off the top of my head the grille was around £50 in nylon and the little bases for under the lights we £1 each which I thought was pretty reasonable.

Sounds familiar to my visits to Solihull. Taking the exact measurement report of the supposedly bad fitting part with me, only to find the part that it mated to was in completely the wrong position. Whatever gets fitted last must be the problem... 

I remember another visit to a premium UK car maker. We were being shown around the facility and about 3 guys were pushing a car onto a 2 poster ramp. It was the rework ramp, so presumably needed something retrofitting, repairing etc. So they push it on the ramp with one guy pushing on the A pillar with the door open and a couple at the back. You guessed it, the open door makes fairly heavy contact with the 2 poster ramp pillars. Doh! Good job it was in the right place for some more rework
I made a bit more progress last night. I made up another door panel and made this one about 2mm narrower as one side of the chassis is slightly narrower.
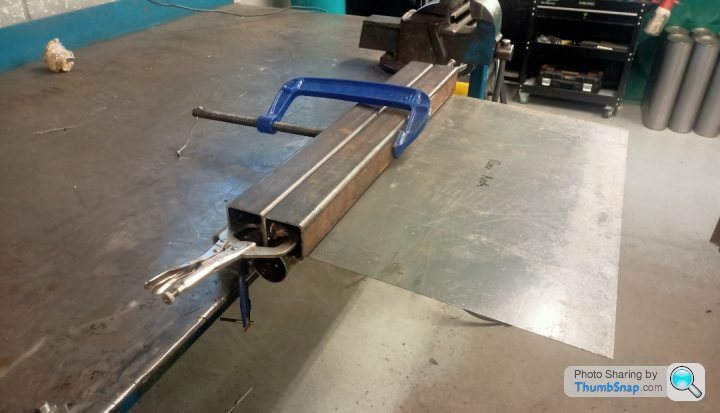
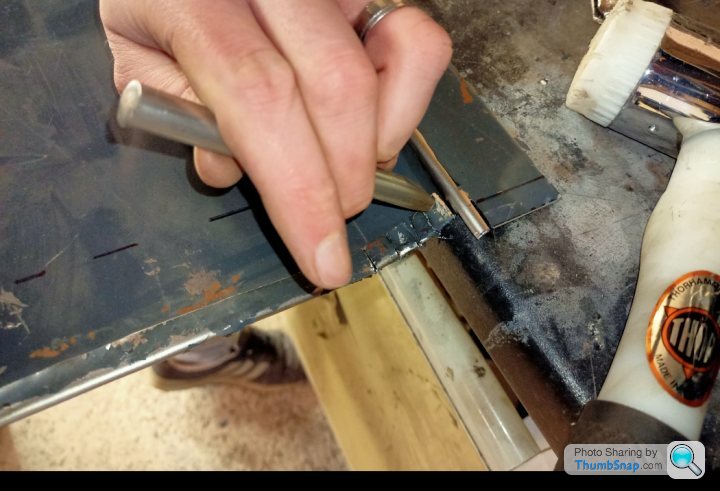
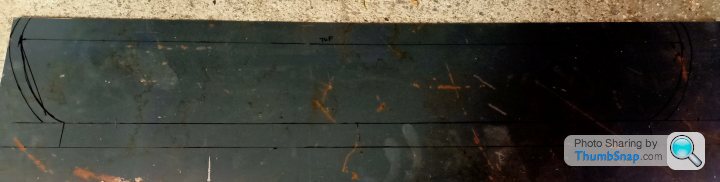
I also started on the sill panel. Start off with some offcut, drawing an approximate shape, leaving a 25mm return on the top and bottom. On the sides, the return is 10mm as this will eventually blend into the wheel arch returns which I want at about 10mm. Also because you are trying to lose material in this area you want it as small as possible;
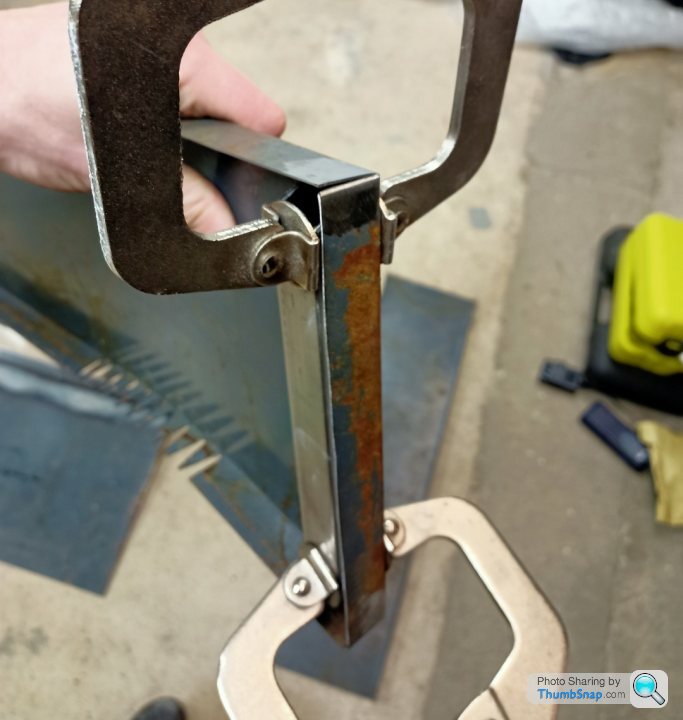
Cut that out with a disc cutter and then form the upper and lower 25mm returns using the angle iron trick shown before. Normally you would do these on a folder, but I don't have one at home.
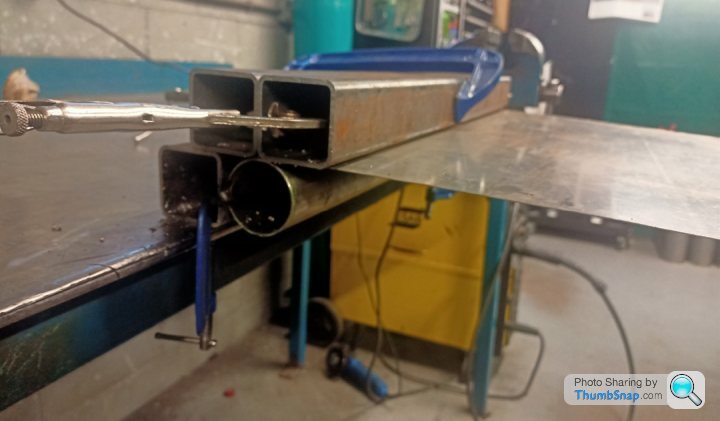
Create a quick 3mm edge to form the side returns on. A carefree quality attitude meant I could use the same tool to do the front and rear edge;
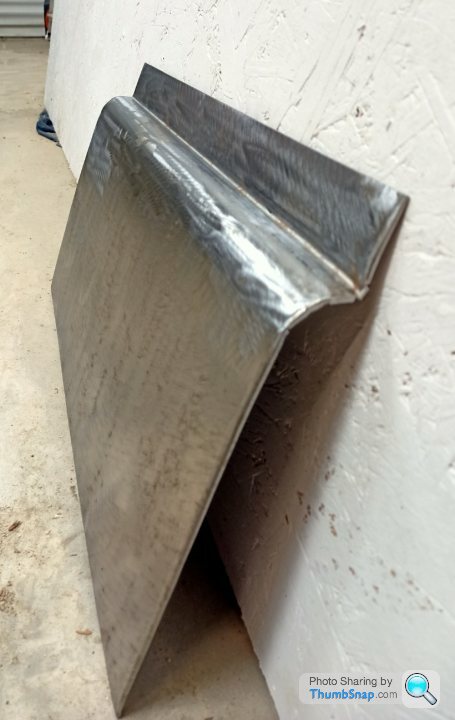
As you hammer the return on and you need to shrink the metal to stop it bunching. In doing this, you end up curving the panel as you are failing to lose the material. So a bit of back and forth, prioritising the face of the panel and accepting the return will be what it is, gets you this;
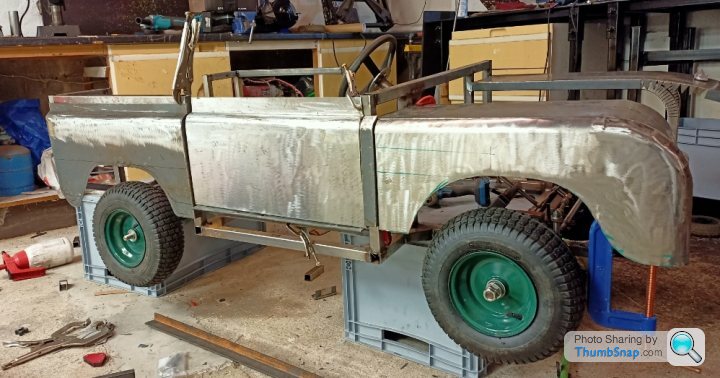
Then a trail fit at about 11pm last night when you are knackered results in this:
I had to remove the rear quarter panel because I hadn't trimmed that back to suit yet. It will fit up better in real life, but I don't have any mounting points set yet, so you can see various packers and I was running out of clamps/magnets/suitable clamping points.
The sill panel is a bit deep compared to the real thing, but this is the path I ended up down. Mainly due to the starting from the front wing panel. You make a mistake there and you carry it to the door, that gets carried to the rear quarter. I can live with it!
Still on target for their 17th birthday. I've got 12 years to go, or 14 if I want to be fair to the young one.
I remember another visit to a premium UK car maker. We were being shown around the facility and about 3 guys were pushing a car onto a 2 poster ramp. It was the rework ramp, so presumably needed something retrofitting, repairing etc. So they push it on the ramp with one guy pushing on the A pillar with the door open and a couple at the back. You guessed it, the open door makes fairly heavy contact with the 2 poster ramp pillars. Doh! Good job it was in the right place for some more rework
I made a bit more progress last night. I made up another door panel and made this one about 2mm narrower as one side of the chassis is slightly narrower.
I also started on the sill panel. Start off with some offcut, drawing an approximate shape, leaving a 25mm return on the top and bottom. On the sides, the return is 10mm as this will eventually blend into the wheel arch returns which I want at about 10mm. Also because you are trying to lose material in this area you want it as small as possible;
Cut that out with a disc cutter and then form the upper and lower 25mm returns using the angle iron trick shown before. Normally you would do these on a folder, but I don't have one at home.
Create a quick 3mm edge to form the side returns on. A carefree quality attitude meant I could use the same tool to do the front and rear edge;
As you hammer the return on and you need to shrink the metal to stop it bunching. In doing this, you end up curving the panel as you are failing to lose the material. So a bit of back and forth, prioritising the face of the panel and accepting the return will be what it is, gets you this;
Then a trail fit at about 11pm last night when you are knackered results in this:
I had to remove the rear quarter panel because I hadn't trimmed that back to suit yet. It will fit up better in real life, but I don't have any mounting points set yet, so you can see various packers and I was running out of clamps/magnets/suitable clamping points.
The sill panel is a bit deep compared to the real thing, but this is the path I ended up down. Mainly due to the starting from the front wing panel. You make a mistake there and you carry it to the door, that gets carried to the rear quarter. I can live with it!
Still on target for their 17th birthday. I've got 12 years to go, or 14 if I want to be fair to the young one.
Gassing Station | Scale Models | Top of Page | What's New | My Stuff