GB: Academy : DR_GN
Discussion


Here's the look I'm aiming for with the flaps down, elevators drooped.
As yet I've not found a picture of a Tempest with the pilot's door/flap open. I've got some pics of pilots climbing out *over* the cockpit side, but not through the side flap. Presumably it did actually open? Judging by the tiny size of the cockpit opening I can't see much point in going OTT with cockpit detailling.
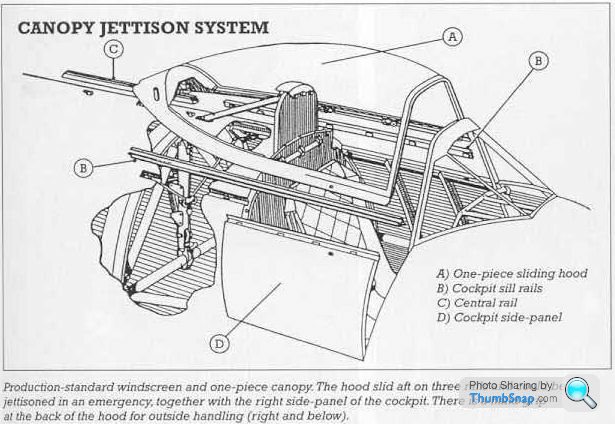
From all the sorting out I've done with my Tiffie so far it seems that after the Typhoon 1B when the sliding canopy appeared the doors fell out of use
The Flight cockpit diagram for the Typhoon shows a sliding hood, but I cannot yet see any actual evidence that the door opened from that point
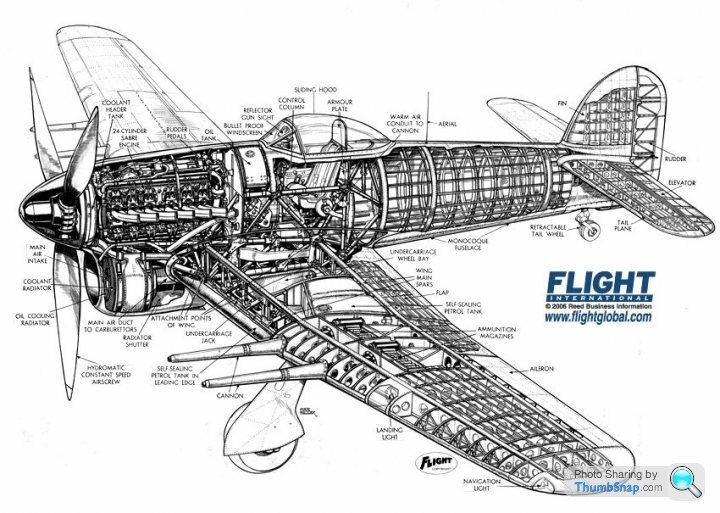
Then, just to over complicate matters a photo for the cockpit interior shows what could just be a door but shows no sign of an opening handle

Mine will be of the doored variety to eliminate all doubt

The Flight cockpit diagram for the Typhoon shows a sliding hood, but I cannot yet see any actual evidence that the door opened from that point
Then, just to over complicate matters a photo for the cockpit interior shows what could just be a door but shows no sign of an opening handle
Mine will be of the doored variety to eliminate all doubt
perdu said:
From all the sorting out I've done with my Tiffie so far it seems that after the Typhoon 1B when the sliding canopy appeared the doors fell out of use
The Flight cockpit diagram for the Typhoon shows a sliding hood, but I cannot yet see any actual evidence that the door opened from that point
Then, just to over complicate matters a photo for the cockpit interior shows what could just be a door but shows no sign of an opening handle
Mine will be of the doored variety to eliminate all doubt
I think the 'doors' are actually not very easily removable panels. Reason I ask is if they are indeed inspection/access panels, then there's little point doing much cockpit detail since it will be mostly invisible.The Flight cockpit diagram for the Typhoon shows a sliding hood, but I cannot yet see any actual evidence that the door opened from that point
Then, just to over complicate matters a photo for the cockpit interior shows what could just be a door but shows no sign of an opening handle
Mine will be of the doored variety to eliminate all doubt
perdu said:
Yes I'd noticed that
basically green then blackish everywhere there's something to see
done a bit of Typhoon
I'll show this then butt out and get a new thread started to share the fun
if you don't want to see this G let me know and I'll pull it 'til my thread starts
Feel free to post here Perdu. Looking better than resin/photo etch already! Are you considering cutting the doors open on this one?basically green then blackish everywhere there's something to see
done a bit of Typhoon
I'll show this then butt out and get a new thread started to share the fun
if you don't want to see this G let me know and I'll pull it 'til my thread starts
Ah, caught me out now 
This is a decision I haven't made yet, the detail I've put in will "just about" be visible but to open it out there would need to be far more accuracy in my panel detailing...
It is a sleep on it type of job, but for a first model in twenty five or more years maybe I'm already there.
I took the bull by the horns this afternoon and went back to visit my old friends at the Brum IPMS.
And some of them even remembered me, as I walked in the door from back of the room.
"Blimey!"
made me feel quite good you know
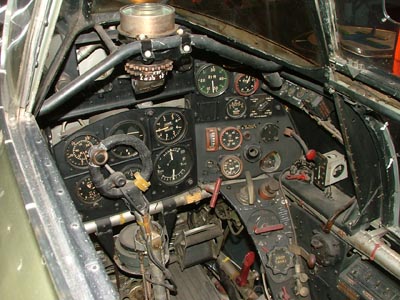
Instrument panel painted:
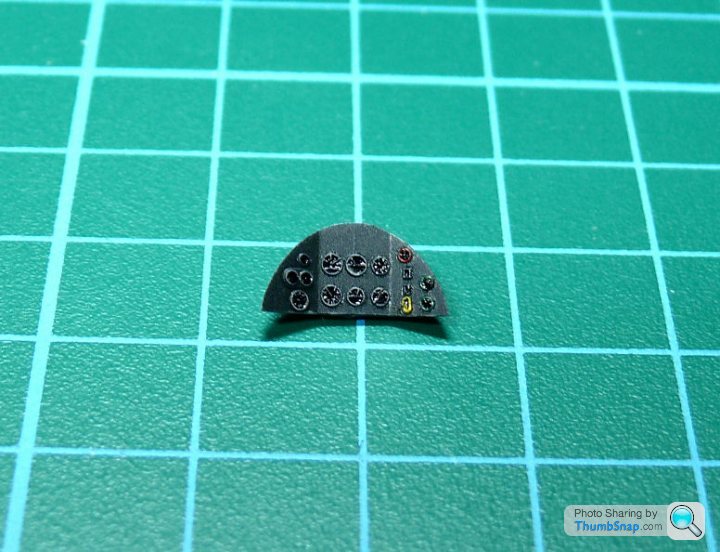
Can't help thinking it would be better as a decal. Anyway it's heading for the bin because I think I might get a full cockpit detail kit after all. For 1:72, I can't see any other way of getting the same detail as resin within a sensible timeframe. Plus now I know I can display it with the emergency door removed, it makes more sense. Kind of.
Can't help thinking it would be better as a decal. Anyway it's heading for the bin because I think I might get a full cockpit detail kit after all. For 1:72, I can't see any other way of getting the same detail as resin within a sensible timeframe. Plus now I know I can display it with the emergency door removed, it makes more sense. Kind of.
optimist
Sorta scary what they miss out isnt it
I'm building a roughly -ish right panel and controls for my Tiffie but I wont have the door open
I am still considering opening the separate canopy door though
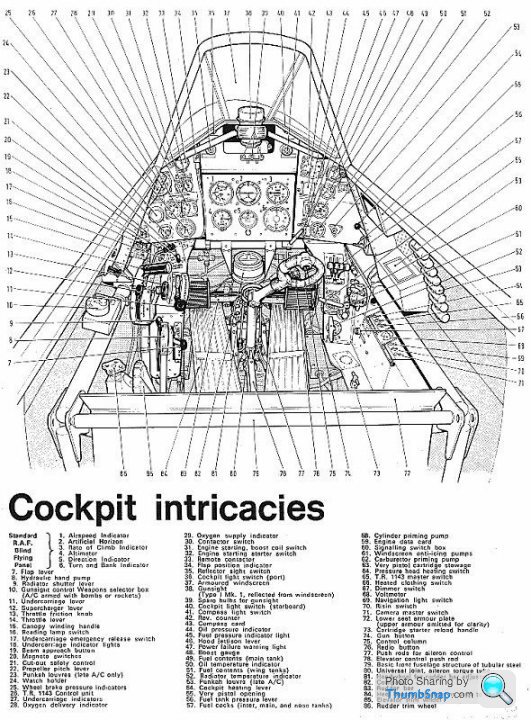
I'd consider using that one but make the "blind flying panel" separate with scored detail and such
the panel really was a basically standard shape across the range of aircraft
have you seen this picture it may help you with this bit
Anyway I would work that one up
1/72 doesn't pay back major reworks I found/find
I'll start putting my efforts up for critique tomorrow but I doubt it will be finished any time soon
Sorta scary what they miss out isnt it
I'm building a roughly -ish right panel and controls for my Tiffie but I wont have the door open
I am still considering opening the separate canopy door though
I'd consider using that one but make the "blind flying panel" separate with scored detail and such
the panel really was a basically standard shape across the range of aircraft
have you seen this picture it may help you with this bit
Anyway I would work that one up
1/72 doesn't pay back major reworks I found/find
I'll start putting my efforts up for critique tomorrow but I doubt it will be finished any time soon
perdu said:
optimist
Sorta scary what they miss out isnt it
I'm building a roughly -ish right panel and controls for my Tiffie but I wont have the door open
I am still considering opening the separate canopy door though
I'd consider using that one but make the "blind flying panel" separate with scored detail and such
the panel really was a basically standard shape across the range of aircraft
have you seen this picture it may help you with this bit
Anyway I would work that one up
1/72 doesn't pay back major reworks I found/find
I'll start putting my efforts up for critique tomorrow but I doubt it will be finished any time soon
MMM still finding my way with 1:72. Many ways more difficult than 1:32. Anyhow it's meant to be a learning exercise, and I've never tried resin before. Guess in terms of cockpit detailling it's not really 'modelling', just 'painting' mostly? It's like taking the 2 or so months of work that went into bodge-building the Bf109 cockpit, and replacing all the individual details with one massive lump of stuff?Sorta scary what they miss out isnt it
I'm building a roughly -ish right panel and controls for my Tiffie but I wont have the door open
I am still considering opening the separate canopy door though
I'd consider using that one but make the "blind flying panel" separate with scored detail and such
the panel really was a basically standard shape across the range of aircraft
have you seen this picture it may help you with this bit
Anyway I would work that one up
1/72 doesn't pay back major reworks I found/find
I'll start putting my efforts up for critique tomorrow but I doubt it will be finished any time soon
We shall see.
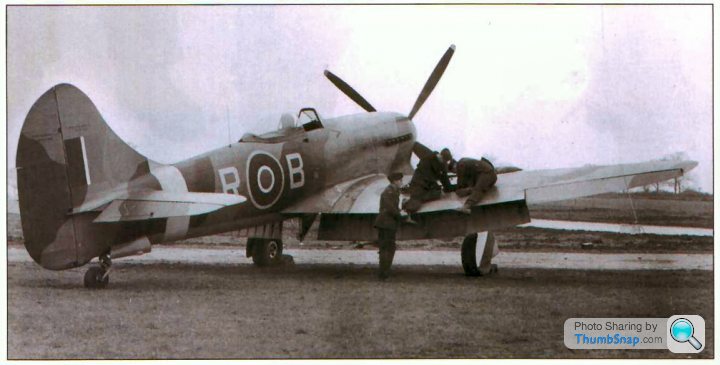
I thought your Tempest had a car door type arrangement?
Eric Mc said:
In 1/72, the effort to super detail cockpits is not that rewarding - although some do like to do it all the same. I tend to just want to add whatever detail is necessary to take any "bare look" off the interior.
I think if it's a cse of bodging a few lumps of resin in there, for the sake of £10 - why not?The things you can actually see well, like the seat and belts, do look considerably better than the original kit items.
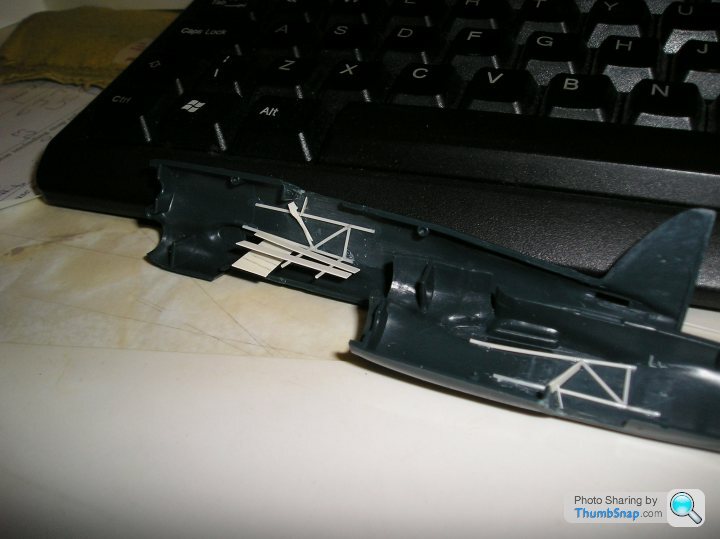
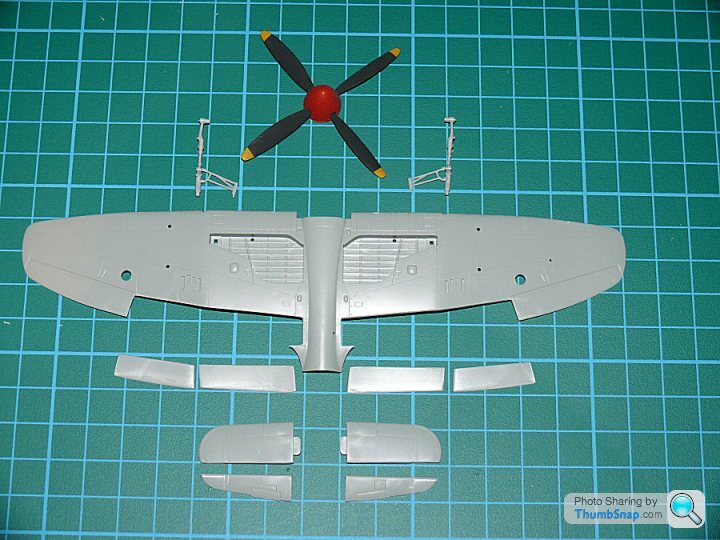
Ho well, slow progress tonight. Cut the flaps off (ouch) and elevators. U/C legs partially assembled too:
Also repaired / bodged / filled the Airfix Tractor and bomb trolley, and sprayed it RAF blue. Bizzarre Humbrol colour that: you can watch it dry from gloss to matt when wafted with a hirdryer, but when you tough it it's still moist. Takes another 8 hours or so in a warm room to cure. Wierd - I'm positive that matt enamels didin't take so long to dry in the good old days.
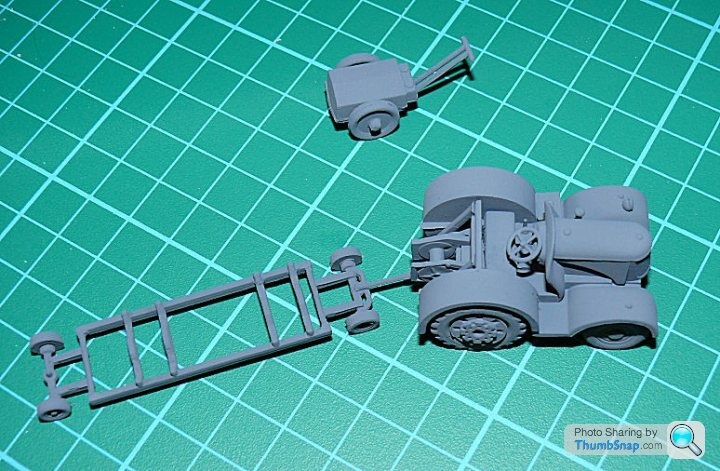
Also repaired / bodged / filled the Airfix Tractor and bomb trolley, and sprayed it RAF blue. Bizzarre Humbrol colour that: you can watch it dry from gloss to matt when wafted with a hirdryer, but when you tough it it's still moist. Takes another 8 hours or so in a warm room to cure. Wierd - I'm positive that matt enamels didin't take so long to dry in the good old days.
Ah...
I hoped that was a primer colour
the actual war time colour is much darker blue than that looks to me
It could easily be a problem with the colour and hue on my monitor but in honesty I've not seen any similar differences
The blue I am thinking of is more like the old Airfix Blue they advised for the tractor in the Stirling kit.
RAF Blue Grey however which was a post war colour mainly, I think is easily looked up as it is a proper Britsih Standards colour (was that BS 381? Kinda think it was)
Any way, the flaps are cut out nicely, a tad traumatic was it? I can imagine, looking at the underfuselage sections where you have to extract from a closed area. Nasty
Omigod those U/C legs are a tad dainty aren't they, too?
but this is looking very nice (blimey I wish dear old Frog had used a simple light grey styrene to mould in) I'm enjoying watching you guys getting down to this
Cheers
perdu said:
Ah...
I hoped that was a primer colour
the actual war time colour is much darker blue than that looks to me
It could easily be a problem with the colour and hue on my monitor but in honesty I've not seen any similar differences
The blue I am thinking of is more like the old Airfix Blue they advised for the tractor in the Stirling kit.
RAF Blue Grey however which was a post war colour mainly, I think is easily looked up as it is a proper Britsih Standards colour (was that BS 381? Kinda think it was)
Huh. What a pisser. It's definitely lighter than it was originally painted by me years ago.I hoped that was a primer colour
the actual war time colour is much darker blue than that looks to me
It could easily be a problem with the colour and hue on my monitor but in honesty I've not seen any similar differences
The blue I am thinking of is more like the old Airfix Blue they advised for the tractor in the Stirling kit.
RAF Blue Grey however which was a post war colour mainly, I think is easily looked up as it is a proper Britsih Standards colour (was that BS 381? Kinda think it was)
I looked at the Airfix Refuelling Set in the shop to see what blue the refuelling tender was (was the same as the tractor back in the day) and it said Humbrol 96 "RAF Blue", so I bought it and merrily re-painted everything. No big deal to redo it, but I painted my 'Walrus' crane the same colour! (and I aint redoing that).
Typical bloody Airfix d
 heads.
 Ah well, put that down to experience

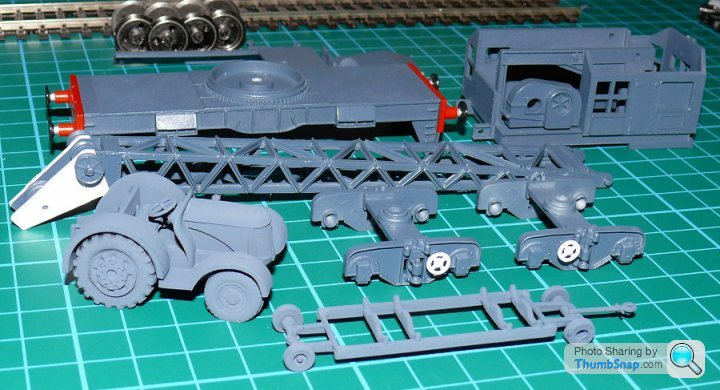
ETA, luckily it darkens after a couple of coats of Klear, and will darken more after a dark wash and satin varnish presumably (the crane's been "Kleared", the tractor hasn't):
Edited by dr_gn on Wednesday 19th January 00:26
Gassing Station | Scale Models | Top of Page | What's New | My Stuff