GB: Academy : DR_GN
Discussion


There was an article in the UK IPMS magazine a few months back which outlined wartime RAF vehicle colours. They were mostly in Army camouflage shades of khaki or sand (depending on theatre of operations). Some vehicles were blue but most weren't.
Here's one of the well known Charles Brown colour photos of the bomb trolley - which was probably the inspiration for Airfix including it with the Stirling -

Here's one of the well known Charles Brown colour photos of the bomb trolley - which was probably the inspiration for Airfix including it with the Stirling -
Edited by Eric Mc on Wednesday 19th January 08:09
dr_gn said:
..It's definitely lighter than it was originally painted by me years ago.
..I'm positive that matt enamels didin't take so long to dry in the good old days.
At the risk of statin' the bleedin' obvious, did you stir it properly?..I'm positive that matt enamels didin't take so long to dry in the good old days.
Edited by pacman1 on Wednesday 19th January 08:29
pacman1 said:
dr_gn said:
..It's definitely lighter than it was originally painted by me years ago.
..I'm positive that matt enamels didin't take so long to dry in the good old days.
At the risk of statin' the bleedin' obvious, did you stir it properly?..I'm positive that matt enamels didin't take so long to dry in the good old days.
Edited by pacman1 on Wednesday 19th January 08:29
Mr. Potato Head said:
dr_gn said:
Instrument panel painted:
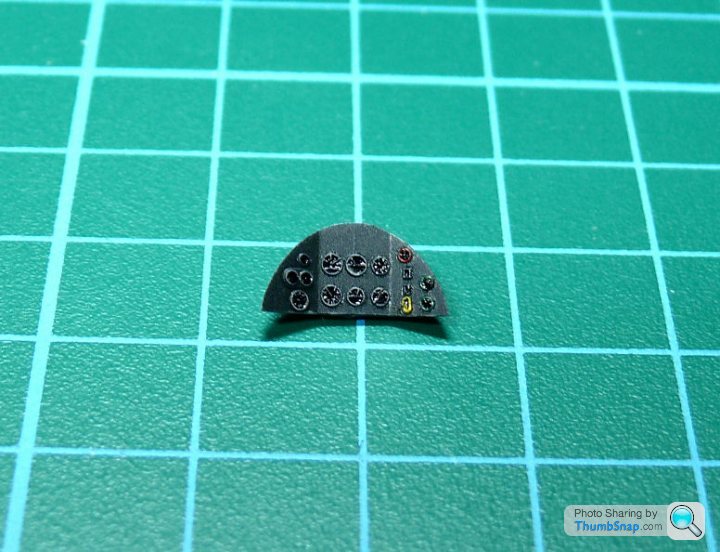
Did you paint the instrements with a brush? I had a go at mine last night, doesn't look anywhere near as good as that!1) Started by spraying it with Tamiya NATO Black.
2) Then dotted some (very lightly shaken) Vallejo Air 'Black' into the instrument centres with a cocktail stick.
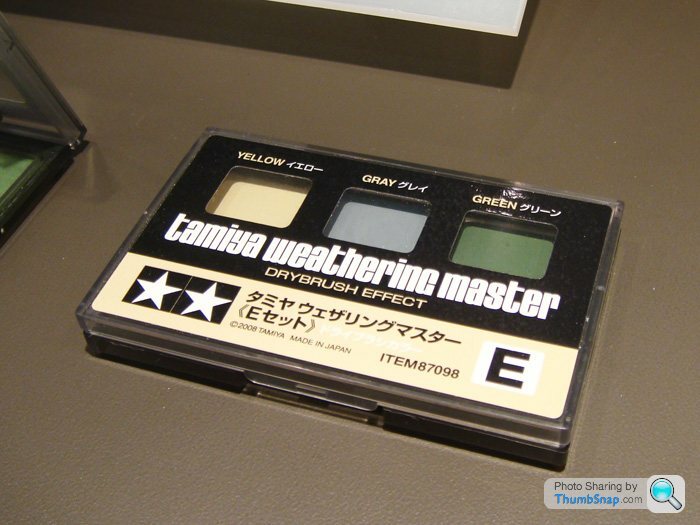
3) Then very lightly brushed it over with Tamiya "Weathering Master" powder (White). This brings out the bezels and markings, and is way easier than dry brushing.
4) Then dotted around the red/green/yellow bezels with a cocktail stick.
5) Then dotted johnsons Klear around the panel (not instrument centres). Capillary action helps here.
6) Finally dotted the instrument glasses with Revell Gloss varnish.

Eric Mc said:
Makes note to myself - that Tamiya White Powder sounds like good stuff.
Oh yeahhh 
I'm experimenting with the Tamiya 'mascara' sets instead of dry brushing liquid paint. I always seem to get it too wet or too dry with paint, and it's a pain in the arse. With powders its dry, and consistent to start with, so it removes a variable.
I've got 3 Tamiya sets, that's 9 colours, and you can mix them to get different effects.
pacman1 said:
Eric Mc said:
Makes note to myself - that Tamiya White Powder sounds like good stuff.
How does it work then? Would chalk be as effective, or is it more like fingerprint dust?
It's almost a substitiute for airbrushing weathering, and less messy and permanent.
Eric Mc said:
Maybe a surrepticous trip to Boots might be in order. I could always send my wife in on an undercover operation.
I've heard that Max Factor supplies camouflage make-up to the Army.
TrueI've heard that Max Factor supplies camouflage make-up to the Army.
Edited by Eric Mc on Wednesday 19th January 12:44
It used to be in dark green squeezy bottles in the seventies.
Where did that modelmascara come from doc, I went into Brum today seeking supplies and found the totally crappiest "model shop" on the planet.
Staff who knew nothing and didn't listen to the old duffer asking the questions
Didn't even have colour charts available
(They did have two Tempest kits on the shelf but I think I have enough on hand without joining the GB this time around)
You and Eric will be able to point out the best internet traders I hope.
I did leave Modelzone with a pack of Millput, a bottle of Testors MEK type liquid and a "packet"? of Revell Aqua color no 361-67 grungrau in the vague hope it will look enough like cockpit green grey to use on my Tiffie...

NO COLOUR CHARTS in a model paint section, are these people MAD?
The said model emporium's spotty oik actually told me I would be better to buy "stuff" on t'internet than expect to find it in a model shop!

perdu said:
Eric Mc said:
Maybe a surrepticous trip to Boots might be in order. I could always send my wife in on an undercover operation.
I've heard that Max Factor supplies camouflage make-up to the Army.
TrueI've heard that Max Factor supplies camouflage make-up to the Army.
Edited by Eric Mc on Wednesday 19th January 12:44
It used to be in dark green squeezy bottles in the seventies.
Where did that modelmascara come from doc, I went into Brum today seeking supplies and found the totally crappiest "model shop" on the planet.
Staff who knew nothing and didn't listen to the old duffer asking the questions
Didn't even have colour charts available
(They did have two Tempest kits on the shelf but I think I have enough on hand without joining the GB this time around)
You and Eric will be able to point out the best internet traders I hope.
I did leave Modelzone with a pack of Millput, a bottle of Testors MEK type liquid and a "packet"? of Revell Aqua color no 361-67 grungrau in the vague hope it will look enough like cockpit green grey to use on my Tiffie...
NO COLOUR CHARTS in a model paint section, are these people MAD?
The said model emporium's spotty oik actually told me I would be better to buy "stuff" on t'internet than expect to find it in a model shop!
I found Revell Aqua Colour Ok...so long as you could persuade it to stay stuck to the surface you painted. It does seem prone to peeling when you remopve masking tape for example, so beware!
There are paint charts online I think.
Tonights fun:
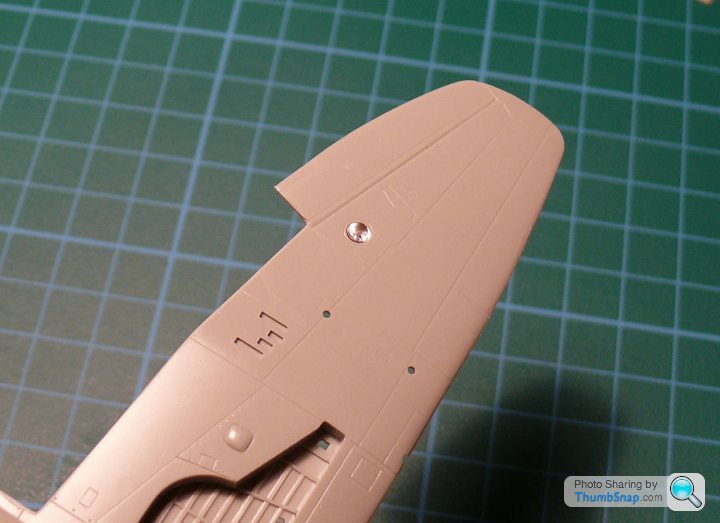
Installed lenses into wings with tin foil over the top to represent reflectors:
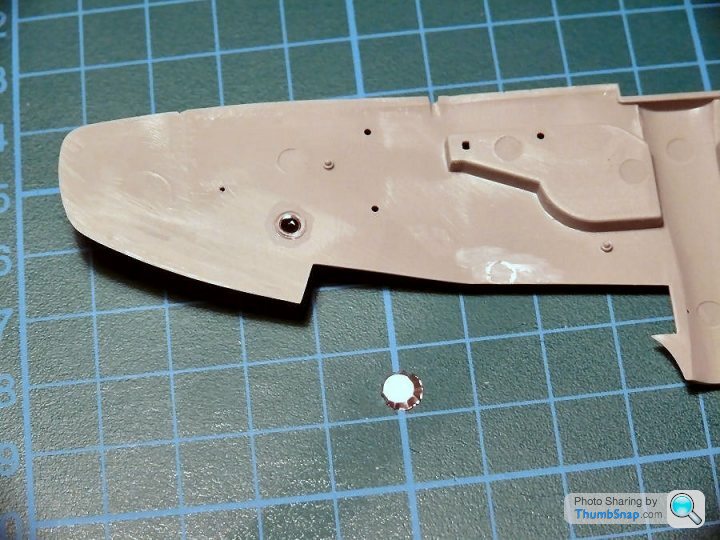
Then a dab of Araldite on top before glueing the wings together (don't want the lenses popping out when I press the masking tape onto them!
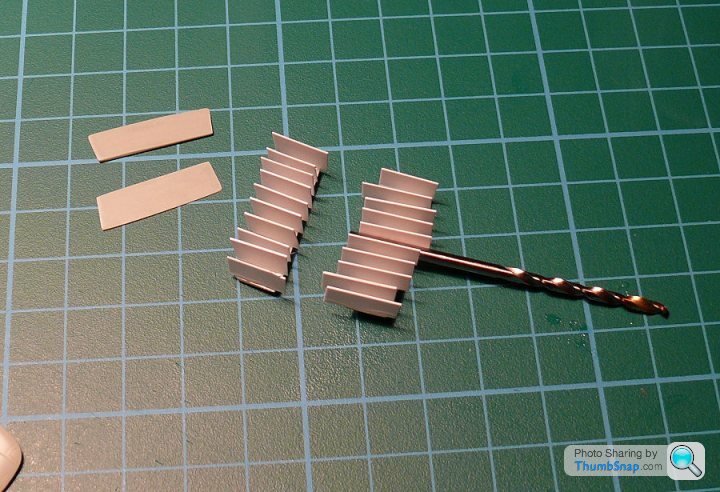
Then the riblets on the inner faces of the flaps. Tricky. Settled on sticking oversized plasticard 'plates' in the correct positions (spaced accurately by using a twist drill as a jig):
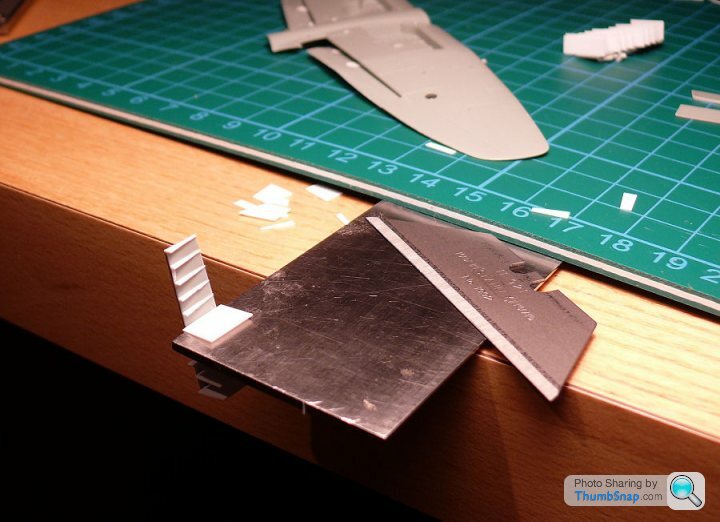
Then the plates were chopped to the right length and angle with a razor on a platten (formed by a hefty steel rule trapped under my cutting mat):
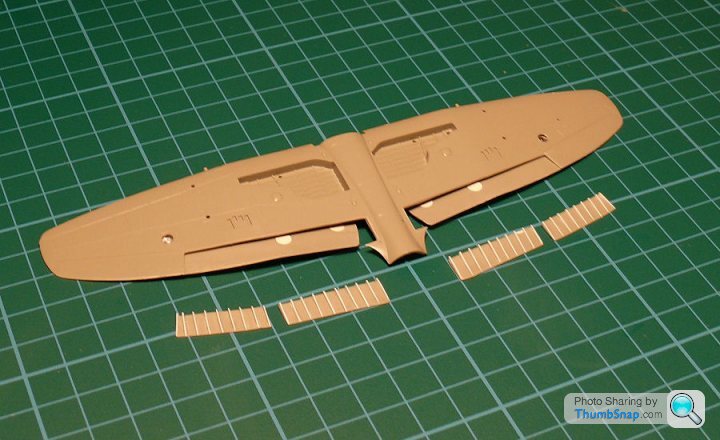
Then sanded on a block to finally get all the ribs the same size and angle:
Of course all that could have been avaoided by buying the ready made resin set, but where's the fun in that?
They just neeed the torque tubes fitting to their inner edges, and a few stiffeneres followed by a coat of Mr. Surfacer 1200 to blend all the joints.
Installed lenses into wings with tin foil over the top to represent reflectors:
Then a dab of Araldite on top before glueing the wings together (don't want the lenses popping out when I press the masking tape onto them!
Then the riblets on the inner faces of the flaps. Tricky. Settled on sticking oversized plasticard 'plates' in the correct positions (spaced accurately by using a twist drill as a jig):
Then the plates were chopped to the right length and angle with a razor on a platten (formed by a hefty steel rule trapped under my cutting mat):
Then sanded on a block to finally get all the ribs the same size and angle:
Of course all that could have been avaoided by buying the ready made resin set, but where's the fun in that?
They just neeed the torque tubes fitting to their inner edges, and a few stiffeneres followed by a coat of Mr. Surfacer 1200 to blend all the joints.

Nick_F said:
I think I might look again at that comprehensive resin set and see how well it works.
Mine arrived today. Many of the parts are - honestly - invisible to me, never mind assembling them, I can't even see them. The sidewall and seat castings are brilliant though, and are worth £10 alone IMO.Gassing Station | Scale Models | Top of Page | What's New | My Stuff