Mazda MX5 NC mk3.5 / 3.75 door lock actuator replacement
Discussion


Hi everyone,
my driver's side door lock started playing up recently (intermittently wouldn't lock or unlock, which became worse over time).
I couldn't find a thread online with a photo how-to guide, so thought I'd post up some photos on here.
Part number from Mazda was NF04-58-310J for the right (UK driver side) door lock actuator. Cost was £146 all in from the main dealer. The passenger side has a slightly different part number.
You'll need about 2 hours start to finish working at a gentle pace, phillips screw driver, 10mm socket, extender bars and universal joint adaptor.
Step one:
Before you start, you may wish to disconnect the car battery. When you disconnect the old door lock lock actuator, it makes the central locking go into a frenzy on the passenger door (hence the decision to disconnect the battery). I didn't lose my stereo code, though the trip computer and radio station presets reset. Also note, that when you disconnect the battery, your car will need to relearn to idle, and you may get a traction control/ DSC/ VSC fault light. To get the car to re learn to idle, you can start the car and leave it for half an hour, or just drive it. It can feel alarming with the revs often dropping to about 500rpm, but the car never stalled on me, and after 20 miles it was back to normal. Regarding the DSC/VSC, simply while stationary take the car from full left lock to right lock a couple of times for the system to re-learn where centre is. You may then need to switch the car off and on and the light clears (see owners manual for details).
Before disconnecting the battery, decide whether you want to remove the window glass (see below for reasons). If you want to remove the glass, do this after door card removal, but before disconnecting the door lock actuator and the battery.
Door card removal: You need a phillips screw driver, and plastic tools for trim removal. There are three screws; one is visible in the cup-holder, one is behind the door handle, and one behind the arm grab.
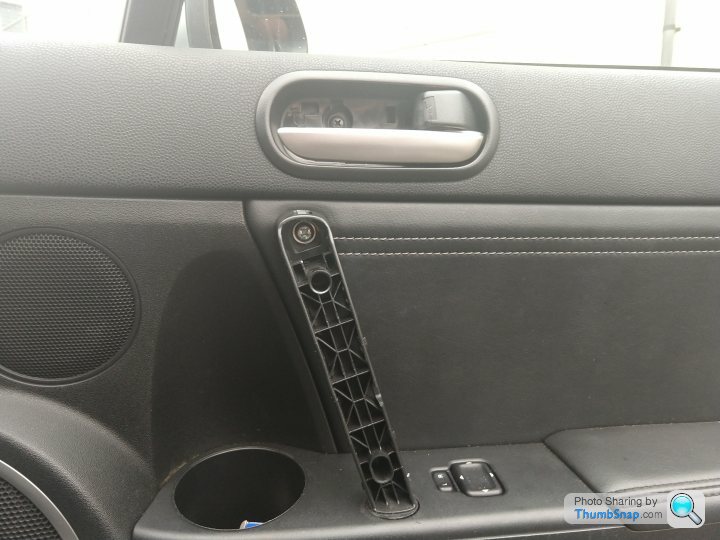
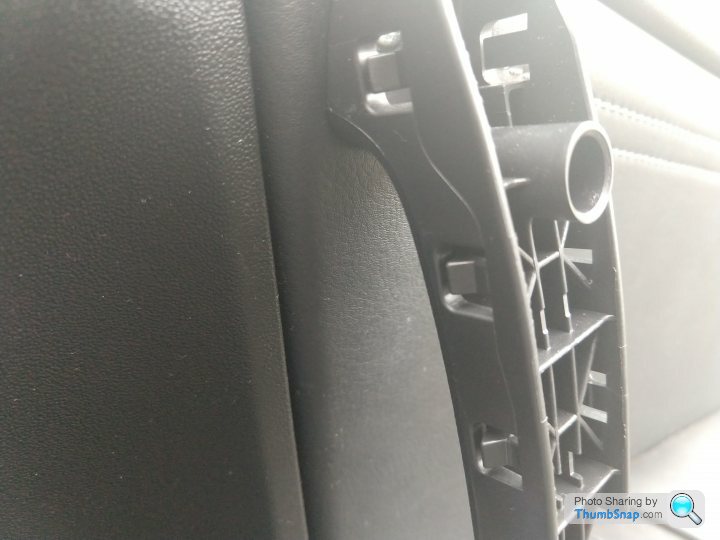
The plastic behind the door handle is thin and flexes an alarming amount before it pops out. Gently pull it from behind using a hook/ pick tool (or thin allen key in my case) from the door lock button end. The plastic covering the door grab is very stiff and required a lot of force to pull off. It's just plastic clips holding it on, so careful to not break anything (though one of my plastic tabs did break, but it re-assembled just fine).
Once you've got the plastic covers off and have taken out the three screws, you can then pull the door card off. Start at the back lower edge, and gently work your way round. The door card is held on by white plastic pop rivets. Miraculously, non of mine broke, but spares can be had for a few pounds on the internet if needed.
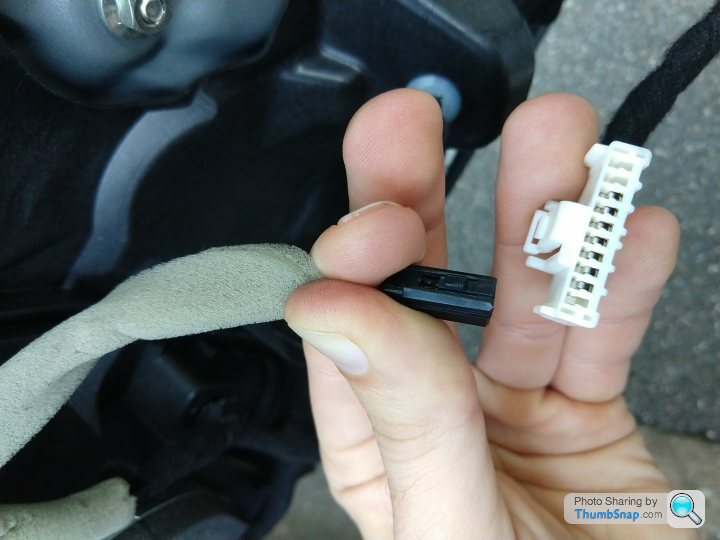
Once you've popped those off, there are 2 wires you need to unclip before you can pull the door card away (going to the tweeter and electric mirror controls). All of the wires have little tabs you have to press in before they can be disconnected. The little black one was very stiff and I used a thin flat blade screw driver to depress the tab while gently pulling it out. Try to pull the plastic rather than tugging the wire.
You'll also need to disconnect the two cables that go to the door handle and door lock using your hands or small needle nose pliers.
Step 2
You should now have the door card off. There's now about 10 10mm hex bolts to remove dotted around the black plastic inner panel. Go ahead and remove those.
There are also two plastic pop clips. which you can just pull the black plastic away from (pull the black plastic towards yourself away from the metal door skin). These plastic clips are indicated by the white arrows in the image below.
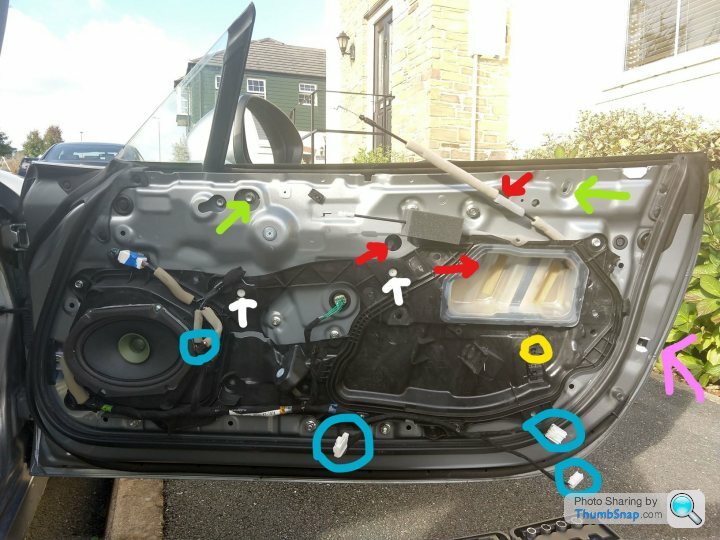
The blue circles show the 4 wires you need will disconnect during this process. Only the front two need to be removed to get the door card off. The rear two need to be disconnected to remove the door lock actuator.
Remove the phillips screw in the yellow circle, and the three phillips screws in the edge of the door (pink arrow).
The big white plastic box can be peeled away. It's held on by a sticky black goo. I did not remove this all the way, and the black goo was sticky enough to be re-usable. Try not to peel it too much as it is probably there for waterproofing.
Next step may vary: I chose to remove the window glass (not a hard job) to make access easier, though it should be possible to do it with the glass in place. There is one 10mm hex bolt holding the anti-theft metal plate in the upper rear part of the door (just behind the exterior door handle). You can either try to feel for it using a extension bar and flex head tool through the access hatch in the white plastic, or, you can see what you're doing from above if you've removed the glass.
To remove the window glass, you'll need to remove 5 10mm hex bolts. Two are shown by the green arrows; these are the window limit stops which are adjustable. If your window seals well at the moment, mark using tippex or similar where the bolts fit at the moment. Or if your windows leak, it's a good chance to fiddle with adjustment when you re-assemble.
The 3 remaining bolts can be accessed through the holes shown in the red arrows (one is behind the white plastic). You may need to lower the window a little bit for the bolts to align with the holes. Do this before disconnecting the battery if you want to remove the glass.
Once those bolts are out, you can carefully pull the window out of the door.
The image below shows the bolt you need to remove looking at it from above through the whole where the window glass used to be. You can also see one of the rods you need to pop out (just pulls out).
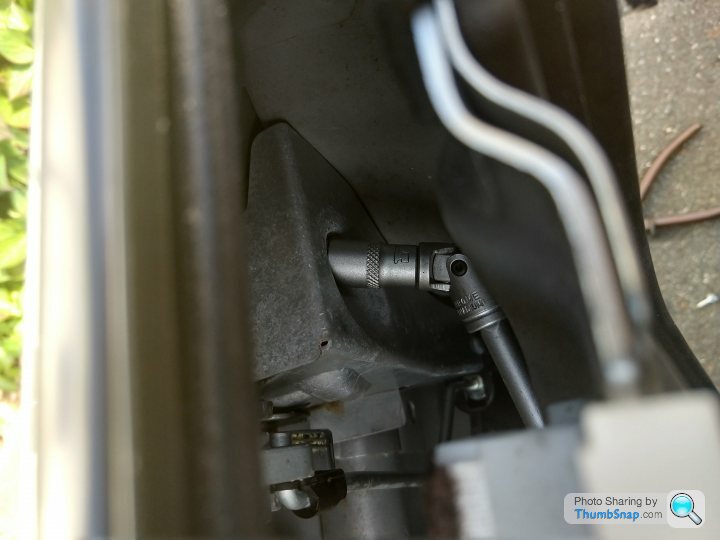
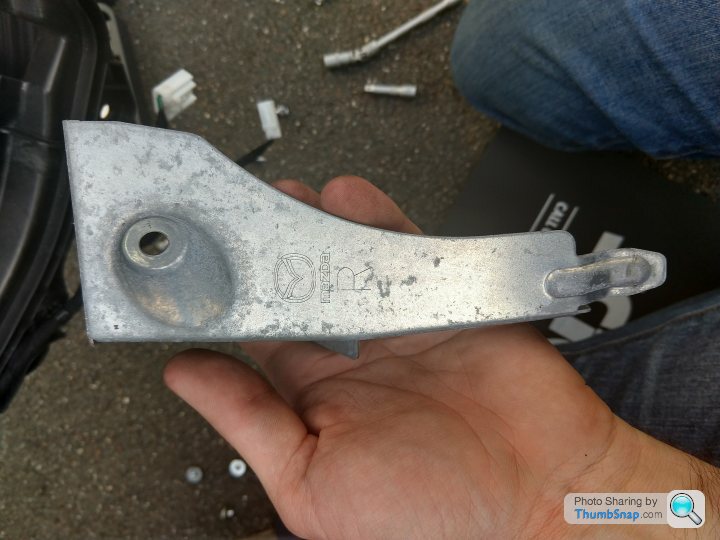
Image below shows the security shield when it's removed.
Once the shield is out, you'll be able to see two rods. Push both out of their hole, and now you can remove the door lock actuator from the car.
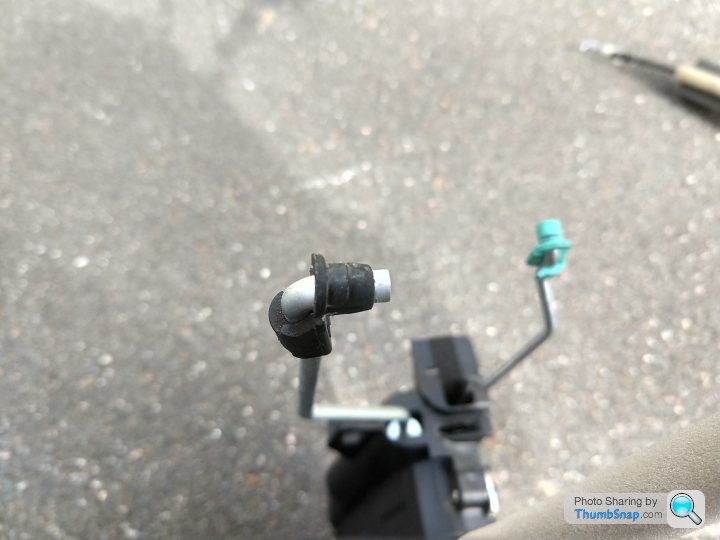
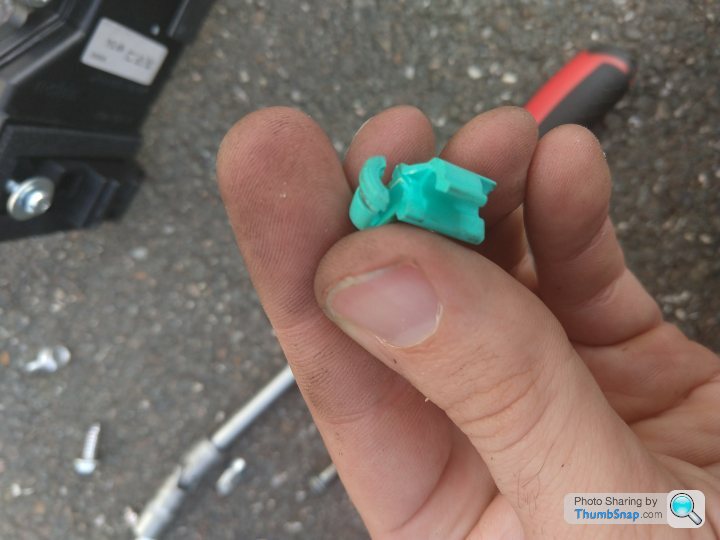
Remove the two plastic pieces from the old door lock actuator, and put these back in the car in the same place they came from. Next, put the new door lock actuator back in, and push the rods into the plastic clips. I found it easier to do this way, as the plastic clips are very hard to fit into their holes when the rods is in them.
Secure the new door lock actuator, replace the metal shield in it's slot and reassembly is the opposite to disassembly.
Be careful when re-installing the window glass to make sure it lines up to the marks you made to ensure good window fitment, and pay special attention that the glass slides into the rubber runner at the front of the door.
Hope this vaguely makes sense and helps someone. It seems like the door lock actuators are a bit of a weak spot on the NC.
my driver's side door lock started playing up recently (intermittently wouldn't lock or unlock, which became worse over time).
I couldn't find a thread online with a photo how-to guide, so thought I'd post up some photos on here.
Part number from Mazda was NF04-58-310J for the right (UK driver side) door lock actuator. Cost was £146 all in from the main dealer. The passenger side has a slightly different part number.
You'll need about 2 hours start to finish working at a gentle pace, phillips screw driver, 10mm socket, extender bars and universal joint adaptor.
Step one:
Before you start, you may wish to disconnect the car battery. When you disconnect the old door lock lock actuator, it makes the central locking go into a frenzy on the passenger door (hence the decision to disconnect the battery). I didn't lose my stereo code, though the trip computer and radio station presets reset. Also note, that when you disconnect the battery, your car will need to relearn to idle, and you may get a traction control/ DSC/ VSC fault light. To get the car to re learn to idle, you can start the car and leave it for half an hour, or just drive it. It can feel alarming with the revs often dropping to about 500rpm, but the car never stalled on me, and after 20 miles it was back to normal. Regarding the DSC/VSC, simply while stationary take the car from full left lock to right lock a couple of times for the system to re-learn where centre is. You may then need to switch the car off and on and the light clears (see owners manual for details).
Before disconnecting the battery, decide whether you want to remove the window glass (see below for reasons). If you want to remove the glass, do this after door card removal, but before disconnecting the door lock actuator and the battery.
Door card removal: You need a phillips screw driver, and plastic tools for trim removal. There are three screws; one is visible in the cup-holder, one is behind the door handle, and one behind the arm grab.
The plastic behind the door handle is thin and flexes an alarming amount before it pops out. Gently pull it from behind using a hook/ pick tool (or thin allen key in my case) from the door lock button end. The plastic covering the door grab is very stiff and required a lot of force to pull off. It's just plastic clips holding it on, so careful to not break anything (though one of my plastic tabs did break, but it re-assembled just fine).
Once you've got the plastic covers off and have taken out the three screws, you can then pull the door card off. Start at the back lower edge, and gently work your way round. The door card is held on by white plastic pop rivets. Miraculously, non of mine broke, but spares can be had for a few pounds on the internet if needed.
Once you've popped those off, there are 2 wires you need to unclip before you can pull the door card away (going to the tweeter and electric mirror controls). All of the wires have little tabs you have to press in before they can be disconnected. The little black one was very stiff and I used a thin flat blade screw driver to depress the tab while gently pulling it out. Try to pull the plastic rather than tugging the wire.
You'll also need to disconnect the two cables that go to the door handle and door lock using your hands or small needle nose pliers.
Step 2
You should now have the door card off. There's now about 10 10mm hex bolts to remove dotted around the black plastic inner panel. Go ahead and remove those.
There are also two plastic pop clips. which you can just pull the black plastic away from (pull the black plastic towards yourself away from the metal door skin). These plastic clips are indicated by the white arrows in the image below.
The blue circles show the 4 wires you need will disconnect during this process. Only the front two need to be removed to get the door card off. The rear two need to be disconnected to remove the door lock actuator.
Remove the phillips screw in the yellow circle, and the three phillips screws in the edge of the door (pink arrow).
The big white plastic box can be peeled away. It's held on by a sticky black goo. I did not remove this all the way, and the black goo was sticky enough to be re-usable. Try not to peel it too much as it is probably there for waterproofing.
Next step may vary: I chose to remove the window glass (not a hard job) to make access easier, though it should be possible to do it with the glass in place. There is one 10mm hex bolt holding the anti-theft metal plate in the upper rear part of the door (just behind the exterior door handle). You can either try to feel for it using a extension bar and flex head tool through the access hatch in the white plastic, or, you can see what you're doing from above if you've removed the glass.
To remove the window glass, you'll need to remove 5 10mm hex bolts. Two are shown by the green arrows; these are the window limit stops which are adjustable. If your window seals well at the moment, mark using tippex or similar where the bolts fit at the moment. Or if your windows leak, it's a good chance to fiddle with adjustment when you re-assemble.
The 3 remaining bolts can be accessed through the holes shown in the red arrows (one is behind the white plastic). You may need to lower the window a little bit for the bolts to align with the holes. Do this before disconnecting the battery if you want to remove the glass.
Once those bolts are out, you can carefully pull the window out of the door.
The image below shows the bolt you need to remove looking at it from above through the whole where the window glass used to be. You can also see one of the rods you need to pop out (just pulls out).
Image below shows the security shield when it's removed.
Once the shield is out, you'll be able to see two rods. Push both out of their hole, and now you can remove the door lock actuator from the car.
Remove the two plastic pieces from the old door lock actuator, and put these back in the car in the same place they came from. Next, put the new door lock actuator back in, and push the rods into the plastic clips. I found it easier to do this way, as the plastic clips are very hard to fit into their holes when the rods is in them.
Secure the new door lock actuator, replace the metal shield in it's slot and reassembly is the opposite to disassembly.
Be careful when re-installing the window glass to make sure it lines up to the marks you made to ensure good window fitment, and pay special attention that the glass slides into the rubber runner at the front of the door.
Hope this vaguely makes sense and helps someone. It seems like the door lock actuators are a bit of a weak spot on the NC.
Edited by Codswallop on Friday 9th November 11:26
Glad it seems helpful. Thanks for the feedback folks.
 Hope yours stays fixed.
kostas_miata said:
Very good write up. Mine was doing the same thing during the summer, but miraculously fixed itself.
Mine did the same. It started playing up in spring, fixed itself over summer, but then unfixed itself again Hope yours stays fixed.Hi, I did the actuator change the other day and here are a few comments on the above posting which incidentally was very helpful. It took about four hours at a leisurely pace with a few ins and outs to get different steps just right.
Definitely a good idea to buy a slack handful of the door card clips before starting, I broke four. £3.39 for 10 from https://www.vehicleclips.co.uk
Step one – didn’t disconnect the battery, the passenger lock just clicked a few times before stopping when cable disconnected.
Step one – managed to perform the job without removing the window glass ok. Only benefit might be if the foam block comes out when doing this allowing the actuator to go out and in better.
Step one - the plastic trim on the door handle can be levered off from the bottom using a plastic car trim removal tool. Plastic knife for want of a better term.
Step one - the door card hooks over the top of the door so when all the clips have been released around the front, rear and bottom of the door, the door card lifts out upwards.
Step two – the two plastic clips indicated by the white arrows were extremely difficult to remove and the plastic door panel needs careful support whilst levering out these clips as close as possible to them.
Step two – the plastic box was not fitted in my car, maybe a sign that someone had a go at this task previously.
Step two – no security lock shield fitted to my car. Another sign that someone had had a go at this previously, it may also be that it is not fitted on all cars.
Step two – To remove the actuator rods from the door lock, rotate the black and blue (fragile) clips whilst leaving them in the holes in the door handle. This allows the rods to be pulled out of the clips in the lock very easily. No need to remove these clips. Take a good look with a light up inside the door to see which way to rotate each clip to release the actuator rods.
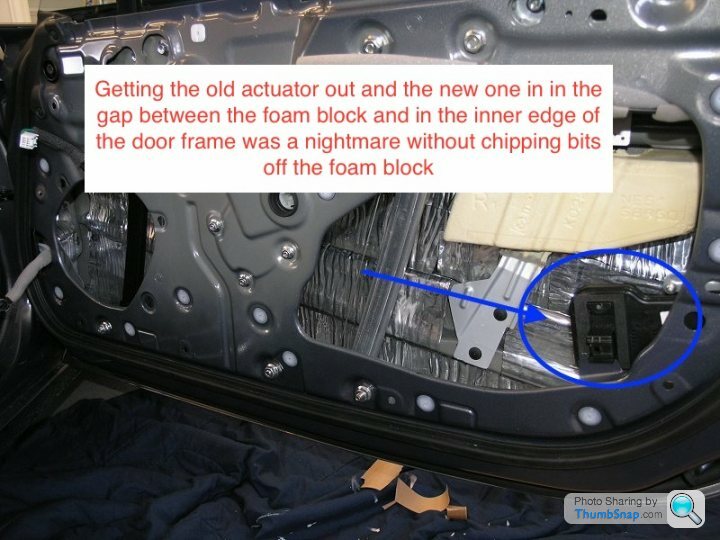
By far the hardest part of the task was removing the old actuator and fitting the new. Maybe someone has some good advice on this?
Not a photo of my car but one from the internet showing the foam block inside the door and the actuator fitted.
Definitely a good idea to buy a slack handful of the door card clips before starting, I broke four. £3.39 for 10 from https://www.vehicleclips.co.uk
Step one – didn’t disconnect the battery, the passenger lock just clicked a few times before stopping when cable disconnected.
Step one – managed to perform the job without removing the window glass ok. Only benefit might be if the foam block comes out when doing this allowing the actuator to go out and in better.
Step one - the plastic trim on the door handle can be levered off from the bottom using a plastic car trim removal tool. Plastic knife for want of a better term.
Step one - the door card hooks over the top of the door so when all the clips have been released around the front, rear and bottom of the door, the door card lifts out upwards.
Step two – the two plastic clips indicated by the white arrows were extremely difficult to remove and the plastic door panel needs careful support whilst levering out these clips as close as possible to them.
Step two – the plastic box was not fitted in my car, maybe a sign that someone had a go at this task previously.
Step two – no security lock shield fitted to my car. Another sign that someone had had a go at this previously, it may also be that it is not fitted on all cars.
Step two – To remove the actuator rods from the door lock, rotate the black and blue (fragile) clips whilst leaving them in the holes in the door handle. This allows the rods to be pulled out of the clips in the lock very easily. No need to remove these clips. Take a good look with a light up inside the door to see which way to rotate each clip to release the actuator rods.
By far the hardest part of the task was removing the old actuator and fitting the new. Maybe someone has some good advice on this?
Not a photo of my car but one from the internet showing the foam block inside the door and the actuator fitted.
Gassing Station | Mazda MX5/Roadster/Miata | Top of Page | What's New | My Stuff