Led Strip lights in kitchen - how to join and prewire
Discussion


Hi, Can anyone offer any advice on what I need to preprepare prior to the kitchen going in.
An empty room at the moment, I've channelled out for the new plugs, but before the work started I want to make sure I'm all set for the pre-wiring of the lights.
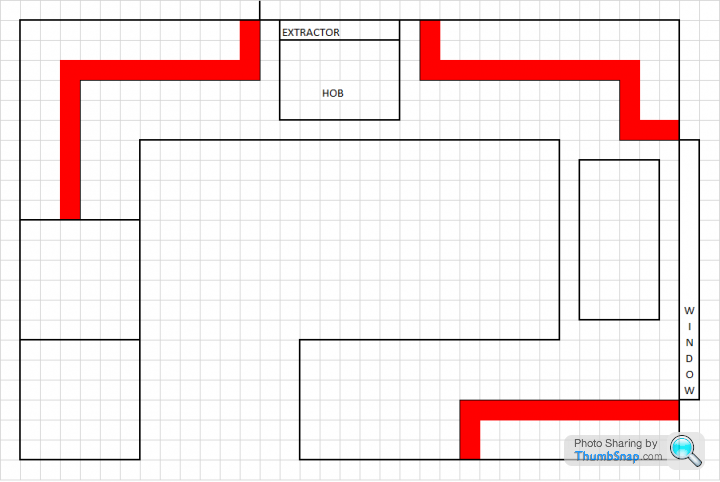
So what I want to do it put in LED strip lights as the Red shows on the Basic plan below, these will operate from a normal Lightswitch. We would Like to go for the RGB Led Strips with either Remote Control or Wifi Operation. Seems to be plenty of options about for all of this. Where I am looking for information is how to join all the strips together. as you see from the plan its approx 5 metres of the strip but needs cutting to size and fitting around bends but also need wiring to connect the 3 separate sections together? Any advice on how to do this reliably?
Effectively I'm going to have SWITCH > Transformer > ControlBox > STRIP 1 >join?? > STRIP2 > join?? > STRIP 3 > END
An empty room at the moment, I've channelled out for the new plugs, but before the work started I want to make sure I'm all set for the pre-wiring of the lights.
So what I want to do it put in LED strip lights as the Red shows on the Basic plan below, these will operate from a normal Lightswitch. We would Like to go for the RGB Led Strips with either Remote Control or Wifi Operation. Seems to be plenty of options about for all of this. Where I am looking for information is how to join all the strips together. as you see from the plan its approx 5 metres of the strip but needs cutting to size and fitting around bends but also need wiring to connect the 3 separate sections together? Any advice on how to do this reliably?
Effectively I'm going to have SWITCH > Transformer > ControlBox > STRIP 1 >join?? > STRIP2 > join?? > STRIP 3 > END
djt100 said:
Hence to Wifi option, as this then enables Alexa support on a log of units 
https://www.amazon.co.uk/gp/product/B06Y584C6V/ref=as_li_tl?ie=UTF8&tag=emi00-21&camp=1634&creative=6738&linkCode=as2&creativeASIN=B06Y584C6V&linkId=1aabeadad9aeb9a3153ec53b9ace631fhttps://www.youtube.com/watch?v=ztTTNyocfH0&t=...
You can just join up runs like that with simple 6 core cable and it can be soldered onto the strips. You might be able to get away with 4 core depending on the LED strips you use (minimum is RGBW), but I would put in 6 core for flexibility.
You will need quite a chunky transformer for those sorts of runs, however.
I would recommend getting some LED strip housing with diffuser panels on top otherwise the individual emitters are too easily identified.
You will need quite a chunky transformer for those sorts of runs, however.
I would recommend getting some LED strip housing with diffuser panels on top otherwise the individual emitters are too easily identified.
We have pelmets under the units, so you can't see the strips unless you're short, or lying on the floor; so we didn't need diffusers. It is a good idea to mount the LED strips on aluminium angle though, as it acts as a heat sink and will help them run cooler.
I used self adhesive strips, and I bonded a small choc block connector to the end of each strip. In this way you can make up each unit, and solder tails onto the LED strips, and attach them into the choc block. Drill screw holes through the aluminium, and you will then find it easier to mount the units and then connect back to your power source. Makes life easier if you need to change anything later.
I used a big driver mounted in the floor space above the kitchen switch, and then took the power from that for all the strips, wired in parallel.
On your drawing, you have shown the light strips returning back to the wall at the end of each cabinet, I doubt that you will need that, just mount them near the middle of each cabinet.
Ooops! deleted bloody upside down photos.
I even tried saving the pic, and turning it upside down - no good.
Edited by Paul Drawmer on Monday 23 October 21:20
gmaz said:
We joined the strips by running a cable inside a half - D shaped conduit and then running that along the top of the line of tiles behind the extractor. You may not be able to do that by the window though.
Empty room so I can channel in a conduit and run the cables through, so that's not a problem.... I think that's the easy bit!IMO you don't need to solder or faff.
I've had good experience with the clip on connectors, then spanning a bit of distance with two core cable/Wagos, or use a small junction box (with a pelmet you have plenty of scope for hiding stuff accessibly).
If the total run's 5m, you're probably going to need an 80W transformer. I posted a bit ago about lighting my office...I haven't updated the thread yet, but it basically turns the room into a bright sunny day with a 5m strip (actually split into 2x 2.5m).
I bought all my kit from UltraLEDs. Strip I bought was "Premium 1440 Lumens 24V 14.4W Neutral White 4000K 60 x 2835 LEDs Per Metre (5 Metre Reel)". The light's too "cool" for living quarters, but probably OK for a kitchen and the equivalent RGB would be more than enough for a kitchen IMO (may even be too bright).
Make sure you get a dimmable transformer.
The tape I have doesn't get especially warm, so treat channel as an option IMO. Channel with a clear cover would make it all easier to clean though (may be difficult to mitre however). Dirt and filth get in surprising places in kitchens.
Gassing Station | Homes, Gardens and DIY | Top of Page | What's New | My Stuff