Gelcoat repair - any tips?
Discussion


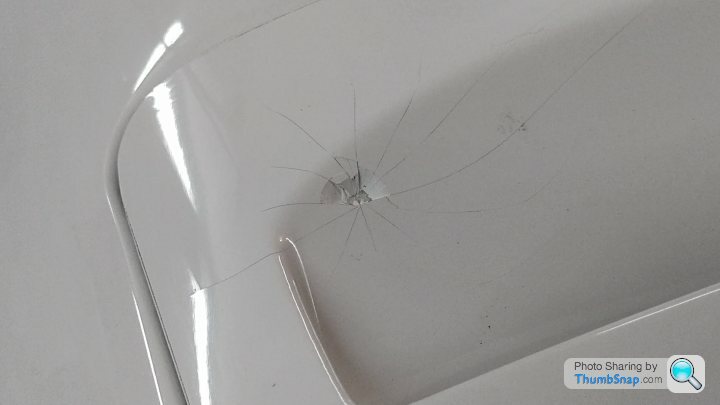
I have my first egregious rock chip in the worst place possible. Anyone have any tips/tricks for making an invisible repair? I've done the standard due diligence and I think I've got a handle on the process - but I'd love some practical advice from anyone who has done this on an Ultima and not a boat. 

Edited by TR3B on Monday 29th November 01:36
I've been looking into this as well, as the factory don't provide any repair or repair kits.
I think with white, it will be much easier to achieve an invisible repair, based on similar searching, diligence and youtubes as you
It might be worth talking to a local boat repair place anyway for some help or tips, as there seems to be a reluctance to get involved by some of the car bodyshops i spoke to.
Sorry i have no more practical experience help (yet) to offer...
Craig
Festa_94 said:
May sound daft but will the factory just sell you a new vent for that arch ?
I'm sure it's on the table but that's a substantial amount of work and expense with the added potential of cracking the clamshell gelcoat while trying to 'manually' un-bond and seal that vent. I think if it came to that I'd just use body filler on the chip and then paint it with an acrylic urethane....but I'd really rather just master gelcoat repair Edited by TR3B on Monday 29th November 22:03
I did a couple of tests on spare pieces. The last attempt was shockingly easy to make perfect using the new catalyst... but it's on a flat surface.
I think the difficulty with this particular repair will be the location. Soon as the weather warms up another 10 degrees, I'm going to take a run at it.
I think the difficulty with this particular repair will be the location. Soon as the weather warms up another 10 degrees, I'm going to take a run at it.
Edited by TR3B on Friday 10th December 17:04
sociopath said:
You're probably going to have to drill the end of each of those spider web cracks to stop them spreading
I'm going to grind them out entirely all the way down to the fiberglass!Festa_94 said:
Will it flat and polish similar to paint?
The process was nearly identical (at least on my test piece). Only real difference is the repair portion started with heavier grit sandpaper - but final sanding and polishing was the same.One other thing I noticed was that allowing the repair to cure at room temp took forever. On the second test I warmed my repair up a bit with a heat gun before walking away. In 15 minutes it was hard enough to sand.
Edited by TR3B on Sunday 12th December 16:59
TR3B said:
sociopath said:
You're probably going to have to drill the end of each of those spider web cracks to stop them spreading
I'm going to grind them out entirely all the way down to the fiberglass!Festa_94 said:
Will it flat and polish similar to paint?
The process was nearly identical (at least on my test piece). Only real difference is the repair portion started with heavier grit sandpaper - but final sanding and polishing was the same.One other thing I noticed was that allowing the repair to cure at room temp took forever. On the second test I warmed my repair up a bit with a heat gun before walking away. In 15 minutes it was hard enough to sand.
Edited by TR3B on Sunday 12th December 16:59
My gelcoat repair came out awesome initially, then I discovered pinholes. In attempting to sand them out I made it through the gelcoat and back into the fiberglass. I've decided at this point the path of least resistance is to just replace the part.
I suspect I made 3 mistakes;
1. Too much catalyst.
2. Too much initial heat.
3. Over mixing my gelcoat/resin and infusing a ton of air into it.
Other than that everything went perfect and the repair was totally invisible.
Wile I'm waiting for parts I'm going to take another run at it by lightly drilling out the pinholes and using a razor blade to fill them with gelcoat (per a suggestion made at The Hull Truth).
Gassing Station | Ultima | Top of Page | What's New | My Stuff