Epoxy garage floor prep can I have a bit of help please?
Discussion


That’s one thick coat at 1.4 meters square per litre coverage. It’s absolutely phenomenal. (But reserving final judgement until I can walk on it and check the rest of it - with my luck at the moment one of the extension leads will have fallen off the ramp and glued itself to the floor lol)
Given that the patio enters the garage at the back of the house I think a custom floor mat will be very cool under the bi fold doors so I’m not tooooo worried about those imperfections.
If the rest of the floor is perfect that’s it, job done, otherwise I’ll apply the last 5 cans as a thin roller coat...
Andeh it will depend on how good your surface is. I’d say you should do your best with the base surface, one coat of primer and then fill the bad bits. Another coat of primer. Then top coat. You can do it with that much paint but maybe not with a foam squeegee thick coat - you’d most likely find it hard to spread it about. We used 75 litres for 105 square meters to achieve that finish, onto a reasonably well filled and primed surface
Hmm, thanks very much! Getting the paint through a family member who gets damaged goods discount! May have to pay full price to ensure a proper job & top up my supplies.
Ill trust your advice, a man who dies it twice, within a week, on the same garage....knows what he is talking about.
What did you use to fill the cracks? It's a new build garage floor in pretty good condition (under the layers of crap paint I'll machine sand off) but there is one thin but long crack.
Haha well you live and learn by these things don’t you!
So the fine surface filler I ordered that they sent was actually a upol product that, reading the tin, is actually nothing more than car filler! The interesting thing is that if you read up the posts above someone else who observed the pros do a floor said that the filler they used smelt like car body filler...
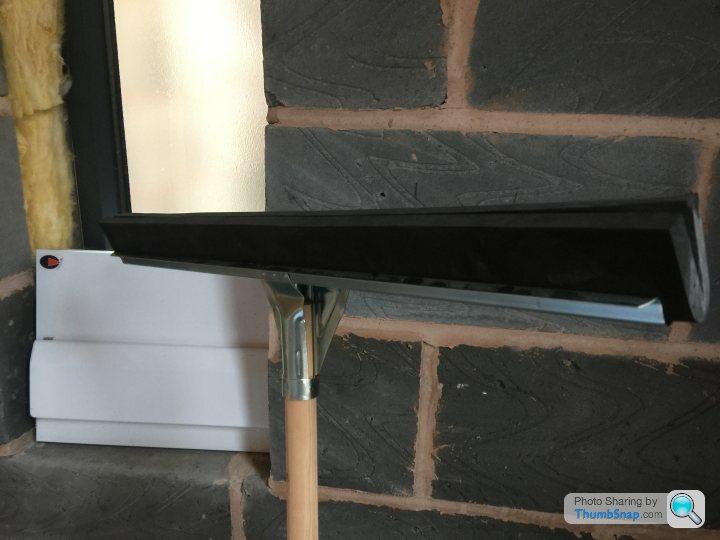
I will get the pic of the rubber squeegee and the details of the upol stuff when I can dare walk on the floor which, 24 hours in, is still slightly soft. I reckon you could gently walk now but I’m not chancing it!
So the fine surface filler I ordered that they sent was actually a upol product that, reading the tin, is actually nothing more than car filler! The interesting thing is that if you read up the posts above someone else who observed the pros do a floor said that the filler they used smelt like car body filler...
I will get the pic of the rubber squeegee and the details of the upol stuff when I can dare walk on the floor which, 24 hours in, is still slightly soft. I reckon you could gently walk now but I’m not chancing it!
Forgot to say - I’m a non expert on this but I saw a video where a guy handled a thin crack in a slab and that’s a different ball game to the body filler stuff.
He actually chiselled out a much bigger crack so that there was surface area and then used some *special stuff* (more research required) to fill the resultant chasm!
The surface filler is just for aesthetic.
He actually chiselled out a much bigger crack so that there was surface area and then used some *special stuff* (more research required) to fill the resultant chasm!
The surface filler is just for aesthetic.
anonymous said:
[redacted]
Yes - I think that sounds right now you mention it. The guy on the video seemed very knowledgeable and it was definitely a two part mix with some kind of cement and special hardener. I’ve watched so many videos on all this now that I’d never find it otherwise I would post the link. The repair to the crack looked highly convincing when it was finished.

That finish is incredible! Very very impressive.
Julian - is the below the sort of machine you used to remove the failed first attempt?
http://www.brandontoolhire.co.uk/en/surface-prepar...
Julian - is the below the sort of machine you used to remove the failed first attempt?
http://www.brandontoolhire.co.uk/en/surface-prepar...
KAgantua said:
can you put this on floor tiles?
I think the answer is - it depends on the floor under the tiles. If you have a tiled floor that’s rock solid then i think it’ll work. The epoxy goes off rock hard and it sticks to anything just unbelievably well. You’d want to prime it and then apply either filler or a coat thick enough to get rid of the grout lines, though. Still a big job and it might be just as easy to yank the tiles and start again?If your floor moves - at all - then my advice is null and void and I have no idea since I don’t know if the epoxy is flexible or how it would react in that situation. I suspect *not well*
Gassing Station | Homes, Gardens and DIY | Top of Page | What's New | My Stuff