Replacing O2 sensors - V8 Vantage
Discussion


I'm looking to do this myself on a 4 post lift (i.e. not lying on my back  )
)
Has anyone else done this themselves, or have any tips/advice/knowledge of tools etc? Are they unplug old, remove, screw in new, then plug and play? Also is there a 'workshop' manual' for the Vantage, I've searched but not had much luck identifying one
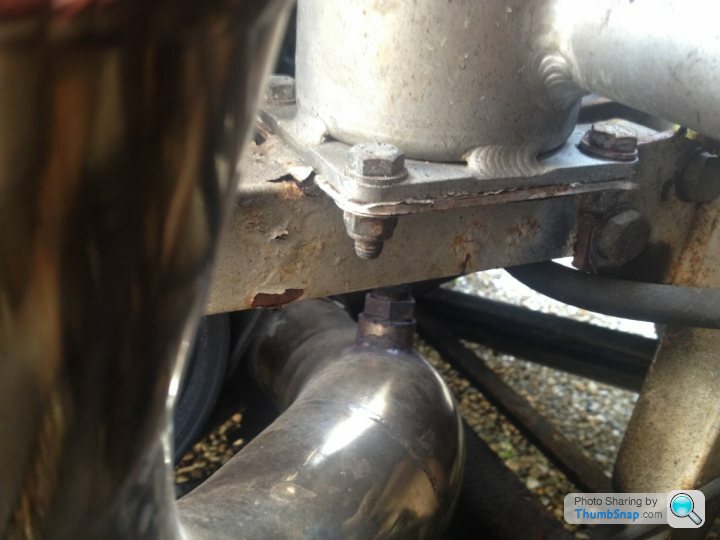
Here's a shot of the downstream Lambda on my Chimaera, I'm guessing the boss/sensor arrangement on the Aston will be similar... (just visible under the swirl pot... Oh, and she's getting a body off chassis refurb next winter )
Thanks in advance for any info/tips...
Chilli
)Has anyone else done this themselves, or have any tips/advice/knowledge of tools etc? Are they unplug old, remove, screw in new, then plug and play? Also is there a 'workshop' manual' for the Vantage, I've searched but not had much luck identifying one
Here's a shot of the downstream Lambda on my Chimaera, I'm guessing the boss/sensor arrangement on the Aston will be similar... (just visible under the swirl pot... Oh, and she's getting a body off chassis refurb next winter
)Thanks in advance for any info/tips...
Chilli
Edited by ChilliWhizz on Tuesday 23 May 16:19
Easy to do.
You'll see two o2 sensors per catalytic converter, "upstream" and "downstream", and each has a different color connector (green and blue) so you won't get the connectors mixed up.

The wiring goes from the sensor, through a hole in the heat shield, and to the connectors. You'll see them beside the torque tube - the green and blue connectors in the bottom of this pic:

Clearance is tight, but otherwise it isn't difficult at all. Might help to spray some PB Blaster or other rust-busting solvent onto it before starting.
You'll see two o2 sensors per catalytic converter, "upstream" and "downstream", and each has a different color connector (green and blue) so you won't get the connectors mixed up.
The wiring goes from the sensor, through a hole in the heat shield, and to the connectors. You'll see them beside the torque tube - the green and blue connectors in the bottom of this pic:
Clearance is tight, but otherwise it isn't difficult at all. Might help to spray some PB Blaster or other rust-busting solvent onto it before starting.

telum01 said:
I should've had a full DIY up by now but I haven't gotten it done yet
Everything should be visible. Clearance is the main challenge.
Another tip: unplug the wiring connectors first, that way the wiring can spin freely as you remove the sensor from the cat.
Brilliant, I'll be having a look underneath soon...Everything should be visible. Clearance is the main challenge.
Another tip: unplug the wiring connectors first, that way the wiring can spin freely as you remove the sensor from the cat.
Love your youtube stuff by the way

telum01 said:
Thanks! Just got a new camera and lighting equipment, so the videos are going to be much better moving forward. Learning process, though... I did a ton of filming for a tail light installation video and half of it didn't record so I have to do it over again lol
Luckily you brake your rear lights on a regular basis 
martindesu said:
Superb.
I also need new cats as mine rattle, either sports or normal.
Which sensors can we buy? Bosch Volvo part I can buy to give my dealer to install when she's next in?
I haven't tried any aftermarket or non-OEM options, so I don't know what would work, or if any issues would arise by straying from OEM, sorry.I also need new cats as mine rattle, either sports or normal.
Which sensors can we buy? Bosch Volvo part I can buy to give my dealer to install when she's next in?
SS972 said:
Luckily you brake your rear lights on a regular basis
Hahaha I do break things a bit too often sometimes, but in this case it just happened to be a series of events falling into place: Ordered a set of clear tail lights for a customer who never paid for them, so I had an extra set. I put my grey car into a tire wall on a track and cracked one of my tail lights on that car. I was already planning to swap the tail lights on my red car to clear, so I put that extra set of clear tail lights on the red car and I'm moving the red tail lights from the red car over to the grey car to replace the cracked one. Lucky, indeed martindesu said:
Superb.
I also need new cats as mine rattle, either sports or normal.
Which sensors can we buy? Bosch Volvo part I can buy to give my dealer to install when she's next in?
Hi Martin, I'm thinking these ...I also need new cats as mine rattle, either sports or normal.
Which sensors can we buy? Bosch Volvo part I can buy to give my dealer to install when she's next in?
http://www.ebay.co.uk/itm/NGK-LAMBDA-oxygen-o2-SEN...
Just a bump on this thread.
How easy is this job to do? in the pics posted above the torque tube seems to have been removed, so how easy is it to access the sensors (position 1 on a 4.7 - upstream?) with the torque tube in place?
While I'm on, how easy is a spark plug replacement on the V8, are they all easy to access?
Thanks
How easy is this job to do? in the pics posted above the torque tube seems to have been removed, so how easy is it to access the sensors (position 1 on a 4.7 - upstream?) with the torque tube in place?
While I'm on, how easy is a spark plug replacement on the V8, are they all easy to access?
Thanks
I guess you've done this job by now, but its actually very easy, similar to changing a light bulb, I fixed a front one yesterday, lying under the car on QuickJacks.
The easiest way seems to be to undo the metal bracket holding the plugs alongside the clutch. They are very visible, and the bracket just has 2 easily accessible 8mm bolts to remove, then you are free to let the bracket hang from the wires. Now you can unplug the sensor, push in the tab at the side, and pull the plugs apart.
Now unbolt the lambda sensor, the bolt holding it will be the same size as the one on your new sensor, so find the right spanner before you go under the car. I had to use an adjustable spanner, it was all I could find that would fit. Once its unplugged, I taped the plug for the new sensor onto the old sensor, then pulled the plug of the old sensor, that left the new one in the right place with the wire threaded behind the heatshield. Undo the tape holding them together and you're ready to go.
Remove the protective cover from the new sensor, bolt in the sensor, then plug in the other end, refit the bracket, and you're done.
Take the car for a drive and the 'emission service required' error will go, all on its own.
I bought the sensor off ebay for £80, its a genuine NGK sensor, but with a white plug and a wire long enough to reach front or back locations. The AM ones have a coloured plug, and a wire just the right length, which is why the genuine ones are different front and back. I paid £80, but they are available for £32. At these prices, it isn't worth buying a very cheap pattern part, and definitely isn't worth buying a genuine AM part with a coloured plug.
Edited by MichaelV8V on Sunday 11th October 16:42
Resurrecting this thread...
How the heck do you get to the left (drivers) side upstream O2 sensor on a LHD car? The right one is totally visible and looks like no access issues, but that left one is completely surrounded by headers and other metal. While I might be able to get my hand in there to touch it, I don't know how I'm going to get a wrench on it and turn it. I couldn't even properly spray penetrating fluid on it.
Thanks
Matt
LiquidPT said:
Resurrecting this thread...
How the heck do you get to the left (drivers) side upstream O2 sensor on a LHD car? The right one is totally visible and looks like no access issues, but that left one is completely surrounded by headers and other metal. While I might be able to get my hand in there to touch it, I don't know how I'm going to get a wrench on it and turn it. I couldn't even properly spray penetrating fluid on it.
Thanks
Matt
I can only imagine what it looks like under a LHD car, so can't give an experience-based view, but, can you undo the cat bolts and swivel the thing round so that you can get to the sensor?How the heck do you get to the left (drivers) side upstream O2 sensor on a LHD car? The right one is totally visible and looks like no access issues, but that left one is completely surrounded by headers and other metal. While I might be able to get my hand in there to touch it, I don't know how I'm going to get a wrench on it and turn it. I couldn't even properly spray penetrating fluid on it.
Thanks
Matt
ChilliWhizz said:
I'm looking to do this myself on a 4 post lift (i.e. not lying on my back )
Has anyone else done this themselves, or have any tips/advice/knowledge of tools etc? Are they unplug old, remove, screw in new, then plug and play? Also is there a 'workshop' manual' for the Vantage, I've searched but not had much luck identifying one
https://www.ampheus.com/V8_Vantage_2006MY_Workshop_Manual.pdf )Has anyone else done this themselves, or have any tips/advice/knowledge of tools etc? Are they unplug old, remove, screw in new, then plug and play? Also is there a 'workshop' manual' for the Vantage, I've searched but not had much luck identifying one
Edited by ChilliWhizz on Tuesday 23 May 16:19
baconsarney said:
Matt, no idea mate, but pm Telum01 (Rich) he’s posted above... google redpants too he has a great website.. he’s in the US and has or had two V8V’s both left hookers I’m sure.. he’ll give you all the advice you need I’m sure....
Cheers,
Richard
Yup, and he said "easy". Both of his cars were earlier 4.3s, and I've run into a number of things that were significantly more complicated / tighter on my car.Cheers,
Richard
Workshop manual says to remove the downstream sensor, cat, mid pipe, and heat shield to get to the upstream sensor. I decided I didn't need to do it right now...
Gassing Station | Aston Martin | Top of Page | What's New | My Stuff