Paging the Hatter - Cooling System replumb
Discussion


Hello Martin,
I was chatting with Chris over the weekend and discussed that I am going to be flushing the cooling system and 'deleting' the plenum preheater. Chris mentioned you had a diagram showing the alternative and ammended/reduced/simplified pipework arrangement.
A, Do you?
B, Can I have a copy please.
Thanks.


Hi all,
I haven't done a successful diagram, whenever I try to illustrate it I end up with a spaghetti mess.
It's pretty simple -
1) Plenum heater outlet connects to the metal pipe stub under the thermostat (so flows into the water pump inlet) - as it does on the original Rover SD1.
2) Tee piece into the lower rad hose (car builder solutions do them), with a large diameter pipe from the lower rad hose to the bottom connection under the expansion tank
3) Blank off the middle expansion tank port (or better still; change the expansion tank to a Merc W124 that was designed originally with an overflow)
4) Connect the radiator vent pipe and the swan neck vent pipe to the top of the expansion tank via a Tee piece.
The set up I now have constantly bleeds the air out of the engine and tops up from the expansion tank into the lower rad hose. No bleeding required and the heater matrix has coolant in it and not air.
Martin,
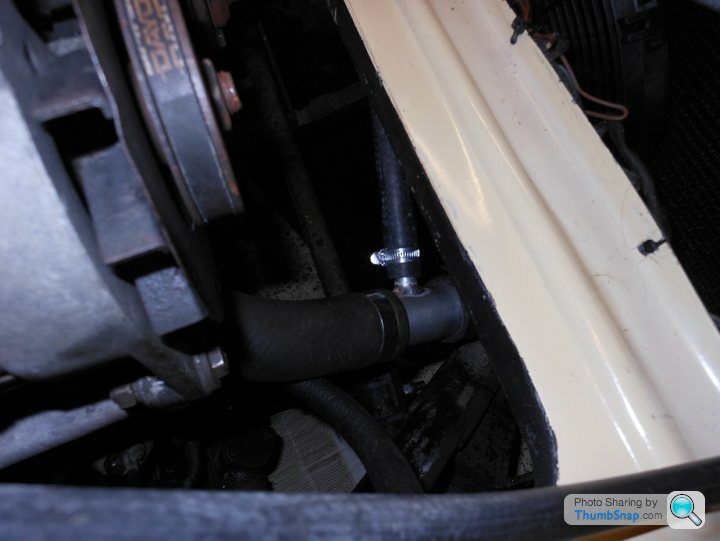
Can you send a picture of how you have got you heater matrix pipe work?
Mine comes through the bulkhead, hits a 90 bend and goes over to the drivers side of the block. It looks a bit Heath Robinson...
Can you send a picture of how you have got you heater matrix pipe work?
Mine comes through the bulkhead, hits a 90 bend and goes over to the drivers side of the block. It looks a bit Heath Robinson...
The Hatter said:
Hi all,
I haven't done a successful diagram, whenever I try to illustrate it I end up with a spaghetti mess.
It's pretty simple -
1) Plenum heater outlet connects to the metal pipe stub under the thermostat (so flows into the water pump inlet) - as it does on the original Rover SD1.
2) Tee piece into the lower rad hose (car builder solutions do them), with a large diameter pipe from the lower rad hose to the bottom connection under the expansion tank
3) Blank off the middle expansion tank port (or better still; change the expansion tank to a Merc W124 that was designed originally with an overflow)
4) Connect the radiator vent pipe and the swan neck vent pipe to the top of the expansion tank via a Tee piece.
The set up I now have constantly bleeds the air out of the engine and tops up from the expansion tank into the lower rad hose. No bleeding required and the heater matrix has coolant in it and not air.
I haven't done a successful diagram, whenever I try to illustrate it I end up with a spaghetti mess.
It's pretty simple -
1) Plenum heater outlet connects to the metal pipe stub under the thermostat (so flows into the water pump inlet) - as it does on the original Rover SD1.
2) Tee piece into the lower rad hose (car builder solutions do them), with a large diameter pipe from the lower rad hose to the bottom connection under the expansion tank
3) Blank off the middle expansion tank port (or better still; change the expansion tank to a Merc W124 that was designed originally with an overflow)
4) Connect the radiator vent pipe and the swan neck vent pipe to the top of the expansion tank via a Tee piece.
The set up I now have constantly bleeds the air out of the engine and tops up from the expansion tank into the lower rad hose. No bleeding required and the heater matrix has coolant in it and not air.
Cerb420James said:
Martin,
Can you send a picture of how you have got you heater matrix pipe work?
Mine comes through the bulkhead, hits a 90 bend and goes over to the drivers side of the block. It looks a bit Heath Robinson...
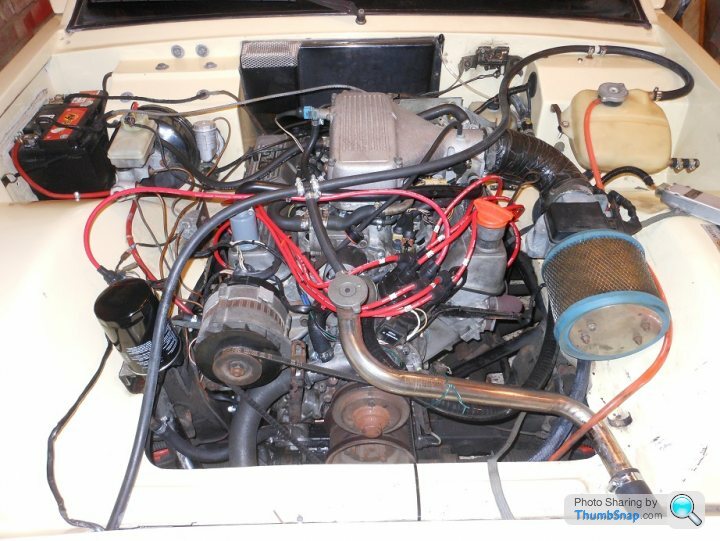
Does this photo help, it's from a Wedge.Can you send a picture of how you have got you heater matrix pipe work?
Mine comes through the bulkhead, hits a 90 bend and goes over to the drivers side of the block. It looks a bit Heath Robinson...
It's from my file that I've used to try and understand how the Heater is plumbed in on my Griff'.

Not the best but might hepl.

Gassing Station | Wedges | Top of Page | What's New | My Stuff