Fitting folding buckets from a LHD car
Discussion


short-shift said:
Hi Slippydiff
I know there's a broad range of opinions on Porsche's differing bucket seat styles but for me the folding bucket (or 'sports bucket seat' as Posrche call it) does the job much better than the 918-style (the so-called 'lightweight bucket seat, or LBS). I'm reasonably short (5'8") so having the slightly increased height of the folding bucket works well for me; on the other hand I find the 918-style to be too upright to be comfortable - and near impossible to use when wearing a helmet (unless one likes looking into the footwell a lot, with one's head pushed down...). So I'm keener on the folding style than the more modern 918 version.
Back to sensors; I was pretty sure about what I've written above about the transducer-type pressure sensors - the trail for this is in PETS or V-pages, where with a bit of detecitive work and a lot of perseverence one can identify the mounting components and wiring that are specifc to this type of occupancy-sensor spec - although , on reflection, I suppose it is possible that this approach was used only in US-spec cars during the 987/997 era. In which case, maybe the folding buckets that we had in the UK during that period (and possibly elesewhere in LHD/European markets, etc) were also devoid of any type of occupant sensing...??
Talk about reverse engineering (as in, trying to work back to the specification and engineering logic from observations about what is now in the field!).
But I'm pretty confident that I should be able to make the LHD set of folding bucket seats work correcty in my RHD car, given a bit of swapping-over of the driver and passenger buckles and associated electical connectors. I mean, what could possibly go wrong??
James
Well knowing how the Yanks require the bI know there's a broad range of opinions on Porsche's differing bucket seat styles but for me the folding bucket (or 'sports bucket seat' as Posrche call it) does the job much better than the 918-style (the so-called 'lightweight bucket seat, or LBS). I'm reasonably short (5'8") so having the slightly increased height of the folding bucket works well for me; on the other hand I find the 918-style to be too upright to be comfortable - and near impossible to use when wearing a helmet (unless one likes looking into the footwell a lot, with one's head pushed down...). So I'm keener on the folding style than the more modern 918 version.
Back to sensors; I was pretty sure about what I've written above about the transducer-type pressure sensors - the trail for this is in PETS or V-pages, where with a bit of detecitive work and a lot of perseverence one can identify the mounting components and wiring that are specifc to this type of occupancy-sensor spec - although , on reflection, I suppose it is possible that this approach was used only in US-spec cars during the 987/997 era. In which case, maybe the folding buckets that we had in the UK during that period (and possibly elesewhere in LHD/European markets, etc) were also devoid of any type of occupant sensing...??
Talk about reverse engineering (as in, trying to work back to the specification and engineering logic from observations about what is now in the field!).
But I'm pretty confident that I should be able to make the LHD set of folding bucket seats work correcty in my RHD car, given a bit of swapping-over of the driver and passenger buckles and associated electical connectors. I mean, what could possibly go wrong??
James
 dization of anything made in Europe, I'd say there's every chance you've hit the nail firmly on the head !!
The Sports Bucket Seats in the Cayman R (and a 981 I drove fitted with them) were agony to sit in for anything over an hour and half. I managed to resolve the height issue by removing the seat base cushion, and whilst it sorted the issue of backache, it did nothing for comfort ..... (remove the seat base cushion and you'll see the base shell in that area is far from flat !!)
short-shift said:
Aha - I think I've found the answer (as to why the seats appear to be handed), if not yet the definitive "it will be OK to fit LHD seats in a RHD car" position.
It's to do with the seat belt buckle (or 'short-end' as they are sometimes called). On the driver's side only (on non-US spec cars) this carries an electrical cable/connection to the seat belt warning circuit - which shows as the light on the dash that illuminates on key-on and goes off when the driver's belt is buckled up. The passenger side buckle has no such functionality (so fastening or unfastening the passenger buckle does not illuminate the dash light in a GT3 - as far as I can tell). And it is these buckles/short-ends, fitted to the seats, that effectively determine whether the seat-set is handed for LHD or RHD.
I still need to work out if that's a simple thing to change-over, from one seat to the other. Physically, it's no problem, but I need to understand where the cable from the driver's-side buckle connects in. I think it goes to a connector under the seat that looks to be common on both seats and this, in turn, is plumbed-in to the main seat connector (the big yellow one) which is common across both seats - in which case I think it will be interchangeable.
Inching forward (for anyone else who might be remotley interested!!).
James
Well done, post back how you go.It's to do with the seat belt buckle (or 'short-end' as they are sometimes called). On the driver's side only (on non-US spec cars) this carries an electrical cable/connection to the seat belt warning circuit - which shows as the light on the dash that illuminates on key-on and goes off when the driver's belt is buckled up. The passenger side buckle has no such functionality (so fastening or unfastening the passenger buckle does not illuminate the dash light in a GT3 - as far as I can tell). And it is these buckles/short-ends, fitted to the seats, that effectively determine whether the seat-set is handed for LHD or RHD.
I still need to work out if that's a simple thing to change-over, from one seat to the other. Physically, it's no problem, but I need to understand where the cable from the driver's-side buckle connects in. I think it goes to a connector under the seat that looks to be common on both seats and this, in turn, is plumbed-in to the main seat connector (the big yellow one) which is common across both seats - in which case I think it will be interchangeable.
Inching forward (for anyone else who might be remotley interested!!).
James
Edited by short-shift on Monday 17th September 20:11
So - just to summarise the main points (and some other interesting snippets) I think I've got to as a result of rather a lot of internet searching and cross-referencing - and also from the contributions made here, for which many thanks:
1. As far as I can tell, there is no passenger/occupancy detection system on 981/991 generation cars in RoW markets (although it is fitted in the US and Canada as a requirement of FMVSS208 regulations). So whilst, in the US and in Canada, the occupancy detection system will automatically disable the airbag system when no passenger is present (or when a baby/child seat is fitted - and maybe even allow a 'softer' deployment of the two-stage passenger bag when a large child or small adult passenger is detected), in RoW markets the only way to disable the passenger-side airbag is via a key-operated switch. This switch assembly is available as a kit of parts from Porsche and can be mounted in the passenger-side glove box area - but it must not be fitted to US and Canadian spec vehicles.
2. Non-US/Canada-spec LHD and RHD folding bucket seat sets are handed only because the driver's buckle (or short-end) is fitted with a single electrical lead and connection that causes the seat-belt warning lamp in the dash to illuminate if (i) the car is live, and (ii) an occupant is in the driver's seat, and (iii) the buckle is unlatched. I suspect that this will be the case for 918-style lightweight bucket seats too.
3. There appears to be no seat belt warning functionality for the passenger side of 981/991 RoW cars.
4. For a LHD set of folding bucket seats to work properly in a RHD car (that is, without error messages or warning lights), the buckles (or short-ends) need to be swapped over, between driver's and passenger's seats. In addition to this physical change-over, the connector at the end of the electical lead that emerges from the driver's buckle needs also to be inserted into position in the main yellow connector block that is mounted under the seat base. I suspect that this will also apply to the 918-style seats as well.
I'm happy to be corrected on any of this, but I think that's where we're at.
Assuming that I now finalise my deal on the folding buckets I have been offered then I will find out pretty quickly whether I'm on-track with this summary or not!
James
Edited by short-shift on Thursday 20th September 08:10
Deal done on the folding bucket seats so they are on their way.
Quite a challenge to find them at any time - and particularly so in this instance as I needed them with red stitching to match the other deviant features in my car.
I'll provide further updates (hopefully confirmation that all is A-OK) in due course...
James
Quite a challenge to find them at any time - and particularly so in this instance as I needed them with red stitching to match the other deviant features in my car.
I'll provide further updates (hopefully confirmation that all is A-OK) in due course...
James
When you swap the seats make sure to re route the seatbelt through the outboard ‘handle’, and fix to the seat itself rather than the chassis.
Mine were retrofitted back in 2011 by a previous owner and the seatbelts had been left fixed to the chassis and hanging as they would have been with the original seats.
I noticed this while sitting in the folding buckets of a lovely guards red 991 GT3 in Portsmouth OPC today (waiting for them to find a 1L bottle of coolant for me).
All it takes is a 17mm socket, you don’t need the washers used while they are fixed to the chassis so make sure you retrieve them and keep them safe.
Can supply phots if required.
gwsinc said:
When you swap the seats make sure to re route the seatbelt through the outboard ‘handle’, and fix to the seat itself rather than the chassis.
Yes - I had cottoned on to this but thanks for the heads-up. Good that the seat belt is common between 'standard' sports seats and the bucket options.James

Of course - it's so frustrating when forum "how-to" posts dry up before a conclusion is reached.
Seems like my seats are currently taking an unscheduled tour of the UK so they didn't arrive yesterday (well, they arrived at an address 250 miles away!) so hopefully I will get them today or tomorrow. If I get the chance this weekend I will get them in the car, but it may be the end of this coming week before I have enough time.
James
Edited by short-shift on Friday 28th September 08:24
woollyjoe said:
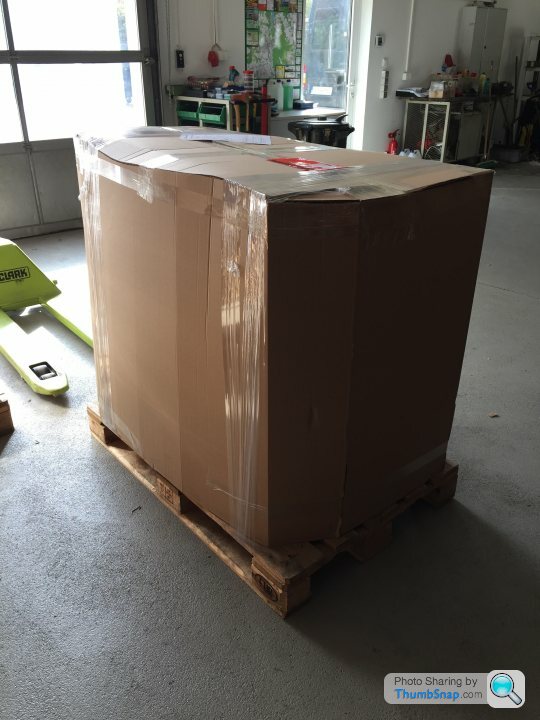
Some bucket seats turned up at my house and am selling if anyone is interested.
You too? What a co-incidence - here are mine that arrived this morning...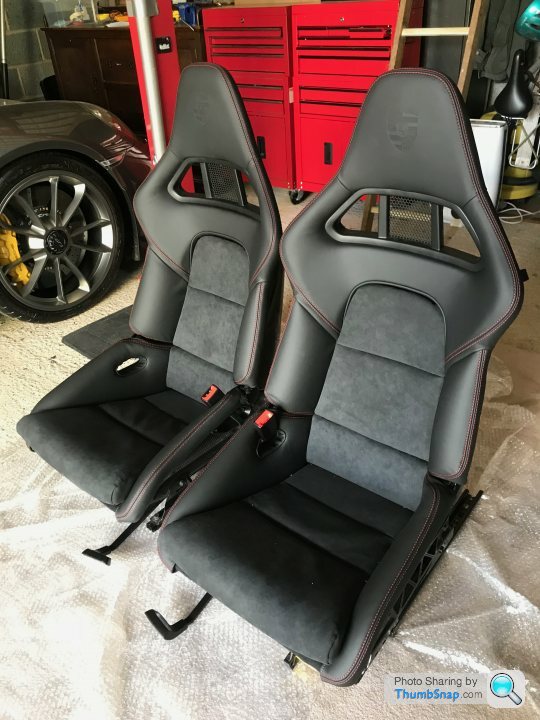
So far, the detective work looks to be sound; the only physical difference I can detect between LH and RH seats that would 'hand' them for RHD and LHD is the electrical connection to the driver's side seat belt buckle. Even the airbag wiring harness (the one that fixes under the seat and includes the big yellow connector) is identical - same part number - from side to side. Fingers still firmly crossed!
James
In short - complete success.
After a little bit of work and adaptation, the LHD folding buckets are now safely installed in my RHD car. The seat belt warning lamp works perfectly (driver's side only) and the airbag warning light operates exactly as it should.
Phew!
Findings:
I think it's worth recapping the main findings which seem to be that:
1. Bucket seat sets are handed and separately part-numbered for LHD and RHD cars in UK/EUR/RoW markets only by virtue of the driver's-side seat belt buckle carrying an electrical connection (for the seat belt warning lamp).
2. Transposing the seat belt stalks and related electical connections over between seats is an easy DIY task.
3. In 981/991 generation cars, there is no passenger occupancy sensor fitted to UK/EUR/RoW seats (meaning that passenger-side airbags cannot be disabled, except through fitment and operation of the optional airbag-off key kit). This is different to the situation with US and Canada spec cars, where passenger occupancy sensors are fitted.
"How-to" notes:
A couple of people have asked for a "how-to" and, knowing how useful these threads can be for future owners, I'm happy to post some of the details as follows, subject - of course - to the usual disclaimer that I can't be held responsible for the outcome or consequences of any attempt you may make to follow the steps that I took.
I should start by saying that I was replacing 18-way Adaptive Sports Seats (I323/324) with the so-called folding bucket seats (or 997 GT2 buckets) although these are more formally called the Sports Bucket Seat (I388/389). I suspect, though, that the same principles will apply to the replacement of any type of 991 or 981 seat (be they manual 4-ways, electrical 14-ways or electrical 18 ways) with the folding buckets. I also believe that the same approach should work when replacing either of the electrically adjustable options (14-way or 18-way) with the latest fixed-back buckets, often called LWBs or 918-style seats (I373/374).
So, summarising the method (and including some imagery where things are a bit unusual, or specific, or tricky)...
1. Remove the existing seats:
1.1 Starting with the driver's seat, remove the trim covers at the front of the seat rails (use a screwdiver to raise the tab and then pull the trims forward and out).
1.2 Power the seat forwards to gain access to the two rear seat rail fixings and remove; power the seat rearwards and remove the two front fixings.
1.3 Power the seat to a mid-position (fore/aft) then make sure the seat is placed in its lowest position and power the backrest as far forward as possible; this is to make the seat as compact as possible for removal through the door aperture.
1.4 Repeat steps 1.1 to 1.3 for the passenger's side seat.
1.5 Remove the key from the ignition slot and disconnect the battery - remembering to remove the earth (-ve) connection first (to minimise the risk of a 'short' to exposed metalwork whilst removing the supply (+ve) connection).
1.6 Look underneath the front edge of the driver's side seat and locate the large yellow connector. Pulling the black 'wrap around' tab away from the body of the connector will cause the two parts (car and seat) of the connector to separate. The seat is now mechanically and electrically disconnected from the car.
1.6 Place protective padding in and over the door sill areas to provide protection whilst removing the seats. Prepare to be shocked by the weight of the seats, but from outside the car reach in and lift each seat out in turn. You may find it best to tilt the entire seat rearwards to help position it for removal through the aperture. Be careful not to damage the car (the seat rails have sharp-edged locating pins that protrude out from under the rail), or yourself as you wrestle with the size and weight of the seat!
1.7 Repeat for the pasenger side seat - the heavy work is now done and the floor area on each side of the car should like this:

2. Prepare the replacement LHD seats for RHD fitment
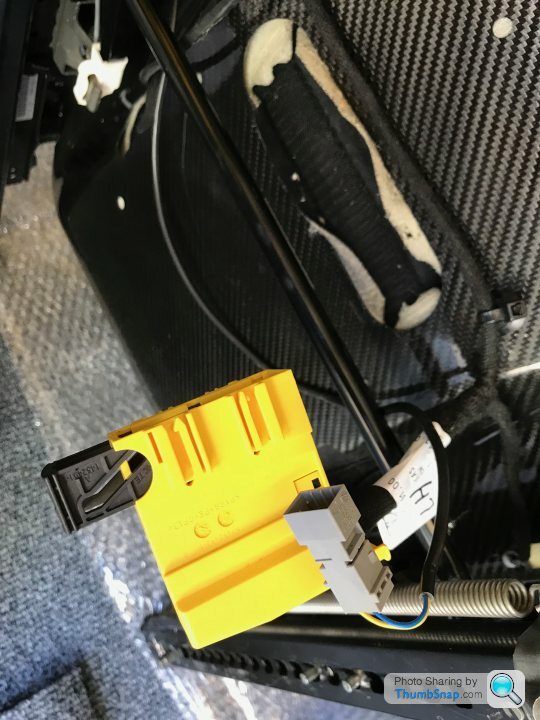
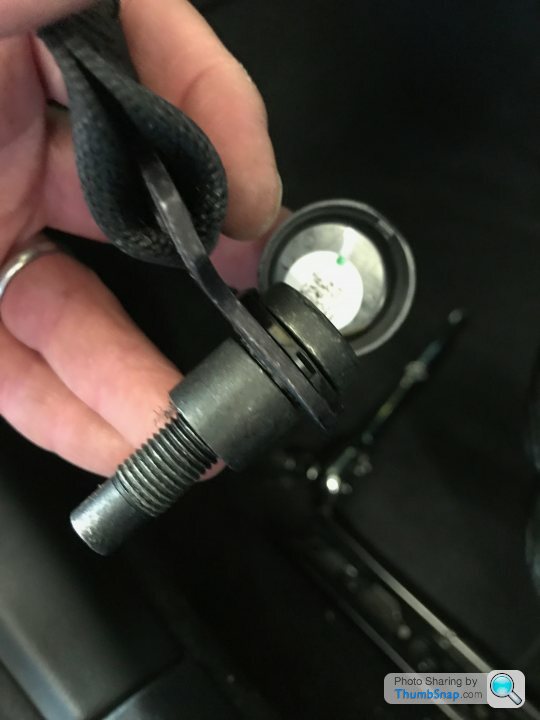
2.1 The seat belt stalk on the LH seat (the driver's seat of the LHD seat-set) also carries the electrical cable for the driver's side seat belt warning device and looks like this:
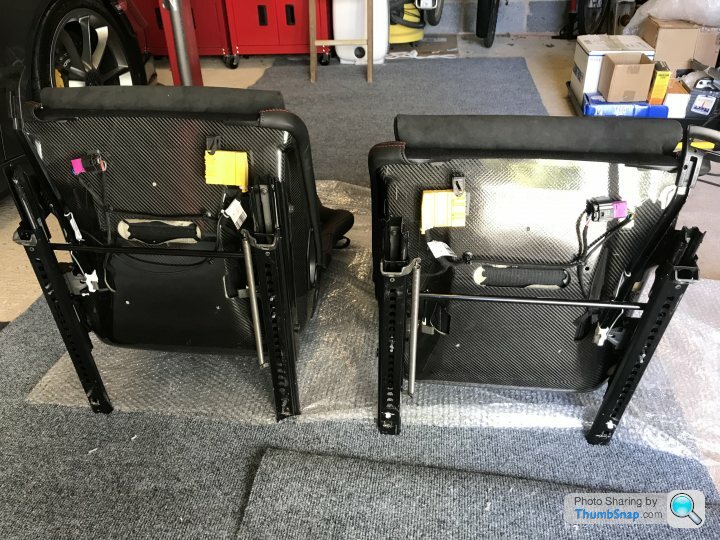
The following image shows the underside of the complete LHD seat set but, rather confusingly, I have positioned them incorrectly (the wrong way round, relative to each other). Dohh! Anyway...
 .
.
In the photos you should be able to see the single electrical cable that runs underneath the LH (driver's) seat from the seat belt buckle and into the yellow connector. As you look at the photo, it's the seat to the left of the picture. The buckle, cable and the related part of the connector need to be swapped over to what is the passenger seat in the LHD case, so that this becomes the driver's seat in the RHD installation.
2.2 Note the run of the cable under the LH seat (so that you can reproduce it on the RH seat) then remove the clips that fasten it to the underside of the seat pan moulding so that the cable is fixed only at each end - at the seat belt buckle and where it enters the yellow connector.
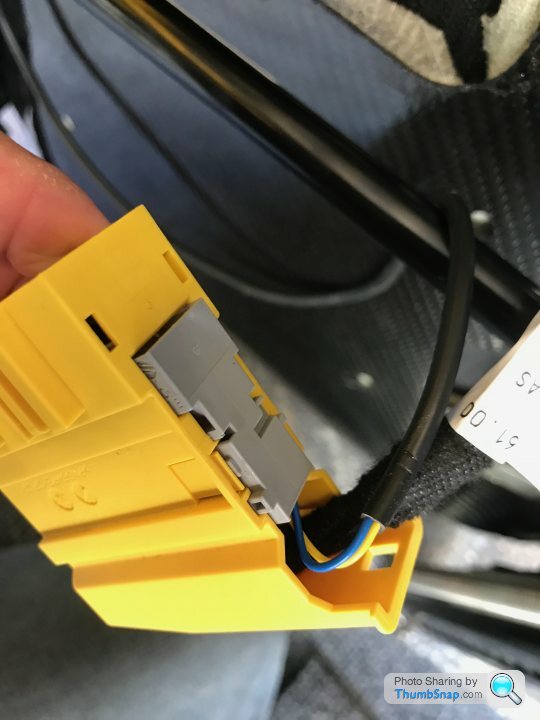
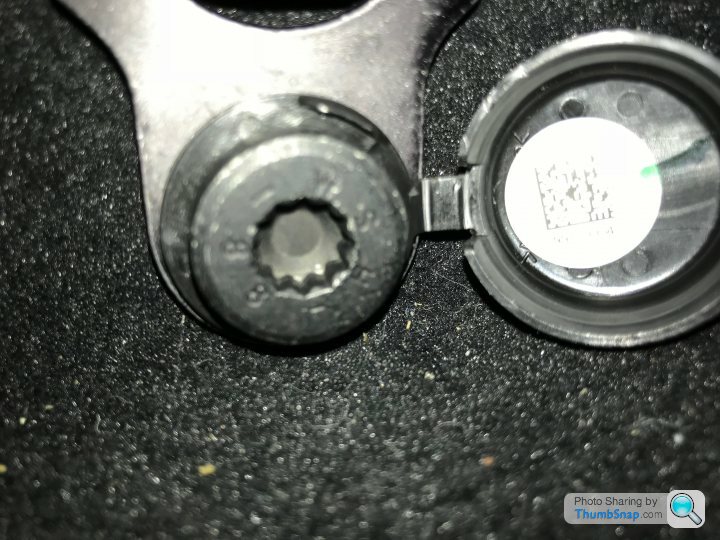
2.3 The yellow connector actually houses three different sub-connector blocks; the seat-belt buckle cable feeds into the small grey coloured two-pin rectangular block at the 'near' end of the yellow housing. (You can see the main power terminals in the black part, and what I believe to be the seat-mounted thorax-airbag electrical connections in the L-shaped grey connector, in the middle of the assembly).
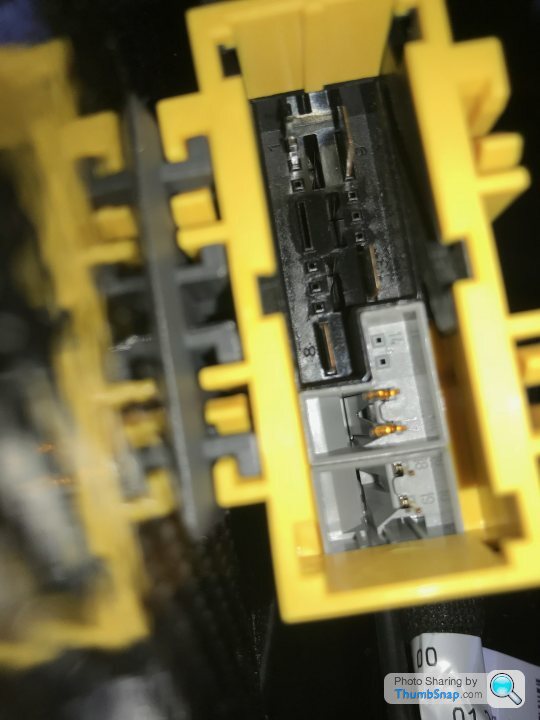
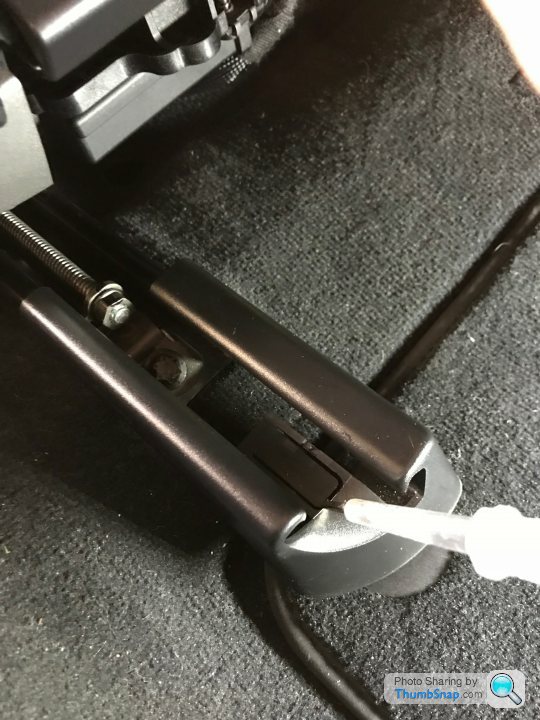
2.4 Squeeze the small tabs on the short edge of the yellow connector housing so that the seat belt warning sub-connector block can be removed from the yellow moulding. You can see the relevant grey block sliding out in the following two images:
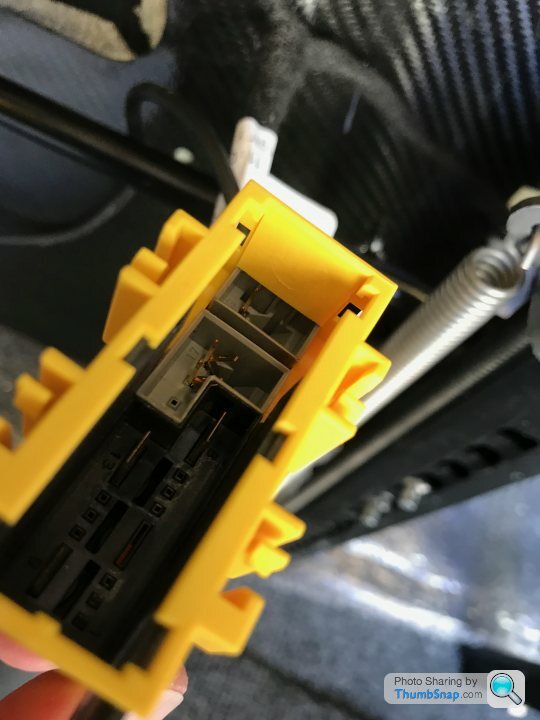
Once the sub-connector is out, it will look like this:
2.5 Now remove the seat belt buckle, cable and sub-connector from the LH seat, using a 17mm socket to unfasten the seat belt stalk from the seat frame.
2.6 On the RH seat, open-up the yellow connector block housing and remove the small grey sub-connector block that is identcal to the one used on the LH seat - except that it has no pins or electrical cable attached!
2.7 Remove the seat belt buckle from the RH seat.
2.8 Simply transpose the seat belt stalks from one seat to the other, so that the wired stalk, cable and connector is now attached to the RH seat (the driver's seat in the RHD fitment) and the 'bare' stalk is attached to the LH (now passenger) seat. Re-route the electrical cable to run under the RH seat , reusing the original clips and adding new cable-ties as necessary, and reassemble both yellow connector block assemblies with the wired or 'bare' grey sub-blocks as appropriate. The seat belt stalk and cable will now be fitted to the RH seat as follows:
2.9 The new seats are now configured for RHD installation, and ready for fitment to the car.
3. Finishing up
3.1 Fit the new seats back into the car (they are so easy to lift in!) and fix them down using the front and rear mechanical fixings.
3.2 Reconnect the yellow connector blocks under each of the driver's and passenger's seat, pushing-in the U-shaped black latch to lock the two halves securely together.
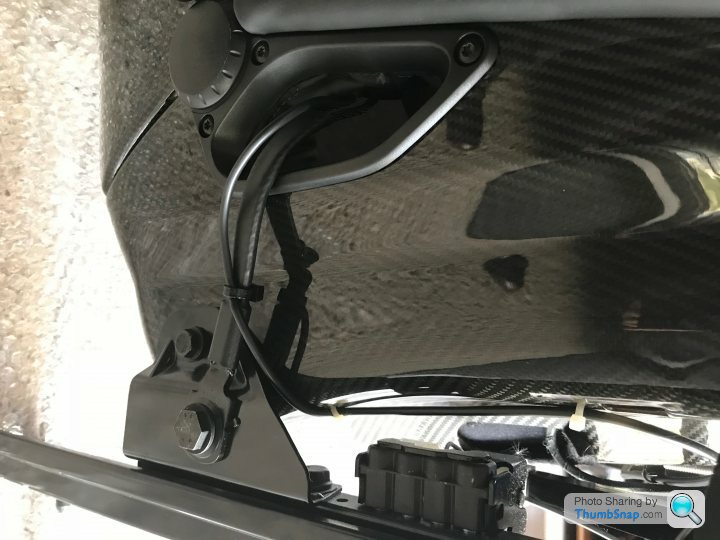
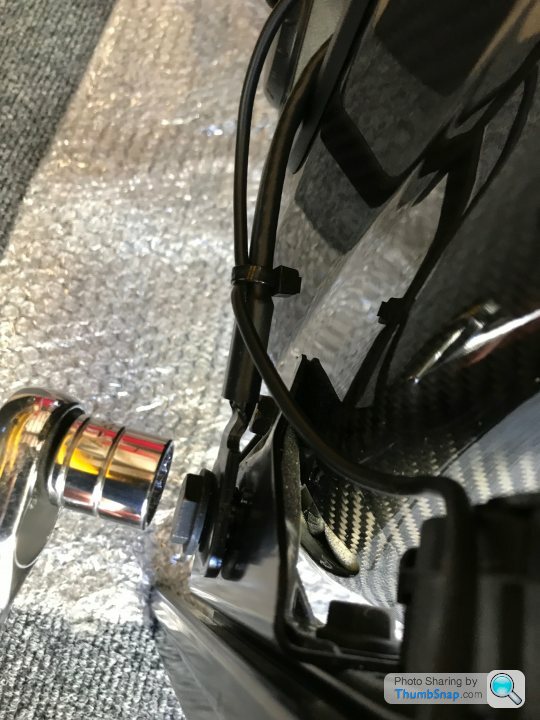
3.3 The seat belt installation now needs to be optimised for the bucket seat installation. This involves mounting the lower belt fixing point to the seat frame, rather than on the vehicle sill. Locate and remove the sill-mounted seat belt fixing (and place the spacer tube somewhere safe for use when the original seats are refitted):
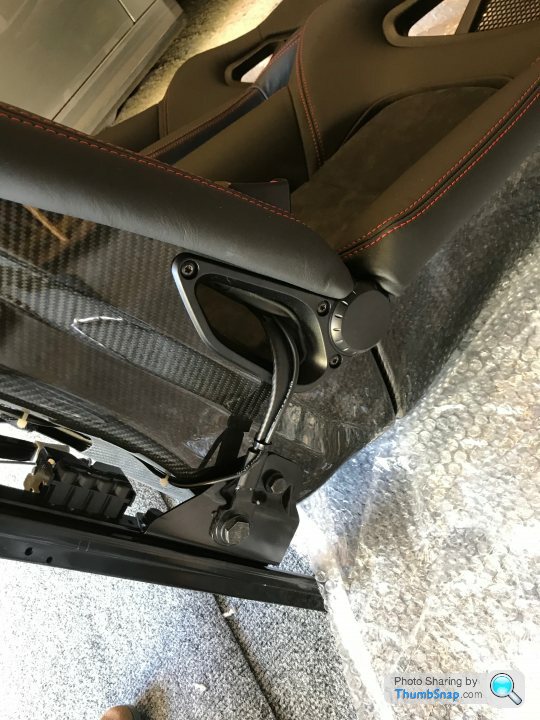
Route what is now the free end of the seat belt through the aperture in the side bolster of the bucket seat so that it emerges in an outboard direction; fix this end of the belt to the mounting point in the seat frame usingthe bolt that has been removed from the sill mounting point.

3.4 Take a deep breath and reconnect the battery terminals (reverse of earlier; reconnect the supply (+ve) terminal first, then the earth (-ve) connection).
3.5 Insert the key in tke key slot and power up the car, taking care to hold your breath... The airbag warning light should extinguish after approximately 5 seconds and the seat belt warning lamp should remain illuminated until the driver's seat belt is fastened. As per usual, in fact.
3.6 Time to stand back and admire your handiwork! You should have a couple of spare seats standing next to the car looking something like this:
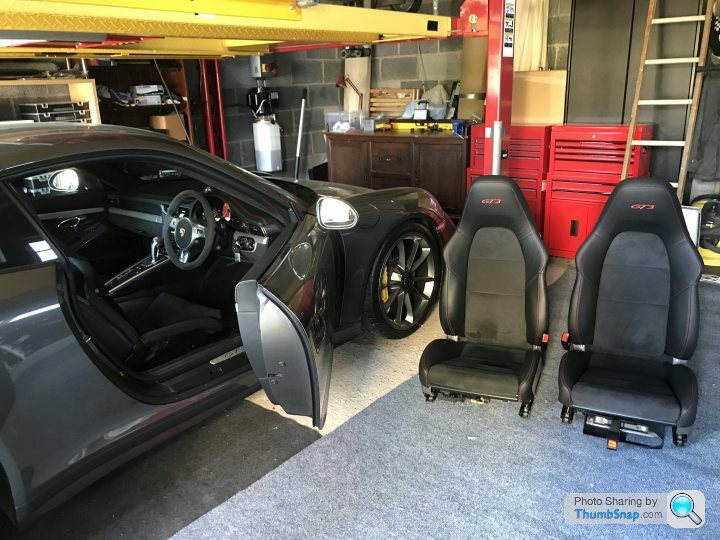
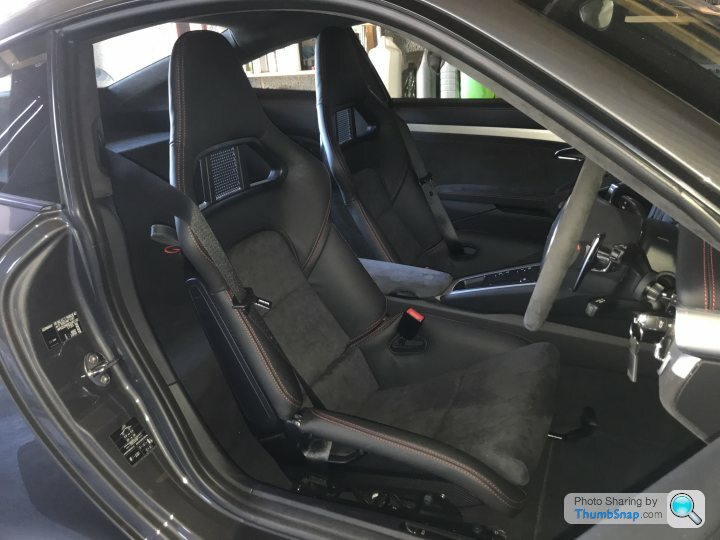
And the finished job will put a grin on your face!
I hope that is helpful!
James
After a little bit of work and adaptation, the LHD folding buckets are now safely installed in my RHD car. The seat belt warning lamp works perfectly (driver's side only) and the airbag warning light operates exactly as it should.
Phew!
Findings:
I think it's worth recapping the main findings which seem to be that:
1. Bucket seat sets are handed and separately part-numbered for LHD and RHD cars in UK/EUR/RoW markets only by virtue of the driver's-side seat belt buckle carrying an electrical connection (for the seat belt warning lamp).
2. Transposing the seat belt stalks and related electical connections over between seats is an easy DIY task.
3. In 981/991 generation cars, there is no passenger occupancy sensor fitted to UK/EUR/RoW seats (meaning that passenger-side airbags cannot be disabled, except through fitment and operation of the optional airbag-off key kit). This is different to the situation with US and Canada spec cars, where passenger occupancy sensors are fitted.
"How-to" notes:
A couple of people have asked for a "how-to" and, knowing how useful these threads can be for future owners, I'm happy to post some of the details as follows, subject - of course - to the usual disclaimer that I can't be held responsible for the outcome or consequences of any attempt you may make to follow the steps that I took.
I should start by saying that I was replacing 18-way Adaptive Sports Seats (I323/324) with the so-called folding bucket seats (or 997 GT2 buckets) although these are more formally called the Sports Bucket Seat (I388/389). I suspect, though, that the same principles will apply to the replacement of any type of 991 or 981 seat (be they manual 4-ways, electrical 14-ways or electrical 18 ways) with the folding buckets. I also believe that the same approach should work when replacing either of the electrically adjustable options (14-way or 18-way) with the latest fixed-back buckets, often called LWBs or 918-style seats (I373/374).
So, summarising the method (and including some imagery where things are a bit unusual, or specific, or tricky)...
1. Remove the existing seats:
1.1 Starting with the driver's seat, remove the trim covers at the front of the seat rails (use a screwdiver to raise the tab and then pull the trims forward and out).
1.2 Power the seat forwards to gain access to the two rear seat rail fixings and remove; power the seat rearwards and remove the two front fixings.
1.3 Power the seat to a mid-position (fore/aft) then make sure the seat is placed in its lowest position and power the backrest as far forward as possible; this is to make the seat as compact as possible for removal through the door aperture.
1.4 Repeat steps 1.1 to 1.3 for the passenger's side seat.
1.5 Remove the key from the ignition slot and disconnect the battery - remembering to remove the earth (-ve) connection first (to minimise the risk of a 'short' to exposed metalwork whilst removing the supply (+ve) connection).
1.6 Look underneath the front edge of the driver's side seat and locate the large yellow connector. Pulling the black 'wrap around' tab away from the body of the connector will cause the two parts (car and seat) of the connector to separate. The seat is now mechanically and electrically disconnected from the car.
1.6 Place protective padding in and over the door sill areas to provide protection whilst removing the seats. Prepare to be shocked by the weight of the seats, but from outside the car reach in and lift each seat out in turn. You may find it best to tilt the entire seat rearwards to help position it for removal through the aperture. Be careful not to damage the car (the seat rails have sharp-edged locating pins that protrude out from under the rail), or yourself as you wrestle with the size and weight of the seat!
1.7 Repeat for the pasenger side seat - the heavy work is now done and the floor area on each side of the car should like this:
2. Prepare the replacement LHD seats for RHD fitment
2.1 The seat belt stalk on the LH seat (the driver's seat of the LHD seat-set) also carries the electrical cable for the driver's side seat belt warning device and looks like this:
The following image shows the underside of the complete LHD seat set but, rather confusingly, I have positioned them incorrectly (the wrong way round, relative to each other). Dohh! Anyway...
. In the photos you should be able to see the single electrical cable that runs underneath the LH (driver's) seat from the seat belt buckle and into the yellow connector. As you look at the photo, it's the seat to the left of the picture. The buckle, cable and the related part of the connector need to be swapped over to what is the passenger seat in the LHD case, so that this becomes the driver's seat in the RHD installation.
2.2 Note the run of the cable under the LH seat (so that you can reproduce it on the RH seat) then remove the clips that fasten it to the underside of the seat pan moulding so that the cable is fixed only at each end - at the seat belt buckle and where it enters the yellow connector.
2.3 The yellow connector actually houses three different sub-connector blocks; the seat-belt buckle cable feeds into the small grey coloured two-pin rectangular block at the 'near' end of the yellow housing. (You can see the main power terminals in the black part, and what I believe to be the seat-mounted thorax-airbag electrical connections in the L-shaped grey connector, in the middle of the assembly).
2.4 Squeeze the small tabs on the short edge of the yellow connector housing so that the seat belt warning sub-connector block can be removed from the yellow moulding. You can see the relevant grey block sliding out in the following two images:
Once the sub-connector is out, it will look like this:
2.5 Now remove the seat belt buckle, cable and sub-connector from the LH seat, using a 17mm socket to unfasten the seat belt stalk from the seat frame.
2.6 On the RH seat, open-up the yellow connector block housing and remove the small grey sub-connector block that is identcal to the one used on the LH seat - except that it has no pins or electrical cable attached!
2.7 Remove the seat belt buckle from the RH seat.
2.8 Simply transpose the seat belt stalks from one seat to the other, so that the wired stalk, cable and connector is now attached to the RH seat (the driver's seat in the RHD fitment) and the 'bare' stalk is attached to the LH (now passenger) seat. Re-route the electrical cable to run under the RH seat , reusing the original clips and adding new cable-ties as necessary, and reassemble both yellow connector block assemblies with the wired or 'bare' grey sub-blocks as appropriate. The seat belt stalk and cable will now be fitted to the RH seat as follows:
2.9 The new seats are now configured for RHD installation, and ready for fitment to the car.
3. Finishing up
3.1 Fit the new seats back into the car (they are so easy to lift in!) and fix them down using the front and rear mechanical fixings.
3.2 Reconnect the yellow connector blocks under each of the driver's and passenger's seat, pushing-in the U-shaped black latch to lock the two halves securely together.
3.3 The seat belt installation now needs to be optimised for the bucket seat installation. This involves mounting the lower belt fixing point to the seat frame, rather than on the vehicle sill. Locate and remove the sill-mounted seat belt fixing (and place the spacer tube somewhere safe for use when the original seats are refitted):
Route what is now the free end of the seat belt through the aperture in the side bolster of the bucket seat so that it emerges in an outboard direction; fix this end of the belt to the mounting point in the seat frame usingthe bolt that has been removed from the sill mounting point.
3.4 Take a deep breath and reconnect the battery terminals (reverse of earlier; reconnect the supply (+ve) terminal first, then the earth (-ve) connection).
3.5 Insert the key in tke key slot and power up the car, taking care to hold your breath... The airbag warning light should extinguish after approximately 5 seconds and the seat belt warning lamp should remain illuminated until the driver's seat belt is fastened. As per usual, in fact.
3.6 Time to stand back and admire your handiwork! You should have a couple of spare seats standing next to the car looking something like this:
And the finished job will put a grin on your face!
I hope that is helpful!
James
Edited by short-shift on Tuesday 9th October 07:27

woollyjoe said:
Can I ask what they cost and where you got them?
There's a pretty regular market for the bucket seats, whether folding-back as I wanted or the fixed-back 918-style LWB's. Asking prices are pretty consistent (and strong) if you look across the various forums and sites, both here (UK) and in the US. I'd say that the LWB's command a higher price than the folders (borne out by ads and known transactions in the UK and the US) and it's also fair to say that some of the folding buckets that you see advertised are getting on in age a bit now - more available from 997-era cars than the later 981/991 generation vehicles.For me, the task of finding a pair of buckets was made more difficult because I wanted the red deviated (see, I have given up on my earlier description...) stitching. They really don't pop-up very often, so you can perhaps see why I was so interested when I came across 'my' set even though they were located in mainland Europe and came out of a LHD car.
I bought them from teile.com, who seem to be building a name for themselves in supplying both new and used genuine Porsche parts. I think they have physical operations in Poland and in the east of Germany. They present their products very cleanly on their webste and, last time I looked, they were offering a number of 981/991 generation bucket seats in different colours and specs. Their prices are in-line with the market and vary according to age, condition and spec/desirability - I noticed that a set of red leather folders was priced a bit lower than the more regular colours...
Without disclosing what I paid, I can say that I was happy with the price that we finally settled on, after some serious but well-natured negotiation. I can also confirm that Michael at Teile was excellent to deal with; very responsive, accurate with information and willing to go the extra mile to make sure that things were as they should be. Shipping from Germany was reasonably priced and very quick - even allowing for the fact that my seats took an unplanned tour around the UK on their way to me (a cock-up by the courier company; not the fault of teile.com at all, and reassuringly they they were fast and effective in getting the issue resolved for me). I can certainly recommend them, based on my experience.
James
Edited by short-shift on Wednesday 3rd October 10:34
Gassing Station | 911/Carrera GT | Top of Page | What's New | My Stuff