Murci Interior tidying
Discussion


Good weekend working on the interior.
Removed Passenger door card to re-glue the leather that was lifting.
Easy to remove;
lever out the small red light on the back of the door - there is a bolt in there.
Remove speaker grill and then the 4 screws holding the speaker.
Remove the two cover pieces behind the wing mirror - there is a bolt in there.
Lift up door release and remove bolt there.
The panel then just lifts off -It is a little fiddly to feed the door release through the door card but if you remove the gold brackets it will go.
there are none of the little clips that snap off on the card itself (there are on the cover panels behind the mirror).
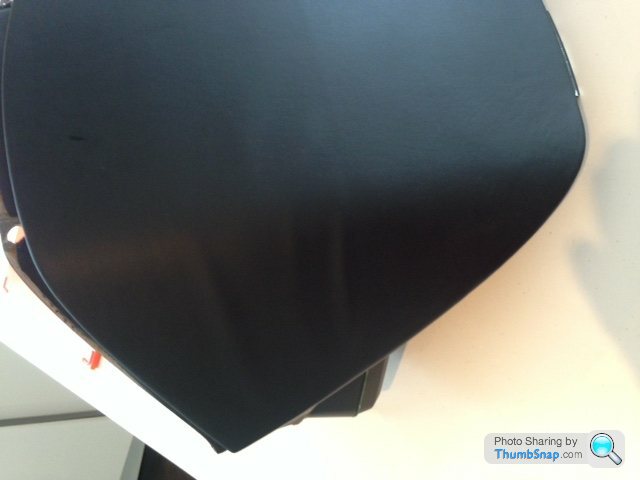
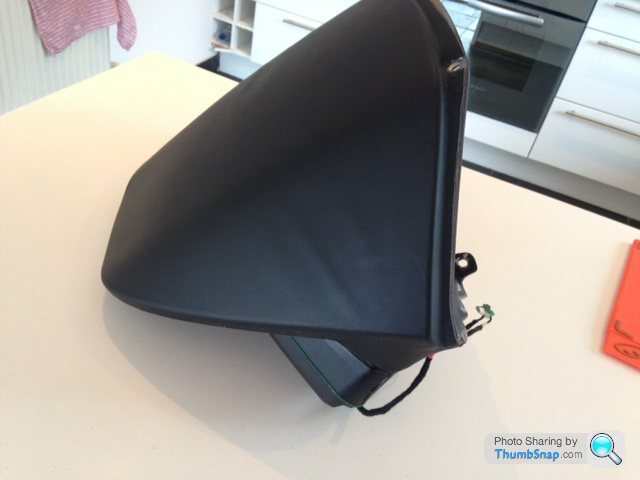
Changed rear view mirror.
The liquid inside for the auto-dim function leaks. It is a Magna Donnelly unit from an Audi A6 c5 model - they all leak. You can buy a new Lambo /Audi one, or a second hand manual adjusting one for a few pounds on ebay. Yes it is not original but it is a rear view mirror !
The arm attached to the screen rotates / twists sideways to come off, and the mirror itself is just a ball and socket joint. I pushed the wires up into the head lining so they are still there if anybody ever want to replace it with an original one.
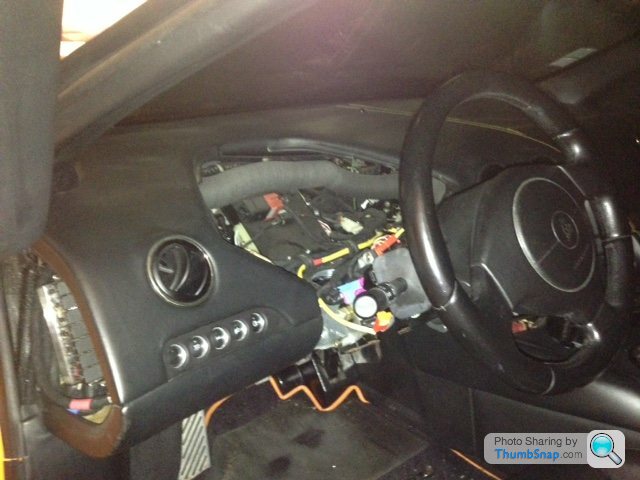
Re-glued the leather on the Instrument binnacle. They appear only to glue around the very edge so that over time the middle section starts to lift.
To remove;
Take off the steering column shroud - a handful of screws.
Remove the plastic / carbon trim at the front of the binnacle - two bolts.
Once off you can see two small socket head bolts and if you feel underneath there are two plastic spin on nuts that you undo by hand. The unit then slides towards you and out. There are two cable connectors on the back of the unit - just unplug. The 4 smaller buttons on the surround - trip, dash lighting etc - you are on your own here I am afraid. There are 4 5p sized circuit boards that appear to clip in the unit behind the buttons. The wire connection unplugged on some but on others it pulled the circuit board away from the unit - they don't snap but are very fragile looking.
I haven't refitted it yet but will clean the dash and refit tonight. It would not be hard to re do this part in leather / alcantara as it is only glued on.
Once I get the radio surround buttons back that has the interior looking better. There are a few marks on the passenger seat which I will have a go on with the hair drier and conditioner, if they don't improve I can get those parts redone. The same with the arm rest, again as glued on I could change that myself.
I still have an annoying squeak / rattle some where....
Del
Removed Passenger door card to re-glue the leather that was lifting.
Easy to remove;
lever out the small red light on the back of the door - there is a bolt in there.
Remove speaker grill and then the 4 screws holding the speaker.
Remove the two cover pieces behind the wing mirror - there is a bolt in there.
Lift up door release and remove bolt there.
The panel then just lifts off -It is a little fiddly to feed the door release through the door card but if you remove the gold brackets it will go.
there are none of the little clips that snap off on the card itself (there are on the cover panels behind the mirror).
Changed rear view mirror.
The liquid inside for the auto-dim function leaks. It is a Magna Donnelly unit from an Audi A6 c5 model - they all leak. You can buy a new Lambo /Audi one, or a second hand manual adjusting one for a few pounds on ebay. Yes it is not original but it is a rear view mirror !
The arm attached to the screen rotates / twists sideways to come off, and the mirror itself is just a ball and socket joint. I pushed the wires up into the head lining so they are still there if anybody ever want to replace it with an original one.
Re-glued the leather on the Instrument binnacle. They appear only to glue around the very edge so that over time the middle section starts to lift.
To remove;
Take off the steering column shroud - a handful of screws.
Remove the plastic / carbon trim at the front of the binnacle - two bolts.
Once off you can see two small socket head bolts and if you feel underneath there are two plastic spin on nuts that you undo by hand. The unit then slides towards you and out. There are two cable connectors on the back of the unit - just unplug. The 4 smaller buttons on the surround - trip, dash lighting etc - you are on your own here I am afraid. There are 4 5p sized circuit boards that appear to clip in the unit behind the buttons. The wire connection unplugged on some but on others it pulled the circuit board away from the unit - they don't snap but are very fragile looking.
I haven't refitted it yet but will clean the dash and refit tonight. It would not be hard to re do this part in leather / alcantara as it is only glued on.
Once I get the radio surround buttons back that has the interior looking better. There are a few marks on the passenger seat which I will have a go on with the hair drier and conditioner, if they don't improve I can get those parts redone. The same with the arm rest, again as glued on I could change that myself.
I still have an annoying squeak / rattle some where....
Del


del mar said:
Good weekend working on the interior.
Removed Passenger door card to re-glue the leather that was lifting.
Easy to remove;
lever out the small red light on the back of the door - there is a bolt in there.
Remove speaker grill and then the 4 screws holding the speaker.
Remove the two cover pieces behind the wing mirror - there is a bolt in there.
Lift up door release and remove bolt there.
The panel then just lifts off -It is a little fiddly to feed the door release through the door card but if you remove the gold brackets it will go.
there are none of the little clips that snap off on the card itself (there are on the cover panels behind the mirror).
Changed rear view mirror.
The liquid inside for the auto-dim function leaks. It is a Magna Donnelly unit from an Audi A6 c5 model - they all leak. You can buy a new Lambo /Audi one, or a second hand manual adjusting one for a few pounds on ebay. Yes it is not original but it is a rear view mirror !
The arm attached to the screen rotates / twists sideways to come off, and the mirror itself is just a ball and socket joint. I pushed the wires up into the head lining so they are still there if anybody ever want to replace it with an original one.
Re-glued the leather on the Instrument binnacle. They appear only to glue around the very edge so that over time the middle section starts to lift.
To remove;
Take off the steering column shroud - a handful of screws.
Remove the plastic / carbon trim at the front of the binnacle - two bolts.
Once off you can see two small socket head bolts and if you feel underneath there are two plastic spin on nuts that you undo by hand. The unit then slides towards you and out. There are two cable connectors on the back of the unit - just unplug. The 4 smaller buttons on the surround - trip, dash lighting etc - you are on your own here I am afraid. There are 4 5p sized circuit boards that appear to clip in the unit behind the buttons. The wire connection unplugged on some but on others it pulled the circuit board away from the unit - they don't snap but are very fragile looking.
I haven't refitted it yet but will clean the dash and refit tonight. It would not be hard to re do this part in leather / alcantara as it is only glued on.
Once I get the radio surround buttons back that has the interior looking better. There are a few marks on the passenger seat which I will have a go on with the hair drier and conditioner, if they don't improve I can get those parts redone. The same with the arm rest, again as glued on I could change that myself.
I still have an annoying squeak / rattle some where....
Del
Post revival. Removed Passenger door card to re-glue the leather that was lifting.
Easy to remove;
lever out the small red light on the back of the door - there is a bolt in there.
Remove speaker grill and then the 4 screws holding the speaker.
Remove the two cover pieces behind the wing mirror - there is a bolt in there.
Lift up door release and remove bolt there.
The panel then just lifts off -It is a little fiddly to feed the door release through the door card but if you remove the gold brackets it will go.
there are none of the little clips that snap off on the card itself (there are on the cover panels behind the mirror).
Changed rear view mirror.
The liquid inside for the auto-dim function leaks. It is a Magna Donnelly unit from an Audi A6 c5 model - they all leak. You can buy a new Lambo /Audi one, or a second hand manual adjusting one for a few pounds on ebay. Yes it is not original but it is a rear view mirror !
The arm attached to the screen rotates / twists sideways to come off, and the mirror itself is just a ball and socket joint. I pushed the wires up into the head lining so they are still there if anybody ever want to replace it with an original one.
Re-glued the leather on the Instrument binnacle. They appear only to glue around the very edge so that over time the middle section starts to lift.
To remove;
Take off the steering column shroud - a handful of screws.
Remove the plastic / carbon trim at the front of the binnacle - two bolts.
Once off you can see two small socket head bolts and if you feel underneath there are two plastic spin on nuts that you undo by hand. The unit then slides towards you and out. There are two cable connectors on the back of the unit - just unplug. The 4 smaller buttons on the surround - trip, dash lighting etc - you are on your own here I am afraid. There are 4 5p sized circuit boards that appear to clip in the unit behind the buttons. The wire connection unplugged on some but on others it pulled the circuit board away from the unit - they don't snap but are very fragile looking.
I haven't refitted it yet but will clean the dash and refit tonight. It would not be hard to re do this part in leather / alcantara as it is only glued on.
Once I get the radio surround buttons back that has the interior looking better. There are a few marks on the passenger seat which I will have a go on with the hair drier and conditioner, if they don't improve I can get those parts redone. The same with the arm rest, again as glued on I could change that myself.
I still have an annoying squeak / rattle some where....
Del
My interior mirror is doing the same, do you happen to have the PN for the replacement Audi one? Or what the non dimming one PN is?
for future help; the Audi part numbers are stamped on the part. I.e the centre ashtray in the armrest is from an Audi A6, the part number is printed/stamped on the bottom (4B0 857 405). The same is true with the mirror and many other minor Audi sourced parts (including number plate lights etc)
Gassing Station | Diablo/Murcielago/Aventador | Top of Page | What's New | My Stuff