Tuscan Challenge Road Car (at the moment) build project
Discussion


Chuggaboom said:
I found a couple of 35mm pics from Combe in 98 Steve.....two different cars.
Although not close up, you can make out one of those carbon recess on the passenger side wing a couple of inches below the bonnet line and 3 to 4 inches fwd of the door, 90 degrees about to that pictured above.
Personally I'd go with in the dash....no little fingers pulling on things from outside the car when you are not around, but if you decide otherwise let me know if you'd like thes pics scanned and sent.
Thanks for the info Grant,Although not close up, you can make out one of those carbon recess on the passenger side wing a couple of inches below the bonnet line and 3 to 4 inches fwd of the door, 90 degrees about to that pictured above.
Personally I'd go with in the dash....no little fingers pulling on things from outside the car when you are not around, but if you decide otherwise let me know if you'd like thes pics scanned and sent.
This sounds right to me ...she needs to look right ..never going to please everyone on something like this but want to be sympathetic to what could have in this application....
I reckon rotating the surround by 90% would look more aesthetically pleasing ( not being unappreciative of Dave's car here...it's just how these cars got put together...not many the same) need to work around the side repeater location ..so will sit below this by the look of things ...
I have a duplicate of this thread on the wwm tvrcc forum, this is an extract from that thread, hope formatting works!
I left this thread at the stage where we were trying to get the correct position for the engine and gearbox getting the correct height to clear the chassis top tubes, not fouling with the bulhead and making sure the gear lever was in the correct position...the replacement chassis was one set up for an AJP engine ...I am running a TVR RV8 500 engine ..so new mounts were required ...
Terry cutting tube on my drive...

The replacement tube is noticeably thicker than the original tubes....


 You notice a green "cross" on one of the white tubes, I put this on so I knew which one I needed to cut out!
Bare in mind that I had already prepared this chassis....and this is it....I have lost count of the number of times I have prepared something on this car then ended up replacing it, damaging it or loosing it!
I made a concious decision to retain the AJP engine mounts....which are in the image above in the top left hand corner...
The engine now sits v.well within the chassis....and looks correct...the grea lever position is correct the starter motor clears the chassis....I did have to cut a corner off the back of the engine on the passenger side though...this part of the cylinder head is used to hold the head does for machining....and this still can be done as I only "shaved" the minimum off Tongue
The rear gearbox mount was given to me by Tim Hood....it's off Tim's race Sagaris as he has gone a different route...
We then decided to take the whole think up to ACEL Metalworks (Terry's Business) ....
long story... but in summary I have known Terry and Tim since the Britcar 24Hrs stuff....in April 2014 they were entered in the GT Cup, they had paid all the entry and had blew two diffs on the Friday and Saturday....I got the call at 4pm on the Saturday afternoon to see if my diff was in the car...which it was....they said OK leave it then ...I sent them photographs of it so they knew what it was....turns out was the right one for the job...a "Cone" diff...Karl, Liz Ginny and myself ended up taking the body off my challenge car and dashing up to Donningtan.....at 7PM my diff was sat on the floor in the pit garage...
This was the moment....


They needed to change the back cover which I had sealed...hey ho!
.they fit it overnight....we would only know if was any good if he stayed out....he did and qualified 6Th!
He went on to come finish 4th in the first race and 5th in the second.....and this is against ferrari, maclaren and other big budget teams....
Since this time we have formed an even stronger friendship and help each other out which is nice..guess thats the TVR world.....hence Terry offered assistance over the welding...at a decent rate...as Crispian would say "on the money"
ACEL are in Nottingham near Trowel ...my 100 mile round trips had startedApprove...I could have asked Terry to "sort it" for me, but this is not what this project is about...I need to be involved in every step of the way...I did not possess the knowledge of how to do many aspects of this build, but I want to learn from it....and know ho this thing goes together...even though it is v.frustrating at times
Edited by schimg on Monday 9th February 14:32
Edited by schimg on Monday 9th February 14:50
RetroWheels said:
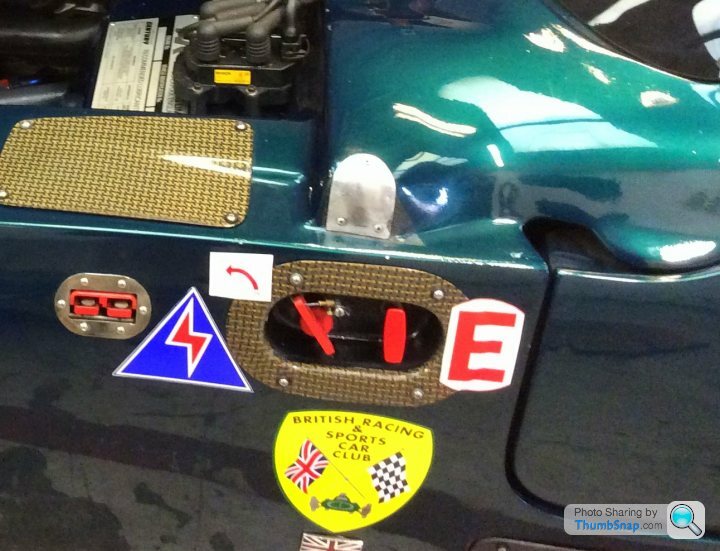

Two more here Steve , the blanking plate to the left of the recess on the red car was a factory mod when some cars had there Andesron connector sockets moved elesewhere.
And here's an Obscure Tuscan Fact..
The stainless/carbon look 'glass blanks were made by factory apprentices.
 .
.Looks like the route I will take....just need to locate one....missing the cover for the driverside engine bay...the shaped cover on the inner wing....
ctsdave said:
Hi Steve. Cant remember speaking to you (sorry!!) Been manic with work amd Ems pregnancy etc...
Can you let me know sizes (diameter) of lamps and I will look into it Monday. And if your at race retro on the Saturday can give them to you there...
No Worries Dave,Can you let me know sizes (diameter) of lamps and I will look into it Monday. And if your at race retro on the Saturday can give them to you there...
Priorities right there family and work...congrats on Ems situ brilliant news!
Will get the measure out when I am at the body shop tomorrow ...
Thanks
Hello Steve,
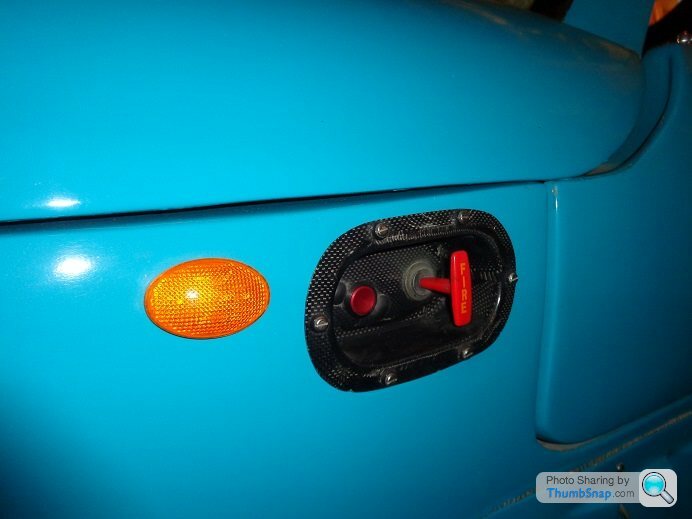
I finally got around to taking a photo of my cut-out switch. It looks similar to the one on Darren's car. Mine's got a fire extinguisher handle and a momentary push switch that goes to an Armtech battery isolator. As a road car, the battery isolator isn't a problem, but I think I'll only connect the fire extinguisher up to the handle when it's on a track. There are too many muppets out there who would find it funny to cover the car in foam/powder when it's parked up somewhere in public.
I don't know if these carbon fibre / gelcoat / fibreglass cut-out switch inserts were fitted to just the later AJP cars, or whether they'd already found their way onto the Rover powered cars. I'm sure there's someone out there with a lot more knowledge than me.
.....Rich
TiffsTuzzy said:
Hello Steve,
I finally got around to taking a photo of my cut-out switch. It looks similar to the one on Darren's car. Mine's got a fire extinguisher handle and a momentary push switch that goes to an Armtech battery isolator. As a road car, the battery isolator isn't a problem, but I think I'll only connect the fire extinguisher up to the handle when it's on a track. There are too many muppets out there who would find it funny to cover the car in foam/powder when it's parked up somewhere in public.
I don't know if these carbon fibre / gelcoat / fibreglass cut-out switch inserts were fitted to just the later AJP cars, or whether they'd already found their way onto the Rover powered cars. I'm sure there's someone out there with a lot more knowledge than me.
.....Rich
Yes agree with being wary about fools who might find it hilarious to cover the car with extinguisher powder horrible stuff that Tims car was covered in it after the silverstone GT cup hanger straight fire incident....nasty stuff ...hard to get off...but does the trick.
I like the Carbon job and it would match my rear diffuser and oil cooler surrounds which will be lacquered ....right where to find one, ...could do with it soon as starting body tub prep today ...gonna extend the dash front edge to the screen too....
Off topic....my rear calipers are CP 5111 ( think from memory) same casting number as my Cerbera 450, so got same pads as are in my Cerb....pads don't fit the pin locating holes are in a different position!
My rear calipers are offset piston solid disc challenge car ones ...never been used so don't have pads.....any thoughts as to which pad I need I think the ones I got we're Pad20?
Thanks
77racing said:
Hi Steve looking good in text you sent don't always get them.a quick call to terry should have the answer. if you get really stuck I have a carbon fibre one in the barn I think with cables etc but I not seen it for a year or two would have to look
Perry if you find yourself in a barn......


Glad that you finally got round to updating and that you are still as anal as ever! Some things never change 
Now that I am so far away I rely on PH for progress reports on the Tuscan so keep it up as I cant get on to the TVR site . Some progress piccies would make my day!
When I left all that you had was a pile of rusty tubes on the drive, so much respect to you and all of your helpers.
We are coming up to the UK in May and hope to pop to Nuneaton so may see you then.
Some things never change Now that I am so far away I rely on PH for progress reports on the Tuscan so keep it up as I cant get on to the TVR site . Some progress piccies would make my day!
When I left all that you had was a pile of rusty tubes on the drive, so much respect to you and all of your helpers.
We are coming up to the UK in May and hope to pop to Nuneaton so may see you then.
marsdalebear said:
That will look a whole lot nicer if he gets his hands on it!
Hi John,Hope things aren't too hot out there in Barbados.....Ginny has given me a pass out to visit you....now that would be interesting!
This car will be on the TVRCC stand at the Practical Classic Show at the end of March so I need to get my backside in gear!
Not sure if I could recover this in carbon, I think I would need to glass in the holes and spray it the same colour as the cage....I need to speak to Perry actually bit ignorant of me not getting back to him sooner in all fairness...
Bit of sad news Buster passed away in my arms just after New Year....we now have another dog mastiff / staffie cross...Buddy..from the dogs trust .....so now we have two dogs ....with Boe a Big Staffie both having their nads removed this morning!
Hope your are all well...love to Jetty from us mate
Edited by schimg on Monday 16th February 08:10
If you want something pristine just make a mould/plug and make your own piece. Cut a few lozenge shaped pieces out of mdf and screw onto a flat piece so you have the top hat shape, put a curved radius on the top with a router, tidy up the sides with body filler, curved radius on the bottom with body filler and a coin/washer, rub it all down, paint, polish, wax and then get busy with the carbon/resin. If you want to hide the joins in the carbon cloth use black gel coat and masking tape before you use the carbon cloth. A fair bit of work but very satisfying...
77racing said:
black shoe polish and large head rivets that's the original way. These are race cars Steve not concourse show cars remember 
Appreciate the post ...see where you are at....with race cars some bits like bonnets etc are considered consumables ...and lucky to last a season.....I have spent shed loads of time on filling the bonnet over the last few weeks ...used I think four large tubs of upol easy .....that's over £100 in filler on the bonnet alone...most of it has been vacuumed off! ..
..the finish we are trying to achieve will be high end ....my body shop man will accept nothing less ...I think this road going car warrants it...
The car goes on the TVRCC stand at the NEC at the end of March...it will be painted by then...Richard will spend two days mopping the car on the stand.....Terry will be working with me too we will be fitting stuff the rear end support, petrol, fuel lines exhaust ....on the stand ....come along and have a look the kettle will be on!
MH Dneg said:
whats that about race car bonnets being consumables!!!!!!!!!! 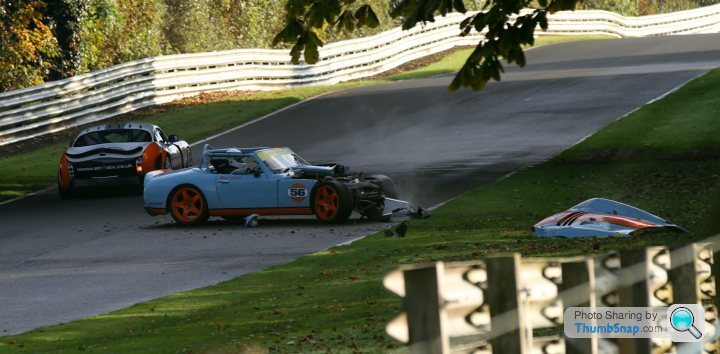
In tuscan terms, the only thing unusual about that picture is the fact that Jason has a brake light out. Everything else in that image is perfectly normal for a Tuscan race or qually on an October morning at Oulton Park Edited by NTEL on Friday 20th February 14:06
Gassing Station | General Motorsport | Top of Page | What's New | My Stuff