Ferrari F430 Spider
Discussion


A very good question.
Superfast 2 is a significant improvement that can be felt on every drive. The change speed is on another level, but the gear ratios are also modified; the lower gears are closer, and interestingly 6th is taller, so long-distance work (road trips) are actually quieter in the cabin.
The electronic systems are better and this really is a road driving benefit: I have a bigger operating window with a faster reacting safety net meaning I can push as hard as I'd really want to on the road but leave the systems on.
The ride and composure over uneven surfaces is another big one. The reduced un-sprung weight has made a significant difference in this area - it genuinely feels like a different car, floating along the road maintaining a very level and stable body, rather than the surface dictating the stability somewhat.
It responds faster to the helm, doesn't have a propensity to bottom out at the front like the standard car, and as said previously; there's a big increase in suspension response/finesse, but the actual handling characteristics and feel aren't significantly different.
The iron brakes on the F430 are really bad for even fast road driving but the optional CCBs that my car had really resolve that whilst maintaining (surprisingly) very good pedal feel. I never got them to fade on the road. The 398mm Scuderia brakes (additional 18mm diameter) I've added haven't really given me anything extra for road driving.
The sprung weight loss is a funny one: it is noticeable but not in the significant way the other changes are. I think the benefits of light weight road cars can be over-stated a little bit, but I also think I need to go further in this area. Here's a runway drag between an F430 Spider and Scuderia coupe (which has a power to weight ratio I'm now close to):
https://www.youtube.com/watch?v=6a922y4R1ok
The non-functional changes (well, aside from a bit of weight loss) have made it a much more special car to own. I feel really lucky to have it.
mwstewart said:
kingkongsfinger said:
No, not got the money to buy it but enjoyed watching the sale as they are one of my favorite cars.
I think you car is actually a lot better than a Scuderia, I mean a lot better. Heaven knows how you have the time, energy and patience to do it.
I cannot begin to imagine how much it would cost to get a Ferrari specialist to carry out the work or even get close to the attention to detail you have lavished over the car, easily double the car value IMO.
Do carry on.

Thanks. The Scuderia, a 458, a manual F430, or the route I've taken were my options a couple of years ago. I'm now pretty much at the dream mid engine V8 spec I had at the outset - the top-down experience in a rigid chassis is exhilarating. I think you car is actually a lot better than a Scuderia, I mean a lot better. Heaven knows how you have the time, energy and patience to do it.
I cannot begin to imagine how much it would cost to get a Ferrari specialist to carry out the work or even get close to the attention to detail you have lavished over the car, easily double the car value IMO.
Do carry on.
My ultimate would be the current car with an engine rebuild but first I'll see how quick the car is with on the new management.
I've also pieced together the (discontinued) parts needed for a manual conversion - hedging my bets for the future if I get bored of F1!

Scuderia Engine Management Conversion - Electronics Completed and Tested
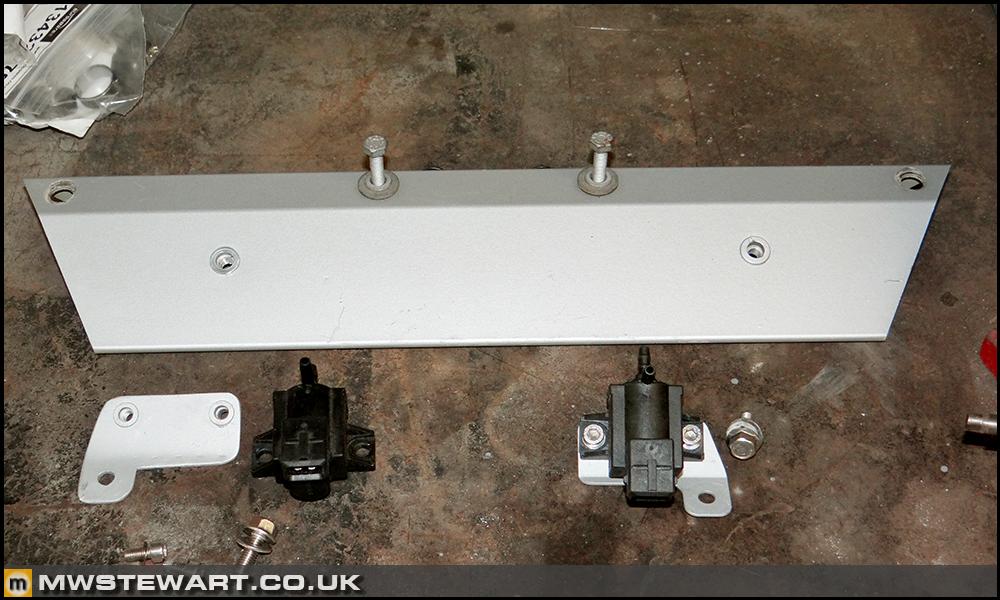
The SAI solenoid is located on part of the gearbox A frame support. I added a rivnut (left) to the frame part and Dad fabricated an aluminium mirrored version (left) of the existing inlet manifold crossover solenoid (right).
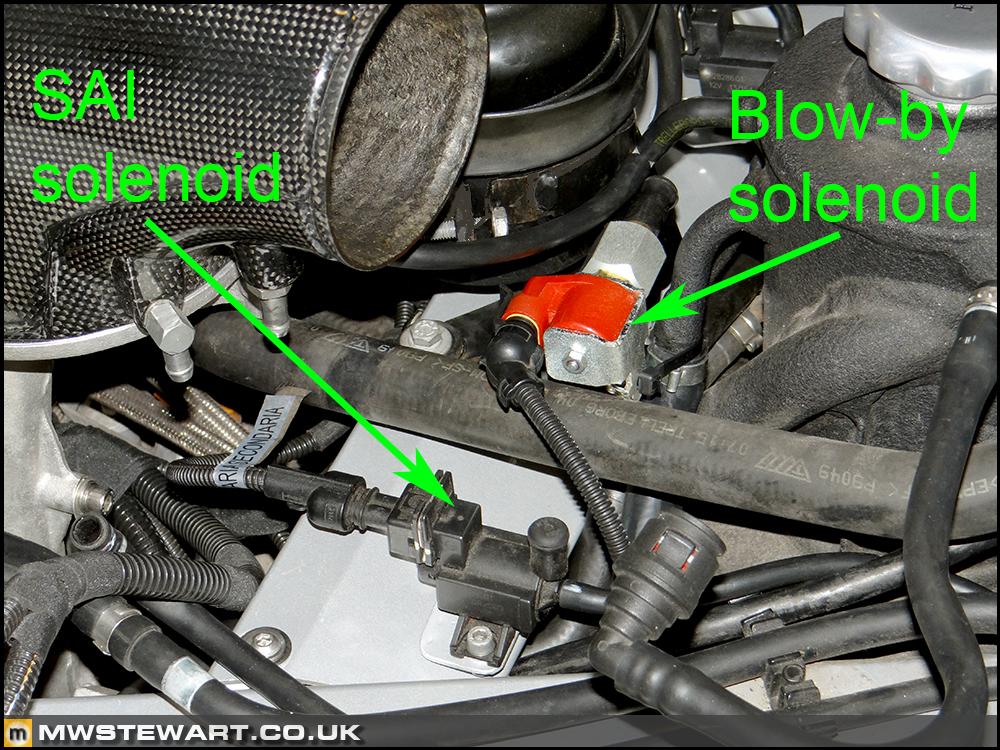
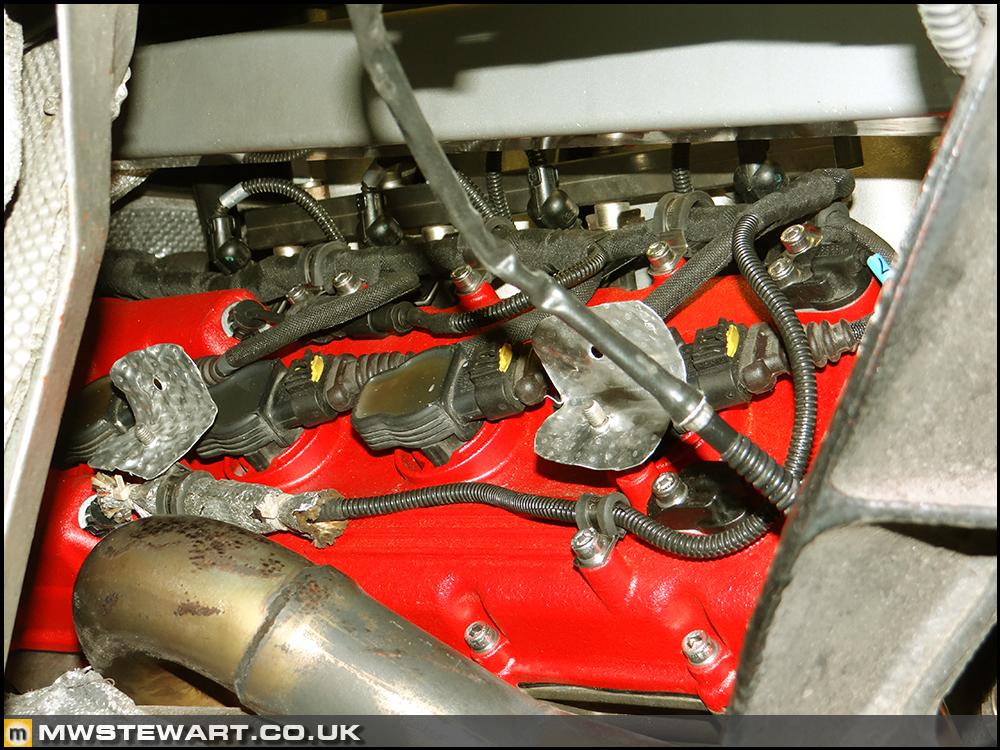
Here are the SAI solenoid and oil breather 'blow by' solenoid in place. For the purposes of testing the electronics I left the standard F430 disareator tank in place with some temporary plumbing to adapt it to the Scuderia cam cover plumbing & blow-by solenoid.
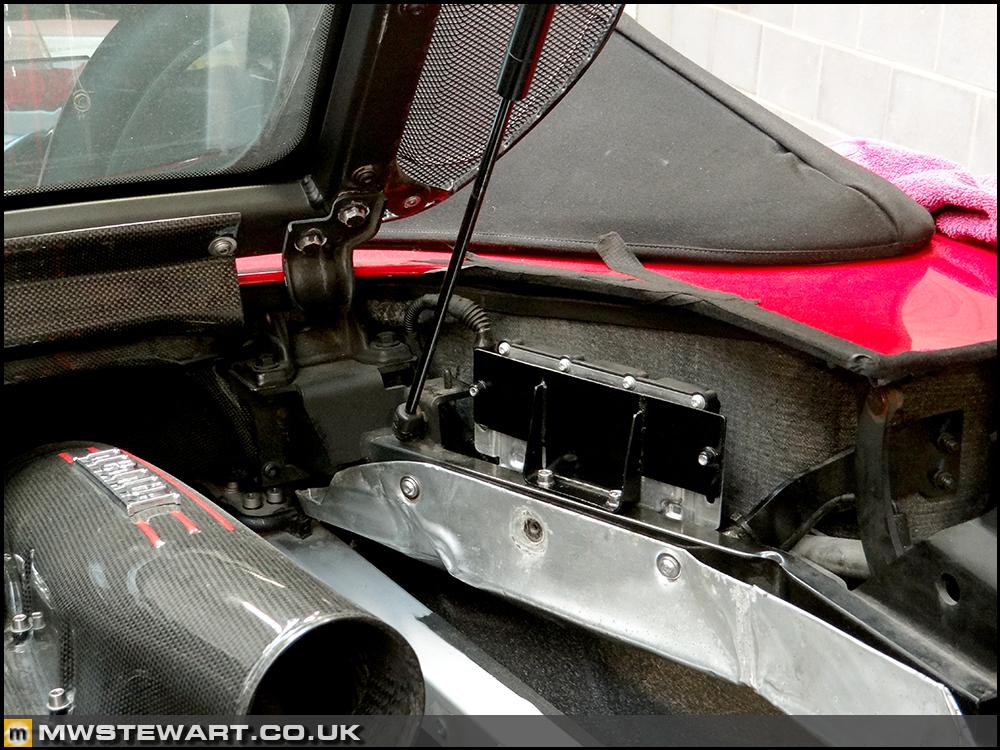
The final electronics fitment work was to mount the ion sending knock detection module. For this task I did not have any 16M reference photos to go from and the parts diagrams were not much help. The loom routing and connector positions did help identify the general location for the module, but the fine-tuning took a little thought. Having settled on the front right area of the engine bay I found two existing M6 tapped holes in part of the Spider roof frame - present on both sides but the right pair were an ideal sport for the bracket mount.
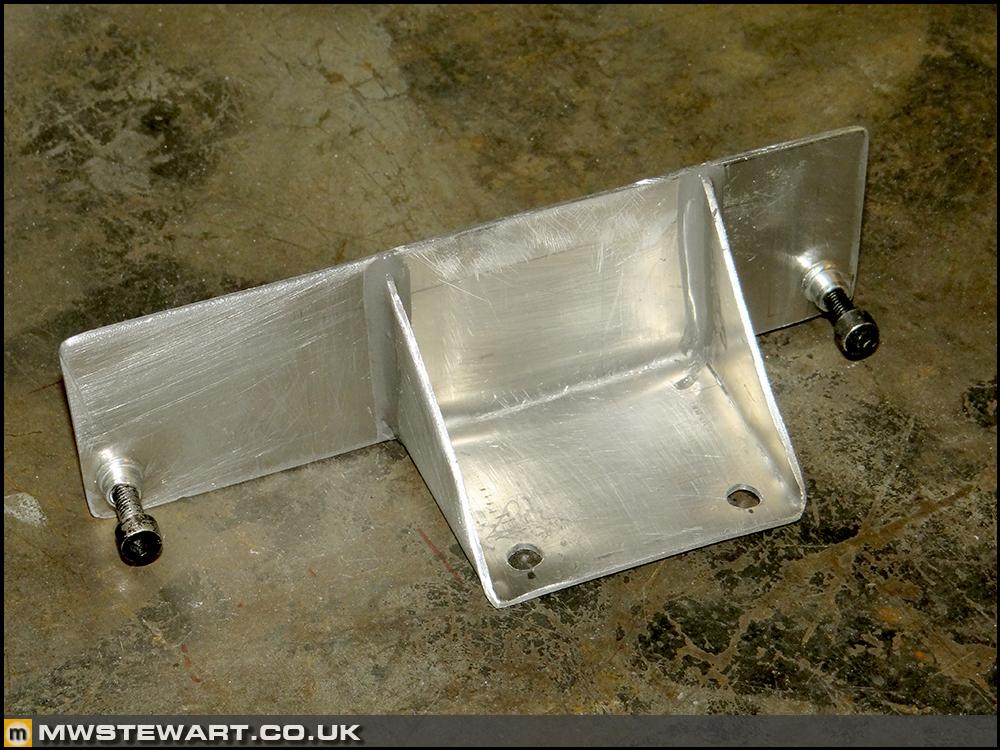
Whilst I was figuring out the breather system my Dad made a card template and version of an alloy bracket.
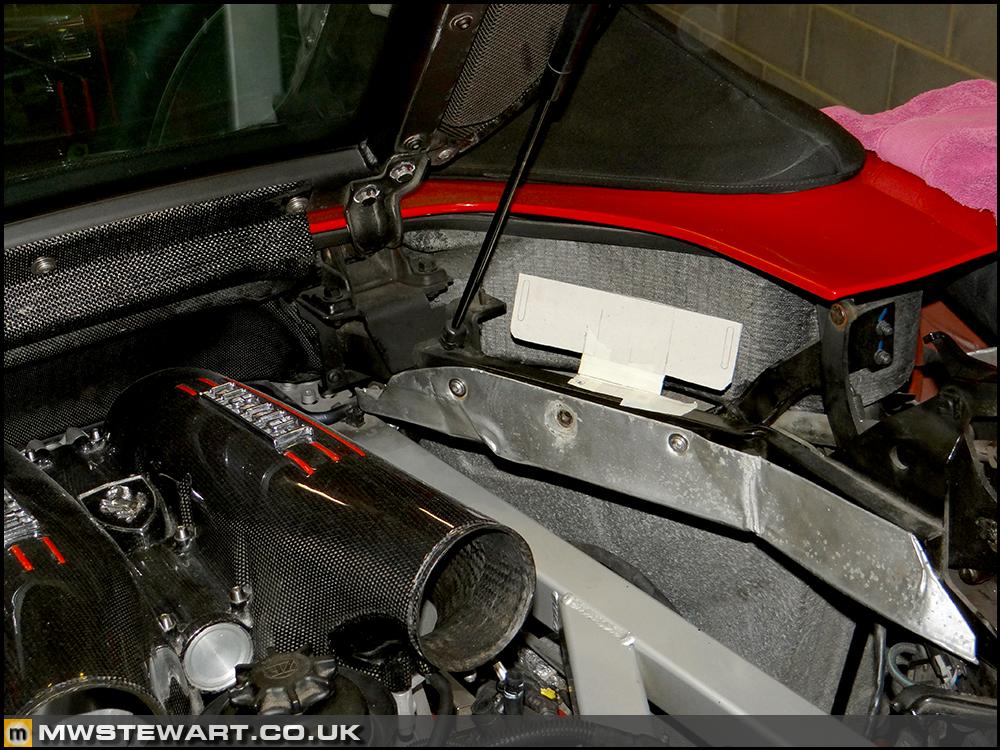
Here is the first bracket installed. Testing with the engine bay trim panel revealed that there was insufficient clearance for the additional can bus wiring connector to the side of the module. Despite appearing otherwise in the photo space was really tight: there is a roof hydraulic hose at the rear, part of the roof frame at the front, a trim panel overhead, and a certain amount of clearance required below to secure the electrical connectors in situ.
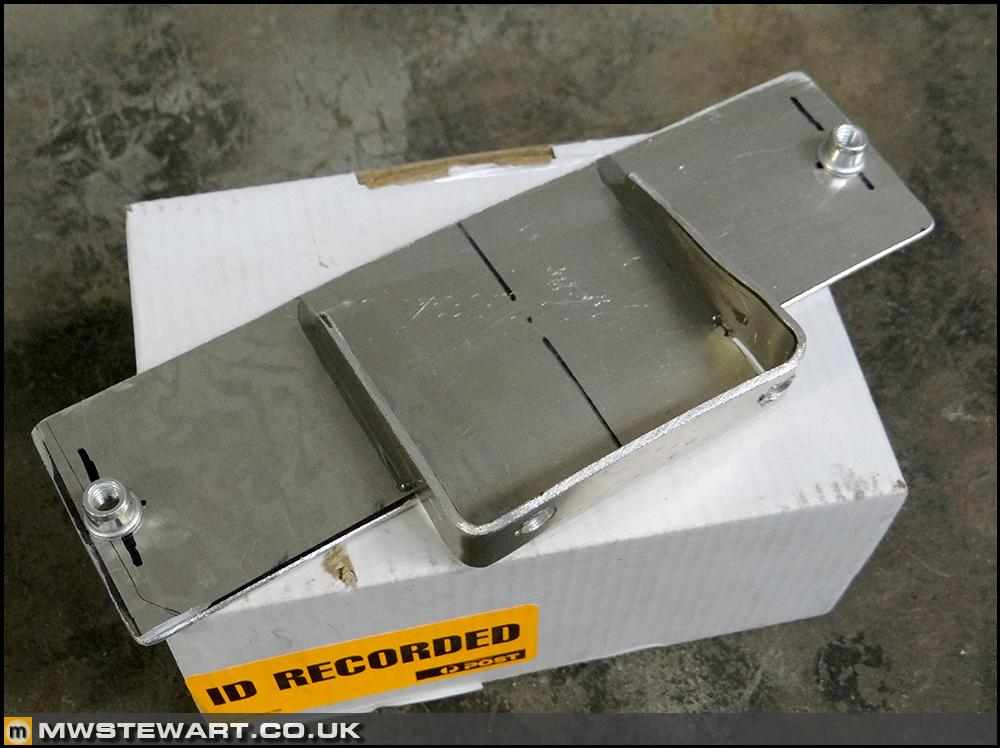
A second version of the bracket was made after some further testing.
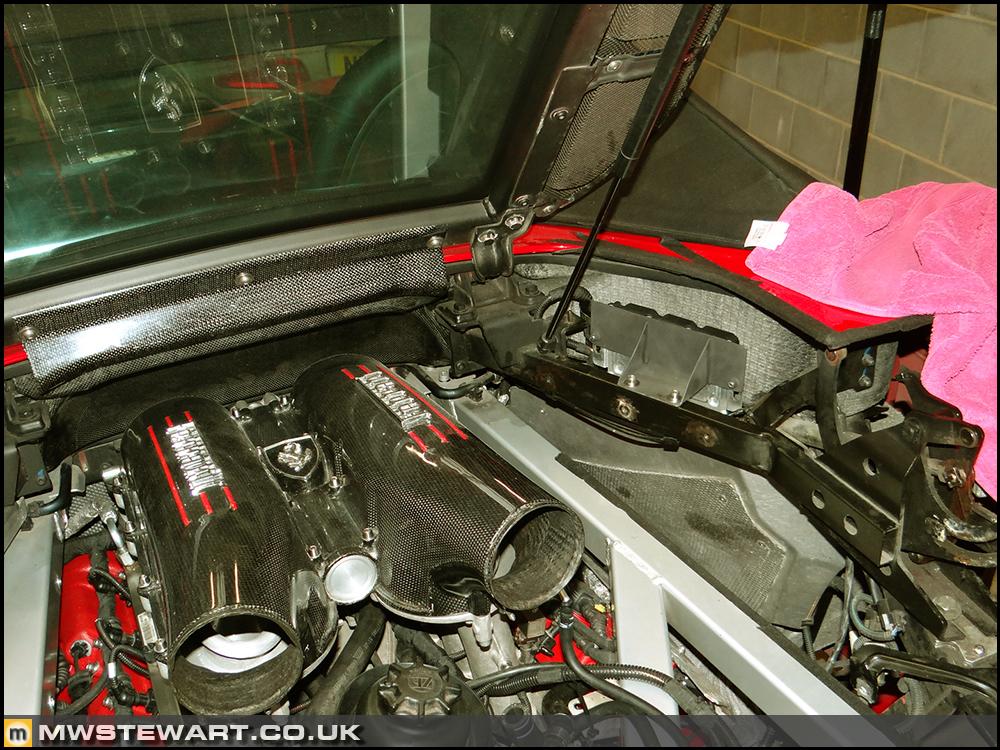
V2 installed. It fits perfectly.
With all of the electrical systems now installed it was time to test and the first step was to ensure the immobiliser synced up to the virgin right bank engine ECU. A turn of the key showed that the immobiliser/code warning lamp illuminated and then went out, as it should. Test one pass.
The second test was to ensure the 'CHECK OK' message appeared and went. I am slightly sceptical about the real value of this check/message but nevertheless: test two pass.
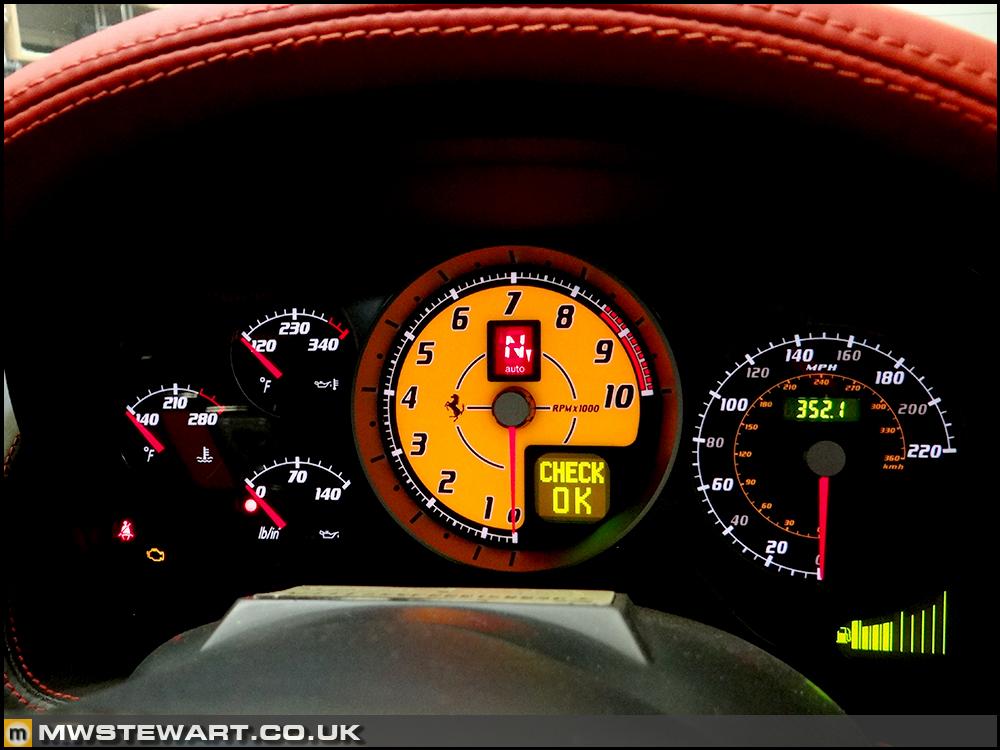
The third and final test was to ensure the engine ECUs did not log any DTCs; none logged would prove that my wiring is correct and the new ion module, SAI system components, and blow-by solenoid were functional. This test was also a pass.

Electronics complete!
Scuderia Engine Management Conversion - Oil Breather System - Part 2
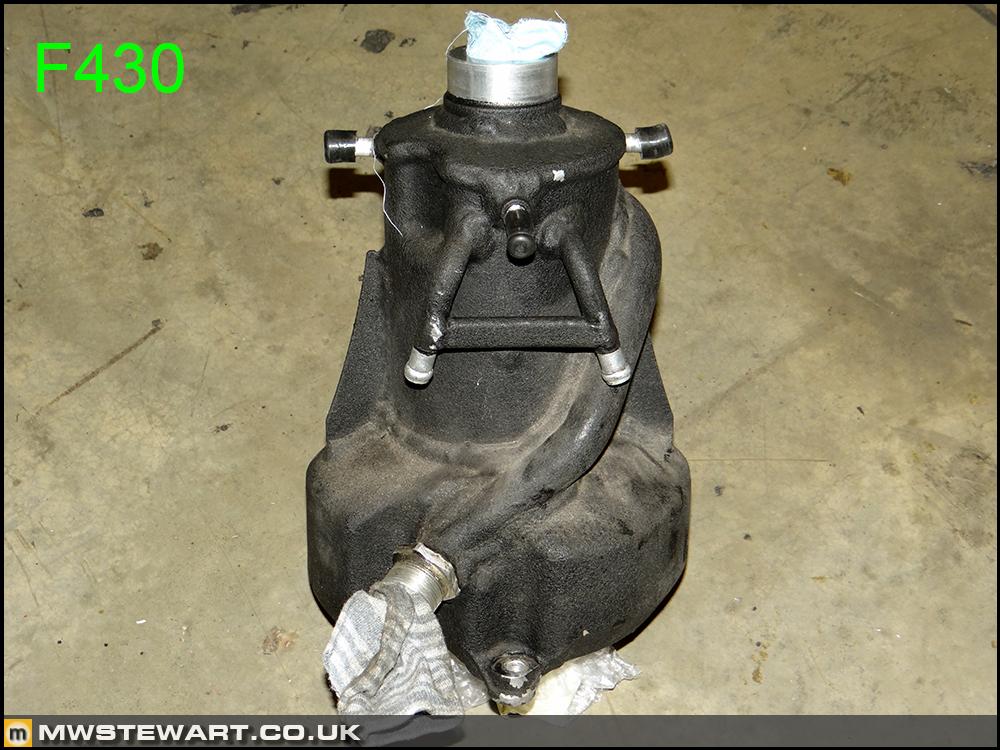
A quick recap in pictures of the difference between the F430 and Scuderia 'Disareator' tank and associated plumbing.
I was about to order the Scuderia disareator but first decided to perform a quick sanity check of the tank body itself, and it was then I discovered that the tank was the same on late F430s and it was just the outlets that were different. I removed my oil tank and decided I could neatly modify it to the required spec.
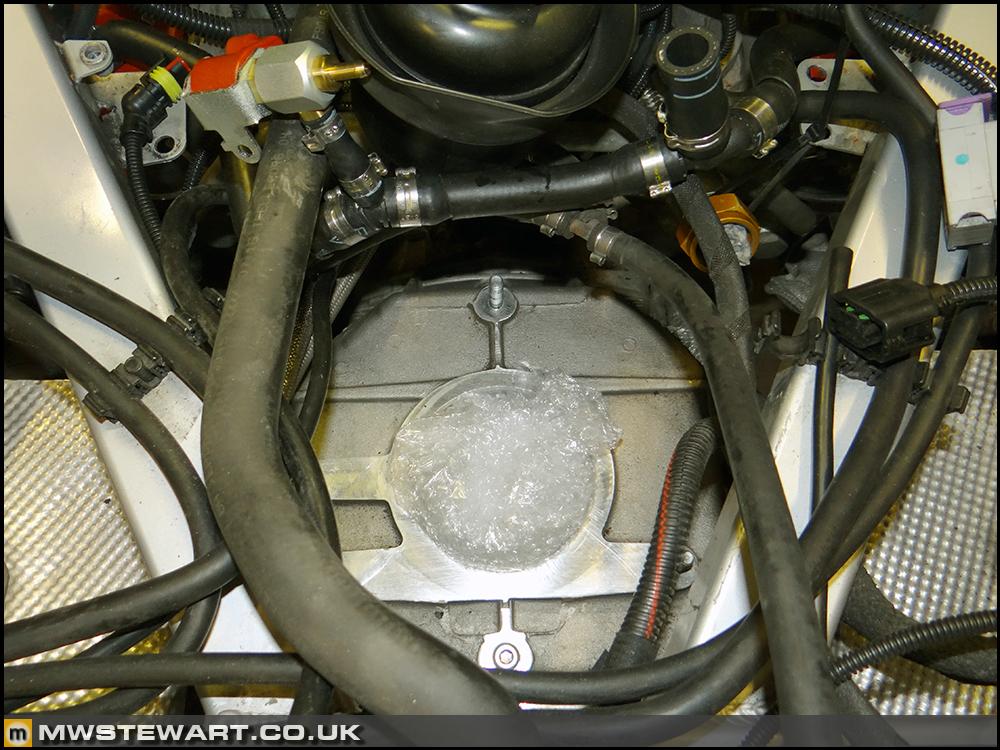
For reference here's a photo of my original tank before modification. I cut off the two 'ears' that are plumbed in to the cam covers and interestingly I found that despite using a ~14mm or 9/16" ID hose, the connection points on the disareator body were welded up to a tiny 1mm hole. The dry sump system should maintain a near vacuum in the crankcase - helped by the firing order of the flat plane crank which means crankcase volume remains reasonably consistent, so I should imagine the cam breathers are for the few occasions when there is a positive crankcase pressure. This discovery has led me to think the valve and solenoid arrangement on the Scuderia oil system are to help maintain the crank vacuum based on RPM and requested throttle.
I used Nitromors to strip off the crackle finish powder coat in the areas to be modified and will return to this later to remove all traces.
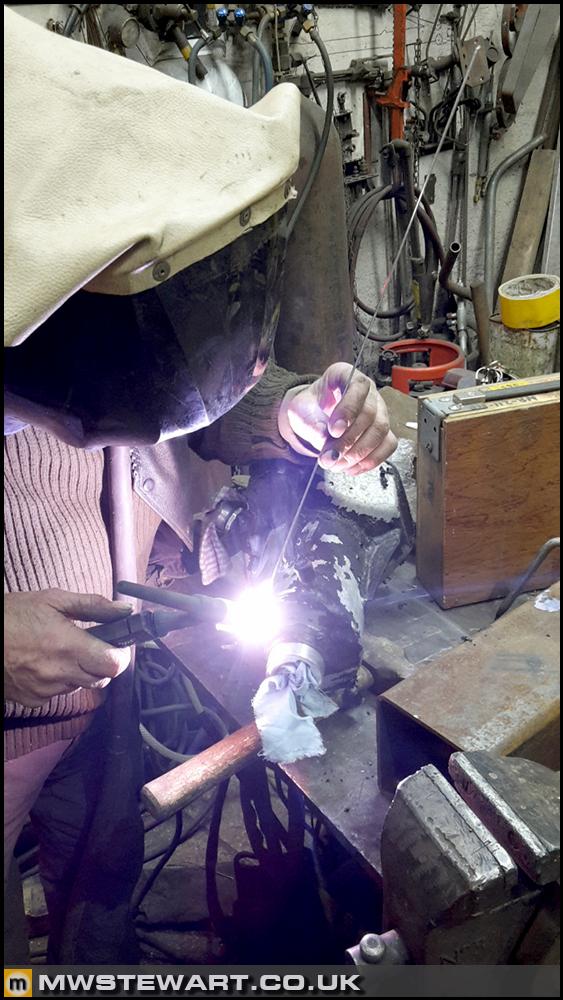
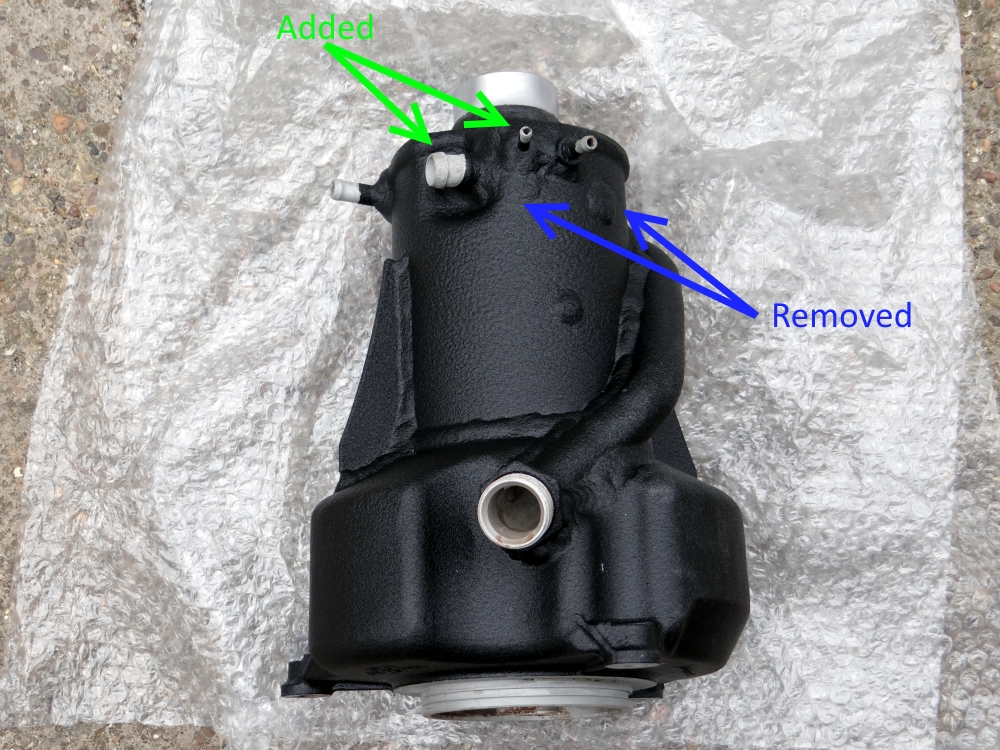
Original F430 cam breather points being welded up and two additional spigots added for the Scuderia system.
Service Items
My car will hit 30k soon enough and that's when there is a major service due, so given it already has new coolant and microfilter I decided to fit new air filters and spark plugs now. From memory that leaves PAS fluid, oil & filter, and possibly the A/C dryer for Christian Lewis.
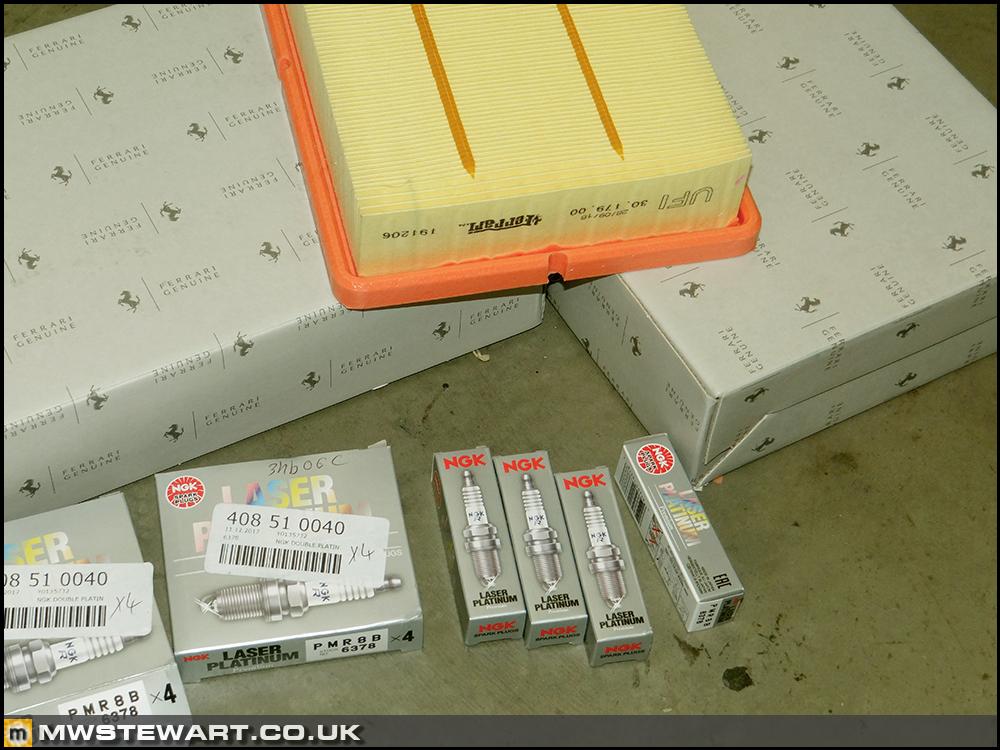
I understand that these cars run rich with aftermarket manifolds and the colour of my plugs would tend to suggest that. If keeping with F430 management I would have gone for a remap, but the problem goes away on the Scuderia management which is configured for a lack of pre-cats.

Cam Cover Heat Shields
When refitting my cam covers I noticed that the heat shields had cracks around the mounting points. It doesn't help that 15mm washers are used - too thin IMO. I have made some reinforcement ears out of Nimbus and in addition replaced the Ferrari washers with 25mm stainless versions.
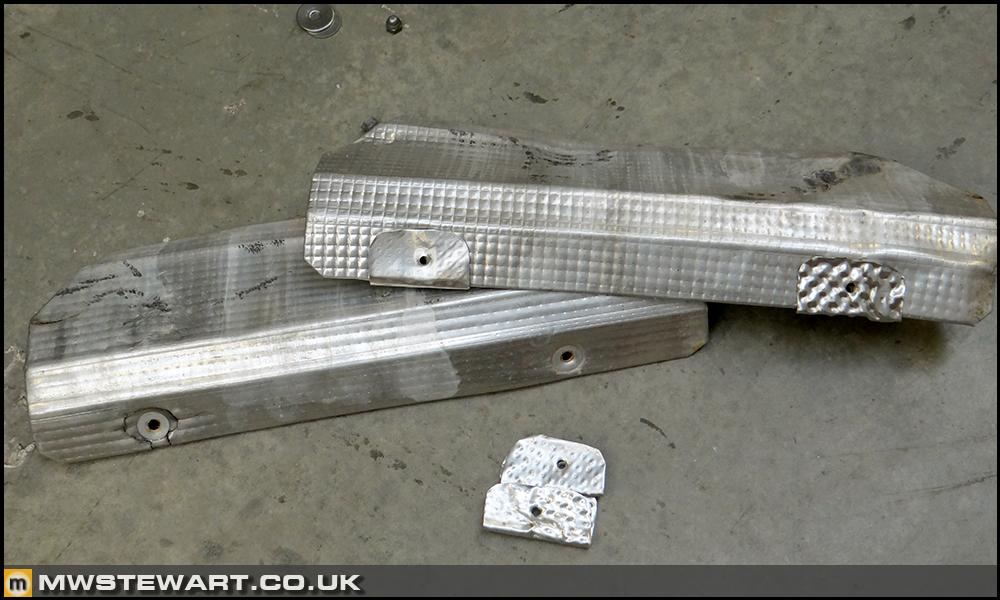
Shields fitted with reinforcement ears and 25mm stainless washers.

The SAI solenoid is located on part of the gearbox A frame support. I added a rivnut (left) to the frame part and Dad fabricated an aluminium mirrored version (left) of the existing inlet manifold crossover solenoid (right).
Here are the SAI solenoid and oil breather 'blow by' solenoid in place. For the purposes of testing the electronics I left the standard F430 disareator tank in place with some temporary plumbing to adapt it to the Scuderia cam cover plumbing & blow-by solenoid.
The final electronics fitment work was to mount the ion sending knock detection module. For this task I did not have any 16M reference photos to go from and the parts diagrams were not much help. The loom routing and connector positions did help identify the general location for the module, but the fine-tuning took a little thought. Having settled on the front right area of the engine bay I found two existing M6 tapped holes in part of the Spider roof frame - present on both sides but the right pair were an ideal sport for the bracket mount.
Whilst I was figuring out the breather system my Dad made a card template and version of an alloy bracket.
Here is the first bracket installed. Testing with the engine bay trim panel revealed that there was insufficient clearance for the additional can bus wiring connector to the side of the module. Despite appearing otherwise in the photo space was really tight: there is a roof hydraulic hose at the rear, part of the roof frame at the front, a trim panel overhead, and a certain amount of clearance required below to secure the electrical connectors in situ.
A second version of the bracket was made after some further testing.
V2 installed. It fits perfectly.
With all of the electrical systems now installed it was time to test and the first step was to ensure the immobiliser synced up to the virgin right bank engine ECU. A turn of the key showed that the immobiliser/code warning lamp illuminated and then went out, as it should. Test one pass.
The second test was to ensure the 'CHECK OK' message appeared and went. I am slightly sceptical about the real value of this check/message but nevertheless: test two pass.
The third and final test was to ensure the engine ECUs did not log any DTCs; none logged would prove that my wiring is correct and the new ion module, SAI system components, and blow-by solenoid were functional. This test was also a pass.
Electronics complete!
Scuderia Engine Management Conversion - Oil Breather System - Part 2
A quick recap in pictures of the difference between the F430 and Scuderia 'Disareator' tank and associated plumbing.
I was about to order the Scuderia disareator but first decided to perform a quick sanity check of the tank body itself, and it was then I discovered that the tank was the same on late F430s and it was just the outlets that were different. I removed my oil tank and decided I could neatly modify it to the required spec.
For reference here's a photo of my original tank before modification. I cut off the two 'ears' that are plumbed in to the cam covers and interestingly I found that despite using a ~14mm or 9/16" ID hose, the connection points on the disareator body were welded up to a tiny 1mm hole. The dry sump system should maintain a near vacuum in the crankcase - helped by the firing order of the flat plane crank which means crankcase volume remains reasonably consistent, so I should imagine the cam breathers are for the few occasions when there is a positive crankcase pressure. This discovery has led me to think the valve and solenoid arrangement on the Scuderia oil system are to help maintain the crank vacuum based on RPM and requested throttle.
I used Nitromors to strip off the crackle finish powder coat in the areas to be modified and will return to this later to remove all traces.
Original F430 cam breather points being welded up and two additional spigots added for the Scuderia system.
Service Items
My car will hit 30k soon enough and that's when there is a major service due, so given it already has new coolant and microfilter I decided to fit new air filters and spark plugs now. From memory that leaves PAS fluid, oil & filter, and possibly the A/C dryer for Christian Lewis.
I understand that these cars run rich with aftermarket manifolds and the colour of my plugs would tend to suggest that. If keeping with F430 management I would have gone for a remap, but the problem goes away on the Scuderia management which is configured for a lack of pre-cats.
Cam Cover Heat Shields
When refitting my cam covers I noticed that the heat shields had cracks around the mounting points. It doesn't help that 15mm washers are used - too thin IMO. I have made some reinforcement ears out of Nimbus and in addition replaced the Ferrari washers with 25mm stainless versions.
Shields fitted with reinforcement ears and 25mm stainless washers.
p1stonhead said:
Quick one for you OP, do you have to tell your insurer about all of these changes or at this point is it just registered as a kit car? 
Yes it is all insured. It was quite easy to do as rather than list everything it is a complete 16M specification F430, plus a few extras.Edited by mwstewart on Thursday 19th April 16:16
Too Late said:
This is a work of art. Love the effort and attention to detail
I remember you logging weight savings early on with the build. Are you also logging costs associated to each weight save you are making.
Hands down, the best build thread i have ever seen.
Thanks Nick. Small world!I remember you logging weight savings early on with the build. Are you also logging costs associated to each weight save you are making.
Hands down, the best build thread i have ever seen.
gcpeters said:
Quick question, and sorry this is way down in the thread but how easy is to change the cam cover gaskets? Thanks!
Berlinetta = easy. Do it from the top of the engine bay. Spider = not so much. I did it from the engine bay and underneath because I was working in those areas already but there was a lot of working by pure feel, but if it was the sole job I would remove the bulkhead trim panel and the engine access panel, then work from both the engine bay and through access aperture on the bulkhead. The cam covers can be withdrawn via the whee larch.
One tip I have is to use very small dabs of RTV along the cam covers to hold the gasket in place. Let it set overnight. Also, watch that the spark plug gaskets aren’t dislodged when refitting.
It’s a pretty straight-forward job really, just a bit time consuming.
Scuderia Disareator - Complete
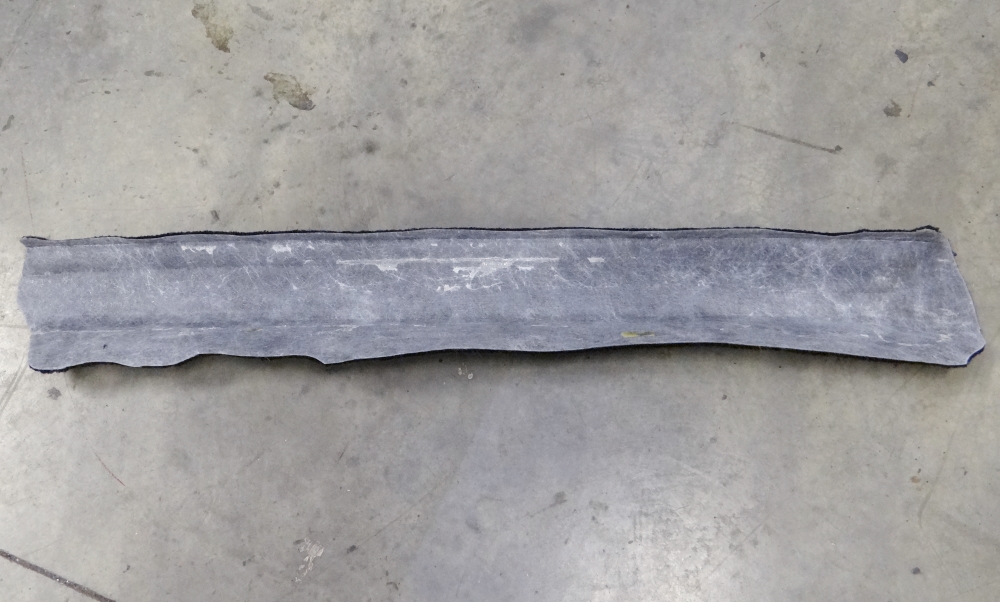
The oil tank is back from CC who as usual have done a fantastic job. The tank was blasted with crushed walnut shells, powder primed, then colour coated.
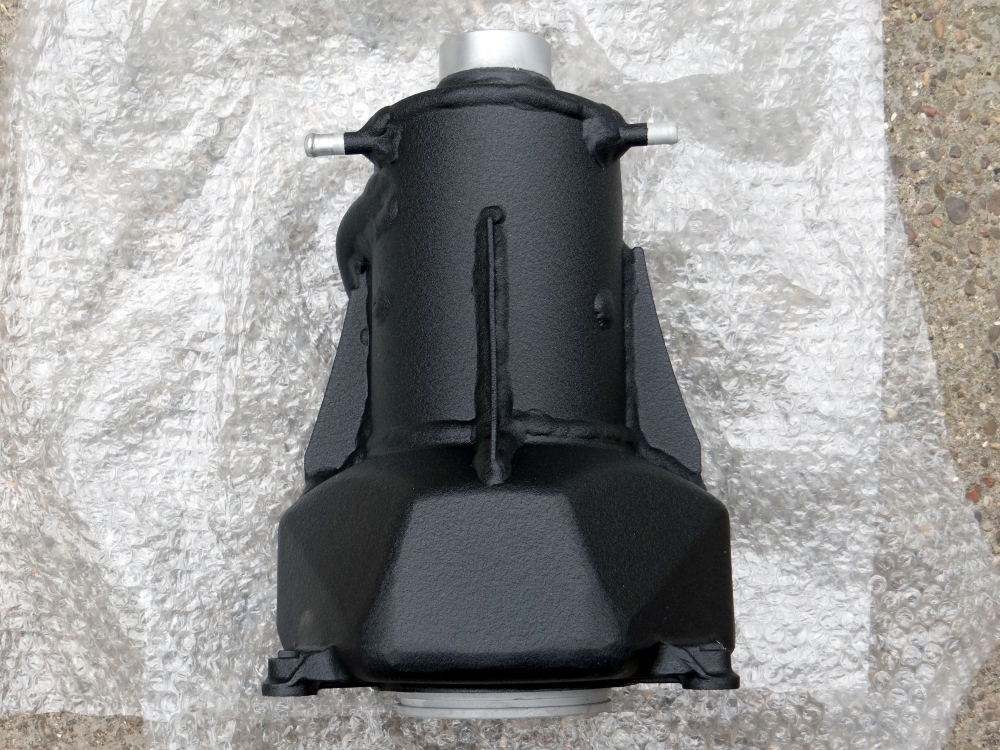
A reminder of what it looked like in F430 configuration:
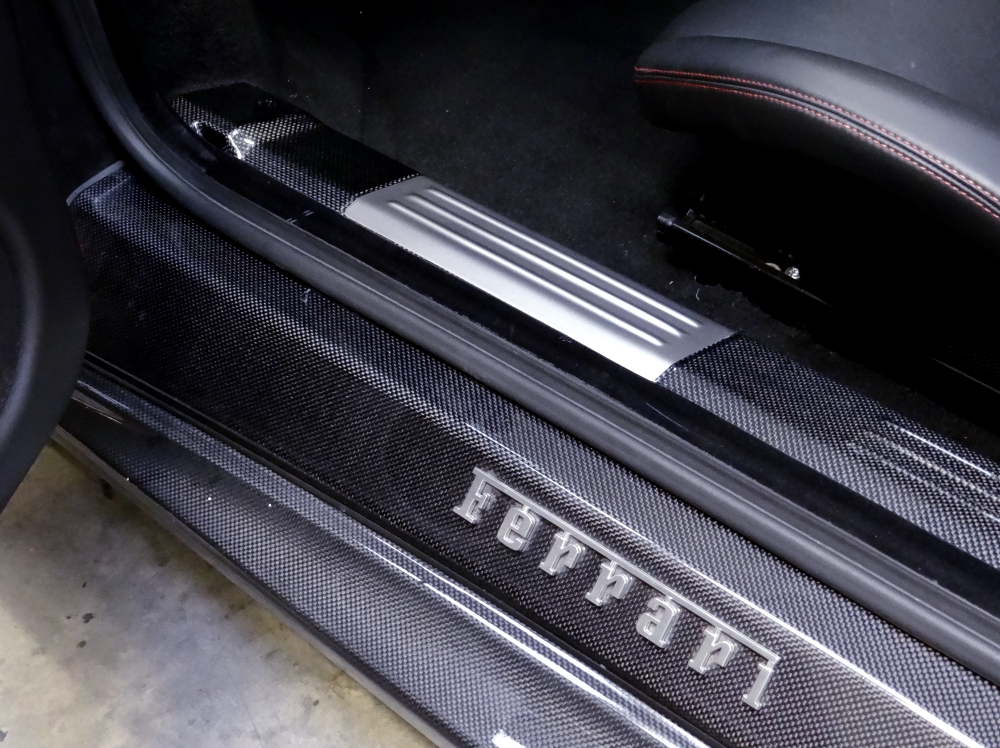
Carbon Inner Sill Trims
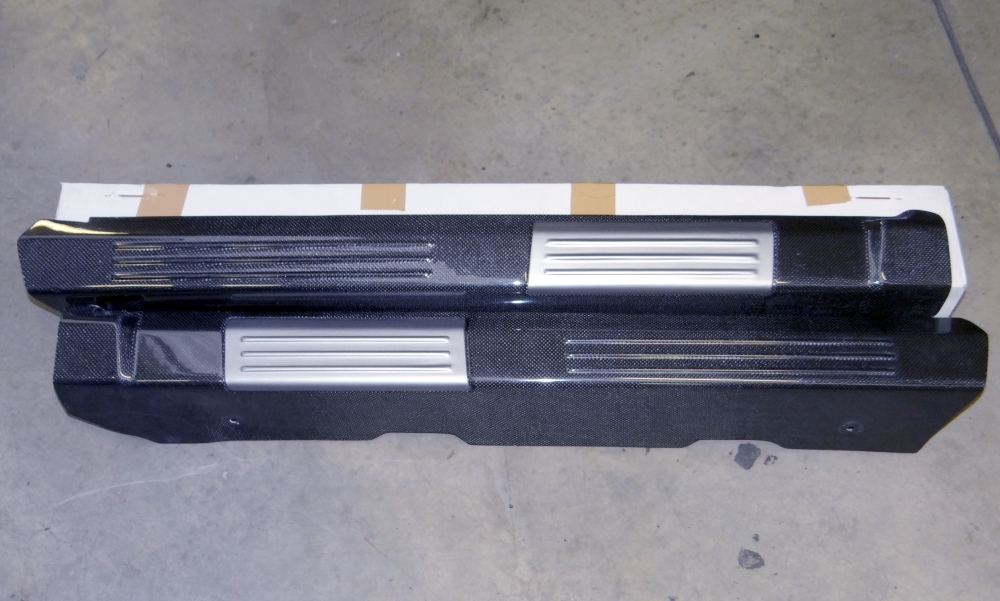
Carbon inner sills were an option on the F430 and Scuderia, but standard on the 16M. The there is a difference between the F430 and Scuderia type with the former being shaped differently at the front. Personally, I think the Scuderia parts look better and of course that's what I've gone for.
The trims are made from a single layer of cloth and hence featherweight, so there isn't a weight penalty when the requisite section of carpet is removed.
I first installed them over the top of the carpet to mark the outline with masking tape. The trims aren't designed to be installed over carpet but doing so gave me an idea.
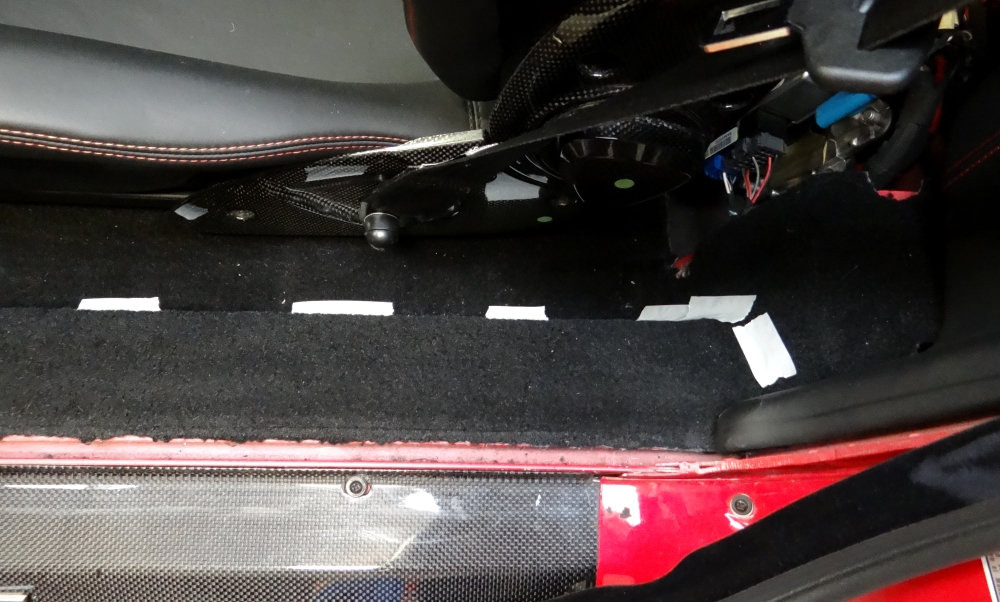
I used a scalpel to cut away the carpet leaving a 15-20mm smaller circumference than the trim itself - this way the carpet is neatly held once the trim was installed. There is a sound deadening sheet glued to the carpet on each side which I removed and maintained by securing to the sill with 3M VHB. I cut two rectangular holes in the sheet to provide access to the two M5 rivnuts present on all chassis' ready to accept the inner sill trims.This is how Ferrari do it.
Installed.
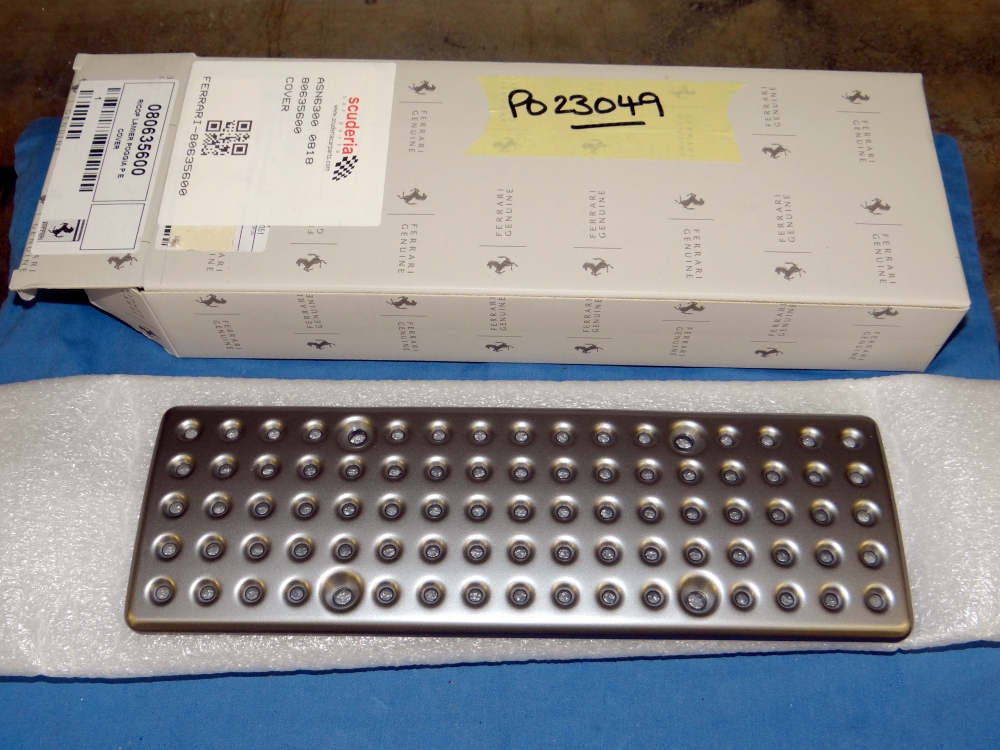
Scuderia Passenger Footrest
I've been waiting for this part for a long time and at one point it looked like the order may get canceled, but then I can only assume the factory had enough orders to warrant making a new batch - this tends to be how it works with less common/required parts. In the mean time as an interim solution I had modified the original F430 footrest to look more like the Scuderia one, but having the the actual Scuderia part to compare revealed it is lighter by 211g - every little helps! It also looks a lot nicer in my interior.
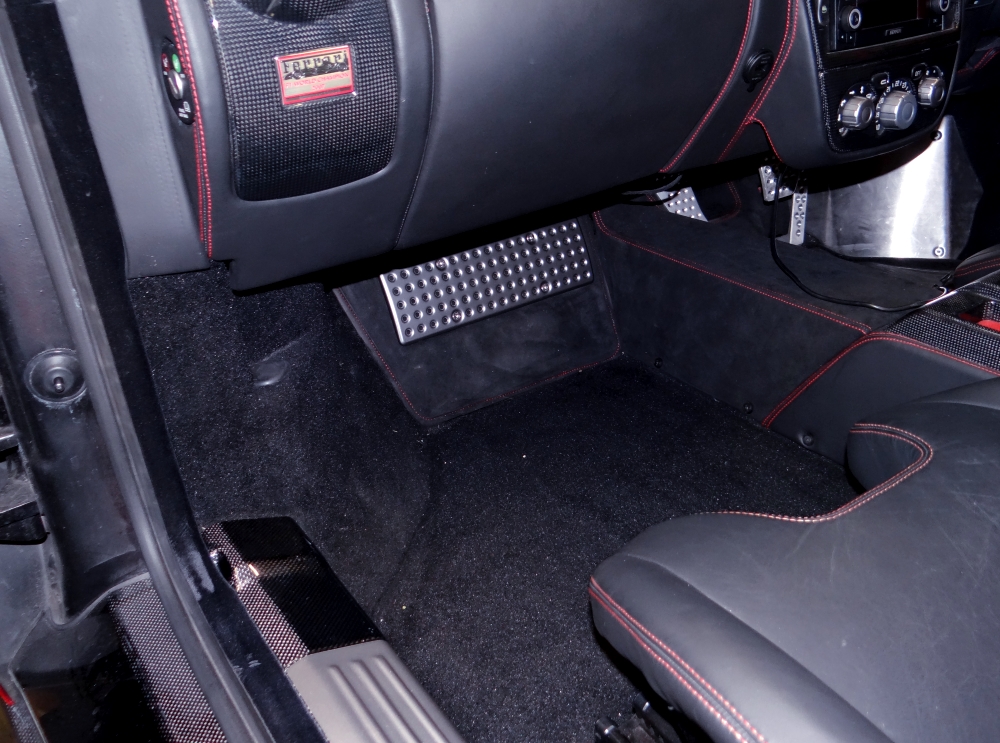
Fitted - excuse the dirty car. I haven't yet cleaned off the Tuscan dust.
Weight saving
Passed the 115kg mark. The trim was 225g heaver in the end but oh so worth it for the improvement, though some of the additional is from the LED steering wheel which is slightly heavier than the standard F430 wheel - I weighed both types to compare.
Sprung weight saved: 90.097 kg
Unsprung weight saved: 24.97 kg
Total weight saved: 115.067 kg
The oil tank is back from CC who as usual have done a fantastic job. The tank was blasted with crushed walnut shells, powder primed, then colour coated.
A reminder of what it looked like in F430 configuration:
Carbon Inner Sill Trims
Carbon inner sills were an option on the F430 and Scuderia, but standard on the 16M. The there is a difference between the F430 and Scuderia type with the former being shaped differently at the front. Personally, I think the Scuderia parts look better and of course that's what I've gone for.
The trims are made from a single layer of cloth and hence featherweight, so there isn't a weight penalty when the requisite section of carpet is removed.
I first installed them over the top of the carpet to mark the outline with masking tape. The trims aren't designed to be installed over carpet but doing so gave me an idea.
I used a scalpel to cut away the carpet leaving a 15-20mm smaller circumference than the trim itself - this way the carpet is neatly held once the trim was installed. There is a sound deadening sheet glued to the carpet on each side which I removed and maintained by securing to the sill with 3M VHB. I cut two rectangular holes in the sheet to provide access to the two M5 rivnuts present on all chassis' ready to accept the inner sill trims.This is how Ferrari do it.
Installed.
Scuderia Passenger Footrest
I've been waiting for this part for a long time and at one point it looked like the order may get canceled, but then I can only assume the factory had enough orders to warrant making a new batch - this tends to be how it works with less common/required parts. In the mean time as an interim solution I had modified the original F430 footrest to look more like the Scuderia one, but having the the actual Scuderia part to compare revealed it is lighter by 211g - every little helps! It also looks a lot nicer in my interior.
Fitted - excuse the dirty car. I haven't yet cleaned off the Tuscan dust.
Weight saving
Passed the 115kg mark. The trim was 225g heaver in the end but oh so worth it for the improvement, though some of the additional is from the LED steering wheel which is slightly heavier than the standard F430 wheel - I weighed both types to compare.
| Original Part | Fitted Quantity | Original Part (kg) | Replacement Part (kg) | Sprung Saving (kg) | Unsprung Saving (kg) | Replacement Part |
|---|---|---|---|---|---|---|
| Pedals - brake | 1 | 0.987 | 0.627 | 0.36 | - | 16M/Scuderia |
| Pedals - brake and clutch height adjuster bracket | 1 | 0.086 | 0 | 0.086 | - | Removed - unused |
| Brakes - ABS/ESP - acceleration sensor | 1 | 0.091 | 0 | 0.091 | - | Removed - function provided by CAN yaw |
| Pedals - Pedals - accelerator assembly | 1 | 0.883 | 0.869 | 0.014 | - | 16M/Scuderia |
| Door hinges | 4 | 0.705 | 0.5005 | 0.818 | - | Machined to reduce weight |
| Dashboard plaque 'F430 Spider' - carbon version | 1 | 0.025 | 0.086 | -0.061 | - | '16M Scuderia Spider - Limited 499' |
| Interior - centre console, complete (carbon driving zone) | 1 | 2.253 | 1.341 | 0.912 | - | 16M (carbon) |
| Windscreen washer tank, pumps, and minimum fluid | 1 | 5.257 | 2.899 | 2.358 | - | 360 non-headlamp wash version adapted |
| Headlamps - standard | 2 | 0.3505 | 0.137 | 0.427 | - | 16M (carbon) |
| Wing mirrors | 1 | 2.11 | 1.431 | 0.679 | - | 16M/Scuderia (carbon) |
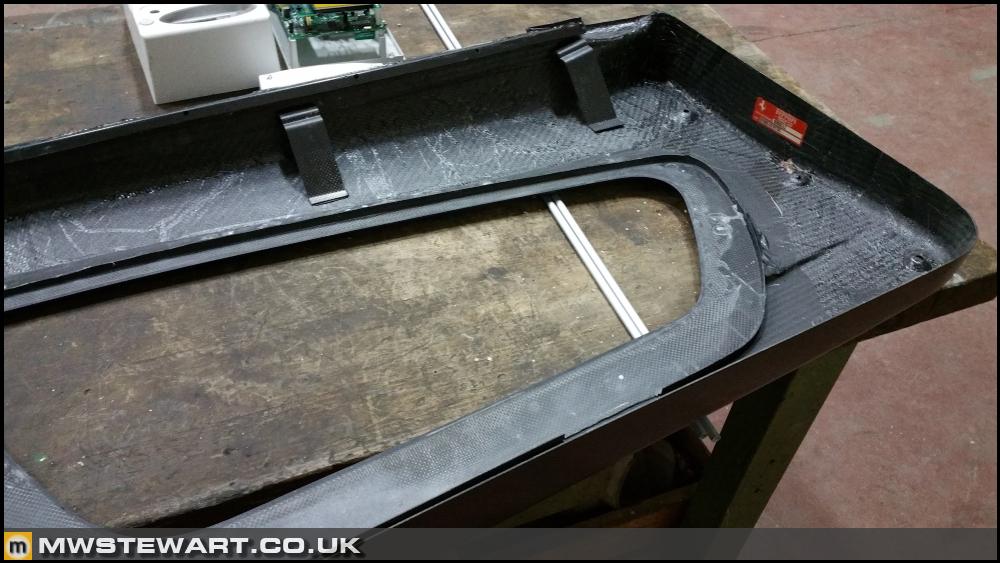
| Spider hood tray | 1 | 8.45 | 1.555 | 6.895 | - | Bespoke carbon version |
| F1 paddles | 1 | 0.154 | 0.103 | 0.051 | - | Steering wheel mounted |
| Steering wheel - leather with aluminium trim | 1 | 1.78 | 1.85 | -0.07 | - | 16M/Scuderia (carbon) - leather & alcantara |
| Interior - rear bulkhead (carpet) | 1 | 2.86 | 2.703 | 0.157 | - | Retrimmed in Alcantara |
| Interior - rear bulkhead document nets (untrimmed) | 2 | 0.119 | 0.257 | -0.276 | - | Retrimmed in Alcantara |
| Interior - rear shelf, centre (carpet) | 1 | 0.402 | 0.465 | -0.063 | - | Retrimmed in Alcantara |
| Pedals - drivers footrest 'dead pedal' | 1 | 0.181 | 0.162 | 0.019 | - | Hill Engineering (drilled aluminium) |
| Interior - tunnel trim (carpet) | 1 | 1.177 | 1.041 | 0.136 | - | Retrimmed in Alcantara |
| Interior - drivers footwell trim (carpet) | 1 | 0.305 | 0.316 | -0.011 | - | Retrimmed in Alcantara |
| Interior - rear shelf, LH (carpet) | 1 | 0.822 | 1.039 | -0.217 | - | Retrimmed in Alcantara |
| Interior - rear shelf, RH (carpet) | 1 | 0.98 | 0.91 | 0.07 | - | Retrimmed in Alcantara |
| Interior - passenger footwell trim (carpet) | 1 | 0.229 | 0.371 | -0.142 | - | Retrimmed in Alcantara |
| Bumper - front mounting washers (steel) | 4 | 0.019 | 0.012 | 0.028 | - | Bespoke aluminium spacers |
| Battery change #2 - Optima 'Red Top' 34R | 1 | 18.75 | 16.72 | 2.03 | - | Bosch S5 007 |
| Pedals - passenger footrest | 1 | 0.347 | 0.136 | 0.211 | - | 16M/Scuderia (machined flat and drilled) |
Sprung weight saved: 90.097 kg
Unsprung weight saved: 24.97 kg
Total weight saved: 115.067 kg
Edited by mwstewart on Wednesday 13th February 15:58
This may have been asked before (may have been me actually ) but what's the factory weight on an F430 spider and a factory weight on the Spider 16M (Dry or curb weight), wiki appears to be quote different weights throughout.
How does that compare to the current weight of your F430 and then your target weight reduction?
) but what's the factory weight on an F430 spider and a factory weight on the Spider 16M (Dry or curb weight), wiki appears to be quote different weights throughout.How does that compare to the current weight of your F430 and then your target weight reduction?
-Neil- said:
One of my favourite threads on here, the attention to detail is fantastic! Keep it up 
Thank you.ZOLLAR said:
This may have been asked before (may have been me actually ) but what's the factory weight on an F430 spider and a factory weight on the Spider 16M (Dry or curb weight), wiki appears to be quote different weights throughout.
How does that compare to the current weight of your F430 and then your target weight reduction?
Weight is very dependant on spec, but the approximate kerb weights are as follows:) but what's the factory weight on an F430 spider and a factory weight on the Spider 16M (Dry or curb weight), wiki appears to be quote different weights throughout.How does that compare to the current weight of your F430 and then your target weight reduction?
F430 Berlinetta: 1,450-1,475kg
Scuderia: 1,375-1,415kg
F430 Spider: 1,540-1,565kg
16M: 1,480kg
Eventually I'd like to end up towards the middle of the Scuderia range.
16M Door Card Recreation - Background
Casting back to November 2016 and Carlo from Italy very kindly donated a pair of Scuderia carbon door panels to the project. These are incomplete, missing a central insert panel which features a moulded mount for the inner door handle and a group of rivnuts to which a storage net is secured. Despite the missing parts, the panels are a great help.

The door panels are actually different between the Scuderia and 16M, and although the 16M parts are still available from the factory the total cost is disproportionate.
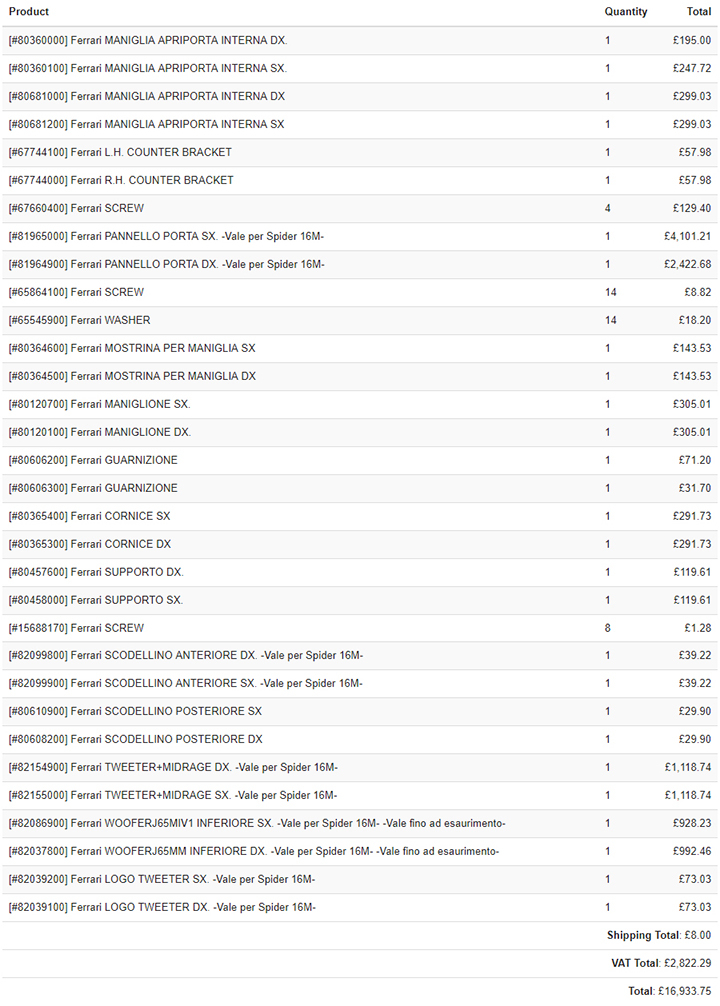
I do need some of the parts purely for functional reasons, but my plan is to finish the Scuderia door cards from Carlo and whilst doing so convert them to 16M spec i.e. with both speaker apertures and grilles. A 16M door panel is pictured below complete with the internal handle and storage net, which are amongst the parts I must source.

To finish this project there are several areas I will need to tackle:
1) Modify the Scuderia door panels to 16M specification;
2) Create a mould for the central insert (handed - L & R) and use it to manufacture the insert from plain weave carbon;
3) Modify my F430 doors to Scuderia spec by fabricating aluminium mounts with M5 spire nuts, to which the carbon panels can fasten.
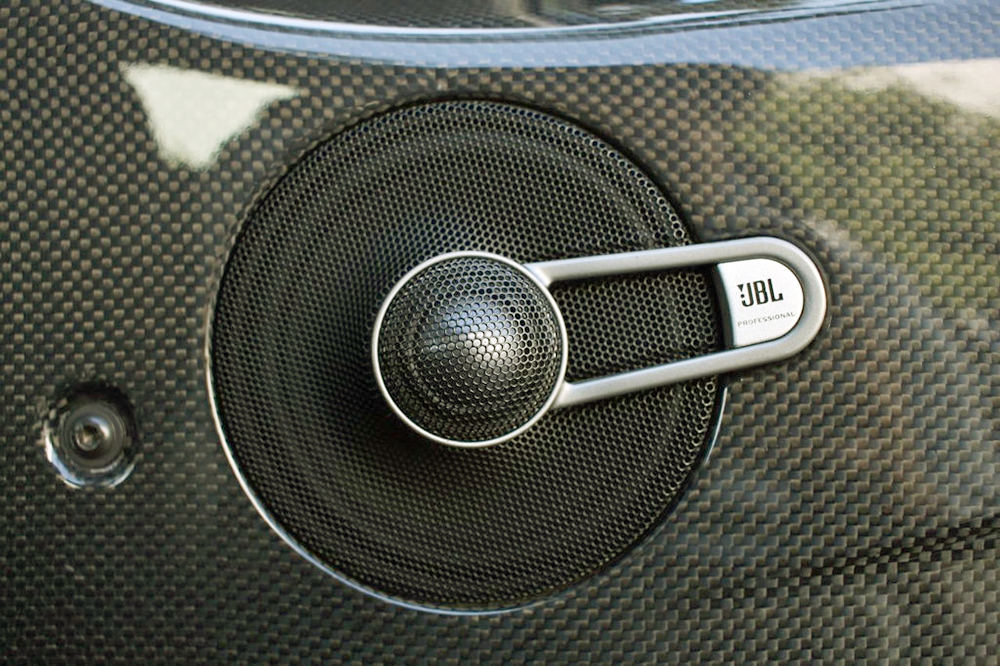
16M Door Card Recreation - Midrange and Tweeter
The tweeter in the F430 is mounted to the internal trim 'triangle' behind the rear view mirror base, but in the 16M the tweeter is mounted in a custom grille angled toward the driver, behind which is a 100mm midrange driver - the internal mirror trim plate is part of the carbon door panel. I would really like to source the grilles with integral tweeters butfor weight reasons I would not fit the midrange nor associated Bose amplifier; I would simply use the standard F430 configuration of a tweeter and midbass driver in the lower door.
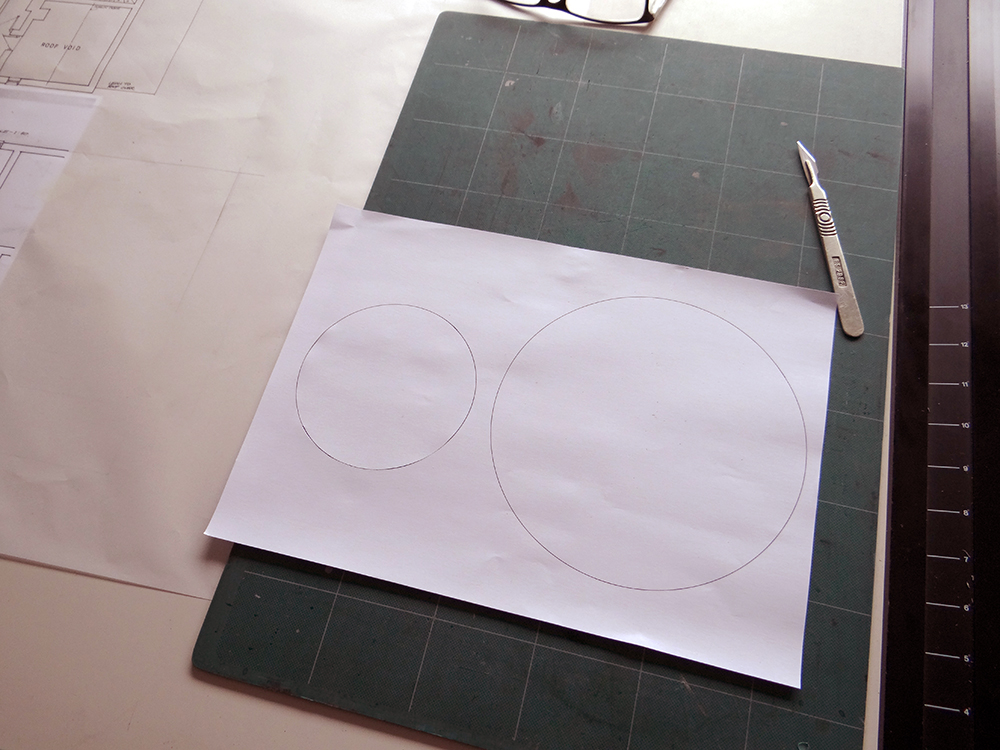
Thanks to 16M owner David from Down Under for measuring the speaker grilles, which enabled me to use accurate paper templates to ascertain the right location for the speaker apertures, and mark the centre point on the door panels.
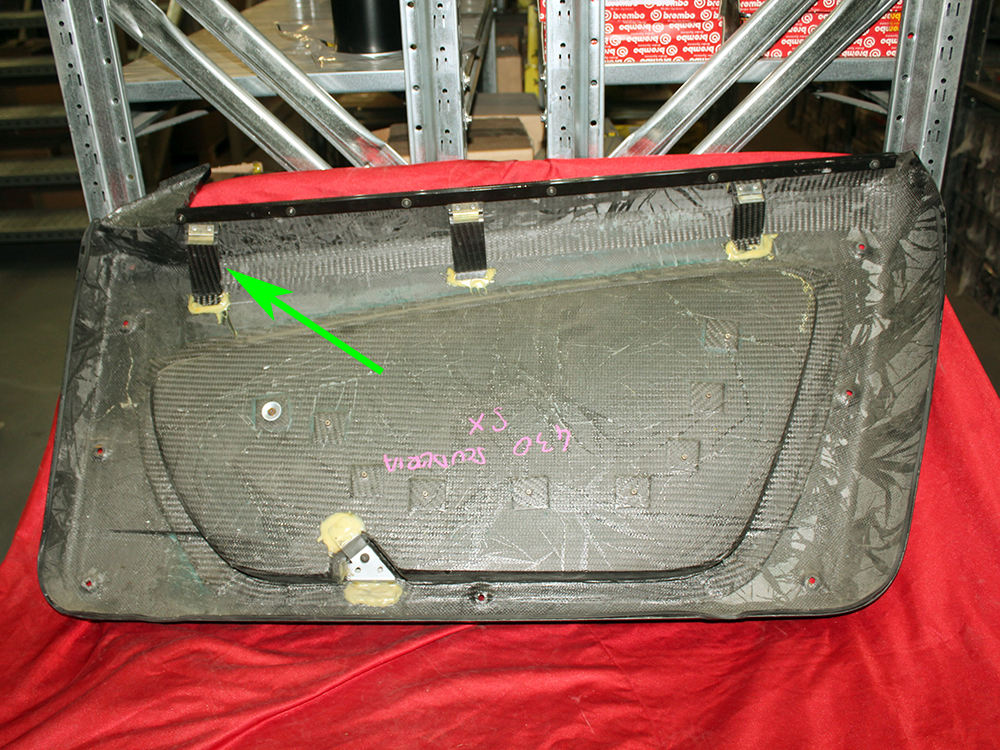
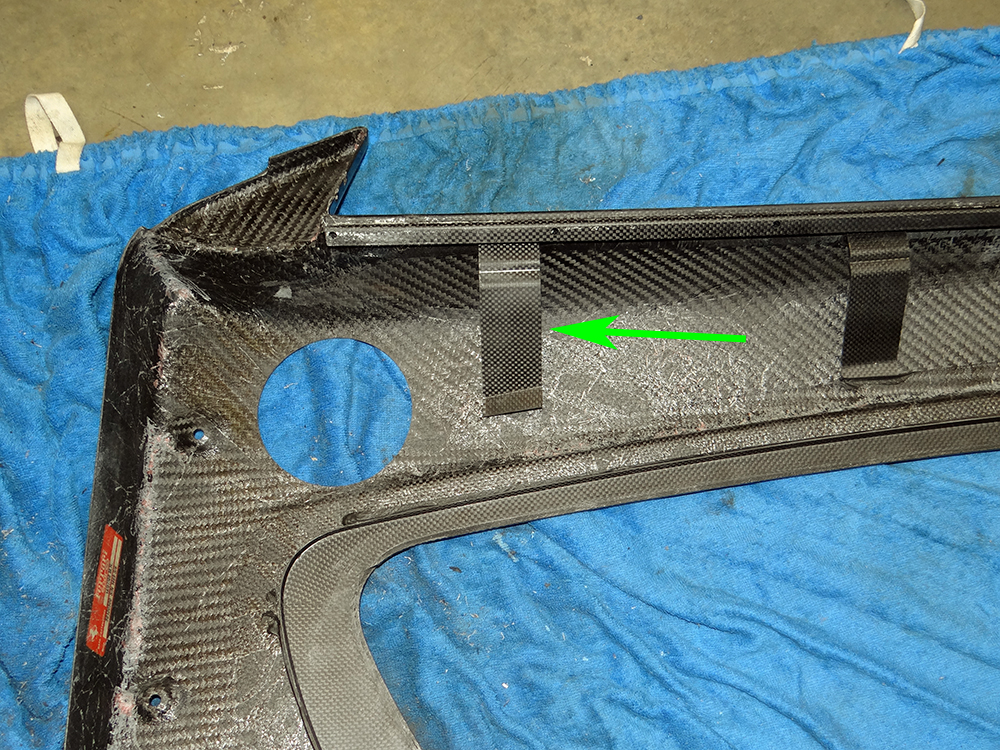
On the rear of the door panel are three upper reinforcement brackets, and the front most of these on the Scuderia panel is in the way of the midrange/tweeter assembly. The following photo shows the rear of a complete Scuderia door panel with the offending bracket marked with a green arrow. I was able to pry off the brackets from my door panels without damage - at a later stage I will re-bond a little further back.
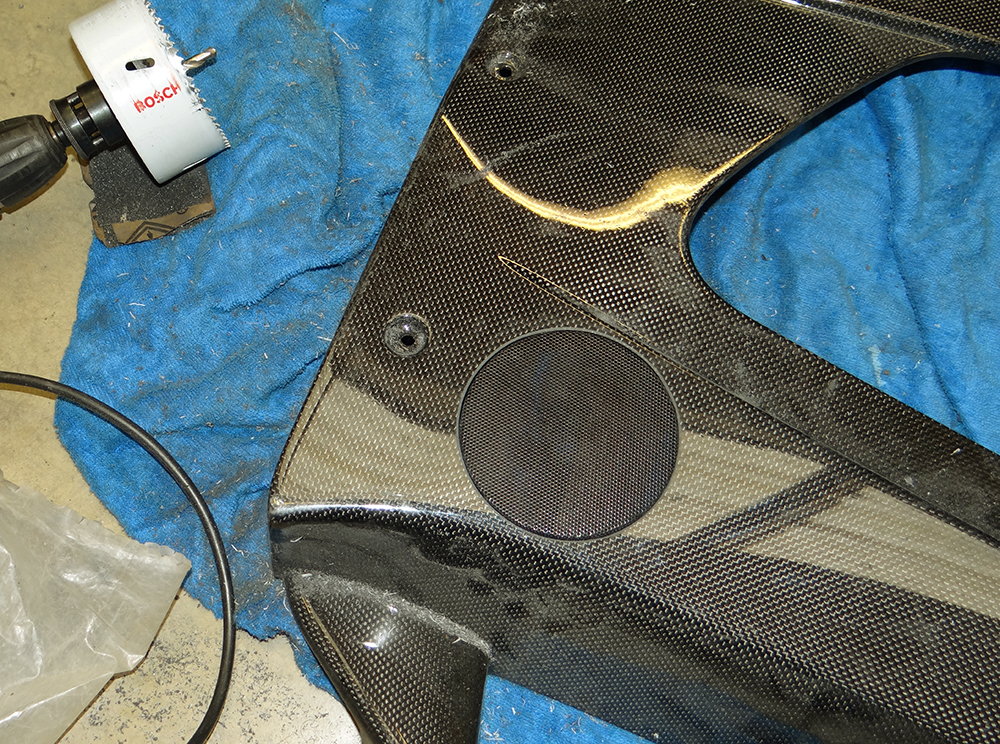
Next, I moved on to drilling the panel. I have to be honest and say I wasn't entirely sure how well it would turn out, so to minimise any problems I did a couple of things; firstly, I purchased a quality hole saw a few mm smaller in diameter than the speaker grille so I could finish the hole by hand with emery paper, and secondly, I used ballistic grade window film to stick on the panel and give the saw something to bite into rather than skipping over the smooth carbon.
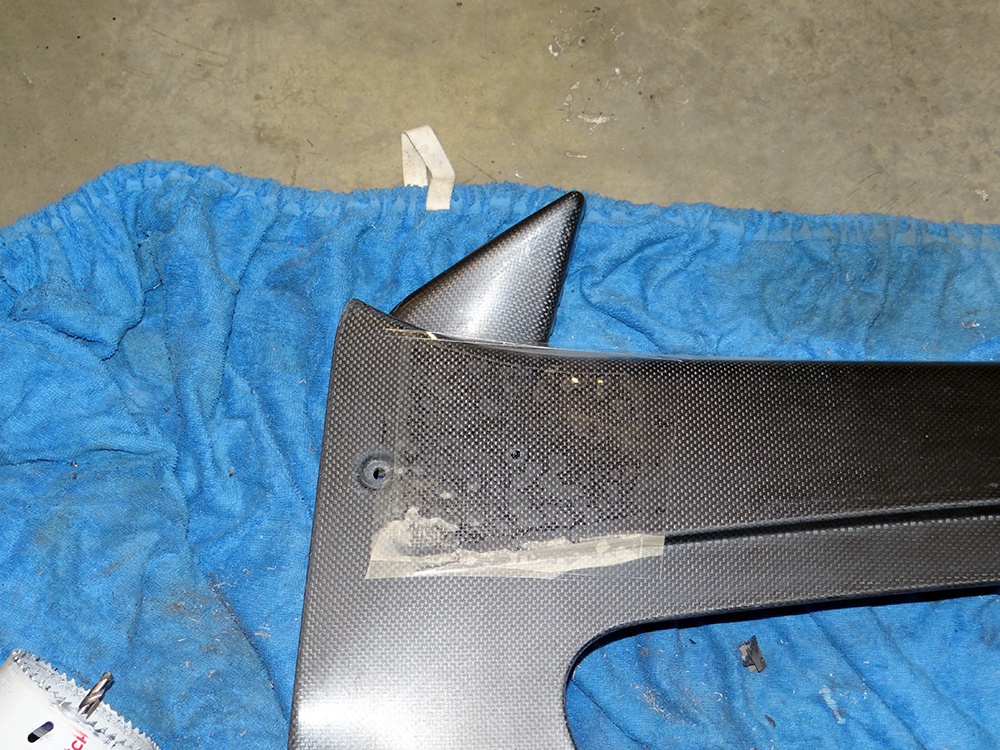
The film actually worked really well and I ended up with a surprisingly precise hole.
I bonded the forward reinforcement bracket further back out of the way of the new hole.
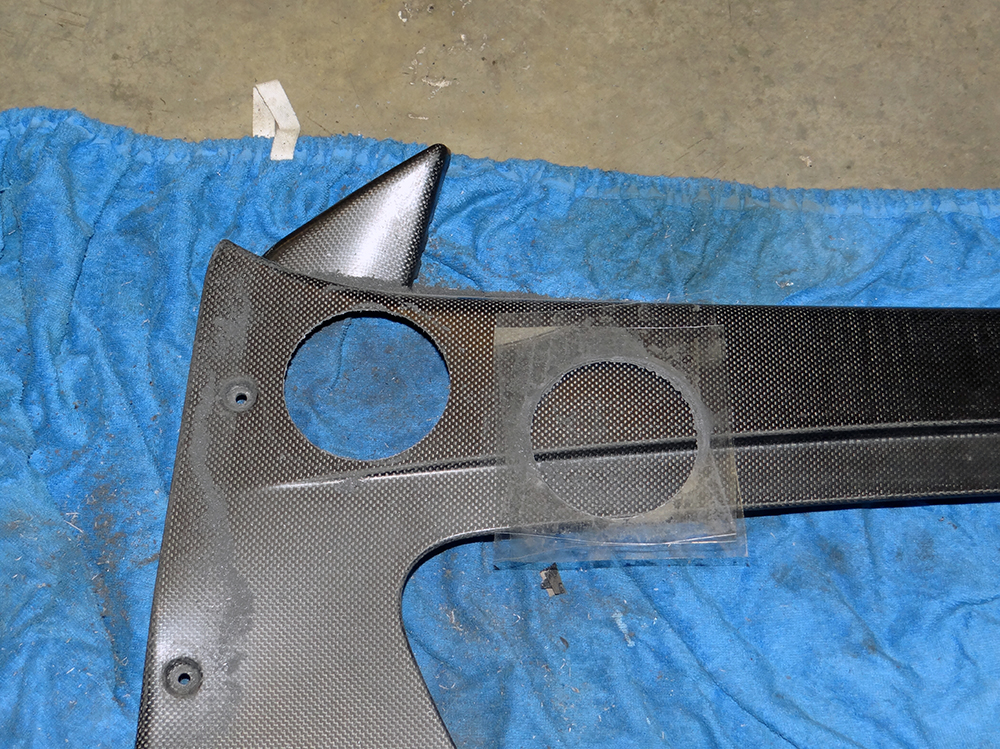
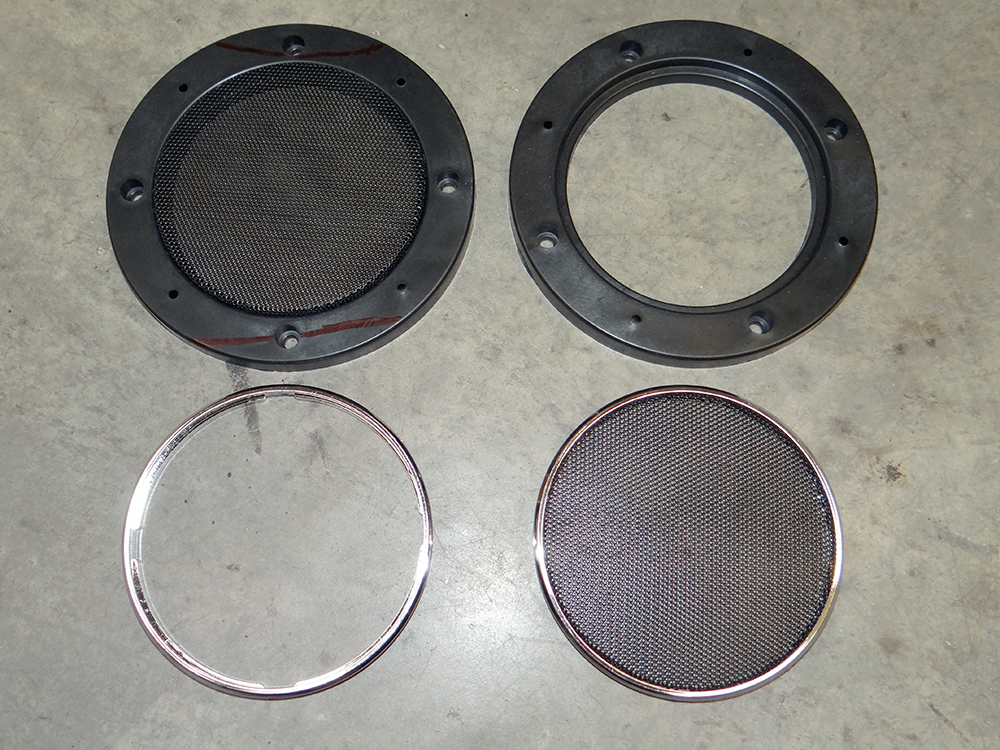
Until I locate some OEM grilles and speakers I will use a plain circular speaker grille and mount the original F430 tweeter behind it on a bespoke carbon bracket. Obviously, I won't have the 'D' shaped cut out in the door panel - where the JBL logo is on the 16M speaker - but I can quite easily add that at a later date.
I sourced some 100mm black grilles and some really useful speaker mounts which have a lip inside them to secure the grille when pushed in from the front of the door panel.
Completed. A small change but a satisfying one. I used emery paper to smooth the hole and add a chamfer on the edge just like the 16M panel. I've bonded the speaker mount to the rear of the panel hence the grille is secured in place.
Casting back to November 2016 and Carlo from Italy very kindly donated a pair of Scuderia carbon door panels to the project. These are incomplete, missing a central insert panel which features a moulded mount for the inner door handle and a group of rivnuts to which a storage net is secured. Despite the missing parts, the panels are a great help.
The door panels are actually different between the Scuderia and 16M, and although the 16M parts are still available from the factory the total cost is disproportionate.
I do need some of the parts purely for functional reasons, but my plan is to finish the Scuderia door cards from Carlo and whilst doing so convert them to 16M spec i.e. with both speaker apertures and grilles. A 16M door panel is pictured below complete with the internal handle and storage net, which are amongst the parts I must source.
To finish this project there are several areas I will need to tackle:
1) Modify the Scuderia door panels to 16M specification;
2) Create a mould for the central insert (handed - L & R) and use it to manufacture the insert from plain weave carbon;
3) Modify my F430 doors to Scuderia spec by fabricating aluminium mounts with M5 spire nuts, to which the carbon panels can fasten.
16M Door Card Recreation - Midrange and Tweeter
The tweeter in the F430 is mounted to the internal trim 'triangle' behind the rear view mirror base, but in the 16M the tweeter is mounted in a custom grille angled toward the driver, behind which is a 100mm midrange driver - the internal mirror trim plate is part of the carbon door panel. I would really like to source the grilles with integral tweeters butfor weight reasons I would not fit the midrange nor associated Bose amplifier; I would simply use the standard F430 configuration of a tweeter and midbass driver in the lower door.
Thanks to 16M owner David from Down Under for measuring the speaker grilles, which enabled me to use accurate paper templates to ascertain the right location for the speaker apertures, and mark the centre point on the door panels.
On the rear of the door panel are three upper reinforcement brackets, and the front most of these on the Scuderia panel is in the way of the midrange/tweeter assembly. The following photo shows the rear of a complete Scuderia door panel with the offending bracket marked with a green arrow. I was able to pry off the brackets from my door panels without damage - at a later stage I will re-bond a little further back.
Next, I moved on to drilling the panel. I have to be honest and say I wasn't entirely sure how well it would turn out, so to minimise any problems I did a couple of things; firstly, I purchased a quality hole saw a few mm smaller in diameter than the speaker grille so I could finish the hole by hand with emery paper, and secondly, I used ballistic grade window film to stick on the panel and give the saw something to bite into rather than skipping over the smooth carbon.
The film actually worked really well and I ended up with a surprisingly precise hole.
I bonded the forward reinforcement bracket further back out of the way of the new hole.
Until I locate some OEM grilles and speakers I will use a plain circular speaker grille and mount the original F430 tweeter behind it on a bespoke carbon bracket. Obviously, I won't have the 'D' shaped cut out in the door panel - where the JBL logo is on the 16M speaker - but I can quite easily add that at a later date.
I sourced some 100mm black grilles and some really useful speaker mounts which have a lip inside them to secure the grille when pushed in from the front of the door panel.
Completed. A small change but a satisfying one. I used emery paper to smooth the hole and add a chamfer on the edge just like the 16M panel. I've bonded the speaker mount to the rear of the panel hence the grille is secured in place.
Edited by mwstewart on Wednesday 13th February 16:01
16M Door Card Recreation - Midbass Part 1
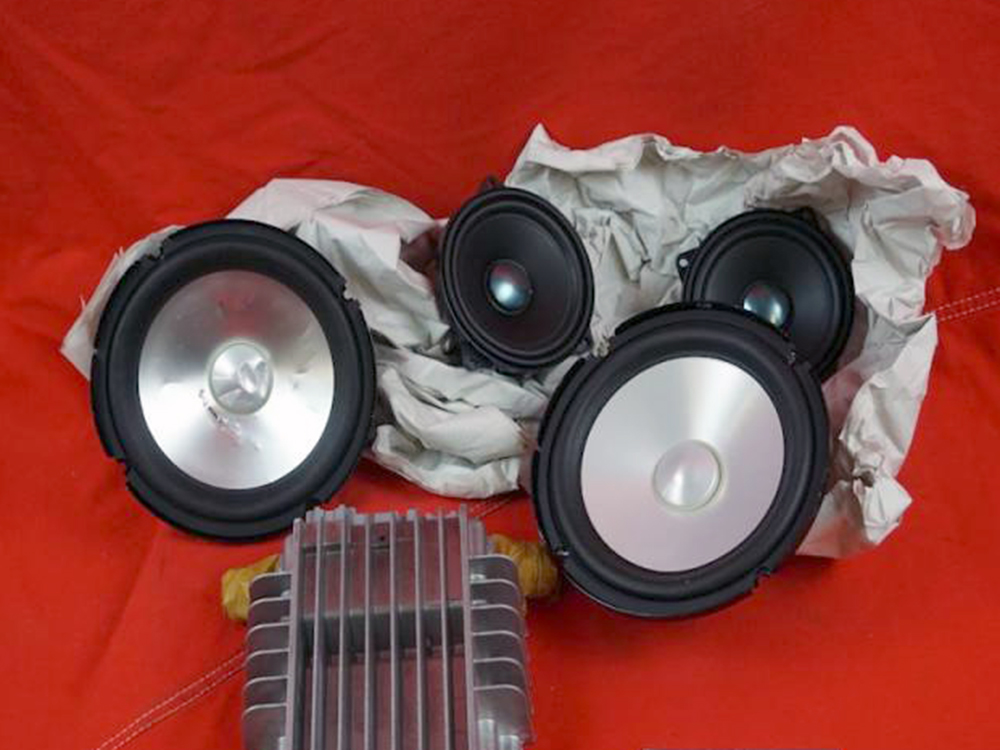
The 16M has a 6.5"/165mm metal cone driver at the bottom of each door, which is the same size as the paper cone driver used in the F430 (the photo below shows both 165mm and 100mm 16M speakers). It is the midbass component of the JBL three way speaker system.
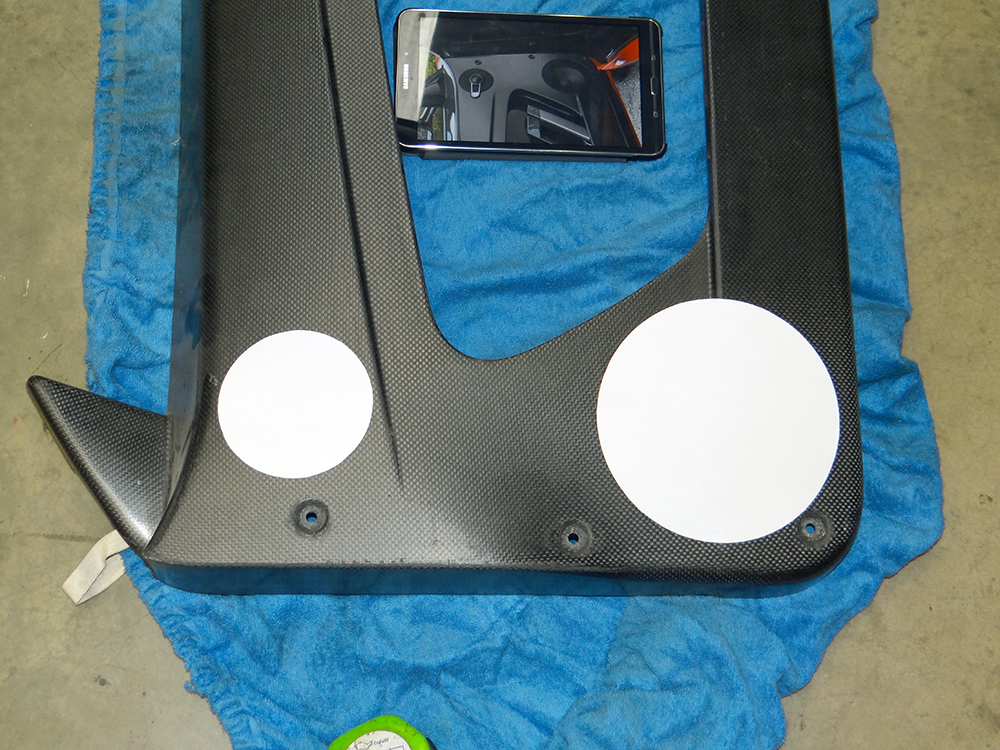
I used a 152mm hole saw using the same approach as before.
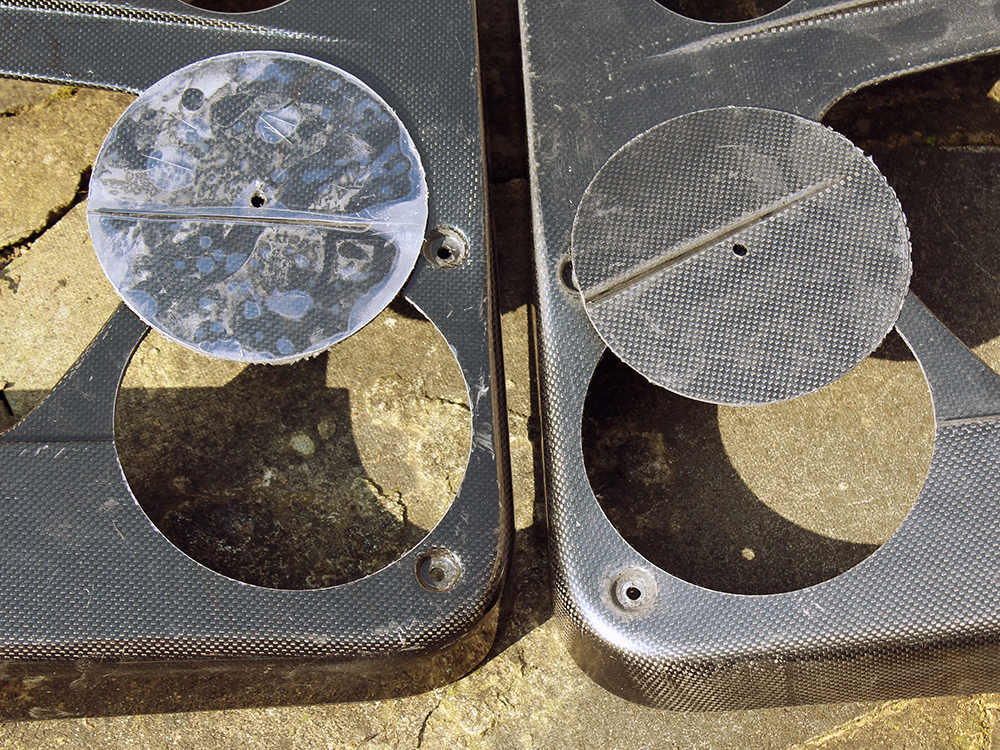
I liberated a pair of grilles from some domestic ceiling speakers I already had. I will have them blasted and powder coated satin black.
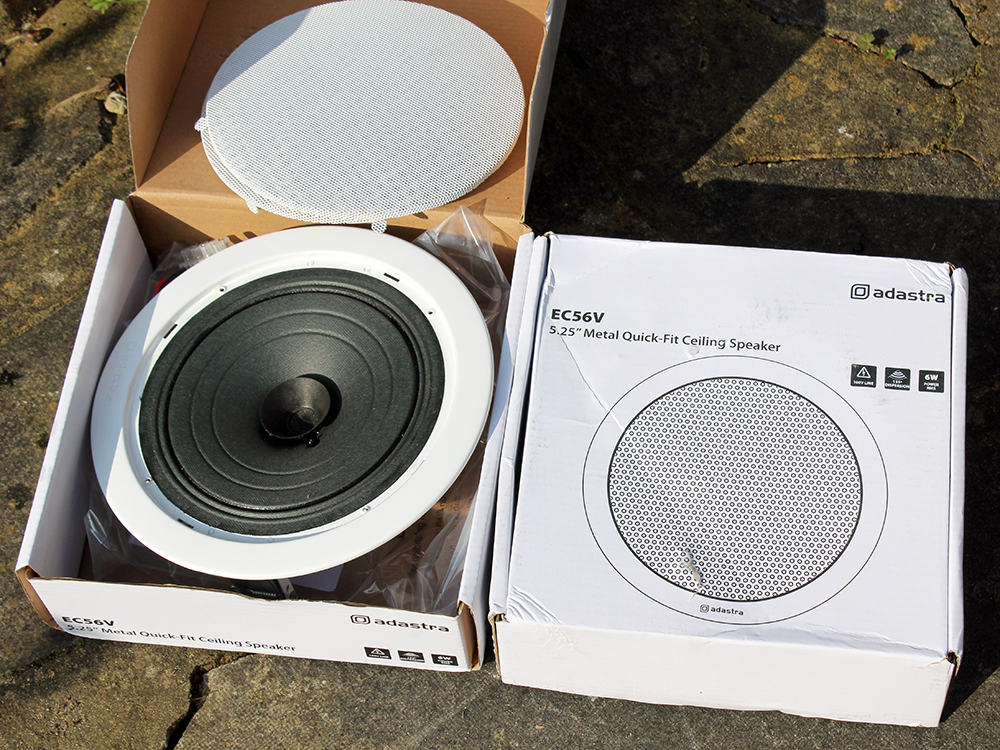
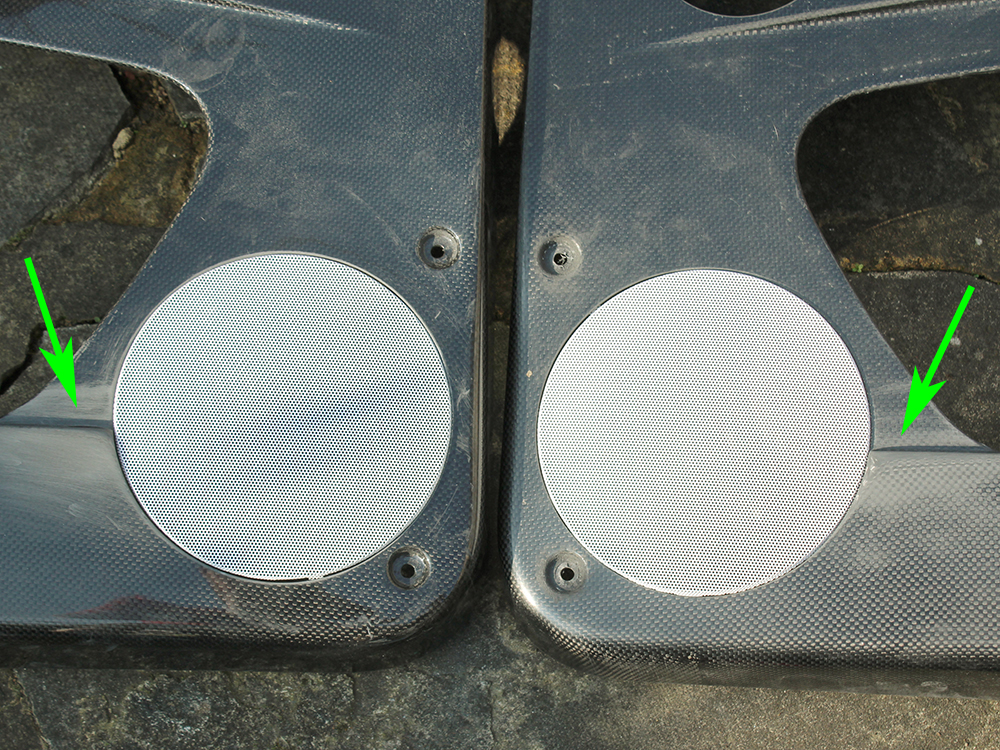
Photo to show sanded edges and grilles loosely mounted. The swage line - indicated by the green arrow - on 16M door cards actually ends before the speaker in order to prevent the abrupt step near the edge of the grille that I've been left with. There was quite a thickness of carbon in that area so I sanded to re-shape and thus visually soften the transition towards the grille, but I'm still not completely happy with it, so I'm going to lay new carbon underneath the ridge to build up the thickness. This will enable me to sand through the original layer without jeopardising the cosmetic appearance so I can blend the entire area in towards the grille, as per OEM 16M.
The 16M has a 6.5"/165mm metal cone driver at the bottom of each door, which is the same size as the paper cone driver used in the F430 (the photo below shows both 165mm and 100mm 16M speakers). It is the midbass component of the JBL three way speaker system.
I used a 152mm hole saw using the same approach as before.
I liberated a pair of grilles from some domestic ceiling speakers I already had. I will have them blasted and powder coated satin black.
Photo to show sanded edges and grilles loosely mounted. The swage line - indicated by the green arrow - on 16M door cards actually ends before the speaker in order to prevent the abrupt step near the edge of the grille that I've been left with. There was quite a thickness of carbon in that area so I sanded to re-shape and thus visually soften the transition towards the grille, but I'm still not completely happy with it, so I'm going to lay new carbon underneath the ridge to build up the thickness. This will enable me to sand through the original layer without jeopardising the cosmetic appearance so I can blend the entire area in towards the grille, as per OEM 16M.
Edited by mwstewart on Wednesday 13th February 16:01
The level of detail in your efforts, mean you will only ever win.
I salute you Sir, because you are a perfectionist, who is a level above perfect.
Every time you fire it up, i see a smile on your face, from my perspective.....you earned it, and thank you for sharing your efforts, like genuinely.
I salute you Sir, because you are a perfectionist, who is a level above perfect.
Every time you fire it up, i see a smile on your face, from my perspective.....you earned it, and thank you for sharing your efforts, like genuinely.
Gassing Station | Readers' Cars | Top of Page | What's New | My Stuff