Ferrari F430 Spider
Discussion


outnumbered said:
 you let someone else clean it ??
Andy_5 said:
outnumbered said:
you let someone else clean it ??
 I try not to be over-protective: I take the view that its going to pick up marks one way or the other especially if the performance is used. I've cut it a few times with the machine polisher and finished with Megairs ultra-finish. That's as far as I'll go with it; there's not a significant amount of orange peel left. Afraid to say I find cleaning a bit of a chore these days purely because of the time aspect.
Having said the above it was amongst the better paint finishes on the stand...
leglessAlex said:
I always forget how good looking these cars are until I see one again. What a superb machine.
Have you any long trips planned this summer/autumn?
Thanks - it's one of my favourites. It was our wedding and a big road trip in June but we cancelled as my Dad had a stroke a few days before. He's all fine now, but we postponed everything until next year. No other big trips planned this year.Have you any long trips planned this summer/autumn?
GiveItSomeWellie said:
I was following you along the A43 and into the circuit on Saturday, and wow in the flesh the car looks and sounds amazing!
Ahh - you must have been in the Jaguar? I remember seeing you behind and thinking you must be headed to the show; there aren't many of those on the road now!Atlas 12v said:
Could you please re-post the link to the electrical component supplier you sourced the plugs etc for the loom.
Thanks
https://www.mouser.co.ukThanks
Bungleaio said:
Shame that your dad has had a stroke but good that he's OK now.
Cheers.
mwstewart said:
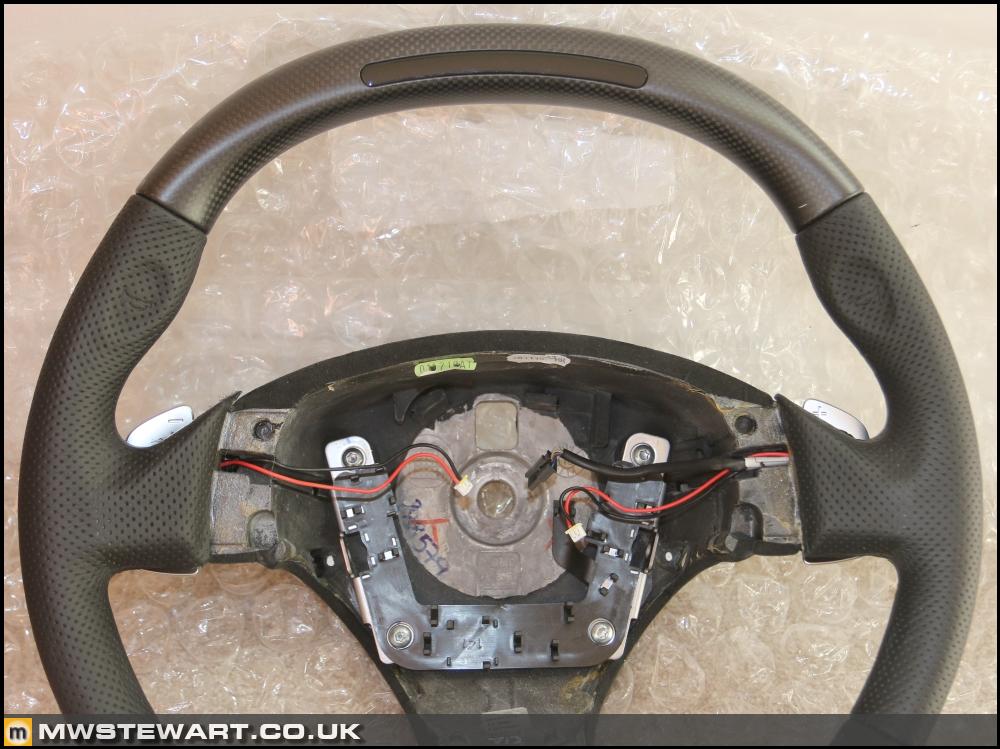
Steering wheel - paddles
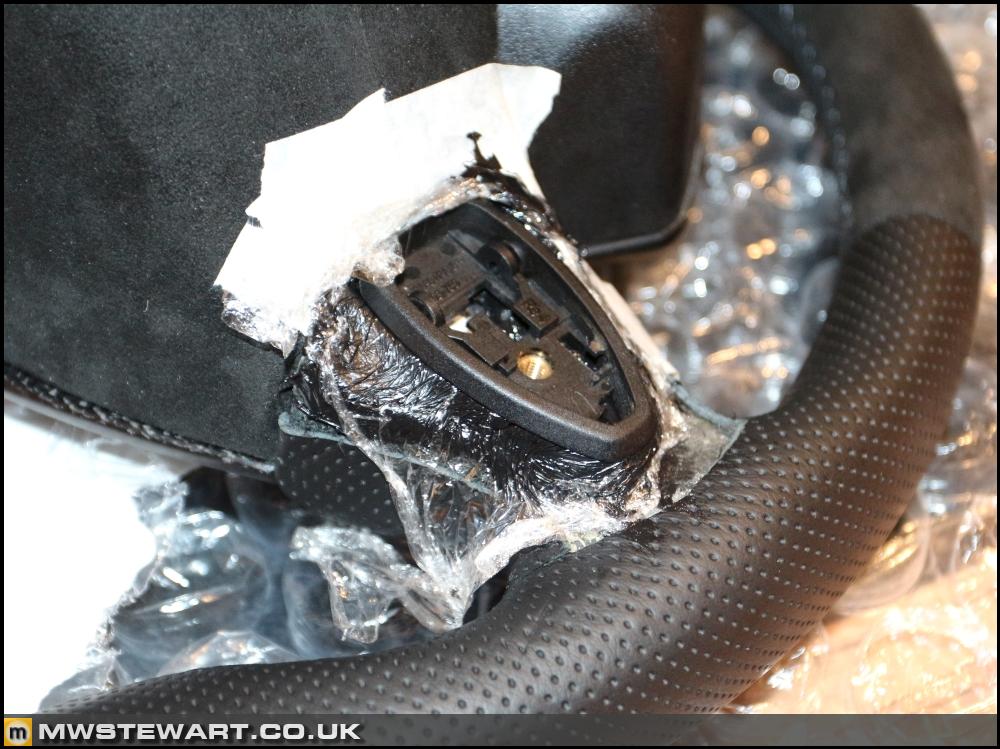
There will be two parts to this conversion: physical and electronic, and this update will detail the physical changes. To start with I stripped the original F1 lever from my car to see how it worked and to see if I could integrate any of it in the Mercedes part.
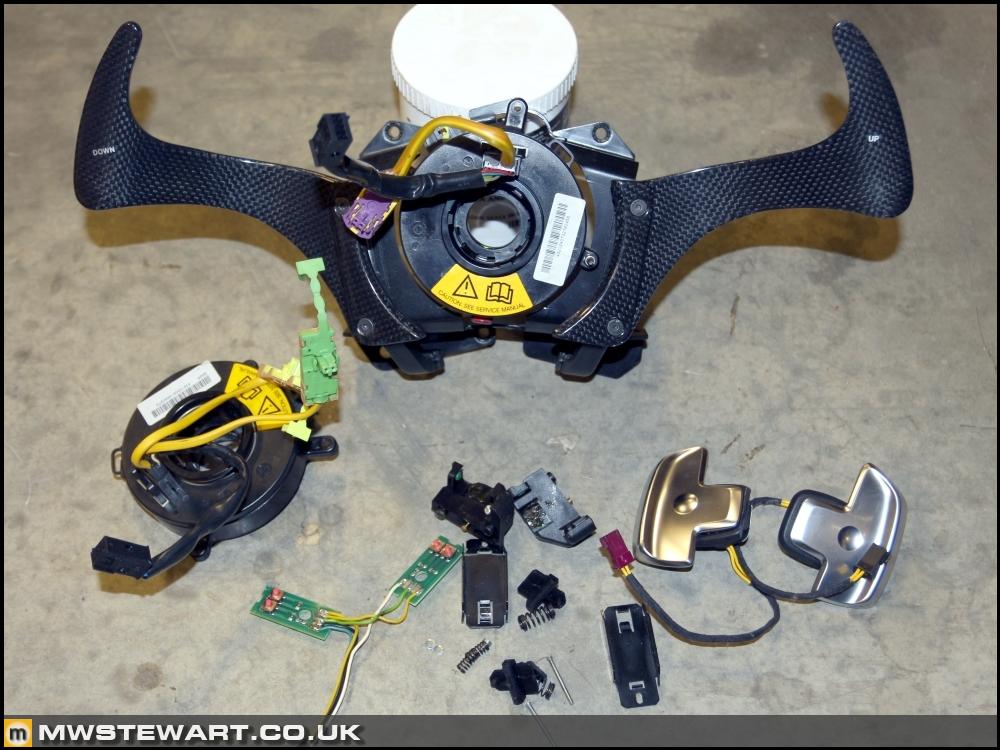
I also stripped the Mercedes switches (part numbers A0999051200 and A0999051300) to understand how they worked and to aid mocking up on the Ferrari wheel. The switches are quite simple and operate by contacting a carbon disc embedded within the tactile element onto the PCB tracks. The whole part is designed very elegantly as the PCB, tactile element, and rocker all fit together to lock in place.
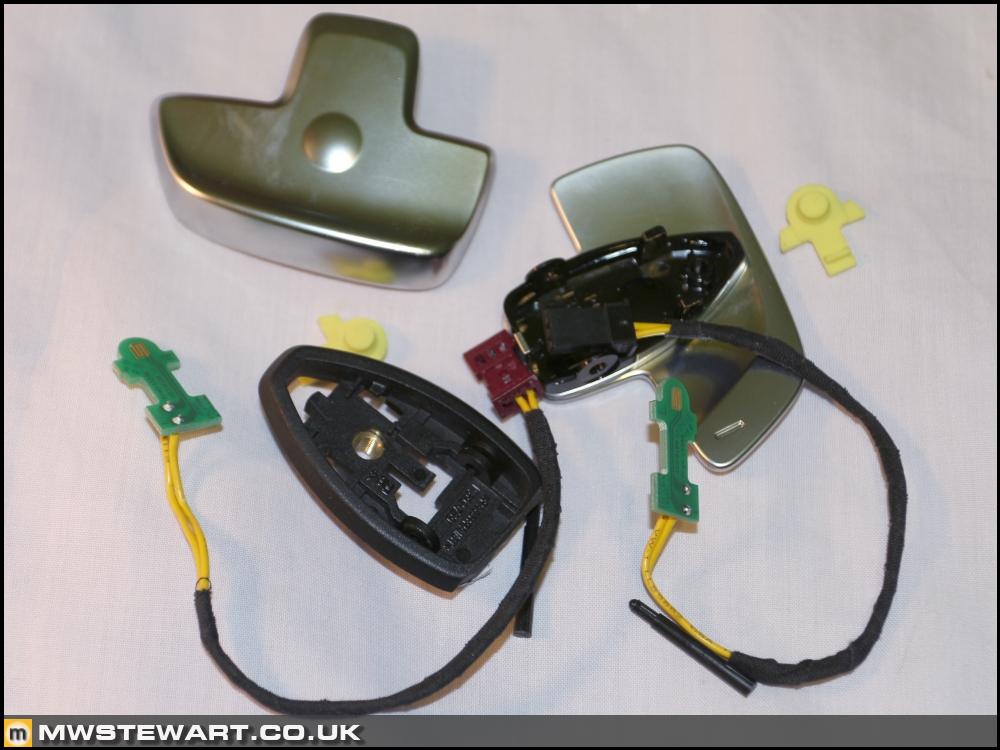
Next to the Ferrari wheel and here is one side of the multifunction computer control switch for the 599; they are simply a push fit into the steering wheel foam secured by barbed prongs.
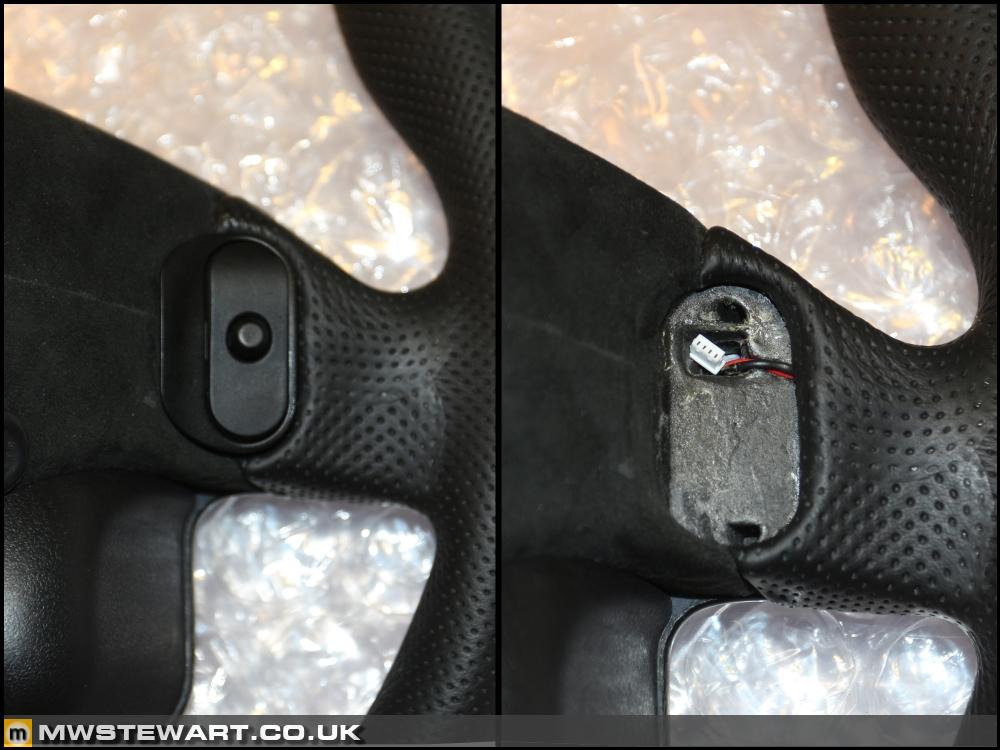
I cut away the leather to expose the foam underneath and after a few trial fits of the paddles I decided where to position them, and where to trim both the paddles themselves and the steering wheel foam to achieve the best fit. The photo shows the areas on the steering wheel that I trimmed with a scalpel.
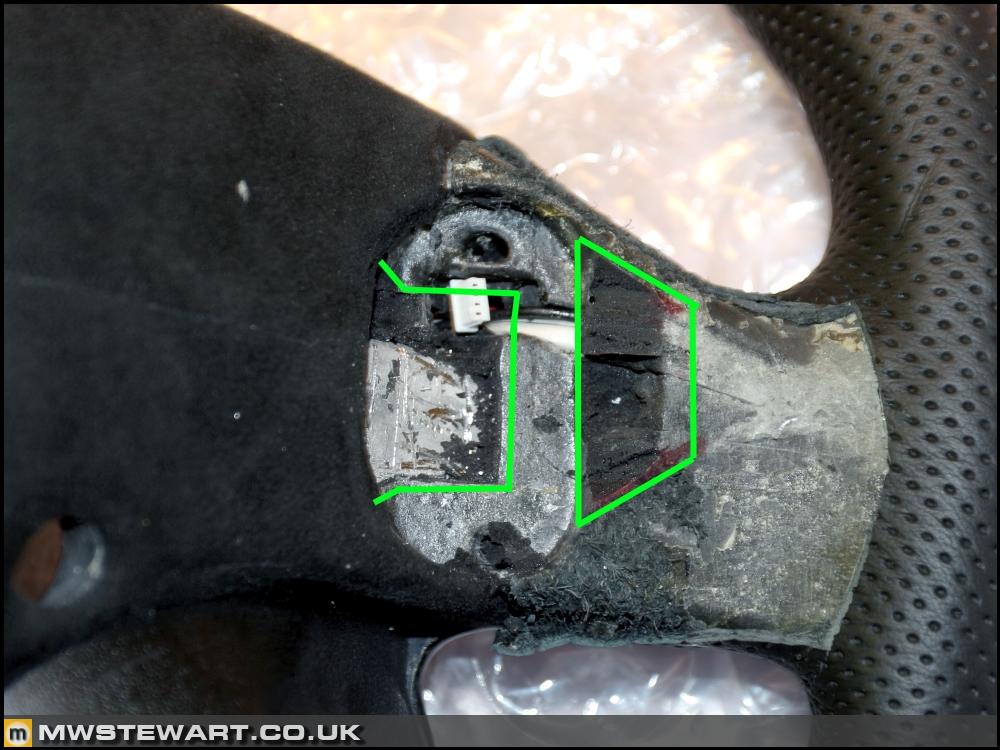
Obviously, the Mercedes paddles were not remotely close in size to the original 599 switches and also they extended beyond the original holes, hence I had a few requirements:
1) Fill the gap between paddles and edge of 599 switch recess;
2) Create a moulded base that securely holds the paddles;
3) Fill the gap between the paddles and at the same time blend them into the steering wheel to look as OE as possible;
4) Use a filling compound with high adhesion that when set has a similar hardness to the OEM steering wheel foam.
After a bit of thinking I decided to try PU adhesive. I knew it had a similar hardness to the existing foam, fantastic adhesion, and sufficient viscosity to allow me to shape it yet still hold its form. I also decided to try cling film moulded to the base of the paddle casing to act as a crude release agent.
After placing the paddle casing in place I moved excess cling film on top of it, and used a screw driver to pack out the base of the casing with PU and begin to build up the area around it. When it was 'about there' I folded over the cling film and used my fingers to smooth everything off.
The finished result after setting overnight. I am really pleased with how it turned out. I left the gap between the PU and Alcantara so the trimmer can tuck in the leather and create a nice radius.
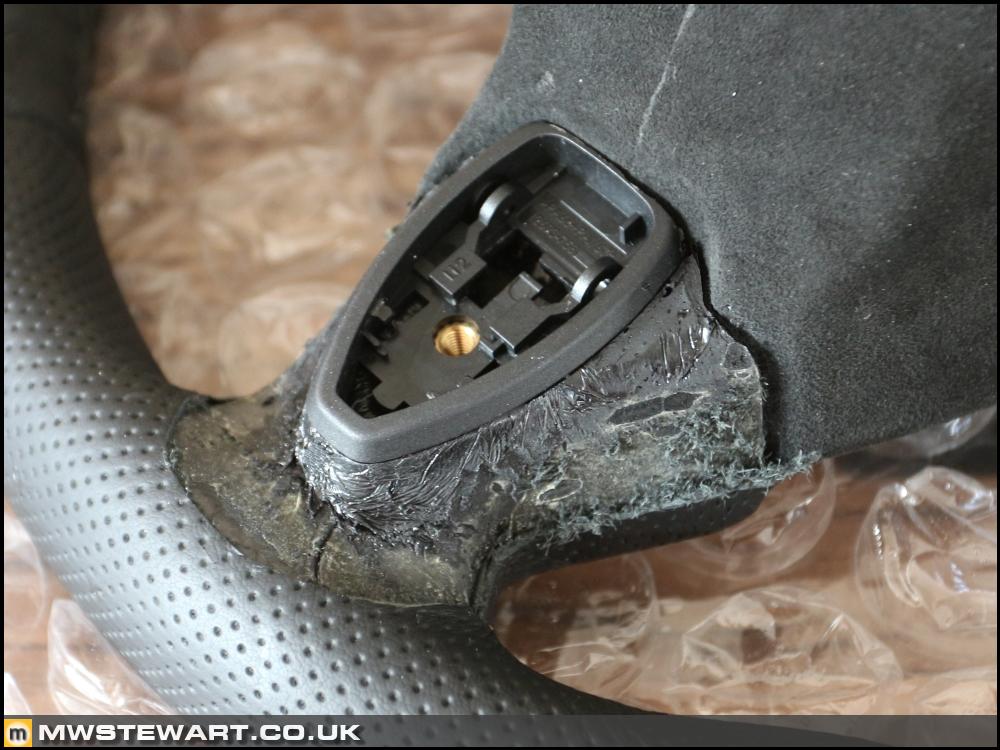
Mercedes paddles reassembled for trial fit. I'm happy. These are the standard paddles but I have extended versions to go on when back from the paint shop after being refinished in Grigio Corsa.

regarding the Mercedes switches (part numbers A0999051200 and A0999051300) , there are two yellow cables from each switch, which one is ground cable?There will be two parts to this conversion: physical and electronic, and this update will detail the physical changes. To start with I stripped the original F1 lever from my car to see how it worked and to see if I could integrate any of it in the Mercedes part.
I also stripped the Mercedes switches (part numbers A0999051200 and A0999051300) to understand how they worked and to aid mocking up on the Ferrari wheel. The switches are quite simple and operate by contacting a carbon disc embedded within the tactile element onto the PCB tracks. The whole part is designed very elegantly as the PCB, tactile element, and rocker all fit together to lock in place.
Next to the Ferrari wheel and here is one side of the multifunction computer control switch for the 599; they are simply a push fit into the steering wheel foam secured by barbed prongs.
I cut away the leather to expose the foam underneath and after a few trial fits of the paddles I decided where to position them, and where to trim both the paddles themselves and the steering wheel foam to achieve the best fit. The photo shows the areas on the steering wheel that I trimmed with a scalpel.
Obviously, the Mercedes paddles were not remotely close in size to the original 599 switches and also they extended beyond the original holes, hence I had a few requirements:
1) Fill the gap between paddles and edge of 599 switch recess;
2) Create a moulded base that securely holds the paddles;
3) Fill the gap between the paddles and at the same time blend them into the steering wheel to look as OE as possible;
4) Use a filling compound with high adhesion that when set has a similar hardness to the OEM steering wheel foam.
After a bit of thinking I decided to try PU adhesive. I knew it had a similar hardness to the existing foam, fantastic adhesion, and sufficient viscosity to allow me to shape it yet still hold its form. I also decided to try cling film moulded to the base of the paddle casing to act as a crude release agent.
After placing the paddle casing in place I moved excess cling film on top of it, and used a screw driver to pack out the base of the casing with PU and begin to build up the area around it. When it was 'about there' I folded over the cling film and used my fingers to smooth everything off.
The finished result after setting overnight. I am really pleased with how it turned out. I left the gap between the PU and Alcantara so the trimmer can tuck in the leather and create a nice radius.
Mercedes paddles reassembled for trial fit. I'm happy. These are the standard paddles but I have extended versions to go on when back from the paint shop after being refinished in Grigio Corsa.


Long time no car stuff. It was due its 30k service earlier in the year; Aldous from AV Engineering gave a good price, and that's where I'll most likely send the car from now on, but time pressures meant it ended up at a Ferrari main dealer close by. I've done a few odd jobs over the past week.
Winter Jobs
Replacement moisture barrier for the luggage compartment bulkhead. They are made from pre-formed Polyethylene foam.
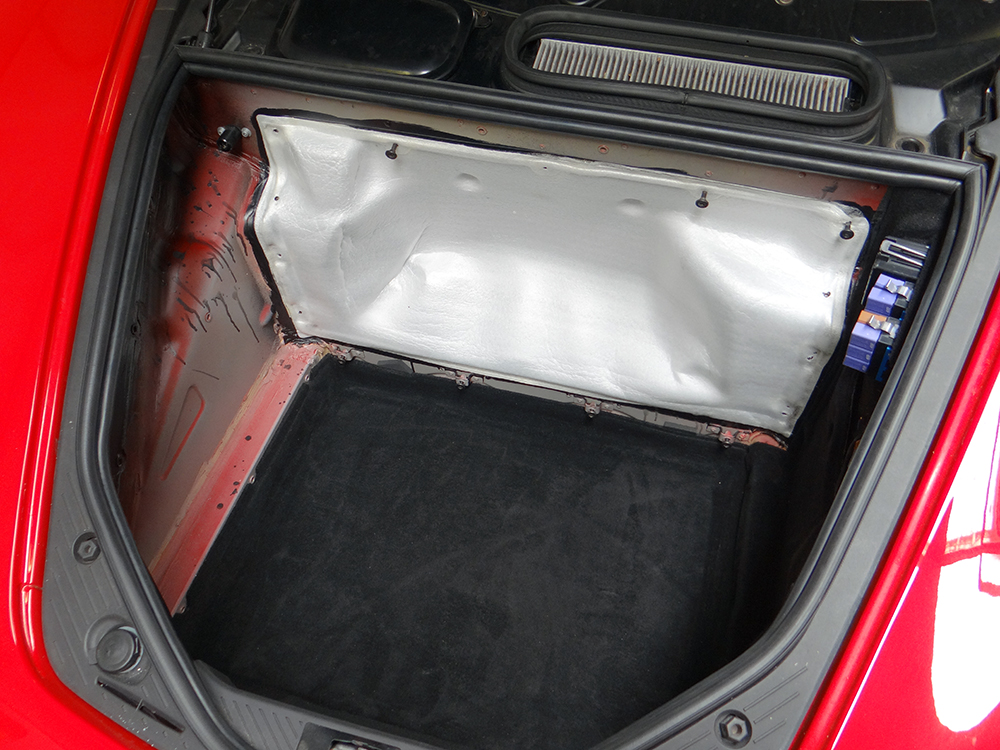
The screws securing the luggage compartment trim are made from cheese, so its important to be careful with them. The sealing compound for the moisture barrier can clog the threads, but I found a 15 minute soak in petrol dissolves it nicely.

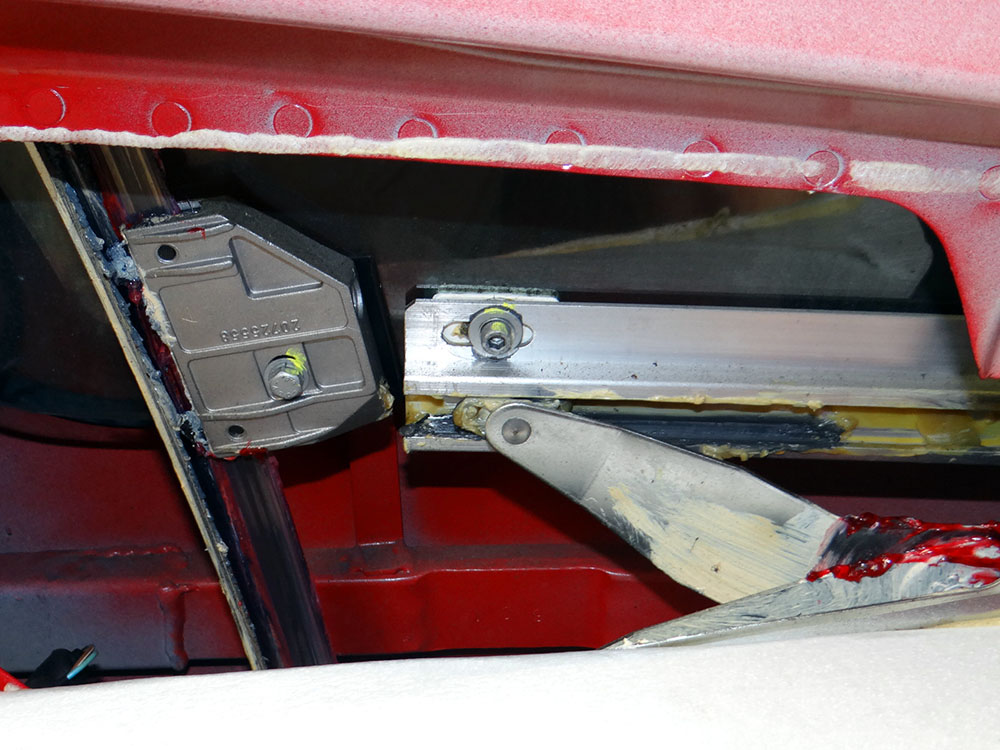
I removed the external window scrapers to polish underneath, but found telltale aluminium oxide. I ended up sanding a couple of areas down to bare aluminium, then etch priming, base, and lacquer. I've sprayed Dinitrol wax in most of the doors and behind seals: the channel in which the scraper sits is a bit of a water trap.

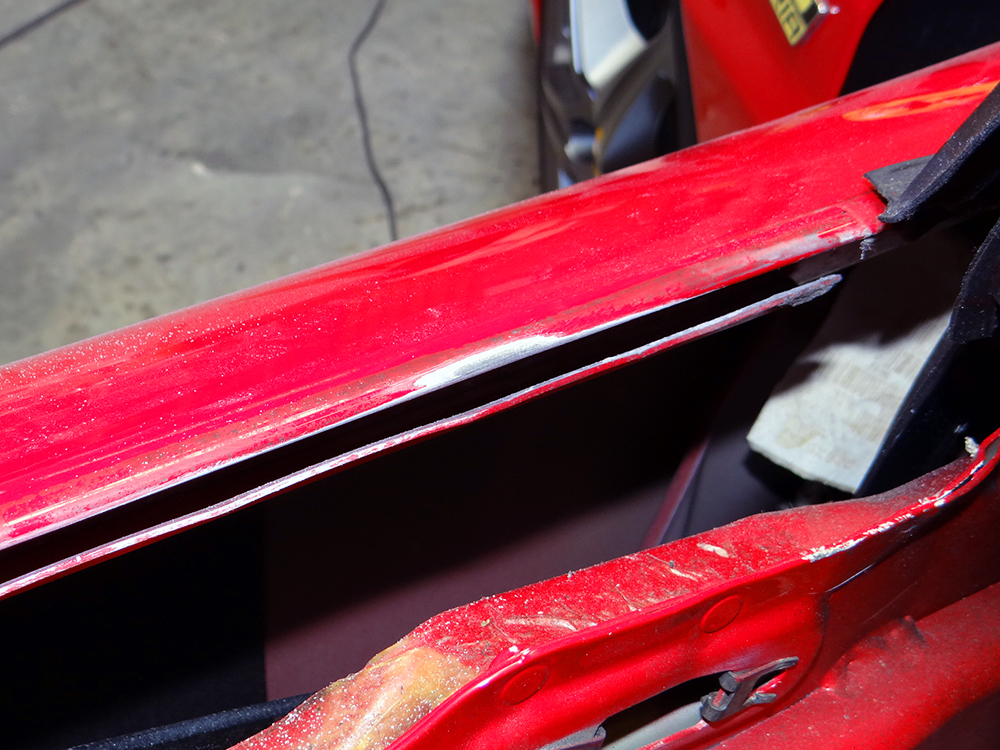
The N/S window went up and down much more slowly than the O/S. With the door card and moisture barrier removed an inspection revealed a very well-greased mechanism. I decided to clean and re-apply grease anyway, and to my surprise, this fully restored performance.
16M Door Cards
amongst several other things I picked up a set of complete door panels from a salvage 16M. I do like car parts/engineering but these are particularly nice. They are quite a bit nicer than the Scuderia version which can be seen behind in the second photo. The 16M cards have kevlar reinforcement in key areas. I'll post up a weight analysis in a later update.
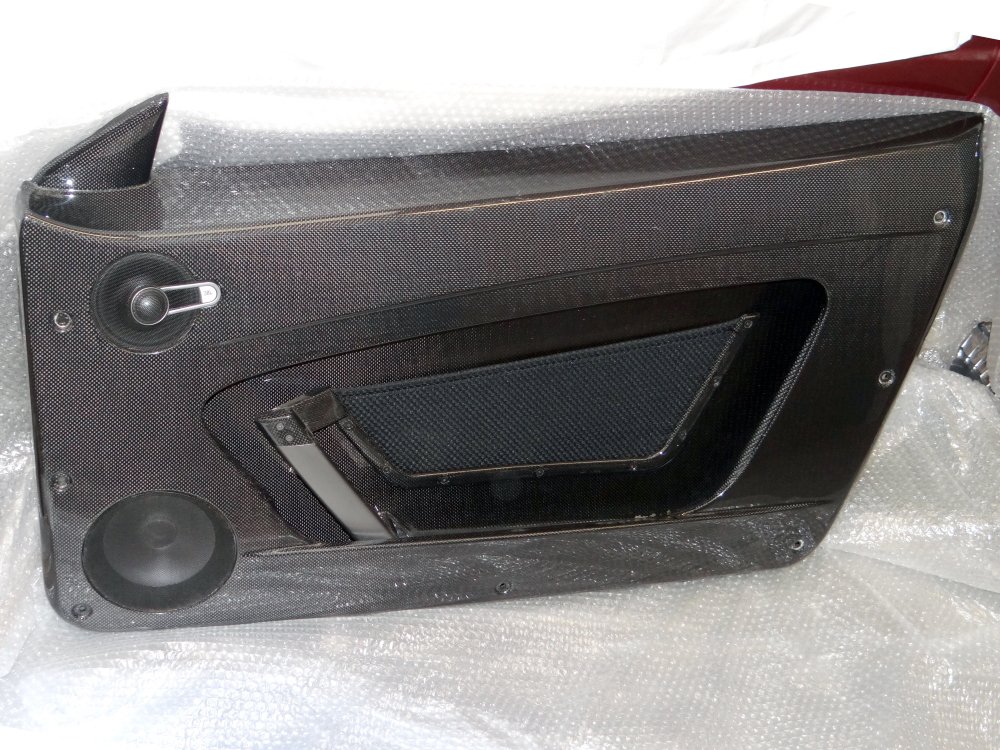
The speakers are secured to beautifully machined billet mounts. I'll post full details of the sound system another time.
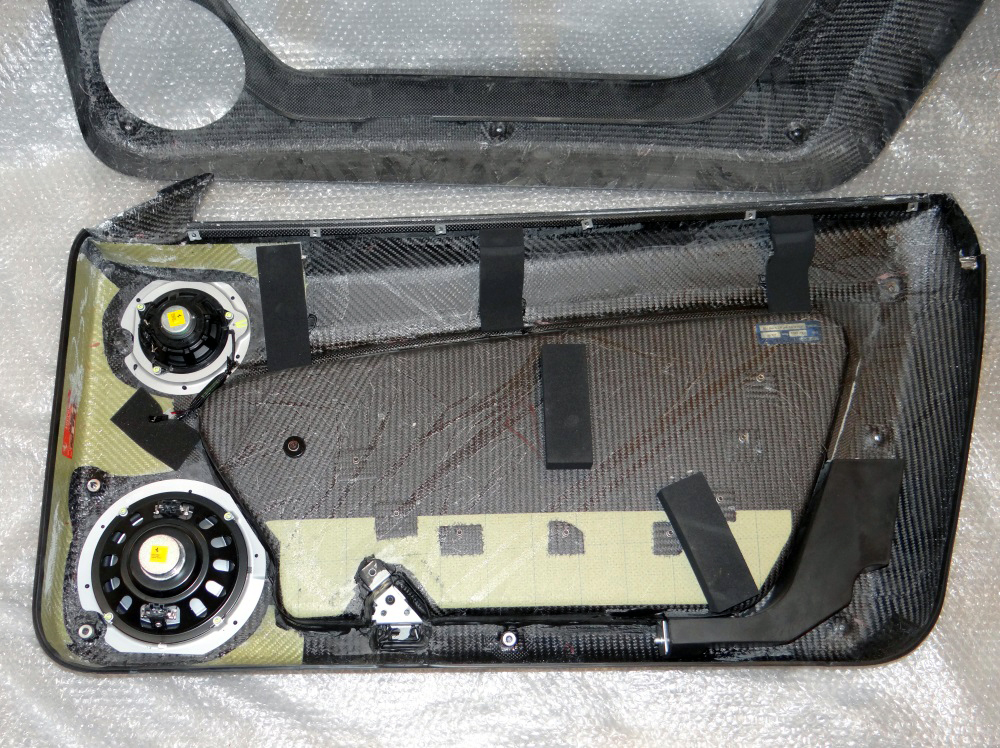
I also purchased the wiring looms. I've checked these over, and found that the 16M does away with the door marker lights, and mirror heating/defrosting in order to pass the additional wires for the speakers; there are insufficient pins in the door loom to car multi-plug to support all functions. I don't know if the coupe does without these functions, but certainly for the 16M Ferrari made a call on what could be taken out.
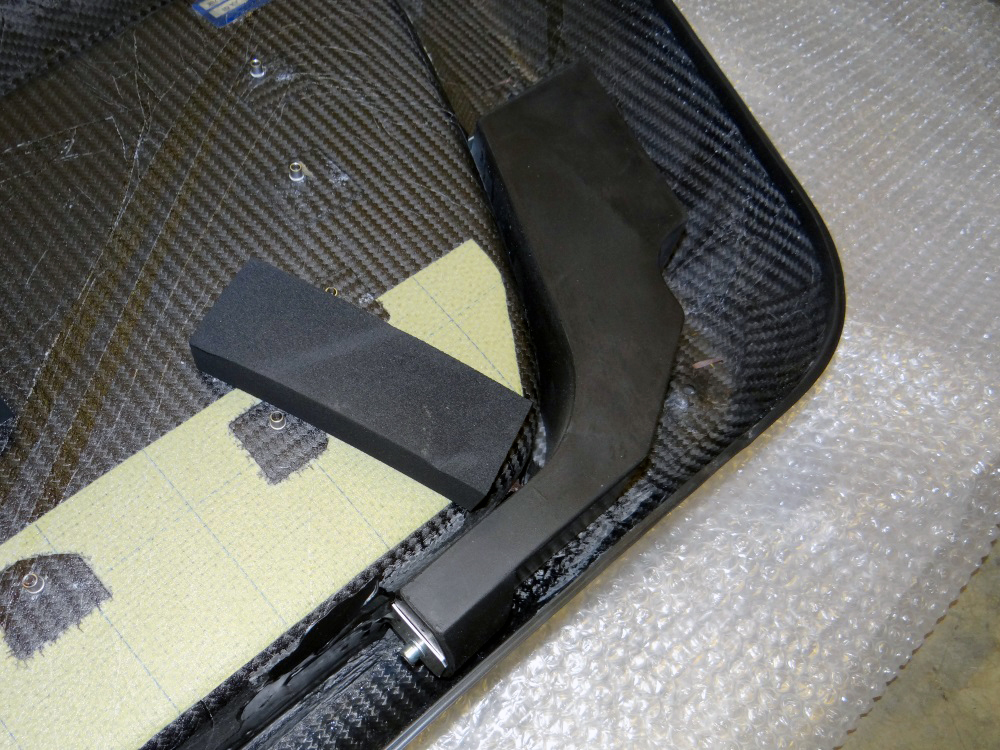
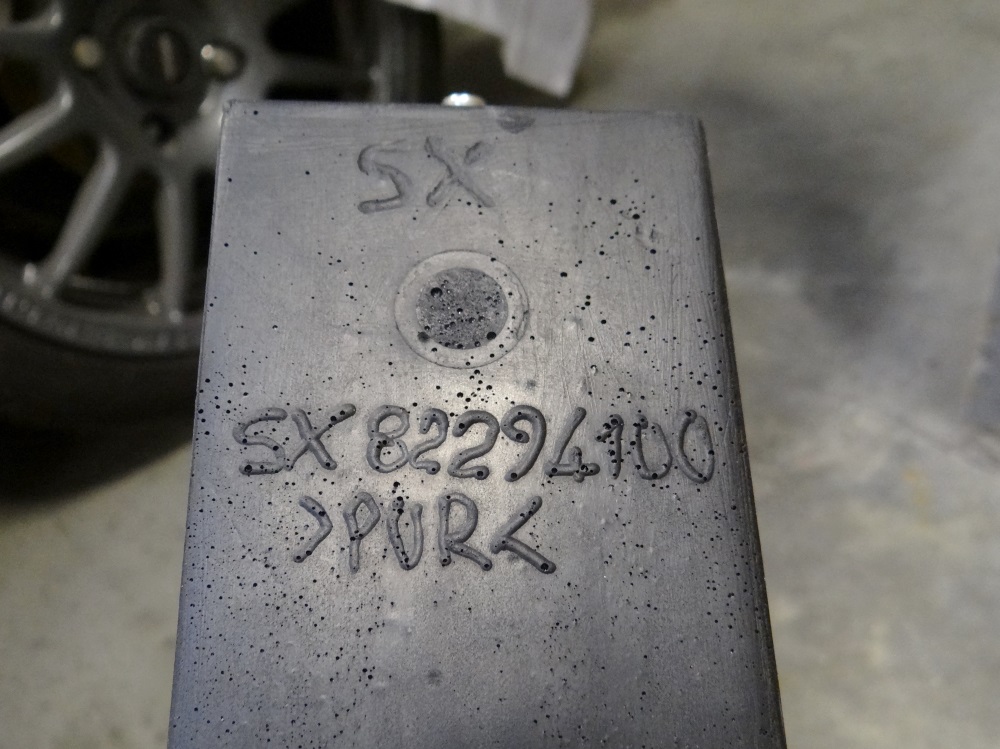
The 16M cards also feature a mass damper or an impact attenuator. I don't know which and the part number doesn't return a result from any of the online catalogues. Hopefully it's just an impact attenuator which I'm happy to do with out, but if there's lot of buzzing caused by the woofers I'll have to add them back in. Weight of the pair is 1.042kg which ins't insignificant given the total weight of the carbon cards.
On standard order Scuderia and 16M door cards the stitching for the map pocket wasn't matched to the rest of the car, and nor was the door bin liners, which were always grey Alcantara . I'm going to send the pockets away to be stiched in red, and the Alcantara pads to be re-made in red leather.
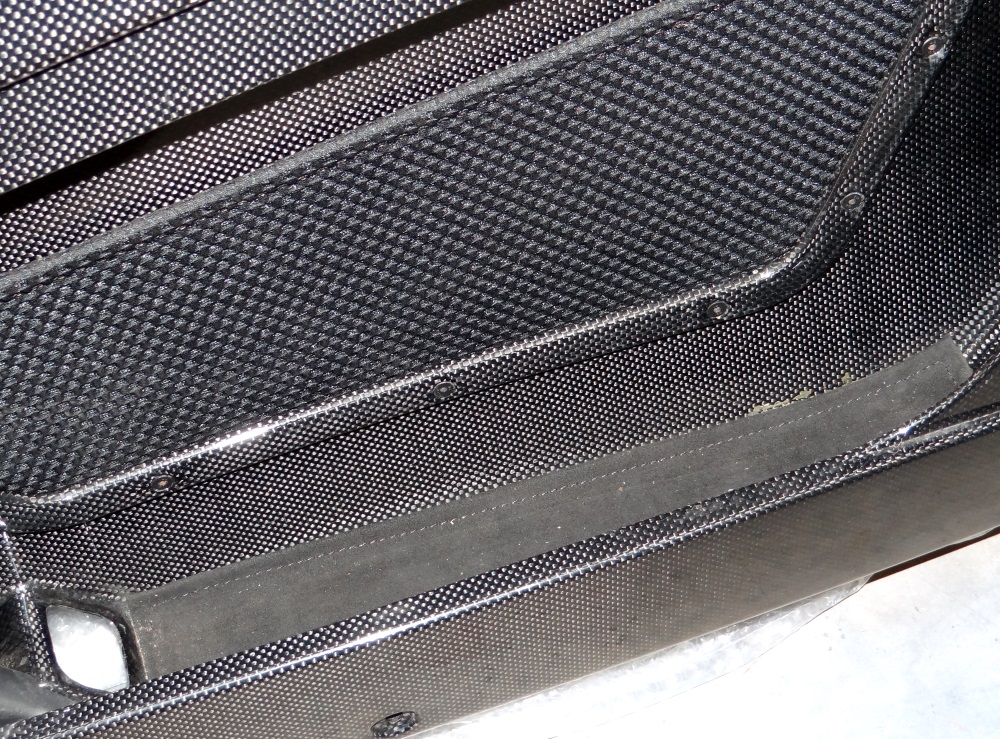
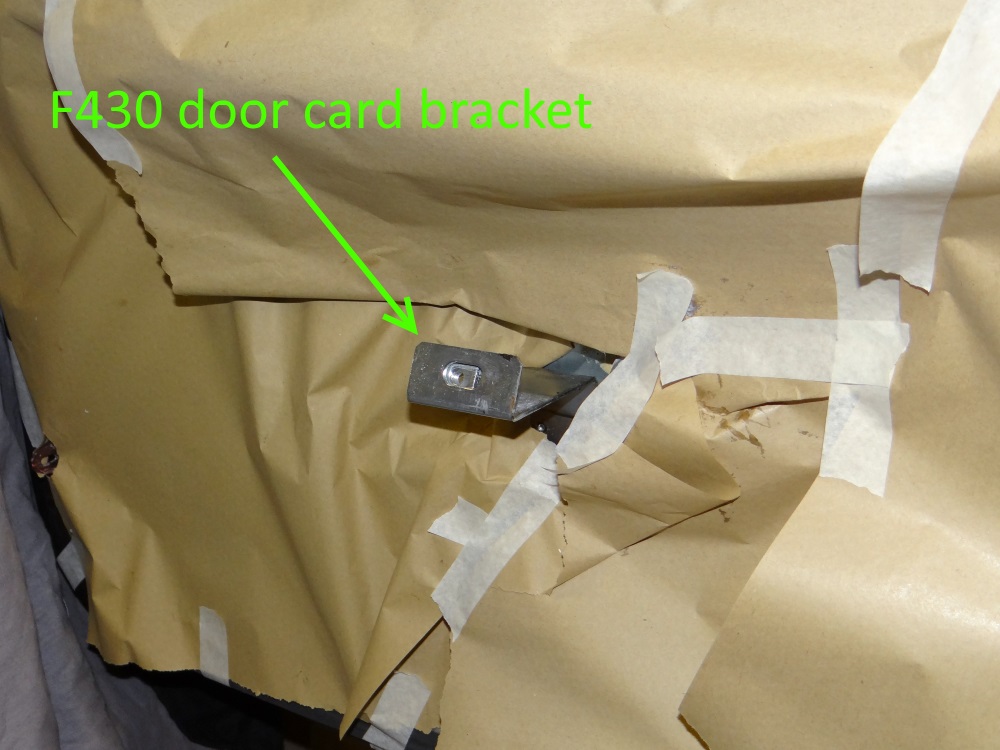
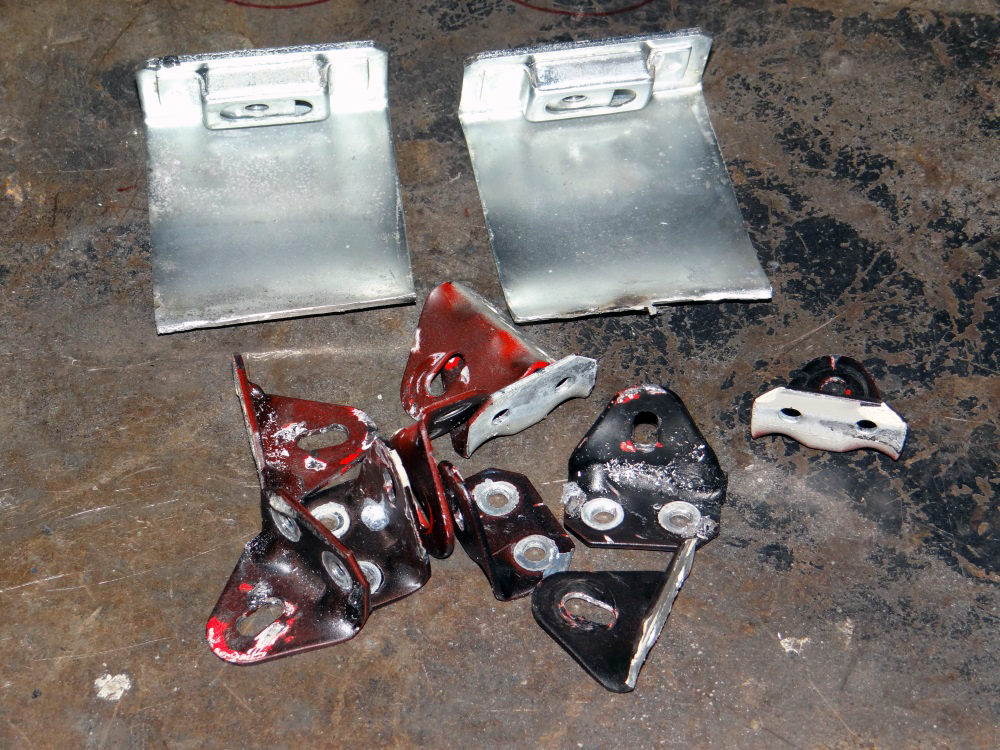
There are a few brackets to remove from the F430 door which will be replaced with a Scuderia equivalent that I'll fabricate. They are simply riveted on with aluminium brackets.

There is also a bracket on the electric window mechanism which is cut off on the Scuderia. I've done the same and finished with some edging trim.
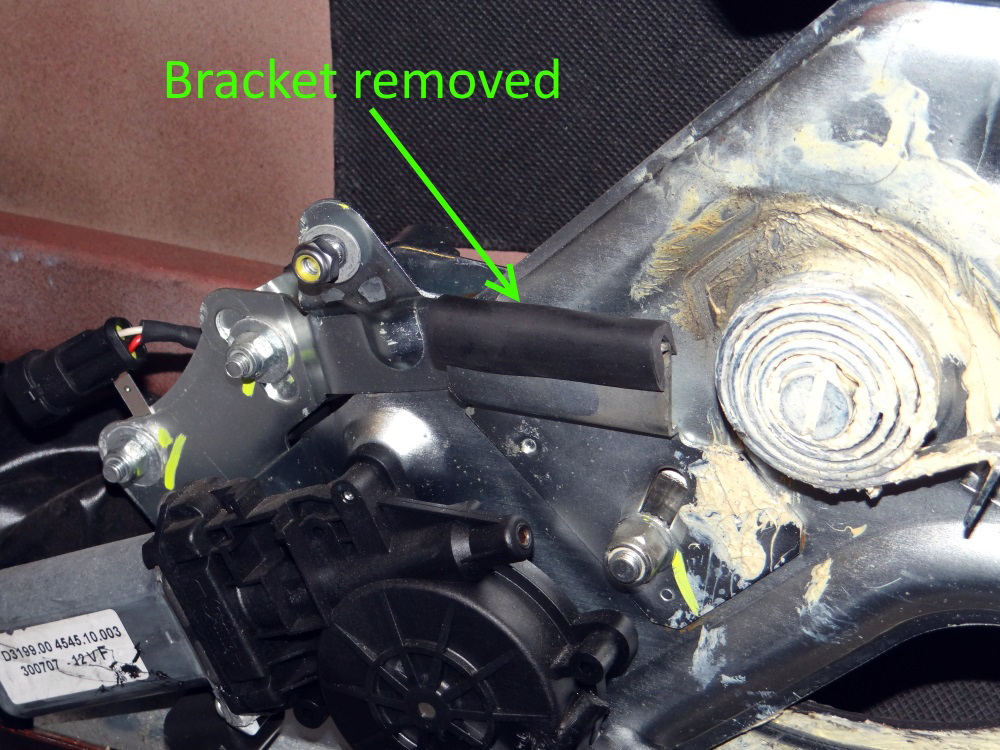
All brackets removed - 0.157kg.
Misc
I picked up the Scuderia floor plates from the 16M. I don't think these will be going in, at least in standard form; my OH doesn't like them one, which I'll conned to, but also they weight a silly 3.688kg - that is heavier than the carpet and sound deadening that they would replace. If I ever go this route I will have them copied in carbon, and painted to match the standard steel items.

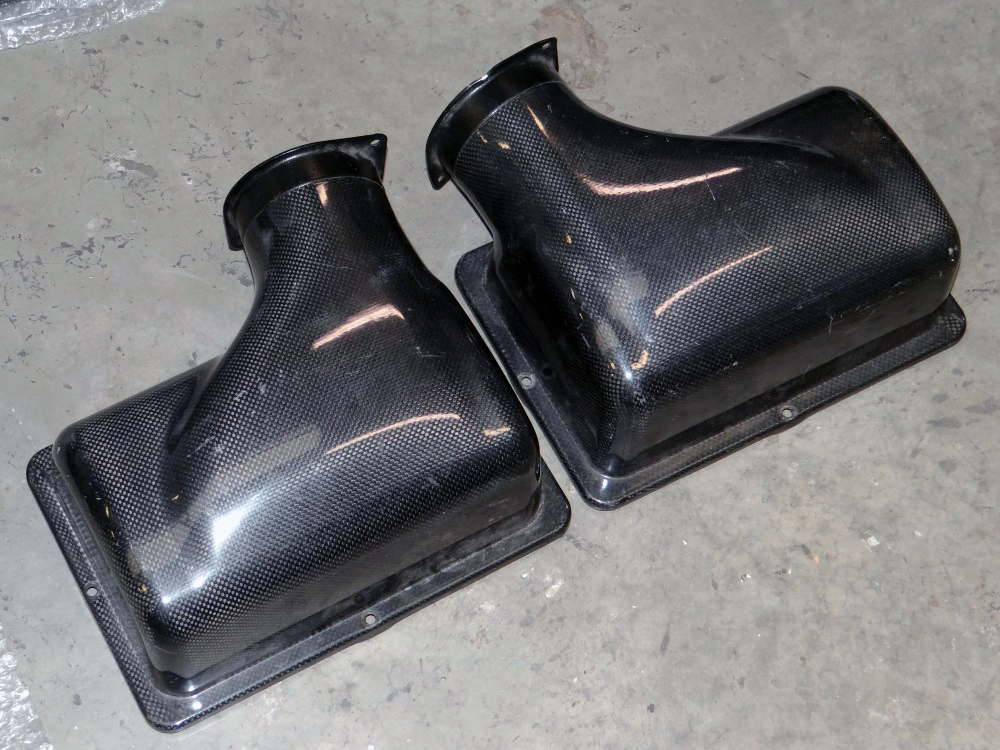
I picked up a spare pair of OEM Scuderia airbox lids. Surprisingly, not at all yellowed near the exhaust.
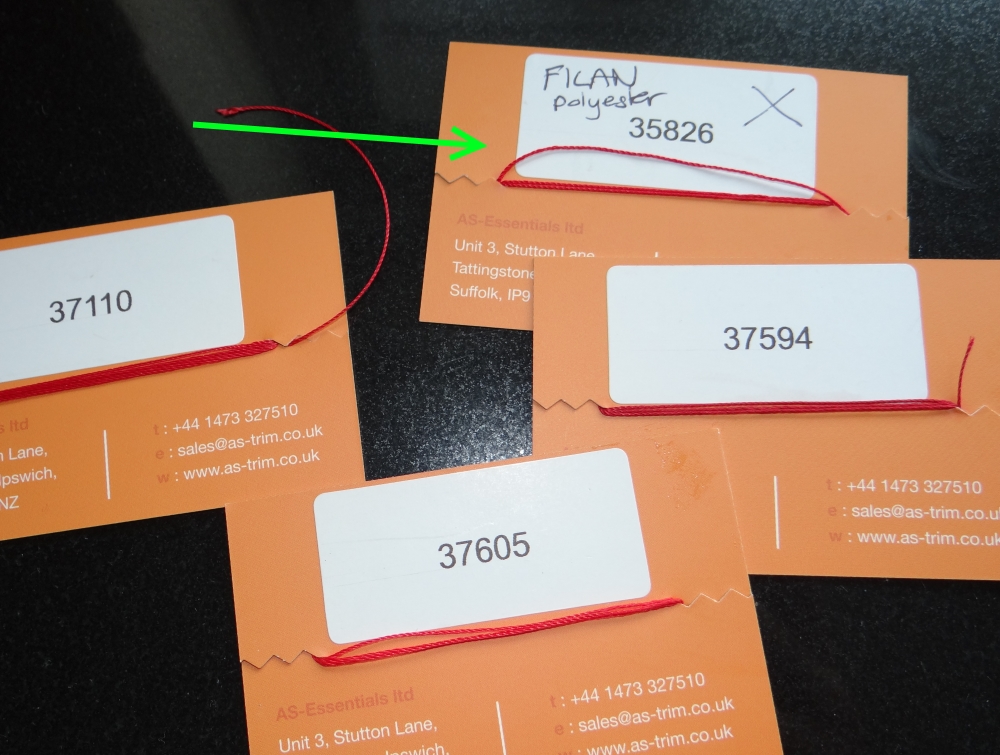
I'm about to have some more parts reupholstered. For anyone interested, Filan polyester thread #35826 matches the original.
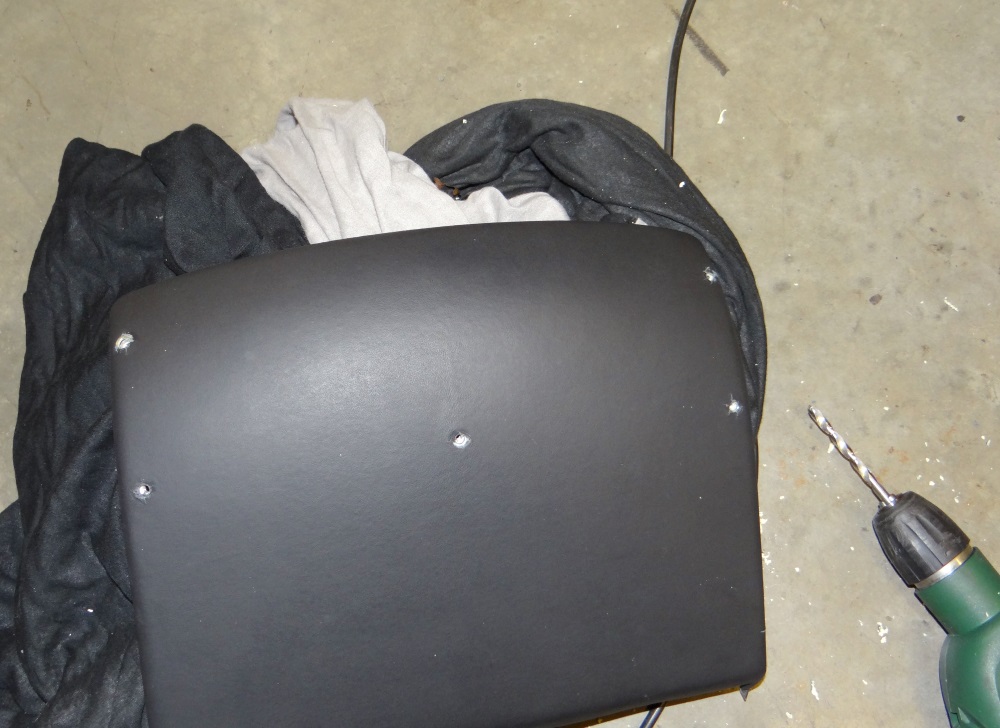
I also picked up the glove box document holder from the 16M. I've marked out the fastening points on my glove box, then drilled, and added rivnuts.
Winter Jobs
Replacement moisture barrier for the luggage compartment bulkhead. They are made from pre-formed Polyethylene foam.
The screws securing the luggage compartment trim are made from cheese, so its important to be careful with them. The sealing compound for the moisture barrier can clog the threads, but I found a 15 minute soak in petrol dissolves it nicely.
I removed the external window scrapers to polish underneath, but found telltale aluminium oxide. I ended up sanding a couple of areas down to bare aluminium, then etch priming, base, and lacquer. I've sprayed Dinitrol wax in most of the doors and behind seals: the channel in which the scraper sits is a bit of a water trap.
The N/S window went up and down much more slowly than the O/S. With the door card and moisture barrier removed an inspection revealed a very well-greased mechanism. I decided to clean and re-apply grease anyway, and to my surprise, this fully restored performance.
16M Door Cards
amongst several other things I picked up a set of complete door panels from a salvage 16M. I do like car parts/engineering but these are particularly nice. They are quite a bit nicer than the Scuderia version which can be seen behind in the second photo. The 16M cards have kevlar reinforcement in key areas. I'll post up a weight analysis in a later update.
The speakers are secured to beautifully machined billet mounts. I'll post full details of the sound system another time.
I also purchased the wiring looms. I've checked these over, and found that the 16M does away with the door marker lights, and mirror heating/defrosting in order to pass the additional wires for the speakers; there are insufficient pins in the door loom to car multi-plug to support all functions. I don't know if the coupe does without these functions, but certainly for the 16M Ferrari made a call on what could be taken out.
The 16M cards also feature a mass damper or an impact attenuator. I don't know which and the part number doesn't return a result from any of the online catalogues. Hopefully it's just an impact attenuator which I'm happy to do with out, but if there's lot of buzzing caused by the woofers I'll have to add them back in. Weight of the pair is 1.042kg which ins't insignificant given the total weight of the carbon cards.
On standard order Scuderia and 16M door cards the stitching for the map pocket wasn't matched to the rest of the car, and nor was the door bin liners, which were always grey Alcantara . I'm going to send the pockets away to be stiched in red, and the Alcantara pads to be re-made in red leather.
There are a few brackets to remove from the F430 door which will be replaced with a Scuderia equivalent that I'll fabricate. They are simply riveted on with aluminium brackets.
There is also a bracket on the electric window mechanism which is cut off on the Scuderia. I've done the same and finished with some edging trim.
All brackets removed - 0.157kg.
Misc
I picked up the Scuderia floor plates from the 16M. I don't think these will be going in, at least in standard form; my OH doesn't like them one, which I'll conned to, but also they weight a silly 3.688kg - that is heavier than the carpet and sound deadening that they would replace. If I ever go this route I will have them copied in carbon, and painted to match the standard steel items.
I picked up a spare pair of OEM Scuderia airbox lids. Surprisingly, not at all yellowed near the exhaust.
I'm about to have some more parts reupholstered. For anyone interested, Filan polyester thread #35826 matches the original.
I also picked up the glove box document holder from the 16M. I've marked out the fastening points on my glove box, then drilled, and added rivnuts.
Edited by mwstewart on Wednesday 13th February 16:06
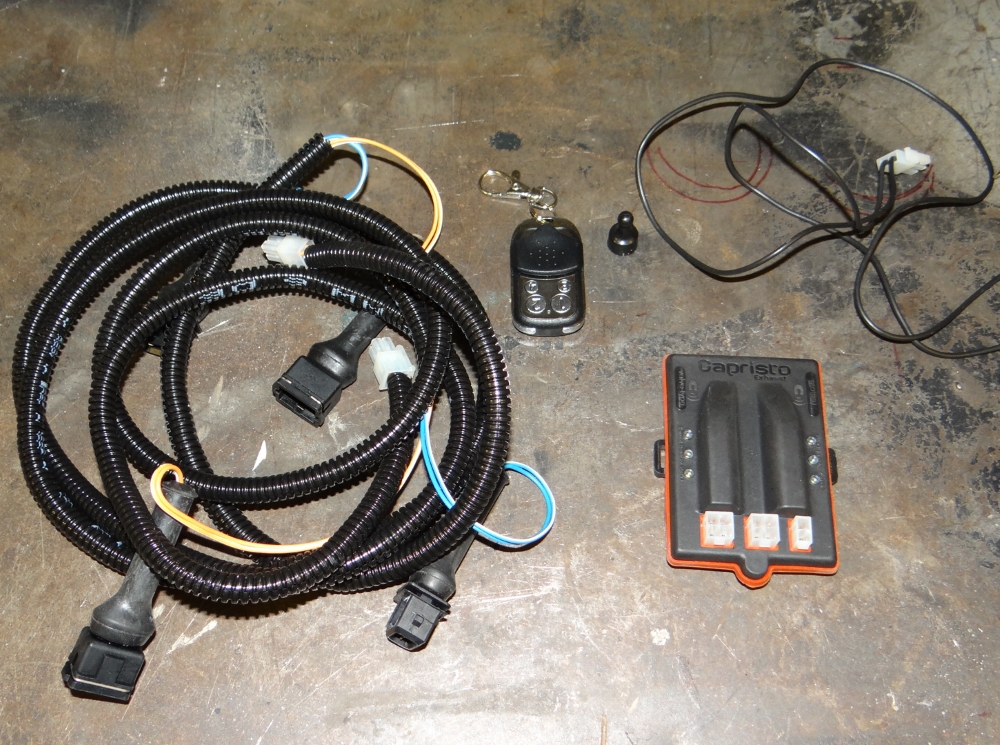
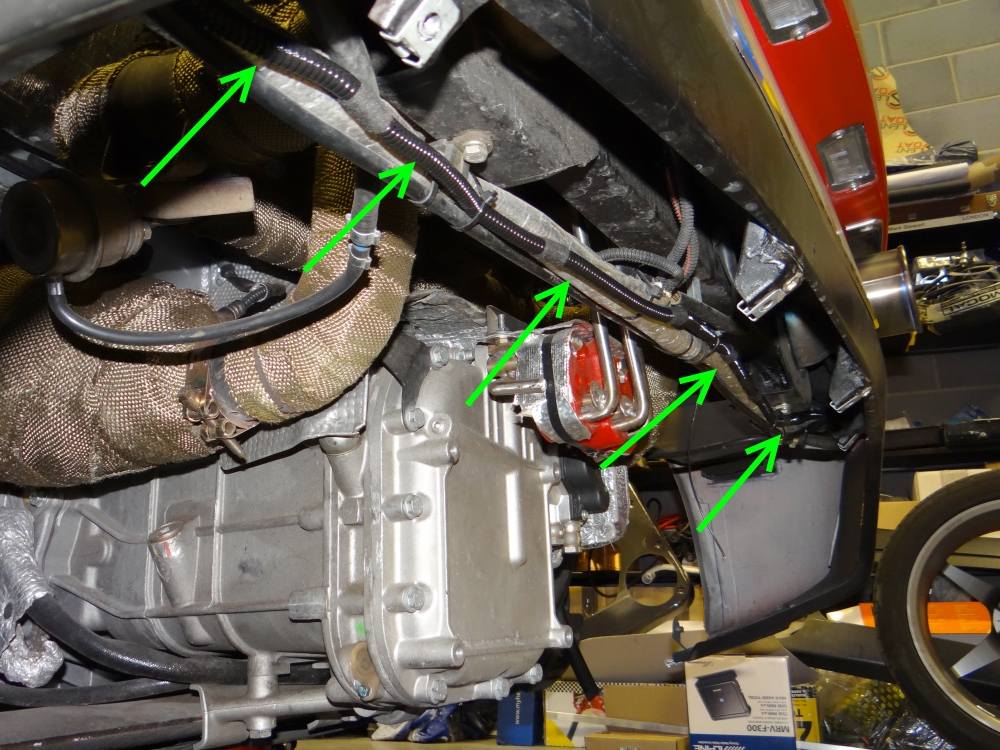
Capristo Exhaust Valve Controller
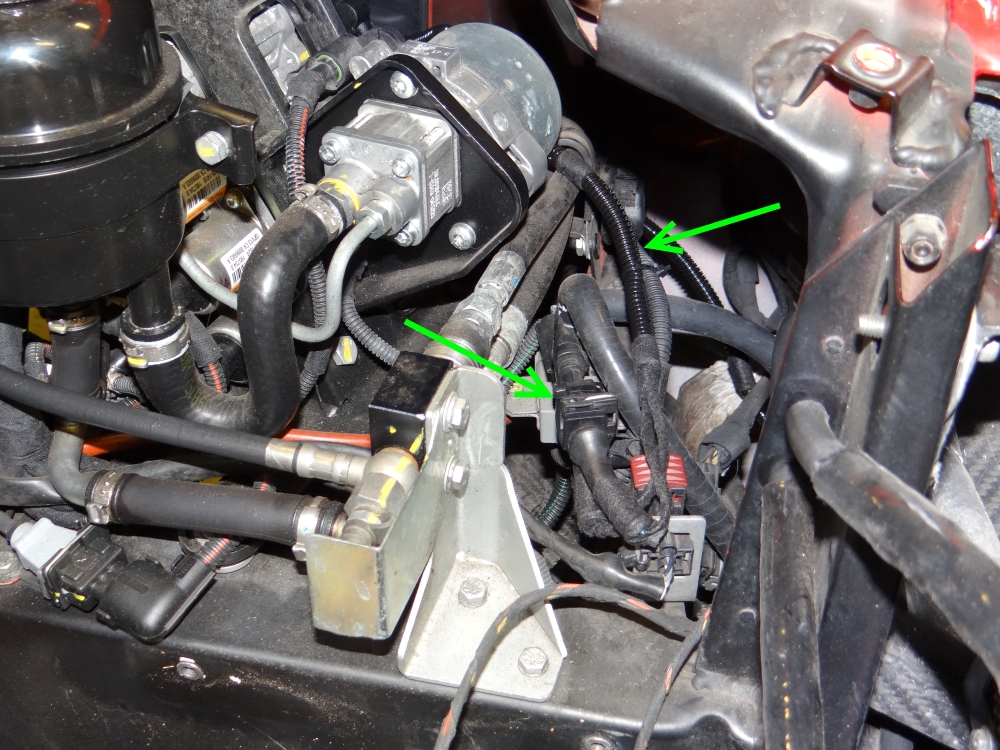
This controller will enable me to switch between an override mode with the valves to permanently open, or the standard ECU controlled setting. The kit is very well made and the mode setting switches are operated by using a small supplied magnet over the top of the case rather than with micro switches which could be a weak point for moisture ingress. Neat touch.
My only criticism is that part of the wiring loom isn't taped.
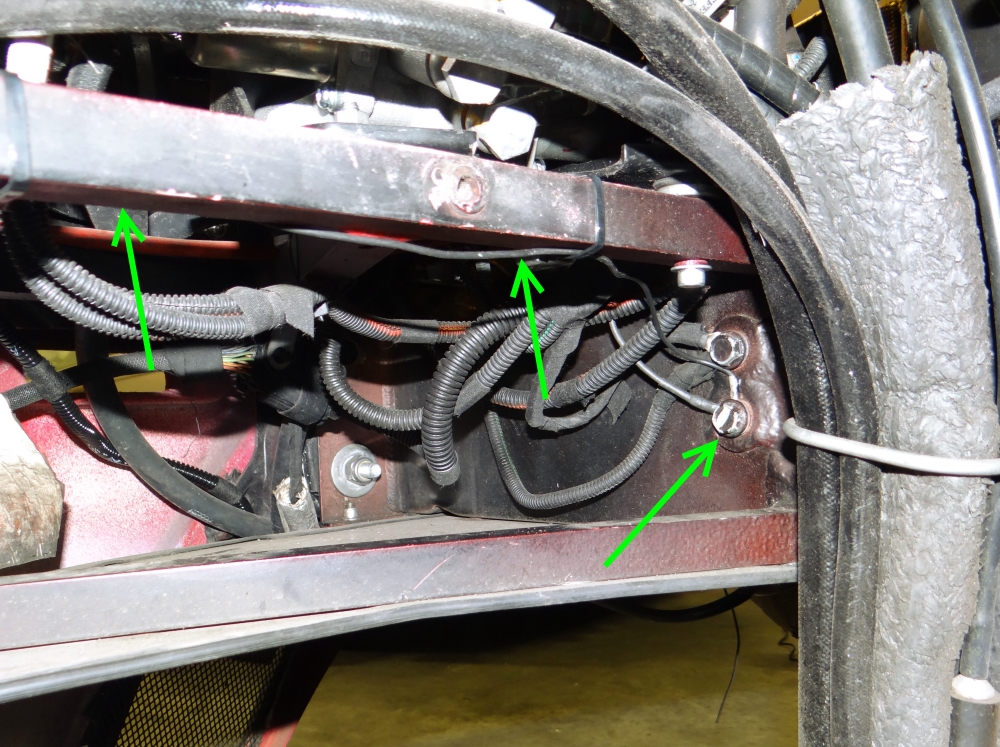
I chose to mount the unit at the rear of the right hand wheel-arch, away from heat of the exhaust but within reach from inside the engine bay if the rearmost trim panel is removed.
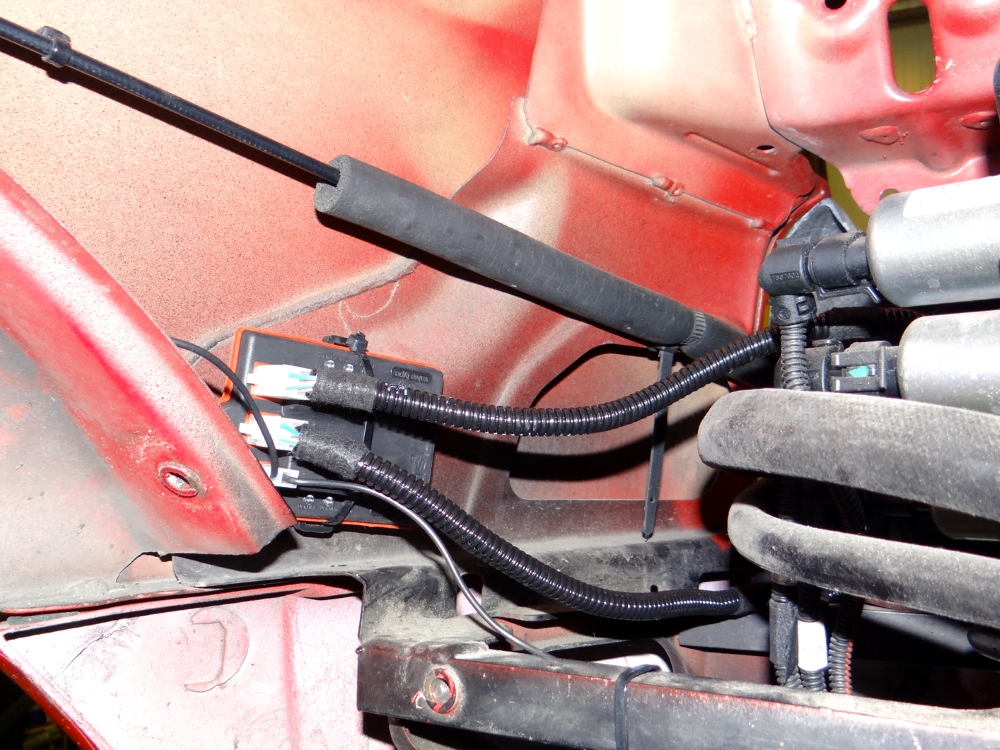
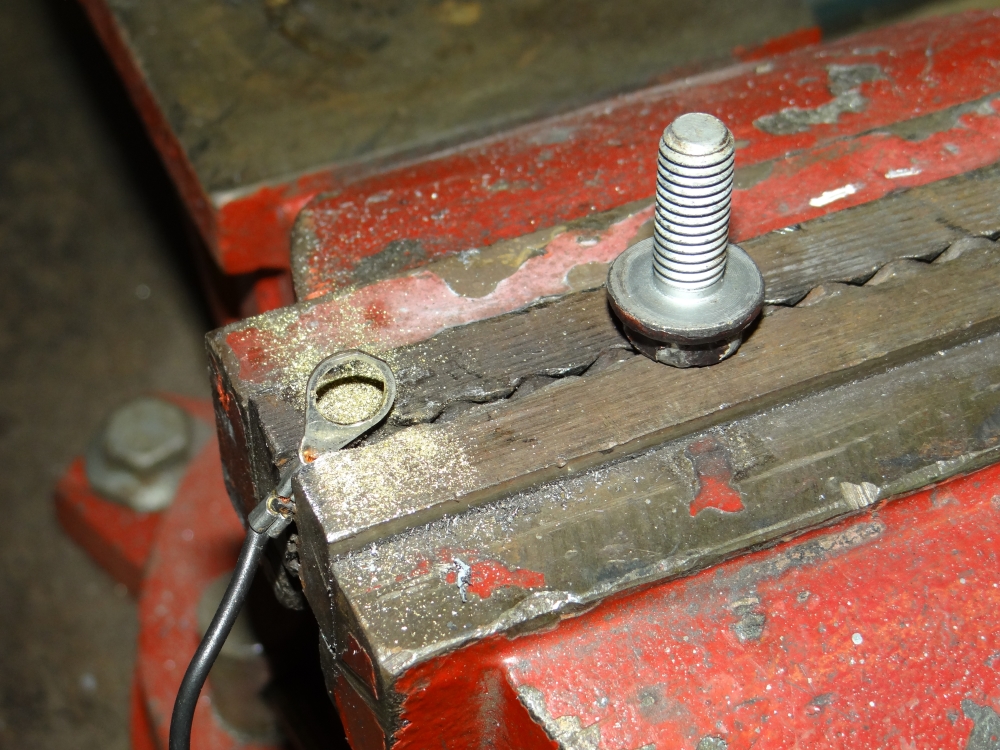
I ran the earth cable across to one of two existing earth points underneath the F1 pump assembly.
I had to file out the ring terminal on the loom from M6 size to M8 which easy to do as the fitting is zinc plated brass.
I taped up any exposed wires and made sure the connectors were secured with cable ties to prevent undue stress on the terminals.
The loom was an absolutely perfect fit for the F430; I ran it behind the rear bumper underneath the cross member.
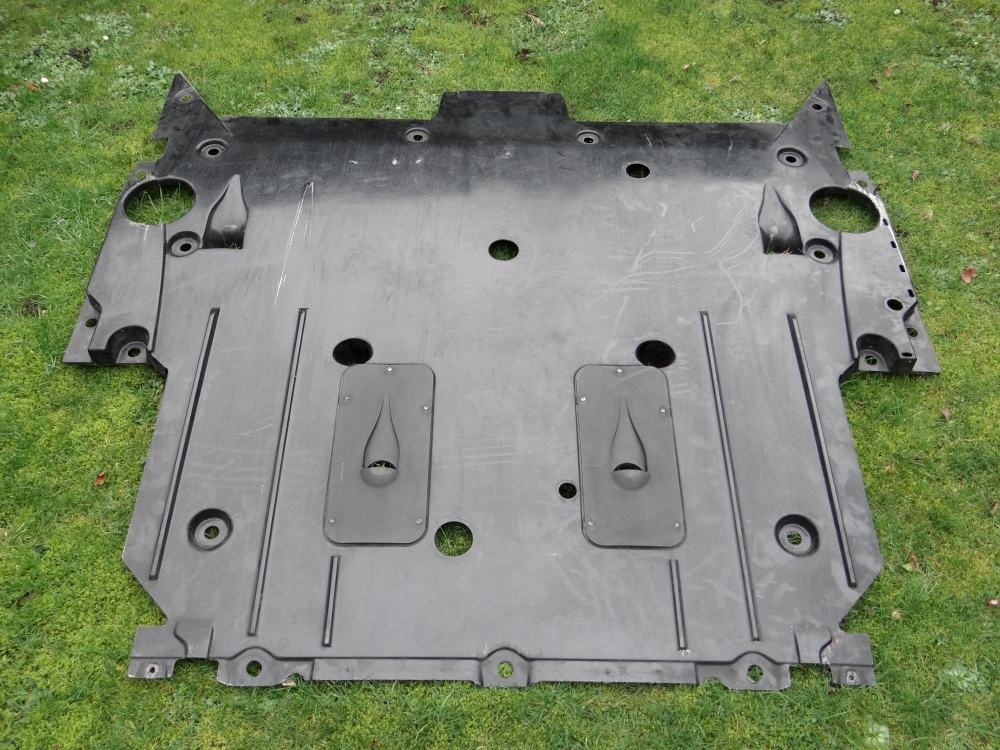
Scuderia Rear Undertray
The Scuderia version is made of a lightweight composite material and has two NACA ducts towards the rear that direct air over the exhaust. The ribs along the underside also match up with the Scuderia diffuser, which is different to the F430 part.

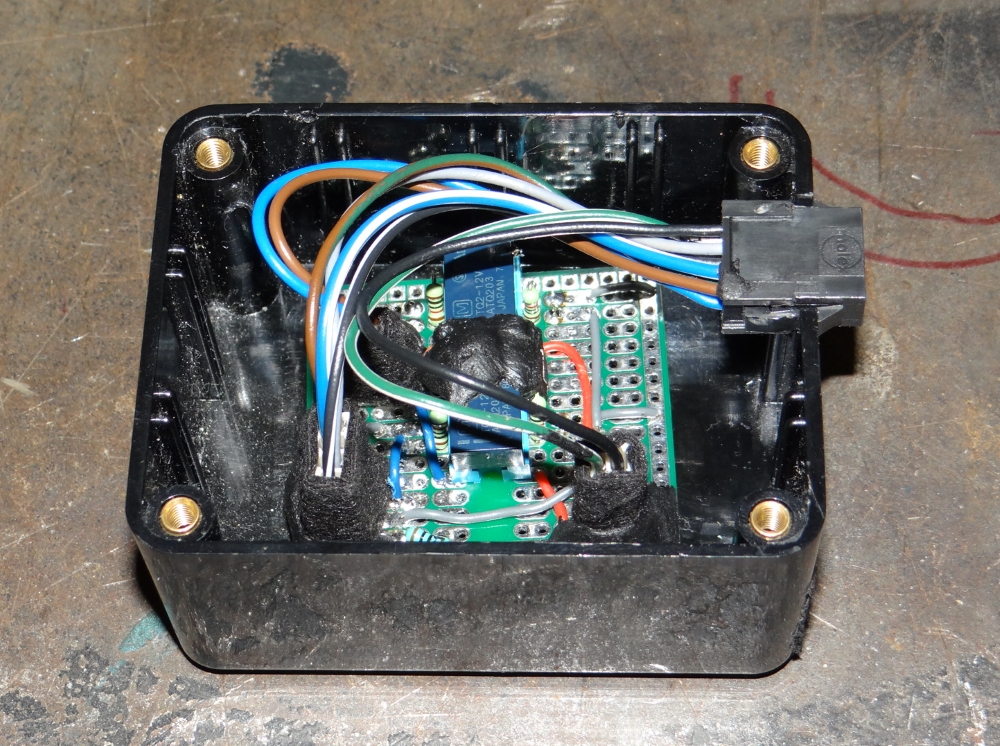
Steering Wheel Paddles - Module v2
I've been driving around for a year with OEM and steering wheel paddles in place - the former being left in whilst I tested the v1 module. I found that sometimes the modulated resistance output was not close enough to the factory values and hence the TCU threw an error. I have redesigned the module to use Panasonic TQ high speed signalling relays which is a much simpler, elegant solution that removes the need for a micro controller and regulated power supply, and enabled me to match the factory resistor values to within 0.05%.
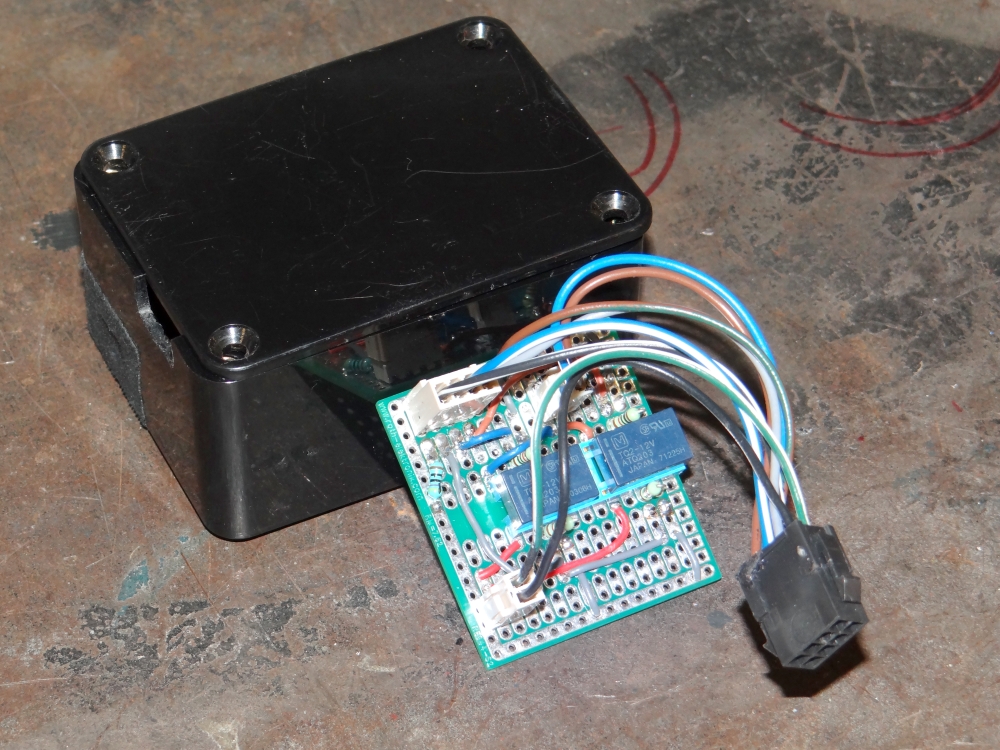
I've used butyl on the connections to prevent 'creep'.
Rear Marker Lights
The reflectors on the rear of the car are the same type of unit that is used as a rear or side marker (lens is amber) light on other Ferraris. For the small amount of effort involved I decided to convert mine to illuminate with the side lights.

I'm using 0.5mm thinwall cable to match the OEM colours, W4W sidelight bulb holders, AMP Junior Timer Housings, red incandescent bulbs, and an LED I'll try to see if it looks OK - it may be too bright.
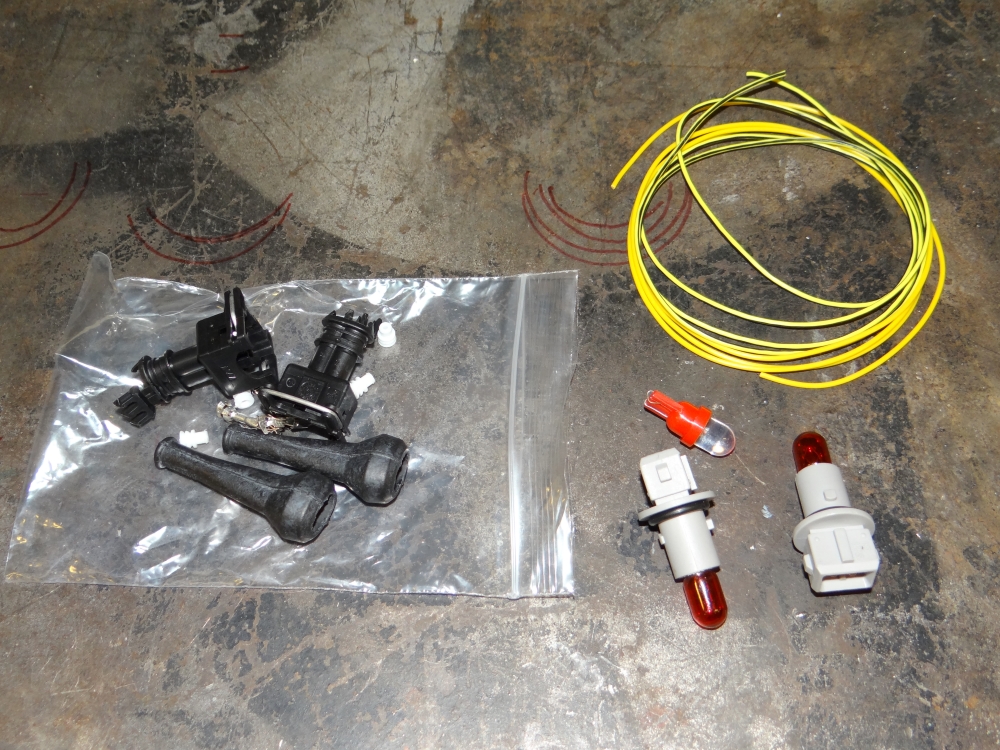
More on this another time.
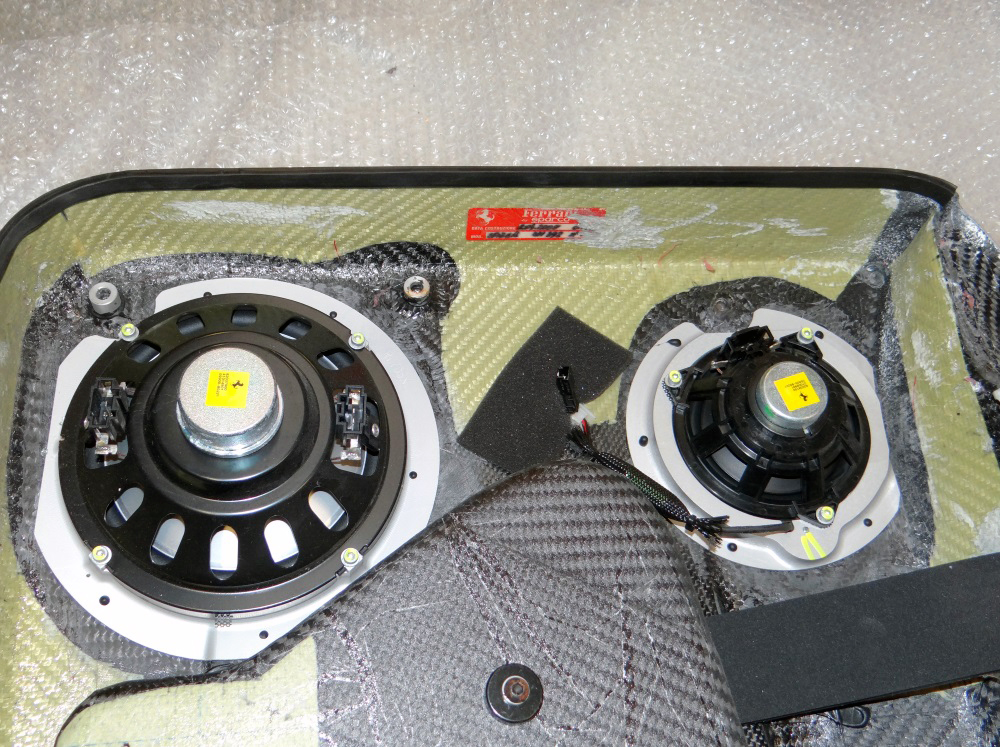
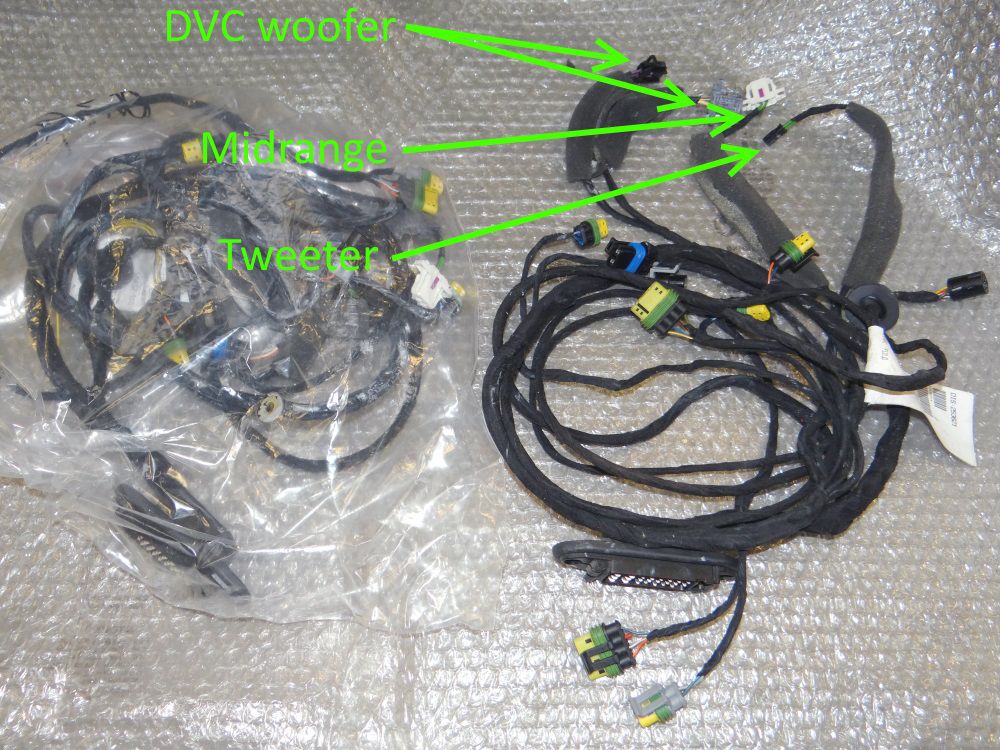
16M Sound System
I've been analysing the sound system which per side features a tweeter with an inline filter fed from a 100mm Midrange, and a 165mm midbass driver. JBL have been pretty clever in their design to keep weight to a minimum as the midbass features a DVC type driver which enables a smaller magnet to be used whilst maintaining power output. Also, the amplifier is a class D which means smaller power wires, reduced footprint, and less weight at the slight expense of ultimate sound quality, which isn't really a concern in this particular car - anything is going to be better than the standard head unit.
The amp has six channels: two powering the midbass coils, and one for the midrange & tweeter.
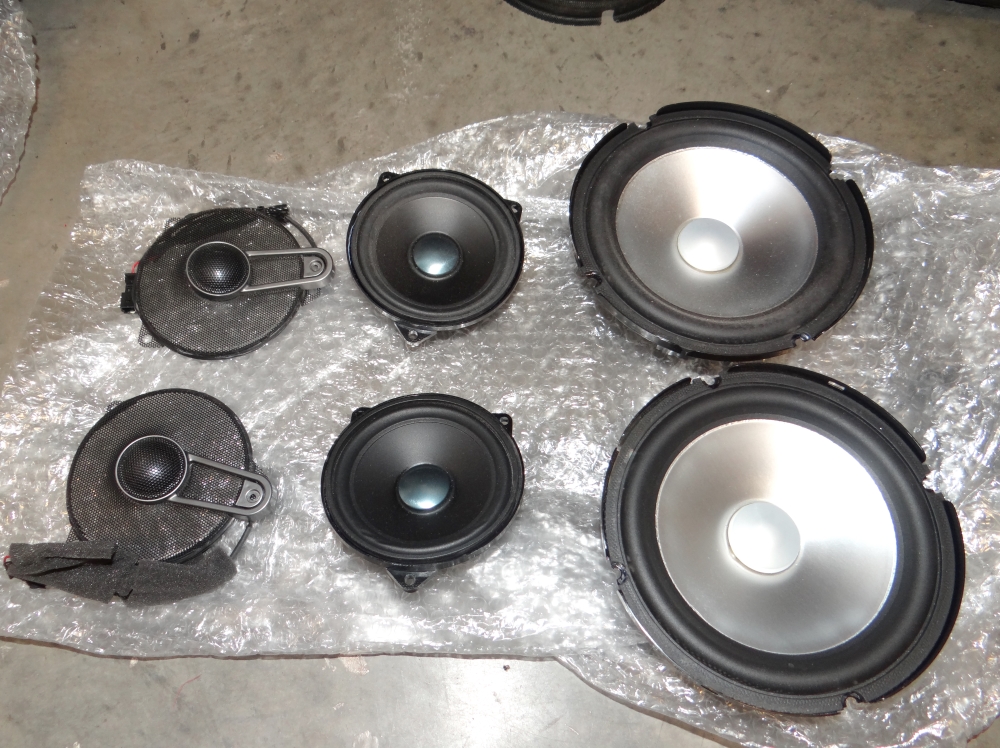
This is all a bit of a concession to luxury rather than weight saving but given the summer roads trips we go on where often we'll spending several hours in the car per day, it's a worthwhile compromise.
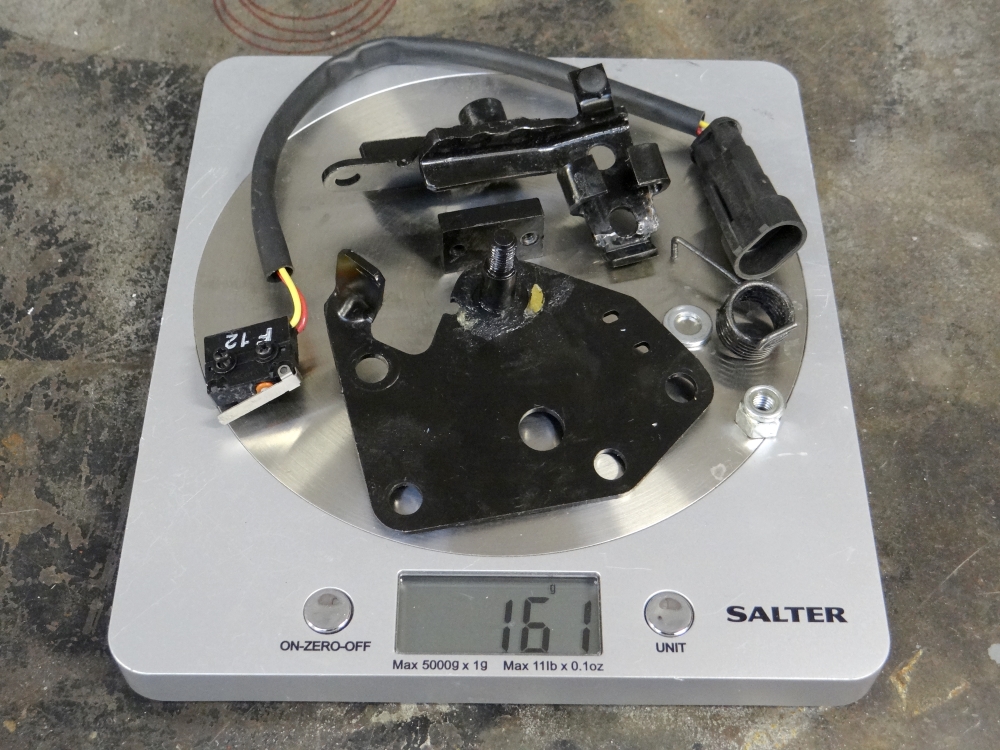
16M Door Cards
The inner door handles and handle mechanisms weigh nearly as much as one door card! I'm having the handles remade in carbon, and I've picked up some aluminium stock to remake parts of the handle mechanism. I can save enough weight to offset the midbass speakers.
This controller will enable me to switch between an override mode with the valves to permanently open, or the standard ECU controlled setting. The kit is very well made and the mode setting switches are operated by using a small supplied magnet over the top of the case rather than with micro switches which could be a weak point for moisture ingress. Neat touch.
My only criticism is that part of the wiring loom isn't taped.
I chose to mount the unit at the rear of the right hand wheel-arch, away from heat of the exhaust but within reach from inside the engine bay if the rearmost trim panel is removed.
I ran the earth cable across to one of two existing earth points underneath the F1 pump assembly.
I had to file out the ring terminal on the loom from M6 size to M8 which easy to do as the fitting is zinc plated brass.
I taped up any exposed wires and made sure the connectors were secured with cable ties to prevent undue stress on the terminals.
The loom was an absolutely perfect fit for the F430; I ran it behind the rear bumper underneath the cross member.
Scuderia Rear Undertray
The Scuderia version is made of a lightweight composite material and has two NACA ducts towards the rear that direct air over the exhaust. The ribs along the underside also match up with the Scuderia diffuser, which is different to the F430 part.
Steering Wheel Paddles - Module v2
I've been driving around for a year with OEM and steering wheel paddles in place - the former being left in whilst I tested the v1 module. I found that sometimes the modulated resistance output was not close enough to the factory values and hence the TCU threw an error. I have redesigned the module to use Panasonic TQ high speed signalling relays which is a much simpler, elegant solution that removes the need for a micro controller and regulated power supply, and enabled me to match the factory resistor values to within 0.05%.
I've used butyl on the connections to prevent 'creep'.
Rear Marker Lights
The reflectors on the rear of the car are the same type of unit that is used as a rear or side marker (lens is amber) light on other Ferraris. For the small amount of effort involved I decided to convert mine to illuminate with the side lights.
I'm using 0.5mm thinwall cable to match the OEM colours, W4W sidelight bulb holders, AMP Junior Timer Housings, red incandescent bulbs, and an LED I'll try to see if it looks OK - it may be too bright.
More on this another time.
16M Sound System
I've been analysing the sound system which per side features a tweeter with an inline filter fed from a 100mm Midrange, and a 165mm midbass driver. JBL have been pretty clever in their design to keep weight to a minimum as the midbass features a DVC type driver which enables a smaller magnet to be used whilst maintaining power output. Also, the amplifier is a class D which means smaller power wires, reduced footprint, and less weight at the slight expense of ultimate sound quality, which isn't really a concern in this particular car - anything is going to be better than the standard head unit.
The amp has six channels: two powering the midbass coils, and one for the midrange & tweeter.
This is all a bit of a concession to luxury rather than weight saving but given the summer roads trips we go on where often we'll spending several hours in the car per day, it's a worthwhile compromise.
16M Door Cards
The inner door handles and handle mechanisms weigh nearly as much as one door card! I'm having the handles remade in carbon, and I've picked up some aluminium stock to remake parts of the handle mechanism. I can save enough weight to offset the midbass speakers.
Edited by mwstewart on Wednesday 13th February 16:07
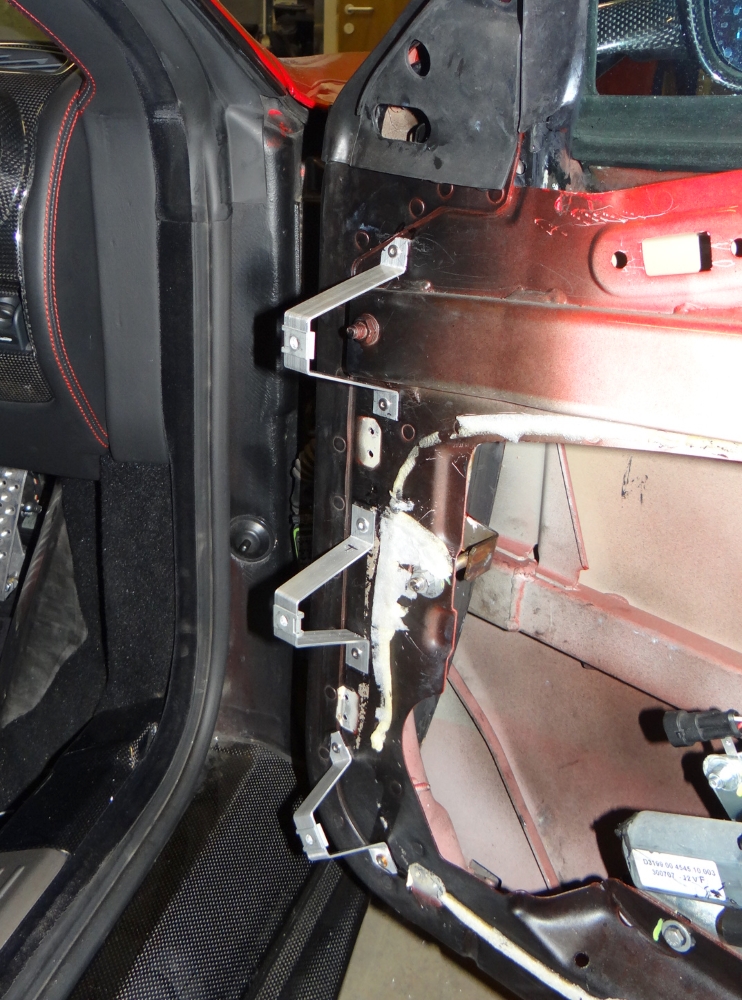
I've made a start on fitting the new door cards. I knew from looking at photos of used doors and the Ferrari parts system that I needed to add seven top hat shaped brackets to each door, which is otherwise the same as the F430.
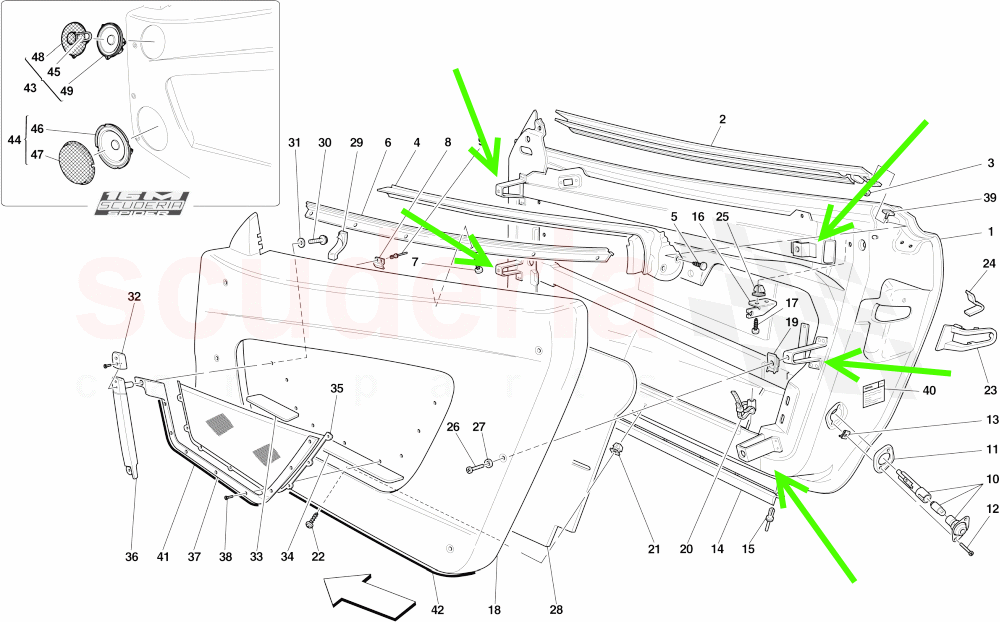
Whilst my Dad held the door panel in place I used the depth measuring blade on some digital calipers to determine distance from the mounting hole to the door behind; I could then draw up a mount for each of the seven holes. The first door will take quite a bit more time than the second, but it's enjoyable work.
I'm using aluminium strip and stainless rivets/fastenings.
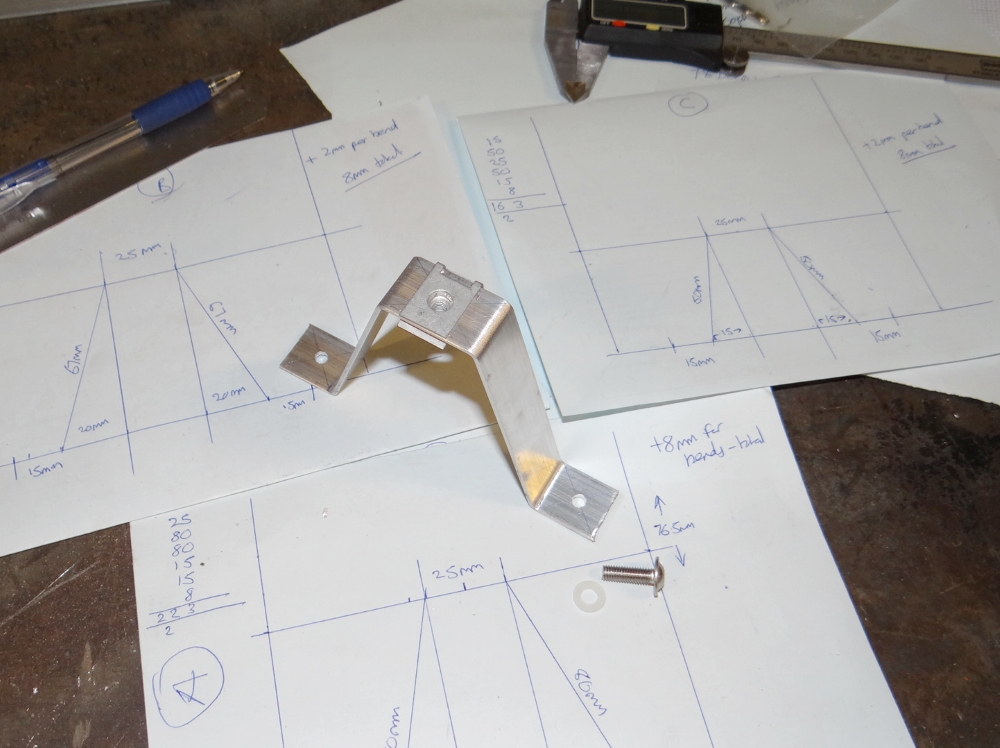
Three down, 11 to go. Once completed I will etch prime and paint to match whatever colour is behind the bracket (Ferrari doors are a mix of body colour and black paint).
Whilst my Dad held the door panel in place I used the depth measuring blade on some digital calipers to determine distance from the mounting hole to the door behind; I could then draw up a mount for each of the seven holes. The first door will take quite a bit more time than the second, but it's enjoyable work.
I'm using aluminium strip and stainless rivets/fastenings.
Three down, 11 to go. Once completed I will etch prime and paint to match whatever colour is behind the bracket (Ferrari doors are a mix of body colour and black paint).
Edited by mwstewart on Wednesday 13th February 16:08
Gassing Station | Readers' Cars | Top of Page | What's New | My Stuff