Ferrari F430 Spider
Discussion


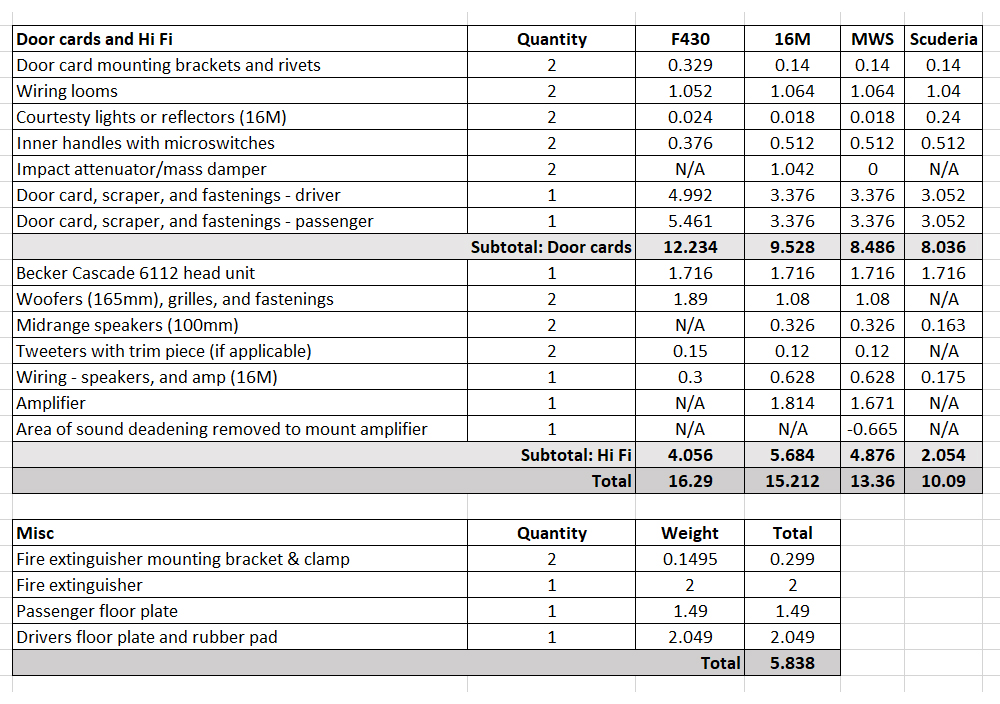
Sound system:
- The Scuderia has a Becker 6112 head unit powering a pair of tweeters which, as is to be expected: terrible;
- The pre-07 F430 has a Becker 6105 powering a two-way paper cone component set. It is a little better than terrible;
- The MY07 onwards F430 has a Becker 6112 powering some slightly beefier paper-cone based two way components. It is 'OK';
- The 16M has a JBL three-way component set: the tweeters driven from the midrange channel via a passive filter and the the midbass drivers are a DVC type driven by two seperate channels. The six channel JBL amplifier has a pre-programmed DSP and is driven by speaker-level inputs. It is good.
The factory systems are marginal in a coupe but 16M aside just don't cut it in a Spider with its roof down. For an A-to-A car it's not really important but on the long road trips we embark on it's an area that warrants some investment.
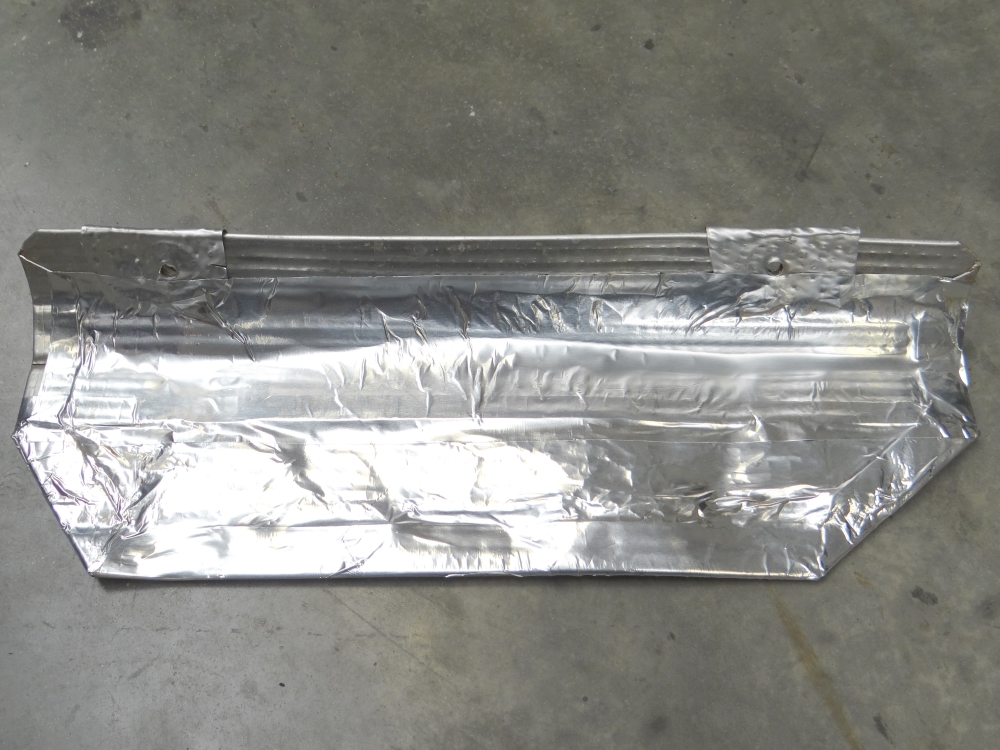
I've gone for the 16M door cards with the 16M JBL three-way component set. I've ditched the OEM amp and gone for a an Alpine four channel with built-in crossovers. I've driven the midrange and tweeters from two amp channels but using a line level input from the head unit front channel, and for the mid-bass I've bridged the third and fourth channels and wired the speakers in parallel and series to create a 2ohm load. I've upgraded the speaker wire from the factory 1.5mm to 2mm.
I posted the weight analysis in a previous post, but basically I'm up on the Scuderia but I've saved 1.852kg over a 16M and 2.93kg over an F430. I'm happy with that compromise.
- The Scuderia has a Becker 6112 head unit powering a pair of tweeters which, as is to be expected: terrible;
- The pre-07 F430 has a Becker 6105 powering a two-way paper cone component set. It is a little better than terrible;
- The MY07 onwards F430 has a Becker 6112 powering some slightly beefier paper-cone based two way components. It is 'OK';
- The 16M has a JBL three-way component set: the tweeters driven from the midrange channel via a passive filter and the the midbass drivers are a DVC type driven by two seperate channels. The six channel JBL amplifier has a pre-programmed DSP and is driven by speaker-level inputs. It is good.
The factory systems are marginal in a coupe but 16M aside just don't cut it in a Spider with its roof down. For an A-to-A car it's not really important but on the long road trips we embark on it's an area that warrants some investment.
I've gone for the 16M door cards with the 16M JBL three-way component set. I've ditched the OEM amp and gone for a an Alpine four channel with built-in crossovers. I've driven the midrange and tweeters from two amp channels but using a line level input from the head unit front channel, and for the mid-bass I've bridged the third and fourth channels and wired the speakers in parallel and series to create a 2ohm load. I've upgraded the speaker wire from the factory 1.5mm to 2mm.
I posted the weight analysis in a previous post, but basically I'm up on the Scuderia but I've saved 1.852kg over a 16M and 2.93kg over an F430. I'm happy with that compromise.
Spider Roof Problem: Warning Light With Roof Down
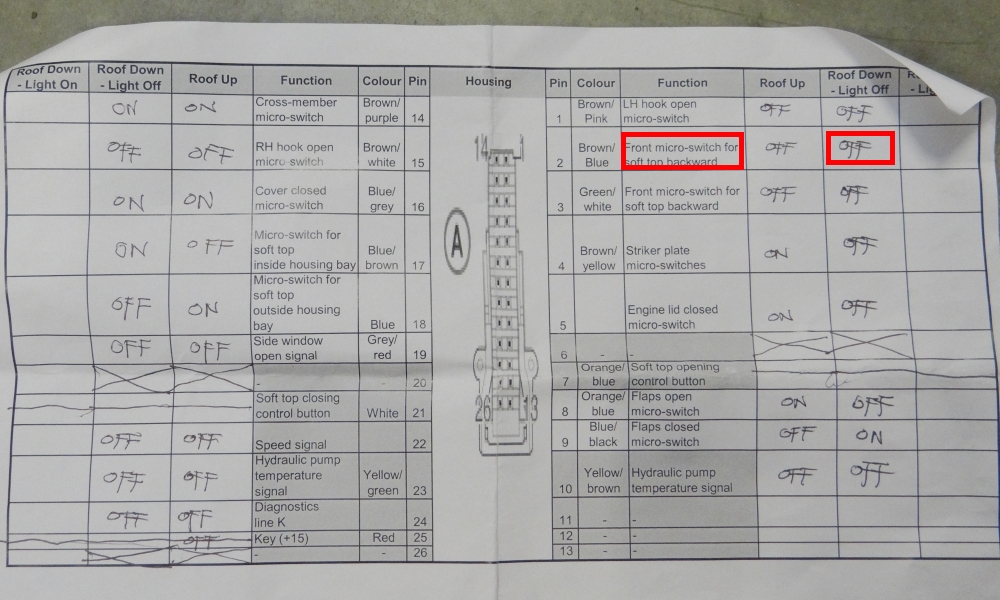
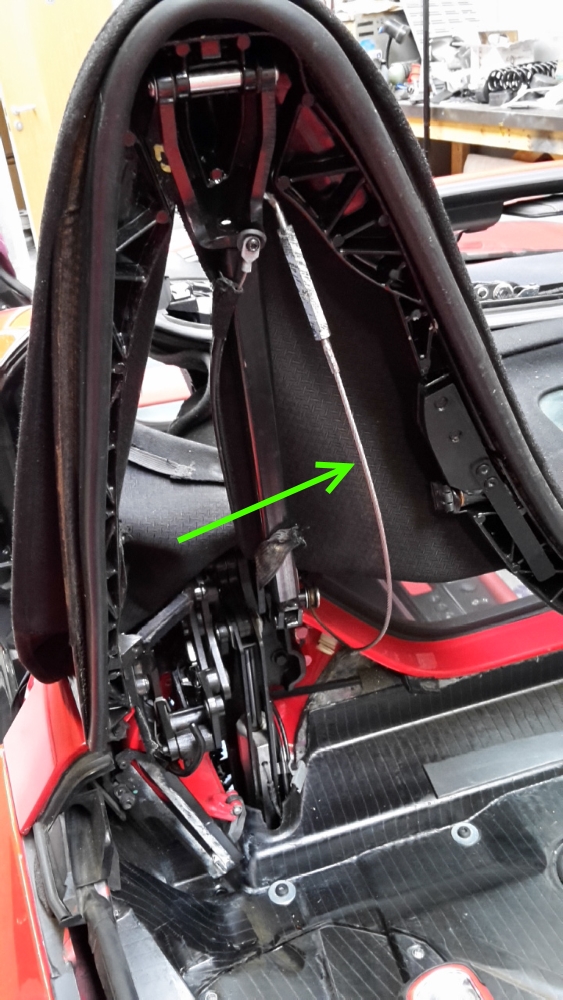
My previous issue persisted: a roof warning light with the hood down. The warning light is triggered if one of the many position-indicating micro-switches provides an unexpected reading for the current roof position. Sadly, my diagnostic device can't read the codes from the roof module so I came up with an alternative approach: I studied the wiring diagrams and noted that all the roof micro-switches simply switch to earth so I made a test chart and used a multimeter to check continuity to ground of the various switches with the roof in up then down positions.
The test revealed that the switch that indicates that the top part of the roof has been folded back was not reading correctly.
In order to access the switch I partially opened the roof and lifted up the top canvass.
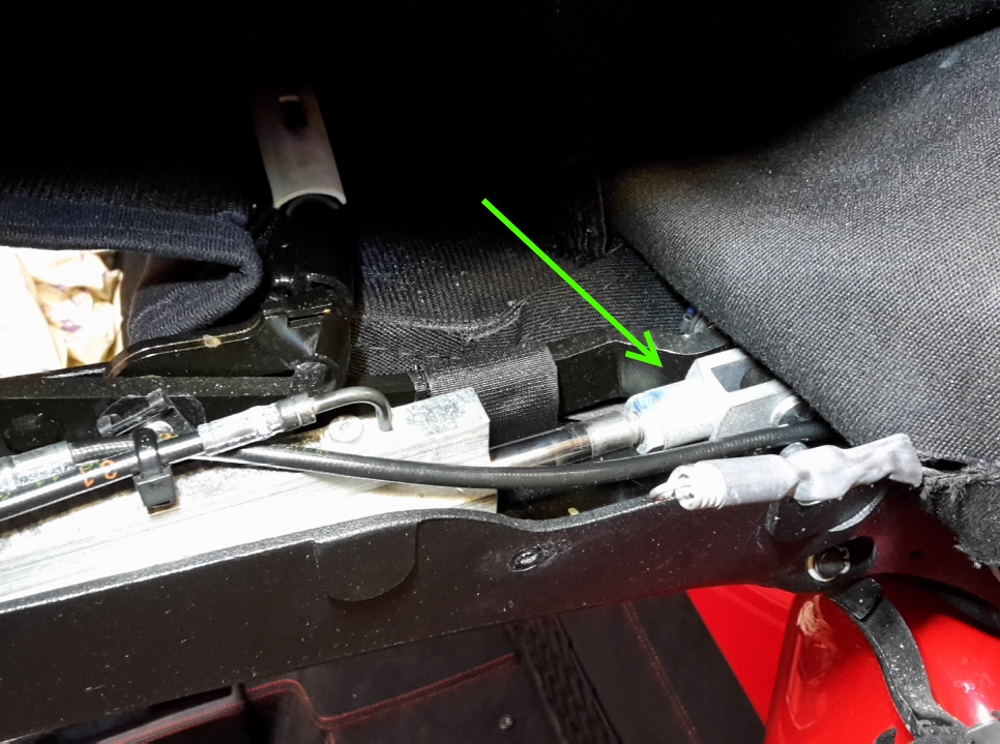
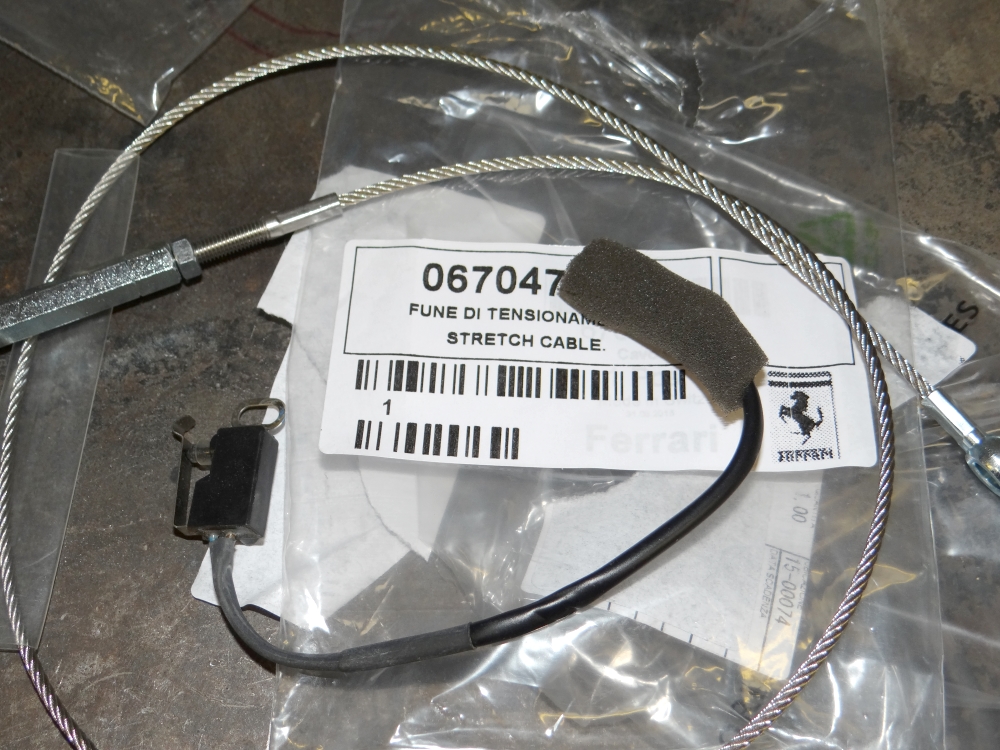
Clearly, the switch was damaged. The actual root cause was not the switch itself but one of the roof tensioning cables was too slack and had fouled the switch as the roof closed. I've ordered a replacement switch and cable.
This particular cable (part #67047300) is actually adjustable behind the rear buttresses, but in my case it was too late.
I will replace the switch and cable myself but the car is booked in with http://www.kbaggstrimming.co.uk for replacement of all of the elastic tensioning straps and a check of the rest of the cables.
I haven't spent any time to-date learning the roof but this incident has promoted me to master it.
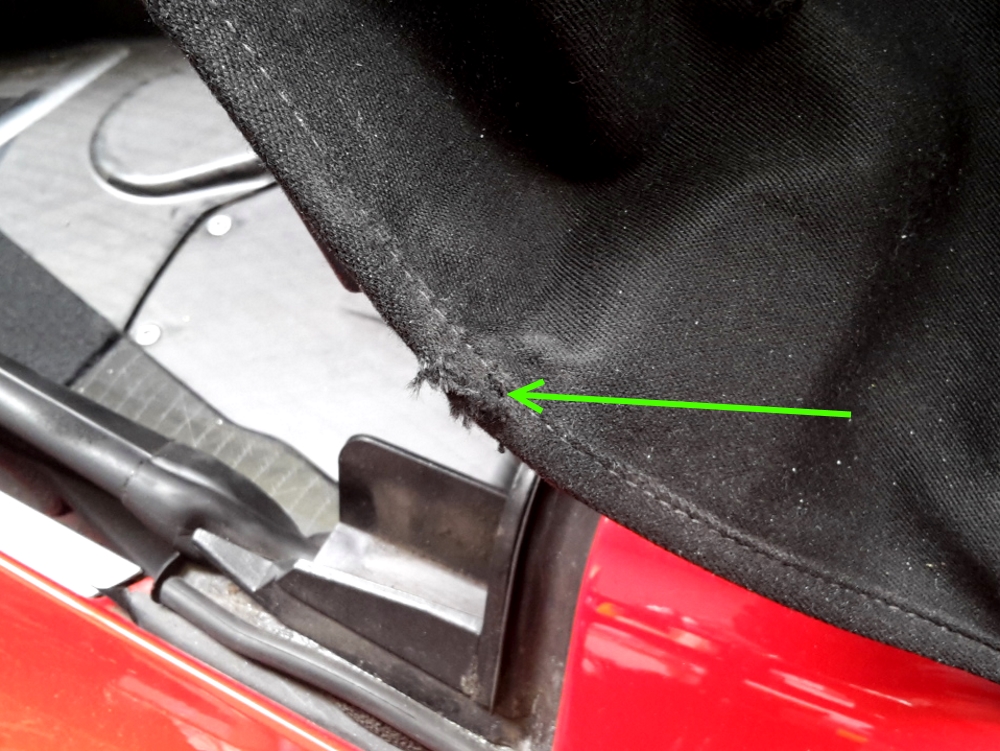
Spider Roof Problem: Canvass Chaffing On Roof Tray
This could happen on either side but on my car the canvass had ceased to fold correctly and was sticking out and brushing on the hood tray as the roof folded away. I really should have attended to this earlier as it had rubbed away some of the seam at the lower part of the hood buttress.
Upon investigation I found that stiff canvass pieces are bonded to rear of the outer fabric but with a small gap in between, which upon lowering the roof coerces the fabric to fold at that specific point to clear the hood tray. On my car these stiffening sections had become to peel away from the outer fabric leaving the hood to fold in a non-ideal way, and foul the edge of the tray.
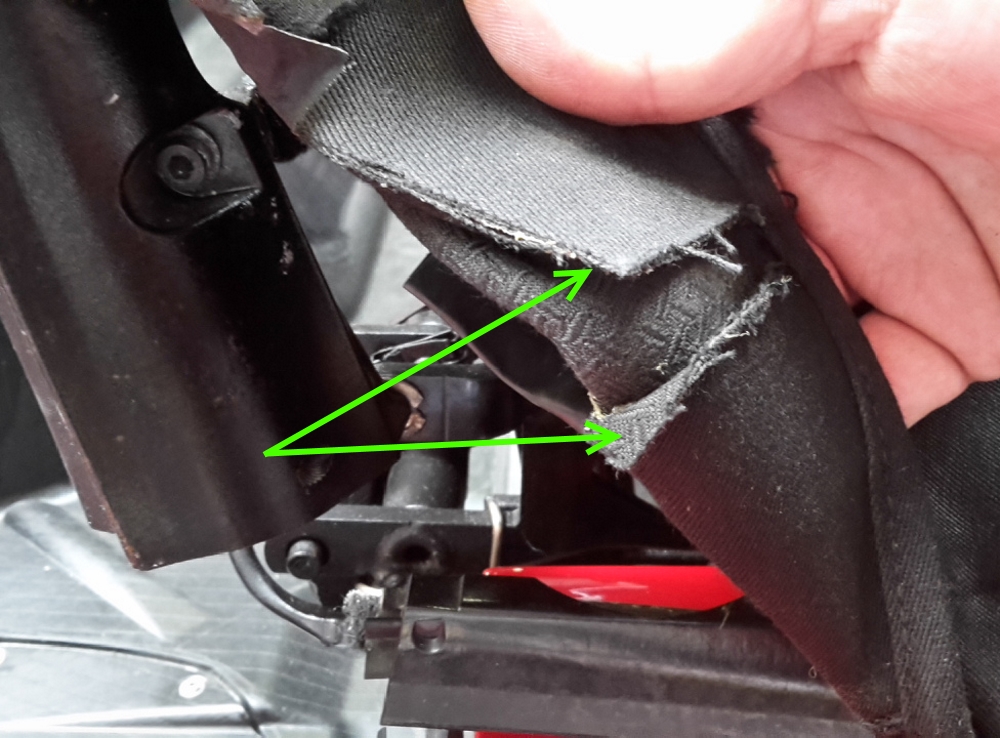
I re-bonded the stiffening fabric with PU adhesive and left overnight secured by clamps. This solved the issue.

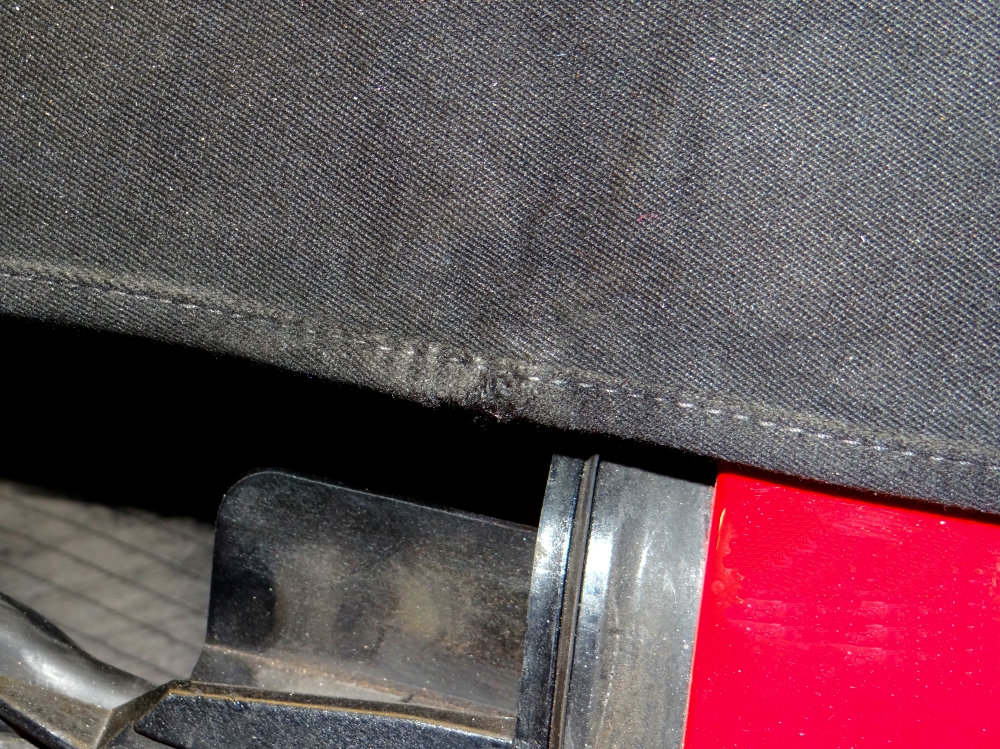
I managed to trim off the excess fluff and make good with PU. It's not perfect but it's pretty good.
My previous issue persisted: a roof warning light with the hood down. The warning light is triggered if one of the many position-indicating micro-switches provides an unexpected reading for the current roof position. Sadly, my diagnostic device can't read the codes from the roof module so I came up with an alternative approach: I studied the wiring diagrams and noted that all the roof micro-switches simply switch to earth so I made a test chart and used a multimeter to check continuity to ground of the various switches with the roof in up then down positions.
The test revealed that the switch that indicates that the top part of the roof has been folded back was not reading correctly.
In order to access the switch I partially opened the roof and lifted up the top canvass.
Clearly, the switch was damaged. The actual root cause was not the switch itself but one of the roof tensioning cables was too slack and had fouled the switch as the roof closed. I've ordered a replacement switch and cable.
This particular cable (part #67047300) is actually adjustable behind the rear buttresses, but in my case it was too late.
I will replace the switch and cable myself but the car is booked in with http://www.kbaggstrimming.co.uk for replacement of all of the elastic tensioning straps and a check of the rest of the cables.
I haven't spent any time to-date learning the roof but this incident has promoted me to master it.
Spider Roof Problem: Canvass Chaffing On Roof Tray
This could happen on either side but on my car the canvass had ceased to fold correctly and was sticking out and brushing on the hood tray as the roof folded away. I really should have attended to this earlier as it had rubbed away some of the seam at the lower part of the hood buttress.
Upon investigation I found that stiff canvass pieces are bonded to rear of the outer fabric but with a small gap in between, which upon lowering the roof coerces the fabric to fold at that specific point to clear the hood tray. On my car these stiffening sections had become to peel away from the outer fabric leaving the hood to fold in a non-ideal way, and foul the edge of the tray.
I re-bonded the stiffening fabric with PU adhesive and left overnight secured by clamps. This solved the issue.
I managed to trim off the excess fluff and make good with PU. It's not perfect but it's pretty good.

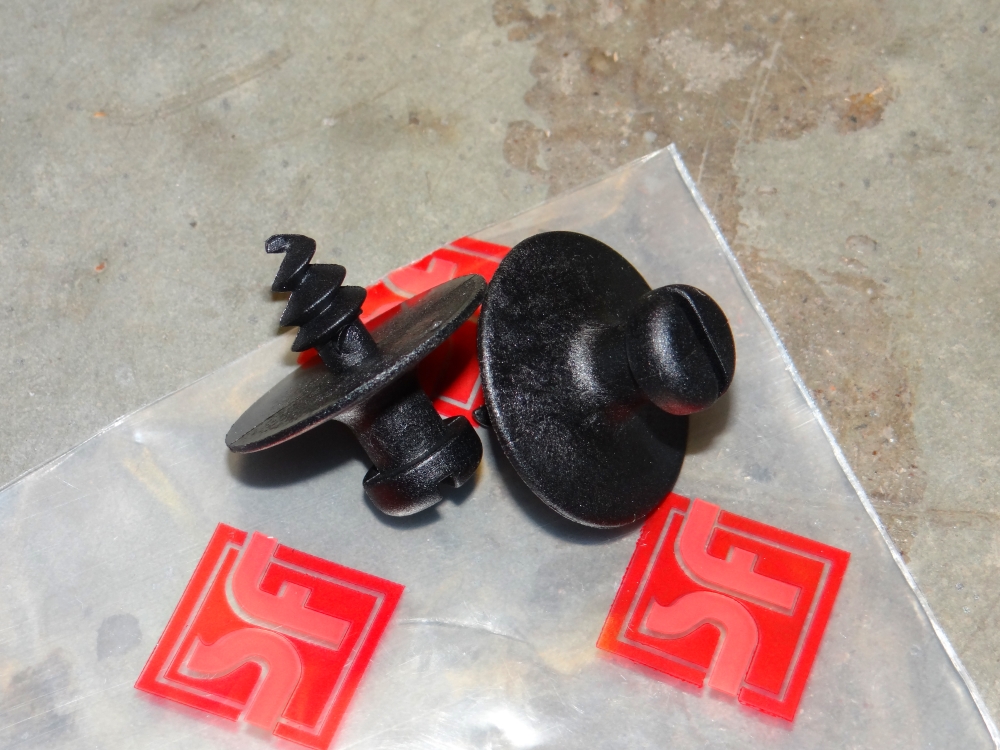
My car was missing the passenger floor mat securing clips and the drivers side never stay put, so I suppose it's not a surprise that that they've been lost. I ordered a new pair but before fitting I put a dab of black PU adhesive on the back of them. So far it seems to have done the trick.
Roof Issue Addressed
The rew roof cable and micro-switch arrived:
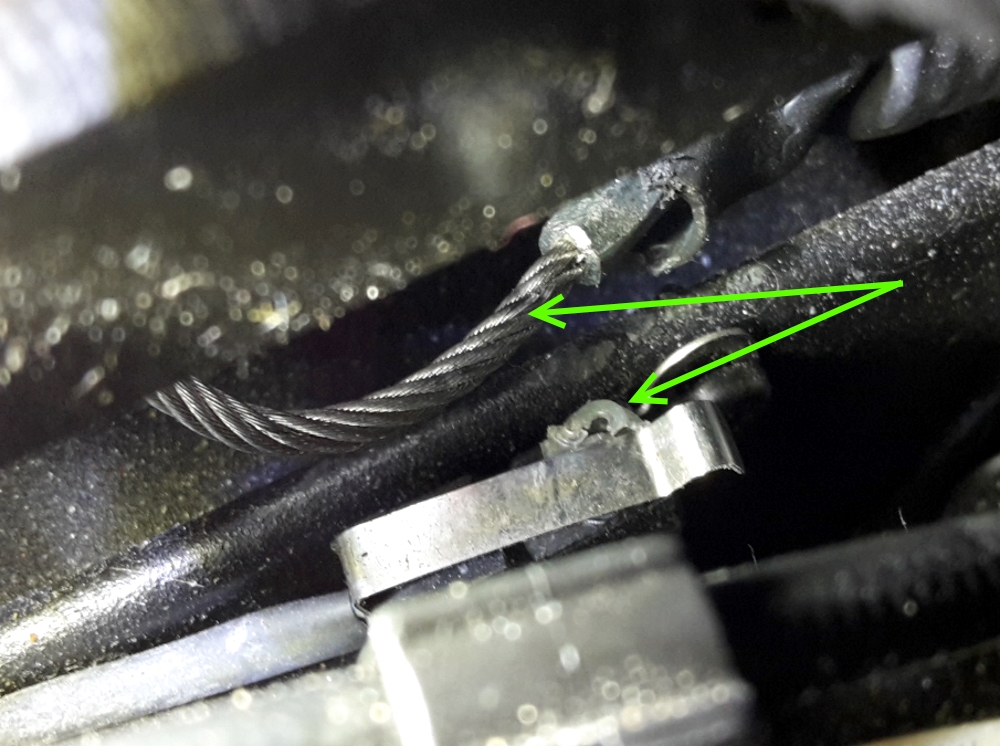
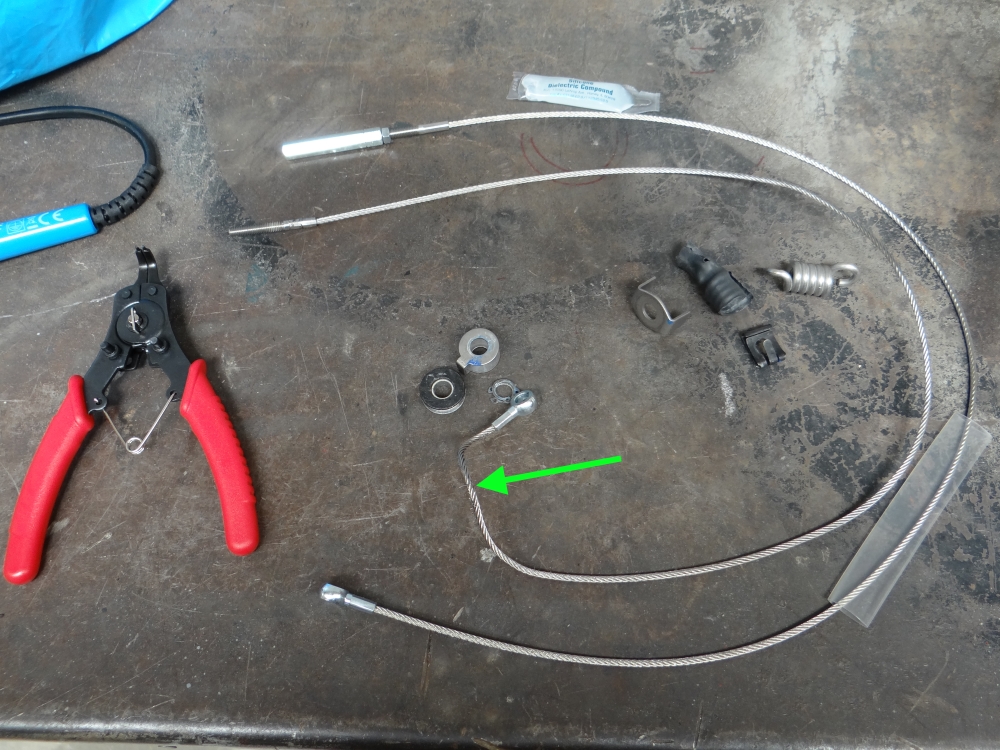
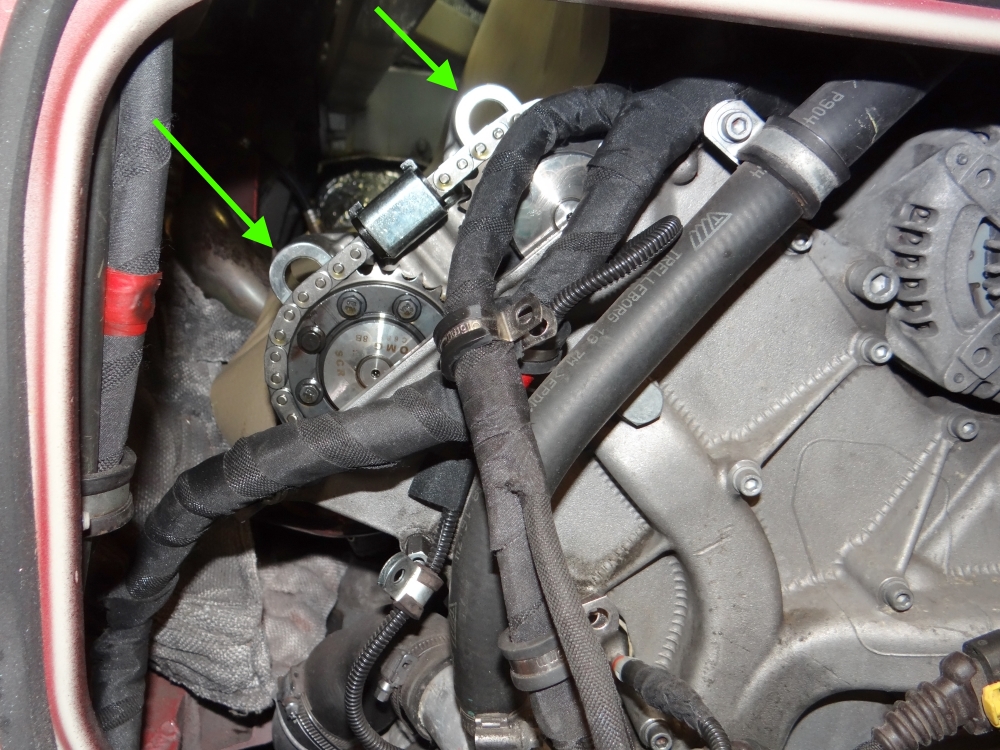
Upon close inspection of my old cable it had started to fray (green arrow).
I didn't have a workshop manual to hand so I had to figure out as I went, however the job wasn't too difficult just fiddly and time consuming.
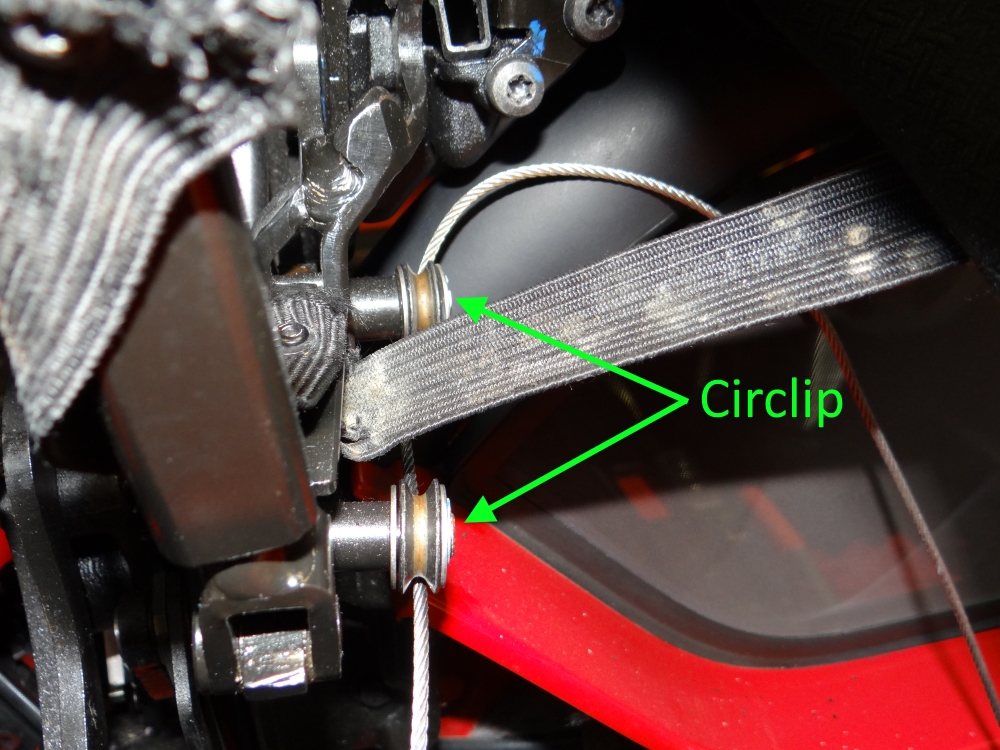
The cable runs from above the passenger headrest to the tip of the rear buttress and there are in total four guide rollers, each having a sheath to hold the cable in place, and these must be removed to withdraw the cable due to the size of the eyelet fitted to the forward end.
he largest of the rollers at the rear of the hood must be removed from its pin which, to my surprise, was made from aluminium, so care must be taken when re-assembling.
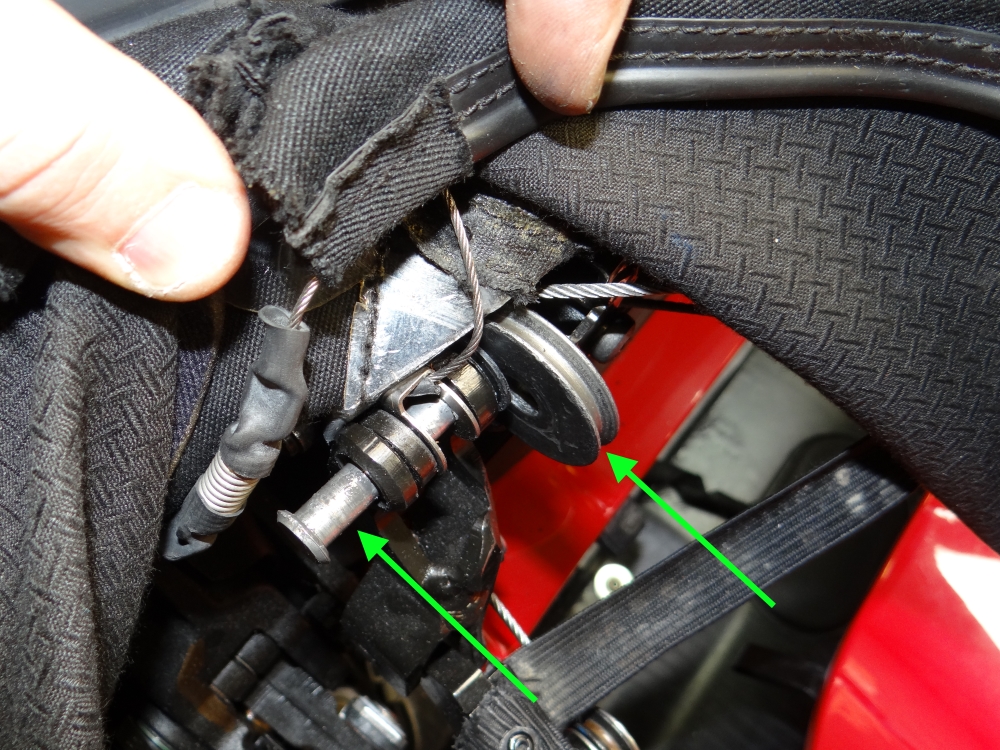
Two guide rollers at the base of the buttress are held in with circlips.
All in it was a couple of hours work, but it has addressed the issue that triggered the fault code. I will leave the roof closed until after my visit to K Baggs for replacement of the elastic straps.
Variator Solenoid Failiure - Again
I must admit this grated on me. It has been only a few thousand miles since I replaced all four solenoids with the later part, due to intermittent failure of one solenoid and oil in the connectors of the other three - a common failure mode. This time around there was a complete open circuit on the right bank inlet cam triggered a P1552, and also the right bank exhaust wiring plug had oil in it. Diagnosis on the failed solenoid revealed a break in the connection between the engine loom plug and the solenoid body.
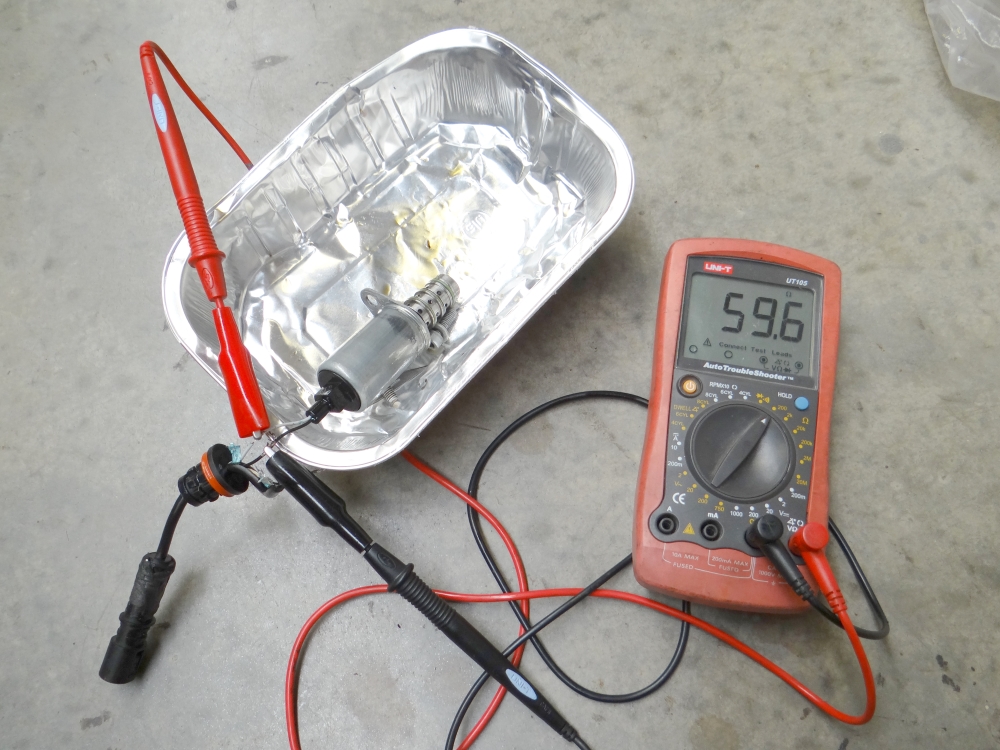
I now have quite a collection of solenoids old and new, so I checked the resistance of them and found that 11 ohms of resistance signifies a healthy coil - in my case the range was from 10.7 to 11.4 ohms. A known bad solenoid measured 37 ohms. What is interesting is that units exhibiting oil in their connector can measure a healthy resistance, so either the presence of oil and internal failure are separate issues, or the oil signifies the onset of internal failure.
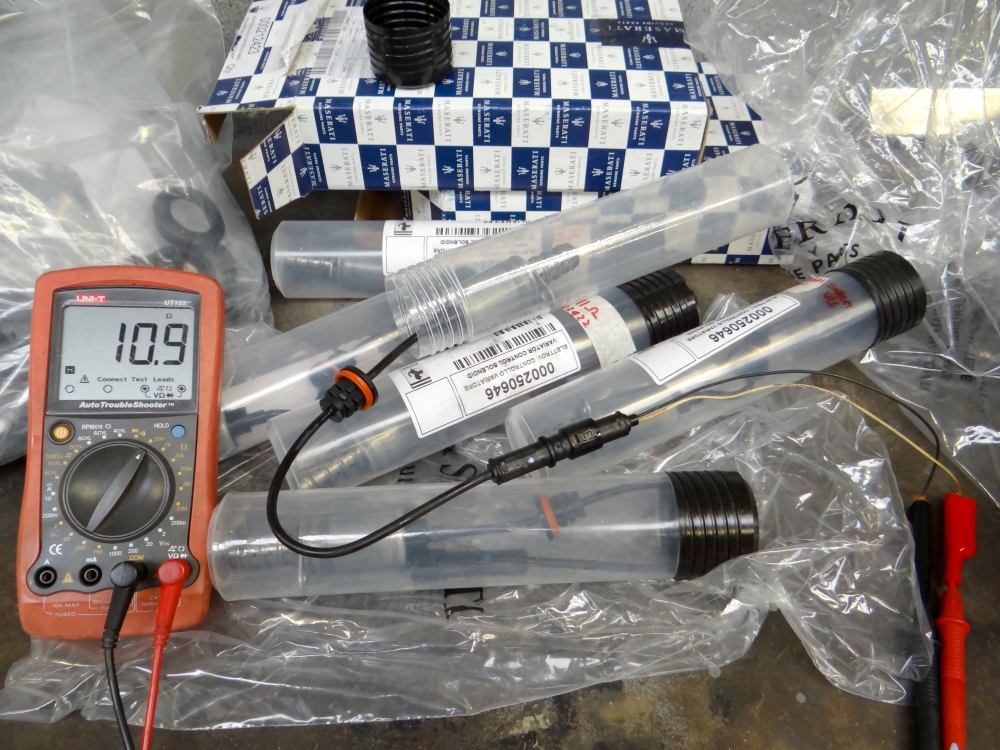
I knew that Maserati's of this era used the same type of solenoid with the only apparent difference being a slightly longer cable. The Maserati version is £376.88 vs the £565.60 I paid for the F430 version, so fully expecting the part to fail again at some point I decided to use the Maserati version.
I did ponder the issue of oil in the solenoid multiplug, which is a problem that other manufacturers have encountered; for example, Mercedes issued an oil break intermediate loom to solve this very issues on one of their engines. Oil must come either from within the solenoid body, or find its way in from the outside then 'wick' its way along the cable. To mitigate the risk of the latter I sealed off the gaps with RTV sealant (the stuff the sump is sealed with).
There is an oil restriction valve in the end of the cam cap that houses solenoids, its function is to maintain oil pressure so that the solenoids may immediately react - if the oil leak is in fact internal to the solenoid then another reason may be that the valve causes small oil pressure spikes in some situations, which forces oil past a seal. This is just conjecture - it could of course be simply an inadequately specced part.
On my Spider I found the fastest way to replace the solenoids was to remove the seats, engine bay panel, rear wheel and wheel arch liner. The cam cover can be withdrawn through the wheel arch.
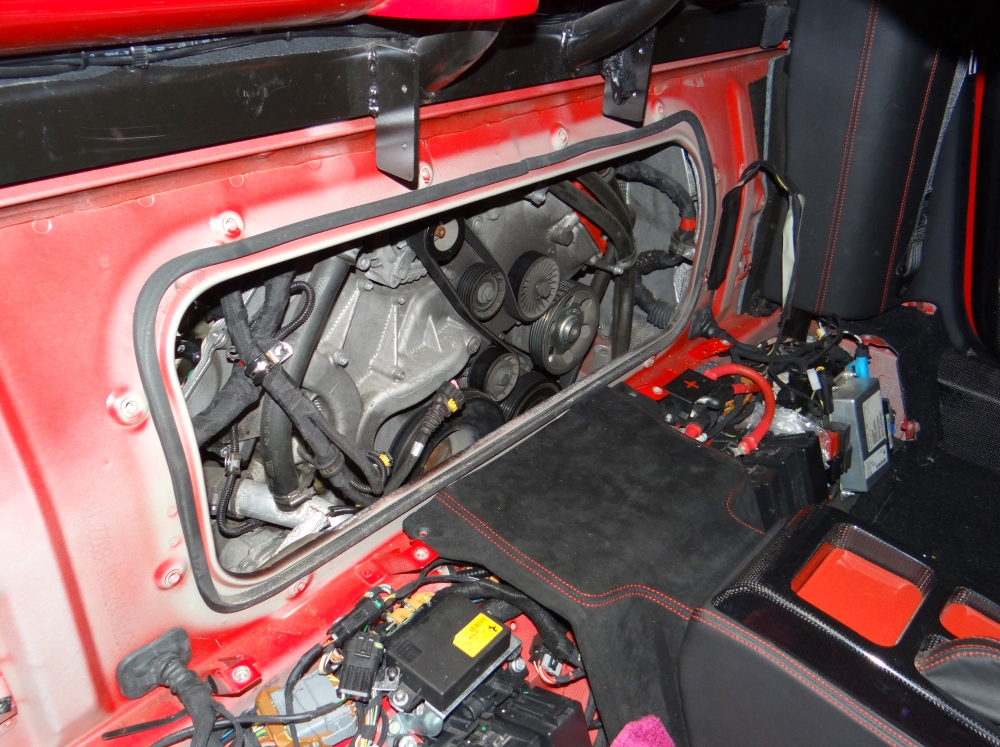
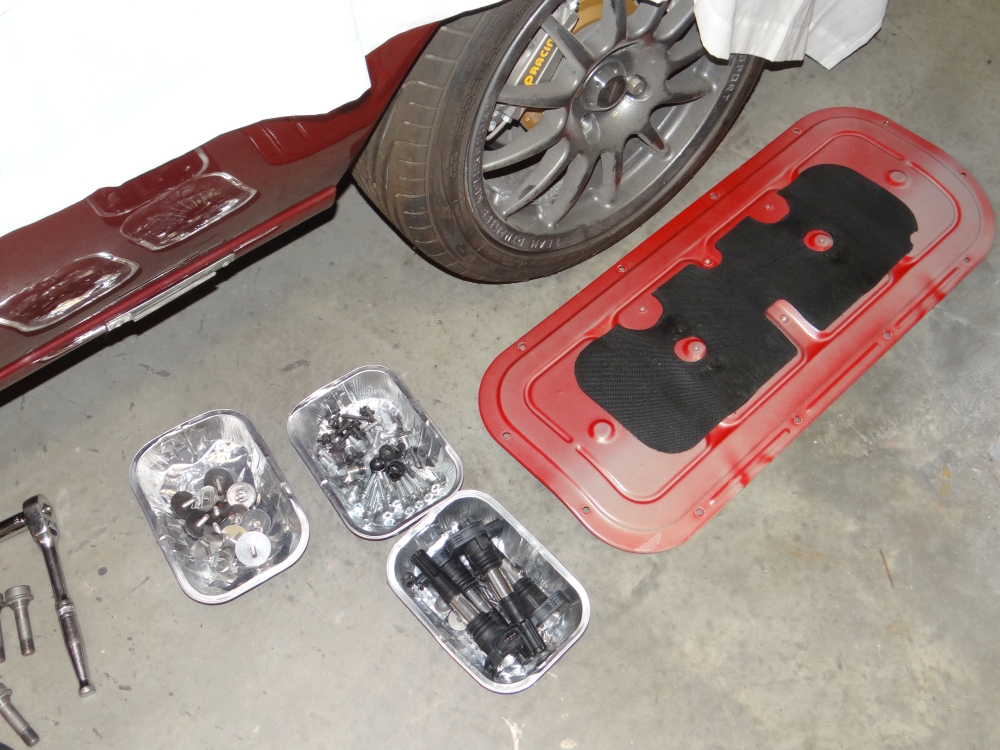
The solenoids can be replaced via the access panel. I laid clean rags over the top of the engine - loosing one of the securing bolts into the engine would cause a significant headache.
Roof Issue Addressed
The rew roof cable and micro-switch arrived:
Upon close inspection of my old cable it had started to fray (green arrow).
I didn't have a workshop manual to hand so I had to figure out as I went, however the job wasn't too difficult just fiddly and time consuming.
The cable runs from above the passenger headrest to the tip of the rear buttress and there are in total four guide rollers, each having a sheath to hold the cable in place, and these must be removed to withdraw the cable due to the size of the eyelet fitted to the forward end.
he largest of the rollers at the rear of the hood must be removed from its pin which, to my surprise, was made from aluminium, so care must be taken when re-assembling.
Two guide rollers at the base of the buttress are held in with circlips.
All in it was a couple of hours work, but it has addressed the issue that triggered the fault code. I will leave the roof closed until after my visit to K Baggs for replacement of the elastic straps.
Variator Solenoid Failiure - Again
I must admit this grated on me. It has been only a few thousand miles since I replaced all four solenoids with the later part, due to intermittent failure of one solenoid and oil in the connectors of the other three - a common failure mode. This time around there was a complete open circuit on the right bank inlet cam triggered a P1552, and also the right bank exhaust wiring plug had oil in it. Diagnosis on the failed solenoid revealed a break in the connection between the engine loom plug and the solenoid body.
I now have quite a collection of solenoids old and new, so I checked the resistance of them and found that 11 ohms of resistance signifies a healthy coil - in my case the range was from 10.7 to 11.4 ohms. A known bad solenoid measured 37 ohms. What is interesting is that units exhibiting oil in their connector can measure a healthy resistance, so either the presence of oil and internal failure are separate issues, or the oil signifies the onset of internal failure.
I knew that Maserati's of this era used the same type of solenoid with the only apparent difference being a slightly longer cable. The Maserati version is £376.88 vs the £565.60 I paid for the F430 version, so fully expecting the part to fail again at some point I decided to use the Maserati version.
I did ponder the issue of oil in the solenoid multiplug, which is a problem that other manufacturers have encountered; for example, Mercedes issued an oil break intermediate loom to solve this very issues on one of their engines. Oil must come either from within the solenoid body, or find its way in from the outside then 'wick' its way along the cable. To mitigate the risk of the latter I sealed off the gaps with RTV sealant (the stuff the sump is sealed with).
There is an oil restriction valve in the end of the cam cap that houses solenoids, its function is to maintain oil pressure so that the solenoids may immediately react - if the oil leak is in fact internal to the solenoid then another reason may be that the valve causes small oil pressure spikes in some situations, which forces oil past a seal. This is just conjecture - it could of course be simply an inadequately specced part.
On my Spider I found the fastest way to replace the solenoids was to remove the seats, engine bay panel, rear wheel and wheel arch liner. The cam cover can be withdrawn through the wheel arch.
The solenoids can be replaced via the access panel. I laid clean rags over the top of the engine - loosing one of the securing bolts into the engine would cause a significant headache.
Variator Solenoids - Complete
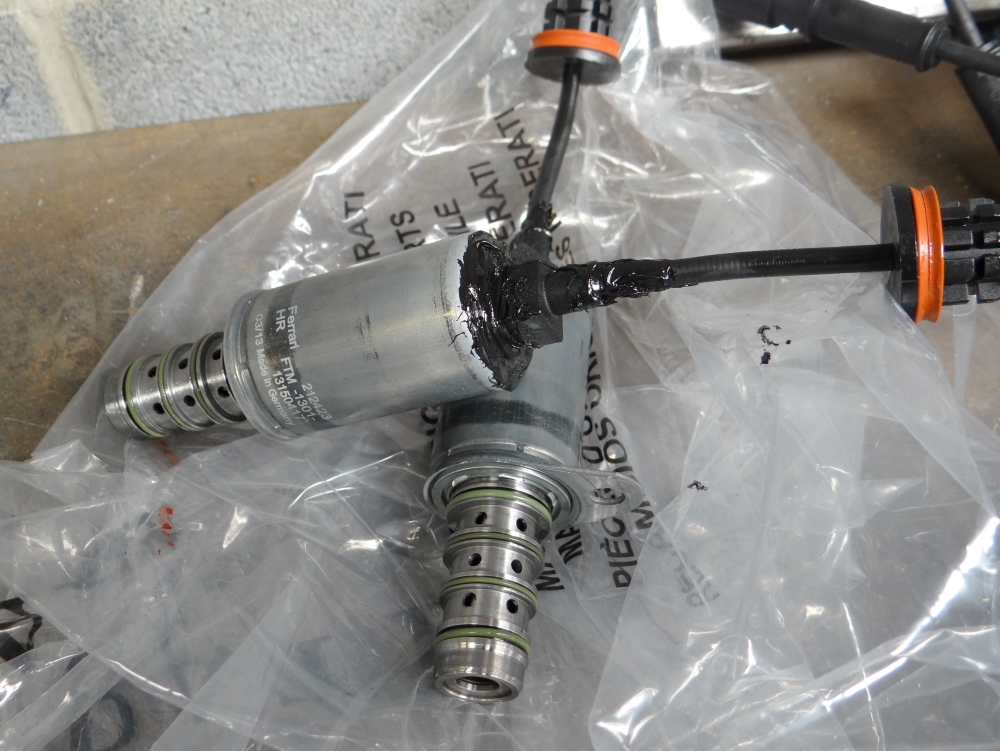
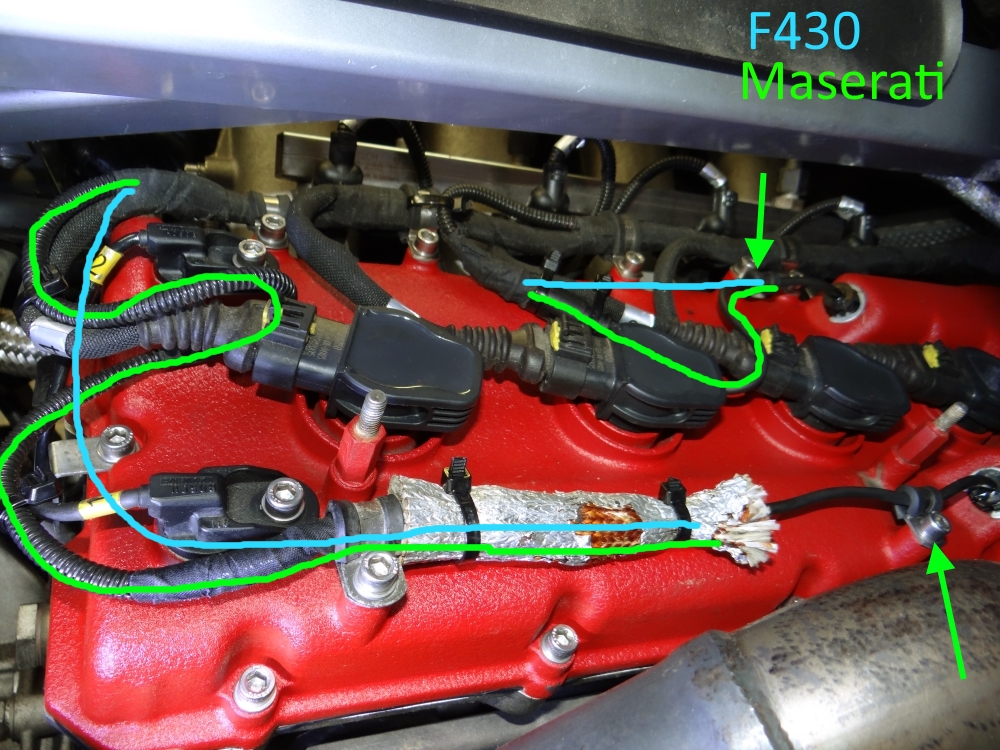
A photo to show how I routed the longer cables on the Maserati solenoids. I did pack the solenoid plugs with dielectric grease in an effort to help prevent oil migrating further up the loom.
The back of the cam cover heat shields were looking a bit worn so I've made good with aluminium tape.
I didn't expect any issues but I've tested the car over a couple of days and all is well - the code has not come back. Note: there is not a need to perform further tests because the ECUs have a target cam angle and check actual vs target and will throw an error if there is a discrepancy.
Advice I can pass on to others doing this is to make sure there aren't any kinks in the cable between the solenoid and the oil seal on the cam cover, and generally ensure that all connections and cables are properly supported.
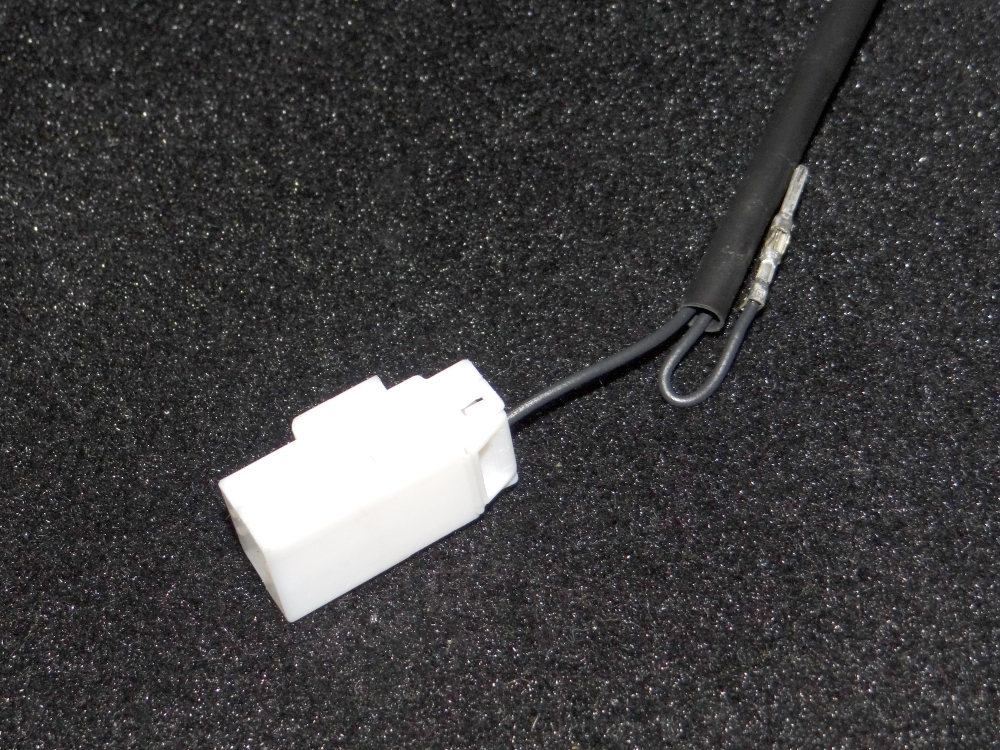
Seat Belt Warning Disabled
The seat belt warning is annoying: it beeps as soon as the key is turned to position 2. On the 360 and F430 it's prudent to wait for the self check to complete before starting the engine, so the first thing I do is turn the key, then I put on my seat belt whilst the check completes. The buckle sensor completes a circuit when closed so disabling is simply a case of disconnecting the plug under the seat, or remove one of the pins and tape it up in the loom itself - I've taken the latter approach so I can keep the plug connected.
A photo to show how I routed the longer cables on the Maserati solenoids. I did pack the solenoid plugs with dielectric grease in an effort to help prevent oil migrating further up the loom.
The back of the cam cover heat shields were looking a bit worn so I've made good with aluminium tape.
I didn't expect any issues but I've tested the car over a couple of days and all is well - the code has not come back. Note: there is not a need to perform further tests because the ECUs have a target cam angle and check actual vs target and will throw an error if there is a discrepancy.
Advice I can pass on to others doing this is to make sure there aren't any kinks in the cable between the solenoid and the oil seal on the cam cover, and generally ensure that all connections and cables are properly supported.
Seat Belt Warning Disabled
The seat belt warning is annoying: it beeps as soon as the key is turned to position 2. On the 360 and F430 it's prudent to wait for the self check to complete before starting the engine, so the first thing I do is turn the key, then I put on my seat belt whilst the check completes. The buckle sensor completes a circuit when closed so disabling is simply a case of disconnecting the plug under the seat, or remove one of the pins and tape it up in the loom itself - I've taken the latter approach so I can keep the plug connected.
 t, there's still 1% to "fix"?!
mwstewart said:
Thanks gents. The car is now at a point where everything has come together and I'm finally really happy with 99% of it.
Is this 99% of this stage of the build or totally. I seem to remember you saying that there were phases and the final included a completely rebuilt and higher performance engine? Still loving this thread and all the updates. The car looks fantastic and I'm sure it drives even better.
Saw this lovely example on eBay and thought you might fancy having a pair.

https://www.ebay.co.uk/itm/Ferrari-F430-replica-co...
Saw this lovely example on eBay and thought you might fancy having a pair.
https://www.ebay.co.uk/itm/Ferrari-F430-replica-co...
Thanks all. I think the proportions on that kit need some work.
I have some more carbon to add but fundamentally the car is now pretty much there - it's a standard car turned up to 9. In June we're taking it for a three week trip to Italy so I'll take some video and write up a little review.
I have some more carbon to add but fundamentally the car is now pretty much there - it's a standard car turned up to 9. In June we're taking it for a three week trip to Italy so I'll take some video and write up a little review.
W00DY said:
Still loving this thread and all the updates. The car looks fantastic and I'm sure it drives even better.
Saw this lovely example on eBay and thought you might fancy having a pair.
https://www.ebay.co.uk/itm/Ferrari-F430-replica-co...
That doesn't look as bad as I remember them looking! Still beyond me why anyone would bother. If you spent the amount of money it costs for that kit on mechanical parts, you'd have a pretty good (all things are relative) MR2.Saw this lovely example on eBay and thought you might fancy having a pair.
https://www.ebay.co.uk/itm/Ferrari-F430-replica-co...
Gassing Station | Readers' Cars | Top of Page | What's New | My Stuff