600bhp 1 Series
Discussion


D4MJT said:
Glad to hear it. They really are a phenomenal car for the money. Out of the box they’re cracking but the scope for modification is mental for what’s effectively the entry level BM hatchback.
Glad to see someone else who thinks their good little cars rather then the internet opinion I’m that they’re virtually undriveable! I enjoy mine a lot. They can be a bit tricky in the wet/cold - but that's not the cars fault, just the tyres. Much as I love their warm weather performance, MPSSs just don't work well most of the time in the UK. I'm still on the original set at 17k miles and have lots of tread left - I will probably change to MPS4s or Goodyear's before winter though as I feel they are past their best and won't be safe in winter conditions.
A bit more preventative maintenance carried out last week.
I changed the rear differential oil for some new Motul oil and also added a magnetic diff drain plug:

The old fluid is pumped out of the diff via the drain / fill plug using a hand pump, and then the new oil is added until it starts to drip out of the drain hole:

Then it's just a case of pop in the new magnetic drain plug and wipe up and the job's a good'un!

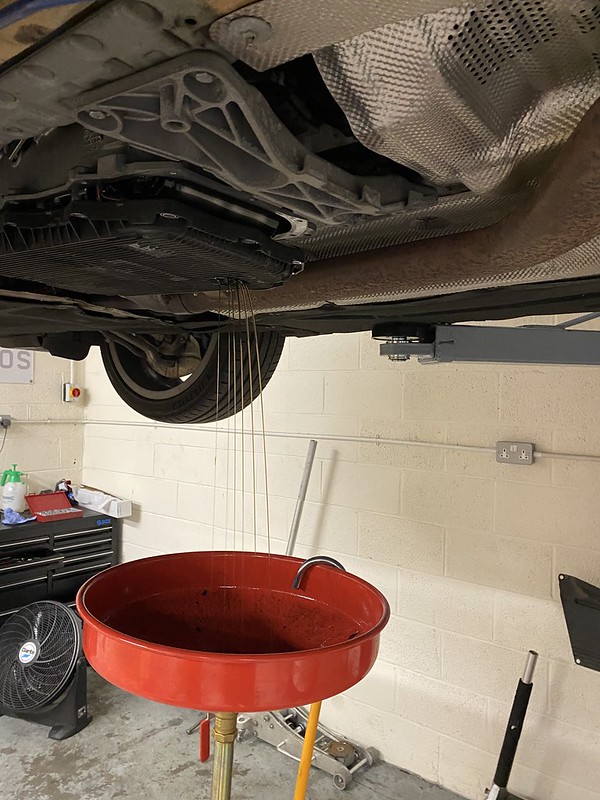
Then I changed the oil in the ZF8 automatic gearbox. BMW state this is a sealed for life unit and doesn't need changing, however ZF recommend oil and filter changes at 50-60k miles. I bought a genuine ZF gearbox sump / filter unit (combined) and the correct ZF LifeGuard 8 fluid.


The process is fairly straight forward. Before anything, ensure that you can undo the refill plug on the side of the gearbox, as you'll be buggered down the line if you drain the box and can't refill it. Then simply undo the drain plug on the bottom of the gearbox and allow the old fluid to drain away.

Once the majority has drained out you can undo the 13 bolts holding the sump on and remove the old sump/filter unit.
It's worth checking that the old oil ring has come away in the old filter and isn't still sat in the fluid pickup. The inside looks terrifying

After that, the refill procedure is a bit of an ordeal but it's OK. Refit the new sump and filter, then refill the box by pumping new fluid in until it starts to flow out of the fill hole. Then, with the plug still removed, start the engine and cycle through the gears several times. Then top up the fluid until it starts to flow out again. The final level needs to be set with the gearbox oil between 30-50c, as the fluid apparently expands at different temperatures. You can use ISTA to monitor the gearbox oil temperature.
That's it!
I wasn't in a mad panic to do this job in all honesty as I was a bit worried that it would introduce issues I didn't have if I had problems getting the level set correctly, and I felt that the car had no problems with the transmission anyway. However, it just goes to show how much things can degrade over time without you realising the difference if you drive it everyday, as the gearbox is changing noticeable smoother and is far far smoother when cold than it was.
Very worth doing and I think I'll now do it again at 100k as part of ongoing preventative maintenance.
I changed the rear differential oil for some new Motul oil and also added a magnetic diff drain plug:
The old fluid is pumped out of the diff via the drain / fill plug using a hand pump, and then the new oil is added until it starts to drip out of the drain hole:
Then it's just a case of pop in the new magnetic drain plug and wipe up and the job's a good'un!
Then I changed the oil in the ZF8 automatic gearbox. BMW state this is a sealed for life unit and doesn't need changing, however ZF recommend oil and filter changes at 50-60k miles. I bought a genuine ZF gearbox sump / filter unit (combined) and the correct ZF LifeGuard 8 fluid.
The process is fairly straight forward. Before anything, ensure that you can undo the refill plug on the side of the gearbox, as you'll be buggered down the line if you drain the box and can't refill it. Then simply undo the drain plug on the bottom of the gearbox and allow the old fluid to drain away.
Once the majority has drained out you can undo the 13 bolts holding the sump on and remove the old sump/filter unit.
It's worth checking that the old oil ring has come away in the old filter and isn't still sat in the fluid pickup. The inside looks terrifying
After that, the refill procedure is a bit of an ordeal but it's OK. Refit the new sump and filter, then refill the box by pumping new fluid in until it starts to flow out of the fill hole. Then, with the plug still removed, start the engine and cycle through the gears several times. Then top up the fluid until it starts to flow out again. The final level needs to be set with the gearbox oil between 30-50c, as the fluid apparently expands at different temperatures. You can use ISTA to monitor the gearbox oil temperature.
That's it!
I wasn't in a mad panic to do this job in all honesty as I was a bit worried that it would introduce issues I didn't have if I had problems getting the level set correctly, and I felt that the car had no problems with the transmission anyway. However, it just goes to show how much things can degrade over time without you realising the difference if you drive it everyday, as the gearbox is changing noticeable smoother and is far far smoother when cold than it was.
Very worth doing and I think I'll now do it again at 100k as part of ongoing preventative maintenance.
Good job on the gearbox. Colleague at work took his 530d in for a gearbox oil change and the garage makes right pigs ear of it. After a week or two of issues he took it to BMW and it hadn’t been filled enough. They changed the oil again and filled it correctly and all seems well again.
Evening all.
Brakes are the subject of today's update. Some time back I replaced the original front discs and pads with Brembo items. This turned out to be a colossal error on my behalf. Normally I research things in more depth, however I needed them quickish and I figured Brembo have a good name. Which they do. For calipers.
A bit of googling suggests their discs and pads are not held in the same high regard. The reason for this became quickly apparent after a few decent stops from Dragy runs, as the discs warped badly. At first I thought it was just pad deposits on the discs, so I tried a few decent stops and then cool down driving, however this made very little difference. They've just got worse so I've had to bite the bullet and bin them which is annoying.
Handily the rears were also due for replacement so it was a fairly expensive day out with discs and pads all round.
As replacements I chose Mtec C-Hook discs and Ferodo DS2500 pads. Now this may sound odd, as Mtec are effectively chinese discs imported and then machined in the UK, and they're fairly cheapish all things considered, but bear with me. The other choice without spending a mental amount of money was Zimmermann which are german manufactured and OEM. In the end, I chose MTec as I've used their discs before on fwd french track hatches with no complaints and I've never had problems with warping. Stick with what you know.

I've also used Ferodo DS2500 pads before in the same environment and have always found them to perform well also. Granted the 140i is a lot heavier than a Clio / Saxo, but the discs are also bigger so hopefully they'll be OK. I think they should perform well for a road car anyway, which is all I use the car for.
Onto the job then! I used masking tape to tape around the caliper where you use a punch to knock out the pad retaining pins. I simply did this to prevent chipping the finish on the calipers if the punch slipped.

The rear discs and pads were definitely past their best, however I think they stood up very well to 62k miles use!
The brakes are an easy DIY job, the pad retaining pins punch out, then you can pull the pads out, and the caliper mounts to the hub with 2 x 16mm bolts (rear axle). Undo these and the caliper can be moved out of the way. A 6mm Hex bit is needed to undo the disc retaining screw.
The next photo will hopefully be helpful for anyone doing the job at home. The rear discs house the handbrake shoes and when they haven't been off for 3 years, they don't really want to let the discs go. So I had to adjust the shoes inwards to release the disc so I could remove it. To do this you have to rotate the hub until you can see the adjuster through one of the wheel bolt holes, you can then adjust it in clicks with a flathead screwdriver. I've pointed out the adjuster so you can see where it actually is rather than try and guess with a torch like me

This was all generally dusty and old, so I cleaned up the hub and adjuster with a wire brush and applied some copper grease to the hub before fitting the new disc.

I used some TFR and Bilt Hamber wheel cleaner to clean up all the old baked on brake dust from the calipers and made sure the pad slide areas were clean before refitting the calipers and popping the new pads in:


The fronts are even easier to do as the handbrake mech isn't a factor.

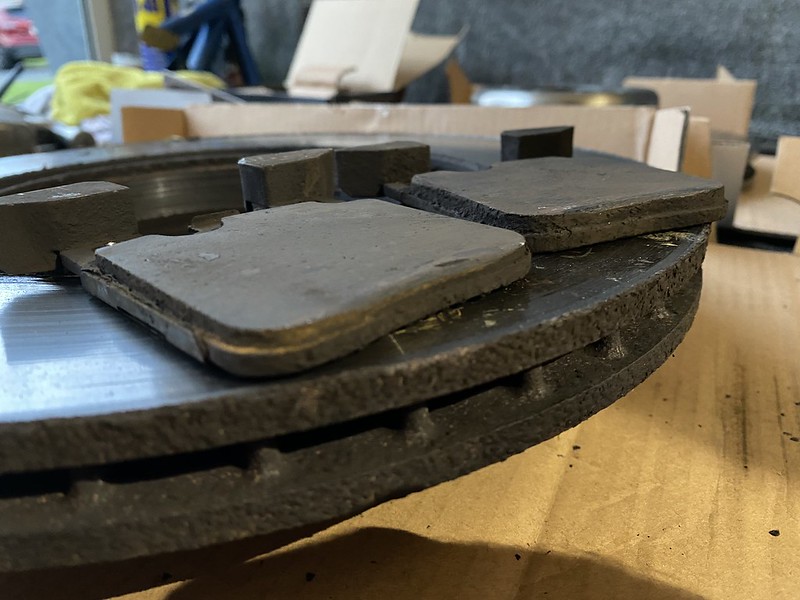
One thing that I did think was interesting was the sheer difference in contact area between the Ferodo DS2500 pads I fitted to the front of the car and the Brembo pads I took back out. Ferodo top, Brembo bottom. The sides of the friction material on the Brembo pads are tapered in to the contact area is less than it could be, as well as there being a large channel cut in the centre.

Anyhow, the job as they say, is a good'un.
This weekend I'm off to borrow a pal's ramp and change the brake fluid out for some fresh Motul fluid, then that should hopefully be the brakes sorted for a while to come. I've bedded the pads in and the bite seems far far better than it's been before.
In 5 days I'm off for a fortnight so I'm hoping to give the paintwork some much needed TLC and the interior. I've not forgotten I said I'd get some pics of cleaning the steering wheel up so I'll sort that out during next weeks cleaning shenanigans and update.
Then it's clay bar and machine polish time before a decent wax up for winter.
Also need some tyres again soon. Bah.
It's still very fast, and very very good fun.
Brakes are the subject of today's update. Some time back I replaced the original front discs and pads with Brembo items. This turned out to be a colossal error on my behalf. Normally I research things in more depth, however I needed them quickish and I figured Brembo have a good name. Which they do. For calipers.
A bit of googling suggests their discs and pads are not held in the same high regard. The reason for this became quickly apparent after a few decent stops from Dragy runs, as the discs warped badly. At first I thought it was just pad deposits on the discs, so I tried a few decent stops and then cool down driving, however this made very little difference. They've just got worse so I've had to bite the bullet and bin them which is annoying.
Handily the rears were also due for replacement so it was a fairly expensive day out with discs and pads all round.
As replacements I chose Mtec C-Hook discs and Ferodo DS2500 pads. Now this may sound odd, as Mtec are effectively chinese discs imported and then machined in the UK, and they're fairly cheapish all things considered, but bear with me. The other choice without spending a mental amount of money was Zimmermann which are german manufactured and OEM. In the end, I chose MTec as I've used their discs before on fwd french track hatches with no complaints and I've never had problems with warping. Stick with what you know.
I've also used Ferodo DS2500 pads before in the same environment and have always found them to perform well also. Granted the 140i is a lot heavier than a Clio / Saxo, but the discs are also bigger so hopefully they'll be OK. I think they should perform well for a road car anyway, which is all I use the car for.
Onto the job then! I used masking tape to tape around the caliper where you use a punch to knock out the pad retaining pins. I simply did this to prevent chipping the finish on the calipers if the punch slipped.
The rear discs and pads were definitely past their best, however I think they stood up very well to 62k miles use!
The brakes are an easy DIY job, the pad retaining pins punch out, then you can pull the pads out, and the caliper mounts to the hub with 2 x 16mm bolts (rear axle). Undo these and the caliper can be moved out of the way. A 6mm Hex bit is needed to undo the disc retaining screw.
The next photo will hopefully be helpful for anyone doing the job at home. The rear discs house the handbrake shoes and when they haven't been off for 3 years, they don't really want to let the discs go. So I had to adjust the shoes inwards to release the disc so I could remove it. To do this you have to rotate the hub until you can see the adjuster through one of the wheel bolt holes, you can then adjust it in clicks with a flathead screwdriver. I've pointed out the adjuster so you can see where it actually is rather than try and guess with a torch like me
This was all generally dusty and old, so I cleaned up the hub and adjuster with a wire brush and applied some copper grease to the hub before fitting the new disc.
I used some TFR and Bilt Hamber wheel cleaner to clean up all the old baked on brake dust from the calipers and made sure the pad slide areas were clean before refitting the calipers and popping the new pads in:
The fronts are even easier to do as the handbrake mech isn't a factor.
One thing that I did think was interesting was the sheer difference in contact area between the Ferodo DS2500 pads I fitted to the front of the car and the Brembo pads I took back out. Ferodo top, Brembo bottom. The sides of the friction material on the Brembo pads are tapered in to the contact area is less than it could be, as well as there being a large channel cut in the centre.
Anyhow, the job as they say, is a good'un.
This weekend I'm off to borrow a pal's ramp and change the brake fluid out for some fresh Motul fluid, then that should hopefully be the brakes sorted for a while to come. I've bedded the pads in and the bite seems far far better than it's been before.
In 5 days I'm off for a fortnight so I'm hoping to give the paintwork some much needed TLC and the interior. I've not forgotten I said I'd get some pics of cleaning the steering wheel up so I'll sort that out during next weeks cleaning shenanigans and update.
Then it's clay bar and machine polish time before a decent wax up for winter.
Also need some tyres again soon. Bah.
It's still very fast, and very very good fun.
Good job. The OE BMW pads are bevelled too.
As I understand it, the pads are that way so that the pad has more bite as it ages to compensate for less mass to act as a heatsink. How true that is I don't know. I'd imagine the line in the middle is to allow the pads to 'gas off' and so that the friction material doesn't expand in a funny way under hard usage.
As I understand it, the pads are that way so that the pad has more bite as it ages to compensate for less mass to act as a heatsink. How true that is I don't know. I'd imagine the line in the middle is to allow the pads to 'gas off' and so that the friction material doesn't expand in a funny way under hard usage.
Oh the joy of adjusting BMW inboard park brake shoes....to think there was an indication it could be done with the wheels on via one of the disc fastening bores ! Mixed views on how to tackle that ...even between mechanics familiar more doing it.
New discs look the part....I even like the fancy new drain plug !
New discs look the part....I even like the fancy new drain plug !
AW8 said:
Oh the joy of adjusting BMW inboard park brake shoes....to think there was an indication it could be done with the wheels on via one of the disc fastening bores ! Mixed views on how to tackle that ...even between mechanics familiar more doing it.
New discs look the part....I even like the fancy new drain plug !
I always pull the wheels. I can never get it in right to adjust the handbrake with the wheel on. Having to sort out the handbrake lever inside the car is also a bit of a pain on newer ones too.New discs look the part....I even like the fancy new drain plug !
Recently I got asked to test a prototype intake for Williams Performance.
There is a world of discussion about intakes for the B58. Essentially the intake is almost directly above the turbo, which isn't ideal for intake temperatures. As such, there is a lot of noise about how the stock intake or a box is better, and open intakes are a bad move. However as far as we can see, these have only been dyno tested, not tested on the road. So basically, Marc Williams and I used my car to do some datalogging, and ran 2 Dragy 100km-200km pulls back to back, on the same night, same car, same ambient temperatures, with the stock airbox with an ITG panel filter and Marc's open cone intake with an ITG filter.
This is the prototype Williams Performance filter fitted:

The results suprised me. I used BootMod3 to run the datalogs and I hit a peak intake temp of 102f with the stock airbox with panel filter.
Using the open intake, which is widely slated, we saw a peak intake temp of 95f, with less timing pull from the ECU. I guess if you're drag racing and sat in a lane heat soaking or on a dyno then heat soak could be an issue, but the engine bay appears to have great airflow in actual road situations, and the logs suggest a good gain from the open filter setup.

Intake testing aside....
It was time for a pre-winter clean up and sort out. I ordered a loads of cleaning bits and set myself away. I first of all snowfoamed the car and gave it a normal wash down:

Then, I washed the car down with microfibre towels and Autosmart Tardis, which is by far and away the best tar / glue remover I've come across.

After a wash down with Tardis I clay barred the car with Bilt Hamber Auto Clay, and then started to polish it back up. I have a DAS-12 and used AutoBrite polishing compounds and pads and 3M Superfina SE to finish.


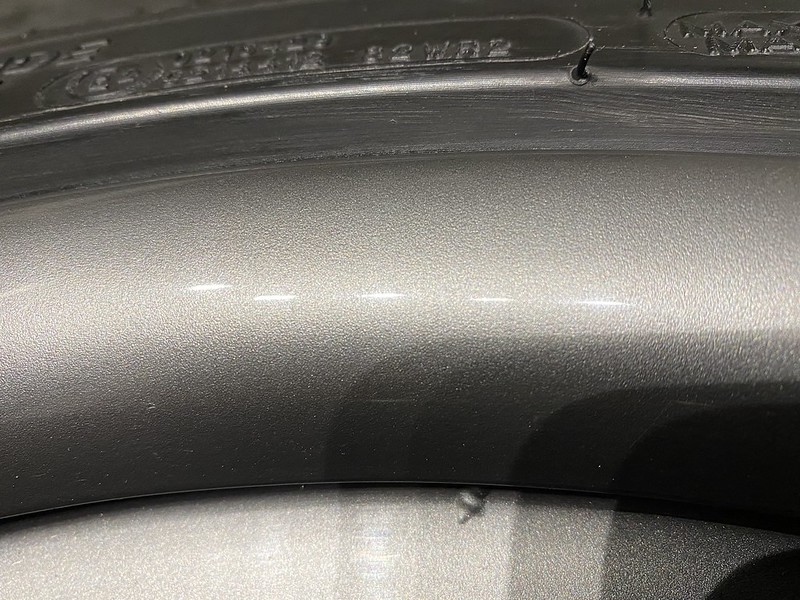
62k road miles had left me with issues like this at the front passenger corner:

A few passes have it looking a lot more respectable. It's not perfect but realistically the front end needs repainting next year anyway.

Obviously having completely cleaned, polished and waxed the car, it absolutely chucked it down overnight. At this point I hadn't touched the wheels or interior so they're still rough, but the beading was on point


At this point I decided the neighbours didn't think I was enough of a mentalist, so I cracked on over 2 nights jacking a side of the car up at a time and taking the wheels into the garage to clean up and protect for the winter:

After washing the wheels off outside, I gave them an additional coat of Bilt Hamber Auto Wheels and worked that in with a brush to have a good go at the tar and glue on the wheels

I then washed the wheels down with Autosmart Tardis and then clay barred them to remove any extra debris, before machine polishing the barrels back up with Autobrite compounds and then applying Collinite 476S wax.


I also pulled the chrome M Performance exhaust tips I currently have fitted and cleaned those up, a 50/50 and both shot:


I'm starting to get some blemishes on the alloys but I think they've held up very well for 62k miles really, I'll probably look at a refurb next year.
Generally though, they're in pretty good order

With the wheels refitted there was the opportunity for some gratuitous beading barrel shots:

With the exterior sorted, it was time to turn to the interior. I decided to remove the seats to clean them and the carpets properly. 4 x T50's hold the seats in and there's a single connector underneath for electrics.

Urgh. Time for some cleanzzzz


With the seats in the garage, it was time to deploy the cleanzzz:

The brush was £3.95 from CleanYourCar and the leather cleaner was Gliptone. My god. I thought they were OK, but when I'd finished the drivers base, the backrest was a completely different colour:

It's hard to pick up well on camera, but the drivers seat on the left was immaculate after cleaning and was soft, cream and matte in texture, whilst the passengers seat on the right was a darker shiny gloss cream. Well worth the effort.

Refitted they looked great:

And although they werent horrific, it was nice to be able to use the brush cleaner to tackle things like the seat belt clasps, which weren't horrendous but weren't super clean either:

But they were far better after a good clean:

Next up was the steering wheel. I have had a few questions about this before, this is what I use to clean the leather, it's a Boots Nail Varnish remover, but acetone free. I found out about it online somewhere and the gist was that it absolutely must be acetone free. It's still very aggressive but appears to lift off all skin oils etc from the wheel leather and return it to a tacky matte finish. I then use a leather care balm to reprotect the leather. This is the cleaner:

And due to the weather, this is the best shot I can give you as to the results, it's a 50/50 with the right hand side of the wheel having been wiped down with the nail polish remover.
With almost all the big jobs done, I washed down the car mats and the extra set I have with a wet vac:

It's pretty much sorted for the winter now, with a decent coat of wax and a good clean up for the mileage. Cue a few extra photos:


All in all now the car is pretty sorted, I'm really pleased with the new brakes which have far more bite. Ideally at the end of next month I'll get the car on a rolling road again to see what sort of power it's making but it feels really strong and drives brilliantly.
That's likely the end of the mods for this year, next year if I keep modding I'll probably look at M3/4 lower control arms and a decent set of coilovers, possibly the underbody brace and the rear subframe bush inserts.
Booked in for an MOT in October (it's first) so hopefully it passes!
There is a world of discussion about intakes for the B58. Essentially the intake is almost directly above the turbo, which isn't ideal for intake temperatures. As such, there is a lot of noise about how the stock intake or a box is better, and open intakes are a bad move. However as far as we can see, these have only been dyno tested, not tested on the road. So basically, Marc Williams and I used my car to do some datalogging, and ran 2 Dragy 100km-200km pulls back to back, on the same night, same car, same ambient temperatures, with the stock airbox with an ITG panel filter and Marc's open cone intake with an ITG filter.
This is the prototype Williams Performance filter fitted:
The results suprised me. I used BootMod3 to run the datalogs and I hit a peak intake temp of 102f with the stock airbox with panel filter.
Using the open intake, which is widely slated, we saw a peak intake temp of 95f, with less timing pull from the ECU. I guess if you're drag racing and sat in a lane heat soaking or on a dyno then heat soak could be an issue, but the engine bay appears to have great airflow in actual road situations, and the logs suggest a good gain from the open filter setup.
Intake testing aside....
It was time for a pre-winter clean up and sort out. I ordered a loads of cleaning bits and set myself away. I first of all snowfoamed the car and gave it a normal wash down:
Then, I washed the car down with microfibre towels and Autosmart Tardis, which is by far and away the best tar / glue remover I've come across.
After a wash down with Tardis I clay barred the car with Bilt Hamber Auto Clay, and then started to polish it back up. I have a DAS-12 and used AutoBrite polishing compounds and pads and 3M Superfina SE to finish.
62k road miles had left me with issues like this at the front passenger corner:
A few passes have it looking a lot more respectable. It's not perfect but realistically the front end needs repainting next year anyway.
Obviously having completely cleaned, polished and waxed the car, it absolutely chucked it down overnight. At this point I hadn't touched the wheels or interior so they're still rough, but the beading was on point
At this point I decided the neighbours didn't think I was enough of a mentalist, so I cracked on over 2 nights jacking a side of the car up at a time and taking the wheels into the garage to clean up and protect for the winter:
After washing the wheels off outside, I gave them an additional coat of Bilt Hamber Auto Wheels and worked that in with a brush to have a good go at the tar and glue on the wheels
I then washed the wheels down with Autosmart Tardis and then clay barred them to remove any extra debris, before machine polishing the barrels back up with Autobrite compounds and then applying Collinite 476S wax.
I also pulled the chrome M Performance exhaust tips I currently have fitted and cleaned those up, a 50/50 and both shot:
I'm starting to get some blemishes on the alloys but I think they've held up very well for 62k miles really, I'll probably look at a refurb next year.
Generally though, they're in pretty good order
With the wheels refitted there was the opportunity for some gratuitous beading barrel shots:
With the exterior sorted, it was time to turn to the interior. I decided to remove the seats to clean them and the carpets properly. 4 x T50's hold the seats in and there's a single connector underneath for electrics.
Urgh. Time for some cleanzzzz
With the seats in the garage, it was time to deploy the cleanzzz:
The brush was £3.95 from CleanYourCar and the leather cleaner was Gliptone. My god. I thought they were OK, but when I'd finished the drivers base, the backrest was a completely different colour:
It's hard to pick up well on camera, but the drivers seat on the left was immaculate after cleaning and was soft, cream and matte in texture, whilst the passengers seat on the right was a darker shiny gloss cream. Well worth the effort.
Refitted they looked great:
And although they werent horrific, it was nice to be able to use the brush cleaner to tackle things like the seat belt clasps, which weren't horrendous but weren't super clean either:
But they were far better after a good clean:
Next up was the steering wheel. I have had a few questions about this before, this is what I use to clean the leather, it's a Boots Nail Varnish remover, but acetone free. I found out about it online somewhere and the gist was that it absolutely must be acetone free. It's still very aggressive but appears to lift off all skin oils etc from the wheel leather and return it to a tacky matte finish. I then use a leather care balm to reprotect the leather. This is the cleaner:
And due to the weather, this is the best shot I can give you as to the results, it's a 50/50 with the right hand side of the wheel having been wiped down with the nail polish remover.
With almost all the big jobs done, I washed down the car mats and the extra set I have with a wet vac:
It's pretty much sorted for the winter now, with a decent coat of wax and a good clean up for the mileage. Cue a few extra photos:
All in all now the car is pretty sorted, I'm really pleased with the new brakes which have far more bite. Ideally at the end of next month I'll get the car on a rolling road again to see what sort of power it's making but it feels really strong and drives brilliantly.
That's likely the end of the mods for this year, next year if I keep modding I'll probably look at M3/4 lower control arms and a decent set of coilovers, possibly the underbody brace and the rear subframe bush inserts.
Booked in for an MOT in October (it's first) so hopefully it passes!
Edited by D4MJT on Saturday 26th September 21:59
Edited by D4MJT on Saturday 26th September 22:01
Edited by D4MJT on Saturday 26th September 22:04
Mine was 3 years old yesterday and had its first MOT last Monday, failed due to an almost invisible bulge in one of the tyre walls (thanks potholes...) so I had PS4s fitted all round. Hurt a bit as the (still original) MPSSs still had plenty of tread (4.5mm) which shows I haven't really been trying hard enough in the 18k miles I've managed 
First impression on the MPS4s is that it is much harder to lose traction and they give a slightly softer/smoother ride even in 'sport' mode. Will be interesting to see what they are like in wetter and colder conditions.
First impression on the MPS4s is that it is much harder to lose traction and they give a slightly softer/smoother ride even in 'sport' mode. Will be interesting to see what they are like in wetter and colder conditions.
Great thread, I have had mine nearly two years now (form new) and having recently sold my Caterham I actually use it as a fast//fun car now, rather than just trundling about in it. I still can't get on with the lack of steering feel, I have more confidence in my wife's Aygo, and I hate the lack of Android Auto, but even with no mods at all the torque and RWD make up for that  I'm still amazed at how quickly it pulls at higher speeds, the tuned ones must be mental but I have enough trouble keeping things vaguely sensible without an extra 100bhp to tempt me!
I always loved the MkIV Supra TT back in the 90s/00s, the M140 is very similar I think in terms of powertrain, bhp, weight and tuning capability. I'd been quite down on mine as it felt like a sofa with the handbrake on compared to the Caterham, but now I'm not spoilt by 500bhp/ton at weekends I appreciate the performance it has a lot more!
I'm still amazed at how quickly it pulls at higher speeds, the tuned ones must be mental but I have enough trouble keeping things vaguely sensible without an extra 100bhp to tempt me!I always loved the MkIV Supra TT back in the 90s/00s, the M140 is very similar I think in terms of powertrain, bhp, weight and tuning capability. I'd been quite down on mine as it felt like a sofa with the handbrake on compared to the Caterham, but now I'm not spoilt by 500bhp/ton at weekends I appreciate the performance it has a lot more!


Gassing Station | Readers' Cars | Top of Page | What's New | My Stuff