BMW 2002Tii (ish)
Discussion


Sf_Manta said:
Kept that one quiet, Congratulations man

Though someone put the wrong link in the info bit on youtube, it's got a 1974 Camero instead

As I’ve said before, you should be incredibly proud of it

Sf_Manta said:
Kept that one quiet, Congratulations man
Though someone put the wrong link in the info bit on youtube, it's got a 1974 Camero instead
Cheers! I put about it in here but it mightve been hidden among everything else I posted Though someone put the wrong link in the info bit on youtube, it's got a 1974 Camero instead

I noticed that, think it's all sorted now by the looks of it!
hooneybadger said:
Quality vid and car
Thanks HB, appreciate it!Slippydiff said:
Great video Scott, the car looks fantastic (and actually looks all the better for looking a bit used and battle scarred) and it sounds superb too.
As I’ve said before, you should be incredibly proud of it
Thanks SD, I'm glad you think the same, I love stonechips and road rash etc. Lots of marks have stories behind them now and it's always a point of conversation.As I’ve said before, you should be incredibly proud of it
Thanks again for the kind words!
Ferosferio said:
The PH vid brought me here! Superb content but glad I've got your full build thread to soak up now, Scott (have dropped you a follow on Instagram too). Awesome car, following with interest!
Brought me here too - should be working on the car spent 2 hours reading the thread - well documented and a cracking carScrump said:
Just watched the video. Fantastic car
It looks so small, I can’t believe that in the ‘70s my family (5 of us) went to France in a 2002 tii.
Thank You! They are really small these days, getting it next to modern stuff when you park up, it looks hilarious! It does mean you have more road to play with though and i find modern cars, especially fast ones, are a little too large for the roads i tend to enjoy driving on.It looks so small, I can’t believe that in the ‘70s my family (5 of us) went to France in a 2002 tii.
The 70's sound like a great time from that aspect

Ferosferio said:
The PH vid brought me here! Superb content but glad I've got your full build thread to soak up now, Scott (have dropped you a follow on Instagram too). Awesome car, following with interest!
Thats great, the link didnt work at first apparently Thanks for the kind words! What is your name on Insta, im useless with that app, other than just chucking pictures up!B'stard Child said:
Brought me here too - should be working on the car spent 2 hours reading the thread - well documented and a cracking car
As above, thank you for the kind words, really appreciated. I hope that reading the thread may spur you on in some way the next time you work on it to make up for that 2 hour loss!jaf65 said:
A great video and great build thread, ideal way to start a Monday morning.
Car looks great and I have been lucky enough to see in it for real (at QSP). It is so much better up close.
Excellent work Scott
Thanks Jaf, im good friends with Simon so try and pop in when i can! I assume it was either out the front or i was stealing use of the alignment ramp Car looks great and I have been lucky enough to see in it for real (at QSP). It is so much better up close.
Excellent work Scott
Looks awesome Scott, nearly bought an Orange 2002 in California some years ago and still regret not buying it.
I do love these old 70's sports cars, recently sold a 105 GTV 1750 and looked small even at the side of a yaris and great fun to drive, I always seemed to be messing with it every time I went out so decided to move it on. I own a few 911SC's and backdated 73RS Rep with a 3.2 motor, stripped out, very little sound proofing, nice and light and like you say feels like you're doing 90 when you're only doing 60 and that's where my passion is. Enjoyed the video and the thread, maybe see you around. Dean L.
I do love these old 70's sports cars, recently sold a 105 GTV 1750 and looked small even at the side of a yaris and great fun to drive, I always seemed to be messing with it every time I went out so decided to move it on. I own a few 911SC's and backdated 73RS Rep with a 3.2 motor, stripped out, very little sound proofing, nice and light and like you say feels like you're doing 90 when you're only doing 60 and that's where my passion is. Enjoyed the video and the thread, maybe see you around. Dean L.
dean1057 said:
Looks awesome Scott, nearly bought an Orange 2002 in California some years ago and still regret not buying it.
I do love these old 70's sports cars, recently sold a 105 GTV 1750 and looked small even at the side of a yaris and great fun to drive, I always seemed to be messing with it every time I went out so decided to move it on. I own a few 911SC's and backdated 73RS Rep with a 3.2 motor, stripped out, very little sound proofing, nice and light and like you say feels like you're doing 90 when you're only doing 60 and that's where my passion is. Enjoyed the video and the thread, maybe see you around. Dean L.
Cheers Dean, it sounds like we are into the same sort of stuff and enjoy the same sort of driving experience, I had a 105 series on the list and ultimately i would like an aircooled 911 to do in the same sort of way as this car. Maybe one day.I do love these old 70's sports cars, recently sold a 105 GTV 1750 and looked small even at the side of a yaris and great fun to drive, I always seemed to be messing with it every time I went out so decided to move it on. I own a few 911SC's and backdated 73RS Rep with a 3.2 motor, stripped out, very little sound proofing, nice and light and like you say feels like you're doing 90 when you're only doing 60 and that's where my passion is. Enjoyed the video and the thread, maybe see you around. Dean L.
The fella that took me down to collect this is a good friend and runs a local Porsche specialist that tends to do aircooled cars so i'm around them a lot and a bonafide Porsche fan boy, even having never owned one! I did nearly stretch to one instead of the 2002 but back then wasnt on the sort of money that would allow me to do a 'build' on one, even now with how the prices have gone on them and inflation im probably still not
Through him and his customers theres quite a group of 911's of that era that get out driving, him included having recently completed his targa sc. You dont appear too far away so if you're ever up this way for a drive (North Pennines sort of area), feel free to give me a shout!
scottos said:
Ferosferio said:
The PH vid brought me here! Superb content but glad I've got your full build thread to soak up now, Scott (have dropped you a follow on Instagram too). Awesome car, following with interest!
Thats great, the link didnt work at first apparently Thanks for the kind words! What is your name on Insta, im useless with that app, other than just chucking pictures up!
Ferosferio said:
Insta handle is Petrolheid. I'm not what you'd call a serial poster but occasionally throw up an old BMW or equivalent!
Ah nice, i love the big 7 and like those RS4's too!D4MJT said:
This is a phenomenal photo Scott.
You know what would look brilliant though, a nice photo of the 2002 and a dashing blue Panda....

The lad that took them is decent, only young and been doing it a short while too!You know what would look brilliant though, a nice photo of the 2002 and a dashing blue Panda....
Ahh, i wouldnt want to be upstaged to be honest!
Well i think in a previous post i said there wasn't much to do this winter and i was only intending to swap the oils out front to back and give it a clean... 
Once i'd got it up in the air and had a poke around underneath i started to notice little bits that weren't right, then when i was halfway through that job, id notice something else; and so on!
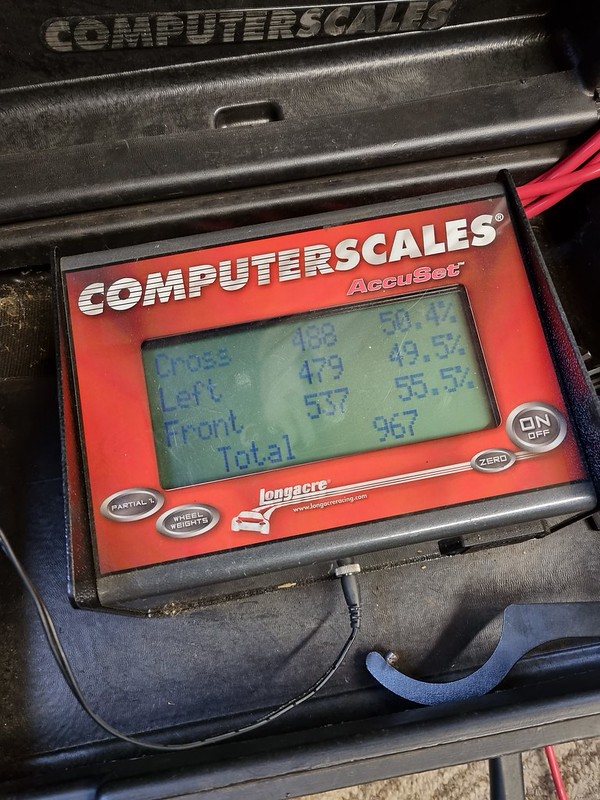
To start off i was making jobs up so i could spend time in the garage tinkering. First up i wanted to check the weights of the car and see how it changed loaded up with the spare wheel/ tools and me in it.
You'll have to take these readings with a pinch of salt, the garage floor isnt perfectly level, the compressed underlay and carpet on top of the concrete actually help this believe it or not. I did calibrate the carpet/ underlay with my own weight and it was spot on so it's somewhere near at least! Ideally you'd want a perfectly level powerfloated concrete surface but here we are!
Borrowed scales:
 20221126_130455 by Scott Osborne, on Flickr
This is with around 1/4 tank of fuel and no spare wheel/ spares and tool box in the boot:
 20221126_132210 by Scott Osborne, on Flickr
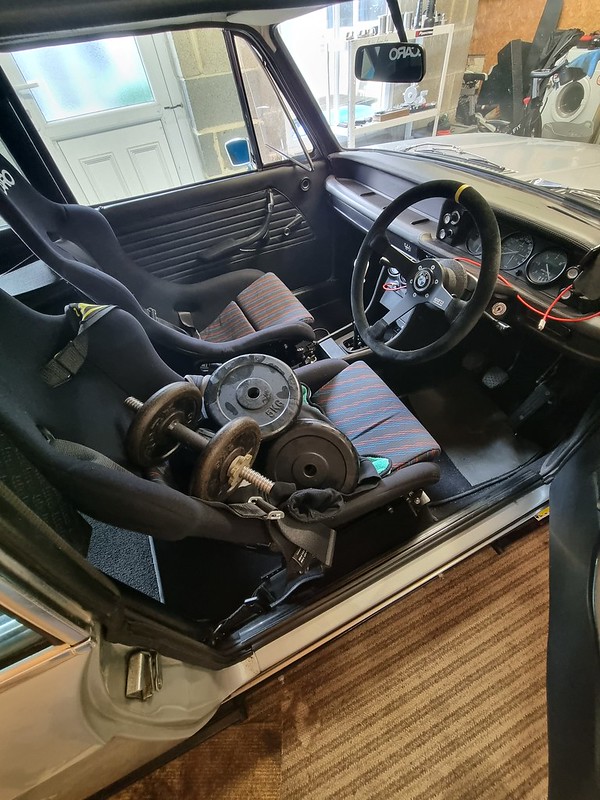
Loaded up with 'me' in the seat and i also put a spare 8" minilite + tyre in the boot, my tool box and spares bag.
 20221126_124707 by Scott Osborne, on Flickr
 20221126_125701 by Scott Osborne, on Flickr
If you're good at maths then please refrain from calling me a FB please
The crossweights are nigh on perfect with the car unladen but with a 45:55 weight distribution front to back. You'll notice that loaded up the crossweights are still great but the front to back weight distribution gets a chuck better because of the spare wheel etc in the boot.
When i'd built the car i'd always placed things where i thought they would be best for weight distribution, i.e. battery was placed rear left, i'd removed 20kg of servos from the front left etc. The fuel tank is rear right and obviously makes a difference depending on fuel and it doesnt help on a RHD car when the big lump driving it also sits on the right! All in all it weights up very good for a road car though, i'm happy with it.
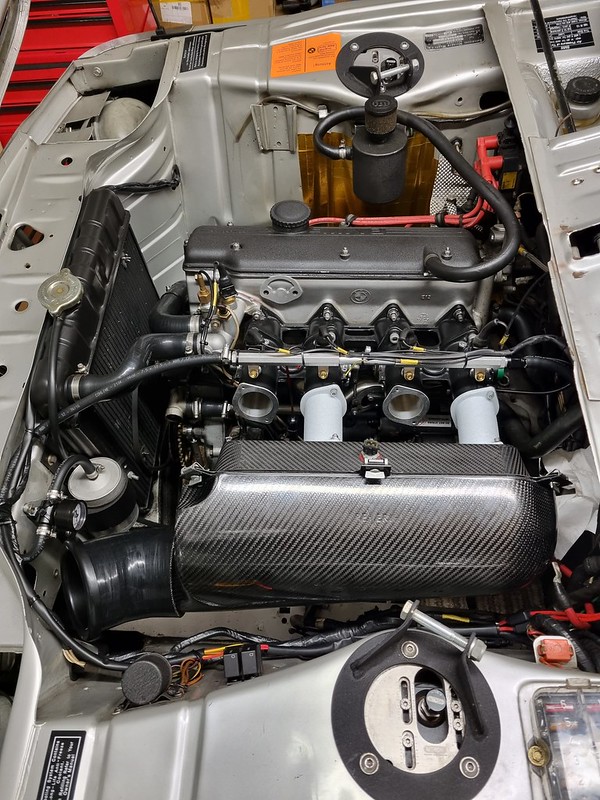
The next step for procrastination, i wanted to lengthen the inlet tracts but didnt want longer trumpets as the airbox would work correctly. Also any lengthening would potentially clash with the bonnet.
A friend is building a hillclimb car and loves procrastinating 10x more than me, he's also handy with a 3D printer/ design software so he was happy to draw something up based on my rough measurements and terrible explanations!
 IMG-20221227-WA0031 by Scott Osborne, on Flickr
A test print with 2 of them:
 20221227_201045 by Scott Osborne, on Flickr
 20221227_200328 by Scott Osborne, on Flickr
Excellent! 60mm longer tracts and plenty of bonnet clearance! On to the proper prints:
 20221229_124117 by Scott Osborne, on Flickr
I tidied them up a tad and then painted them:
 20230107_172048 by Scott Osborne, on Flickr
 20230107_172032 by Scott Osborne, on Flickr
The above is the quiet option, the below is the deafening one:
 20230107_171714 by Scott Osborne, on Flickr
 20230107_165606 by Scott Osborne, on Flickr
I had to extend the wiring on the air temp sensor, again thanks to my procrastinating friend for making me up a new section/ plug etc.
 20230107_164847 by Scott Osborne, on Flickr
I also remote mounted the fuel pressure regulator after last years mishap of it cracking the fuel rail. I temporarily fitted it back on for the Pistonheads video and to last me the year but knew it was a job that needed sorting over winter to stop it happening again in a year or two!
 20230107_164856 by Scott Osborne, on Flickr
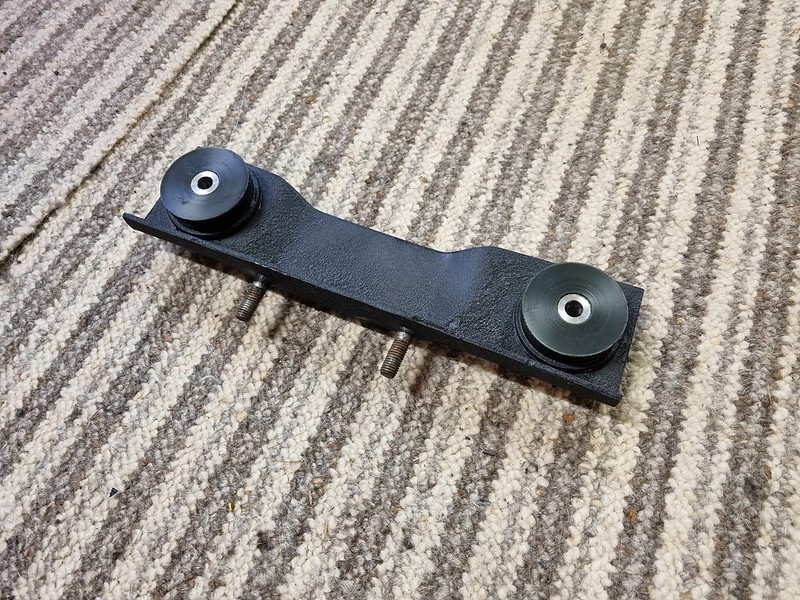
Last on my list before a full fluids swap was to tart up the the diff mount and fit some heritage powerflex bushes i had. The heritage ones are essentially the softer purple version but not in a garish colour! Mount off:
 20230122_170703 by Scott Osborne, on Flickr
I pressed the bushes out, painted the mount and stuck the new ones in:
 20230204_155312 by Scott Osborne, on Flickr
Fitted with new hardware:
 20230204_171327 by Scott Osborne, on Flickr
Undercarriage shot, it's looking a big worse for wear after this year but it's covered a lot of hard miles. Lots of road rash and the paint is obviously flaking off the roll bar! I spent quite a lot of time cleaning this all up and applying acf-50. It still comes up nice but is something i'll address better in the future.
 20230204_171222 by Scott Osborne, on Flickr
With me having cleaned up the rear, it spurred me on to cleaning up the front and the engine bay. I started on the offside front and noticed this:
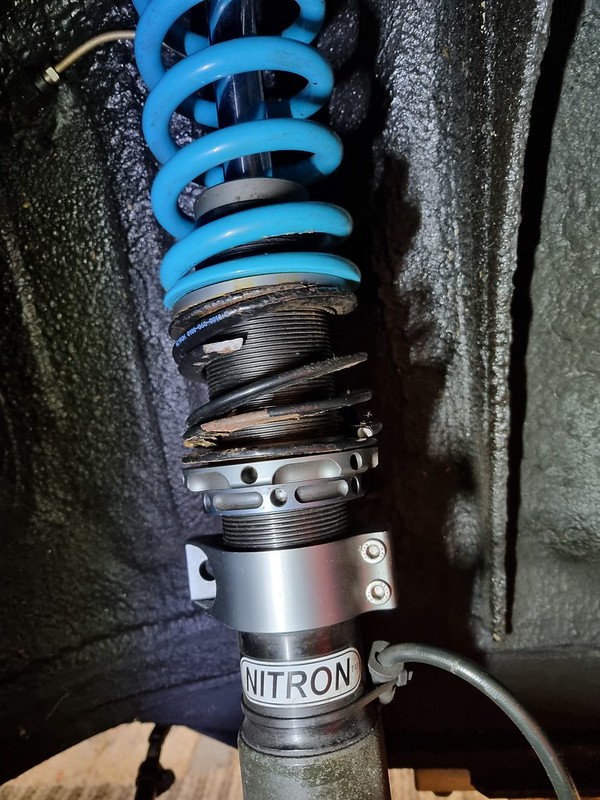 20230122_152258 by Scott Osborne, on Flickr
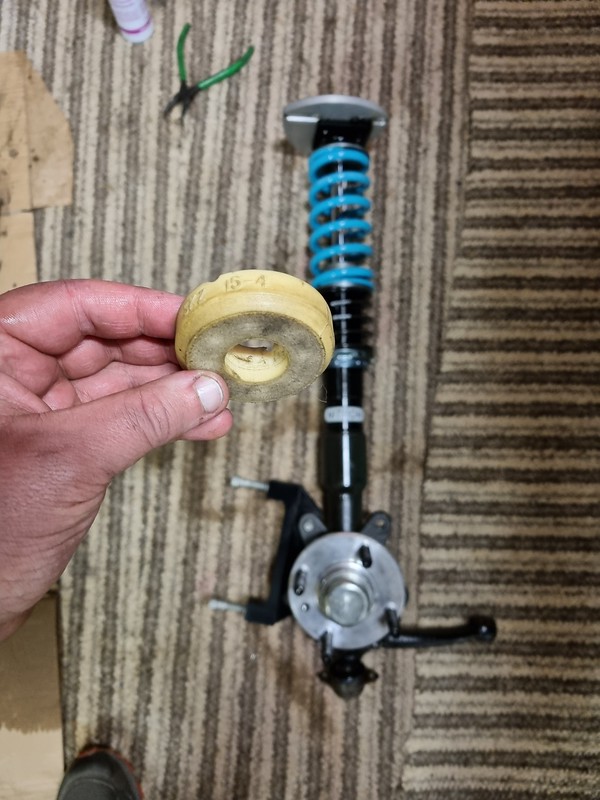
The helper spring had snapped in half. These are fully compressed when the car is down on its wheels and it's only there to keep the spring above seated when it isnt. The car does end up coming off the ground a fair amount in the North Pennines, so maybe that contributed
Everything marked up, measured and removed. The kit comes apart very easily and all the parts are incredibly impressive, it's nice to see where the money goes on a suspension kit like this.
 20230122_173341 by Scott Osborne, on Flickr
New springs sourced from a friend, i decided to replace both sides and keep the Nitron one spare. The springs from Nitron were also very expensive.
 20230209_201220 by Scott Osborne, on Flickr
Everything cleaned and coated:
 20230212_174052 by Scott Osborne, on Flickr
Back together and fitted back on the car:
 20230212_175615 by Scott Osborne, on Flickr
 20230212_185127 by Scott Osborne, on Flickr
Same on the other side; dont you hate it when you miss something!
 20230220_211011 by Scott Osborne, on Flickr
 20230220_215359 by Scott Osborne, on Flickr
I'd then set about cleaning up the underside at the front and noticed this:
 20230218_180632 by Scott Osborne, on Flickr
 20230220_201922 by Scott Osborne, on Flickr
Exhaust manifold has cracked. The company who made it are great and will repair FOC with a quick turn around. I still need to drop it off with them though. I'll replace the exhaust hanger bushes with new ones so they remain stiff and hopefully limit this happening again.
I moved onto the engine bay and took all the HT leads off for a clean and thought i'd change the plugs too whilst i was there.Before and after of the leads:
 20230204_140849 by Scott Osborne, on Flickr
I decided to take the rocker cover off and spot check the valve clearances whilst doing all of this. I'd done them not long back so didnt need to check them all if i was happy with my spot check.
 20230204_143447 by Scott Osborne, on Flickr
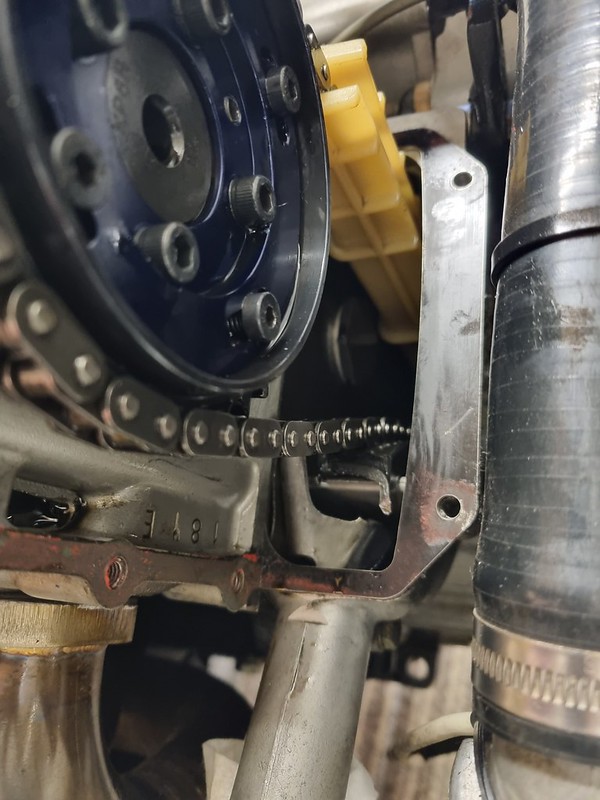
I poked a light down the front cover to have a general check and noticed something out of place:
 20230204_143853 by Scott Osborne, on Flickr
 20230204_145317 by Scott Osborne, on Flickr
That is the top of the timing chain tension guide rail and it's not attached!
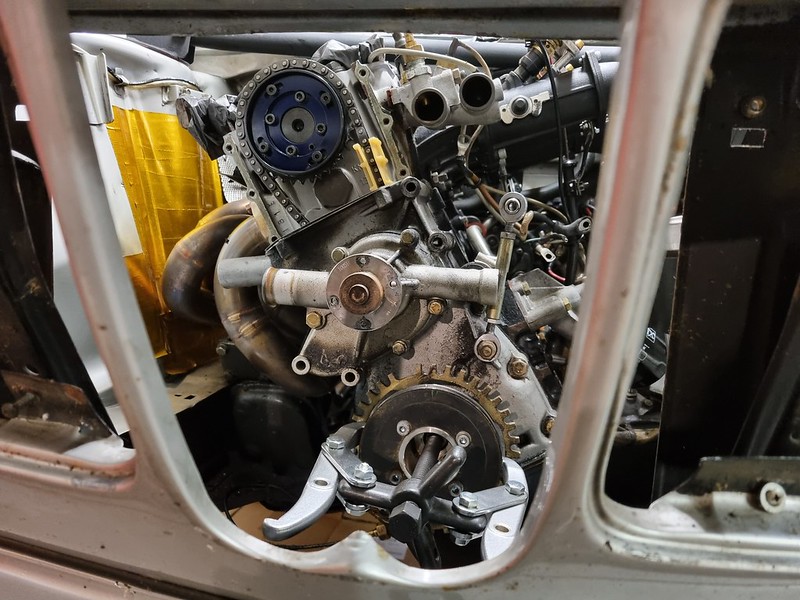
First thoughts were "i've lunched my engine, it'll all be wrecked", but then I thought rationally in that in drove into the garage fine and it was fine all of the last drive out! I took the upper timing cover off for a better look:
 20230204_151058 by Scott Osborne, on Flickr
Looking at the design of the front cover, there is a metal rib on it that you can see the lower remains of the attached rail sitting against. It looks like this has allowed just enough tension on the chain for it not to slip over the teeth, which would cause catastrophic failure. I assume this isnt by luck and BMW thought about this. Luckily the snapped off bit has just sat nicely on this rib and not martyred itself into the chains!
A simple replacement of this part and we should be good to go again! I say simple, it's a bit of a rubbish job and i was not looking forward to doing it. The part is NLA through BMW and a year or so back you couldnt even get hold of good after market ones but they seem aplenty now. I got a febi bilstein one on order, as well as all the relevent gaskets and a new front seal for the lower front cover. The Febi one seemed better quality than the one i got last time so fingers crossed.
 20230208_200416 by Scott Osborne, on Flickr
 20230208_200340 by Scott Osborne, on Flickr
 20230218_174111 by Scott Osborne, on Flickr
Typically i did find a genuine one at the competition engine builders i help out at. Sadly it's destined for better things in the form of a Group A spec 635 engine!
 20230211_105313 by Scott Osborne, on Flickr
To do this job you need to remove the front grills, the radiator, all the front coolant hoses/ thermostat set up, crank pulley, waterpump etc and then you'll have access to the lower front cover. I always make a mess when i change the coolant on this car and i did think this time was an exception, that was until i elbowed the coolant dish over and onto the floor, i was doing so well!
Front grills, radiator/ thermostat assembly out:
 20230218_170850 by Scott Osborne, on Flickr
Front pulley off, lower front cover/ waterpump removed and tensioner still in place:
 20230218_173819 by Scott Osborne, on Flickr
The state of affairs from the top, you can see the offending coolant dish i then knocked over too!
 20230218_174414 by Scott Osborne, on Flickr
I was left with a bench full of parts. I'd cleaned most of them by this point but will have a proper go before assembly.
 20230218_180120 by Scott Osborne, on Flickr
Ideally i'd have the sump off too, to replace the gasket but it's not possible because of my windage tray/ baffle unless i take the engine out. I'll have to make do with some dirko sealant and a repair to the existing one. If i had more time/ money available then this would be the perfect excuse for phase 2 of the engine works but nevermind, i just want it sorted and back on the road for spring.
I also convinced myself that the radiator had a slight weep too, i definitely saw something that looked as such and with my luck so far i thought it would be knackered. I took it to a friends garage and we rigged it up for a quick pressure test. Thankfully it was all good as can live to fight another day!
That takes us up to the current day. I dont have all that much time at the moment so i'll just be trying to chip away at this over the next few weeks. Fingers crossed it's all plain sailing! That should be just in time for spring and saltless roads.
 20230221_185513 by Scott Osborne, on Flickr
Thanks for reading, until next time!
Scott
Once i'd got it up in the air and had a poke around underneath i started to notice little bits that weren't right, then when i was halfway through that job, id notice something else; and so on!
To start off i was making jobs up so i could spend time in the garage tinkering. First up i wanted to check the weights of the car and see how it changed loaded up with the spare wheel/ tools and me in it.
You'll have to take these readings with a pinch of salt, the garage floor isnt perfectly level, the compressed underlay and carpet on top of the concrete actually help this believe it or not. I did calibrate the carpet/ underlay with my own weight and it was spot on so it's somewhere near at least! Ideally you'd want a perfectly level powerfloated concrete surface but here we are!
Borrowed scales:
20221126_130455 by Scott Osborne, on FlickrThis is with around 1/4 tank of fuel and no spare wheel/ spares and tool box in the boot:
20221126_132210 by Scott Osborne, on FlickrLoaded up with 'me' in the seat
and i also put a spare 8" minilite + tyre in the boot, my tool box and spares bag.20221126_124707 by Scott Osborne, on Flickr20221126_125701 by Scott Osborne, on FlickrIf you're good at maths then please refrain from calling me a FB please
The crossweights are nigh on perfect with the car unladen but with a 45:55 weight distribution front to back. You'll notice that loaded up the crossweights are still great but the front to back weight distribution gets a chuck better because of the spare wheel etc in the boot.
When i'd built the car i'd always placed things where i thought they would be best for weight distribution, i.e. battery was placed rear left, i'd removed 20kg of servos from the front left etc. The fuel tank is rear right and obviously makes a difference depending on fuel and it doesnt help on a RHD car when the big lump driving it also sits on the right! All in all it weights up very good for a road car though, i'm happy with it.
The next step for procrastination, i wanted to lengthen the inlet tracts but didnt want longer trumpets as the airbox would work correctly. Also any lengthening would potentially clash with the bonnet.
A friend is building a hillclimb car and loves procrastinating 10x more than me, he's also handy with a 3D printer/ design software so he was happy to draw something up based on my rough measurements and terrible explanations!
IMG-20221227-WA0031 by Scott Osborne, on FlickrA test print with 2 of them:
20221227_201045 by Scott Osborne, on Flickr20221227_200328 by Scott Osborne, on FlickrExcellent! 60mm longer tracts and plenty of bonnet clearance! On to the proper prints:
20221229_124117 by Scott Osborne, on FlickrI tidied them up a tad and then painted them:
20230107_172048 by Scott Osborne, on Flickr20230107_172032 by Scott Osborne, on FlickrThe above is the quiet option, the below is the deafening one:
20230107_171714 by Scott Osborne, on Flickr20230107_165606 by Scott Osborne, on FlickrI had to extend the wiring on the air temp sensor, again thanks to my procrastinating friend for making me up a new section/ plug etc.
20230107_164847 by Scott Osborne, on FlickrI also remote mounted the fuel pressure regulator after last years mishap of it cracking the fuel rail. I temporarily fitted it back on for the Pistonheads video and to last me the year but knew it was a job that needed sorting over winter to stop it happening again in a year or two!
20230107_164856 by Scott Osborne, on FlickrLast on my list before a full fluids swap was to tart up the the diff mount and fit some heritage powerflex bushes i had. The heritage ones are essentially the softer purple version but not in a garish colour! Mount off:
20230122_170703 by Scott Osborne, on FlickrI pressed the bushes out, painted the mount and stuck the new ones in:
20230204_155312 by Scott Osborne, on FlickrFitted with new hardware:
20230204_171327 by Scott Osborne, on FlickrUndercarriage shot, it's looking a big worse for wear after this year but it's covered a lot of hard miles. Lots of road rash and the paint is obviously flaking off the roll bar! I spent quite a lot of time cleaning this all up and applying acf-50. It still comes up nice but is something i'll address better in the future.
20230204_171222 by Scott Osborne, on FlickrWith me having cleaned up the rear, it spurred me on to cleaning up the front and the engine bay. I started on the offside front and noticed this:
20230122_152258 by Scott Osborne, on FlickrThe helper spring had snapped in half. These are fully compressed when the car is down on its wheels and it's only there to keep the spring above seated when it isnt. The car does end up coming off the ground a fair amount in the North Pennines, so maybe that contributed
Everything marked up, measured and removed. The kit comes apart very easily and all the parts are incredibly impressive, it's nice to see where the money goes on a suspension kit like this.
20230122_173341 by Scott Osborne, on FlickrNew springs sourced from a friend, i decided to replace both sides and keep the Nitron one spare. The springs from Nitron were also very expensive.
20230209_201220 by Scott Osborne, on FlickrEverything cleaned and coated:
20230212_174052 by Scott Osborne, on FlickrBack together and fitted back on the car:
20230212_175615 by Scott Osborne, on Flickr20230212_185127 by Scott Osborne, on FlickrSame on the other side; dont you hate it when you miss something!
20230220_211011 by Scott Osborne, on Flickr20230220_215359 by Scott Osborne, on FlickrI'd then set about cleaning up the underside at the front and noticed this:
20230218_180632 by Scott Osborne, on Flickr20230220_201922 by Scott Osborne, on FlickrExhaust manifold has cracked. The company who made it are great and will repair FOC with a quick turn around. I still need to drop it off with them though. I'll replace the exhaust hanger bushes with new ones so they remain stiff and hopefully limit this happening again.
I moved onto the engine bay and took all the HT leads off for a clean and thought i'd change the plugs too whilst i was there.Before and after of the leads:
20230204_140849 by Scott Osborne, on FlickrI decided to take the rocker cover off and spot check the valve clearances whilst doing all of this. I'd done them not long back so didnt need to check them all if i was happy with my spot check.
20230204_143447 by Scott Osborne, on FlickrI poked a light down the front cover to have a general check and noticed something out of place:
20230204_143853 by Scott Osborne, on Flickr20230204_145317 by Scott Osborne, on FlickrThat is the top of the timing chain tension guide rail and it's not attached!
First thoughts were "i've lunched my engine, it'll all be wrecked", but then I thought rationally in that in drove into the garage fine and it was fine all of the last drive out! I took the upper timing cover off for a better look:
20230204_151058 by Scott Osborne, on FlickrLooking at the design of the front cover, there is a metal rib on it that you can see the lower remains of the attached rail sitting against. It looks like this has allowed just enough tension on the chain for it not to slip over the teeth, which would cause catastrophic failure. I assume this isnt by luck and BMW thought about this. Luckily the snapped off bit has just sat nicely on this rib and not martyred itself into the chains!
A simple replacement of this part and we should be good to go again! I say simple, it's a bit of a rubbish job and i was not looking forward to doing it. The part is NLA through BMW and a year or so back you couldnt even get hold of good after market ones but they seem aplenty now. I got a febi bilstein one on order, as well as all the relevent gaskets and a new front seal for the lower front cover. The Febi one seemed better quality than the one i got last time so fingers crossed.
20230208_200416 by Scott Osborne, on Flickr20230208_200340 by Scott Osborne, on Flickr20230218_174111 by Scott Osborne, on FlickrTypically i did find a genuine one at the competition engine builders i help out at. Sadly it's destined for better things in the form of a Group A spec 635 engine!
20230211_105313 by Scott Osborne, on FlickrTo do this job you need to remove the front grills, the radiator, all the front coolant hoses/ thermostat set up, crank pulley, waterpump etc and then you'll have access to the lower front cover. I always make a mess when i change the coolant on this car and i did think this time was an exception, that was until i elbowed the coolant dish over and onto the floor, i was doing so well!
Front grills, radiator/ thermostat assembly out:
20230218_170850 by Scott Osborne, on FlickrFront pulley off, lower front cover/ waterpump removed and tensioner still in place:
20230218_173819 by Scott Osborne, on FlickrThe state of affairs from the top, you can see the offending coolant dish i then knocked over too!
20230218_174414 by Scott Osborne, on FlickrI was left with a bench full of parts. I'd cleaned most of them by this point but will have a proper go before assembly.
20230218_180120 by Scott Osborne, on FlickrIdeally i'd have the sump off too, to replace the gasket but it's not possible because of my windage tray/ baffle unless i take the engine out. I'll have to make do with some dirko sealant and a repair to the existing one. If i had more time/ money available then this would be the perfect excuse for phase 2 of the engine works but nevermind, i just want it sorted and back on the road for spring.
I also convinced myself that the radiator had a slight weep too, i definitely saw something that looked as such and with my luck so far i thought it would be knackered. I took it to a friends garage and we rigged it up for a quick pressure test. Thankfully it was all good as can live to fight another day!
That takes us up to the current day. I dont have all that much time at the moment so i'll just be trying to chip away at this over the next few weeks. Fingers crossed it's all plain sailing! That should be just in time for spring and saltless roads.
20230221_185513 by Scott Osborne, on FlickrThanks for reading, until next time!
Scott
scottos said:
Well i think in a previous post i said there wasn't much to do this winter and i was only intending to swap the oils out front to back and give it a clean...
Once i'd got it up in the air and had a poke around underneath i started to notice little bits that weren't right, then when i was halfway through that job, id notice something else; and so on!
To start off i was making jobs up so i could spend time in the garage tinkering. First up i wanted to check the weights of the car and see how it changed loaded up with the spare wheel/ tools and me in it.
You'll have to take these readings with a pinch of salt, the garage floor isnt perfectly level, the compressed underlay and carpet on top of the concrete actually help this believe it or not. I did calibrate the carpet/ underlay with my own weight and it was spot on so it's somewhere near at least! Ideally you'd want a perfectly level powerfloated concrete surface but here we are!
Borrowed scales:
20221126_130455 by Scott Osborne, on Flickr
This is with around 1/4 tank of fuel and no spare wheel/ spares and tool box in the boot:
20221126_132210 by Scott Osborne, on Flickr
Loaded up with 'me' in the seat and i also put a spare 8" minilite + tyre in the boot, my tool box and spares bag.
20221126_124707 by Scott Osborne, on Flickr
20221126_125701 by Scott Osborne, on Flickr
If you're good at maths then please refrain from calling me a FB please
The crossweights are nigh on perfect with the car unladen but with a 45:55 weight distribution front to back. You'll notice that loaded up the crossweights are still great but the front to back weight distribution gets a chuck better because of the spare wheel etc in the boot.
When i'd built the car i'd always placed things where i thought they would be best for weight distribution, i.e. battery was placed rear left, i'd removed 20kg of servos from the front left etc. The fuel tank is rear right and obviously makes a difference depending on fuel and it doesnt help on a RHD car when the big lump driving it also sits on the right! All in all it weights up very good for a road car though, i'm happy with it.
The next step for procrastination, i wanted to lengthen the inlet tracts but didnt want longer trumpets as the airbox would work correctly. Also any lengthening would potentially clash with the bonnet.
A friend is building a hillclimb car and loves procrastinating 10x more than me, he's also handy with a 3D printer/ design software so he was happy to draw something up based on my rough measurements and terrible explanations!
IMG-20221227-WA0031 by Scott Osborne, on Flickr
A test print with 2 of them:
20221227_201045 by Scott Osborne, on Flickr
20221227_200328 by Scott Osborne, on Flickr
Excellent! 60mm longer tracts and plenty of bonnet clearance! On to the proper prints:
20221229_124117 by Scott Osborne, on Flickr
I tidied them up a tad and then painted them:
20230107_172048 by Scott Osborne, on Flickr
Sorry for the long quote... But what's your mate printed them out of? I'd be a little concerned about the lack of a support on them given they're a fair length from mounting point and got stuff hanging off them.. Some of these filaments on paper have amazing strength and rigidty but are not very vibration resistant. All these carbon filaments etc sound great but it's all about the layer adhesion as they are built up with tiny lines of melted material, the "stiffer" they are generally the less vibration resistant and more shatter prone they are unless you design around it, i.e it needs to have a lot more material in it than it would if it was metal. Not trying to piss on your chips as they look great just from my recent experience I wonder if they're strong enough. I'd put a support somewhere from say the block to the airbox or something at the very least. Once i'd got it up in the air and had a poke around underneath i started to notice little bits that weren't right, then when i was halfway through that job, id notice something else; and so on!
To start off i was making jobs up so i could spend time in the garage tinkering. First up i wanted to check the weights of the car and see how it changed loaded up with the spare wheel/ tools and me in it.
You'll have to take these readings with a pinch of salt, the garage floor isnt perfectly level, the compressed underlay and carpet on top of the concrete actually help this believe it or not. I did calibrate the carpet/ underlay with my own weight and it was spot on so it's somewhere near at least! Ideally you'd want a perfectly level powerfloated concrete surface but here we are!
Borrowed scales:
20221126_130455 by Scott Osborne, on FlickrThis is with around 1/4 tank of fuel and no spare wheel/ spares and tool box in the boot:
20221126_132210 by Scott Osborne, on FlickrLoaded up with 'me' in the seat
and i also put a spare 8" minilite + tyre in the boot, my tool box and spares bag.20221126_124707 by Scott Osborne, on Flickr20221126_125701 by Scott Osborne, on FlickrIf you're good at maths then please refrain from calling me a FB please
The crossweights are nigh on perfect with the car unladen but with a 45:55 weight distribution front to back. You'll notice that loaded up the crossweights are still great but the front to back weight distribution gets a chuck better because of the spare wheel etc in the boot.
When i'd built the car i'd always placed things where i thought they would be best for weight distribution, i.e. battery was placed rear left, i'd removed 20kg of servos from the front left etc. The fuel tank is rear right and obviously makes a difference depending on fuel and it doesnt help on a RHD car when the big lump driving it also sits on the right! All in all it weights up very good for a road car though, i'm happy with it.
The next step for procrastination, i wanted to lengthen the inlet tracts but didnt want longer trumpets as the airbox would work correctly. Also any lengthening would potentially clash with the bonnet.
A friend is building a hillclimb car and loves procrastinating 10x more than me, he's also handy with a 3D printer/ design software so he was happy to draw something up based on my rough measurements and terrible explanations!
IMG-20221227-WA0031 by Scott Osborne, on FlickrA test print with 2 of them:
20221227_201045 by Scott Osborne, on Flickr20221227_200328 by Scott Osborne, on FlickrExcellent! 60mm longer tracts and plenty of bonnet clearance! On to the proper prints:
20221229_124117 by Scott Osborne, on FlickrI tidied them up a tad and then painted them:
20230107_172048 by Scott Osborne, on FlickrI've made some velocity stacks for my race car and ended up having to significantly beef the design up to make them last, I've also since made some out of 95A shore TPU which I think is better (at least for what I'm doing) as it has a lot of vibration resistance, but it's not rigid, it's kinda semi flexible.

Edited by Yazza54 on Wednesday 22 February 14:52
bumskins said:
Love this car, and great in-depth post - good catch with the timing chain, glad it didn't cause any serious damage!
Cheers and glad you're enjoying it! You and me both on that one!Yazza54 said:
Sorry for the long quote... But what's your mate printed them out of? I'd be a little concerned about the lack of a support on them given they're a fair length from mounting point and got stuff hanging off them.. Some of these filaments on paper have amazing strength and rigidty but are not very vibration resistant. All these carbon filaments etc sound great but it's all about the layer adhesion as they are built up with tiny lines of melted material, the "stiffer" they are generally the less vibration resistant and more shatter prone they are unless you design around it, i.e it needs to have a lot more material in it than it would if it was metal. Not trying to piss on your chips as they look great just from my recent experience I wonder if they're strong enough. I'd put a support somewhere from say the block to the airbox or something at the very least.
I've made some velocity stacks for my race car and ended up having to significantly beef the design up to make them last, I've also since made some out of 95A shore TPU which I think is better (at least for what I'm doing) as it has a lot of vibration resistance, but it's not rigid, it's kinda semi flexible.
I'll be honest, i've not idea I've made some velocity stacks for my race car and ended up having to significantly beef the design up to make them last, I've also since made some out of 95A shore TPU which I think is better (at least for what I'm doing) as it has a lot of vibration resistance, but it's not rigid, it's kinda semi flexible.
Edited by Yazza54 on Wednesday 22 February 14:52
i've just trusted his judgement on this side of things as hes a complete anorak on it. There is only 800g or so across the 4 of the extensions though, its all carbon but appreciate the heads up. It'll certainly be a bit of trial and error by the sounds of it and worse case i can build my high comp engine at last and ill get the parts made out of stainless or aluminium scottos said:
bumskins said:
Love this car, and great in-depth post - good catch with the timing chain, glad it didn't cause any serious damage!
Cheers and glad you're enjoying it! You and me both on that one!Yazza54 said:
Sorry for the long quote... But what's your mate printed them out of? I'd be a little concerned about the lack of a support on them given they're a fair length from mounting point and got stuff hanging off them.. Some of these filaments on paper have amazing strength and rigidty but are not very vibration resistant. All these carbon filaments etc sound great but it's all about the layer adhesion as they are built up with tiny lines of melted material, the "stiffer" they are generally the less vibration resistant and more shatter prone they are unless you design around it, i.e it needs to have a lot more material in it than it would if it was metal. Not trying to piss on your chips as they look great just from my recent experience I wonder if they're strong enough. I'd put a support somewhere from say the block to the airbox or something at the very least.
I've made some velocity stacks for my race car and ended up having to significantly beef the design up to make them last, I've also since made some out of 95A shore TPU which I think is better (at least for what I'm doing) as it has a lot of vibration resistance, but it's not rigid, it's kinda semi flexible.
I'll be honest, i've not idea I've made some velocity stacks for my race car and ended up having to significantly beef the design up to make them last, I've also since made some out of 95A shore TPU which I think is better (at least for what I'm doing) as it has a lot of vibration resistance, but it's not rigid, it's kinda semi flexible.
Edited by Yazza54 on Wednesday 22 February 14:52
i've just trusted his judgement on this side of things as hes a complete anorak on it. There is only 800g or so across the 4 of the extensions though, its all carbon but appreciate the heads up. It'll certainly be a bit of trial and error by the sounds of it and worse case i can build my high comp engine at last and ill get the parts made out of stainless or aluminium The good thing is they tend to break in big chunks.. i.e. in half, so hopefully nothing for your lovely engine to ingest
Gassing Station | Readers' Cars | Top of Page | What's New | My Stuff