BMW 2002Tii (ish)
Discussion


Yazza54 said:
scottos said:
A friend is building a hillclimb car and loves procrastinating 10x more than me, he's also handy with a 3D printer/ design software so he was happy to draw something up based on my rough measurements and terrible explanations!
 IMG-20221227-WA0031 by Scott Osborne, on Flickr
A test print with 2 of them:
 20221227_201045 by Scott Osborne, on Flickr
 20221227_200328 by Scott Osborne, on Flickr
Excellent! 60mm longer tracts and plenty of bonnet clearance! On to the proper prints:
 20221229_124117 by Scott Osborne, on Flickr
I tidied them up a tad and then painted them:
 20230107_172048 by Scott Osborne, on Flickr
Sorry for the long quote... But what's your mate printed them out of? I'd be a little concerned about the lack of a support on them given they're a fair length from mounting point and got stuff hanging off them.. Some of these filaments on paper have amazing strength and rigidty but are not very vibration resistant. All these carbon filaments etc sound great but it's all about the layer adhesion as they are built up with tiny lines of melted material, the "stiffer" they are generally the less vibration resistant and more shatter prone they are unless you design around it, i.e it needs to have a lot more material in it than it would if it was metal. Not trying to piss on your chips as they look great just from my recent experience I wonder if they're strong enough. I'd put a support somewhere from say the block to the airbox or something at the very least. IMG-20221227-WA0031 by Scott Osborne, on FlickrA test print with 2 of them:
20221227_201045 by Scott Osborne, on Flickr20221227_200328 by Scott Osborne, on FlickrExcellent! 60mm longer tracts and plenty of bonnet clearance! On to the proper prints:
20221229_124117 by Scott Osborne, on FlickrI tidied them up a tad and then painted them:
20230107_172048 by Scott Osborne, on FlickrI've made some velocity stacks for my race car and ended up having to significantly beef the design up to make them last, I've also since made some out of 95A shore TPU which I think is better (at least for what I'm doing) as it has a lot of vibration resistance, but it's not rigid, it's kinda semi flexible.

Edited by Yazza54 on Wednesday 22 February 14:52
To continue on from my last post, I took my new tension guide rail and the snapped one back into the engine builders i help out at and took the new genuine one out of the packet. To my surprise it looks like the one i snapped is a genuine one (i cant remember what i bought at the time or where from now)
 20230225_112110 by Scott Osborne, on Flickr
Febi > snapped genuine > new genuine below:
 20230225_112201 by Scott Osborne, on Flickr
The Febi one i bought as a replacement, with genuine being NLA, actually looks much nicer finished and better quality. No qualms about fitting it at all now!
With that being that i set about fitting it and getting it back together. I cleaned up the front cover and fitted a new crank seal, it would be rude not to!
 20230225_170843 by Scott Osborne, on Flickr
Refitting this was a little bit of a pain as the head gasket and sump gasket seal on the top and bottom of this cover. If you were doing things 100% you'd be removing the head and the sump, neither of which i was going to do. I applied a nice smearing of Dirko to the new gaskets and managed to slot it in and get it all buttoned up quick sharp. It did feel like a bit of a juggling act and like it could get messy any second so i was thankful when it was in place!
 20230225_195609 by Scott Osborne, on Flickr
I got the crank pulley and crank position sensor back on and went to turn it over a few times to double check the timing. It turned so far and then locked solid! The chain seemed to have bunched up on the crank sprocket so i had to take the cam sprocket off and jiggle the chain around a bit, whilst turning it over and then applying tension by hand. Whilst applying the tension i could get the sprocket back on (this took a couple of attempts in the right place!) and then tension up the rail via the manual tensioner. I turned it over many times by hand to observe any tight or loose spots and adjust the tensioner to suit.
Following this i got the upper front cover on:
 20230225_190722 by Scott Osborne, on Flickr
I then turned it over a few more times to make sure the timing was all still correct, as before and then the next installment of the "i havent really got anything to do to it this winter" curse struck...
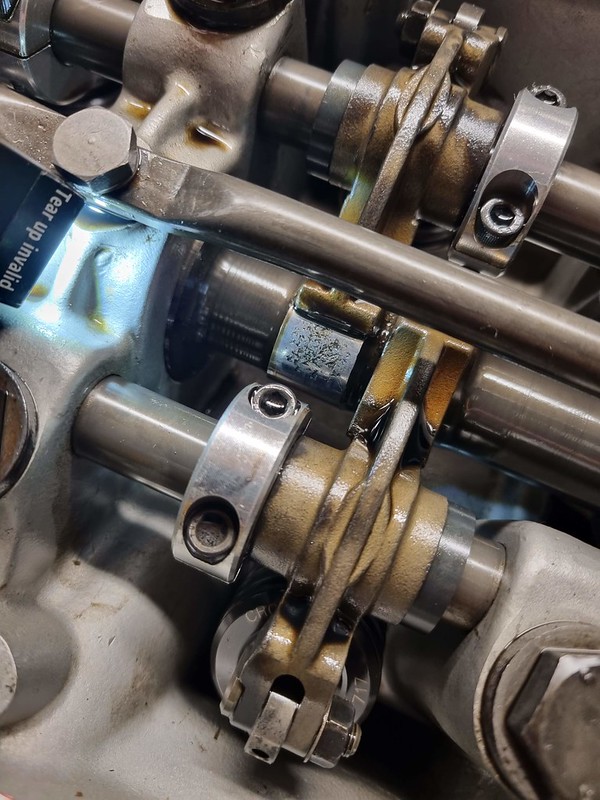 20230227_174728 by Scott Osborne, on Flickr
20230227_174728 by Scott Osborne, on Flickr
There is very weird wear on a couple of the cam lobes. There's no step down between where the pad of the rocker runs and where it doesnt and there is plenty of oil getting through to it anyway (there were drips on it from me turning it over by hand!), so it doesnt appear physically worn and more that the surface has just started breaking away a little.
The company have been a little lax in responding to emails so far but finally got a response the other day asking if i'd fitted new followers, i assume they meant the rockers and i replied it was all new when built and they've gone silent again so we shall see!
I want the car back on the road asap and dont have the funds to do phase 2 engine build at the moment anyway. Worst case if i get no resolve from the current manufacturer i'll buy another cam and swap them out and get the map tweaked. Swapping the cam is a chew in itself without removing the head and dismantling the full head but i've been leant a tool that will allow me to do it, with much chewing on
It's a shame as i wouldve got it finished for this weekend!
20230225_112110 by Scott Osborne, on FlickrFebi > snapped genuine > new genuine below:
20230225_112201 by Scott Osborne, on FlickrThe Febi one i bought as a replacement, with genuine being NLA, actually looks much nicer finished and better quality. No qualms about fitting it at all now!
With that being that i set about fitting it and getting it back together. I cleaned up the front cover and fitted a new crank seal, it would be rude not to!
20230225_170843 by Scott Osborne, on FlickrRefitting this was a little bit of a pain as the head gasket and sump gasket seal on the top and bottom of this cover. If you were doing things 100% you'd be removing the head and the sump, neither of which i was going to do. I applied a nice smearing of Dirko to the new gaskets and managed to slot it in and get it all buttoned up quick sharp. It did feel like a bit of a juggling act and like it could get messy any second so i was thankful when it was in place!
20230225_195609 by Scott Osborne, on FlickrI got the crank pulley and crank position sensor back on and went to turn it over a few times to double check the timing. It turned so far and then locked solid! The chain seemed to have bunched up on the crank sprocket so i had to take the cam sprocket off and jiggle the chain around a bit, whilst turning it over and then applying tension by hand. Whilst applying the tension i could get the sprocket back on (this took a couple of attempts in the right place!) and then tension up the rail via the manual tensioner. I turned it over many times by hand to observe any tight or loose spots and adjust the tensioner to suit.
Following this i got the upper front cover on:
20230225_190722 by Scott Osborne, on FlickrI then turned it over a few more times to make sure the timing was all still correct, as before and then the next installment of the "i havent really got anything to do to it this winter" curse struck...
20230227_174728 by Scott Osborne, on Flickr20230227_174728 by Scott Osborne, on FlickrThere is very weird wear on a couple of the cam lobes. There's no step down between where the pad of the rocker runs and where it doesnt and there is plenty of oil getting through to it anyway (there were drips on it from me turning it over by hand!), so it doesnt appear physically worn and more that the surface has just started breaking away a little.
The company have been a little lax in responding to emails so far but finally got a response the other day asking if i'd fitted new followers, i assume they meant the rockers and i replied it was all new when built and they've gone silent again so we shall see!
I want the car back on the road asap and dont have the funds to do phase 2 engine build at the moment anyway. Worst case if i get no resolve from the current manufacturer i'll buy another cam and swap them out and get the map tweaked. Swapping the cam is a chew in itself without removing the head and dismantling the full head but i've been leant a tool that will allow me to do it, with much chewing on
It's a shame as i wouldve got it finished for this weekend!
Further advancements from the last post. A friend had made a tool that pushes the rocker arms down and allows you to slide the camshaft out, he'd made this for his sons bmw e21 316, which has another version of this engine in. This was great as it would mean i wouldnt have to take the head off, more on that below!
I'd mentioned this tool to another guy that works with M10's a lot and he told me under no circumstance to use the tool! I 100% trusted his judgement on this and he advised i whipped the head off instead and then i could use the tool when i could see what the valves were doing, whilst using the tool. This made sense as the e21 valves are a lot smaller than mine, in the 2.0 2002 engines the valves are rather large as standard (46mm inlet and 38mm exhaust). He noted so many people try and use these tools and clash the valves into one another and start bending things and with the head off i could see what he meant!
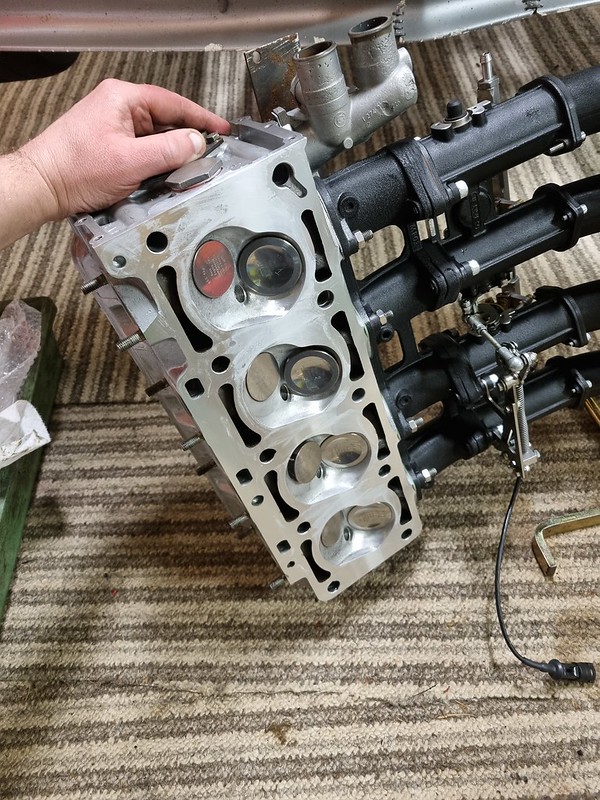
So off with it's head!!
 20230307_190648 by Scott Osborne, on Flickr
45 minutes or so and i had a nice pile of bits on the floor. A lot of the time consuming work had already been done i.e. draining the coolant and getting the radiator out etc. whilst i did the timing chain guide.
I was interested to see what the insides would look like after 10k-ish relatively hard miles. The car runs on throttle position/ revs and has no idle control system so it'll always run fairly rich at idle. It does seem to use a bit of oil too but using the big standard heavy cast pistons and revving it 1800rpm more than i should, i thought this may be the case. The inside condition seemed to match a relatively rich running car that uses a little bit of oil
 20230307_191334 by Scott Osborne, on Flickr
 20230307_191342 by Scott Osborne, on Flickr
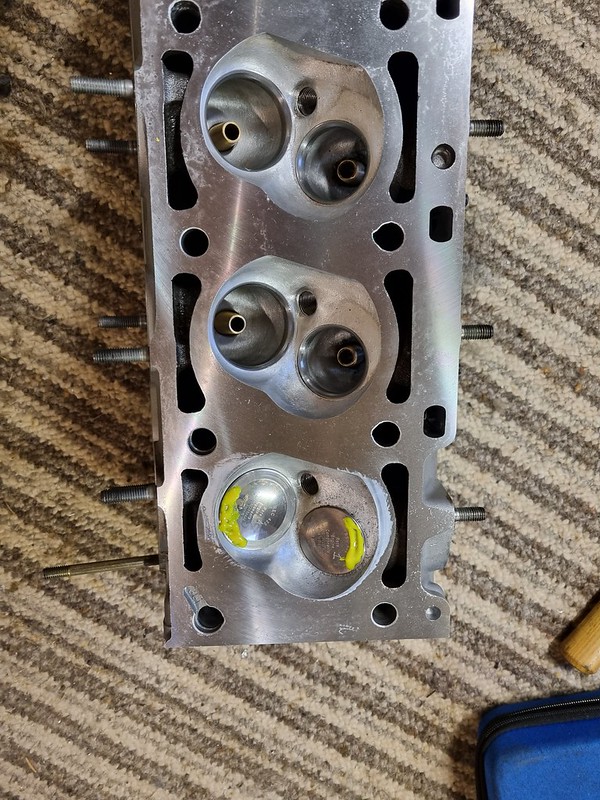
What i also noticed straight away is that No.1 and No.4 exhaust valves had been 'kissing' (more like full blown snogging) the pistons. The lack of any carbon where this had happened suggested it had been fairly recent but there were no indentations to the aluminium thankfully. The fact its only happened on 2 of them and that i had plenty of valve to piston clearance suggests there's some weird timing issue going on for 180 degrees of the stroke. With the slack on the timing chain from the recent timing tension guide failure, it would appear it was allowing the cam timing to change when the slack wasnt taken up by the firing stroke (or something like that!).
With the head off, it was time to try this tool out. You can see here, the angle iron bolts onto the top of the head and then the bolts press down on some modified cap heads to depress the rockers, which allows you to slide the cam out. It's an odd exercise to carry out and is much like a puzzle finding out which order to do things so that itll work. The lobes are quite big on this cam so getting the springs depressed enough to clear them was difficult and i ended up having to turn the cam as i went to slot it passed the rockers.
 20230307_203614 by Scott Osborne, on Flickr
The cam is already out in the picture above but hopefully it illustrates my ramblings! I should've got a picture of the underside so you could see the valves too but i often get caught up in the task at hand and forget to get pictures. They get very very close but you can just make them pass one another to depress them both a bit more.
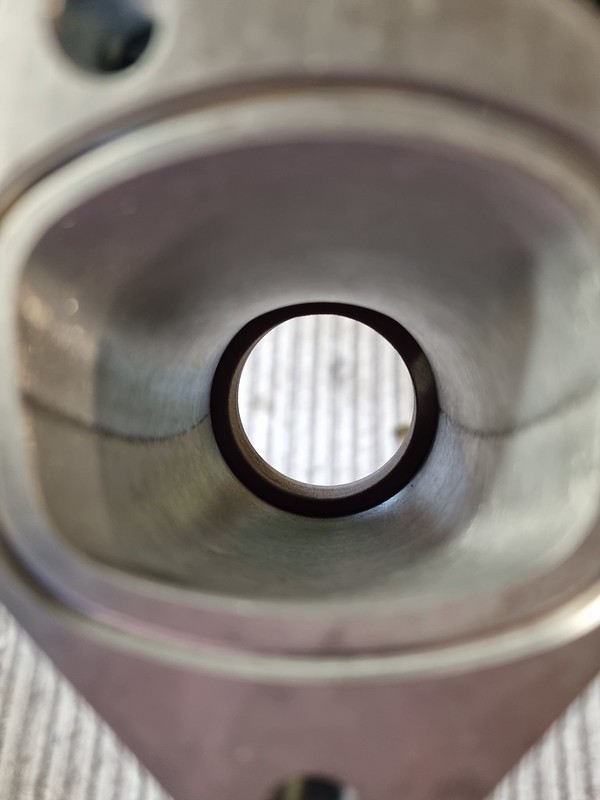
A picture through the cam journal shows the typical condition of the rocker pads, not perfect but not bad:
 20230307_203839 by Scott Osborne, on Flickr
The cam manufacturer, after hassling them a bit, finally responded and suggested my rockers were at fault even though i'd 'apparently' fitted new ones. The email almost suggested i was lying but i gave them the benefit of doubt and put that down to a language barrier. They also admitted that they used forged hollow blanks for their cams now but this is 100% not down to these older castings failing...
I couldnt get anything more out of them, other than some information regarding the polishing of the rocker pads that run on the cam, using oiled 400 grit if they didnt look great. Useful information for sure but i feel a little too late, not that the pads on my new rockers even needed it in the past.
With this i set about looking at alternative cam specs. I didnt want to go much milder than this one, it's a little dead low down but when it goes it really is great fun. I couldnt go any bigger as this would require me to fit different pistons and with an 8-12 week lead time i didnt want to wait, or spend the money doing the bottom end at the moment.
This is the cam that has failed:
 catcams m10 by Scott Osborne, on Flickr
This is the one i've decided on:
 Kent bm02 by Scott Osborne, on Flickr
The overall lift is 0.2mm less and it has slightly less duration, 2 degrees from 1.0mm lift to be exact. The interesting thing for me was to see the lift at top dead centre was a whole 1.1mm less, with a slightly smaller lobe separation angle. This should up the dynamic compression, making the bottom end a little better and it should idle a little better too, not that its too bad at the moment. It may loose a little bit of power at the top but the manufacturer seems to suggest it'll have some form of power up to 8k rpm. My current max power is around 7k, with a 7.5k rev limit so should be good. If its almost as good as the other one up top but has more low down then i'll be a happy lad.
With fitting a new cam, i wanted to fit new rockers. I was happy to use the same again but there's no need to run steel rockers really and its extra valvetrain weight for no real reason. I've ordered up some aluminium 'heavy duty' ones, which are loads lighter than these steel ones but still strong enough for this cam. To replace the rockers you need to knock the rocker shafts out and in hindsight i really didnt need to borrow that tool off my friend when im going this far! It's really not much effort once youve got the head off and i think from now on it'll just be the way i do it.
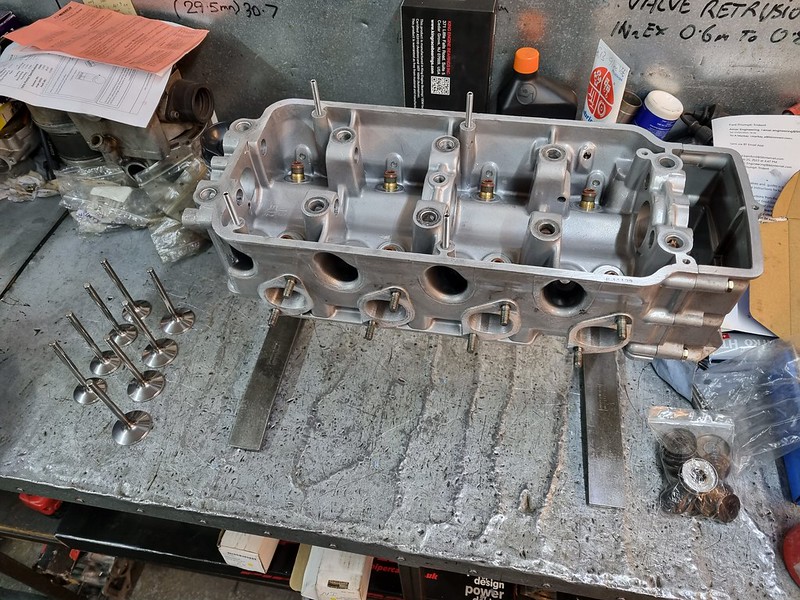
Within no time the head was stripped, the picture below still shows 4No valve stem seals fitted:
 20230317_130539 by Scott Osborne, on Flickr
Typical exhaust valve:
 20230317_105147 by Scott Osborne, on Flickr
In the pillar drill:
 20230317_105325 by Scott Osborne, on Flickr
Various grades of emery paper later:
 20230317_105157 by Scott Osborne, on Flickr
All of them done:
 20230317_130543 by Scott Osborne, on Flickr
I was just going to lap these back in but a couple of the exhaust valves had a bit too much play in the guides really. I thought it was the guides at first but for whatever reason it seemed to be the valves. I didnt give it too much thought before remembering i had a posh set of Race Engineering Components valves sitting on the shelf so took the executive decision to take the head in to have the work done to fit those. These are 1mm larger, single piece and a marginally wasted stem on the inlets. I definitely want to run them +1mm in the exhaust but was rather tempted to keep the inlets 46mm and have the valves machined down. I've left it to their expertise and judgement. Sat in place in the picture below, ready to go on its holiday:
 20230318_171256 by Scott Osborne, on Flickr
I still wanted to clean the ports up and all of the faces before dropping it off, there's nothing worse than people dropping off horrible oily engine parts. The inlets were still as clean as the day it was modified but the exhaust ports do get coked up fairly easily. I got a piece of 8mm rod, cut a slot down the middle with a hacksaw and rounded the end off. I could then slot emery paper into it and use my trusty cheap drill to set away.
This worked a treat:
 20230317_111156 by Scott Osborne, on Flickr
 20230317_111206 by Scott Osborne, on Flickr
All done:
 20230317_205523 by Scott Osborne, on Flickr
The piston tops and block needed the same treatment so I taped up any oil or water galleries and stuck a little grease around the piston top and set away on those as well:
 20230317_093959 by Scott Osborne, on Flickr
All done:
 20230317_101538 by Scott Osborne, on Flickr
That takes us pretty much up to present day. I've ordered a myriad of gaskets, bolts, seals etc. most of which have arrived. I'm awaiting my Cometic head gasket (special order), camshaft and the headwork being completed. Once i have all these parts, i can get it back together at long last and get it back on the road. I will also be getting the map checked/ tweaked as necessary. I really cannot wait, i'd have had the car back out already if it was working!
Cheers,
Scott
I'd mentioned this tool to another guy that works with M10's a lot and he told me under no circumstance to use the tool! I 100% trusted his judgement on this and he advised i whipped the head off instead and then i could use the tool when i could see what the valves were doing, whilst using the tool. This made sense as the e21 valves are a lot smaller than mine, in the 2.0 2002 engines the valves are rather large as standard (46mm inlet and 38mm exhaust). He noted so many people try and use these tools and clash the valves into one another and start bending things and with the head off i could see what he meant!
So off with it's head!!
20230307_190648 by Scott Osborne, on Flickr45 minutes or so and i had a nice pile of bits on the floor. A lot of the time consuming work had already been done i.e. draining the coolant and getting the radiator out etc. whilst i did the timing chain guide.
I was interested to see what the insides would look like after 10k-ish relatively hard miles. The car runs on throttle position/ revs and has no idle control system so it'll always run fairly rich at idle. It does seem to use a bit of oil too but using the big standard heavy cast pistons and revving it 1800rpm more than i should, i thought this may be the case. The inside condition seemed to match a relatively rich running car that uses a little bit of oil
20230307_191334 by Scott Osborne, on Flickr20230307_191342 by Scott Osborne, on FlickrWhat i also noticed straight away is that No.1 and No.4 exhaust valves had been 'kissing' (more like full blown snogging) the pistons. The lack of any carbon where this had happened suggested it had been fairly recent but there were no indentations to the aluminium thankfully. The fact its only happened on 2 of them and that i had plenty of valve to piston clearance suggests there's some weird timing issue going on for 180 degrees of the stroke. With the slack on the timing chain from the recent timing tension guide failure, it would appear it was allowing the cam timing to change when the slack wasnt taken up by the firing stroke (or something like that!).
With the head off, it was time to try this tool out. You can see here, the angle iron bolts onto the top of the head and then the bolts press down on some modified cap heads to depress the rockers, which allows you to slide the cam out. It's an odd exercise to carry out and is much like a puzzle finding out which order to do things so that itll work. The lobes are quite big on this cam so getting the springs depressed enough to clear them was difficult and i ended up having to turn the cam as i went to slot it passed the rockers.
20230307_203614 by Scott Osborne, on FlickrThe cam is already out in the picture above but hopefully it illustrates my ramblings! I should've got a picture of the underside so you could see the valves too but i often get caught up in the task at hand and forget to get pictures. They get very very close but you can just make them pass one another to depress them both a bit more.
A picture through the cam journal shows the typical condition of the rocker pads, not perfect but not bad:
20230307_203839 by Scott Osborne, on FlickrThe cam manufacturer, after hassling them a bit, finally responded and suggested my rockers were at fault even though i'd 'apparently' fitted new ones. The email almost suggested i was lying but i gave them the benefit of doubt and put that down to a language barrier. They also admitted that they used forged hollow blanks for their cams now but this is 100% not down to these older castings failing...
I couldnt get anything more out of them, other than some information regarding the polishing of the rocker pads that run on the cam, using oiled 400 grit if they didnt look great. Useful information for sure but i feel a little too late, not that the pads on my new rockers even needed it in the past.
With this i set about looking at alternative cam specs. I didnt want to go much milder than this one, it's a little dead low down but when it goes it really is great fun. I couldnt go any bigger as this would require me to fit different pistons and with an 8-12 week lead time i didnt want to wait, or spend the money doing the bottom end at the moment.
This is the cam that has failed:
catcams m10 by Scott Osborne, on FlickrThis is the one i've decided on:
Kent bm02 by Scott Osborne, on FlickrThe overall lift is 0.2mm less and it has slightly less duration, 2 degrees from 1.0mm lift to be exact. The interesting thing for me was to see the lift at top dead centre was a whole 1.1mm less, with a slightly smaller lobe separation angle. This should up the dynamic compression, making the bottom end a little better and it should idle a little better too, not that its too bad at the moment. It may loose a little bit of power at the top but the manufacturer seems to suggest it'll have some form of power up to 8k rpm. My current max power is around 7k, with a 7.5k rev limit so should be good. If its almost as good as the other one up top but has more low down then i'll be a happy lad.
With fitting a new cam, i wanted to fit new rockers. I was happy to use the same again but there's no need to run steel rockers really and its extra valvetrain weight for no real reason. I've ordered up some aluminium 'heavy duty' ones, which are loads lighter than these steel ones but still strong enough for this cam. To replace the rockers you need to knock the rocker shafts out and in hindsight i really didnt need to borrow that tool off my friend when im going this far! It's really not much effort once youve got the head off and i think from now on it'll just be the way i do it.
Within no time the head was stripped, the picture below still shows 4No valve stem seals fitted:
20230317_130539 by Scott Osborne, on FlickrTypical exhaust valve:
20230317_105147 by Scott Osborne, on FlickrIn the pillar drill:
20230317_105325 by Scott Osborne, on FlickrVarious grades of emery paper later:
20230317_105157 by Scott Osborne, on FlickrAll of them done:
20230317_130543 by Scott Osborne, on FlickrI was just going to lap these back in but a couple of the exhaust valves had a bit too much play in the guides really. I thought it was the guides at first but for whatever reason it seemed to be the valves. I didnt give it too much thought before remembering i had a posh set of Race Engineering Components valves sitting on the shelf so took the executive decision to take the head in to have the work done to fit those. These are 1mm larger, single piece and a marginally wasted stem on the inlets. I definitely want to run them +1mm in the exhaust but was rather tempted to keep the inlets 46mm and have the valves machined down. I've left it to their expertise and judgement. Sat in place in the picture below, ready to go on its holiday:
20230318_171256 by Scott Osborne, on FlickrI still wanted to clean the ports up and all of the faces before dropping it off, there's nothing worse than people dropping off horrible oily engine parts. The inlets were still as clean as the day it was modified but the exhaust ports do get coked up fairly easily. I got a piece of 8mm rod, cut a slot down the middle with a hacksaw and rounded the end off. I could then slot emery paper into it and use my trusty cheap drill to set away.
This worked a treat:
20230317_111156 by Scott Osborne, on Flickr20230317_111206 by Scott Osborne, on FlickrAll done:
20230317_205523 by Scott Osborne, on FlickrThe piston tops and block needed the same treatment so I taped up any oil or water galleries and stuck a little grease around the piston top and set away on those as well:
20230317_093959 by Scott Osborne, on FlickrAll done:
20230317_101538 by Scott Osborne, on FlickrThat takes us pretty much up to present day. I've ordered a myriad of gaskets, bolts, seals etc. most of which have arrived. I'm awaiting my Cometic head gasket (special order), camshaft and the headwork being completed. Once i have all these parts, i can get it back together at long last and get it back on the road. I will also be getting the map checked/ tweaked as necessary. I really cannot wait, i'd have had the car back out already if it was working!
Cheers,
Scott
Crikey that escalated quickly!
On the timing guide I'd bet the original one was made by Febi once upon a time, and they've re-tooled and done a run of them again recently with better QC. I've seen Catcams have the issue you had with the surface finish before, not sure why but there we go.
Hopefully it'll be back together in time to get it mapped and enjoyed again this spring.
Krikkit said:
Crikey that escalated quickly!
On the timing guide I'd bet the original one was made by Febi once upon a time, and they've re-tooled and done a run of them again recently with better QC. I've seen Catcams have the issue you had with the surface finish before, not sure why but there we go.
Hopefully it'll be back together in time to get it mapped and enjoyed again this spring.
I thought the same On the timing guide I'd bet the original one was made by Febi once upon a time, and they've re-tooled and done a run of them again recently with better QC. I've seen Catcams have the issue you had with the surface finish before, not sure why but there we go.
Hopefully it'll be back together in time to get it mapped and enjoyed again this spring.
You're probably not far wrong there, fingers crossed the new Febi one holds together.
It's funny how many people have said the same to me about them since i've had the issue, it's a shame they couldnt even offer a discount replacement on their new billet steel blanks, i wasnt expecting much but nevermind.
Thank You, i hope so too!
Yazza54 said:
Off topic but just curious how you got on with the 3d printed intake runners?
You'll see above that the engine has basically been in bits since i fitted them, so they are working fine at the moment bomb said:
Lots more wonderful work Scott. Fascinating stuff. Hope to see it back on the tarmac when the weather is better.
Cheers Andy, hopefully the cold doesnt come back as there's currently not much salt on the roads. A couple more rain showers and it'll be gone so i best pull my finger out. I would have it out today if it was working!Looking good Scott, hope you get it back together soon, today would have been perfect!
I'm sure it's mentioned, but there are a lot of pages, what exhaust are you running? My middle and back sections are rusted/blown, so I need to get on and order new. Jaymic looks like £300/£400 depending if you go genuine or PP's. Funds are low, otherwise I'd take the opportunity to replace the mani etc.
I'm sure it's mentioned, but there are a lot of pages, what exhaust are you running? My middle and back sections are rusted/blown, so I need to get on and order new. Jaymic looks like £300/£400 depending if you go genuine or PP's. Funds are low, otherwise I'd take the opportunity to replace the mani etc.
Yazza54 said:
Don't wanna mess the quotes up but it didn't look to me like the ones that were on the head upon removal were the printed ones hence asking.
Hope you get it back together soon!
Thats still them, once all this is done i should get some time on a friends rollers and he will make any tweaks necessary for the head/ cam changes. I'll see if those runners make any difference at all. I think long term i'll get them fabbed up in aluminium, even if they end up being aesthetic. And thanks, me too!Hope you get it back together soon!
illmonkey said:
Looking good Scott, hope you get it back together soon, today would have been perfect!
I'm sure it's mentioned, but there are a lot of pages, what exhaust are you running? My middle and back sections are rusted/blown, so I need to get on and order new. Jaymic looks like £300/£400 depending if you go genuine or PP's. Funds are low, otherwise I'd take the opportunity to replace the mani etc.
Cheers, i cant wait now, my photo app on my phone keeps reminding me of this time x amount of years ago and pretty much every year since i've had it on the road, i've had it out by now!I'm sure it's mentioned, but there are a lot of pages, what exhaust are you running? My middle and back sections are rusted/blown, so I need to get on and order new. Jaymic looks like £300/£400 depending if you go genuine or PP's. Funds are low, otherwise I'd take the opportunity to replace the mani etc.
I'm using a Martelius exhaust, it's a nice bit of kit and when i didnt have the car on the road seemed to be the best off the shelf solution i could find. They do a really nice manifold too that this exhaust mates up to, so you have to get a link pipe made up using any other mani. Their mani is only for left hand drive cars as well!
With your car being mobile i think i'd just take it to your local exhaust fabricator and get them to knock something up unless you're happy to stick a standard one on. The guys near me that made my manifold will probably end up doing the rest of my exhaust at some point as i fancy a subtle group a style side exit
I know what you mean about money though, these things do have a habit of sapping it away!Small update to keep me up to date and so i dont forget anything once the big parcel of work of getting it all back together starts!
I ordered my new rockers etc from the USA, there's quite a following for these cars over there, so aftermarket parts are more plentiful! I'll cover more on the rockers etc when i come to use them during the head rebuild.
Any time i order parts from the USA i normally man maths additional parts 'whilst im ordering'. I kept myself in line this time but did let a fancy steering coupling slip through the net!
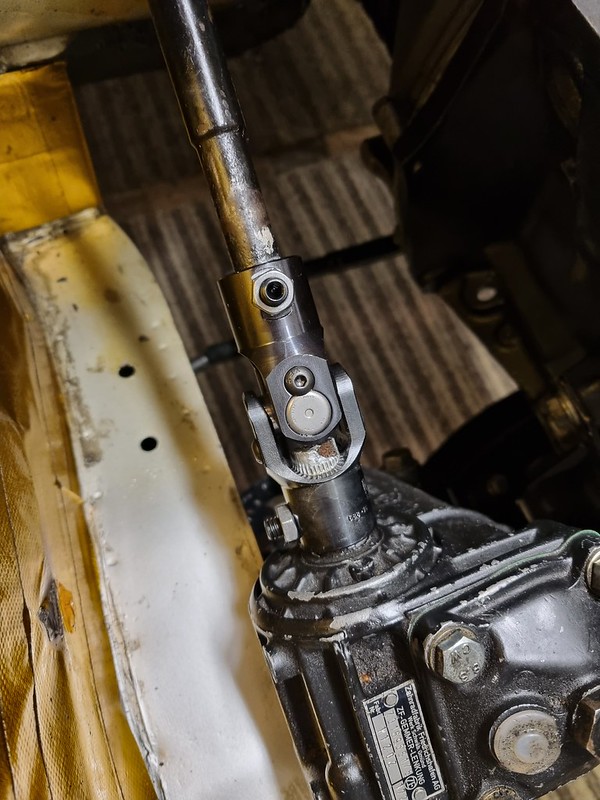
The below picture is the original item. Its quite a large diameter and because on right hand drive the coupling is next to the exhaust manifold and it's rubber, it has a heat shield around it (LHD Dont). I've had it twice now where the heatshield comes loose and the resonance from the engine will sometimes vibrate it and its really annoying, imagine loose heatshield on your exhaust sort of noise.
 IMG_20200404_172224 by Scott Osborne, on Flickr
 IMG_20200404_172217 by Scott Osborne, on Flickr
The below is the new item fitted, it's a really nicely made steel U joint affair, slimline and very solid/ precise, shouldn't be affected by the heat from the exhaust and NO RATTLING!
 20230322_220212 by Scott Osborne, on Flickr
Another job i've been doing this week is sorting out the phenolic gaskets for the itb's. I ran one of these years ago on an Ibiza Cupra and the difference was unbelievable. They effectively stop nearly all heat transfer from the head to the inlet set up.
I found a DCOE set up online, that would fit my set up but the price seemed high for what it was, i found the same item for half the price after a short time of searching but they had no stock of 45mm and werent continuing to make them. They did have a set of 38mm ones though, that could be made to fit and because i love nothing more than messing around and obviously dont value my own time enough, i bought them!
I already had a 45mm hole cutter from doing the backplate on the air filter set up, so figured i could just use that. Obviously with a 38mm hole already in the phenolic gaskets i had to somehow centre the hole cutter. I essentially cut a 45mm hole in a bit of aluminium plate i've previously used as a hole jig for something else and also a bearing press for my mountain bike. It's been a very handy bit of plate
Bolted up to the manifold, sandwiching the gasket:
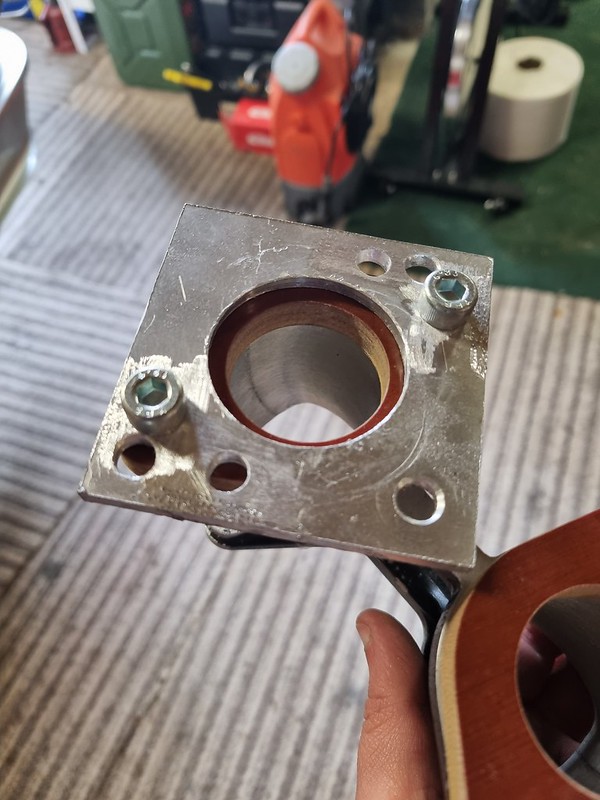 20230320_125007 by Scott Osborne, on Flickr
Big step with the 38mm hole:
 20230320_125015 by Scott Osborne, on Flickr
Bored through:
 20230321_192612 by Scott Osborne, on Flickr
 20230321_192634 by Scott Osborne, on Flickr
Smoothed out and a comparison with the 38mm one adjacent:
 20230321_193103 by Scott Osborne, on Flickr
50/50:
 20230321_195613 by Scott Osborne, on Flickr
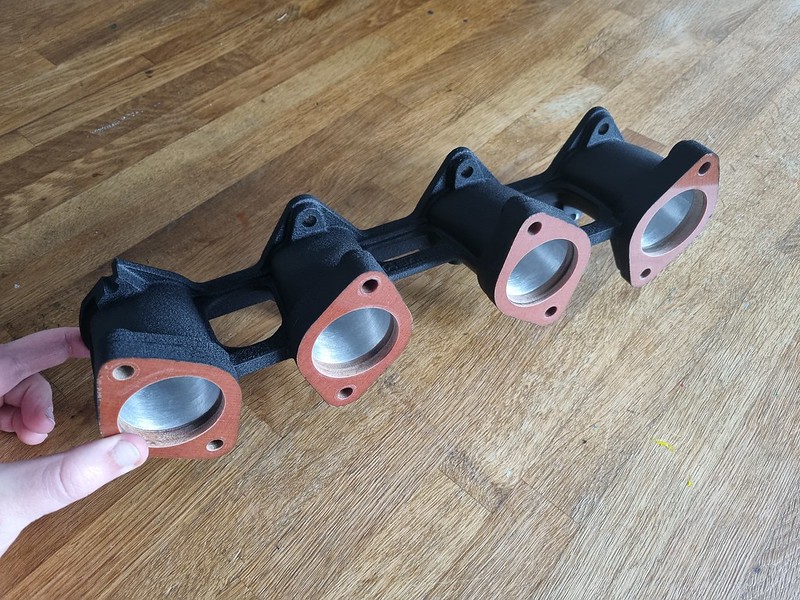
Blended through and finished:
 20230321_212810 by Scott Osborne, on Flickr
All bolted up to check fitment. I left the inlet manifold in a hot wash for 4 hours to try and take the paint off but it held up surprisingly well and i'd only given it a quick coat in the past to see what it would look like in black. I'll be painting that and the edges of the phenolic material in the wrinkle black paint i seem to paint everything in and that'll be that done!
 20230322_220245 by Scott Osborne, on Flickr
Just waiting on the headwork being completed, cam and head gasket turning up and everything will be ready to go back together! I cant wait to get back out in the hills in it, there's some cracking cars coming out of the woodwork this year locally and one of my friends is buying all manner of crazy things so it should make for some even more decent drives out!
Cheers,
Scott
I ordered my new rockers etc from the USA, there's quite a following for these cars over there, so aftermarket parts are more plentiful! I'll cover more on the rockers etc when i come to use them during the head rebuild.
Any time i order parts from the USA i normally man maths additional parts 'whilst im ordering'. I kept myself in line this time but did let a fancy steering coupling slip through the net!
The below picture is the original item. Its quite a large diameter and because on right hand drive the coupling is next to the exhaust manifold and it's rubber, it has a heat shield around it (LHD Dont). I've had it twice now where the heatshield comes loose and the resonance from the engine will sometimes vibrate it and its really annoying, imagine loose heatshield on your exhaust sort of noise.
IMG_20200404_172224 by Scott Osborne, on FlickrIMG_20200404_172217 by Scott Osborne, on FlickrThe below is the new item fitted, it's a really nicely made steel U joint affair, slimline and very solid/ precise, shouldn't be affected by the heat from the exhaust and NO RATTLING!
20230322_220212 by Scott Osborne, on FlickrAnother job i've been doing this week is sorting out the phenolic gaskets for the itb's. I ran one of these years ago on an Ibiza Cupra and the difference was unbelievable. They effectively stop nearly all heat transfer from the head to the inlet set up.
I found a DCOE set up online, that would fit my set up but the price seemed high for what it was, i found the same item for half the price after a short time of searching but they had no stock of 45mm and werent continuing to make them. They did have a set of 38mm ones though, that could be made to fit and because i love nothing more than messing around and obviously dont value my own time enough, i bought them!
I already had a 45mm hole cutter from doing the backplate on the air filter set up, so figured i could just use that. Obviously with a 38mm hole already in the phenolic gaskets i had to somehow centre the hole cutter. I essentially cut a 45mm hole in a bit of aluminium plate i've previously used as a hole jig for something else and also a bearing press for my mountain bike. It's been a very handy bit of plate
Bolted up to the manifold, sandwiching the gasket:
20230320_125007 by Scott Osborne, on FlickrBig step with the 38mm hole:
20230320_125015 by Scott Osborne, on FlickrBored through:
20230321_192612 by Scott Osborne, on Flickr20230321_192634 by Scott Osborne, on FlickrSmoothed out and a comparison with the 38mm one adjacent:
20230321_193103 by Scott Osborne, on Flickr50/50:
20230321_195613 by Scott Osborne, on FlickrBlended through and finished:
20230321_212810 by Scott Osborne, on FlickrAll bolted up to check fitment. I left the inlet manifold in a hot wash for 4 hours to try and take the paint off but it held up surprisingly well and i'd only given it a quick coat in the past to see what it would look like in black. I'll be painting that and the edges of the phenolic material in the wrinkle black paint i seem to paint everything in and that'll be that done!
20230322_220245 by Scott Osborne, on FlickrJust waiting on the headwork being completed, cam and head gasket turning up and everything will be ready to go back together! I cant wait to get back out in the hills in it, there's some cracking cars coming out of the woodwork this year locally and one of my friends is buying all manner of crazy things so it should make for some even more decent drives out!
Cheers,
Scott
I was in at the engine builders i help out at last weekend, my Cometic headgasket has turned up, which is quite quickly really considering they tend to be custom order and of USA origin!
 20230401_092741 by Scott Osborne, on Flickr
My new cam had just turned up the day before i was in as well, i wasted no time it getting it out of the box for a look. It's a chilled iron blank and had some form of coating, so straight away i have higher hopes than using Catcams again (even though they've changed their blanks now...). I think i touched on it above, long term when i do the bottom end, i'll use a hollow billet one with internal oiling, for now im eager to see how this performs!
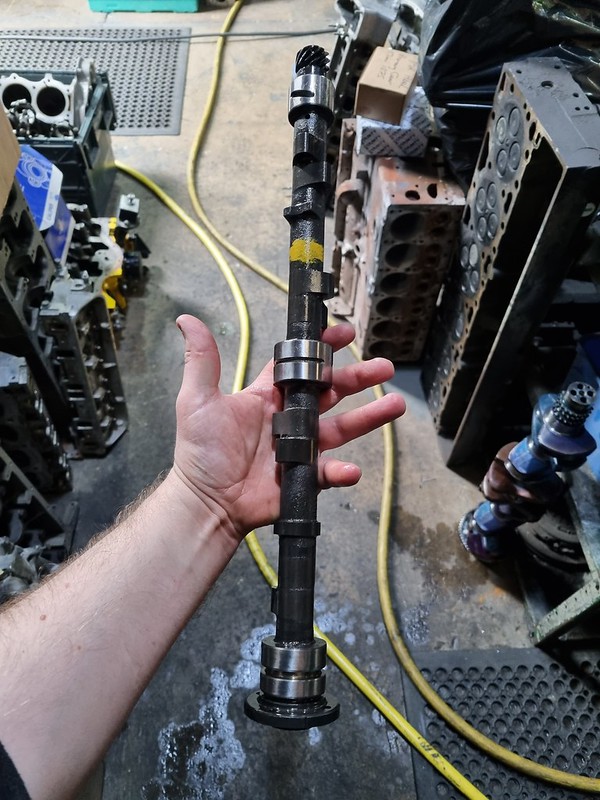 20230401_120259 by Scott Osborne, on Flickr
 20230401_120250 by Scott Osborne, on Flickr
That is all of the parts present to crack on...! Except the head isnt done yet i'm hoping by the next time im in, that it'll be done. Still aiming to run 46mm inlets and 39mm exhausts but keeping the standard size seats the exhaust may end up 38.5mm, we shall see!
I also got my manifold finished up, wrinkle black really is one of my favorite things and i've got the method for it almost down to a T now as well:
 20230329_135831 by Scott Osborne, on Flickr
 20230329_135654 by Scott Osborne, on Flickr
 20230329_135819 by Scott Osborne, on Flickr
The phenolic kit came with washers too, to stop heat transfer bypassing the gaskets via the bolts, i'd also painted these so they dont look out of place.
 20230329_140029 by Scott Osborne, on Flickr
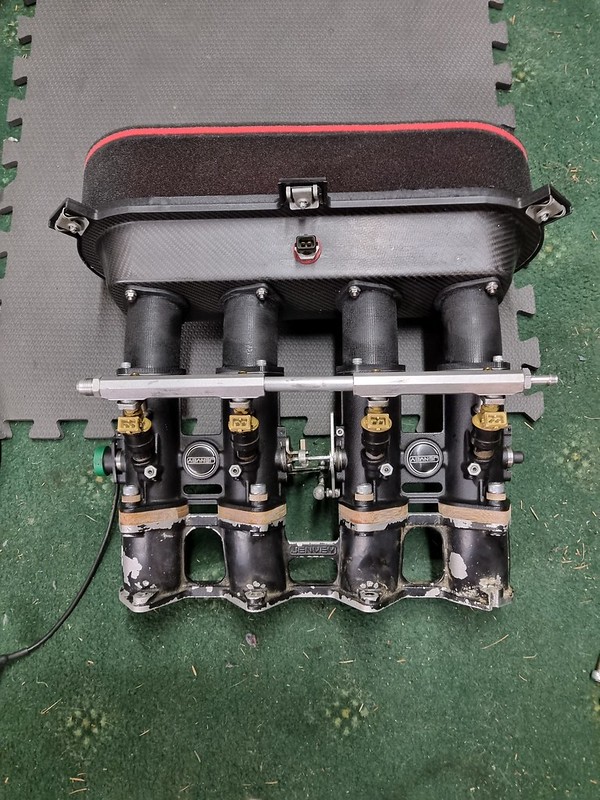
All fitted back together with the ITB's, linkage and filter set up:
 20230329_140838 by Scott Osborne, on Flickr
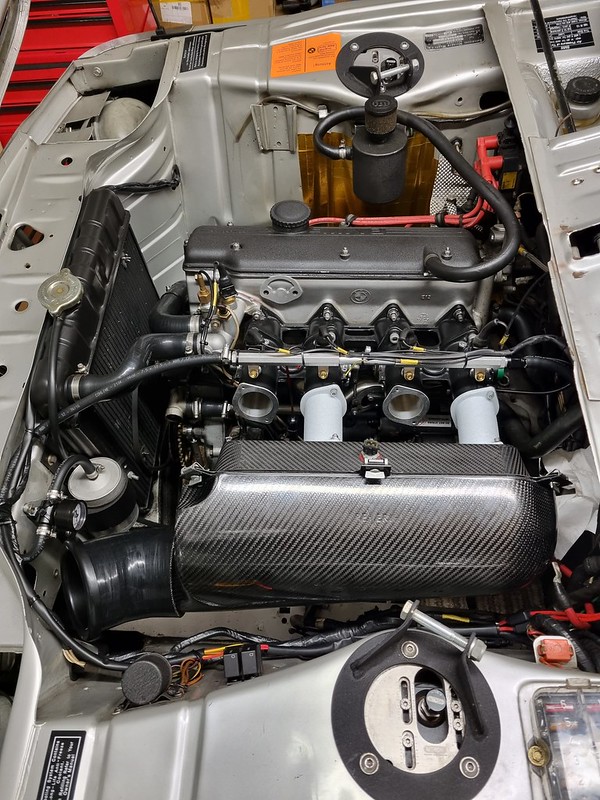
Lastly a current picture of how it sits, its still dirty from last year and now has a lovely covering of dust, so it's looking a little sorry for itself! I cleaned the wheels properly whilst they were off, at least!
 20230403_205327 by Scott Osborne, on Flickr
Hopefully with the next update it'll be going back together!
Scott
20230401_092741 by Scott Osborne, on FlickrMy new cam had just turned up the day before i was in as well, i wasted no time it getting it out of the box for a look. It's a chilled iron blank and had some form of coating, so straight away i have higher hopes than using Catcams again (even though they've changed their blanks now...). I think i touched on it above, long term when i do the bottom end, i'll use a hollow billet one with internal oiling, for now im eager to see how this performs!
20230401_120259 by Scott Osborne, on Flickr20230401_120250 by Scott Osborne, on FlickrThat is all of the parts present to crack on...! Except the head isnt done yet
i'm hoping by the next time im in, that it'll be done. Still aiming to run 46mm inlets and 39mm exhausts but keeping the standard size seats the exhaust may end up 38.5mm, we shall see!I also got my manifold finished up, wrinkle black really is one of my favorite things and i've got the method for it almost down to a T now as well:
20230329_135831 by Scott Osborne, on Flickr20230329_135654 by Scott Osborne, on Flickr20230329_135819 by Scott Osborne, on FlickrThe phenolic kit came with washers too, to stop heat transfer bypassing the gaskets via the bolts, i'd also painted these so they dont look out of place.
20230329_140029 by Scott Osborne, on FlickrAll fitted back together with the ITB's, linkage and filter set up:
20230329_140838 by Scott Osborne, on FlickrLastly a current picture of how it sits, its still dirty from last year and now has a lovely covering of dust, so it's looking a little sorry for itself! I cleaned the wheels properly whilst they were off, at least!
20230403_205327 by Scott Osborne, on FlickrHopefully with the next update it'll be going back together!
Scott
The head ended up being done a few days after the last post, excellent!
It had a very light skim, throats opened up to match the new valves (went +1mm on exhaust and 0.1mm on the inlets) and blended in, tiny bit of chamber work to 'de-shroud' the valve, multi-angle seats. Work done is to 11/10 standard, as per!
I fitted the new valve stem seals with the proper tool whilst i was in there:
 20230406_163313 by Scott Osborne, on Flickr
 20230406_163434 by Scott Osborne, on Flickr
 20230406_163847 by Scott Osborne, on Flickr
 20230406_163800 by Scott Osborne, on Flickr
One home i checked that the bigger valves were okay in the existing valve pockets, all looked well (old HG used for this step):
 20230412_180253 by Scott Osborne, on Flickr
 20230412_180659 by Scott Osborne, on Flickr
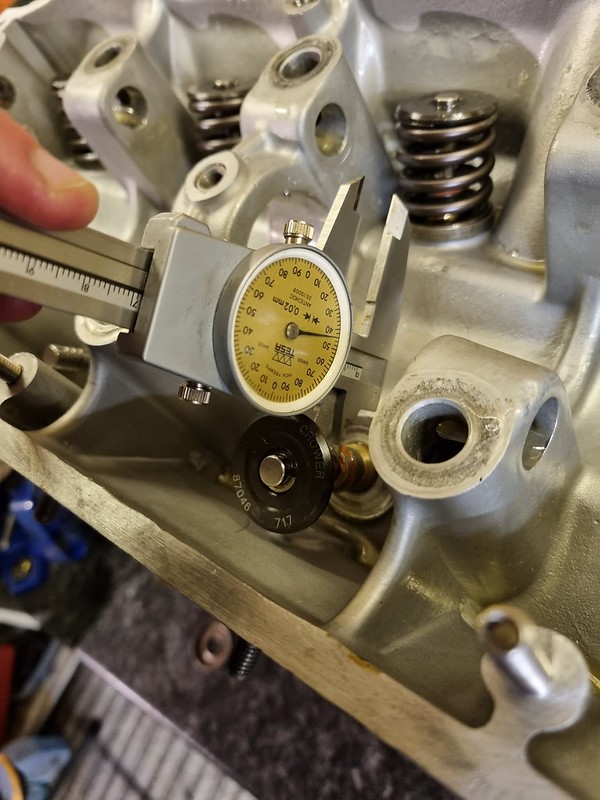
Also checked the clearance between the bottom of the retainer and the stem seal. It leaves me with around 13.5mm travel and the cam is 11.2mm, so plenty clearance:
 20230412_190348 by Scott Osborne, on Flickr
Cracked on fitting the valves, first picture is the exhaust, second are the inlets:
 20230412_182653 by Scott Osborne, on Flickr
 20230412_182658 by Scott Osborne, on Flickr
Flat head screw driver and a bit of general grease allows you to drop the collets in place pretty easily:
 20230412_184801 by Scott Osborne, on Flickr
 20230412_191633 by Scott Osborne, on Flickr
 20230412_202731 by Scott Osborne, on Flickr
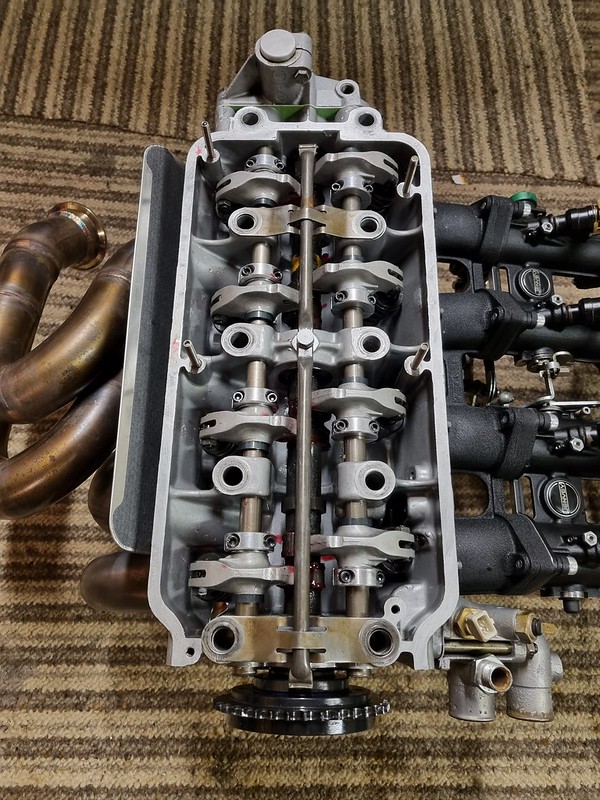
The tricky bit after this step it getting the rocker shafts in with the rockers and the retainers etc.its like a puzzle! The rocker pads were also poorly finished and i assume would chew the cam up fairly quickly, so i polished all the pads up with oiled 600 grit and then scotchbrite:
 20230412_193320 by Scott Osborne, on Flickr
 20230412_193033 by Scott Osborne, on Flickr
 20230412_234732 by Scott Osborne, on Flickr
 20230412_235531 by Scott Osborne, on Flickr
 20230412_235524 by Scott Osborne, on Flickr
 20230413_003250 by Scott Osborne, on Flickr
At this stage it was getting rather late but i thought i might as well crack on! New HG fitted:
 20230413_003508 by Scott Osborne, on Flickr
Head on and setting timing, very easy on this engine!
 20230413_011224 by Scott Osborne, on Flickr
Valve clearances set, clearances on the rocker locks and timing checked multiple times along with tension on the timing chain:
 20230413_011232 by Scott Osborne, on Flickr
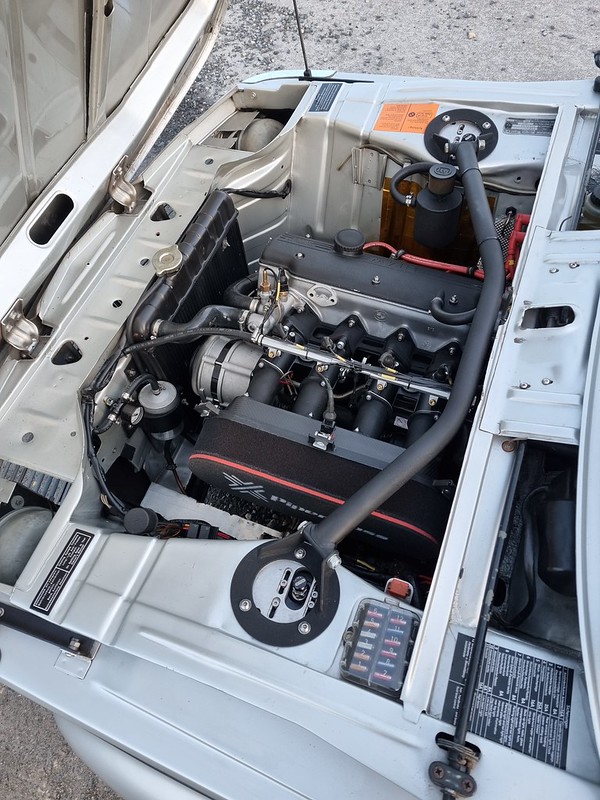
It's starting to look like a proper engine bay again at this point! It was now 2:15am in the morning on a school night and i'd got far too carried away!
 20230413_214617 by Scott Osborne, on Flickr
I managed another long stint over the weekend just gone. I needed to finish up in the bay, securing and plugging in the loom, attaching fuel flow and returns, water inlet/ outlet to the head and then i could get on fitting the radiator and associated pipework and the electric fan. Before long it was done and topped off with Valvoline VR1.
 20230415_174714 by Scott Osborne, on Flickr
 20230415_174701 by Scott Osborne, on Flickr
I did the gearbox and diff oils whilst it was still up in the air:
 20230415_102211 by Scott Osborne, on Flickr
I also fitted some new genuine bushings to the exhaust hanger/ bracket arrangement, these were a fortune for what they are but seem a lot more sturdy than the ones they replaced (i'd assumed they were genuine but they werent!)
 20230415_122516 by Scott Osborne, on Flickr
With this all done i primed the oil system and fired it up. With the new cam i had to do a cam burn which involves holding the revs at 2500-3000rpm for 20-25 minutes (sorry neighbors!). This passed over quickly and the temps all stayed great too. With the new phenolic gaskets on the ITB's this sitting at those revs for that amount of time was a good test and the ITB's were nice and cool with the new inlet extensions even cooler, happy days! The inlet manifold on the other side of the gasket was too hold to keep a hold of!
Back down on its feet:
 20230415_174620 by Scott Osborne, on Flickr
I was full of adrenaline at this point and very happy so i went inside to chill out for a few hours but i had a nagging feeling that i wanted to get out in it to make sure it was all fine. I did a 90 minute loop to check it all and it runs quite well on the existing map, it picks up better at lower revs and still revs out nice and fuelling all seemed great on the AFR Gauge. It had a bit of a dead spot off part throttle low down but i think an adjustment to the map will overcome this. I really was surprised how well it ran as is!
It was so so good to get back out and i'd forgotten how good it is, i can easily corner as quick as the GR Yaris and that was taking it fairly steady away with it feeling unfamiliar. It just feels like home though, it really is amazing to be back out in it.
 20230415_195314 by Scott Osborne, on Flickr
 20230415_195336 by Scott Osborne, on Flickr
 20230415_194708 by Scott Osborne, on Flickr
 20230415_194922 by Scott Osborne, on Flickr
The only issue was that 2 of the quick release v band clamps quick released when i didnt want them to! A bit of a pain and im going to take them off and fit none quick release ones. Hopefully they turn up ASAP as it's booked in for a mapping adjustment this Thursday!
Cheers,
Scott
It had a very light skim, throats opened up to match the new valves (went +1mm on exhaust and 0.1mm on the inlets) and blended in, tiny bit of chamber work to 'de-shroud' the valve, multi-angle seats. Work done is to 11/10 standard, as per!
I fitted the new valve stem seals with the proper tool whilst i was in there:
20230406_163313 by Scott Osborne, on Flickr20230406_163434 by Scott Osborne, on Flickr20230406_163847 by Scott Osborne, on Flickr20230406_163800 by Scott Osborne, on FlickrOne home i checked that the bigger valves were okay in the existing valve pockets, all looked well (old HG used for this step):
20230412_180253 by Scott Osborne, on Flickr20230412_180659 by Scott Osborne, on FlickrAlso checked the clearance between the bottom of the retainer and the stem seal. It leaves me with around 13.5mm travel and the cam is 11.2mm, so plenty clearance:
20230412_190348 by Scott Osborne, on FlickrCracked on fitting the valves, first picture is the exhaust, second are the inlets:
20230412_182653 by Scott Osborne, on Flickr20230412_182658 by Scott Osborne, on FlickrFlat head screw driver and a bit of general grease allows you to drop the collets in place pretty easily:
20230412_184801 by Scott Osborne, on Flickr20230412_191633 by Scott Osborne, on Flickr20230412_202731 by Scott Osborne, on FlickrThe tricky bit after this step it getting the rocker shafts in with the rockers and the retainers etc.its like a puzzle! The rocker pads were also poorly finished and i assume would chew the cam up fairly quickly, so i polished all the pads up with oiled 600 grit and then scotchbrite:
20230412_193320 by Scott Osborne, on Flickr20230412_193033 by Scott Osborne, on Flickr20230412_234732 by Scott Osborne, on Flickr20230412_235531 by Scott Osborne, on Flickr20230412_235524 by Scott Osborne, on Flickr20230413_003250 by Scott Osborne, on FlickrAt this stage it was getting rather late but i thought i might as well crack on! New HG fitted:
20230413_003508 by Scott Osborne, on FlickrHead on and setting timing, very easy on this engine!
20230413_011224 by Scott Osborne, on FlickrValve clearances set, clearances on the rocker locks and timing checked multiple times along with tension on the timing chain:
20230413_011232 by Scott Osborne, on FlickrIt's starting to look like a proper engine bay again at this point! It was now 2:15am in the morning on a school night and i'd got far too carried away!
20230413_214617 by Scott Osborne, on FlickrI managed another long stint over the weekend just gone. I needed to finish up in the bay, securing and plugging in the loom, attaching fuel flow and returns, water inlet/ outlet to the head and then i could get on fitting the radiator and associated pipework and the electric fan. Before long it was done and topped off with Valvoline VR1.
20230415_174714 by Scott Osborne, on Flickr20230415_174701 by Scott Osborne, on FlickrI did the gearbox and diff oils whilst it was still up in the air:
20230415_102211 by Scott Osborne, on FlickrI also fitted some new genuine bushings to the exhaust hanger/ bracket arrangement, these were a fortune for what they are but seem a lot more sturdy than the ones they replaced (i'd assumed they were genuine but they werent!)
20230415_122516 by Scott Osborne, on FlickrWith this all done i primed the oil system and fired it up. With the new cam i had to do a cam burn which involves holding the revs at 2500-3000rpm for 20-25 minutes (sorry neighbors!). This passed over quickly and the temps all stayed great too. With the new phenolic gaskets on the ITB's this sitting at those revs for that amount of time was a good test and the ITB's were nice and cool with the new inlet extensions even cooler, happy days! The inlet manifold on the other side of the gasket was too hold to keep a hold of!
Back down on its feet:
20230415_174620 by Scott Osborne, on FlickrI was full of adrenaline at this point and very happy so i went inside to chill out for a few hours but i had a nagging feeling that i wanted to get out in it to make sure it was all fine. I did a 90 minute loop to check it all and it runs quite well on the existing map, it picks up better at lower revs and still revs out nice and fuelling all seemed great on the AFR Gauge. It had a bit of a dead spot off part throttle low down but i think an adjustment to the map will overcome this. I really was surprised how well it ran as is!
It was so so good to get back out and i'd forgotten how good it is, i can easily corner as quick as the GR Yaris and that was taking it fairly steady away with it feeling unfamiliar. It just feels like home though, it really is amazing to be back out in it.
20230415_195314 by Scott Osborne, on Flickr20230415_195336 by Scott Osborne, on Flickr20230415_194708 by Scott Osborne, on Flickr20230415_194922 by Scott Osborne, on FlickrThe only issue was that 2 of the quick release v band clamps quick released when i didnt want them to! A bit of a pain and im going to take them off and fit none quick release ones. Hopefully they turn up ASAP as it's booked in for a mapping adjustment this Thursday!
Cheers,
Scott
Epic as always Scott, good to see the old girl back out on the road - 2:15AM on a school night, good effort!  Just in time for the better weather too!
Must admit i'm somewhat envious of the car being nicely modified whilst still being usable 'on the road', unfortunately gone a bit too 'full retard' with the A35 so it's bloody horrible at anything other than full chat! Looking forward to seeing your updates over the coming months
Just in time for the better weather too!Must admit i'm somewhat envious of the car being nicely modified whilst still being usable 'on the road', unfortunately gone a bit too 'full retard' with the A35 so it's bloody horrible at anything other than full chat! Looking forward to seeing your updates over the coming months
Chunkychucky said:
Epic as always Scott, good to see the old girl back out on the road - 2:15AM on a school night, good effort! Just in time for the better weather too!
Must admit i'm somewhat envious of the car being nicely modified whilst still being usable 'on the road', unfortunately gone a bit too 'full retard' with the A35 so it's bloody horrible at anything other than full chat! Looking forward to seeing your updates over the coming months
Cheers matey, i had a mega drive out the weekend before and it spurred me on! You're right about the weather, i'm off tomorrow and will be heading over to Alston to get the map tweaked and then sample the roads whilst over that way! Just in time for the better weather too!Must admit i'm somewhat envious of the car being nicely modified whilst still being usable 'on the road', unfortunately gone a bit too 'full retard' with the A35 so it's bloody horrible at anything other than full chat! Looking forward to seeing your updates over the coming months
I think it's the way to go for me, i thought id be doing a load of trackdays when i first started building this and instead i've got into driving out in the hills instead. I'm sure you build up to it but i dont feel like i could ever go past 70-80%, even on track and i get some much enjoyment on the roads i take it on, i cant see me getting any more on track. I'll certainly never race either, im just not a competitive guy. Are you racing with the a35, if not then it might be worth softening it off a bit and i'll see you out in the Dales/ Pennines?
Wow, I have spent the last 3-4 days working my way through this thread whenever I have a spare few minutes, what a lovely build. I love the attention to detail and all the “right” bits, everything on the car fits the theme, it looks incredible.
I love the Recaro pole positions, I had a MK2 golf a few years ago which had pole positions that were retrimmed in grey fabric and ultraviolet material in the centres to match the OEM rear seats. It was my favourite thing about the car. Great to see someone doing the same thing. It looks superb.
Great to see all the in depth coverage of the engine work also, I enjoy working on my car myself. But my skills don’t extend to inside the engine yet but I would love to carry out a rebuild and learn that kind of thing and some point.
Fantastic car, and very enjoyable thread to read! I look forward to seeing more.
Edited by MTW on Thursday 20th April 10:24
scottos said:
Cheers matey, i had a mega drive out the weekend before and it spurred me on! You're right about the weather, i'm off tomorrow and will be heading over to Alston to get the map tweaked and then sample the roads whilst over that way!
I think it's the way to go for me, i thought id be doing a load of trackdays when i first started building this and instead i've got into driving out in the hills instead. I'm sure you build up to it but i dont feel like i could ever go past 70-80%, even on track and i get some much enjoyment on the roads i take it on, i cant see me getting any more on track. I'll certainly never race either, im just not a competitive guy. Are you racing with the a35, if not then it might be worth softening it off a bit and i'll see you out in the Dales/ Pennines?
Nice, I presume you're going to just perfect the drivability aspect with the new intake setup as opposed for trying to squeeze more power out? Must admit it's impressive what the old M10 can do, incredible when you consider the competition engines that the bottom ends went on to support!I think it's the way to go for me, i thought id be doing a load of trackdays when i first started building this and instead i've got into driving out in the hills instead. I'm sure you build up to it but i dont feel like i could ever go past 70-80%, even on track and i get some much enjoyment on the roads i take it on, i cant see me getting any more on track. I'll certainly never race either, im just not a competitive guy. Are you racing with the a35, if not then it might be worth softening it off a bit and i'll see you out in the Dales/ Pennines?
Yeah it's a good call, I love road driving early morning/in the evenings during the Summer once all the slow c*nts/cyclists have toddled off home, and being able to enjoy the great roads we have up here in something like your 2002 is special
Haha yeah unfortunately going to be racing it, tempting to soften it off a bit and (shock horror) raise the ride height a bit, but ideally i'd also put a carpet/back bench back in it, and not have a weld-in roll cage with door bars... need to get another one for road use really that I can tune free of the racing regulations, might have a hope in Hell of keeping your car in sight then 
Great to see the car back on the road and everything is looking top notch as always! I assume it'll be in the Readers Cars section at the PH25 event? There'll be loads of us crawling over / under it 

I built a 600bhp engine from scratch with zero training or experience whatsoever, the reality is most of the bits only fit together one way really... Just don't set yourself a deadline so there's no time pressure and just tinker away.
MTW said:
Great to see all the in depth coverage of the engine work also, I enjoy working on my car myself. But my skills don’t extend to inside the engine yet but I would love to carry out a rebuild and learn that kind of thing and some point.
Get an engine stand and have a go, it truly isn't complicated when it's there in front of you, and there is so much footage / content on youtube for anything you can imagine you can be pretty familiar with the process before you even start I built a 600bhp engine from scratch with zero training or experience whatsoever, the reality is most of the bits only fit together one way really...
Just don't set yourself a deadline so there's no time pressure and just tinker away. Gassing Station | Readers' Cars | Top of Page | What's New | My Stuff