Mx5 Rocketeer V6 Conversion Project
Discussion


fido said:
Better balance with a light alloy V6 in the front. Less is better IMO.
The 1uzfe is a very compact and light v8 - probably more so than most v6s.Also watch this for some info about weight distribution with a v8 in a MX5 (admittedly an LS in this case): https://www.youtube.com/watch?v=T2BSSy7fxOc
bicycleshorts said:
The 1uzfe is a very compact and light v8 - probably more so than most v6s.
Also watch this for some info about weight distribution with a v8 in a MX5 (admittedly an LS in this case): https://www.youtube.com/watch?v=T2BSSy7fxOc
I just laughed out loud at the gt40 overtake.Also watch this for some info about weight distribution with a v8 in a MX5 (admittedly an LS in this case): https://www.youtube.com/watch?v=T2BSSy7fxOc
So, a small festive update. I've been out, as the weather and yuletide jollity has permitted, wire brushing the underside of the car.
Sadly, this does not make for good or interesting pictures, so this update is mainly of a few dull photos! Sorry...
In preparation for undersealing, any loose surface rust/anything else needs to be removed. So with both a hand brush and drill attachments this was done over the course of several days. I like to think this is a testament to my thoroughness, rather than slowness...
 IMG_2682 by Jon Fellows, on Flickr
As promised, a boring photo of the rear wheel arch.
I also removed the front wings, to give better access so here is a mid-wire brushing shot.
 IMG_2684 by Jon Fellows, on Flickr
And one of under the rear of the car:
 IMG_2683 by Jon Fellows, on Flickr
Not the most thrilling alas, but very neccessary. This has now begun to be rust converted, however I've now run out so had to order more. I already had double the amount that normally comes in the kit so I must be very heavy handed. Though I am also rust converting the cavities, which is not mentioned in the kit instructions.
I was slightly nervous about what I might find when I started brushing back the car, but I have only found one very small hole which I'll be welding up when my new gas tanks arrives. The only negative really has been closer inspection of the sill 'repairs' that have previously been done. Suffice to say, I have now budgeted in for them to be done again properly in the next few years!
In other news, the roll bar is in and torqued up at last, so another job off the list.
Not action packed this update, by any means, but work is still getting done slowly...!
Sadly, this does not make for good or interesting pictures, so this update is mainly of a few dull photos! Sorry...
In preparation for undersealing, any loose surface rust/anything else needs to be removed. So with both a hand brush and drill attachments this was done over the course of several days. I like to think this is a testament to my thoroughness, rather than slowness...
IMG_2682 by Jon Fellows, on FlickrAs promised, a boring photo of the rear wheel arch.
I also removed the front wings, to give better access so here is a mid-wire brushing shot.
IMG_2684 by Jon Fellows, on FlickrAnd one of under the rear of the car:
IMG_2683 by Jon Fellows, on FlickrNot the most thrilling alas, but very neccessary. This has now begun to be rust converted, however I've now run out so had to order more. I already had double the amount that normally comes in the kit so I must be very heavy handed. Though I am also rust converting the cavities, which is not mentioned in the kit instructions.
I was slightly nervous about what I might find when I started brushing back the car, but I have only found one very small hole which I'll be welding up when my new gas tanks arrives. The only negative really has been closer inspection of the sill 'repairs' that have previously been done. Suffice to say, I have now budgeted in for them to be done again properly in the next few years!
In other news, the roll bar is in and torqued up at last, so another job off the list.
Not action packed this update, by any means, but work is still getting done slowly...!
bicycleshorts said:
...v8 in a MX5 (admittedly an LS in this case): https://www.youtube.com/watch?v=T2BSSy7fxOc
Ford 302; think crown vic/SN95 Mustang era.Old school but cheap, plentiful, compact, and near unlimited tuning options.
Another update - yesterday I managed to finish undersealing the car. I meant to take many photos of the process, but due to time constraints and the filthy state of me about 15 minutes into the job I didn't dare touch my phone to take any!
I had previously wire brushed everything, and the day before I rust converted everything and let that dry. I have used the Dinitrol underseal system, and I've been pretty impressed so far. Of course, how long it lasts will determine how good it really is, but first impressions are good.
After rust converter (in the cavities too), I used the cavity wax in all the chassis rails etc. Theres a very helpful guide n the MX5 forum section so you don't miss anywhere. Then the whole car is lightly sprayed with the wax, then the underseal can be applied.
Disgusting though the job is, its very satisfying to have a uniform black underbody. So much neater...!
As said, only have pictures from after I finished. So no mid-undseal action alas.
 IMG_2710 by Jon Fellows, on Flickr
 IMG_2711 by Jon Fellows, on Flickr
 IMG_2712 by Jon Fellows, on Flickr
Very pleased to have got that done. And I should hopefully have all the bits back from the powder coaters this week so I can start to add bits back onto the car soon, as opposed to keep removing them!
Though I have found another issue. During heavy rain, I found the hood leaked from around the rear screen. So I got my Beloved to hose the roof down while I was in the car to see if I could see the leak. Turns out I could; easily! As it poured through where there should have been stitching, but was none, I was mainly wondering how the whole car didn't fill up completely with all the rain we've enjoyed of late.
I have therefore effected a subtle water-proofing while I decide whether to try to repair or just replace the whole roof:
 ETRM9539 by Jon Fellows, on Flickr
I had previously wire brushed everything, and the day before I rust converted everything and let that dry. I have used the Dinitrol underseal system, and I've been pretty impressed so far. Of course, how long it lasts will determine how good it really is, but first impressions are good.
After rust converter (in the cavities too), I used the cavity wax in all the chassis rails etc. Theres a very helpful guide n the MX5 forum section so you don't miss anywhere. Then the whole car is lightly sprayed with the wax, then the underseal can be applied.
Disgusting though the job is, its very satisfying to have a uniform black underbody. So much neater...!
As said, only have pictures from after I finished. So no mid-undseal action alas.
IMG_2710 by Jon Fellows, on FlickrIMG_2711 by Jon Fellows, on FlickrIMG_2712 by Jon Fellows, on FlickrVery pleased to have got that done. And I should hopefully have all the bits back from the powder coaters this week so I can start to add bits back onto the car soon, as opposed to keep removing them!
Though I have found another issue. During heavy rain, I found the hood leaked from around the rear screen. So I got my Beloved to hose the roof down while I was in the car to see if I could see the leak. Turns out I could; easily! As it poured through where there should have been stitching, but was none, I was mainly wondering how the whole car didn't fill up completely with all the rain we've enjoyed of late.
I have therefore effected a subtle water-proofing while I decide whether to try to repair or just replace the whole roof:
ETRM9539 by Jon Fellows, on FlickrEddieslofart said:
Fair play op for having a go. You’ll have something unique to you at the end, and it will make you smile every time you start it up, you can’t put a value on that. Best of luck with it. 
Cheers, that's the idea. It may take a while (longer than I first thought), but I hope eventually to have a super clean car that will be just how I want it.To be fair, I think I've been watching too many youtube shows where they just throw lovely new bits of kit on rotten cars and treble its value just in suspension parts!
More progress to report...!
I have got all of the bits and pieces back from the powder coaters. It's been very nice working with clean parts for a change.
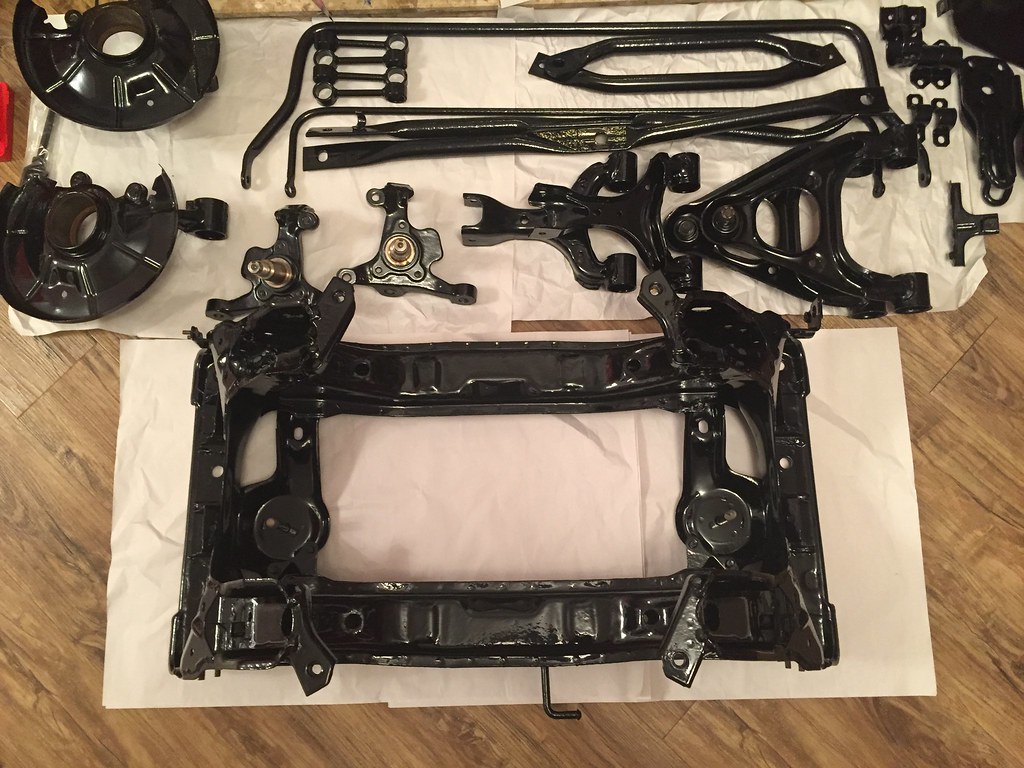 IMG_2725 by Jon Fellows, on Flickr
I spent a while as soon as all the bits were back, cleaning threads and bores etc and generally making sure nothing would catch me out on reassembly (some hope, but that was the aim anyway).
I then, as the weather has been a bit rubbish and I have started working a day shift for the first time in about 10 years, found I had no time where there was natural light to work on the car in the week. So I took the only action possible, and moved the press into the kitchen to get bearings and bushes installed! Very comfortable...
Rear bearing going in:
 IMG_2734 by Jon Fellows, on Flickr
Rather messy kitchen:
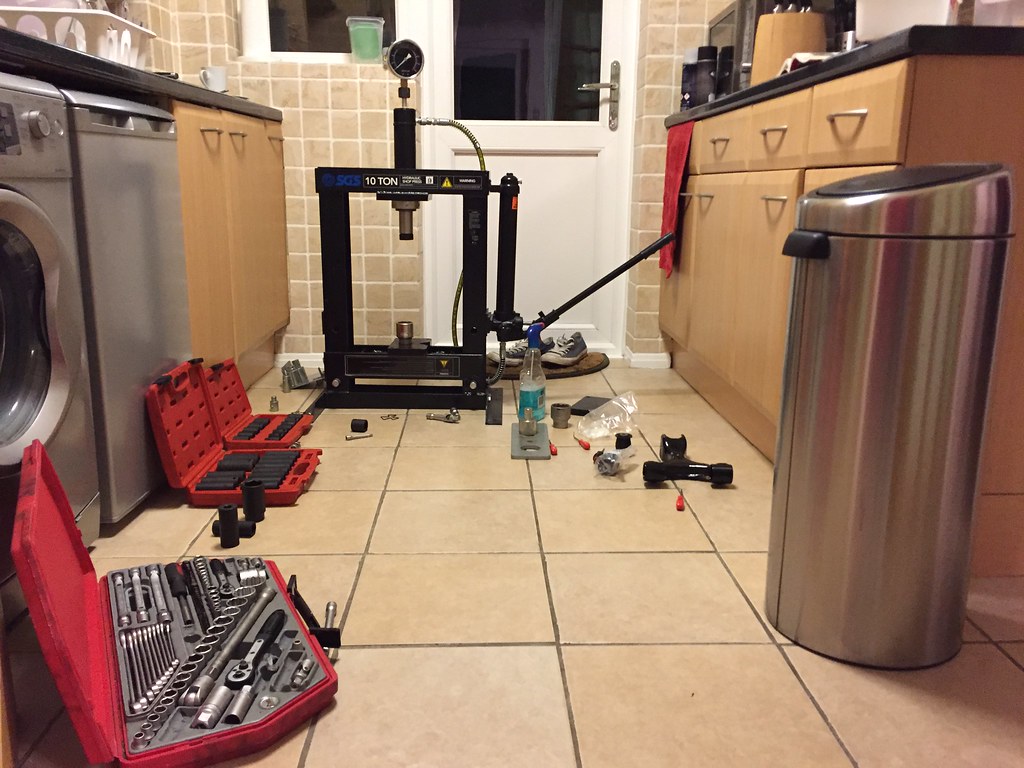 IMG_2736 by Jon Fellows, on Flickr
I've now installed all of the bushes aside from the droplinks, and installed the rear bearings. Also the front ball joints are in and torqued up. This is not a very photogenic process, though did take a while - hence not may pictures of different bushes being pressed in.
I have managed to get the rear subframe installed too, which again, doesn't make for exciting photos but has freed up some space in the living room!
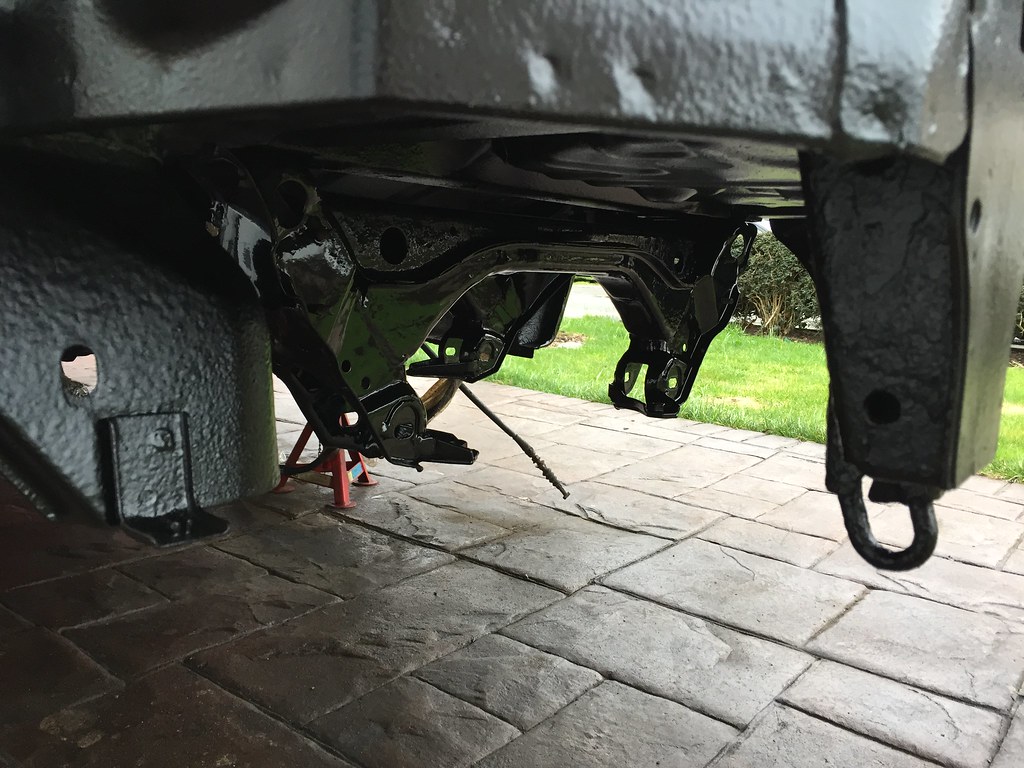 IMG_2739 by Jon Fellows, on Flickr
Next is the roof replacement, which all being well should be in the next couple of days. So progress is slowly being made...
I have got all of the bits and pieces back from the powder coaters. It's been very nice working with clean parts for a change.
IMG_2725 by Jon Fellows, on FlickrI spent a while as soon as all the bits were back, cleaning threads and bores etc and generally making sure nothing would catch me out on reassembly (some hope, but that was the aim anyway).
I then, as the weather has been a bit rubbish and I have started working a day shift for the first time in about 10 years, found I had no time where there was natural light to work on the car in the week. So I took the only action possible, and moved the press into the kitchen to get bearings and bushes installed! Very comfortable...
Rear bearing going in:
IMG_2734 by Jon Fellows, on FlickrRather messy kitchen:
IMG_2736 by Jon Fellows, on FlickrI've now installed all of the bushes aside from the droplinks, and installed the rear bearings. Also the front ball joints are in and torqued up. This is not a very photogenic process, though did take a while - hence not may pictures of different bushes being pressed in.
I have managed to get the rear subframe installed too, which again, doesn't make for exciting photos but has freed up some space in the living room!
IMG_2739 by Jon Fellows, on FlickrNext is the roof replacement, which all being well should be in the next couple of days. So progress is slowly being made...


Gassing Station | Readers' Cars | Top of Page | What's New | My Stuff