Rover 75 CDTi Tourer
Discussion


As the Rover 75 / MG ZT is getting a bit more affection these days, I'm going to take a tenth of a brave pill and post up our facelift Tourer.
 Screen shot 2014-02-27 at 20.16.34 by Clifton Tausberger, on Flickr
As it does the lion's share of the mileage in our household, no expense (or swearword) has been spared in it's upkeep. It's also my fiancee's car, which I suggested as a purchase, so to justify my unquestionable judgement I constantly treat it to all manner of upgrades. The 75/ZT forums are great, but there's not an easy-to-navigate list of all the fixes, improvements and tweaks required for the indomitable CDTi, so I'll document three years of persistence here.
We have had a number of Rovers, but in 2014 my fiancee took over a business and needed to replace our champagne (read: prosecco) Rover 600 with an estate for lugging stock.
 2017-12-26_10-05-34 by Clifton Tausberger, on Flickr
Requirements included: leather seats, high mpg, massive boot, manual box, as much wood trim as possible and green. It had to be green. My fiancee shares my interest in classic cars, and is drawn to chrome, wood and the 'retro' looking examples.
We dismissed all manner of estates from other manufacturers, the 75 being an early favourite given its classic looks, parts availability, community support and price. The Jaguar X Type estates we saw, for instance, were deathtraps. Finding a decent 75 proved difficult, so we stretched the budget and packed our passports for Wales to secure a clean example with moderate mileage (about 105k I believe in 2014), a solid maintenance history and the Connoisseur trim. Yes, we identified a number of common issues (turbo boost, tired suspension) but a short haggle later it was ours.
 2017-12-26_10-06-00 by Clifton Tausberger, on Flickr
Then, the laundry list of fixes began...
Screen shot 2014-02-27 at 20.16.34 by Clifton Tausberger, on FlickrAs it does the lion's share of the mileage in our household, no expense (or swearword) has been spared in it's upkeep. It's also my fiancee's car, which I suggested as a purchase, so to justify my unquestionable judgement I constantly treat it to all manner of upgrades. The 75/ZT forums are great, but there's not an easy-to-navigate list of all the fixes, improvements and tweaks required for the indomitable CDTi, so I'll document three years of persistence here.
We have had a number of Rovers, but in 2014 my fiancee took over a business and needed to replace our champagne (read: prosecco) Rover 600 with an estate for lugging stock.
2017-12-26_10-05-34 by Clifton Tausberger, on FlickrRequirements included: leather seats, high mpg, massive boot, manual box, as much wood trim as possible and green. It had to be green. My fiancee shares my interest in classic cars, and is drawn to chrome, wood and the 'retro' looking examples.
We dismissed all manner of estates from other manufacturers, the 75 being an early favourite given its classic looks, parts availability, community support and price. The Jaguar X Type estates we saw, for instance, were deathtraps. Finding a decent 75 proved difficult, so we stretched the budget and packed our passports for Wales to secure a clean example with moderate mileage (about 105k I believe in 2014), a solid maintenance history and the Connoisseur trim. Yes, we identified a number of common issues (turbo boost, tired suspension) but a short haggle later it was ours.
2017-12-26_10-06-00 by Clifton Tausberger, on FlickrThen, the laundry list of fixes began...
Haddock82 said:
I am biased because of my job, but these are cracking cars.
In my experience the earlier ZT/75 pre-facelift tend to be slightly better (still BMW at that time and before the cost cuttings) however the later cars are also not bad too
Look after it and it'll serve you well :-)
Pre-Project Drive cars are correctly sought after, but (as you'll see here...) don't pass up a later example that ticks expensive boxes. Almost everything from the earlier models can be retro-fitted, if you'll pardon the pun.In my experience the earlier ZT/75 pre-facelift tend to be slightly better (still BMW at that time and before the cost cuttings) however the later cars are also not bad too
Look after it and it'll serve you well :-)
littlebasher said:
Looking forward to the photographic evidence!
Be careful what you wish for! I have just trawled through my old phones and unearthed all sorts of jobs, many of which had been forgotten, and also my trusty hand-written notes.Purging the Exxon Valdese
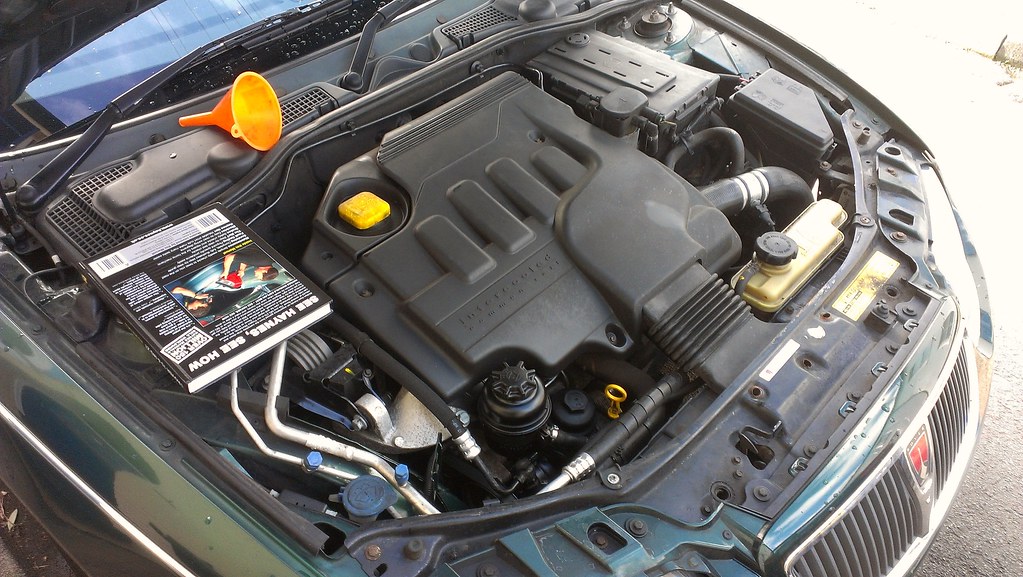
First up, a simple oil change. At the time I had no driveway, so I purchased a Pela vacuum pump, 6litres of 10w40, a new filter cartridge and a 36mm socket.
Quite tidy under here:
 2017-12-26_10-06-22 by Clifton Tausberger, on Flickr
Dipstick out and oil filter access here. Open the oil cap on the top of the engine too. Ensure the alternator and surrounding area are well protected with rags. I've done this three times now and still can't get away with a clean change.
 2017-12-26_10-06-33 by Clifton Tausberger, on Flickr
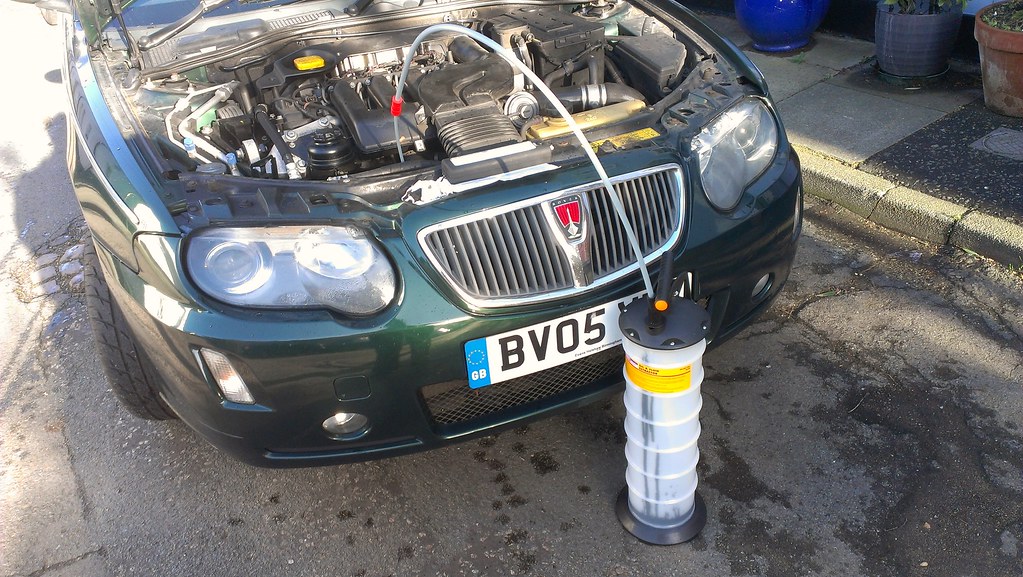
In goes the extractor, and a cup of tea for me:
 2017-12-26_10-06-45 by Clifton Tausberger, on Flickr
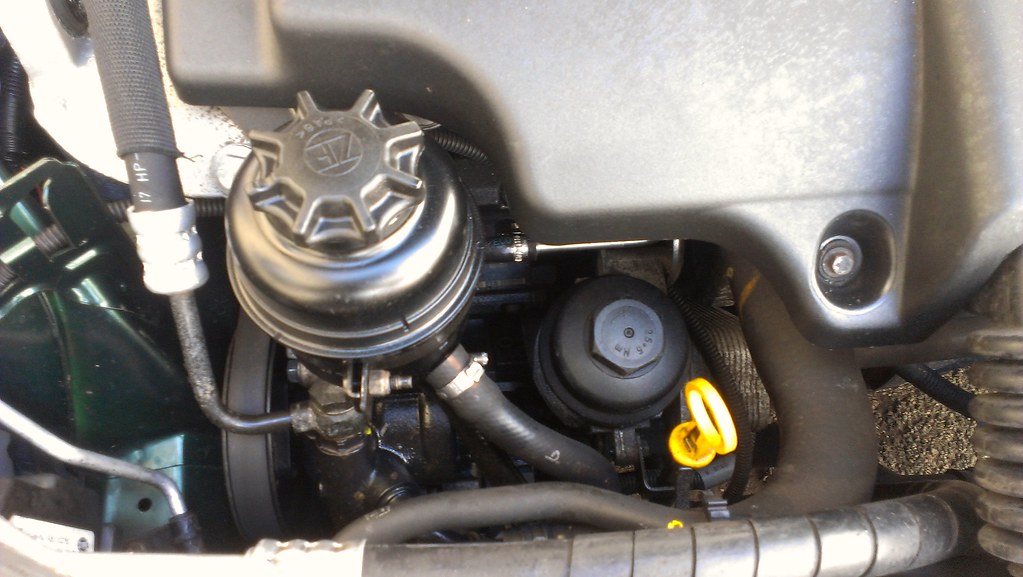
Once drained, a 36mm socket opens the oil filter housing by the dipstick above.
 2017-12-26_10-07-25 by Clifton Tausberger, on Flickr
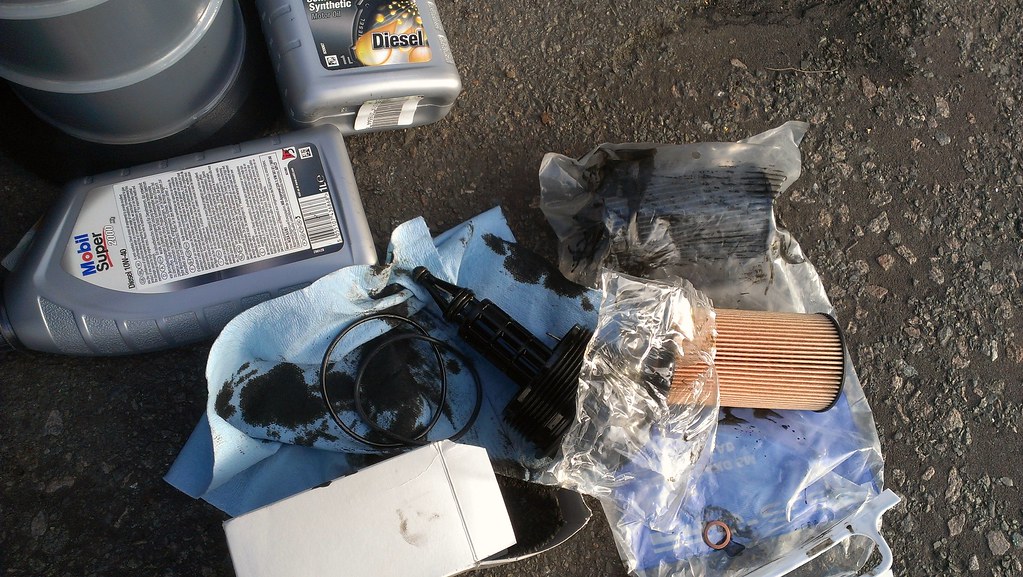
As it's plastic, take care to loosen it smoothly. Extracting the filter assembly comes with the lid and (probably) some washers. New filter on, new washers and seals on, screw it all back together and put however much oil came out back in.
 2017-12-26_10-07-14 by Clifton Tausberger, on Flickr
Edited by Spinakerr on Wednesday 10th January 21:49
The Tale Of The Thermostat Anaconda
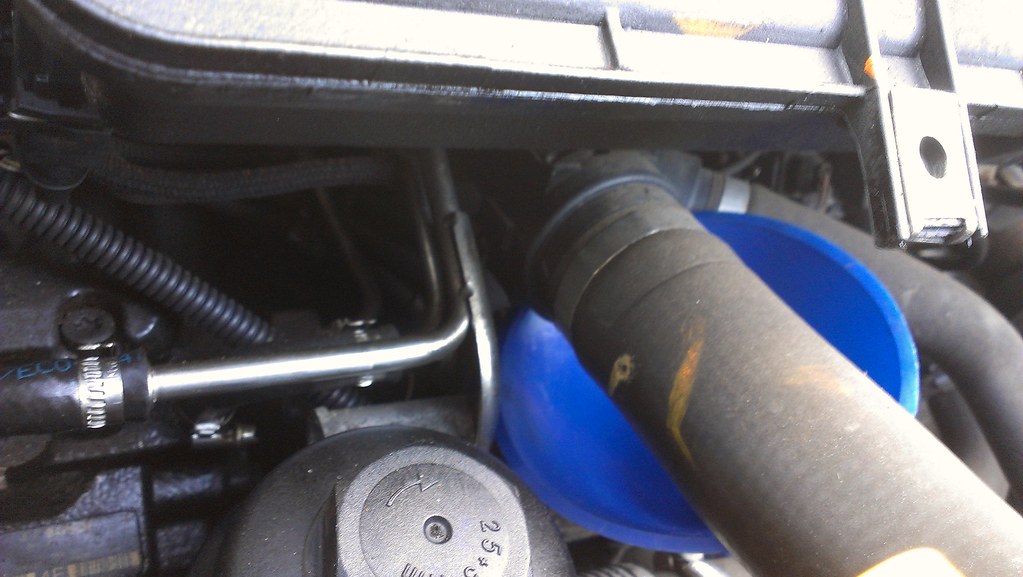
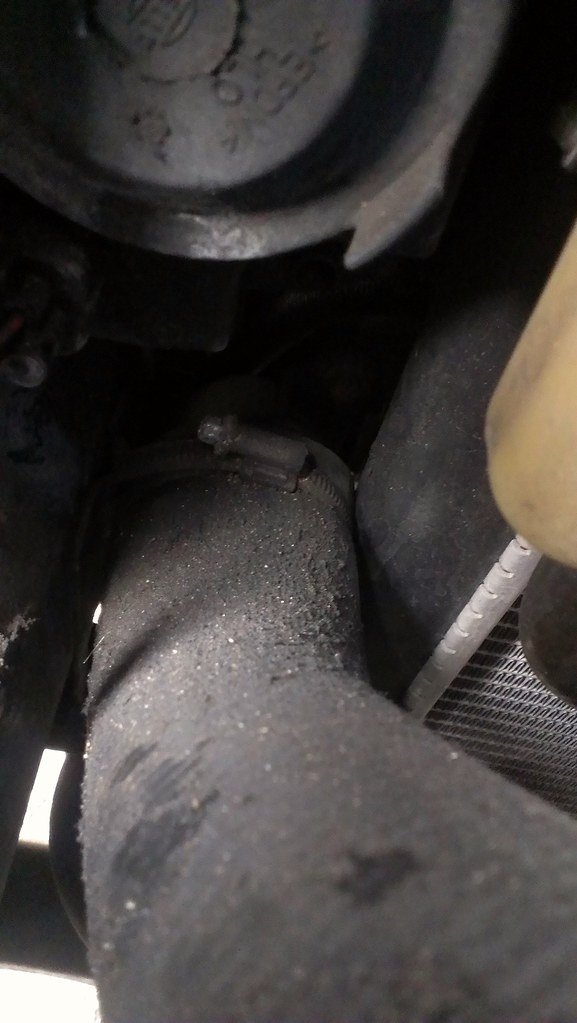
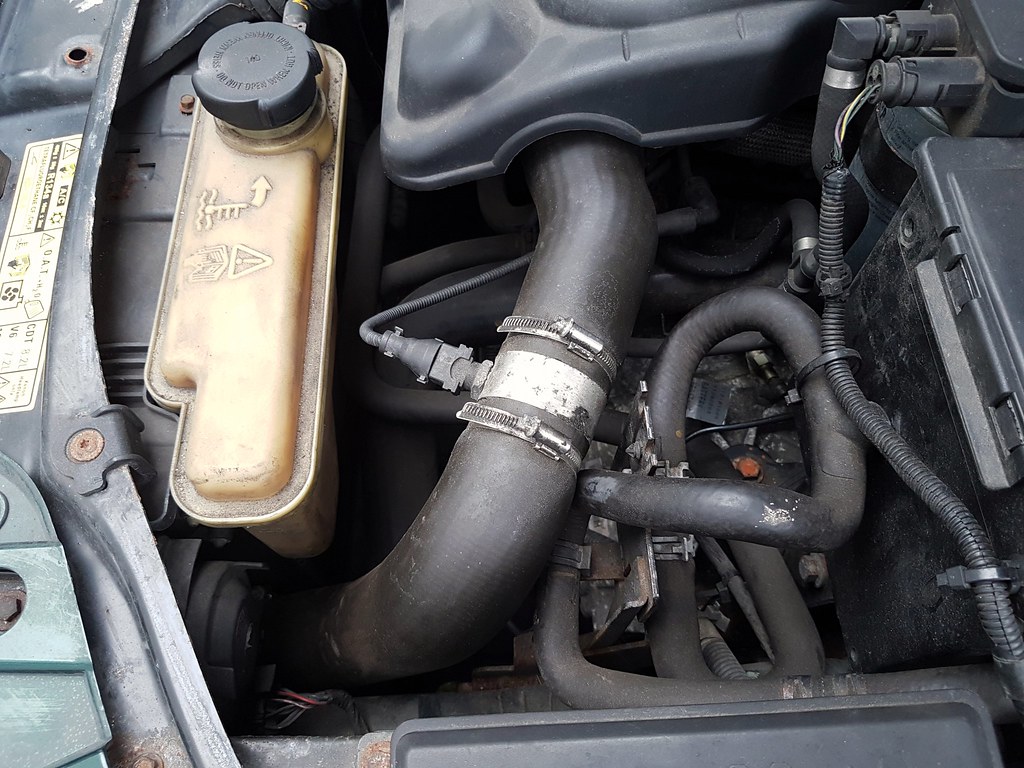
Next up, one haggling point at sale was the cool running - luckily this is a well known CDTi fault of a stuck thermostat. Replacement is an involved process that often recurs within a year, so the community suggest leaving the housing alone and adding a secondary thermostat in the system.
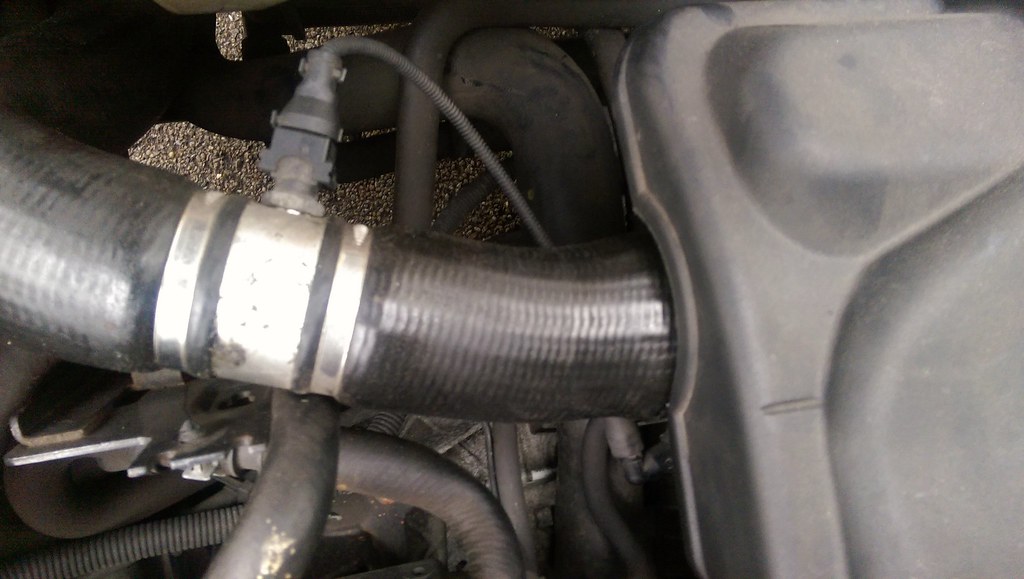
Here's the candidate - a top hose above the oil filter. Ensure you have a funnel and bottle to catch coolant (red OAT), then dremel off the retainer by the engine.
 2017-12-26_10-08-14 by Clifton Tausberger, on Flickr
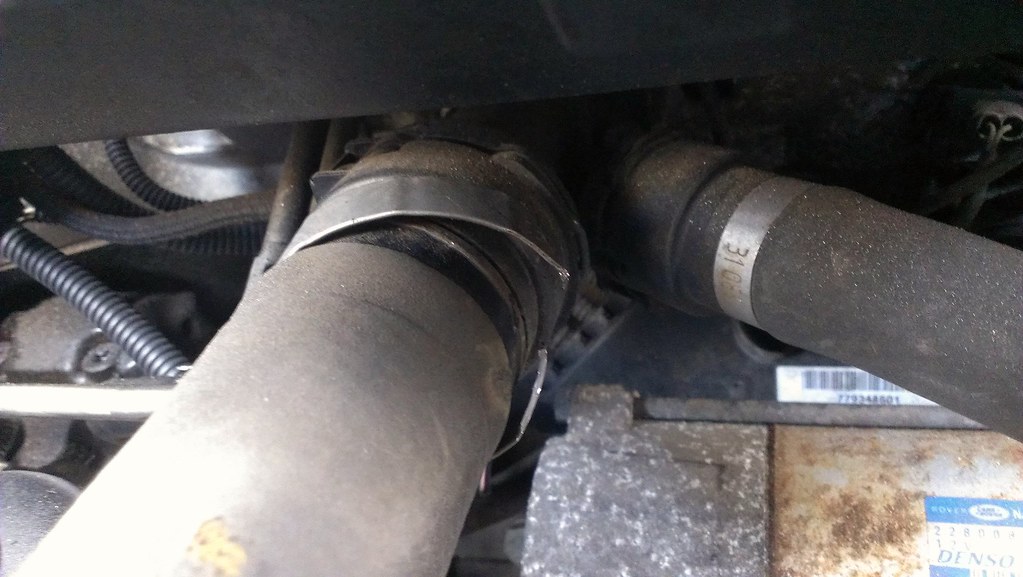 2017-12-26_10-08-24 by Clifton Tausberger, on Flickr
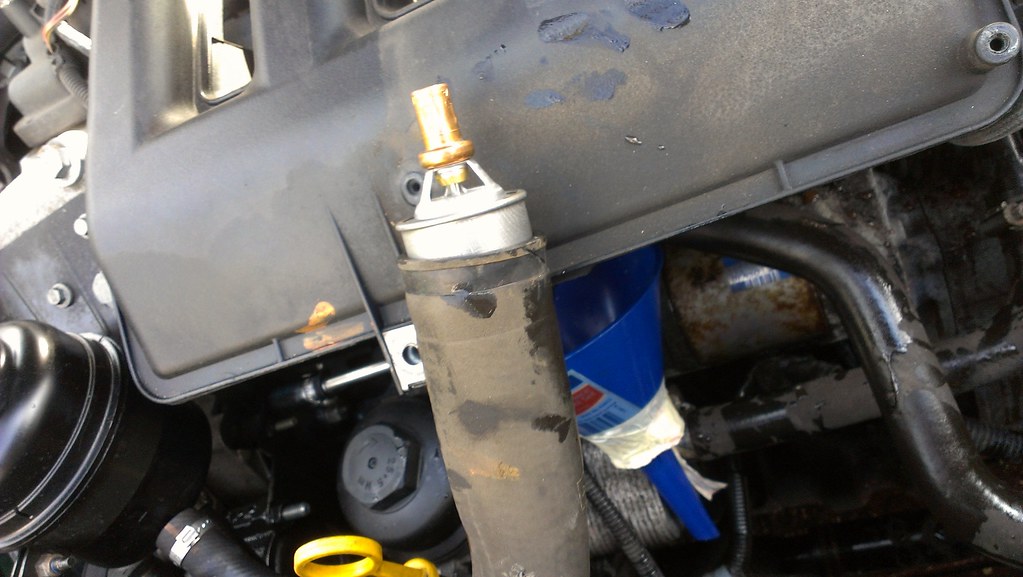
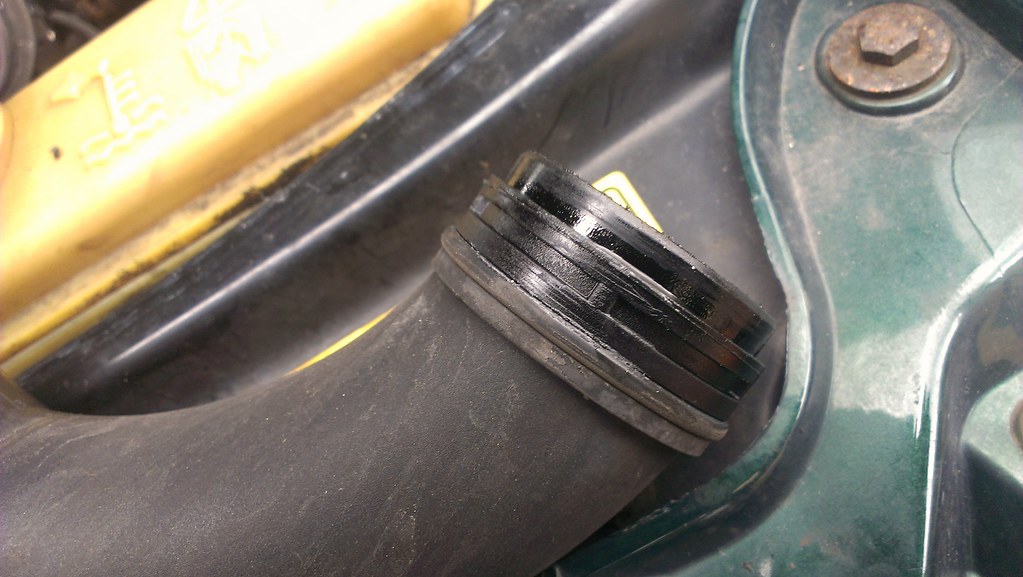
With brute force, patience and chanting a Renault 5 88 degree thermostat will fill down the hose, with the thin end pointing towards the block. Don't be tempted to use any lubricant as this will contaminate the system.
 2017-12-26_10-09-46 by Clifton Tausberger, on Flickr
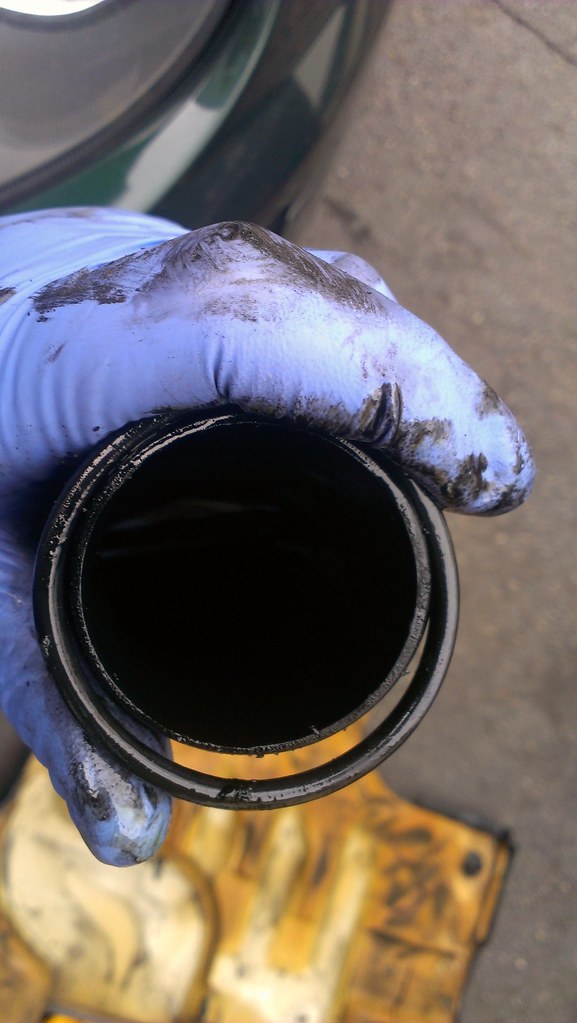
This far will do, not I removed the radiator-side clip as well for better purchase.
 2017-12-26_10-09-56 by Clifton Tausberger, on Flickr
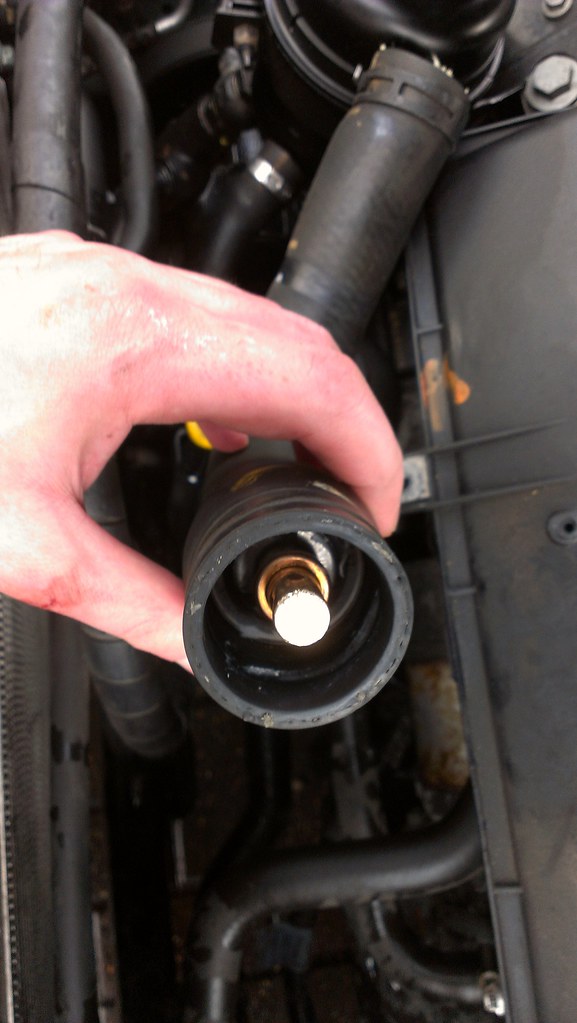
The slightly anaconda-like hose now in place, add a new 38-45mm jubilee clip and you should be all set. Instantly our car got better mpg and of course was happier in the winter.
Edited by Spinakerr on Wednesday 10th January 21:51
bungz said:
Old diesel dagdag estate with loads of broken bits

This has provided much merriment to my household, thank you.The Predictably Grotty Story Of Turbo Seals and EGuRgh Cleaning
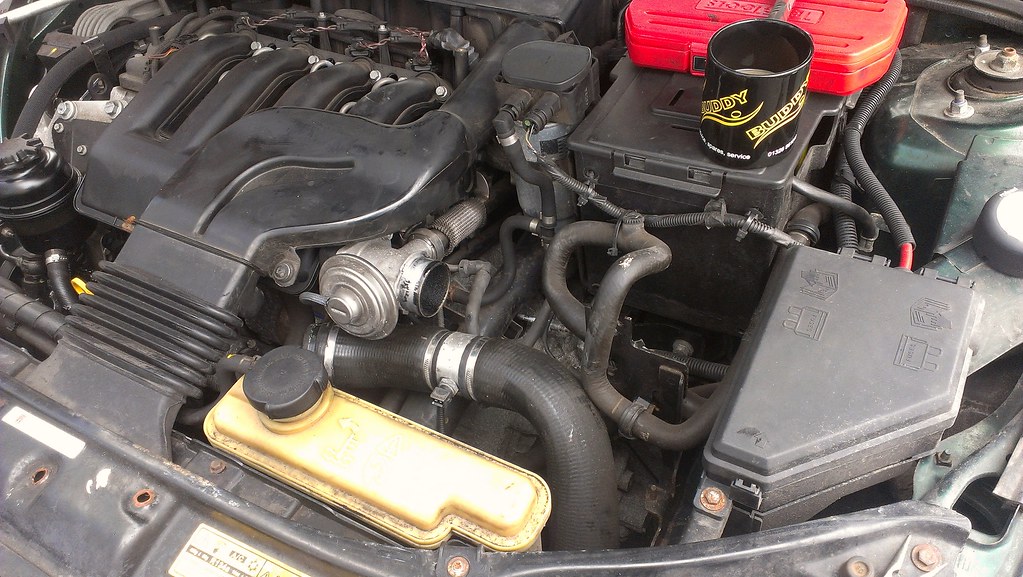
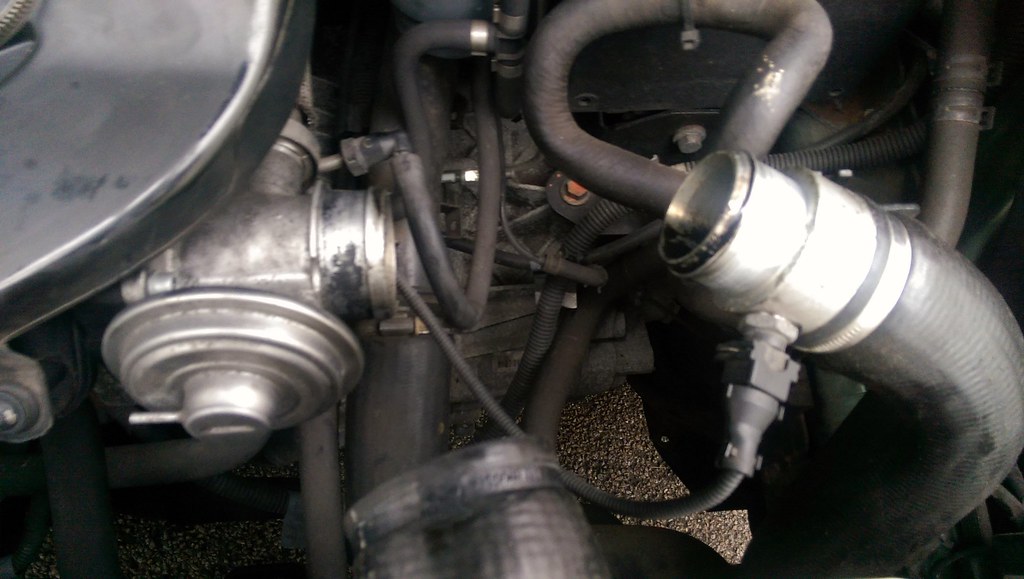
The BMW diesel lump in the 75/ZT is a solid, chain driven beast that is capable of Lexus-like mileage. Of course, give a vehicle to a member of the general public and they will treat it like a fridge, and they predictably suffer. With the aforementioned oil resembling the tar that killed Tasha Yar, I was prepared for the worst in exhaust gas recirculation nastiness. Access is good, and several jubilee clips later the main air intake pipes were off:
 2017-12-26_10-10-32 by Clifton Tausberger, on Flickr
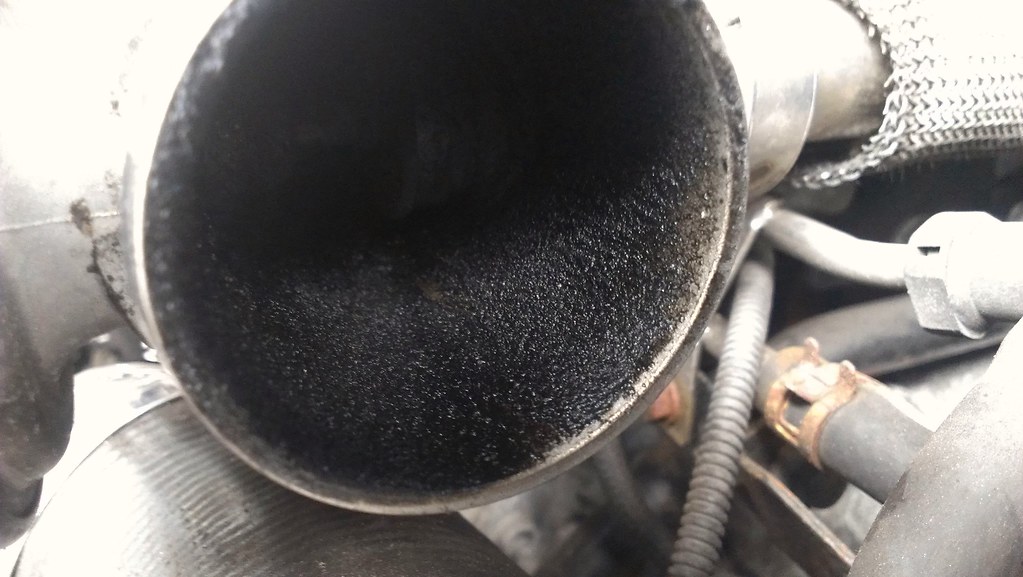
Allowing an inspection of the EGR. Mmm.
 2017-12-26_10-11-44 by Clifton Tausberger, on Flickr
Lovely.
 2017-12-26_10-10-42 by Clifton Tausberger, on Flickr
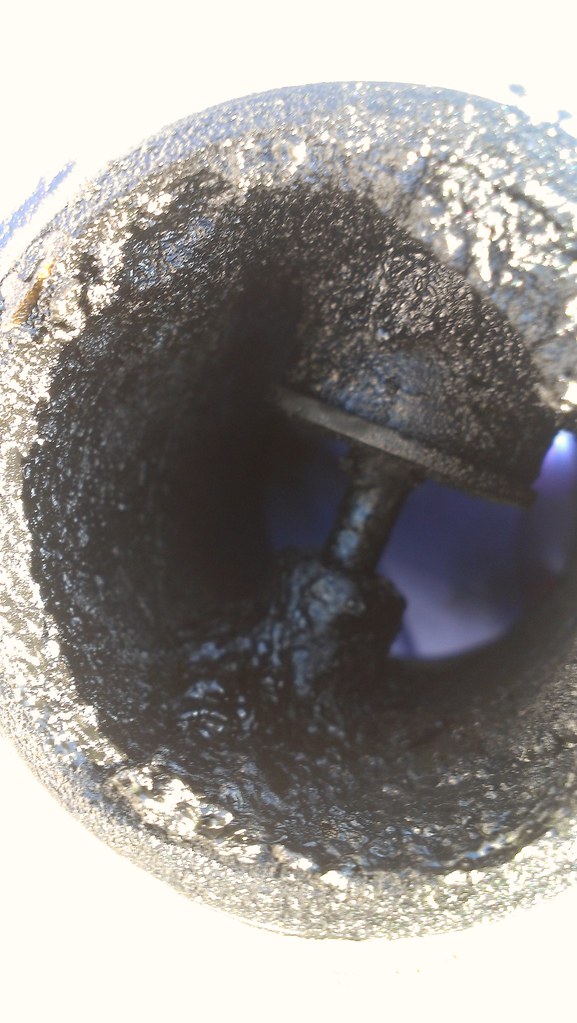
Unbolting the EGR entirely, you can see the thickness of the grot:
 2017-12-26_10-12-16 by Clifton Tausberger, on Flickr
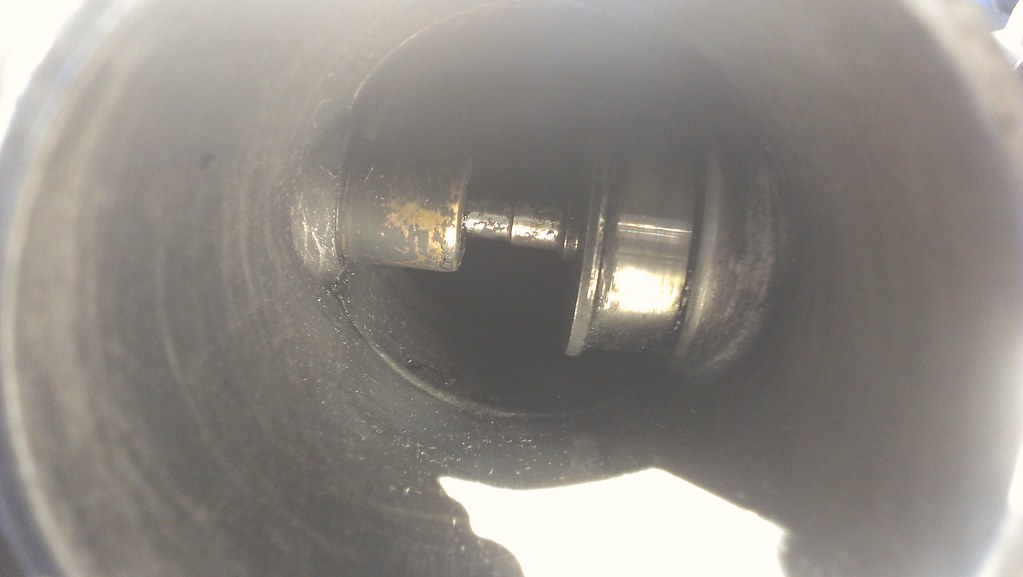
A healthy spray of carb cleaner, a blunt screwdriver and a toothbrush brought it up clean as a (diesel) train whistle:
 2017-12-26_10-12-28 by Clifton Tausberger, on Flickr
I also block off the EGR pipe with a screw and crimped the EGR intake closed.
Next up, turbo intercooler seals. A very common issue on these cars, the nitrile seals at the intercooler elbow, just under the left headlight, deform over time and pop out. Our 75 lost boost on hard acceleration and made a nasty hissing noise. Telltale oil spray when viewed from above:
 2017-12-26_10-10-52 by Clifton Tausberger, on Flickr
With some contortionist spannering you can get both the flexible hose and the solid plastic elbow out without removing the grill/bumper/headlight. My original seals weren't too bad, but were clearly letting air past. Top:
 2017-12-26_10-11-03 by Clifton Tausberger, on Flickr
Bottom:
 2017-12-26_10-11-13 by Clifton Tausberger, on Flickr
It's important not to replace like for like, so I ordered new viton seals (the smaller brown one, black old one for comparison) from the 75 experts:
 2017-12-26_10-11-22 by Clifton Tausberger, on Flickr
Neat and clean:
 2017-12-26_10-11-34 by Clifton Tausberger, on Flickr
The elbow pops back into the intercooler, then pipework can be reattached. This cured our hiss and some boostiness, but the power still arrived in one Saab 900-like shove. Further investigation was needed...
ECU Overfloweth
By this stage the 75 had done a few months and several thousand miles, and we were digging in to the preventative fixes and service items with gusto.
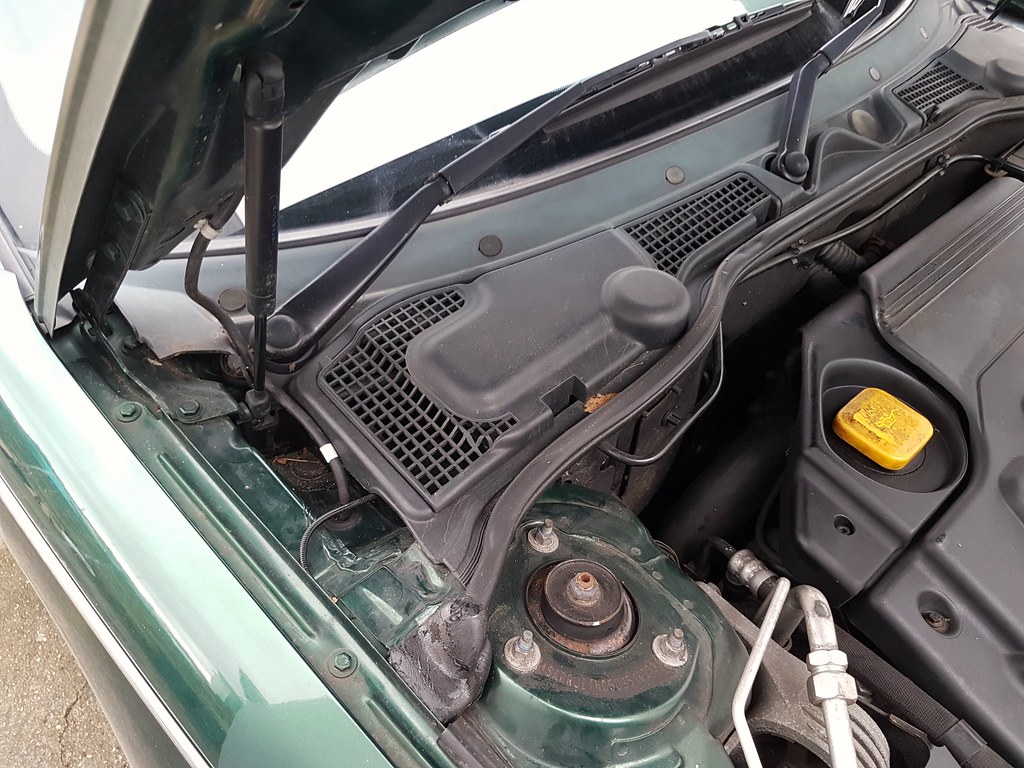
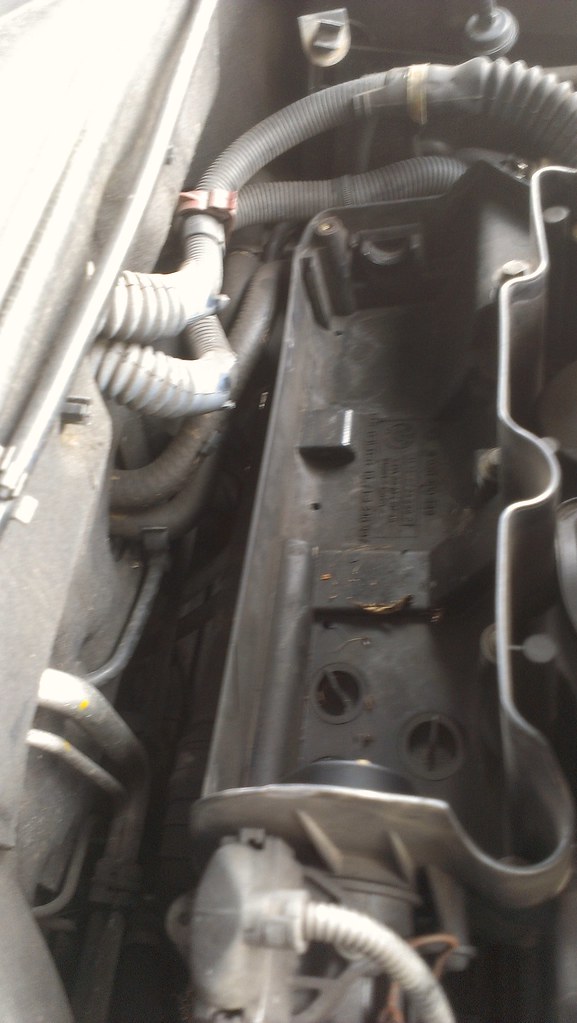
One very important upgrade from the community is a small L shaped piece of plastic that sits in the scuttle. As the ECU is located in front of the bulkhead, if any of the trains are blocked with leaves the water cascades into the ECU area on the driver's side.
 2018-01-13_12-28-54 by Clifton Tausberger, on Flickr
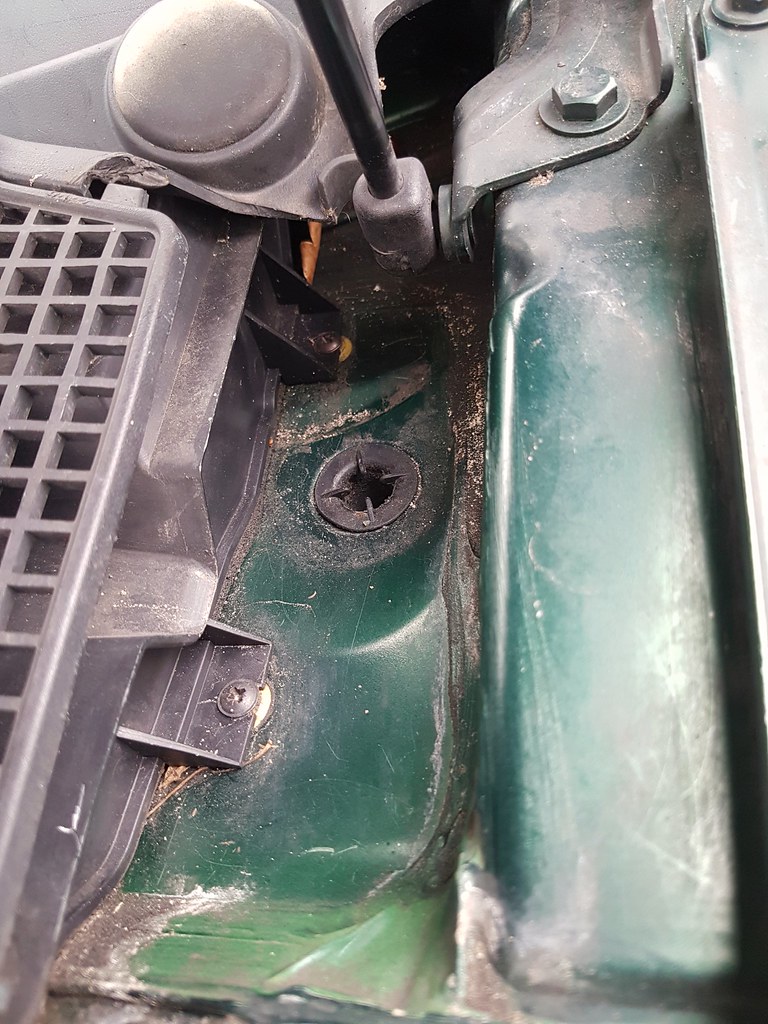
This is one of the major causes of 75 death. Step one - remove crud, clear drains with coat hanger:
 2018-01-13_12-29-29 by Clifton Tausberger, on Flickr
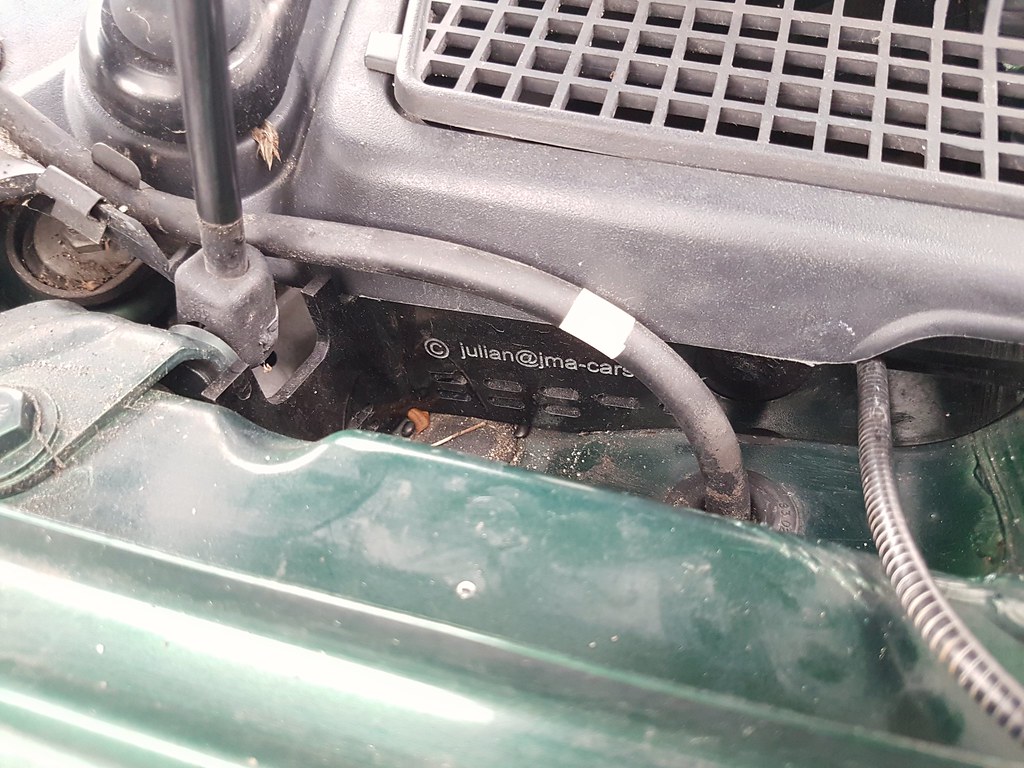
Step two - add plastic drain for a few pounds on the driver's side:
 2018-01-13_12-29-15 by Clifton Tausberger, on Flickr
Step three - feel better.
By this stage the 75 had done a few months and several thousand miles, and we were digging in to the preventative fixes and service items with gusto.
One very important upgrade from the community is a small L shaped piece of plastic that sits in the scuttle. As the ECU is located in front of the bulkhead, if any of the trains are blocked with leaves the water cascades into the ECU area on the driver's side.
2018-01-13_12-28-54 by Clifton Tausberger, on FlickrThis is one of the major causes of 75 death. Step one - remove crud, clear drains with coat hanger:
2018-01-13_12-29-29 by Clifton Tausberger, on FlickrStep two - add plastic drain for a few pounds on the driver's side:
2018-01-13_12-29-15 by Clifton Tausberger, on FlickrStep three - feel better.
Turbo Selecta
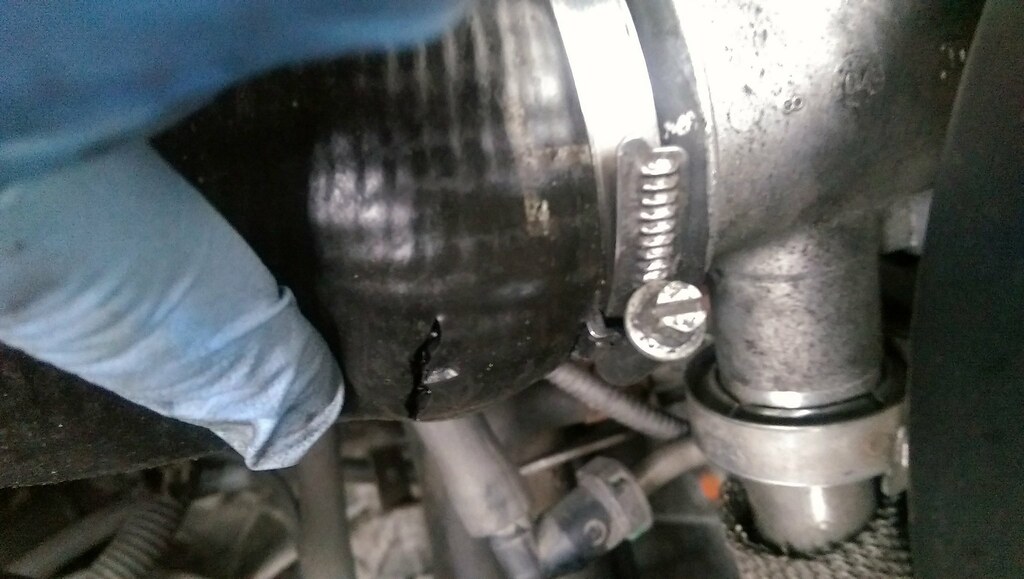
The turbo issue was starting to grate, so I went through a number of items that are probably causes. First off, a tear in the intercooler pipe:
 2018-01-13_12-30-08 by Clifton Tausberger, on Flickr
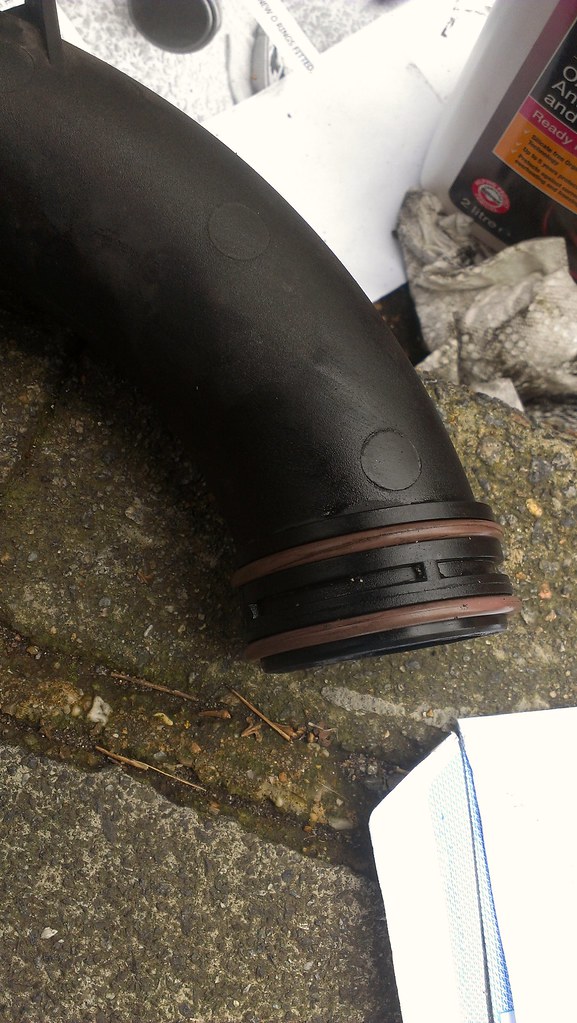
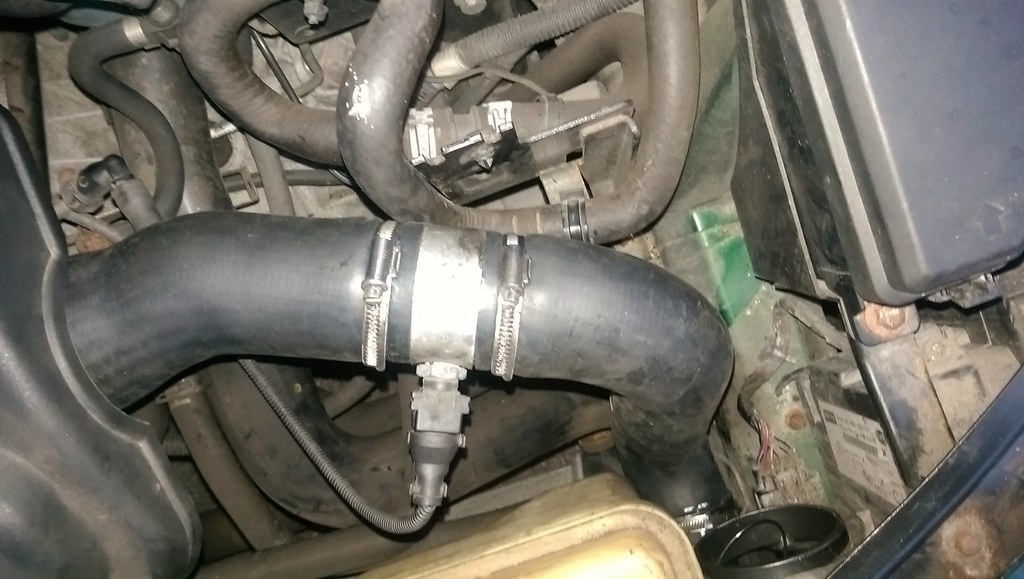
The big plastic engine cover had rubber through on the top half of that picture. In the earlier years this was a single pipe, but later on the silver sensor section in the middle was added, changing the angle:
 2018-01-13_12-34-45 by Clifton Tausberger, on Flickr
Cover removed:
 2018-01-13_12-35-00 by Clifton Tausberger, on Flickr
Out came the section:
 2018-01-13_12-35-12 by Clifton Tausberger, on Flickr
Top tip - the original version of the hose can be bought and just cut into two sections, don't bother trying to track down just one section!
 2018-01-13_12-35-24 by Clifton Tausberger, on Flickr
The plastic cover was then judiciously trimmed to prevent reoccurence. Did it help?
No. But I felt better.
Next up - the boost pressure sensor, which can get blocked. Given the state of the EGR detritus, this was likely. It's on the bottom left of the manifold. This could never be described as a pretty engine:
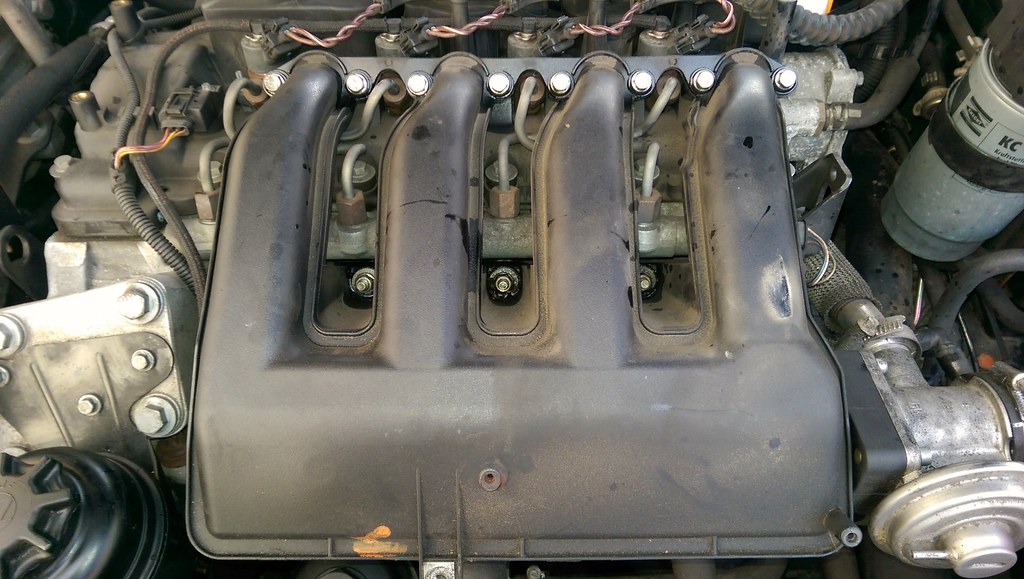 2017-12-26_10-20-49 by Clifton Tausberger, on Flickr
Here it is:
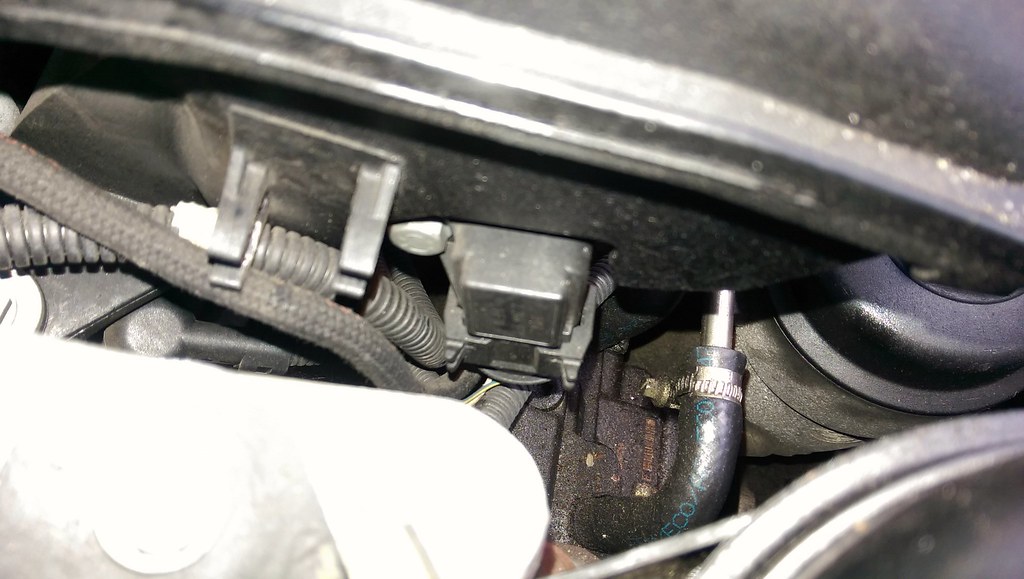 2017-12-26_10-20-40 by Clifton Tausberger, on Flickr
Unfortunately the angles are not ideal for tools, so I just unbolted the whole intake (13 bolts, some of which are captive). Make sure all the orange gaskets are saved and don't drop into the engine:
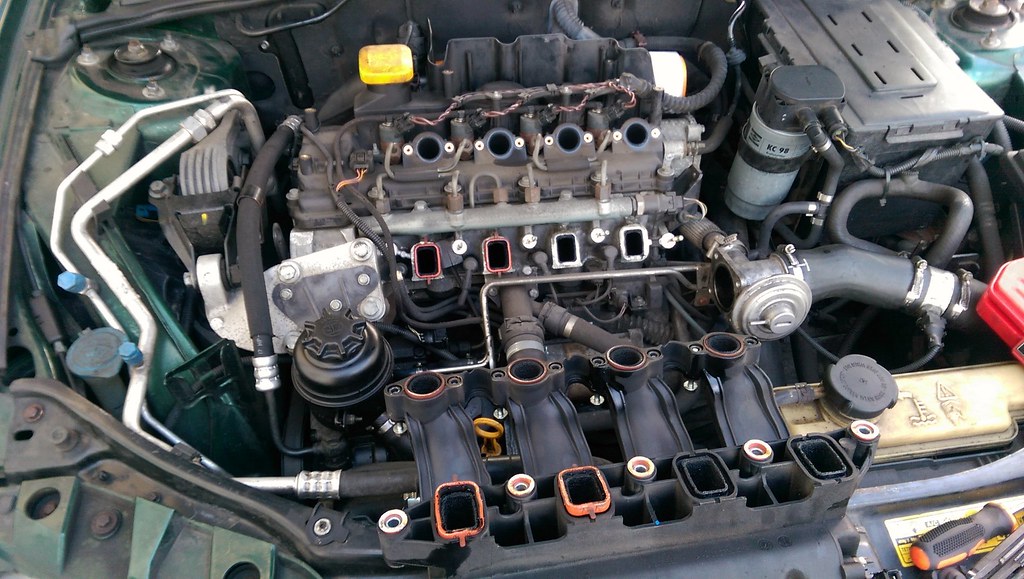 2017-12-26_10-21-17 by Clifton Tausberger, on Flickr
Easier access:
 2017-12-26_10-21-32 by Clifton Tausberger, on Flickr
Despite being utterly filthy, it was unblocked. Trouble items often resemble one of those ancient 'draw a beard with iron filings' toys:
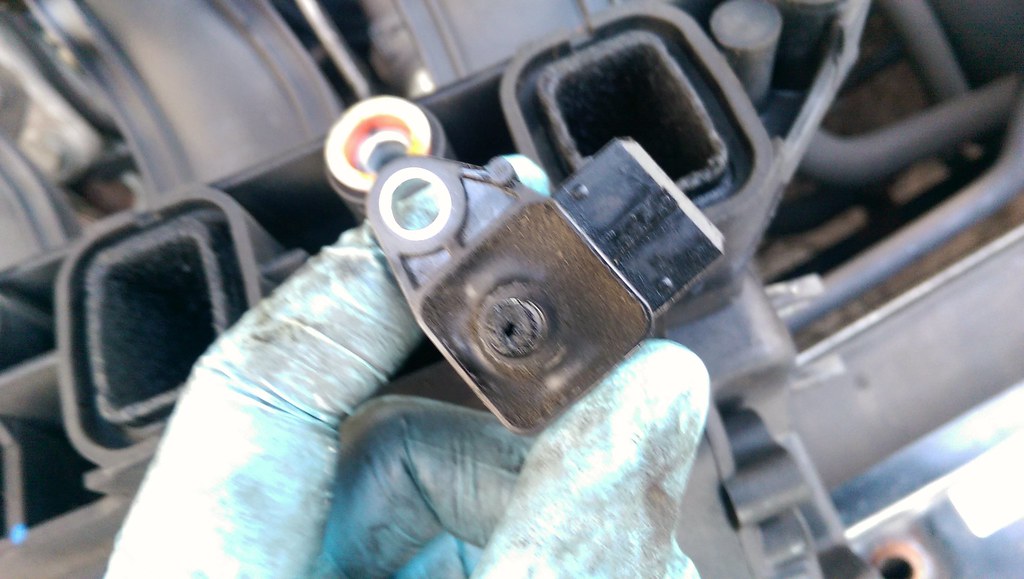 2017-12-26_10-21-46 by Clifton Tausberger, on Flickr
Cleaned and reassembled, no change. Blast.
The air filter needed a change anyway, and as the PCV filter is not a service item on the Rover service schedules they always need a change, plus I could clean the MAF while the top of the engine was out. Curiously, the PCV is a service item for the BMW Minis that share the engine. Fun fact, I know (snore...).
Engine cover off, oil filler cap off, three captive bolts for the air filter cover:
 2017-12-26_10-13-04 by Clifton Tausberger, on Flickr
Old and new:
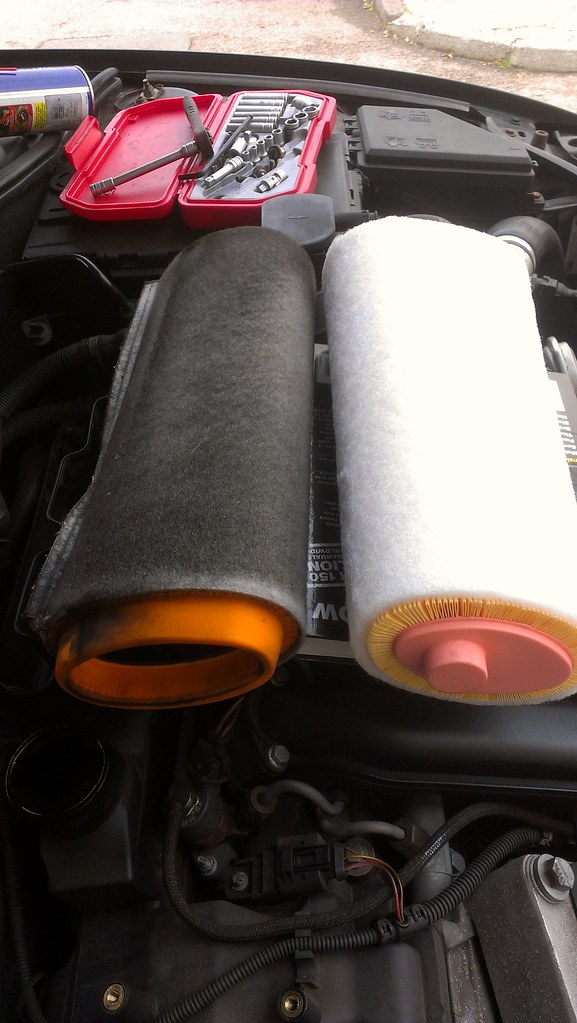 2017-12-26_10-13-13 by Clifton Tausberger, on Flickr
Also, hoover out the airbox:
 2017-12-26_10-13-22 by Clifton Tausberger, on Flickr
MAF connection at the bottom of that picture (unclip, two star bolts, easy).
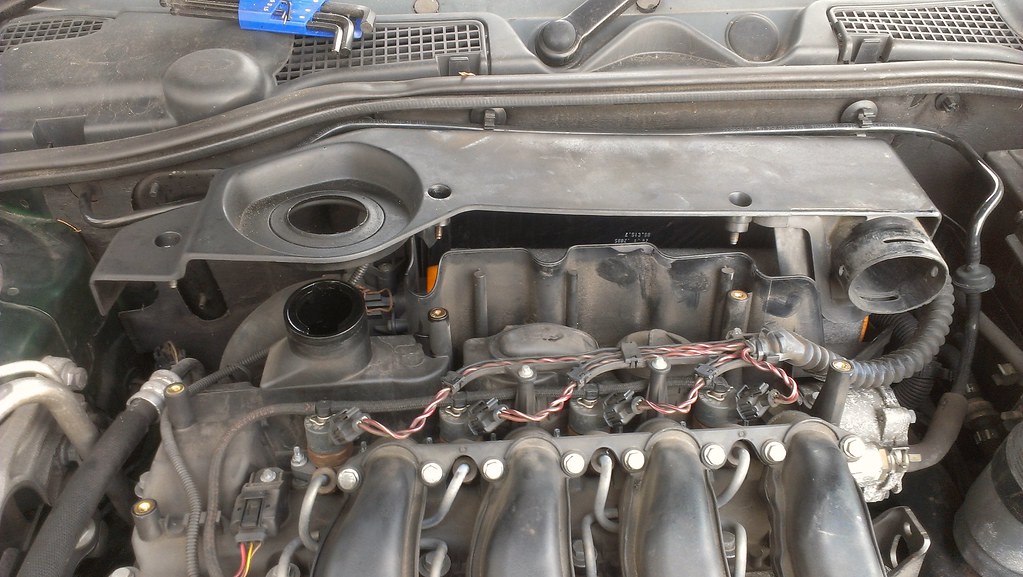
Next up remove injector harness. PCV filters are in the domes at the back of this picture:
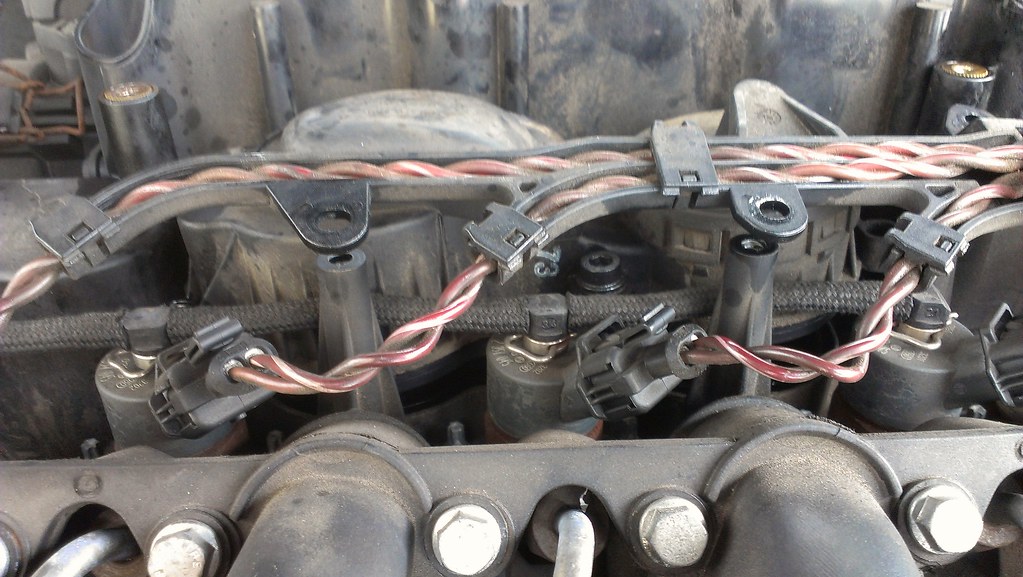 2017-12-26_10-13-32 by Clifton Tausberger, on Flickr
Lovely:
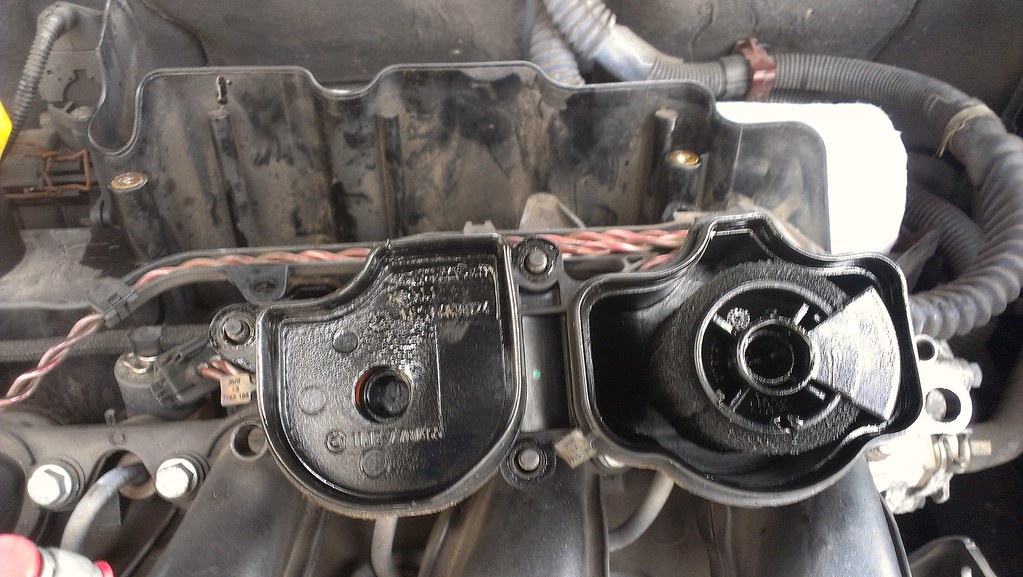 2017-12-26_10-13-42 by Clifton Tausberger, on Flickr
Similar to the oil filter housing, unclip, change filter, change seals:
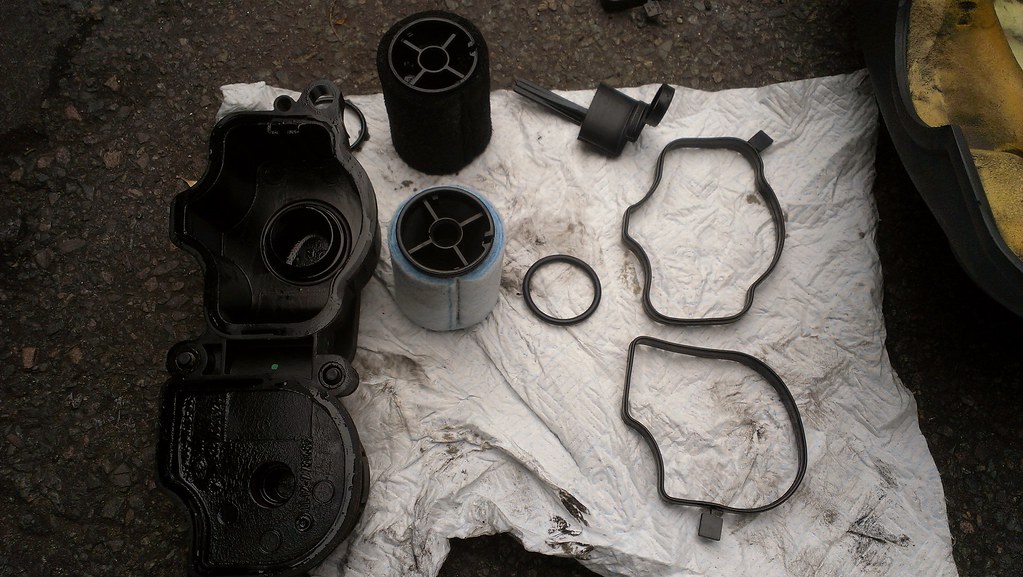 2017-12-26_10-13-52 by Clifton Tausberger, on Flickr
Some contact cleaner on the MAF (carefully):
 2017-12-26_10-19-56 by Clifton Tausberger, on Flickr
...and put it all back together. No change. Double drat.
I got talking to the Rover beards and luckily had my photos to hand. 'Not a real MAF that' one of the older wizards sniffed.
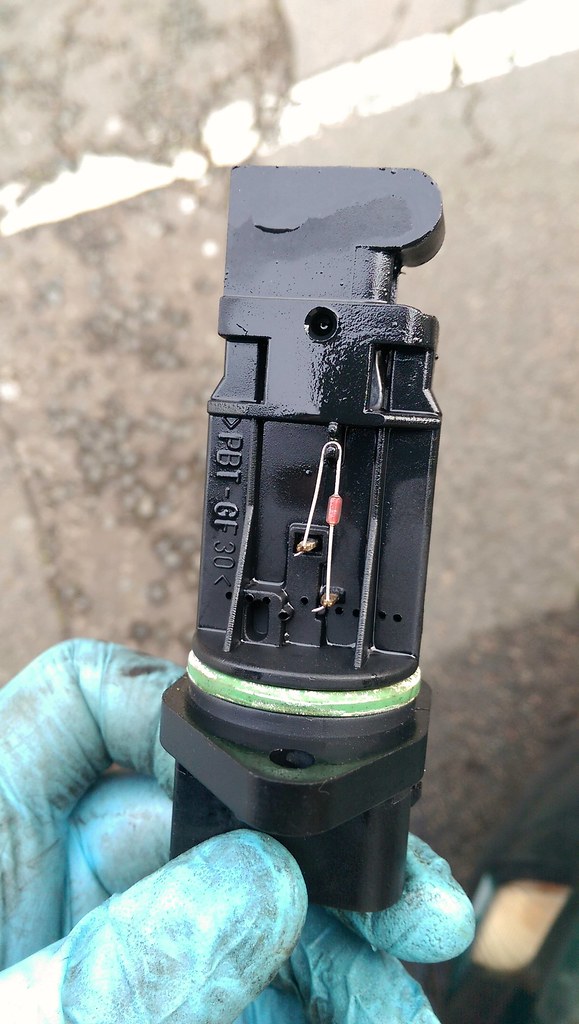
Sure enough, it was a poor copy of the Bosch one. Copies are so prevalent they had worker their way into some of the bigger suppliers, and the Rover community have ended up contact Bosch directly for their approved suppliers. A week or so later a German parcel arrived. Here's the difference. Note the numbers present, seal colour and (trust me on this) a better quality of plastic:
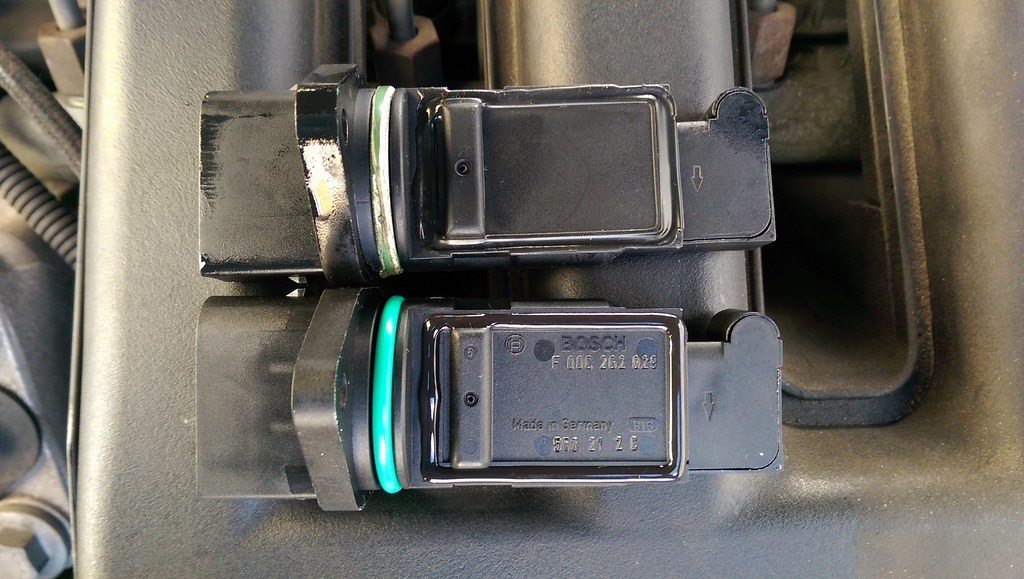 2017-12-26_10-20-11 by Clifton Tausberger, on Flickr
I will forever remember F 00C 2G2 029. All diesel owners, I encourage you to check yours. The difference was incredible! No shove but smooth boost, efficiency climbed by a few mpg and no sudden hiccups under acceleration. It only took a few months of frittering and 200GBP of parts...
The turbo issue was starting to grate, so I went through a number of items that are probably causes. First off, a tear in the intercooler pipe:
2018-01-13_12-30-08 by Clifton Tausberger, on FlickrThe big plastic engine cover had rubber through on the top half of that picture. In the earlier years this was a single pipe, but later on the silver sensor section in the middle was added, changing the angle:
2018-01-13_12-34-45 by Clifton Tausberger, on FlickrCover removed:
2018-01-13_12-35-00 by Clifton Tausberger, on FlickrOut came the section:
2018-01-13_12-35-12 by Clifton Tausberger, on FlickrTop tip - the original version of the hose can be bought and just cut into two sections, don't bother trying to track down just one section!
2018-01-13_12-35-24 by Clifton Tausberger, on FlickrThe plastic cover was then judiciously trimmed to prevent reoccurence. Did it help?
No. But I felt better.
Next up - the boost pressure sensor, which can get blocked. Given the state of the EGR detritus, this was likely. It's on the bottom left of the manifold. This could never be described as a pretty engine:
2017-12-26_10-20-49 by Clifton Tausberger, on FlickrHere it is:
2017-12-26_10-20-40 by Clifton Tausberger, on FlickrUnfortunately the angles are not ideal for tools, so I just unbolted the whole intake (13 bolts, some of which are captive). Make sure all the orange gaskets are saved and don't drop into the engine:
2017-12-26_10-21-17 by Clifton Tausberger, on FlickrEasier access:
2017-12-26_10-21-32 by Clifton Tausberger, on FlickrDespite being utterly filthy, it was unblocked. Trouble items often resemble one of those ancient 'draw a beard with iron filings' toys:
2017-12-26_10-21-46 by Clifton Tausberger, on FlickrCleaned and reassembled, no change. Blast.
The air filter needed a change anyway, and as the PCV filter is not a service item on the Rover service schedules they always need a change, plus I could clean the MAF while the top of the engine was out. Curiously, the PCV is a service item for the BMW Minis that share the engine. Fun fact, I know (snore...).
Engine cover off, oil filler cap off, three captive bolts for the air filter cover:
2017-12-26_10-13-04 by Clifton Tausberger, on FlickrOld and new:
2017-12-26_10-13-13 by Clifton Tausberger, on FlickrAlso, hoover out the airbox:
2017-12-26_10-13-22 by Clifton Tausberger, on FlickrMAF connection at the bottom of that picture (unclip, two star bolts, easy).
Next up remove injector harness. PCV filters are in the domes at the back of this picture:
2017-12-26_10-13-32 by Clifton Tausberger, on FlickrLovely:
2017-12-26_10-13-42 by Clifton Tausberger, on FlickrSimilar to the oil filter housing, unclip, change filter, change seals:
2017-12-26_10-13-52 by Clifton Tausberger, on FlickrSome contact cleaner on the MAF (carefully):
2017-12-26_10-19-56 by Clifton Tausberger, on Flickr...and put it all back together. No change. Double drat.
I got talking to the Rover beards and luckily had my photos to hand. 'Not a real MAF that' one of the older wizards sniffed.
Sure enough, it was a poor copy of the Bosch one. Copies are so prevalent they had worker their way into some of the bigger suppliers, and the Rover community have ended up contact Bosch directly for their approved suppliers. A week or so later a German parcel arrived. Here's the difference. Note the numbers present, seal colour and (trust me on this) a better quality of plastic:
2017-12-26_10-20-11 by Clifton Tausberger, on FlickrI will forever remember F 00C 2G2 029. All diesel owners, I encourage you to check yours. The difference was incredible! No shove but smooth boost, efficiency climbed by a few mpg and no sudden hiccups under acceleration. It only took a few months of frittering and 200GBP of parts...
JakeT said:
Bloody M47 air filters. Two of my mates have the same engine in 3 series and it takes min half an hour to do an air filter on one. Otherwise they're a good diesel unit for the time. Does the rover variant have swirl flaps?
No.Turbo is also non-variable vane, unlike the freelander.
Means it's the least complicated, but also the most reliable.
I can definitely vouch for reliability, but there's a good laundry list of stuff to keep them healthy that is fortunately relatively cheap and easy to learn.
Loyly said:
A great thread. I have enjoyed all these pictures and in-depth facts on the car. I love reading on owners who really get stuck into a car like this.
Thanks - It's really enjoyable to keep a car going, especially as this one is so well catered for both in parts and advice. I thought I wouldn't enjoy working on it but it's the least 'modern' of modern cars I have got into. BrettMRC said:
You need to inspect the ECU as a priority - from past experience these are usually sitting in a bath of water in front of the firewall....
Amen. Can't stress this enough. Resistance Is Futile
As summer in the first year of ownership kicked off, my girlfriend ticked over about 5k in as many months and we took our first holiday down to Cornwall. Somewhat unbelievably, the air conditioning did just need a regas, as the original advert said, and we wafted down in relative comfort. This is the first car she has owned with working air con, and we felt very nouveau-rich indeed, following our shed-laden couple history.
Here it is at Fowey:
 2017-12-26_10-16-01 by Clifton Tausberger, on Flickr
No holiday is complete without me bringing a bag of bits to attach to the car. It's a great incentive, knowing that if you get it wrong with limited tools on a driveway by the beach that you might not be able to leave.
Fuel filter is dead simple: under the bonnet, unplug some plugs, position rags to catch diesel and unbolt a 10mm nut to loosen the bracket. Keep the filter level when removing to minimise spillage.
 2017-12-26_10-14-02 by Clifton Tausberger, on Flickr
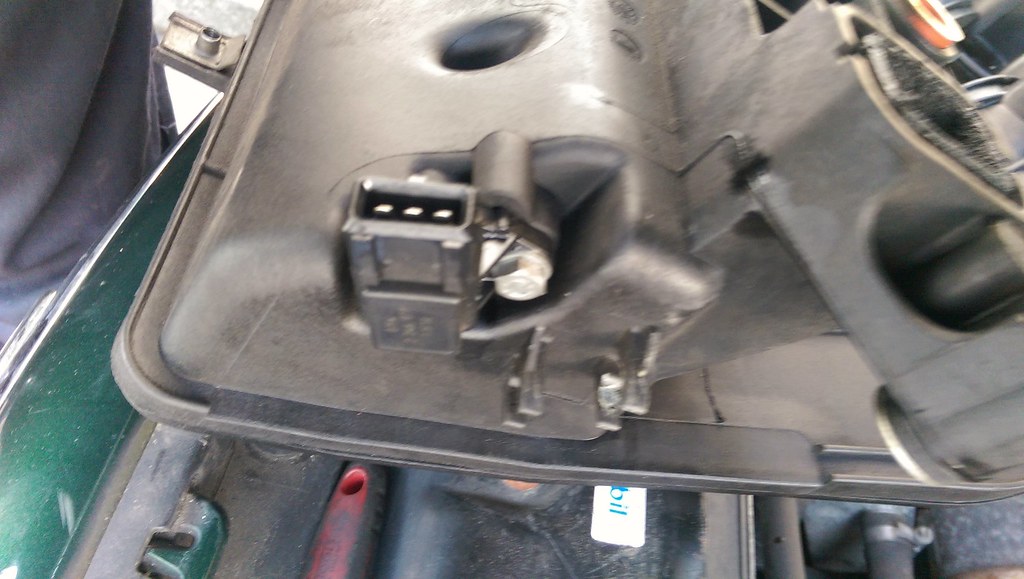
On to something more tricky - the fan resistor. 75s have form in their cooling circuit, loosing speeds or failing entirely. The Mk2 has a two speed fan, but ours either ran full speed (very noisy) or off, and sometimes cycled between the two in quick succession. The Rover community have a prominent member, Jules, who supplies a resistor replacement to (more often than not) bring the circuit back to the correct behavior.
First off, unbolt 412 bolts and plastic retainers, be surprised at the weight of the bumper:
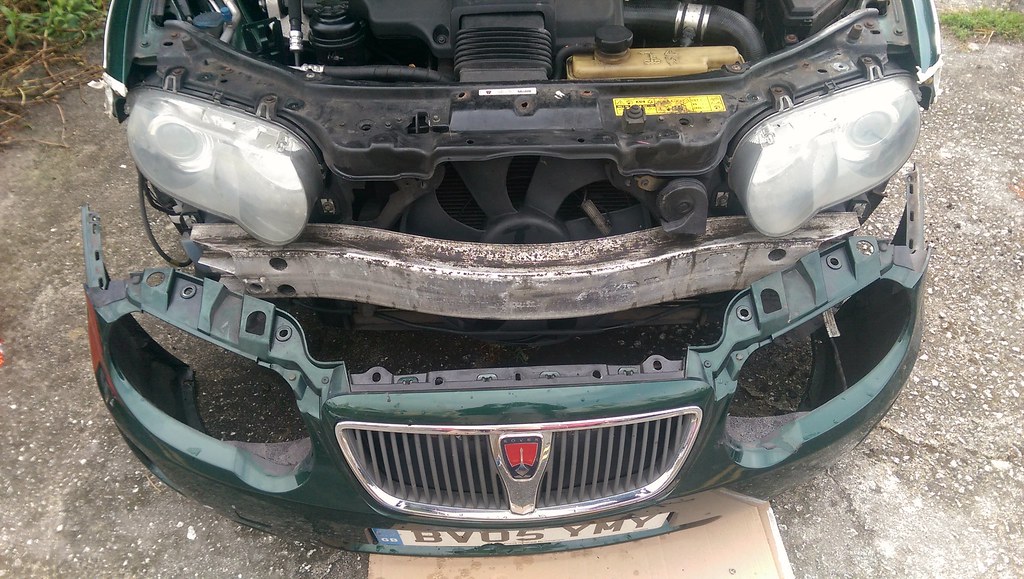 2017-12-26_10-15-20 by Clifton Tausberger, on Flickr
You can see I had already unscrewed the resistor in the pic, it sits behind the fan.
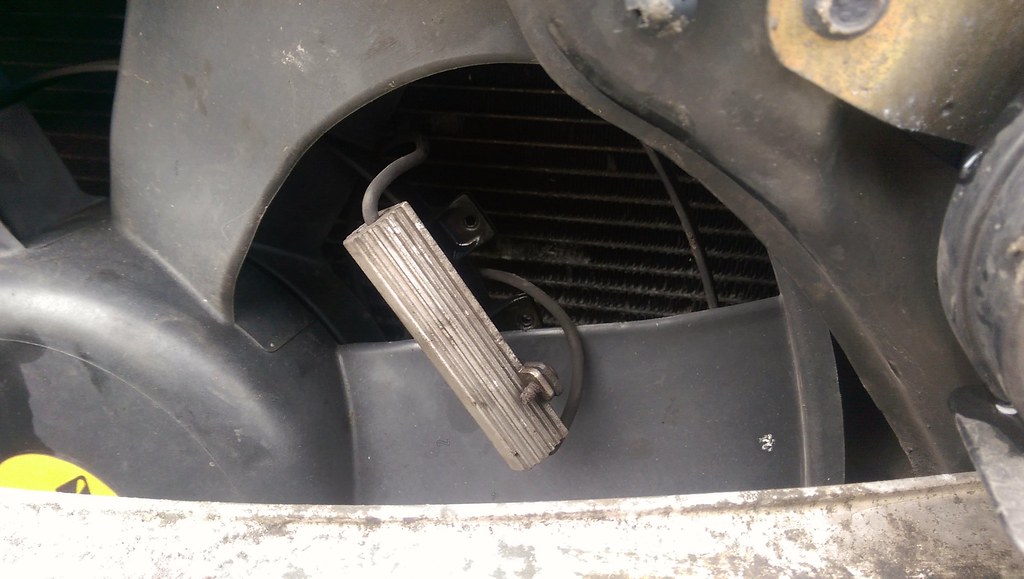 2017-12-26_10-15-31 by Clifton Tausberger, on Flickr
If you have time and want to do a perfect job you can unbolts more bits and solder the leads on. I took the shorter route (hey, the pub was opening, don't judge me!) and fitted some new connectors to the wires, screw it all back down and then began the tiresome rebolting procedure.
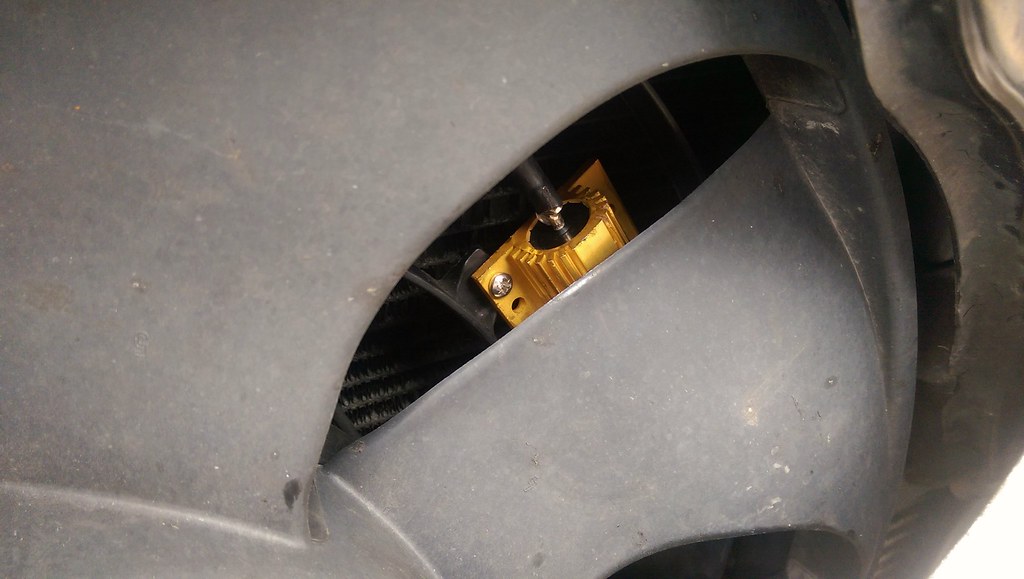 2017-12-26_10-15-48 by Clifton Tausberger, on Flickr
It's gold and shiny, it must be better.
Primed the fuel system for 15 seconds before starting, fan kicked in with the AC and all was well. Blissful whisper replaced narcoleptic banshee.
As summer in the first year of ownership kicked off, my girlfriend ticked over about 5k in as many months and we took our first holiday down to Cornwall. Somewhat unbelievably, the air conditioning did just need a regas, as the original advert said, and we wafted down in relative comfort. This is the first car she has owned with working air con, and we felt very nouveau-rich indeed, following our shed-laden couple history.
Here it is at Fowey:
2017-12-26_10-16-01 by Clifton Tausberger, on FlickrNo holiday is complete without me bringing a bag of bits to attach to the car. It's a great incentive, knowing that if you get it wrong with limited tools on a driveway by the beach that you might not be able to leave.
Fuel filter is dead simple: under the bonnet, unplug some plugs, position rags to catch diesel and unbolt a 10mm nut to loosen the bracket. Keep the filter level when removing to minimise spillage.
2017-12-26_10-14-02 by Clifton Tausberger, on FlickrOn to something more tricky - the fan resistor. 75s have form in their cooling circuit, loosing speeds or failing entirely. The Mk2 has a two speed fan, but ours either ran full speed (very noisy) or off, and sometimes cycled between the two in quick succession. The Rover community have a prominent member, Jules, who supplies a resistor replacement to (more often than not) bring the circuit back to the correct behavior.
First off, unbolt 412 bolts and plastic retainers, be surprised at the weight of the bumper:
2017-12-26_10-15-20 by Clifton Tausberger, on FlickrYou can see I had already unscrewed the resistor in the pic, it sits behind the fan.
2017-12-26_10-15-31 by Clifton Tausberger, on FlickrIf you have time and want to do a perfect job you can unbolts more bits and solder the leads on. I took the shorter route (hey, the pub was opening, don't judge me!) and fitted some new connectors to the wires, screw it all back down and then began the tiresome rebolting procedure.
2017-12-26_10-15-48 by Clifton Tausberger, on FlickrIt's gold and shiny, it must be better.
Primed the fuel system for 15 seconds before starting, fan kicked in with the AC and all was well. Blissful whisper replaced narcoleptic banshee.
Great thread and looks a good example.
Owned our 75 for just over 3 years and 35k. It's a 2003 cdt saloon, with 140k on the clock. Had that thermostat issue for 3 years and never looked at it... Don't quite have the confidence to start unbolting stuff. It's just been resigned to "2nd car" as i've a new work car, so it doesn't get used that much any more.
Owned our 75 for just over 3 years and 35k. It's a 2003 cdt saloon, with 140k on the clock. Had that thermostat issue for 3 years and never looked at it... Don't quite have the confidence to start unbolting stuff. It's just been resigned to "2nd car" as i've a new work car, so it doesn't get used that much any more.
xcseventy said:
Great thread and looks a good example.
Owned our 75 for just over 3 years and 35k. It's a 2003 cdt saloon, with 140k on the clock. Had that thermostat issue for 3 years and never looked at it... Don't quite have the confidence to start unbolting stuff. It's just been resigned to "2nd car" as i've a new work car, so it doesn't get used that much any more.
Go on, treat that car to 20 minutes and thermostat - it's dead easy to fit the Renault one as above. Or if you're ever in SW london, send me a note, I thnk I have a few spares now having done it for a 75s since.Owned our 75 for just over 3 years and 35k. It's a 2003 cdt saloon, with 140k on the clock. Had that thermostat issue for 3 years and never looked at it... Don't quite have the confidence to start unbolting stuff. It's just been resigned to "2nd car" as i've a new work car, so it doesn't get used that much any more.
Gassing Station | Readers' Cars | Top of Page | What's New | My Stuff