Sensible family daily wagon - Mercedes Benz S211 E500
Discussion


S100HP said:
Hats off to you. It's costing you a few quid!!
For me, it's a keeper until the government legislate me out of ownership. That includes European governments too, as I like to travel around Europe.None of the things that I have done won't benefit me immediately during ownership and actually, reward me with a better driving experience and greater peace of mind. I think that there will always be peaks and troughs with long term ownership of a well-engineered high-mileage vehicle.
Edited by bolidemichael on Thursday 23 May 15:52
Great update. It's not good when your car comes out of a service broken. Glad you got it fixed.
The roadtrip looked amazing. So much more family fun than a budget flight etc.
My S211 329cdi is going in two weeks time to get rear driver side air spring replaced. They are thinking an Arnott unit but they say better to fit a pair! Would be cheaper to get one MB unit.
I haven't read over your thread again but is this something you've replaced and have a recommendation on?
Cheers
MercedesClassic said:
Great update. It's not good when your car comes out of a service broken. Glad you got it fixed.
The roadtrip looked amazing. So much more family fun than a budget flight etc.
My S211 329cdi is going in two weeks time to get rear driver side air spring replaced. They are thinking an Arnott unit but they say better to fit a pair! Would be cheaper to get one MB unit.
I haven't read over your thread again but is this something you've replaced and have a recommendation on?
Cheers
I had my rear air springs replaced and was also recommended to have both done at the same time. I went with OEM. Not cheap but should be good for a few yearsThe roadtrip looked amazing. So much more family fun than a budget flight etc.
My S211 329cdi is going in two weeks time to get rear driver side air spring replaced. They are thinking an Arnott unit but they say better to fit a pair! Would be cheaper to get one MB unit.
I haven't read over your thread again but is this something you've replaced and have a recommendation on?
Cheers
Thanks. It does feel nice to share experiences with other enthusiasts.
The trip from home to Barcelona was really well paced with each stint being a handful of hours. As such, we didn't 'wait' to start our holiday as it was a little adventure from the off and something to do at each destination.
The front air bellows were replaced on mine under previous ownership, which was a major plus. I'm not certain about the rear units, so far they are working fine. Apparently the front is more likely to fail due to the weight of the engine.
Having said that, my Dad's S211 E350 has leaking air units and I have seen some replacement units on ebay For Mercedes EClass W211 E500 E320 RIGHT REAR AIR SUSPENSION SPRING Bag Airmatic that don't look too dear.
Additionally on the MB Owners forum, this was being discussed and someone said that addressing a leaking hose rectified this issue:
"So the most common place for this sort of leak is the rear bag reservoir. The spigot on the end which leads to the air bag tends to leak with age.
I’ve had the exact same issue as mine went down after 8-10 days (weekend car). I re sealed it and it’s been holding perfect since. I would check there for sure. If you can get access to a 4 post ramp and spray soapy solution, that should help. You want to test the joints with the air system pressurised.
At worst case, the tank end will be cracked but I’ve not personally seen or heard that being a common thing. Replaced bags are worth doing at some point if that’s your issue but we can go onto that later, and if that’s even needed.
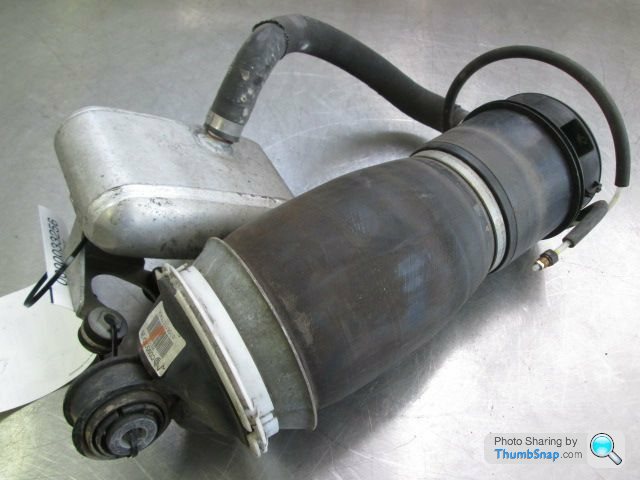
The hose that goes onto the tank, that’s the issue I had. Check all joints with soapy solution, or leak detector spray from Screwfix (I use this daily being a gas engineer) which works well."
additionally another replaced theirs with Arnott units:
"A footnote for anyone doing this job. Arnott have re-engineered the rear bags and they no longer need a connection to the small reservoir air tank which becomes redundant. The only downside is that they need to be replaced as a pair to avoid ride height issues. Expensive but good practice anyway."
I hope that this helps.
The trip from home to Barcelona was really well paced with each stint being a handful of hours. As such, we didn't 'wait' to start our holiday as it was a little adventure from the off and something to do at each destination.
The front air bellows were replaced on mine under previous ownership, which was a major plus. I'm not certain about the rear units, so far they are working fine. Apparently the front is more likely to fail due to the weight of the engine.
Having said that, my Dad's S211 E350 has leaking air units and I have seen some replacement units on ebay For Mercedes EClass W211 E500 E320 RIGHT REAR AIR SUSPENSION SPRING Bag Airmatic that don't look too dear.
Additionally on the MB Owners forum, this was being discussed and someone said that addressing a leaking hose rectified this issue:
"So the most common place for this sort of leak is the rear bag reservoir. The spigot on the end which leads to the air bag tends to leak with age.
I’ve had the exact same issue as mine went down after 8-10 days (weekend car). I re sealed it and it’s been holding perfect since. I would check there for sure. If you can get access to a 4 post ramp and spray soapy solution, that should help. You want to test the joints with the air system pressurised.
At worst case, the tank end will be cracked but I’ve not personally seen or heard that being a common thing. Replaced bags are worth doing at some point if that’s your issue but we can go onto that later, and if that’s even needed.
The hose that goes onto the tank, that’s the issue I had. Check all joints with soapy solution, or leak detector spray from Screwfix (I use this daily being a gas engineer) which works well."
additionally another replaced theirs with Arnott units:
"A footnote for anyone doing this job. Arnott have re-engineered the rear bags and they no longer need a connection to the small reservoir air tank which becomes redundant. The only downside is that they need to be replaced as a pair to avoid ride height issues. Expensive but good practice anyway."
I hope that this helps.
Thanks for the replies guys. Yes those are the ones I've seen on eBay but we're cheaper and UK supplier with free delivery, wasn't sure if they right part.
I asked the Indy if he could repair and he said no point. He recommended Arnott and said they're best done in pairs as they pressurise differently and the pump doesn't like or something!
They're about £270 each so £540 the pair. I called in MB parts and the OEM unit is with MB club discount about £330 with exchange of old unit. I'll in theory only need the one so saving.
However my luck would be the other one pops! So I'm now thinking to get a pair of the cheapies for 250-300.
I might sound mean but car was bought to save £ and put that to the SL's upkeep. Also it's getting suspension refresh and maybe few other things too.
Near future will be tyres, then brakes and hopefully that be it for a while. Happy motoring.
I attended one of the MB Club's breakfast meetings

and one of the old boys there suggested that I clean up my leather seats using non-acetone nail cleaner, so popping into Boots the next day and feeling decidedly self conscious I picked up a bottle and got to work.

Before:

After:

So that was quite an interesting exercise, though as it common for any 'learning' on my car, I had to cock something up also. Not being certain whether my steering wheel was grubby or dyed, I rubbed away like Aladdin with his lamp, except my wish didn't come true

I also noticed that the n/s shroud on the C pillar had dislodged somehow... so I grabbed some shots in order to find the appropriate clips.


You can make out the gap in the bodywork to which the clip will secure the overlapping hole in the shroud.

and one of the old boys there suggested that I clean up my leather seats using non-acetone nail cleaner, so popping into Boots the next day and feeling decidedly self conscious I picked up a bottle and got to work.
Before:
After:
So that was quite an interesting exercise, though as it common for any 'learning' on my car, I had to cock something up also. Not being certain whether my steering wheel was grubby or dyed, I rubbed away like Aladdin with his lamp, except my wish didn't come true
I also noticed that the n/s shroud on the C pillar had dislodged somehow... so I grabbed some shots in order to find the appropriate clips.
You can make out the gap in the bodywork to which the clip will secure the overlapping hole in the shroud.
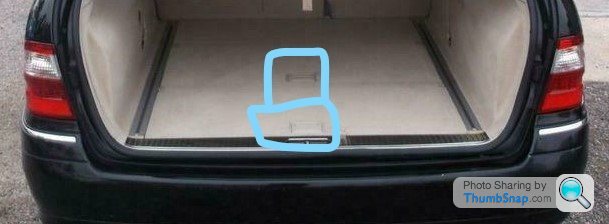
I also came across some items that were damaged at some stage under a previous ownership. These are the mounting points for the retractable rear load cover and luggage/dog guard net, located in the back of the rear seat backrests.


I also played with the info display and brought up some data on the oil level (etc...) which should be 8L

and hit a little rounded landmark

and why not take a moment to admire the cavernous and organised rear load area, since this car was specced with option 942 'Load Compartment Package':


I also played with the info display and brought up some data on the oil level (etc...) which should be 8L
and hit a little rounded landmark
and why not take a moment to admire the cavernous and organised rear load area, since this car was specced with option 942 'Load Compartment Package':
Liquid Leather sell kits with cleaners, dyes, conditioners and sealers. Worth the money and time. Get your interior code and they’ll send a matching dye.
Love the car despite the war damage, but good on you for not throwing the toys out of the pram when it gets more patina. Often wonder if I should make the jump but I get big enough bills with my 16 year old M3.
Oh, and I’ve been to Beaune too! It’s in a very nice part of the world, just a few hours away from me. Surely an S211 is perfect for such continent crushing.
Last August... (I have so much to catch up on, a self assigned Sisyphean task), the MB Owners Club held their first 'E Class' Day, which essentially encouraged all types of workhorses as opposed to garage queens. Of course, a garage queen won 'car of the day', but we needn't scrutinise the logic too closely..!
It was held at the magnificent grounds of Burliegh House in Stamford, a part of the world that I hadn't previously visited. I made the journey up on the day previously having stopped to see an E500 for sale in SW London. It was ropey at best and the seller a dreamer, so we left that behind. It's a shame as it was well specced and in a nice colour

There were a number of models lined up on the grounds and all sorts came along, which was quote endearing as it enabled enthusiasm to shine thought, regardless of starting budget


We then took a drive into Stamford town and I can confirm that it is indeed a fine stone town.

In fact, here is some stone for your pleasure


along with some architectural highlights


The car ran well and was comfortable enough on the air suspenders to have lulled me into a snooze on the run up the previous day and then my Dad on the return leg. It seems to have that effect on passengers!
It was held at the magnificent grounds of Burliegh House in Stamford, a part of the world that I hadn't previously visited. I made the journey up on the day previously having stopped to see an E500 for sale in SW London. It was ropey at best and the seller a dreamer, so we left that behind. It's a shame as it was well specced and in a nice colour
There were a number of models lined up on the grounds and all sorts came along, which was quote endearing as it enabled enthusiasm to shine thought, regardless of starting budget
We then took a drive into Stamford town and I can confirm that it is indeed a fine stone town.
In fact, here is some stone for your pleasure
along with some architectural highlights
The car ran well and was comfortable enough on the air suspenders to have lulled me into a snooze on the run up the previous day and then my Dad on the return leg. It seems to have that effect on passengers!
Edited by bolidemichael on Monday 5th August 17:23
The MOT (the first under my stewardship) was soon due and I took it to Star Tec, as they have the facilities. It's a weird feeling that I imagine is similar to waiting outside an exam hall for your child!

Whilst waiting I noticed some interesting models.
An R129 S600

A quite rare W251 R500

Magnus passed with the only advisory being a child seat obscuring the adult belt. Buoyed by our shared triumph, we took a drive to MB Brookland parts dept (always feels like an occasion) to pick up some interior trim for refreshing.
The new (at the time) G Wagen (only the AMG is released for the UK, rather than the G500 option which I spotted in Belgium recently):


Also spotted was this incredible CLS63 AMG, which dons what must rank amongst my favourite MB colours 950 - Caspian Blue:


Whilst waiting I noticed some interesting models.
An R129 S600
A quite rare W251 R500
Magnus passed with the only advisory being a child seat obscuring the adult belt. Buoyed by our shared triumph, we took a drive to MB Brookland parts dept (always feels like an occasion) to pick up some interior trim for refreshing.
The new (at the time) G Wagen (only the AMG is released for the UK, rather than the G500 option which I spotted in Belgium recently):
Also spotted was this incredible CLS63 AMG, which dons what must rank amongst my favourite MB colours 950 - Caspian Blue:
Since I had a good few days at home, I started to dismantle the trim, mainly in the boot space and rear bench in order to either re-fit or identify any additional parts that might be required. Most of the damage seems to have been down to general cack-handedness over the years but since this is my car now, I'd resolved to address these issue where possible - particularly since my mechanical skills fall under the category of inept-unless-too-much-time-is-dedicated-and-conditions-are-perfect.
Based on a quote from MB, I thought that I'd need to dismantle the pop-up bench backrest in order to get access to the broken handle (which regularly proved to be a paid in the proverbial), which is why I'd brought the parts information on screen - but further to beginning to dismantle the plastic shrouds, I had a poke around and realised that I could actually gain access to a partially obscured torx screw by putting a fair bit of effort into wedging the foam cushioning to the side.
For the purposes of visualisation, these are two of the broken handles (I'm not an animation whizz, I'm afraid):
This was me, whilst trying to figure out how to remove the back rest. I got close, but in the end, frustration bore ingenuity and I avoided incurring further damage and expense whilst attempting to prise the foam backing away with too much force


This is the handle closest to us - the same part number as the handle further away:

Keeping an eye on the schematics as I progressed.

This is how the plastic shrouds are accessed, btw. I captured the screw with selfie mode on the camera, most handy for those that don't sport a trout pout.

The backrest is secure with two screws at the base, one on either side


The seat belt retainer shroud simply pops out (simple still requires care!)


It's when I reached this stage, the headrest column simply did not want to let go, and so I called it quits after a few exploratory tugs (fnarr)


So, I looked closer and since all that was required was to have removed the handle, a touch of probing and poking around revealed the necessary bolt. I figured that I'd worry about the re-fitting at a later stage:


Next, for the removal of the handle accessing the pneumatically assisted cover for the spare wheel/tool kit etc. This was particularly annoying as it is very difficult to access it without a serious amount of fiddling.


I then decided to tackle the misaligned luggage rails, accessed by some recessed torx screws.


and then, since I was on a roll, removal of the loading bash plate:


Next was the simple removal of the hinge latch


After a rudimentary clean up

A great deal of dirt settled in the bodywork


A snapshot of the work thus far:

and after having put everything back together, save for the handle which needed ordering:

I also noted that since the boot is misaligned, it pushes more against the offside, chipping away at the paintwork

in comparison to the nearside

Conducting a round up of replacement bits required, I spotted some other items. This had been on my radar for sometime, but I only realised that a trim was missing when I compared it to the other side. Someone in the past has had a real go at this rear end!

This cracked trim for the securing of the luggage cover and dog guard

and the other one, this seems to have cracked by being overtightened by the same moron that worked on the rest of the rear panelling and trim. Once again, will there be a benefit to replacing it other than my OCD? Obviously, I don't care!


So, off to Brooklands again:

![]()
![]()
![]()
Based on a quote from MB, I thought that I'd need to dismantle the pop-up bench backrest in order to get access to the broken handle (which regularly proved to be a paid in the proverbial), which is why I'd brought the parts information on screen - but further to beginning to dismantle the plastic shrouds, I had a poke around and realised that I could actually gain access to a partially obscured torx screw by putting a fair bit of effort into wedging the foam cushioning to the side.
For the purposes of visualisation, these are two of the broken handles (I'm not an animation whizz, I'm afraid):
This was me, whilst trying to figure out how to remove the back rest. I got close, but in the end, frustration bore ingenuity and I avoided incurring further damage and expense whilst attempting to prise the foam backing away with too much force
This is the handle closest to us - the same part number as the handle further away:
Keeping an eye on the schematics as I progressed.
This is how the plastic shrouds are accessed, btw. I captured the screw with selfie mode on the camera, most handy for those that don't sport a trout pout.
The backrest is secure with two screws at the base, one on either side
The seat belt retainer shroud simply pops out (simple still requires care!)
It's when I reached this stage, the headrest column simply did not want to let go, and so I called it quits after a few exploratory tugs (fnarr)
So, I looked closer and since all that was required was to have removed the handle, a touch of probing and poking around revealed the necessary bolt. I figured that I'd worry about the re-fitting at a later stage:
Next, for the removal of the handle accessing the pneumatically assisted cover for the spare wheel/tool kit etc. This was particularly annoying as it is very difficult to access it without a serious amount of fiddling.
I then decided to tackle the misaligned luggage rails, accessed by some recessed torx screws.
and then, since I was on a roll, removal of the loading bash plate:
Next was the simple removal of the hinge latch
After a rudimentary clean up
A great deal of dirt settled in the bodywork
A snapshot of the work thus far:
and after having put everything back together, save for the handle which needed ordering:
I also noted that since the boot is misaligned, it pushes more against the offside, chipping away at the paintwork
in comparison to the nearside
Conducting a round up of replacement bits required, I spotted some other items. This had been on my radar for sometime, but I only realised that a trim was missing when I compared it to the other side. Someone in the past has had a real go at this rear end!
This cracked trim for the securing of the luggage cover and dog guard
and the other one, this seems to have cracked by being overtightened by the same moron that worked on the rest of the rear panelling and trim. Once again, will there be a benefit to replacing it other than my OCD? Obviously, I don't care!
So, off to Brooklands again:
A couple of days later and the new items were received, some for today and some (such as the duo control valve for temp control on air con and the bonnet badge) for another day.
A folded branded polythene sheet? Erm yes, well, that's the bag for the dirty alloy for when the space saver has to be employed. How could I resist?

First on the list was the irritating broken seat belt retainer that had been snapped inadvertently by myself. It's such a simple part but so useful when dropping the rear bench seats in order to extend the loading area.To replace, it needs to be twisted out, and with a snapped return a pair of plyers comes in useful.


and the part, prosaically known as the 'bracket'. 7F72 is the colour code for Palm Grey


and popping it straight in


et, voila; so simple, so satisfying. Function normalised.

Next to tackle is replacing the missing or damaged seat rail shrouds. Once again, it's barely noticeable, but so satisfying once they're in place.

They slot into place. It's a little tight, but gently does it.


Next to tackle are the cracked retainers for the removable luggage net housing

Shiny and new. What a novel way to spend money - all important parts for my own mini renovation!


and finally in place

The next day, I turned my attention to the boot. The broken black handle due to be replaced. Old next to new, front and rear


Slots into place

secures from the underside of the pneumatic assisted lever bracket


Next to replace the handle behind the pop up rear bench

the housing at the top

the handle secures into this gap

no 'after' photos, sorry!
Whilst in the boot, I noticed and remembered that the buttons securing the panel seem to have been removed at some point. These'll need replacing.


Next job would be to tackle the snapped retainers for the pop-up rear seat belts. I had assumed that I'd need to remove the panelling in order to gain access to the seat belt in order to slot the replacements in:

Note the random screws

I then attempted to remove the old item, only to discover that the clever so and sos from Sindelfingen had utilised a partially expandable/collapsible slot design into which the seat belt could insert, in situ.


No more 'home brew' solution


and in place. Another annoyance resolve and a slow fettle back to factory standard.

A folded branded polythene sheet? Erm yes, well, that's the bag for the dirty alloy for when the space saver has to be employed. How could I resist?
First on the list was the irritating broken seat belt retainer that had been snapped inadvertently by myself. It's such a simple part but so useful when dropping the rear bench seats in order to extend the loading area.To replace, it needs to be twisted out, and with a snapped return a pair of plyers comes in useful.
and the part, prosaically known as the 'bracket'. 7F72 is the colour code for Palm Grey
and popping it straight in
et, voila; so simple, so satisfying. Function normalised.
Next to tackle is replacing the missing or damaged seat rail shrouds. Once again, it's barely noticeable, but so satisfying once they're in place.
They slot into place. It's a little tight, but gently does it.
Next to tackle are the cracked retainers for the removable luggage net housing
Shiny and new. What a novel way to spend money - all important parts for my own mini renovation!
and finally in place
The next day, I turned my attention to the boot. The broken black handle due to be replaced. Old next to new, front and rear
Slots into place
secures from the underside of the pneumatic assisted lever bracket
Next to replace the handle behind the pop up rear bench
the housing at the top
the handle secures into this gap
no 'after' photos, sorry!
Whilst in the boot, I noticed and remembered that the buttons securing the panel seem to have been removed at some point. These'll need replacing.
Next job would be to tackle the snapped retainers for the pop-up rear seat belts. I had assumed that I'd need to remove the panelling in order to gain access to the seat belt in order to slot the replacements in:
Note the random screws
I then attempted to remove the old item, only to discover that the clever so and sos from Sindelfingen had utilised a partially expandable/collapsible slot design into which the seat belt could insert, in situ.
No more 'home brew' solution
and in place. Another annoyance resolve and a slow fettle back to factory standard.
This car really shrinks into parking spaces!

September was a win for used bargains. Firstly collected a set of alloys for £100, crappily spray painted at some point, but true and no cracks.

I then collected a set of winter tyres - Michelin Alpins with the correct specifications and the added bonus of being MO spec, too. £102 with the catch being a collection from Warboys, but since I was heading to Peterborough, it wasn't an issue. The seller had replaced his E Class with a GLA, so had this set of tyres that had covered about 15k. At least 6mm tread all round, so a good find. They are to replace the excellent Pirelli Sottozeros that I ran the previous winter, as they were RFTs which are not actually supposed to be run on the car.

a couple of days later, this beast parked behind me. It's almost perfect, with the exception of the alloys that look a couple of inches too small

September was a win for used bargains. Firstly collected a set of alloys for £100, crappily spray painted at some point, but true and no cracks.
I then collected a set of winter tyres - Michelin Alpins with the correct specifications and the added bonus of being MO spec, too. £102 with the catch being a collection from Warboys, but since I was heading to Peterborough, it wasn't an issue. The seller had replaced his E Class with a GLA, so had this set of tyres that had covered about 15k. At least 6mm tread all round, so a good find. They are to replace the excellent Pirelli Sottozeros that I ran the previous winter, as they were RFTs which are not actually supposed to be run on the car.
a couple of days later, this beast parked behind me. It's almost perfect, with the exception of the alloys that look a couple of inches too small
Edited by bolidemichael on Monday 5th August 23:35
Gassing Station | Readers' Cars | Top of Page | What's New | My Stuff