325TI - Project Mpact
Discussion


amc_adam said:
geeks said:
amc_adam said:
geeks said:
Ok fine, but I expect you to send me some stickers for the racecar and I want zero s t for not having the eye for detail that you do
EDIT - P.S Superb update pics, forgot how clean everything was underneath!
Stickers, that's food for thought t for not having the eye for detail that you do EDIT - P.S Superb update pics, forgot how clean everything was underneath!

I'd never knock someone else's work, we all have to start somewhere!
If you send me two sets I will put a set on my Compact as well!

Love the latest updates, will be interested to see how the front end geos up, should be good fun!
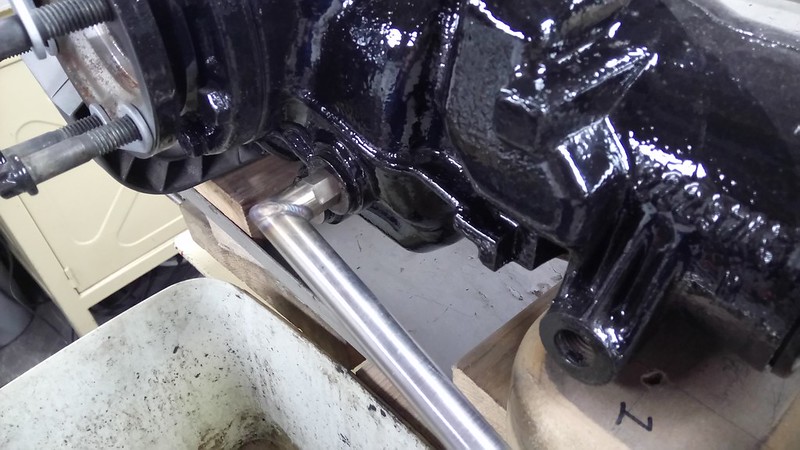
Next up was to get the diff back into the car, but first i wanted to change the diff input seal.
When the diff was in the donor vehicle it was perfectly dry with no leaks, when i came to move the diff from being stored a slight weeping had occurred under the input seal.
So after a bit of googling on how to change a seal,
Drain the oil, i had every other allan key other than the size needed...so quickly made one,
1 litre exactly removed,

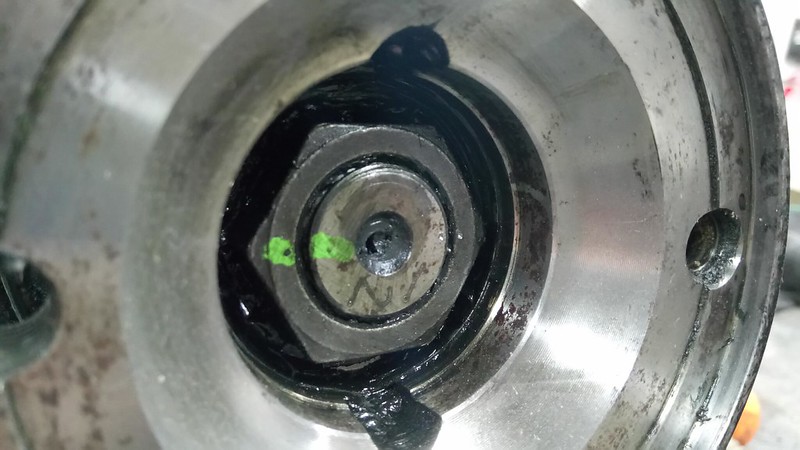
Shaft and Nut dot punched so upon reassembly these can be matched,
Drive flange and diff seal removed,

New seal going in, it was covered in clean diff oil to stop any binding. I used a thick steel plate and rubber mallet to gently tap the seal in, this ensured the seal was not damaged as it went in.


Back together and dot punch marks realigned,

Castrol Syntrax was used with a tiny bit of the friction modifier added, I managed to fit 1.2 litres in the diff.... although the internet states it should take slightly more.

With that all done, the diff was lifted into the Axle carrier/subframe... forgetting the weight/awkwardness of the diff, lifting it over head almost resulted in prolapsing
When the diff was in the donor vehicle it was perfectly dry with no leaks, when i came to move the diff from being stored a slight weeping had occurred under the input seal.
So after a bit of googling on how to change a seal,
Drain the oil, i had every other allan key other than the size needed...so quickly made one,
1 litre exactly removed,
Shaft and Nut dot punched so upon reassembly these can be matched,
Drive flange and diff seal removed,
New seal going in, it was covered in clean diff oil to stop any binding. I used a thick steel plate and rubber mallet to gently tap the seal in, this ensured the seal was not damaged as it went in.
Back together and dot punch marks realigned,
Castrol Syntrax was used with a tiny bit of the friction modifier added, I managed to fit 1.2 litres in the diff.... although the internet states it should take slightly more.
With that all done, the diff was lifted into the Axle carrier/subframe... forgetting the weight/awkwardness of the diff, lifting it over head almost resulted in prolapsing
Onto the front end, nothing too serious here... just a general tidy up and paint.

Anything that would fit into the blast cabinet was blasted to remove any rust. The cross member was cleaned up with a grinder, mainly to remove the weld splatter from the factory MIG welds.... this wasn't necessary, it just bugged me.
All the parts were treated with the usual POR15 (on the second can now),
Front hubs and back plates,

Cross member,

Tie rods,

Hydraulic steering pipes and fittings,

Reassembly,

As it's a Compact it already has one of the quicker steering racks,

Front Arms, a trick my dad taught me many years ago when cleaning the Aluminium parts on a classic Mini engine/gearbox. Brick acid or Concrete cleaner, works wonders. Just smells like an eggy trump


Anything that would fit into the blast cabinet was blasted to remove any rust. The cross member was cleaned up with a grinder, mainly to remove the weld splatter from the factory MIG welds.... this wasn't necessary, it just bugged me.
All the parts were treated with the usual POR15 (on the second can now),
Front hubs and back plates,
Cross member,
Tie rods,
Hydraulic steering pipes and fittings,
Reassembly,
As it's a Compact it already has one of the quicker steering racks,
Front Arms, a trick my dad taught me many years ago when cleaning the Aluminium parts on a classic Mini engine/gearbox. Brick acid or Concrete cleaner, works wonders. Just smells like an eggy trump
amc_adam said:
I've only just seen this! I've been wanting to get some stickers made for a while now, only thing is i want to separate my logo from it's white back ground (make the back ground transparent).....but i have no idea how to do that, so i'm a bit stuck there.
Adam, the printers of your choice will be able to modify your logo and print transparrent stickers for you. You can even choose if they will be externally or internally stuck on, ofcourse they will charge you for the priviledge. Anyway, its not difficult to do with PS, subject to the complexity of your logo. If you are prepared to send me the highest resolution image of your logo, I will be able to modify it for you.
Cant PM you so posting here 😋
Great fab work. Could do with you doing a couple of bits to my track car, but not sure I can afford you lol
ndtman said:
Brick or concrete cleaner is usually Muriatic/Hydrochloric acid and in contact with aluminium will produce hydrogen gas. Be safe, use plenty of ventilation and be wary of ignition sources. Wouldn't want this thread to come to a premature end
Oh blimey, that would explain the smell it gives off! Thanks for that, we all know what happened to the Hindenburg 
Humour said:
Adam, the printers of your choice will be able to modify your logo and print transparrent stickers for you. You can even choose if they will be externally or internally stuck on, ofcourse they will charge you for the priviledge.
Anyway, its not difficult to do with PS, subject to the complexity of your logo. If you are prepared to send me the highest resolution image of your logo, I will be able to modify it for you.
Cant PM you so posting here ??
Great fab work. Could do with you doing a couple of bits to my track car, but not sure I can afford you lol
Thanks for that, I've spoken to a couple of printers now and they have said that they can't work with the file i have. Like you say, the chap who designed my logo said the printers should be able to do it.Anyway, its not difficult to do with PS, subject to the complexity of your logo. If you are prepared to send me the highest resolution image of your logo, I will be able to modify it for you.
Cant PM you so posting here ??
Great fab work. Could do with you doing a couple of bits to my track car, but not sure I can afford you lol
I've just been watching some more 'how to' video's on YouTube, so I'll have another go at doing it myself and if all fails I shall be in contact. Thanks for offering, it's very much appreciated

For the standard of my work my hourly rate isn't expensive, all depends on how involved the job is. If you have any enquiries drop me an email, you'll find it somewhere on here.

With the car being wrapped up in protective plastic for the last year or so, i decided to take all the plastic off just to look at it.
So just to remind you all that there is a top of the vehicle, not just the under side

And then i wrapped it back up with new plastic sheeting.
Anyway, I made a decision and sprayed the diffuser.
The Aluminium was Etch Primed few days before and blocked it flat to make sure there wasn't any defects from the English wheel and then keyed it ready for paint. I waited for a few days for Storm Gareth to pass by (which seemed to be never ending) as i wanted to spray it outside/in the doorway of the workshop, I'm a bit OCD about the workshop and didn't want over spray anywhere.
The back of the diffuser was lightly sprayed and lacquered first to seal the Aluminium, once that had dried i bonded the carbon fiber part to the diffuser using Tigerseal.
I chose to do it this way as i was going to use clamps to hold the carbon fiber in place while the Tigerseal dried, i didn't want clamps going on the freshly painted front of the diffuser in case they marked it. The carbon fiber part was masked to prevent over spray.
With some cardboard laid down on the floor and some lumps of metal each end to hold it still, a spray booth was created. I'd had a couple more Aerosols of Estoril Blue mixed and some lacquer.
Couple of pictures from the 'spray booth' while the paint was wet,


I'd waited a couple of days for it to cure/harden and then flattened it back with wet and dry, then polished it up.


I was a bit paranoid about colour match, nothing worse than seeing poorly colour matched panels on a car.... Bugs the hell out of me. As the front arches/bonnet and bumper will need a bit of tlc in the near future i'll have the rest of body work done at the same time. So in the mean time this is how it will look,


It's pretty close, but until the car is back on it's wheels and outside in natural sunlight it's quite difficult to see for sure
So just to remind you all that there is a top of the vehicle, not just the under side
And then i wrapped it back up with new plastic sheeting.
Anyway, I made a decision and sprayed the diffuser.
The Aluminium was Etch Primed few days before and blocked it flat to make sure there wasn't any defects from the English wheel and then keyed it ready for paint. I waited for a few days for Storm Gareth to pass by (which seemed to be never ending) as i wanted to spray it outside/in the doorway of the workshop, I'm a bit OCD about the workshop and didn't want over spray anywhere.
The back of the diffuser was lightly sprayed and lacquered first to seal the Aluminium, once that had dried i bonded the carbon fiber part to the diffuser using Tigerseal.
I chose to do it this way as i was going to use clamps to hold the carbon fiber in place while the Tigerseal dried, i didn't want clamps going on the freshly painted front of the diffuser in case they marked it. The carbon fiber part was masked to prevent over spray.
With some cardboard laid down on the floor and some lumps of metal each end to hold it still, a spray booth was created. I'd had a couple more Aerosols of Estoril Blue mixed and some lacquer.
Couple of pictures from the 'spray booth' while the paint was wet,
I'd waited a couple of days for it to cure/harden and then flattened it back with wet and dry, then polished it up.
I was a bit paranoid about colour match, nothing worse than seeing poorly colour matched panels on a car.... Bugs the hell out of me. As the front arches/bonnet and bumper will need a bit of tlc in the near future i'll have the rest of body work done at the same time. So in the mean time this is how it will look,
It's pretty close, but until the car is back on it's wheels and outside in natural sunlight it's quite difficult to see for sure


I now have a deadline set, the car needs to be on the road for the end of July.
With a Villa booked mid August I'll be heading to the Nurburg Ring with a group of friends, it's been a couple years since we've been due to work and the Compact being off the road. The previous time I had to take the Cooper S last minute due to the Compact oil consumption, I didn't enjoy hammering the Cooper S on track and started to feel a bit sorry for it going up the long inclines. But on the twisty little village roads it was brilliant!.
So not wanting to let everyone down and a long list of things still to do, I really need to pull my finger out
The start of the important stuff, The Gearbox.
The Compact is a manual and is staying manual, so the pedal box etc is already in the car. The donor M3 is an SMG, I did debate making the Compact SMG but after driving the M3 for 6 months it wasn't for me.
So, converting the E46 M3 Gearbox (Bell housing) to manual.
With the E46 M3 be it a Manual or SMG the gearbox itself is exactly the same. It's the Bell Housing that needs to be modified.
Technically you could put a gearstick on an SMG car but the gearstick would be flopping about not knowing what gear the car would be in.
There are a couple of ways of making an SMG into a manual, either using an external sprung shifter like the one from CAE or making it like an OEM manual and installing the parts inside the Bell Housing.
To make it like an OEM Manual, Gear Detents need to be added to the SMG Bell housing. The Detents are Pins on springs that make the Gearstick spring back into Neutral after being in gear, or help prevent you putting the car into reverse by accident.
SMG cars do not need the Detents as they are shifted by the pump and actuator.
After a lot of thinking on how to do the Machining on the bell Housing i decided to get in contact with Jack 'wicksy' on the M3Cutters forum, Jack and his Father (both E46 M3 owners) have modified many SMG Bell Housings for people and race teams. As they are already confident with what they were doing and knew what Original BMW parts were needed for the conversion, I posted the Bell Housing to them and a couple of weeks later i picked it up while i was at Brands Hatch.
So this is what Jack and his Father done to the Bell Housing,
Pre-Machined photo (borrowed from Google, can't find mine).
And After Machining with all the BMW Springs, Pins, Bearing and other bits,

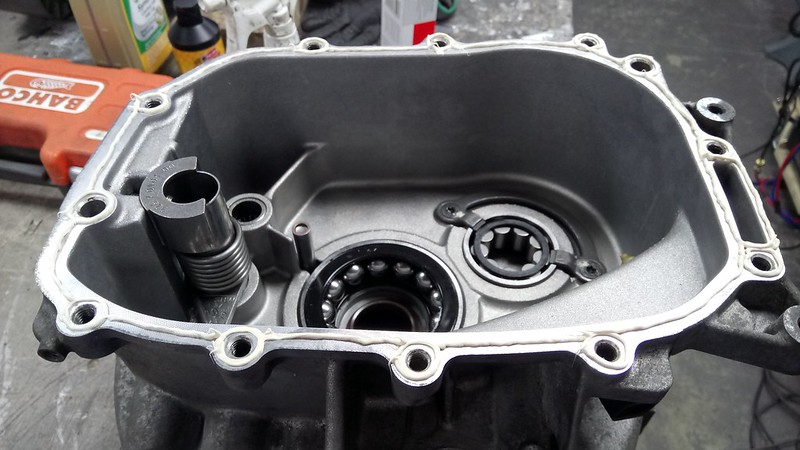
This is the outside of the gearbox, on SMG cars this is a solid casting. This has been Bored out, and a Recess made for the Circlips. This contains the Detent Springs and Pins.
Jack and his Father done a cracking job with the Machining, it looks just like what a Manual Bell Housing is meant to. The only thing i did do was slightly Modify the Spring pin/bolt. I done this as i was worried about the Spring catching the edge of the Dome Headed bolt and slipping off.

I turned the head of the Dome Headed bolt down a bit and created a small chamfer to make sure the spring couldn't slip off, i'm sure they haven't had a problem before.... Just a precaution.

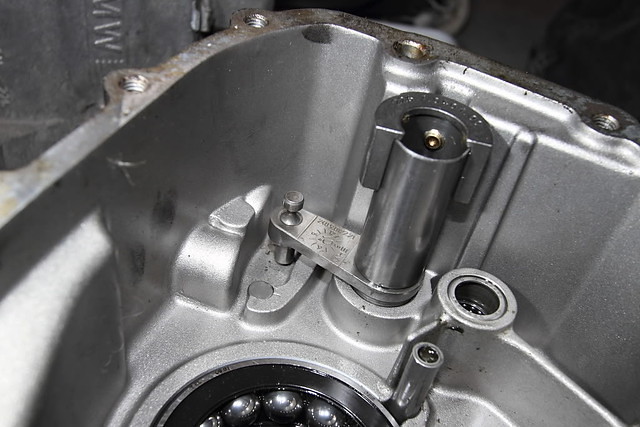
Next up, the Input Shaft Seal was replaced in the Bell Housing, a tube with a flat face was used to gently tap the new seal in to position.

After cleaning out any muck or crap from inside the Bell Housing that can happen while it was machined, the meeting faces of the Gearbox and Bell Housing were degreased and a thin layer of gasket seal was applied.
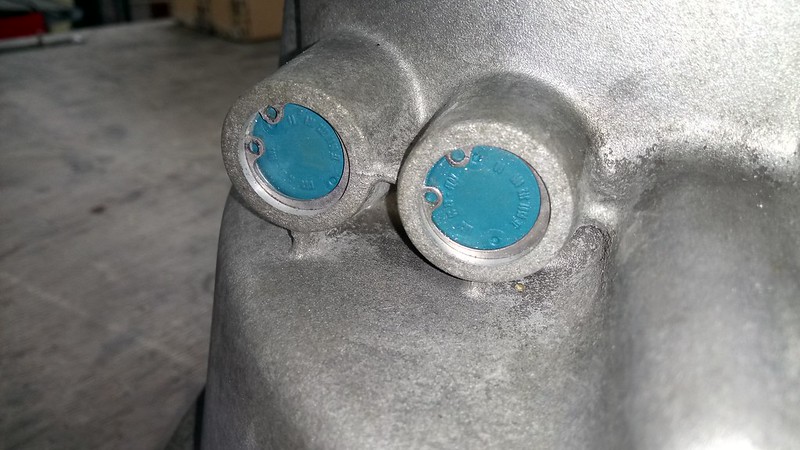
Almost forgot to put these back on,
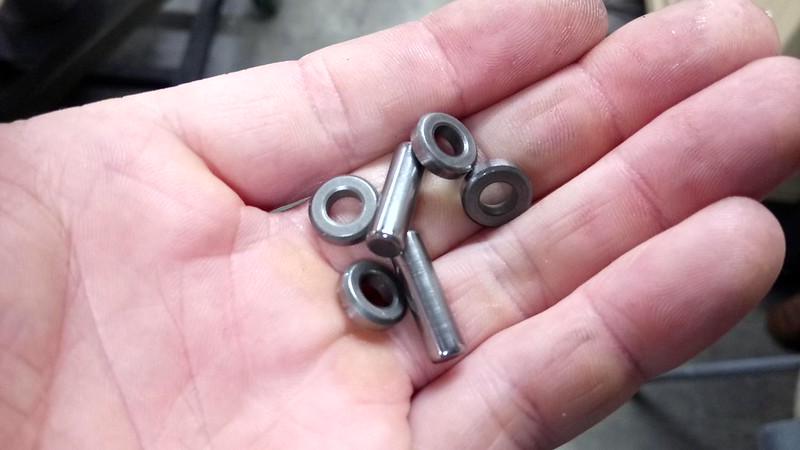

And as i was carefully lowering the Bell Housing onto the Gearbox, i was disturbed and ended up knocking those little bits into the gears ....future reference, do it the other way round and lower the Gearbox onto the Bell Housing.
Back together,


Then it had a good scrub clean,

That's all for now!
The Compact is a manual and is staying manual, so the pedal box etc is already in the car. The donor M3 is an SMG, I did debate making the Compact SMG but after driving the M3 for 6 months it wasn't for me.
So, converting the E46 M3 Gearbox (Bell housing) to manual.
With the E46 M3 be it a Manual or SMG the gearbox itself is exactly the same. It's the Bell Housing that needs to be modified.
Technically you could put a gearstick on an SMG car but the gearstick would be flopping about not knowing what gear the car would be in.
There are a couple of ways of making an SMG into a manual, either using an external sprung shifter like the one from CAE or making it like an OEM manual and installing the parts inside the Bell Housing.
To make it like an OEM Manual, Gear Detents need to be added to the SMG Bell housing. The Detents are Pins on springs that make the Gearstick spring back into Neutral after being in gear, or help prevent you putting the car into reverse by accident.
SMG cars do not need the Detents as they are shifted by the pump and actuator.
After a lot of thinking on how to do the Machining on the bell Housing i decided to get in contact with Jack 'wicksy' on the M3Cutters forum, Jack and his Father (both E46 M3 owners) have modified many SMG Bell Housings for people and race teams. As they are already confident with what they were doing and knew what Original BMW parts were needed for the conversion, I posted the Bell Housing to them and a couple of weeks later i picked it up while i was at Brands Hatch.
So this is what Jack and his Father done to the Bell Housing,
Pre-Machined photo (borrowed from Google, can't find mine).
And After Machining with all the BMW Springs, Pins, Bearing and other bits,
This is the outside of the gearbox, on SMG cars this is a solid casting. This has been Bored out, and a Recess made for the Circlips. This contains the Detent Springs and Pins.
Jack and his Father done a cracking job with the Machining, it looks just like what a Manual Bell Housing is meant to. The only thing i did do was slightly Modify the Spring pin/bolt. I done this as i was worried about the Spring catching the edge of the Dome Headed bolt and slipping off.
I turned the head of the Dome Headed bolt down a bit and created a small chamfer to make sure the spring couldn't slip off, i'm sure they haven't had a problem before.... Just a precaution.
Next up, the Input Shaft Seal was replaced in the Bell Housing, a tube with a flat face was used to gently tap the new seal in to position.
After cleaning out any muck or crap from inside the Bell Housing that can happen while it was machined, the meeting faces of the Gearbox and Bell Housing were degreased and a thin layer of gasket seal was applied.
Almost forgot to put these back on,
And as i was carefully lowering the Bell Housing onto the Gearbox, i was disturbed and ended up knocking those little bits into the gears
....future reference, do it the other way round and lower the Gearbox onto the Bell Housing.Back together,
Then it had a good scrub clean,
That's all for now!

Gassing Station | Readers' Cars | Top of Page | What's New | My Stuff