325TI - Project Mpact
Discussion


SlimJim16v said:
shalmaneser said:
The upper mount for that rear caliper scares me a bit, it's awfully thin...
Maybe better made from something stronger? Also, brake shims, better made from stainless?
Also agree on the rear caliper brackets, the material cut around to make clearance looks like might allow too much flex given its aluminium. Each to their own but I would opt for steel brackets there, despite the amount of time and tools consumption it would take to make the same shapes out of steel.
My other area of concern is the oil pump sprocket nut/weld solution. I also own an M5x motor so have also done plenty of research on the subject. In summary the weld nut solution is no guarantee, the whole shaft has been known to snap, add to that a blob of weld now unbalancing the assembly, at 8Krpm what is the likely speed of the sprocket and how much stress/resonance would the shaft be under taking any imbalance into account?
I realise it comes across as scaremongering and I can assure its not intended that way, I also realise Im somewhat late to the party as the engine is now in, but food for thought so to speak.........Given the meticulous prep everywhere and given the cost of an engine rebuild, the solution to that problem which addresses both the shaft and the sprocket attachment to the shaft at circa £300 quid are good value for peace of mind especially if going to rev it up there regularly. I know the Vacs and the Turners have a solution for this, have also seen an ebay solution copying the US parts from eastern europe providing a completely rebuilt oil pump assy for the M50/M52 for £250 quid, which I think its good value for peace of mind.
Just my 2pence.
Have fun @ the Ring
P.S. Droid keyboards suck lol
Edited by Humour on Wednesday 3rd July 21:06
Edited by Humour on Wednesday 3rd July 21:09
Im aware that the engine is the s54, but its all part of the same family of M5x engines. The E36/E46 M3 block from that generation is basically an M50 (325i cast iron unit) with different heads and ancillaries.
More importantly, the oil pump is the same basic design and probably interchangeable. I know the sumps and pickups are with any M5x engine. The S52 twin pickup affair is a common mod for ppl who track their M5x heavily. I have the simpler S50 M3 baffled sump installed in my M52.
American forums have very good info on this topic, discussing problems by ppl who race these cars and have found their shortcomings, so they are a good source of info for the most part.
How high of a risk this is for a road car, depends on Adam's tolerance for risk and how high he spins the motor.
This could be retrofitted ofcourse. The sump does come out with the subframe in place but you do have to drop it on one side and it is a PITA to do that way but doable.
Humour said:
SlimJim16v said:
shalmaneser said:
The upper mount for that rear caliper scares me a bit, it's awfully thin...
Maybe better made from something stronger? Also, brake shims, better made from stainless?
Also agree on the rear caliper brackets, the material cut around to make clearance looks like might allow too much flex given its aluminium. Each to their own but I would opt for steel brackets there, despite the amount of time and tools consumption it would take to make the same shapes out of steel.
My other area of concern is the oil pump sprocket nut/weld solution. I also own an M5x motor so have also done plenty of research on the subject. In summary the weld nut solution is no guarantee, the whole shaft has been known to snap, add to that a blob of weld now unbalancing the assembly, at 8Krpm what is the likely speed of the sprocket and how much stress/resonance would the shaft be under taking any imbalance into account?
I realise it comes across as scaremongering and I can assure its not intended that way, I also realise Im somewhat late to the party as the engine is now in, but food for thought so to speak.........Given the meticulous prep everywhere and given the cost of an engine rebuild, the solution to that problem which addresses both the shaft and the sprocket attachment to the shaft at circa £300 quid are good value for peace of mind especially if going to rev it up there regularly. I know the Vacs and the Turners have a solution for this, have also seen an ebay solution copying the US parts from eastern europe providing a completely rebuilt oil pump assy for the M50/M52 for £250 quid, which I think its good value for peace of mind.
Just my 2pence.
Have fun @ the Ring
P.S. Droid keyboards suck lol
Edited by Humour on Wednesday 3rd July 21:06
Edited by Humour on Wednesday 3rd July 21:09

The shims, yes they could have been from Stainless which i did consider...... the only thing with thin Stainless Sheet is its terrible for warping when heat is applied. Also, the backing material that the pad is mounted onto is Mild Steel, and that seems to cope quite well.
The Rear Caliper Mounts, I do see why their are concerns here. I think it's quite hard to scale from the photos, doesn't help that the radius edges trick the eye. Compared to the rest of the mount which is 40x40 solid T6 (slightly over engineered, if that's possible with brakes) the top of the mount does look considerably thinner. The material tapers down to 12mm on the thinnest point, and there are radius' corners inside the cut out to prevent shear points.
Until I drive it i'm unsure what the brake bias will be like, I may have to put the stock M3 Rear Calipers back on which is why i haven't modified the caliper Lugs on the hub too extensively.
The Oil pump, this is all a learning curve for me. Until a friend pointed out about the nut backing off i didn't know it was a common fault or even the shaft suffered from snapping too which is why i only tacked the nut
 I think as with most things it's preventative rather than a 100% stopping it from happening. I didn't consider the weld unbalancing it! Thank you for the information, much appreciated I'll put it with the list of other expensive sounding faults and problems

DUNNERS said:
Fantastic stuff!
Been keeping an eye on this thread from the beginning.
Any pics of the finished article with the standard wheels sat over the new calipers?
Thank you! yep, as requested........Been keeping an eye on this thread from the beginning.
Any pics of the finished article with the standard wheels sat over the new calipers?


Oh, and the car is back on it's wheels!
Edited by amc_adam on Thursday 11th July 21:30
Superhoop said:
Only you could look at some factory brackets on the inner wing, decide that you think they look s t and you can make something far better quality and that look much better too
 you don't want to cut them off the original shell and therefore "just knock some new ones up"
Amazing project..
t and you can make something far better quality and that look much better too Amazing project..
Thank you, I probably would have cut them off the donor if they were more intricate. But they were pretty simple to make, just covered the ones on the donor car in masking tape, trimmed the masking tape to the bracket = bracket pattern, stuck the pattern to a stainless sheet, cut it out then folded it, simples stevesingo said:
amc_adam said:
As the calipers are meant to be used with wider disks as previously mentioned, 32mm front and 26mm rear and the M3 disks i'm using are 28mm front and 20mm rear i made up some Shims to go inbetween the pad and pistons to make up the difference. These are made from mild steel, blasted and then painted with the VHT spray.
I was faced with a similar issue when designing my brakes for the E30 M3. I split the calipers, milled 1.5mm off the mating faces and bolted them back together.
Small update,
I started putting the front all back together, trying to remember where things go!

On the M3 there is a tube that goes between the Brake Duct and the Air Box, the compact didn't have this. In the picture you can see the Tube that runs down from the Air Box and it doesn't meet the Brake Duct,

So I cut a big hole in the Brake Duct, and made an Aluminium Duct thingy. It had to be quite small to avoid the Fog Light and Outside Temp Sensor

And fitted,

Pretty much back together now!

Next Update, Over Engineered Washer Bottle
I started putting the front all back together, trying to remember where things go!
On the M3 there is a tube that goes between the Brake Duct and the Air Box, the compact didn't have this. In the picture you can see the Tube that runs down from the Air Box and it doesn't meet the Brake Duct,
So I cut a big hole in the Brake Duct, and made an Aluminium Duct thingy. It had to be quite small to avoid the Fog Light and Outside Temp Sensor
And fitted,
Pretty much back together now!
Next Update, Over Engineered Washer Bottle
The washer bottle,
On the Compact the washer bottle is meant to be located on the Drivers side inner arch just in front of the Strut Tower, this is now where the Expansion Tank is located for the Radiator (As found on the E46 M3). On the E46 M3 the washer bottle is located under the Driver side Headlight, between the Bumper and Arch liner. As the Compact is a lot stumpier, there isn't the room to fit the M3 Washer bottle behind the Bumper/under Headlight.
I was thinking of using a washer bottle from another Vehicle, I have some Classic mini and VW bits laying around..... although they would have worked fine, they wouldn't have looked right......
On the E46 M3 there is a Secondary Air pump, apparently this only works for the first two minutes to help warm the Cats up. It seems quite a common thing to remove and Code out, Luckily the Compact never had one and Coding it out also means less wiring too.
Pictured below is the Secondary Air pump (the round thing in front of the expansion tank) ,

When the Air Pump is removed there's a hole in the Head that needs blocking off, so i made a little plate to cover that,

Once the Air pump was removed I roughly worked out what needed to be made and avoided i.e Aircon Pipes, Headlight etc,
1.6mm Aluminium sheet was used, roughly cut and Bead Rolled,

A Hammer form was made from MDF, the edges had a Radius put on them to match that found on the Expansion Tank,

Three Locating Pins were Turned to match that found on the Air Pump, A Neck was Turned so the original Cap could be used and all the parts started to be Tacked together for a mock test fit,

As space was tight and i didn't want to loose any more capacity in the bottle, the Washer Pump had to be mounted horizontally poking out the side. Once it was fully welded it was then put in the Blast Cabinet, this keyed the surface of the Aluminium ready for Primer and painting.
And Painted in Matt Black,


Fitted,

The front of the Washer Bottle had a slight curve in it to allow access to the Headlight Adjuster,

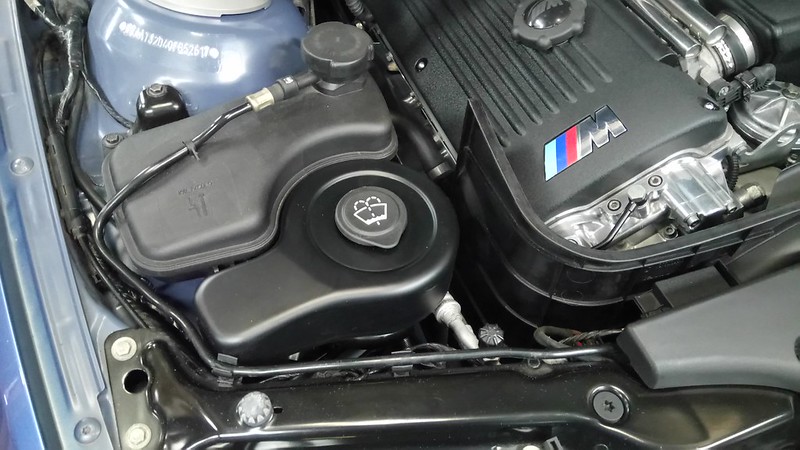
Although the Standard bottle had a capacity of 5ltrs, this will only hold 2ltrs. Also, the Level Sensor is no longer needed so that will either need Coding out or a Resistor adding to turn the dash light off.
Still more to come of this never ending 'Engine Swap', The car does now run! And I leave for Nurburgring next month
On the Compact the washer bottle is meant to be located on the Drivers side inner arch just in front of the Strut Tower, this is now where the Expansion Tank is located for the Radiator (As found on the E46 M3). On the E46 M3 the washer bottle is located under the Driver side Headlight, between the Bumper and Arch liner. As the Compact is a lot stumpier, there isn't the room to fit the M3 Washer bottle behind the Bumper/under Headlight.
I was thinking of using a washer bottle from another Vehicle, I have some Classic mini and VW bits laying around..... although they would have worked fine, they wouldn't have looked right......
On the E46 M3 there is a Secondary Air pump, apparently this only works for the first two minutes to help warm the Cats up. It seems quite a common thing to remove and Code out, Luckily the Compact never had one and Coding it out also means less wiring too.
Pictured below is the Secondary Air pump (the round thing in front of the expansion tank) ,
When the Air Pump is removed there's a hole in the Head that needs blocking off, so i made a little plate to cover that,
Once the Air pump was removed I roughly worked out what needed to be made and avoided i.e Aircon Pipes, Headlight etc,
1.6mm Aluminium sheet was used, roughly cut and Bead Rolled,
A Hammer form was made from MDF, the edges had a Radius put on them to match that found on the Expansion Tank,
Three Locating Pins were Turned to match that found on the Air Pump, A Neck was Turned so the original Cap could be used and all the parts started to be Tacked together for a mock test fit,
As space was tight and i didn't want to loose any more capacity in the bottle, the Washer Pump had to be mounted horizontally poking out the side. Once it was fully welded it was then put in the Blast Cabinet, this keyed the surface of the Aluminium ready for Primer and painting.
And Painted in Matt Black,
Fitted,
The front of the Washer Bottle had a slight curve in it to allow access to the Headlight Adjuster,
Although the Standard bottle had a capacity of 5ltrs, this will only hold 2ltrs. Also, the Level Sensor is no longer needed so that will either need Coding out or a Resistor adding to turn the dash light off.
Still more to come of this never ending 'Engine Swap', The car does now run! And I leave for Nurburgring next month
Gassing Station | Readers' Cars | Top of Page | What's New | My Stuff