MG ZS 120+ - aka "The Learning Experience"
Discussion


Glad its not looking too bad OP! Certainly will be good to learn on! Was really interested in a v6 when i was last in the market (1500 max to spend) but was put off by the rust issues/inlet/cambelt etc etc and went for an e46 in the end, but still have a soft spot for the mg's! Am I right in saying the zs has the underpinnings of the previous gen honda civic?
daniel-5zjw7 said:
Glad its not looking too bad OP! Certainly will be good to learn on! Was really interested in a v6 when i was last in the market (1500 max to spend) but was put off by the rust issues/inlet/cambelt etc etc and went for an e46 in the end, but still have a soft spot for the mg's! Am I right in saying the zs has the underpinnings of the previous gen honda civic?
Yes and no on the Civic. Certainly based on it, but there are some subtle differences. I saw a pair of lower control arms side by side and the shock mount is slightly offset. I'm yet to find a definitive resource. That said, the front arb bush that's coming is also a fit for a dc2 Integra.Anyone have any pearls of wisdom on the platform share?
mattyprice4004 said:
Sorry, didn't see your reply to my post! 
Lovely to see one getting some love - my ZT-T is away with a good friend having similar treatment.
With regards to the HG, my honest opinion is that they Payen BW750 (or a copy of it) is the way to go - it just needs to be the latest iteration of such.
The MLS, while on paper is much better, does have some flaws - notably that it absolutely cannot deal with low or uneven liners (which a large proportion of K Series do have by this time).
If you need any impartial advice, you're welcome to PM me on here or drop a line to sales@dmgrs.co.uk
Email sent - with a long list of parts!Lovely to see one getting some love - my ZT-T is away with a good friend having similar treatment.
With regards to the HG, my honest opinion is that they Payen BW750 (or a copy of it) is the way to go - it just needs to be the latest iteration of such.
The MLS, while on paper is much better, does have some flaws - notably that it absolutely cannot deal with low or uneven liners (which a large proportion of K Series do have by this time).
If you need any impartial advice, you're welcome to PM me on here or drop a line to sales@dmgrs.co.uk
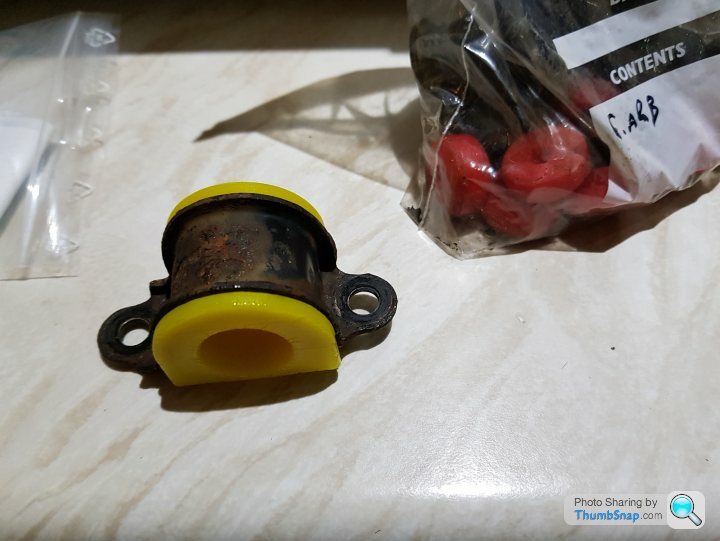
Next installment coming soon. The final fit of the dodgy homemade bushes. Also note, still no sign of my Polish arb bushes... Ace. Not.
Smitters said:
Next installment coming soon. The final fit of the dodgy homemade bushes. Also note, still no sign of my Polish arb bushes... Ace. Not.
It's 1.44 am. I've just Briget Jonesed a tub of Haagen-Dazs to reward my four hours of persistence, but the arb is attached with fine (if ill fitting) Polish bush, and homemade droplinks. Also, a proper thumbs up to Matt at Discount MG Rover Spares, who retrospectively applied a Black Friday discount to my sizeable cam/hg order. Thank you again.
Photos, and the tale of how I got head in Caerphilly for a bargain basement price when it's daylight.
Mmmm. Ice cream.
Only minor guilt was felt on that one. I was taking advantage of a long weekend, having taken Thursday and Friday off work to decorate the bathroom. I was "forced" to leave things to dry inside like plaster, undercoat and paint, so while that time elapsed I got busy on the MG.
As is often the way, I whinge about something not turning up and hey-ho, it's sitting on the doormat that night. And so it proved with the Polish el-cheapo bushes. They fitted into the metalwork fine on the bench (or in this case, kitchen counter), but on closer inspection, the holes drilled in the bush were not round, so more like 24mm (correct) on one axis, but 22mm on the perpendicular. This was to be an issue...
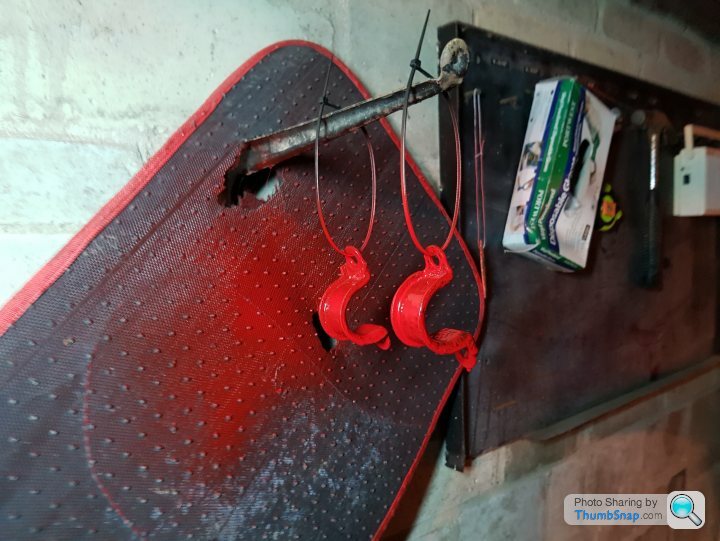
They did highlight how scabby the brackets were, so I set about doing an appalling job in 2 degree weather with whatever I could find. First, I carefully painted them in my custom spraybooth.
Then I took advantage of the warm oven after cooking a pizza for supper.
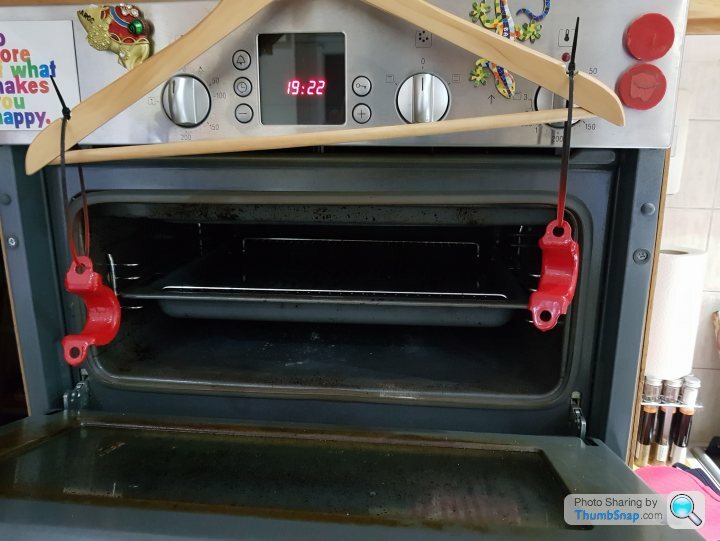
Minty.
At this point it's worth mentioning that my delightfully uncompliant body had decided, since I was taking some actual holiday, it should get ill. I was coughing and hacking like a good-un and my nose was streaming like a tap. So obviously lying on my back on cold concrete would be a great idea. Ah, I thought. It's two droplinks and four bolts for the arb brackets. How long can it take? Error.
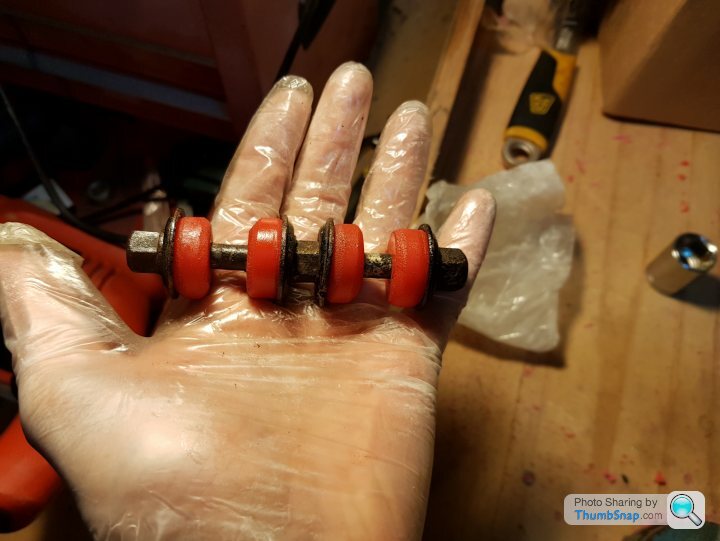
I was very pleased with my droplinks, so I was motivated to get it all fitted, plus this would mean, barring a bit more painting on bits I've missed up front, I can turn my attention to the large and exciting package delivered by Mat from DMGRS and actually make some mechanical headway, instead of nibbling at the cosmetic edges of the car.
Pro performance parts... ish.
What ensued was the most frustrating four hours. The 22mm underdrilling was on the horizontal, so when I slipped the bush over the ARB (the bush was slotted) the slot wouldn't close. It was about finding a decent method to compress the bracket over the bush so I could get both nuts started without cross threading either. In truth, I fought with one side for about 90 minutes, and thought I'd got it cracked. A combination of a jack holding the ARB in place and a length of wooden batten wedged between the floor and the bracket was looking like a good solution, but one bolt just didn't want to take, or if it did, it was as a crossed thread. In, out, reset the batten in a new position, in, out, remove the other bolt, refit, batten in, in, out, argh! Finally in. I then did the other side in five minutes using the same method and went to torque everything up, only for the bolt that had been fighting me to drop out again. Obviously it hadn't taken a thread! Cue another 60 mins. I was tired at this point and had to remind myself this was a hobby.
I should point out, I'd also done something a bit dumb. I'd opened the garage door and put the car half in half out. Great for a flat surface, lots of space and close proximity for tools. Not so useful if you've jacked it up at the front, removed the wheels and then want to quit halfway through the job... Determined to see it through, and risking a Basil Fawlty-style thrashing of the car if that f king bolt fell out again, down I went again... It went, I cheered, tidied up and made like a lonely 30-something blonde with the ice-cream.

That's guaranteed understeer right there.
Then, because this had happened:

I was in the market for a 135 cam. If the head's coming off, I (the man) may as well tinker, within reason. I found a nice chap willing to sell me a 1.8 head from a 78k MGTF with a 135 cam in place. Since the 135 cams go for about £100 anyway, and given I have two 1.8s with HGF, having a spare head seemed a sensible plan. If the cams were too worn to the eye of my Lotus man, I'd bung them into the MG. If not, I'd still have a spare head and dare I say it, a home porting opportunity.
So, again mindful of my OH not being in the house, I carefully stored and inspected my new purchase, courtesy of a quick trip to Caerphilly.
Drinks of choice - coffee, sports drink and Lemsip Max. Enough to kickstart the dead.
I'd done some research and despite the camshaft part number being an oft-quoted identifier, it seems the stamping only really relates to the blank shaft, not the cams themselves. With some trepidation, I set to them with a caliper, but by measuring across the round diameter, them across the longest length (to the tip of the lobe) and subtracting the small from the big number I got about 9.5mm. Standard 120 cams are about 8.9mm difference, so I am pleased not to have been scammed as it occurred to me, after paying, and halfway across the bridge, that the ad had said it was a 135 head with cams. Technically, that doesn't mean the cams are from a 135, but I'm too cynical apparently.
The man says the cams are in good order, so I'll pull them out and let him tidy up some casting imperfections and fit the required spigot for timing. Good for the Lotus, shame for the MG.
Final bit is just unnecessary bling, but having smashed the screen removing the biohazard that was the original leather knob, I'm damned if I'm not adding 10bhp and the ability to slam my shifts like I'm Fast and Furious. And so we have...

Does it bolt straight on? Does it fk. Sigh.
Only minor guilt was felt on that one. I was taking advantage of a long weekend, having taken Thursday and Friday off work to decorate the bathroom. I was "forced" to leave things to dry inside like plaster, undercoat and paint, so while that time elapsed I got busy on the MG.
As is often the way, I whinge about something not turning up and hey-ho, it's sitting on the doormat that night. And so it proved with the Polish el-cheapo bushes. They fitted into the metalwork fine on the bench (or in this case, kitchen counter), but on closer inspection, the holes drilled in the bush were not round, so more like 24mm (correct) on one axis, but 22mm on the perpendicular. This was to be an issue...
They did highlight how scabby the brackets were, so I set about doing an appalling job in 2 degree weather with whatever I could find. First, I carefully painted them in my custom spraybooth.
Then I took advantage of the warm oven after cooking a pizza for supper.
Minty.
At this point it's worth mentioning that my delightfully uncompliant body had decided, since I was taking some actual holiday, it should get ill. I was coughing and hacking like a good-un and my nose was streaming like a tap. So obviously lying on my back on cold concrete would be a great idea. Ah, I thought. It's two droplinks and four bolts for the arb brackets. How long can it take? Error.
I was very pleased with my droplinks, so I was motivated to get it all fitted, plus this would mean, barring a bit more painting on bits I've missed up front, I can turn my attention to the large and exciting package delivered by Mat from DMGRS and actually make some mechanical headway, instead of nibbling at the cosmetic edges of the car.
Pro performance parts... ish.
What ensued was the most frustrating four hours. The 22mm underdrilling was on the horizontal, so when I slipped the bush over the ARB (the bush was slotted) the slot wouldn't close. It was about finding a decent method to compress the bracket over the bush so I could get both nuts started without cross threading either. In truth, I fought with one side for about 90 minutes, and thought I'd got it cracked. A combination of a jack holding the ARB in place and a length of wooden batten wedged between the floor and the bracket was looking like a good solution, but one bolt just didn't want to take, or if it did, it was as a crossed thread. In, out, reset the batten in a new position, in, out, remove the other bolt, refit, batten in, in, out, argh! Finally in. I then did the other side in five minutes using the same method and went to torque everything up, only for the bolt that had been fighting me to drop out again. Obviously it hadn't taken a thread! Cue another 60 mins. I was tired at this point and had to remind myself this was a hobby.
I should point out, I'd also done something a bit dumb. I'd opened the garage door and put the car half in half out. Great for a flat surface, lots of space and close proximity for tools. Not so useful if you've jacked it up at the front, removed the wheels and then want to quit halfway through the job... Determined to see it through, and risking a Basil Fawlty-style thrashing of the car if that f
king bolt fell out again, down I went again... It went, I cheered, tidied up and made like a lonely 30-something blonde with the ice-cream.That's guaranteed understeer right there.
Then, because this had happened:
I was in the market for a 135 cam. If the head's coming off, I (the man) may as well tinker, within reason. I found a nice chap willing to sell me a 1.8 head from a 78k MGTF with a 135 cam in place. Since the 135 cams go for about £100 anyway, and given I have two 1.8s with HGF, having a spare head seemed a sensible plan. If the cams were too worn to the eye of my Lotus man, I'd bung them into the MG. If not, I'd still have a spare head and dare I say it, a home porting opportunity.
So, again mindful of my OH not being in the house, I carefully stored and inspected my new purchase, courtesy of a quick trip to Caerphilly.
Drinks of choice - coffee, sports drink and Lemsip Max. Enough to kickstart the dead.
I'd done some research and despite the camshaft part number being an oft-quoted identifier, it seems the stamping only really relates to the blank shaft, not the cams themselves. With some trepidation, I set to them with a caliper, but by measuring across the round diameter, them across the longest length (to the tip of the lobe) and subtracting the small from the big number I got about 9.5mm. Standard 120 cams are about 8.9mm difference, so I am pleased not to have been scammed as it occurred to me, after paying, and halfway across the bridge, that the ad had said it was a 135 head with cams. Technically, that doesn't mean the cams are from a 135, but I'm too cynical apparently.
The man says the cams are in good order, so I'll pull them out and let him tidy up some casting imperfections and fit the required spigot for timing. Good for the Lotus, shame for the MG.
Final bit is just unnecessary bling, but having smashed the screen removing the biohazard that was the original leather knob, I'm damned if I'm not adding 10bhp and the ability to slam my shifts like I'm Fast and Furious. And so we have...
Does it bolt straight on? Does it f
k. Sigh.
A big box of fun arrived from DMGRS - thanks Mat - but children's birthday celebrations have somewhat taken over the last week. Ah well - got to keep the little bugger happy, especially when he pronounced "the blue racing car" his favourite of the lot!
I don't want to know about cutting knobs off, but I shall endeavor to get this one to fit - it's a bit central to my intended colour scheme.
And I should say even though mine's very sheddy, I was pretty surprised about how well it handled. It just feels "right", and that's coming from an ex-Caterham owner. You tend to have certain bias after enjoying a 22% quick rack on a Caterham with polybushed everything. A new meaning to the word "direct".
A very, very long overdue update here.
It really comprises two sessions on the car, one just after new year and one this week. Time has been short, I’ve been ill, family first – all the usual stuff. But then right up front, I said to myself this has to be about having fun and learning stuff. Even if I don’t end up with a running driving car at the end, I’ll only be slightly disappointed as long as I know why it’s not running.
So, things wot I have done:
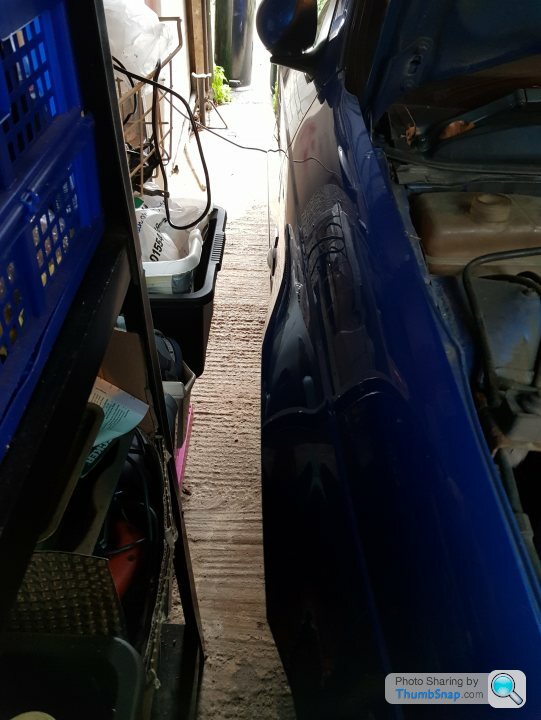
I fitted the MG into the garage. Just. With the front bumper off, it’s touching a cabinet at one end and I had to take the towbar off to make the door close. So, tight. It still needs a glove on the bumper to stop the door damaging the paint. Width wise it’s much better. I’ve got a good 6-8 inches to squeeze through. Damn those Christmas Quality Streets!
Can't do it holding a cup of coffee...
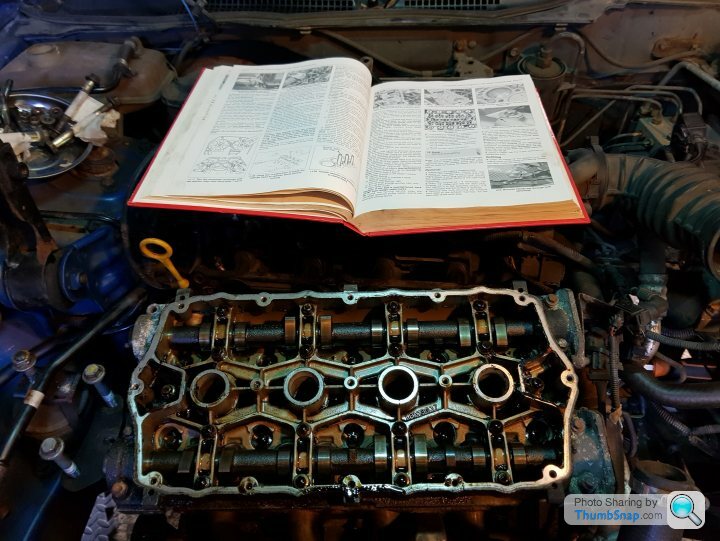
Anything else? A little bit, though it’s taken me a long time. I’m not going to lie – I spent a lot of time staring at the engine bay, reading and re-reading both the engine manual and the Haynes manual and just taking my time. Especially because my biggest fears are rounding bolts and stripping threads in the alloy head/block. I am taking note of torque settings. Especially the small ones, like 6Nm!
I shan’t go into any great detail about how I’ve done each task as this isn’t (and really shouldn’t be!) a how-to guide. Possibly more of a how-not-to guide in places. Rimmer Bros have a couple of excellent YouTube videos on working on the K-Series. They’re not perfect, but combined and with manuals to hand, they make a lots of sense and have been very helpful to me – especially just watching 30 secs at a time while actually doing the job being described.
Replacing the head gasket, water pump and cambelt on a Rover 75 1.8 turbo
Replacing the Timing belt and head gasket on an MGF
The engine itself looks a bit tired, as it would for 124k, but even so, it’s generally in good order, so I set to. I whipped off the plug cover, the seven nuts holding the intake manifold off (some of which are a bd to get to) and generally manoeuvred the thing out of the way. My intention was to minimally disturb stuff that didn’t need touching, since I have generally found that new faults occur right in the areas I’ve recently played with.
Right away I found a couple of issues – a plug was very oily and the intake manifold gasket looked old, knackered and like it had had a run in with some silicone seal in a vague and pointless attempt to stop a leak. In addition, there were signs of emulsified coolant in a blanked waterway.
Touch of oil
Grubby intake manifold
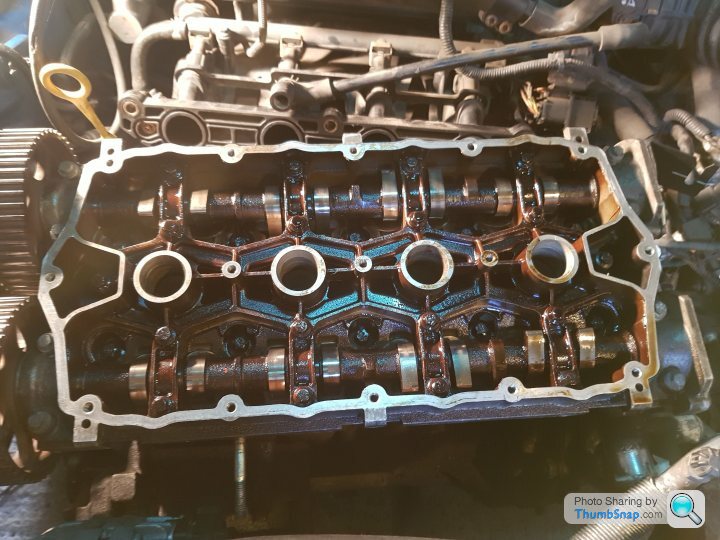
I took the cam cover off, using my new favourite Ebay buy – adaptors for my cordless drill – and was greeted with some good news. Just oil…
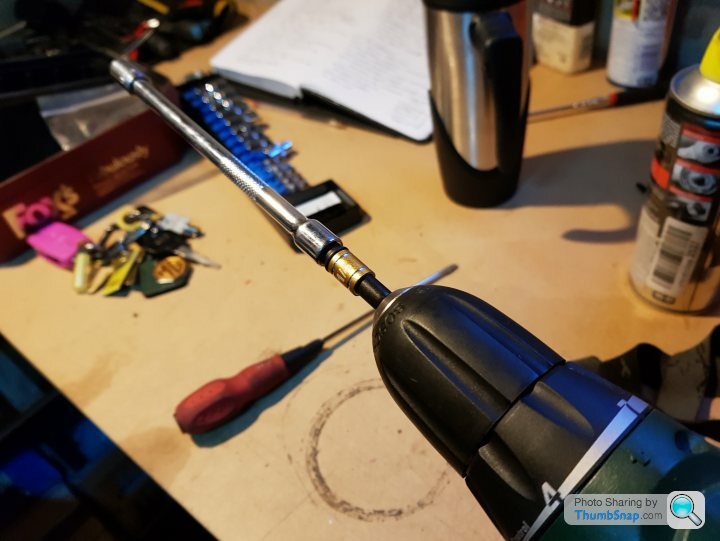
Easy with battery power!
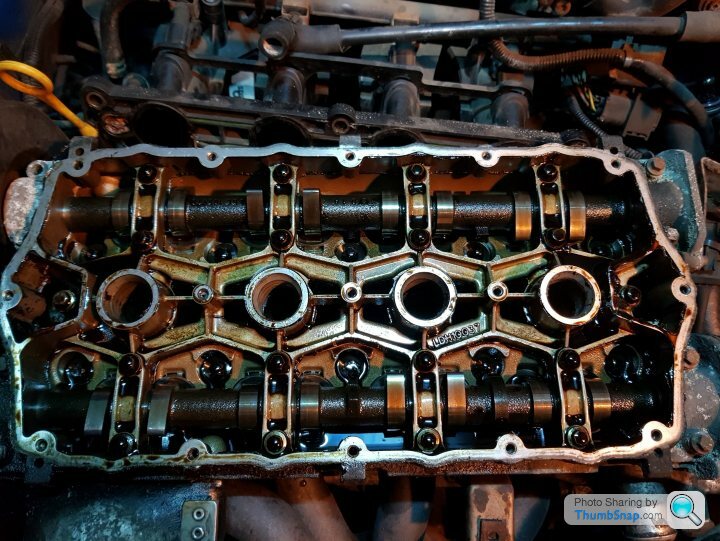
Good news!
I would say this car has slowly been leaking coolant into the oil for some time, possibly from a number of spots. None have been catastrophic – there’s no mayo in the cam-carried/cam area, but there’s definitely been at least localised mixing and some spreading. The header tank surfaces are a mess, for one thing.
Now ideally, I would have carried on working, but this being the Christmas holidays, apparently my small children were eager to play with their new stuff, so in I came, and there she sat, for a rather unexpected 8 week while we enjoyed the various time pulls of parenthood and then, out of the blue, the bloody flu. Proper drop you to your knees flu. Ugh.
Anyway, fast forward to this week and I have some energy and renewed enthusiasm, plus it’s sunny, so I can see the appeal of being outside for once. Plus the MOT is due in May and I’d like to try a trackday (or at least drive it) before then.
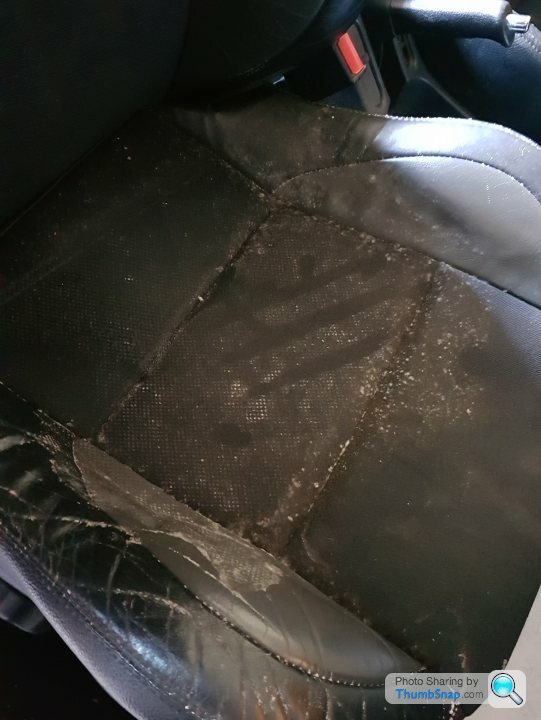
Now I should say in the interim, I’d notice the car was a bit musty and some mould had appeared in a few spots. No probs – I’ll pop a dehumidifier in there and dry it out. It went well. Initially.
I popped in every couple of weeks, checked the water level and everything was tickety-boo. Then I was ill, and didn’t check for a month. I wasn’t worried of course – the dehumidifier cuts off when it’s full, so the only downside was a bit of dampness creeping back in. How wrong I was.
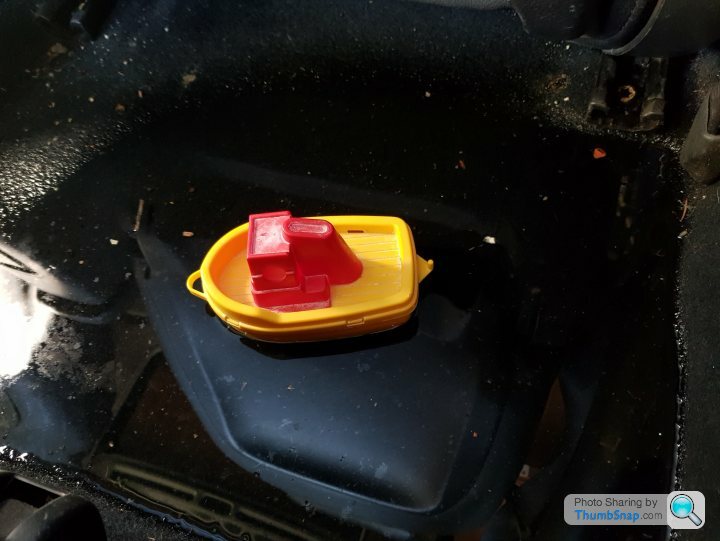
Messing about with boats
Not sitting here any time soon
What had happened was this: The dehumidifier had slipped off its level perch, tilting back far enough so water could run out of the back of the tank before being full enough to trigger the cut-off. It had been dribbling down through the seat, into the footwell and out onto the floor (thank goodness for removing bungs for de-rusting). I was left with a small ocean in which to play with my boat. Woo and indeed hoo. Ah well. Towels to soak up the worst, and a more solid perch for the dehumidifier and it’ll be dry, well, never, but I’ll have a good crack. Cock it.
Still – I had a couple of sunny days, the kids at their grandparents and no reason to be inside, so on I cracked.
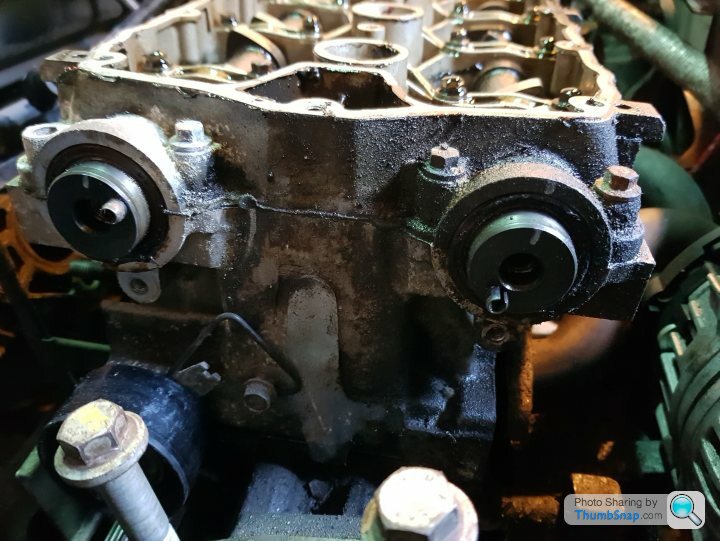
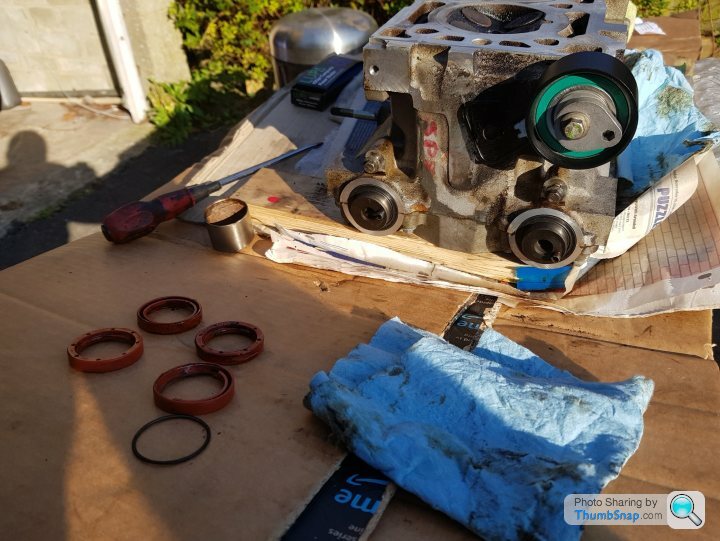
After a bit of a wrestle with the exhaust manifold, and some cautious tinkering with the auxiliary and timing stuff, I had removed enough to lift the head off. I went really slowly through all of this, double checking what I was doing and so I don’t think I made any errors, aside from not pulling the water-pump off before the head. This left the block a bit full and I had to soak some coolant up to avoid spills onto the block face and into the cylinders.
Keeping track of the order to undo the bolts
I used a white paint pen to mark where the cam dowels were against the rear timing cover and then the cams themselves against the head. The former will be helpful when the head changes, the latter when re-using the old head.
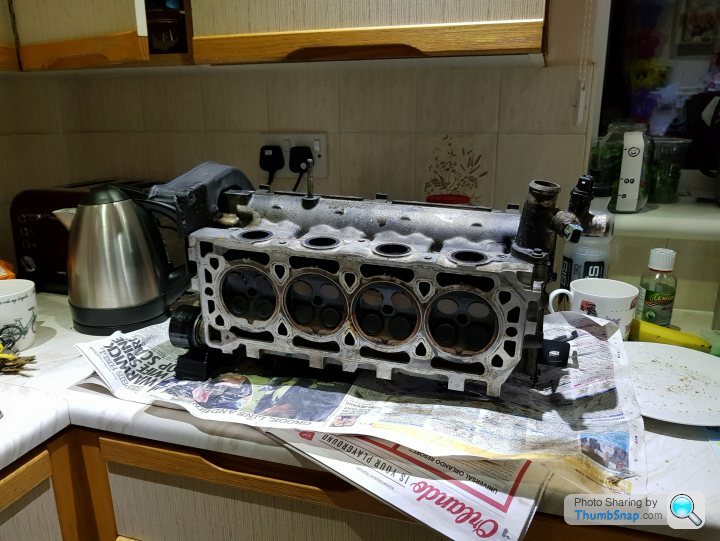
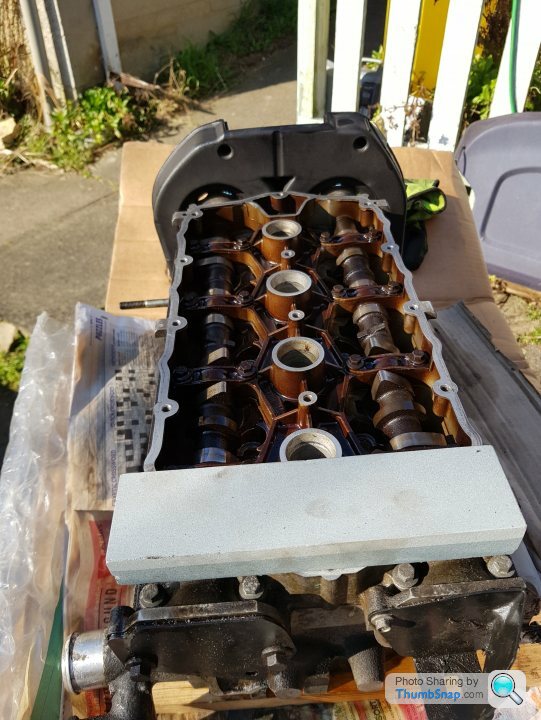
The old head was a state, and the gasket had rust, which I feel isn’t a great sign, but on closer inspection (I’ll refer to it as the 120 head, since I also have the 135 head) the 120 head looks in OK condition.
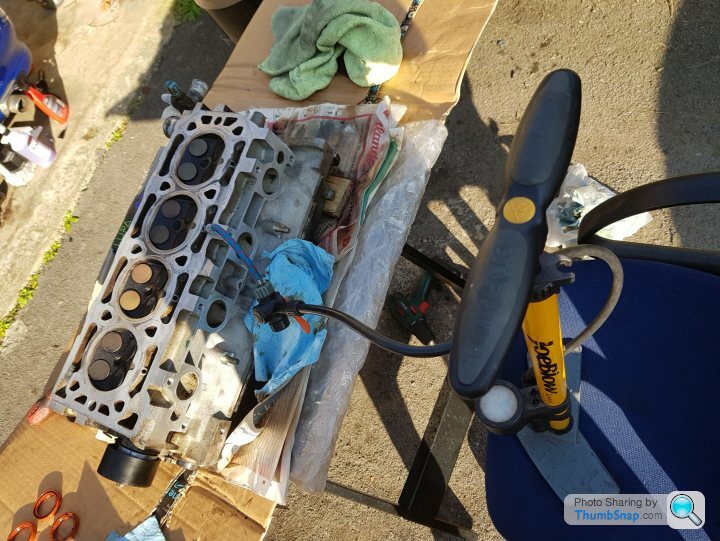
Still, I had sourced a second set of 135 cams for my Lotus, so I still had a whole head, complete with 135 cams, on hand. I had spent some time researching what I could do and ultimately the right course would probably be a hardness test, some peening over suspect areas and a light skim. However, I don’t have the £ for a hardness test, I don’t have the confidence to peen it myself and I don’t have the tools, skill or intention of removing the cams and valves in order to do a full skim myself, backyard style. Maybe another year (or when this fails spectacularly in a few months) I will do that, pull the valves, lap them, buy a Dremel and get busy in the ports, but for now, I would have to get very, very backyard.
Having tried it tentatively on a flat but non-essential part of the 135 head, I went with… a knife sharpening stone and some WD40…
I’ll just give you a minute to absorb how utterly ghetto that is.
But Al said it was OK, so there…
I didn’t actually use the stone pictured – I put a straight edge to it and it was too far off flat. I do however have my Grandad’s old sharpening stone, complete with its wooden case. The straight edge revealed this to be almost perfectly flat – the 0.002mm feeler only just started to stick, so I had my tool. I know in things like this a full sweep of the head is preferable, but I made do with half sweeps as I manipulated the cam wheels, which were still on the 135 head, to keep the valves out of the way.
Once I was happy with all the surfaces, I replaced the cam seals in a less ape-like fashion than the previous owner, using minor details like the right seals, popped a new timing belt tensioner on, installed a new waterpump on the block, cleaned the housing and replaced the stat with a new one, drilled twice at 2mm to allow some seeping.
I'm going to studiously ignore that leak from the cam cage...

Then it was just a basic clean-up of the head surfaces before turning my attention to what would eventually defeat me and stop play. No compressor? No problem…
Ghetto-life continues... that’s got a football needle on the end – proved very effective provided you put some elbow into the pump-stroke.
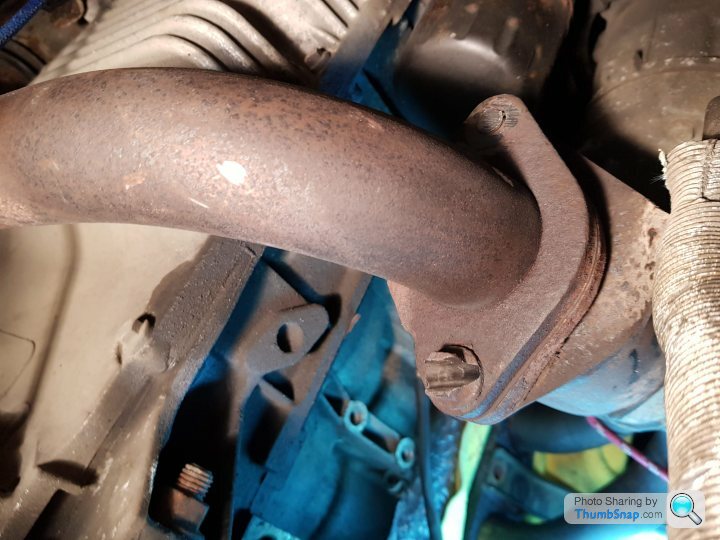
So, you may remember a while back I pictured a leak, but mentioned the exhaust manifold may provide some amusement…
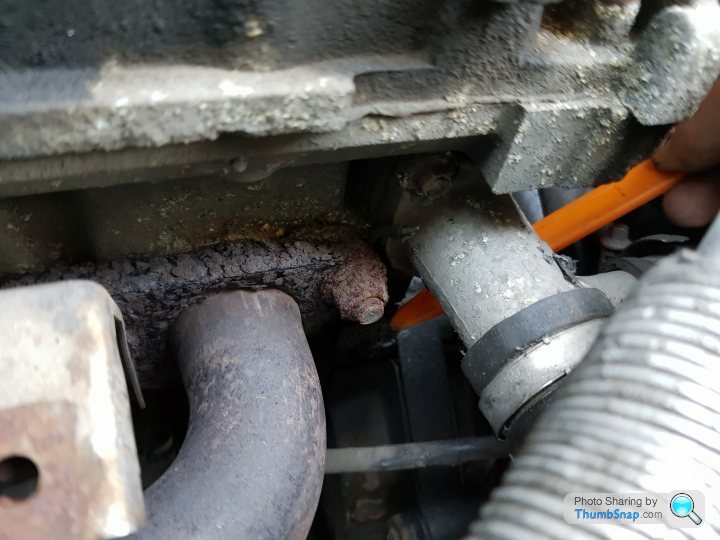
Well, the waterfall of coolant had really done a job on the flange face (which is also a great insult). It was rusted to buggery and would never seal again without some serious work, so the manifold and pre-cat needed to come off. Only issue? The two bolts from pre-cat to centre-section were also rusted to buggery. Cue my first rounded bolt. So, the next instalment will involve the perils of fire, wheels of death and possibly hammers. In the meantime, Ebay is sending me their very cheapest manifold and a gasket too, in anticipation of success.
It really comprises two sessions on the car, one just after new year and one this week. Time has been short, I’ve been ill, family first – all the usual stuff. But then right up front, I said to myself this has to be about having fun and learning stuff. Even if I don’t end up with a running driving car at the end, I’ll only be slightly disappointed as long as I know why it’s not running.
So, things wot I have done:
I fitted the MG into the garage. Just. With the front bumper off, it’s touching a cabinet at one end and I had to take the towbar off to make the door close. So, tight. It still needs a glove on the bumper to stop the door damaging the paint. Width wise it’s much better. I’ve got a good 6-8 inches to squeeze through. Damn those Christmas Quality Streets!
Can't do it holding a cup of coffee...
Anything else? A little bit, though it’s taken me a long time. I’m not going to lie – I spent a lot of time staring at the engine bay, reading and re-reading both the engine manual and the Haynes manual and just taking my time. Especially because my biggest fears are rounding bolts and stripping threads in the alloy head/block. I am taking note of torque settings. Especially the small ones, like 6Nm!
I shan’t go into any great detail about how I’ve done each task as this isn’t (and really shouldn’t be!) a how-to guide. Possibly more of a how-not-to guide in places. Rimmer Bros have a couple of excellent YouTube videos on working on the K-Series. They’re not perfect, but combined and with manuals to hand, they make a lots of sense and have been very helpful to me – especially just watching 30 secs at a time while actually doing the job being described.
Replacing the head gasket, water pump and cambelt on a Rover 75 1.8 turbo
Replacing the Timing belt and head gasket on an MGF
The engine itself looks a bit tired, as it would for 124k, but even so, it’s generally in good order, so I set to. I whipped off the plug cover, the seven nuts holding the intake manifold off (some of which are a b
d to get to) and generally manoeuvred the thing out of the way. My intention was to minimally disturb stuff that didn’t need touching, since I have generally found that new faults occur right in the areas I’ve recently played with. Right away I found a couple of issues – a plug was very oily and the intake manifold gasket looked old, knackered and like it had had a run in with some silicone seal in a vague and pointless attempt to stop a leak. In addition, there were signs of emulsified coolant in a blanked waterway.
Touch of oil
Grubby intake manifold
I took the cam cover off, using my new favourite Ebay buy – adaptors for my cordless drill – and was greeted with some good news. Just oil…
Easy with battery power!
Good news!
I would say this car has slowly been leaking coolant into the oil for some time, possibly from a number of spots. None have been catastrophic – there’s no mayo in the cam-carried/cam area, but there’s definitely been at least localised mixing and some spreading. The header tank surfaces are a mess, for one thing.
Now ideally, I would have carried on working, but this being the Christmas holidays, apparently my small children were eager to play with their new stuff, so in I came, and there she sat, for a rather unexpected 8 week while we enjoyed the various time pulls of parenthood and then, out of the blue, the bloody flu. Proper drop you to your knees flu. Ugh.
Anyway, fast forward to this week and I have some energy and renewed enthusiasm, plus it’s sunny, so I can see the appeal of being outside for once. Plus the MOT is due in May and I’d like to try a trackday (or at least drive it) before then.
Now I should say in the interim, I’d notice the car was a bit musty and some mould had appeared in a few spots. No probs – I’ll pop a dehumidifier in there and dry it out. It went well. Initially.
I popped in every couple of weeks, checked the water level and everything was tickety-boo. Then I was ill, and didn’t check for a month. I wasn’t worried of course – the dehumidifier cuts off when it’s full, so the only downside was a bit of dampness creeping back in. How wrong I was.
Messing about with boats
Not sitting here any time soon
What had happened was this: The dehumidifier had slipped off its level perch, tilting back far enough so water could run out of the back of the tank before being full enough to trigger the cut-off. It had been dribbling down through the seat, into the footwell and out onto the floor (thank goodness for removing bungs for de-rusting). I was left with a small ocean in which to play with my boat. Woo and indeed hoo. Ah well. Towels to soak up the worst, and a more solid perch for the dehumidifier and it’ll be dry, well, never, but I’ll have a good crack. Cock it.
Still – I had a couple of sunny days, the kids at their grandparents and no reason to be inside, so on I cracked.
After a bit of a wrestle with the exhaust manifold, and some cautious tinkering with the auxiliary and timing stuff, I had removed enough to lift the head off. I went really slowly through all of this, double checking what I was doing and so I don’t think I made any errors, aside from not pulling the water-pump off before the head. This left the block a bit full and I had to soak some coolant up to avoid spills onto the block face and into the cylinders.
Keeping track of the order to undo the bolts
I used a white paint pen to mark where the cam dowels were against the rear timing cover and then the cams themselves against the head. The former will be helpful when the head changes, the latter when re-using the old head.
The old head was a state, and the gasket had rust, which I feel isn’t a great sign, but on closer inspection (I’ll refer to it as the 120 head, since I also have the 135 head) the 120 head looks in OK condition.
Still, I had sourced a second set of 135 cams for my Lotus, so I still had a whole head, complete with 135 cams, on hand. I had spent some time researching what I could do and ultimately the right course would probably be a hardness test, some peening over suspect areas and a light skim. However, I don’t have the £ for a hardness test, I don’t have the confidence to peen it myself and I don’t have the tools, skill or intention of removing the cams and valves in order to do a full skim myself, backyard style. Maybe another year (or when this fails spectacularly in a few months) I will do that, pull the valves, lap them, buy a Dremel and get busy in the ports, but for now, I would have to get very, very backyard.
Having tried it tentatively on a flat but non-essential part of the 135 head, I went with… a knife sharpening stone and some WD40…
I’ll just give you a minute to absorb how utterly ghetto that is.
But Al said it was OK, so there…
I didn’t actually use the stone pictured – I put a straight edge to it and it was too far off flat. I do however have my Grandad’s old sharpening stone, complete with its wooden case. The straight edge revealed this to be almost perfectly flat – the 0.002mm feeler only just started to stick, so I had my tool. I know in things like this a full sweep of the head is preferable, but I made do with half sweeps as I manipulated the cam wheels, which were still on the 135 head, to keep the valves out of the way.
Once I was happy with all the surfaces, I replaced the cam seals in a less ape-like fashion than the previous owner, using minor details like the right seals, popped a new timing belt tensioner on, installed a new waterpump on the block, cleaned the housing and replaced the stat with a new one, drilled twice at 2mm to allow some seeping.
I'm going to studiously ignore that leak from the cam cage...
Then it was just a basic clean-up of the head surfaces before turning my attention to what would eventually defeat me and stop play. No compressor? No problem…
Ghetto-life continues... that’s got a football needle on the end – proved very effective provided you put some elbow into the pump-stroke.
So, you may remember a while back I pictured a leak, but mentioned the exhaust manifold may provide some amusement…
Well, the waterfall of coolant had really done a job on the flange face (which is also a great insult). It was rusted to buggery and would never seal again without some serious work, so the manifold and pre-cat needed to come off. Only issue? The two bolts from pre-cat to centre-section were also rusted to buggery. Cue my first rounded bolt. So, the next instalment will involve the perils of fire, wheels of death and possibly hammers. In the meantime, Ebay is sending me their very cheapest manifold and a gasket too, in anticipation of success.
InitialDave said:
Good work so far!
On that manifold nut, wire brush it down, soak some Plusgas onto it, and try an Irwin Bolt-Grip socket. They've got some seriously nasty old fasteners undone for me, I always give them a try before breaking out the "destructive" approach.
Cheers - all those manifold nuts came off nicely in fact - it's the two below the pre-cat - under the car. Though the method still applies. Whatever, it'll be a new manifold. I'll get a photo of the face once it's off. Lets put it this way - it's the rustiest part I've found so far, including the chassis.On that manifold nut, wire brush it down, soak some Plusgas onto it, and try an Irwin Bolt-Grip socket. They've got some seriously nasty old fasteners undone for me, I always give them a try before breaking out the "destructive" approach.
Edited by Smitters on Friday 1st March 15:34
My father very helpfully drilled the thermostat we put into mine late one year. Big mistake - resulted in slow warm up times and some uncomfortable journeys. Also, freezing fog isn't much fun when there's very little heat to put onto the screen. Fortunately I was wearing my snowboarding jacket on that occasion, but I still got cold.
It's a complete pig to get to on the 200vi too. Not sure where the thermostat is on a ZS 120, but I'd caution against fitting a drilled thermostat. Better to make sure that the cooling system is clear and the radiator in good condition.
It's a complete pig to get to on the 200vi too. Not sure where the thermostat is on a ZS 120, but I'd caution against fitting a drilled thermostat. Better to make sure that the cooling system is clear and the radiator in good condition.
gweaver said:
My father very helpfully drilled the thermostat we put into mine late one year. Big mistake - resulted in slow warm up times and some uncomfortable journeys. Also, freezing fog isn't much fun when there's very little heat to put onto the screen. Fortunately I was wearing my snowboarding jacket on that occasion, but I still got cold.
It's a complete pig to get to on the 200vi too. Not sure where the thermostat is on a ZS 120, but I'd caution against fitting a drilled thermostat. Better to make sure that the cooling system is clear and the radiator in good condition.
Point taken. Its very much an experiment so we'll see. Its a bugger to get to on the ZS too, so fingers crossed.It's a complete pig to get to on the 200vi too. Not sure where the thermostat is on a ZS 120, but I'd caution against fitting a drilled thermostat. Better to make sure that the cooling system is clear and the radiator in good condition.
Having looked again at your photo, I can see that you've drilled two holes, both of which are larger than the one hole that my father drilled.
IIRC the effect of that one small hole was to allow enough water through the rad that the engine would only fully warm up (in the winter) if the heater was off. If the engine was fully warmed up, turning the heater on would almost instantly drop the temperature again.
I've heard lots about the sub-optimal cooling system designs in the Lotus/MGF/Freelander, so that mod may have use there, but in the 200/400 and descendants I don't think it's necessary.
I think the cooling system design is ok, bar the well known issues with the inlet manifold gasket, head gasket and the lack of a coolant level sensor. Where we did have a problem was with the replacement coolant hose with the "SAAB" valve - it had a small rubber piece that didn't like oil contamination and would cause the valve to disintegrate and fully open. I remember finding bits of the valve elsewhere in the cooling system. Whoever specced that replacement part was a bit of an idiot, and I wouldn't be surprised if Project Drive had something to do with it.
My 200vi engine was reliable after being fitted with the MLS gasket and stiffened oil ladder (at 102k miles), though there was always a small amount of mayo caused, we think, by porosity in the head. That developed around 60k miles and continued until the car was scrapped at 191k miles due to rust.
Well, we'll have to see where we're at on the cooling front. I realise that of course, to a lesser degree, opening the "heating" circuit will provide the same shot of cold water into the system. I'll be honest, I'm not convinced I'll have got everything watertight first time out and I've got to flush the whole system out a good few times to get rid of the muck, so I'll have a good idea of how cold my toes are going to be.
At any rate, it's going to be a track hack, so as long as I can clear the windscreen I'll be happy. If I've got it wrong, I'll happily fess up and then start looking at a homebrew PRT as I just can't see why it would be £100 if you have time on your hands.
At any rate, it's going to be a track hack, so as long as I can clear the windscreen I'll be happy. If I've got it wrong, I'll happily fess up and then start looking at a homebrew PRT as I just can't see why it would be £100 if you have time on your hands.
Things have happened.
A fuller post and pictures coming soon, but for now, imagine a man, tubby from Easter eggs, wedged between a car and a shelf, holding his newly fettled 135 cam head in the air above his head to get it past the open bonnet and feeling it slowly slide out of his grip...
A fuller post and pictures coming soon, but for now, imagine a man, tubby from Easter eggs, wedged between a car and a shelf, holding his newly fettled 135 cam head in the air above his head to get it past the open bonnet and feeling it slowly slide out of his grip...
Smitters said:
Things have happened.
A fuller post and pictures coming soon, but for now, imagine a man, tubby from Easter eggs, wedged between a car and a shelf, holding his newly fettled 135 cam head in the air above his head to get it past the open bonnet and feeling it slowly slide out of his grip...
I admire your dedication, if this was mine it would have been weighted in on the 30th of August 2018.A fuller post and pictures coming soon, but for now, imagine a man, tubby from Easter eggs, wedged between a car and a shelf, holding his newly fettled 135 cam head in the air above his head to get it past the open bonnet and feeling it slowly slide out of his grip...
Smitters said:
Things have happened.
A fuller post and pictures coming soon, but for now, imagine a man, tubby from Easter eggs, wedged between a car and a shelf, holding his newly fettled 135 cam head in the air above his head to get it past the open bonnet and feeling it slowly slide out of his grip...
Noooooooooooooooo! A fuller post and pictures coming soon, but for now, imagine a man, tubby from Easter eggs, wedged between a car and a shelf, holding his newly fettled 135 cam head in the air above his head to get it past the open bonnet and feeling it slowly slide out of his grip...
Smitters said:
I should probably have heeded the above before attempting to squeeze through with the 135 head above my own head...Joey Deacon said:
I admire your dedication, if this was mine it would have been weighted in on the 30th of August 2018.
You may prove yet to be a wiser man than I.The Crack Fox said:
Great thread! I love quasi-classics like this. (Quasi-modo-classics?) Your dedication to what many might turn their noses up at is admirable. These are cracking cars to drive. I’m smiling at your pizza oven paint drying. Keep up the good work!
Cheers. I do see it as a classic, not necessarily in itself, but in the ethos of the drive - not caught up in a big power race, unashamedly targeted at a certain audience more keen on show than go, but when you dig in, it's got decent underpinnings and I'm sure in more capable hands than mine, would lap a track alarmingly briskly.I have to be honest, if it was a minter, nice working interior etc, I'd be happy driving it every day. I can't wait to see how (if) it goes!
Peanut Gallery said:
Noooooooooooooooo!
Alright - I didn't drop the head, and am guilty of a red-top style click-bait headline. I did gash my arm and tear my bicep though, leading to some issues with the gardening/holding the baby/general DIY - as in I couldn't do it for a week.Obviously I carried on working on the car though.
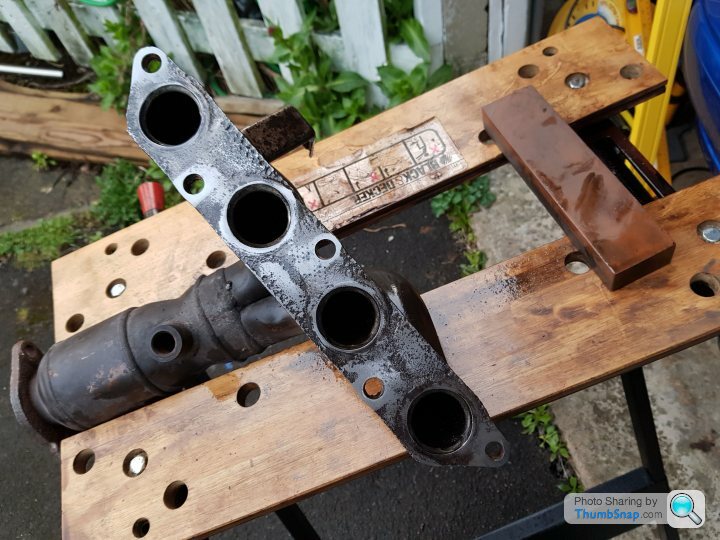
Exhaust-wise, the old manifold had to be removed by fair means or foul. I chose foul. In this instance, it was a spinning wheel of angry death about six inches from my face to grind through the bolts. Not slick, but definitely quick.
This was all because the manifold face was really badly rusted. I will take a pic of the old one at some point. Regrettably, I did not take a "before" pic of the replacement manifold I got from eBay, because for "good condition", it actually meant rusted badly. Just not as badly as the original. Ho hum. But, I began to deal with that in the traditional ghetto way. Here we are about halfway through smoothing off the high points to get a decently flat sealing surface for the gasket. There's still a way to go...
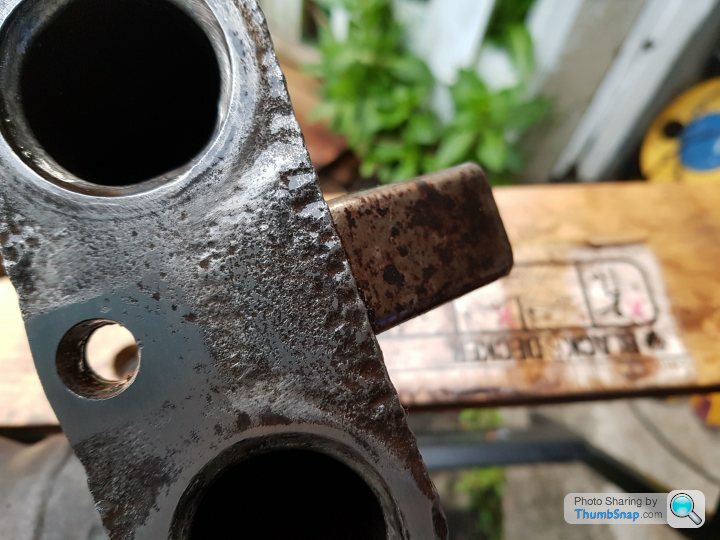
I do still love the idea of hand-tooling it, even if it takes some time. After about 20 mins, you can see a nice surface appearing, but some deep rust spots still to get into. You can see from the bolt hole area how smooth the stone leaves the metal though.
Talking of smooth metal, I may had cocked up. Lovers of doing things exactly the right way, just skip this bit.
When removing the old manifold, I managed to scratch the deck of the engine block. Only very lightly, but it was perpendicular to the edge and ran from a waterway area, so it was pretty much a guaranteed exit route for coolant. So, obviously I stripped the entire block, took it to a machine shop, had it decked and then rebuilt it. Yep. That. Definitely not High-temp JBWeld. Bizarrely, I have no pics of the actual infill of JBWeld. I had to do the infill quickly one evening because I was granted Easter Friday to work exclusively on the car, so just smashed it in and went for supper.
The upshot of all that was I smoothed it off the next morning, cleaned up the deck, gashed my arm, tore my bicep, cursed at myself a lot, then popped the HG and head into place.
I'll grant you, it's not terribly evident, but that is the 135 head installed, torqued down and ready to be timed. After I took a celebratory photo I popped the rear timing cover on and managed to wiggle the timing belt on. I'm not convinced I've got it tight enough on the exhaust side and may have a spare tooth's worth of belt there, but I turned everything over and the marks all lined up again, so it really is at the point I can button the remainder up and try starting it.
Tomorrow's job will be to lock the flywheel and get 205Nm on the crank bolt, then clean up and re-install the cam-cover and other bits.
In an ideal world, and if I did this all again, I'd have changed the oil first, but I didn't so then I'll run it up to temp with water and radflush, drain that, and the oil, change the oil and filter, flush the water pipes with a hose, use MGJohns somewhat dubious dishwasher tablet trick ( no really ) and then run it up to temp again. If all seems leak-free (ha!) then I'll do the second coat of paint and seal-sealing gubbins underneath and actually drive it about a bit.
If that all happens this weekend, you will be as shocked as I will.
Gassing Station | Readers' Cars | Top of Page | What's New | My Stuff