Advice regarding (finished) wallpaper job
Discussion


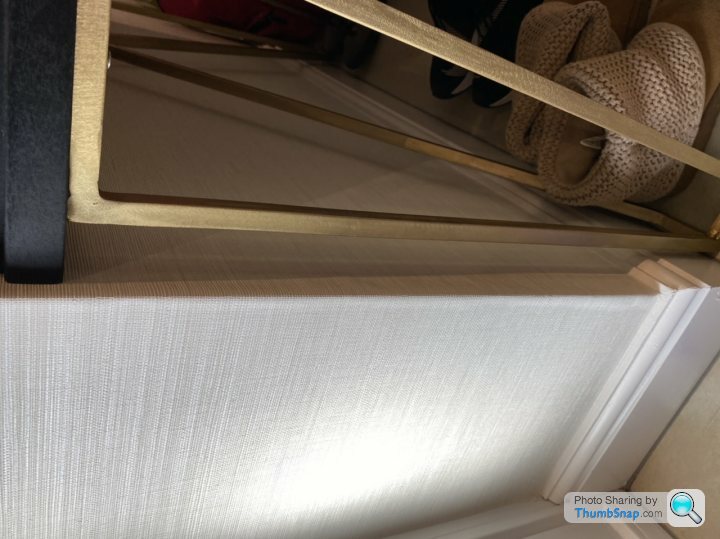
Our decoration is more or less finished and whilst the decorator has done a good job in general, the wallpaper throughout the hallway seems to have been a bit problematic. It is a very thick paper, vinyl weave, and he has just really struggled to get a good finish on a number of external corners. They seem to have air bubbles running up the edge. The hallway is a fairly large space spanning 3 storeys and the flat spans and internal corners are fine, it’s just the external corners.
I think he’s done his best but doesn’t have any experience of this sort of material as it’s quite a niche / high end paper (interior designer choice, costing £3.5k for the paper alone - so don’t fancy redoing it), so I’m just wondering if it would be worth contacting another decorator and seeing if they can get this better? What do you guys recommend - I’d love to see it improved.

I think he’s done his best but doesn’t have any experience of this sort of material as it’s quite a niche / high end paper (interior designer choice, costing £3.5k for the paper alone - so don’t fancy redoing it), so I’m just wondering if it would be worth contacting another decorator and seeing if they can get this better? What do you guys recommend - I’d love to see it improved.

EarlofDrift said:
Spending 3.5k on wallpaper was never a good idea. From experience the quality almost never matches the price.
Well no, I don’t think I would go down that route again, this is our first proper family home and first time with a designer, so we got carried away.But anyway it’s done now, and so I want to make the best of it and see what steps we should take next.
That's not good. I guess I would have got the feel for the paper as I going along and realised that I would need to run a firm crease down the paper before pasting that piece. Bit tricky to resolve now but you could try piercing it carefully with a pin and pressing it down with a steam iron and a tea towel between the iron and the paper (the pin holes are to let trapped air to escape.
RichB said:
That's not good. I guess I would have got the feel for the paper as I going along and realised that I would need to run a firm crease down the paper before pasting that piece. Bit tricky to resolve now but you could try piercing it carefully with a pin and pressing it down with a steam iron and a tea towel between the iron and the paper (the pin holes are to let trapped air to escape.
Hi Rich, ok that’s an interesting idea. I am happy to try that myself on a discreet corner. Do you think that is better to try than injecting more paste behind?I was thinking of getting an external corner roller which should help to work in a crease, though obviously that would have been better at time of application...
https://www.ebay.co.uk/itm/Internal-External-Corne...
The external corners with this type of paper really need overlap adhesive applied to the wall.
I’ve used this thick vinyl, and it’s not the easiest to bend - more so if the external edge Isn’t square.
But that then comes under prep - I’ve sometimes added a new angle bead to a dodgy edge and feathered it in with filler to make sure it’s plumb.
You can also gently heat the vinyl with a hair dryer when putting it on, and manipulate the corners, but it still needs a good bit of overlap underneath.
(Overlap - vinyl to vinyl paste, not just ready mixed tub paste)
sealtt said:
RichB said:
That's not good. I guess I would have got the feel for the paper as I going along and realised that I would need to run a firm crease down the paper before pasting that piece. Bit tricky to resolve now but you could try piercing it carefully with a pin and pressing it down with a steam iron and a tea towel between the iron and the paper (the pin holes are to let trapped air to escape.
Hi Rich, ok that’s an interesting idea. I am happy to try that myself on a discreet corner. Do you think that is better to try than injecting more paste behind?I was thinking of getting an external corner roller which should help to work in a crease, though obviously that would have been better at time of application...
https://www.ebay.co.uk/itm/Internal-External-Corne...
However you do it, it needs paste behind.
MellowshipSlinky said:
Rolling it may not work - the paste behind will be dry so nothing to stick, and there’s now effectively an excess of paper as it’s not dried tight to the wall.
However you do it, it needs paste behind.
Thanks for your messages. So what would be your advice to me at this stage on what to do next? I’d love to get the corners better, if you were faced with this job what would you do?However you do it, it needs paste behind.
sealtt said:
Thanks for your messages. So what would be your advice to me at this stage on what to do next? I’d love to get the corners better, if you were faced with this job what would you do?
Is it every external corner?The one in your pic - as the join is only just around the corner I’d be inclined to replace that whole piece.
A few things to take into consideration though - was the wall lined first?
Is it a non woven paper ( paste the wall)?
What adhesive was used - ready mixed tub or flake?
The above will make a difference as to how I’d go about making it good.
MellowshipSlinky said:
Is it every external corner?
The one in your pic - as the join is only just around the corner I’d be inclined to replace that whole piece.
A few things to take into consideration though - was the wall lined first?
Is it a non woven paper ( paste the wall)?
What adhesive was used - ready mixed tub or flake?
The above will make a difference as to how I’d go about making it good.
Of the 3 external wall corners, the one in photo is only one I have a real issue with, the others are not 100% perfect but they are good enough. This is also prominent in the downstairs hallway so I see it all the time.The one in your pic - as the join is only just around the corner I’d be inclined to replace that whole piece.
A few things to take into consideration though - was the wall lined first?
Is it a non woven paper ( paste the wall)?
What adhesive was used - ready mixed tub or flake?
The above will make a difference as to how I’d go about making it good.
There are also the external corners that go around the window reveal and front door reveal, I am unhappy with 3-4 of these.
The house is a new build (1yr old) and the paper went straight onto painted walls.
It is a woven paper made of vinyl. There were conflicting instructions included with the paper and from the paper brand, which said both paste the wall and paste the paper & soak for 10mins. In the end he pasted the paper after paste the wall gave bad adhesion.
It was ready mixed paste direct from the wallpaper supplier - they specified this paste to be used with the paper.
sealtt said:
Of the 3 external wall corners, the one in photo is only one I have a real issue with, the others are not 100% perfect but they are good enough. This is also prominent in the downstairs hallway so I see it all the time.
There are also the external corners that go around the window reveal and front door reveal, I am unhappy with 3-4 of these.
The house is a new build (1yr old) and the paper went straight onto painted walls.
It is a woven paper made of vinyl. There were conflicting instructions included with the paper and from the paper brand, which said both paste the wall and paste the paper & soak for 10mins. In the end he pasted the paper after paste the wall gave bad adhesion.
It was ready mixed paste direct from the wallpaper supplier - they specified this paste to be used with the paper.
Ok, then I’d be removing that whole length of paper and re doing it with overlap adhesive on the edge.There are also the external corners that go around the window reveal and front door reveal, I am unhappy with 3-4 of these.
The house is a new build (1yr old) and the paper went straight onto painted walls.
It is a woven paper made of vinyl. There were conflicting instructions included with the paper and from the paper brand, which said both paste the wall and paste the paper & soak for 10mins. In the end he pasted the paper after paste the wall gave bad adhesion.
It was ready mixed paste direct from the wallpaper supplier - they specified this paste to be used with the paper.
One issue though - if it’s gone straight onto painted walls there’s a high chance the emulsion will also come off (depending how the original paint was applied, i.e mist coat first).
Had the wall been lined ( which is what I’d have done considering the cost of your paper) the paper can be taken off leaving the lining intact.
As it’s a woven paper then pasting it sounds the correct way.
Manufacturers sure know how to confuse decorators....
As an aside, did you manage to get the bit behind the bannister done ok?
MellowshipSlinky said:
Ok, then I’d be removing that whole length of paper and re doing it with overlap adhesive on the edge.
One issue though - if it’s gone straight onto painted walls there’s a high chance the emulsion will also come off (depending how the original paint was applied, i.e mist coat first).
Had the wall been lined ( which is what I’d have done considering the cost of your paper) the paper can be taken off leaving the lining intact.
As it’s a woven paper then pasting it sounds the correct way.
Manufacturers sure know how to confuse decorators....
As an aside, did you manage to get the bit behind the bannister done ok?
That makes sense, I will discuss further with the designer and see if there is someone else who she knows is experienced with these papers just to redo this specific corner.One issue though - if it’s gone straight onto painted walls there’s a high chance the emulsion will also come off (depending how the original paint was applied, i.e mist coat first).
Had the wall been lined ( which is what I’d have done considering the cost of your paper) the paper can be taken off leaving the lining intact.
As it’s a woven paper then pasting it sounds the correct way.
Manufacturers sure know how to confuse decorators....
As an aside, did you manage to get the bit behind the bannister done ok?
Again many thanks for your advice on this subject. I hope we can find someone local with the same know how to get this bit perfect, as it is so prominent I think it would be worth it.
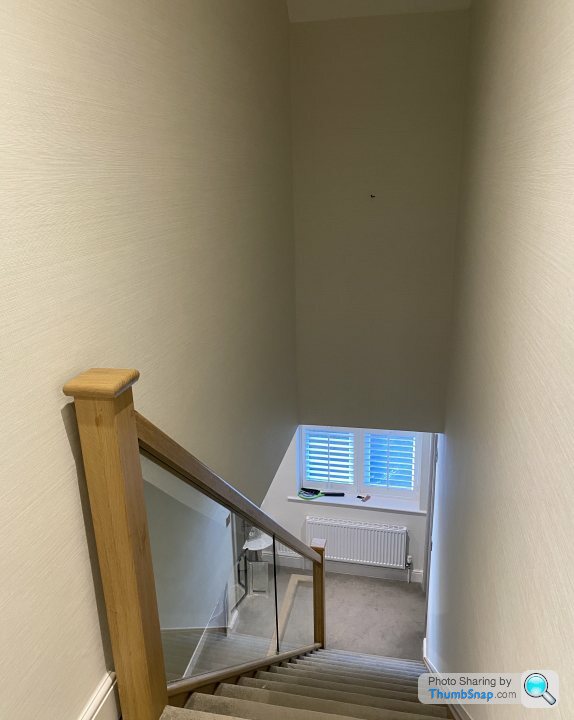
Regarding upstairs, well remembered! We told him to just try his best, and if it didn’t work out we wouldn’t hold it against him. So he went for it. There are a few big bubbles towards the bottom behind the glass balustrade where you just can’t get to it, but as the glass is so shiny they are very well hidden. The perfectionist in me would love it flawless, but the reality is it’s good enough and unless you look for them you won’t notice them, so we are happy.
Photo below (feature light still to go on back wall).
Edited by sealtt on Sunday 5th July 20:36
That’s a real shame. It looks like it just wasn’t folded well enough around the corners. I let a complete gibbon* paper a wall once and he left air bubbles. I managed to remove those by pin pricking them and the wafting a steam cleaner over the area and then rolling with a modelling roller but I think of you tried that you would get creases as your issue is an excess of material rather than air bubbles?
All I can suggest is that if the designer sourced the worker then you bring them in and show them the error and request that they remedy it.
* For ‘gibbon’ read ‘me’.
All I can suggest is that if the designer sourced the worker then you bring them in and show them the error and request that they remedy it.
* For ‘gibbon’ read ‘me’.
As others have said you really need to crease it before applying as it doesn't like sharp radii.
If the advice given above doesn't work then you can do what I have done once before on a corner: Find some right angle wood edging that matches what you have in that room and apply it top to bottom. I did this as the corner in question was likely to get rubbed by people passing by and over time the paper would become worn on the corner. But it may cover up your bubbles if they annoy you enough. Just a suggestion as it may or may not work for you.
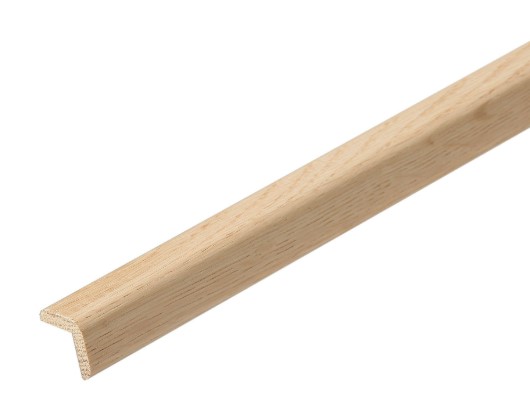
If the advice given above doesn't work then you can do what I have done once before on a corner: Find some right angle wood edging that matches what you have in that room and apply it top to bottom. I did this as the corner in question was likely to get rubbed by people passing by and over time the paper would become worn on the corner. But it may cover up your bubbles if they annoy you enough. Just a suggestion as it may or may not work for you.
DonkeyApple said:
That’s a real shame. It looks like it just wasn’t folded well enough around the corners. I let a complete gibbon* paper a wall once and he left air bubbles. I managed to remove those by pin pricking them and the wafting a steam cleaner over the area and then rolling with a modelling roller but I think of you tried that you would get creases as your issue is an excess of material rather than air bubbles?
All I can suggest is that if the designer sourced the worker then you bring them in and show them the error and request that they remedy it.
* For ‘gibbon’ read ‘me’.
Yes, I think if you got rid of the bubbles you'd have excess paper left over, that's even if you could get the paper flush now.All I can suggest is that if the designer sourced the worker then you bring them in and show them the error and request that they remedy it.
* For ‘gibbon’ read ‘me’.
I am starting to lean towards redoing the whole downstairs hallway. The more I look, the more I see that the finish is very sloppy, not just on external corners, and it really pisses me off! I don't think it is worth redoing upstairs as the wall area is much larger and you only see it a couple of times a day.
Designer is coming over today to look. Hope she knows a high end decorator to make this right. IMO she should not have arranged for us to use this average guy if she was going to get us to buy in top end materials.
Edited by sealtt on Monday 6th July 13:28
MikeStroud said:
As others have said you really need to crease it before applying as it doesn't like sharp radii.
If the advice given above doesn't work then you can do what I have done once before on a corner: Find some right angle wood edging that matches what you have in that room and apply it top to bottom. I did this as the corner in question was likely to get rubbed by people passing by and over time the paper would become worn on the corner. But it may cover up your bubbles if they annoy you enough. Just a suggestion as it may or may not work for you.
Hi Mike, nice idea! Wouldn't work style wise where the issue is unfortunately, but would have been a great fix. A well chosen piece of trim can solve a lot of finish issues!!If the advice given above doesn't work then you can do what I have done once before on a corner: Find some right angle wood edging that matches what you have in that room and apply it top to bottom. I did this as the corner in question was likely to get rubbed by people passing by and over time the paper would become worn on the corner. But it may cover up your bubbles if they annoy you enough. Just a suggestion as it may or may not work for you.
Gassing Station | Homes, Gardens and DIY | Top of Page | What's New | My Stuff