My 1994 Riviera Blue Porsche 968 Club Sport Diary
Discussion


Winter SORN 2022
So, take off the rose tinted specs, get underneath, and lets see what I have actually bought...

Actually, step one is apply for Classic Register Membership at Porsche Centre Cambridge.
Many benefits come with this scheme, many of those will pass me by, but one caught my eye - 15% off parts.
You get a nice welcome pack...

...and a charming aluminium membership card with your VIN on the reverse. The Fuchs cut out spokes are a nice touch...
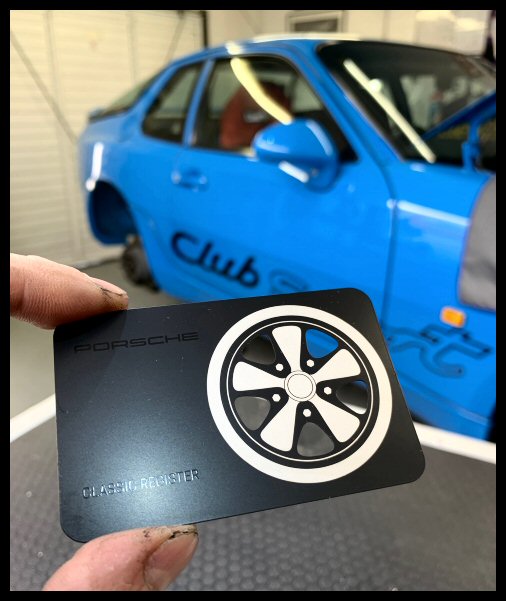
All this was complimentary. Times certainly have changed, because when I last owned my 944, you were definitely a poor relation when you rocked up at a Porsche Dealer. Some long overdue recognition for the older transaxle cars of the marque - although it's probably just a gimmick to get that piece of the classic servicing pie.
What hasn't changed though, is that you still take dealership staff by surprise when you walk to the counter and ask for parts
Build Sheet Foreword
The factory build sheet is King. This tells you exactly what the car should of had from new. Not only does it prove Club Sport, but it also details any options specified from new. Contrary to popular belief, the whole options list was available for Club Sport. You could take the bare bones CS and specify back in electric windows, comfort seats, airbag... sky was the limit.
Porsche were really struggling in 1994 and whatever the customer wanted, they got. Oh what a contrast!
I'm really proud of my build sheet; it proves my front seats were factory installed, as it does with the body colour wheels, the rear seat delete, central locking delete, radio delete and so on.
There are plenty of Club Sports rolling around out there with Recaro Pole Positions fitted. Some of those would of been "comfort seat" specified cars with the Pole Positions retro-fitted later in life. The build sheet would prove that.
M030 Anti-Roll Bars
I mention the build sheet above as this covers my first dilemma. The previous owner had upgraded the anti-roll bars to "M030" spec. This was an option code for an upgrade that, amongst other items, got you fatter anti-roll bars. This is desirable for track use, but I was unhappy that the M030 anti-roll bars were not on the build sheet.
Therefore, virtually new front & rear M030 bars removed, together with the larger diameter bushes...

Thankfully the OE roll bars were kept when they were replaced for M030, but the originals were looking a bit shabby in places...

So, the original specification (27mm & 16mm) roll bars (plus hangers) shot blasted & zinc powder coated...

...for fitment with new genuine standard diameter bushes...

Bizarrely these "base" size bushes are twice the price than M030 bushes; go figure!?!
Front Struts
Not looking great. Bump stops destroyed and only fragments of the dirt shields remaining...

Time for a strip down. As far as i'm concerned the shocks are fully serviceable still. The car drives well and there are zero damper fluid leaks. This is merely presentation.
First casualty - the ABS ground wires. How these were actually "grounded" is beyond me...

Blue overspray on my brake disc shields. Oh the embarrassment!

Disc shields removed. Note the grinding...
It's a double skin affair, swelling with corrosion and then grinding the back of the hub...

This, in turn, showers the ABS sensor in swarf. With an ABS sensor tip now covered in steel filings, together with non-existent ABS grounds (see above), its amazing my ABS lamp ever extinguished!
Disassembly...

Component parts cleaned, wire brushed, rust treated and painted...

New bump stops and shields...

New stainless captive nuts fitted for the ABS ground points...

Much more presentable and hopefully a couple of years of service left.
Together with new brake disc backing shields...

...that handily need an M7 tap for cleaning....

Had to get some M7 fixings in as I don't carry them!
The ABS harness holders also broken, but again, new items available...

I'm genuinely not used to this level of parts support for the 90's cars that I own!
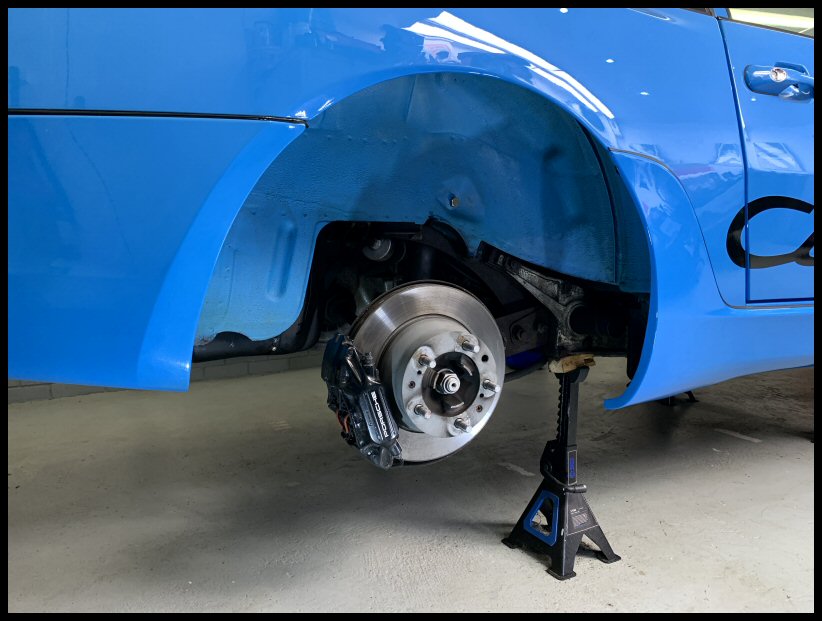
Front Wheel Arches
Perfect opportunity for a teardown & clean, what with no front struts in the way. Fixings all in a right mess, some having to be drilled...

All cleaned with TFR...

Again, embarrassing overspray to tidy...

Selection of bracketry, some new and/or blasted & zinc painted for re-fitment...

The volume of bracketry is total bonkers really. Another insight into poor 968 profitability on the production line.
Screw holes - which I presume is mudflap butchery - being repaired...

Front liners going back in...

All finished...

Rear Wheel Arches
Rear arches also needing a clean...

Tar removal and general cleaning...

Much more presentable...
Power Steering Leak
Unclear on the precise source. In summary, an absolute mess everywhere. I know the ZF bottles can crack and the cap seal degrades over time...

Plus, all the hose connections get repeatedly "nipped up" over the years until there's no more nipping to do...

The ZF reservoir has an internal micro-gauze filter so it's no harm to renew. It means you get a new cap seal too. The ZF bottle has a 928 part number. This, and the supply hose are still available, so that's a good place to start...

Sadly, what I can't replace, is the return line from the PAS cooler. This was absolutely destroyed with historic "nipping up"...

Well, that's technically a lie, as it's still available, but £400 :shock:

I don't mind paying what needs to be paid, but not £400 for 20mm of hose. Perhaps one day when the cooler rots out, but not just now thank you.
Therefore, I cut and spliced the return line for a better connection to the reservoir, enabling the use of fresh rubber hose...


All refitted, topped up with ATF-DIII and all leak free. For now at least.
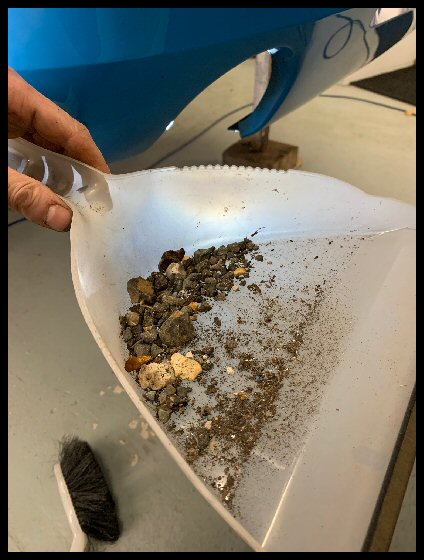
One manky undertray to tidy after all that...

A good soaking with TFR...

This was the collection of undertray fixings, the biggest assortment of s te you have ever seen...

All resolved with new zinc yellow fixings...

Lets hope that undertray stays oil free after this summers' use. We can but hope.
Battery
Took the battery out to charge and things not too pretty...

All rust preserved and re-painted...

Stupid I know, and a total waste of money, but I like the look of an OE battery. It's a bit more visually fitting of 1994 than a modern looking Bosch. I think it gives the car that dash of authenticity too (in my twisted mind anyways)...

All fitted, with my C-TEK charge cable and a Dis-car-nect...
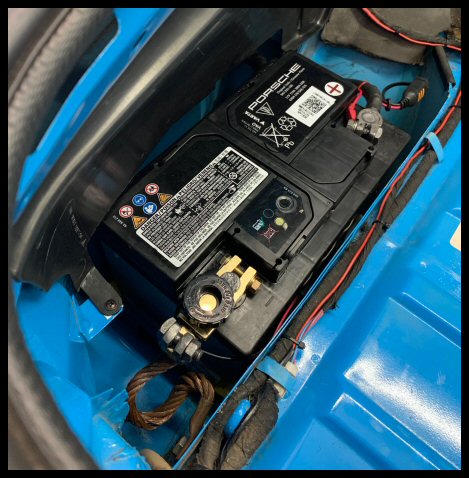
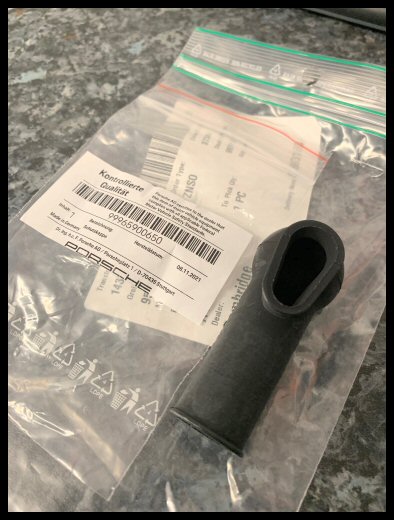
I sourced a new battery vent tube as none was fitted...
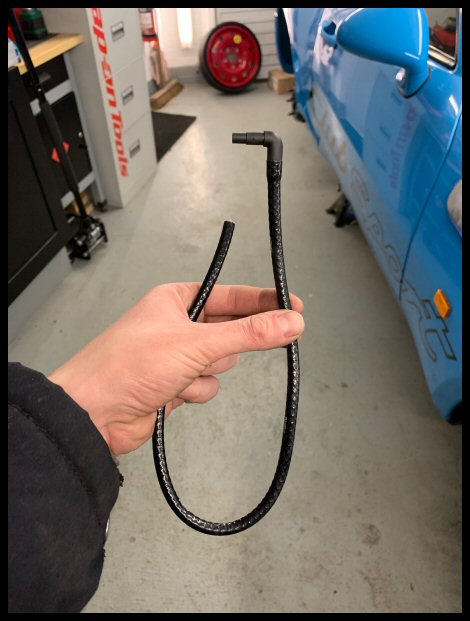
...which feeds through a dedicated grommet in the body...

Starter Motor Cable
Anyway, talking of batteries and such like, one internet image of a 968 waking up in the middle of the night really spooked me...
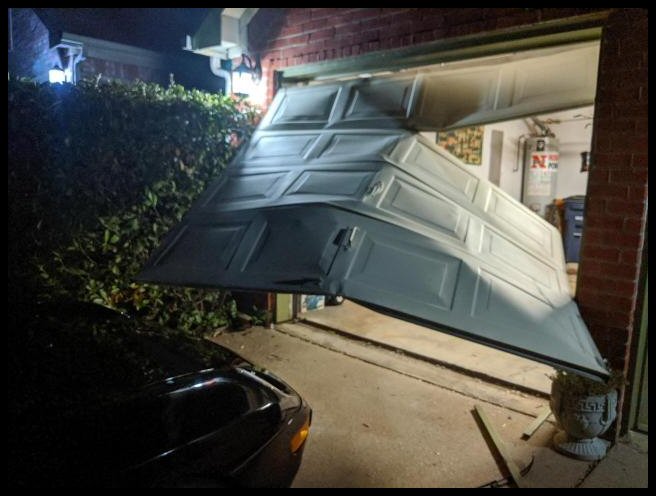
Thankfully not mine, but I feel sorry for the person whom it was.
The cable insulation rots out, then the battery feed wire contacts the crank wire. Left in gear and she's off!
This prompted me to start poking around and instantly I saw all I needed to see...

That was up by the brake servo. Time to get rid. They are remanufactured by a contact on the 968 forum (NLA from Porsche). This was well received and of high quality.
Dissection of the old one with the outer sheath removed. Cable was fine but the insulation was rock hard and brittle. That meant any disturbance, and it just cracks...

New harness received and installed...

Plus new rubber termination boots which I didn't have, as spotted in the parts catalogue...
Radiator
Four concerns here, all for something recently replaced by a specialist...
1) Fan;
In the very little I have driven the car (errr.... twice), I have been concerned about the cooling fan duty cycle. When it cuts in, it stays on. I like to hear a cooling fan cycle in/out/in/out.
This won't have helped; fan shroud upper bolts missing...
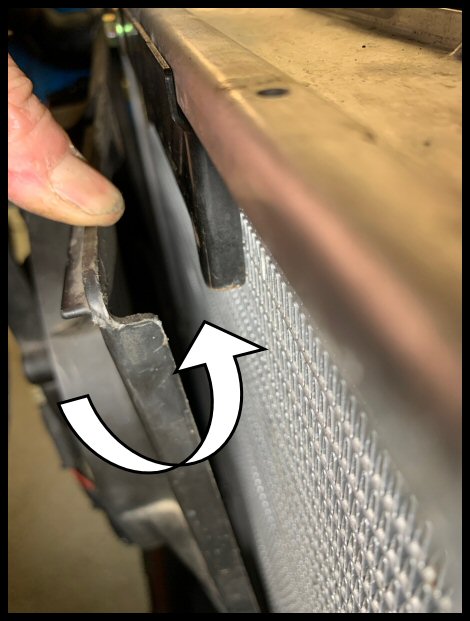
The fan was drawing in air from round the perimeter (above), rather than through the radiator core itself. Rectified with new bolts which pulls the shroud tight against the core fins.
2) Radiator Mounting;
Radiator loose; the adjusting pins on the radiator top bracket had broken hex-drives and therefore no longer adjustable...

The whole bracket was looking pretty shabby to be fair, so top bracket removed, shot blasted and treated to a zinc powdercoat...
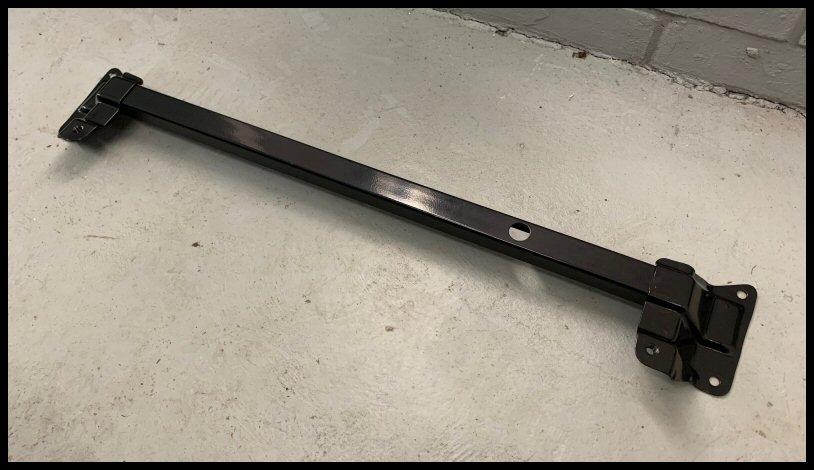
...fitted with new adjusting pins...

3) Blanking Cap;
I take exception to this awful bright blue blanking cap. It's garishly aftermarket, it's the wrong size and above all, it's leaking...
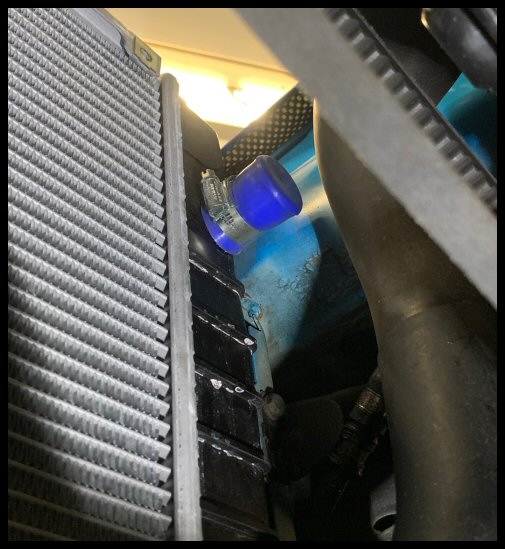
I don't think the 968 should have this blanking cap at all, as there is no such port in the 968 parts catalogue diagrams. I think this is a pattern radiator, designed to be 944/968 universal, hence the redundant port. No harm in that, as a genuine 968 radiator is £800, so fully understandable. However, if this port is to be blanked off, you might as well do it "officially" as the blanking cap has a 944 part number. This is still available from Porsche, of the right size and a non-obtrusive colour...

4) Coolant;
I needed a splash of coolant as I had lost some when changing the above blanking bung.
In my personal opinion, you can trace this engine's architecture back to the 1982 944. Arguably even earlier with the 928. Therefore, in my old fashioned ways, coolant should be blue.
However, removing the expansion tank cap, i'm greeted with orange, perhaps pink ...

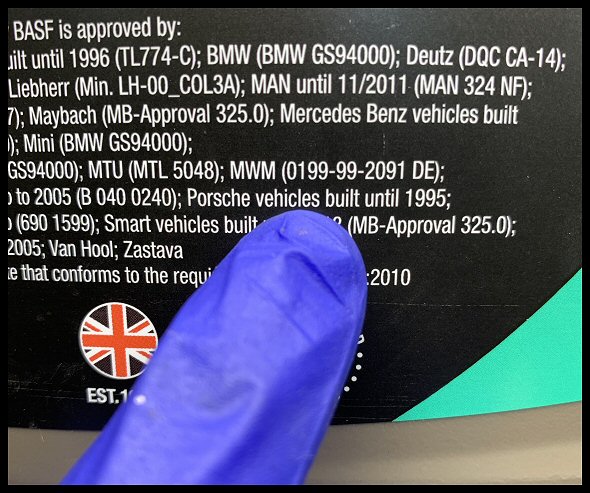
Who's to say what that is. I don't want to mix my OATs, HOATs and GOATs. After a bit of research, the general consensus seems to be Comma G48. Which, by any other name, is blue ethylene glycol...

Even says so on the bottle...
Certainly no doubt about the colour...

Coolant flush and drain it is then. At least this way, I know where I stand from day 1.
Coolant drained, flushed (four times to clear the last bit of pink) and refilled with Comma Xstream G48.
My cooling fan now cycles in-and-out (see above) so happy with that.
Engine Bay Presentation
Just some general tidying required. Cam cover bolts proper manky...

Collection of scabby parts sent to General Polishers of Arlesey (Beds)...

Amazing job as always from them...

The Tri-Sticker Set
Using my best reference picture, this is the sticker trilogy, for coil, dizzy and PAS reservoir...

Time to sort that...
Coil looking shabby...
Painted and new OE sticker obtained from DMB graphics...

I searched high and low for the PAS reservoir sticker but it can't be found. Time to make my own then...

The trilogy complete...

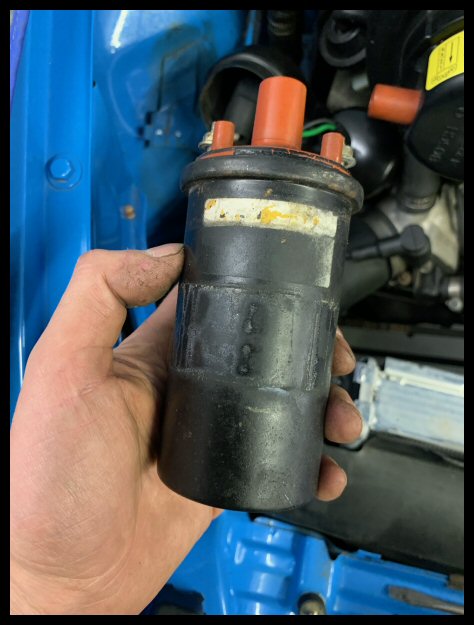
Variocam Wiring
No, I havent a clue what has gone on here, but it needs tidying...
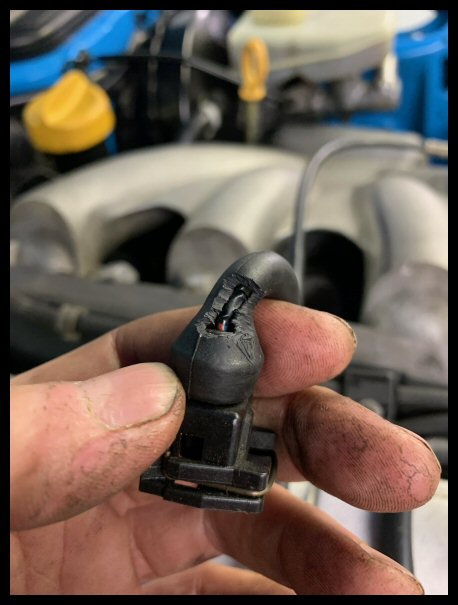
Yep, someone has definitely been here before me...

New connector and MTA boot...
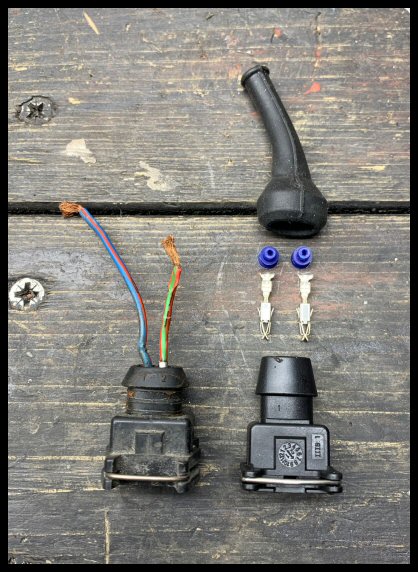
Perfect opportunity for some cleaning...

Much better and no insulation tape to be found!

TDC Plug
Missing, so new plug obtained...

Airbox
A good clean...

Don't worry, i'm not drilling any power holes!
The rubber mounting pegs looking worse for wear...

Still available new and replaced...

The nose cone wind deflector was looking proper shabby and is one of the most visually prominent engine bay items...

New one ordered and fitted with new clips...

All fitted...

That's enough for this update. Quite a bit more to follow. Not happy with the side skirts and the amount of crud they contain. They are also badly stone chipped in places. Got to bite the bullet and get them off...
All the best,
Jay.
So, take off the rose tinted specs, get underneath, and lets see what I have actually bought...
Actually, step one is apply for Classic Register Membership at Porsche Centre Cambridge.
Many benefits come with this scheme, many of those will pass me by, but one caught my eye - 15% off parts.
You get a nice welcome pack...
...and a charming aluminium membership card with your VIN on the reverse. The Fuchs cut out spokes are a nice touch...
All this was complimentary. Times certainly have changed, because when I last owned my 944, you were definitely a poor relation when you rocked up at a Porsche Dealer. Some long overdue recognition for the older transaxle cars of the marque - although it's probably just a gimmick to get that piece of the classic servicing pie.
What hasn't changed though, is that you still take dealership staff by surprise when you walk to the counter and ask for parts
Build Sheet Foreword
The factory build sheet is King. This tells you exactly what the car should of had from new. Not only does it prove Club Sport, but it also details any options specified from new. Contrary to popular belief, the whole options list was available for Club Sport. You could take the bare bones CS and specify back in electric windows, comfort seats, airbag... sky was the limit.
Porsche were really struggling in 1994 and whatever the customer wanted, they got. Oh what a contrast!
I'm really proud of my build sheet; it proves my front seats were factory installed, as it does with the body colour wheels, the rear seat delete, central locking delete, radio delete and so on.
There are plenty of Club Sports rolling around out there with Recaro Pole Positions fitted. Some of those would of been "comfort seat" specified cars with the Pole Positions retro-fitted later in life. The build sheet would prove that.
M030 Anti-Roll Bars
I mention the build sheet above as this covers my first dilemma. The previous owner had upgraded the anti-roll bars to "M030" spec. This was an option code for an upgrade that, amongst other items, got you fatter anti-roll bars. This is desirable for track use, but I was unhappy that the M030 anti-roll bars were not on the build sheet.
Therefore, virtually new front & rear M030 bars removed, together with the larger diameter bushes...
Thankfully the OE roll bars were kept when they were replaced for M030, but the originals were looking a bit shabby in places...
So, the original specification (27mm & 16mm) roll bars (plus hangers) shot blasted & zinc powder coated...
...for fitment with new genuine standard diameter bushes...
Bizarrely these "base" size bushes are twice the price than M030 bushes; go figure!?!
Front Struts
Not looking great. Bump stops destroyed and only fragments of the dirt shields remaining...
Time for a strip down. As far as i'm concerned the shocks are fully serviceable still. The car drives well and there are zero damper fluid leaks. This is merely presentation.
First casualty - the ABS ground wires. How these were actually "grounded" is beyond me...
Blue overspray on my brake disc shields. Oh the embarrassment!
Disc shields removed. Note the grinding...
It's a double skin affair, swelling with corrosion and then grinding the back of the hub...
This, in turn, showers the ABS sensor in swarf. With an ABS sensor tip now covered in steel filings, together with non-existent ABS grounds (see above), its amazing my ABS lamp ever extinguished!
Disassembly...
Component parts cleaned, wire brushed, rust treated and painted...
New bump stops and shields...
New stainless captive nuts fitted for the ABS ground points...
Much more presentable and hopefully a couple of years of service left.
Together with new brake disc backing shields...
...that handily need an M7 tap for cleaning....
Had to get some M7 fixings in as I don't carry them!
The ABS harness holders also broken, but again, new items available...
I'm genuinely not used to this level of parts support for the 90's cars that I own!
Front Wheel Arches
Perfect opportunity for a teardown & clean, what with no front struts in the way. Fixings all in a right mess, some having to be drilled...
All cleaned with TFR...
Again, embarrassing overspray to tidy...
Selection of bracketry, some new and/or blasted & zinc painted for re-fitment...
The volume of bracketry is total bonkers really. Another insight into poor 968 profitability on the production line.
Screw holes - which I presume is mudflap butchery
- being repaired...Front liners going back in...
All finished...
Rear Wheel Arches
Rear arches also needing a clean...
Tar removal and general cleaning...
Much more presentable...
Power Steering Leak
Unclear on the precise source. In summary, an absolute mess everywhere. I know the ZF bottles can crack and the cap seal degrades over time...
Plus, all the hose connections get repeatedly "nipped up" over the years until there's no more nipping to do...
The ZF reservoir has an internal micro-gauze filter so it's no harm to renew. It means you get a new cap seal too. The ZF bottle has a 928 part number. This, and the supply hose are still available, so that's a good place to start...
Sadly, what I can't replace, is the return line from the PAS cooler. This was absolutely destroyed with historic "nipping up"...
Well, that's technically a lie, as it's still available, but £400 :shock:
I don't mind paying what needs to be paid, but not £400 for 20mm of hose. Perhaps one day when the cooler rots out, but not just now thank you.
Therefore, I cut and spliced the return line for a better connection to the reservoir, enabling the use of fresh rubber hose...
All refitted, topped up with ATF-DIII and all leak free. For now at least.
One manky undertray to tidy after all that...
A good soaking with TFR...
This was the collection of undertray fixings, the biggest assortment of s
te you have ever seen...All resolved with new zinc yellow fixings...
Lets hope that undertray stays oil free after this summers' use. We can but hope.
Battery
Took the battery out to charge and things not too pretty...
All rust preserved and re-painted...
Stupid I know, and a total waste of money, but I like the look of an OE battery. It's a bit more visually fitting of 1994 than a modern looking Bosch. I think it gives the car that dash of authenticity too (in my twisted mind anyways)...
All fitted, with my C-TEK charge cable and a Dis-car-nect...
I sourced a new battery vent tube as none was fitted...
...which feeds through a dedicated grommet in the body...
Starter Motor Cable
Anyway, talking of batteries and such like, one internet image of a 968 waking up in the middle of the night really spooked me...
Thankfully not mine, but I feel sorry for the person whom it was.
The cable insulation rots out, then the battery feed wire contacts the crank wire. Left in gear and she's off!
This prompted me to start poking around and instantly I saw all I needed to see...
That was up by the brake servo. Time to get rid. They are remanufactured by a contact on the 968 forum (NLA from Porsche). This was well received and of high quality.
Dissection of the old one with the outer sheath removed. Cable was fine but the insulation was rock hard and brittle. That meant any disturbance, and it just cracks...
New harness received and installed...
Plus new rubber termination boots which I didn't have, as spotted in the parts catalogue...
Radiator
Four concerns here, all for something recently replaced by a specialist...
1) Fan;
In the very little I have driven the car (errr.... twice), I have been concerned about the cooling fan duty cycle. When it cuts in, it stays on. I like to hear a cooling fan cycle in/out/in/out.
This won't have helped; fan shroud upper bolts missing...
The fan was drawing in air from round the perimeter (above), rather than through the radiator core itself. Rectified with new bolts which pulls the shroud tight against the core fins.
2) Radiator Mounting;
Radiator loose; the adjusting pins on the radiator top bracket had broken hex-drives and therefore no longer adjustable...
The whole bracket was looking pretty shabby to be fair, so top bracket removed, shot blasted and treated to a zinc powdercoat...
...fitted with new adjusting pins...
3) Blanking Cap;
I take exception to this awful bright blue blanking cap. It's garishly aftermarket, it's the wrong size and above all, it's leaking...
I don't think the 968 should have this blanking cap at all, as there is no such port in the 968 parts catalogue diagrams. I think this is a pattern radiator, designed to be 944/968 universal, hence the redundant port. No harm in that, as a genuine 968 radiator is £800, so fully understandable. However, if this port is to be blanked off, you might as well do it "officially" as the blanking cap has a 944 part number. This is still available from Porsche, of the right size and a non-obtrusive colour...
4) Coolant;
I needed a splash of coolant as I had lost some when changing the above blanking bung.
In my personal opinion, you can trace this engine's architecture back to the 1982 944. Arguably even earlier with the 928. Therefore, in my old fashioned ways, coolant should be blue.
However, removing the expansion tank cap, i'm greeted with orange, perhaps pink ...
Who's to say what that is. I don't want to mix my OATs, HOATs and GOATs. After a bit of research, the general consensus seems to be Comma G48. Which, by any other name, is blue ethylene glycol...
Even says so on the bottle...
Certainly no doubt about the colour...
Coolant flush and drain it is then. At least this way, I know where I stand from day 1.
Coolant drained, flushed (four times to clear the last bit of pink) and refilled with Comma Xstream G48.
My cooling fan now cycles in-and-out (see above) so happy with that.
Engine Bay Presentation
Just some general tidying required. Cam cover bolts proper manky...
Collection of scabby parts sent to General Polishers of Arlesey (Beds)...
Amazing job as always from them...
The Tri-Sticker Set
Using my best reference picture, this is the sticker trilogy, for coil, dizzy and PAS reservoir...
Time to sort that...
Coil looking shabby...
Painted and new OE sticker obtained from DMB graphics...
I searched high and low for the PAS reservoir sticker but it can't be found. Time to make my own then...
The trilogy complete...
Variocam Wiring
No, I havent a clue what has gone on here, but it needs tidying...
Yep, someone has definitely been here before me...
New connector and MTA boot...
Perfect opportunity for some cleaning...
Much better and no insulation tape to be found!
TDC Plug
Missing, so new plug obtained...
Airbox
A good clean...
Don't worry, i'm not drilling any power holes!
The rubber mounting pegs looking worse for wear...
Still available new and replaced...
The nose cone wind deflector was looking proper shabby and is one of the most visually prominent engine bay items...
New one ordered and fitted with new clips...
All fitted...
That's enough for this update. Quite a bit more to follow. Not happy with the side skirts and the amount of crud they contain. They are also badly stone chipped in places. Got to bite the bullet and get them off...
All the best,
Jay.
Edited by jay-kay-em on Thursday 18th January 17:45

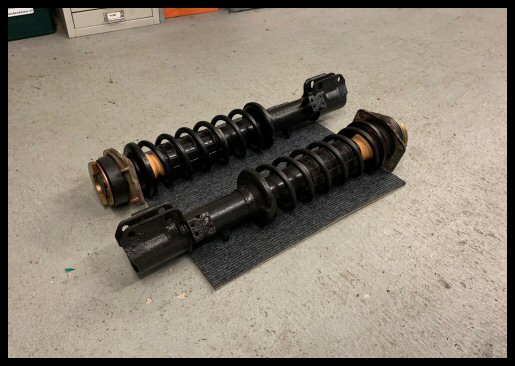
Winter/Spring 2023 : Body
On the whole, she's really good and very solid for what is an M-reg car. Some of my other M-reg cars over the years have been swept up into a dustpan, sills n'all. So, on that note, i'm very grateful!
Everything needing a general tidy really...

No way to do that thoroughly without taking the side skirts off sadly. Got to bite that bullet...
The first step is just getting parts. I really struggle to find all the parts I need in yellow zinc. It's so representative of the era. It was common place at the time. Too expensive nowadays, plus I think it has questionable environmental credentials.
Even new bolts from Porsche don't have the original yellow zinc as they would have when new. Most parts are bright zinc plated (BZP) or this new water based, chromium-free coating called GEOMET...

Pictured above are the original 968 rear shock absorber bolts in zellow zinc, and their brand new OPC equivalent of today.
Annoyingly, this means buying everything in BZP or GEOMET (as per above) and then taking brand new parts to be stripped & re-plated in period fitting yellow zinc...

An expensive and time consuming process, but essential for trying to acheive that factory look. It just looks so "right".
Side Skirts
Here we go then...

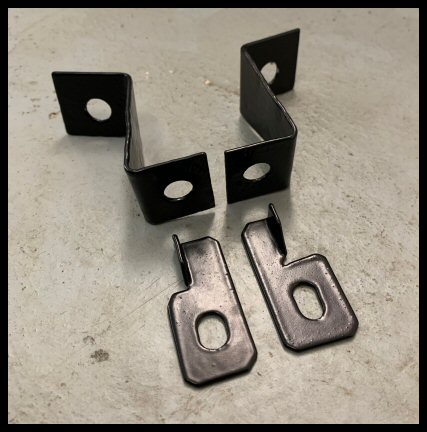
Again, bracketry in a bad shape...

All looking very shabby...

Yet more drilled mudflap holes...

Real heart-in-the-mouth stuff popping off the shark fin skirts...

Some fixings still needed to be cut off. The stud clips break their captivity and even with plastic nuts they just turn and turn...

Anyway, all removed and no horror stories, spot welds all good and no major tin-worm. Having a clean-up behind the skirts with soapy water...

Unfortunately for the skirt rear mounting rods, a steel bolt passes through alloy suspension, and we all know how that goes...

New skirt mounting rods still available from Porsche...

Other sideskirt bracketry fabricated from scratch as required...

All zinc powder coated...
I promised myself that with the purchase price of the car, I had no manoeuvrability for paintwork.
Yet again, for every damn car I buy, I broke that promise :lol:
They were pretty shabby though to be fair...

Sideskirts off to paint then...


These were laser scanned for the correct tint of Riviera prior to stripping. This accommodates for paint fading over the years, if indeed its original paint. Probably isn't. All the horrific mud flap screw holes and careless jacking errors repaired. Painted clear over base...


With the skirts away at paint, a perfect time to get preserving. Everything solid, just cleaning and preservation required...

These are my chosen products, everyone has their favourites, but these are mine...
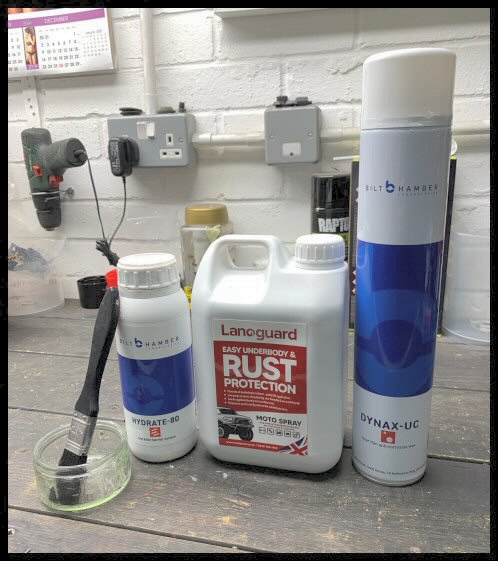
Bilt Hamber Hydrate 80, Lanoguard and Dynax-UC.
All trusted products and most importantly for me, they're clear. I'm never more sceptical than seeing a freshly black schutz'd car underneath. I never want to blamed for hiding stuff, so with the clear, everything is still to be seen.
After a good general going over with a wire wheel, all treated with Bilt Hamber Hydrate 80...
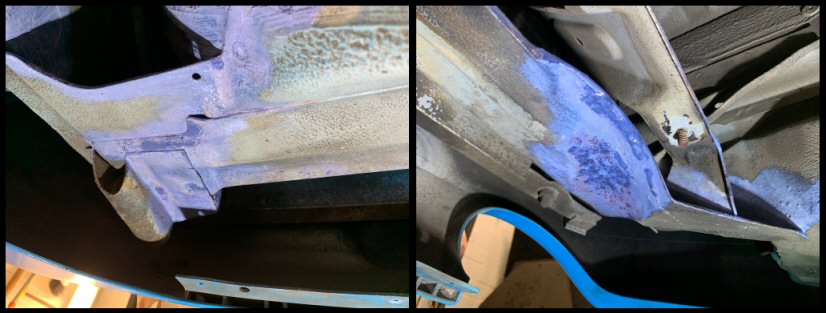
You've got to pay really close attention, because the car is suffering exactly the same as my Mk2 Golf. It's barely noticeable, but...
The underseal cracks (arrowed), and it becomes a water trap, with the rust brewing underneath...
There is no doubt, in three or four years, with winter use (if you're that way inclined), then that will need a welder.
Hopefully we have arrested that.
Clean up to bare metal...
...and treat...
Let that dry overnight. A sympathetic touch up of paint and then few wax coats.
For as long as it is a steel car that has lived all year round in the UK, there WILL be rust. It's a force that can't be eliminated. It does boil my blood when you see adverts of 30 year old, 120000 mile UK cars, with claims "zero rust". Don't believe it i'm afraid. Not one iota.
New yellow zinc speed fasteners fitted to the now wire cleaned/treated/waxed mounting brackets...
Sideskirts all returned from the paintshop. My thanks to the excellent team @ J.S Holmes of Wisbech St. Mary...

They're gorgeous...

Don't know whether to fit them, or hang them on the wall as art!
New clips installed and sorting the rubber gaskets...

Tactical and sparing dabs of clear silicone to prevent the gasket seals shifting on installation.
All fitted...


The front of the skirts have a cavity panel in the front wheel house. Yet again, mine were heavily stone blasted and with more unsightly mud flap holes (arrowed)...

Still available new, supplied and fitted...

Jacking Points
It didn't all go smoothly...
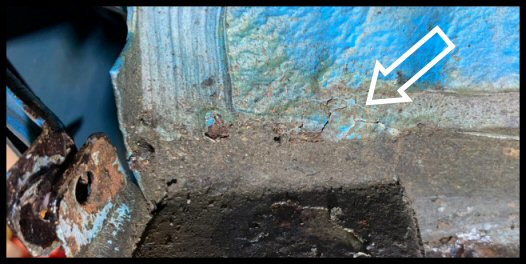
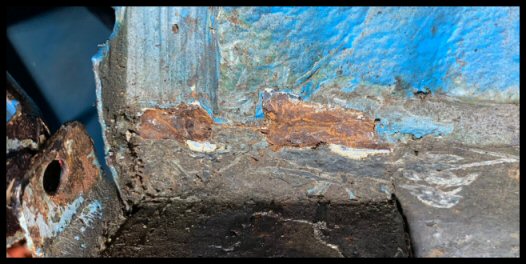
Sideskirt removal exposed the jacking points and I noticed this (nearside rear)...

That jacking point should be square within that dashed box, but the tiniest crack (circled) has made the jacking point into a squished parallelogram!
This needs to be sorted as it will only collapse further, plus peoples' jack pads may cause sideskirt damage. It had already.
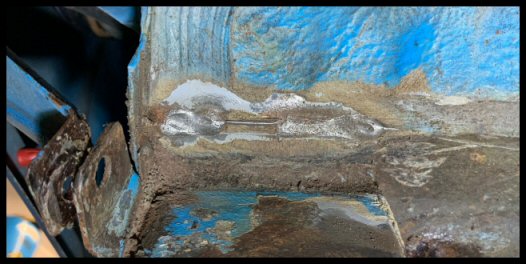
Dissected to re-form into shape...

I must admit, I hadn't anticipated putting an angle grinder to my new purchase :shock:
All welded square & true...

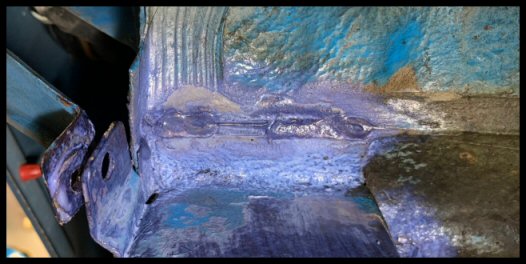
Ready for rust preservation + paint.
Thing is with these jacking points, they still leave the side skirts really vulnerable. All it takes is one MoT jacking and your nice sideskirts are deformed and cracked again.
I purchased these jacking pads, which I think are actually re-purposed hockey pucks... no joke!

They have a dedicated T-post on top that is a 90' twist home, which is convenient.
They just give that extra bit of side skirt safety...

I'll be handing them to my MoT tester and he'll have a face of total bemusement i'm sure.
Rear Bumper
Full of stones!

A Club Sport weight saving right there
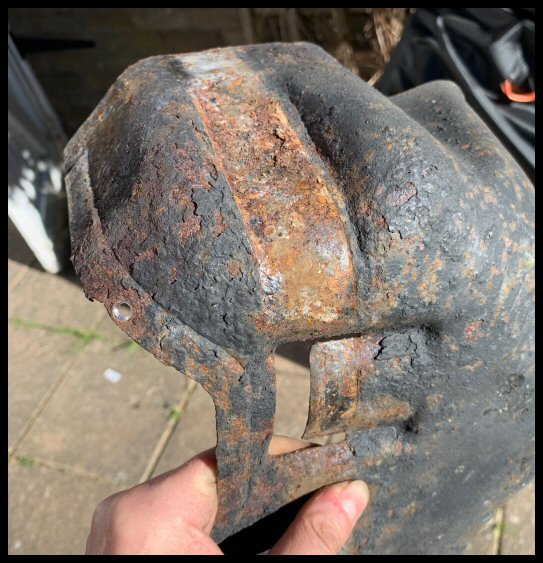
Corroded bracketry...

All blasted and zinc powdercoated...

All refitted with added longevity.
Fuel Tank Shield & Straps
All the 968's I looked at for sale, the fuel tank shield was crumbling real bad. Mine was no different, but hopefully on the cusp of saving. I believe this part is now discontinued.
Having to drill out the rounded-off rusty screws...

Just in time for some much needed TLC...
Yet more money spent at the powdercoaters dammit. Blasted, zinc primer and black powdercoat...

With a new stainless fuel pump clamp replacing the cable ties as found...

Foam perimeter gasket renewed to match OE...

Surrounding fuel tank heatshield clips a corroded mess. All renewed...

Much more presentable...

Exhaust
The car came with a stainless Cargraphic system, which needed a good clean...


It's a beautiful thing with a price tag in the history folder that made me choke.
In which case, it's a total travesty that something so beautiful be mounted with such corroded rubbish. More items off for powdercoat...

Hanger captive nuts repaired ready for blasting and zinc powdercoat...

...all sorted...

Saving these heatshields before they crumble away to nothing...

Rust treated...

VHT painted and oven baked...

Again, the previous keeper had kept the full standard exhaust system which I have safely stored. Out of pure curiosity I removed the stock (and somewhat corroded) tailpipe...

...and I was very happy to find out that the original, non-glamourous tailpipe is interchangeable with the aftermarket system. Sure enough, the Cargraphic website states each exhaust section is compatible with OE.
Standard tailpipe therefore painted VHT black and oven baked...

I now have a choice of tailpipe dependant on what the event demands...

I kind of like the original tailpipe for how utterly rubbish it is. Different times. If it was for today's Porsche lightweight track special, it would have four ginormous spud cannons out the back which could be carbon tipped for £2000 extra...
To the best of my research it's standard. It's so difficult to tell as the sales brochure is utter rubbish. You can only rely on period photos...

Transmission Oil
Again, in the very little I have driven the car last summer, she baulked a shift just the once. Either that was me getting used to a different clutch, or we have possible issues on the horizon.
From memory, my 944's were really sensitive to gear oil. They need the slippery GL5 capabilities for the diff crown gear, but the less slippery GL4 for the synchros.
I have no idea what the gearbox currently contains, so just like the coolant, best drain and refill for a known quantity. It's one less unknown then.
I used Castrol Transmax 75W/90 specifically designed for transaxles. It's GL4+ (the + meaning the ultimate compromise between that GL4 v. GL5 argument).

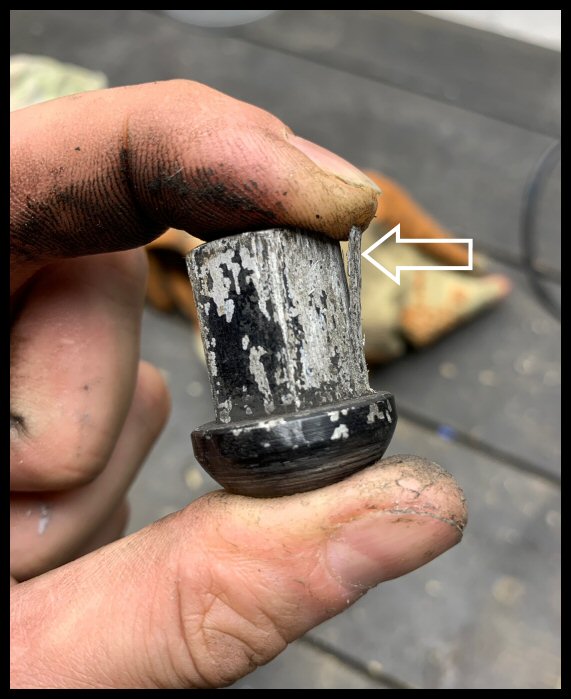
Drain plug in a right state. That's meant to be a hex drive believe it or not

New plugs (drain and fill) from Porsche...

Let's see how we get on with that.
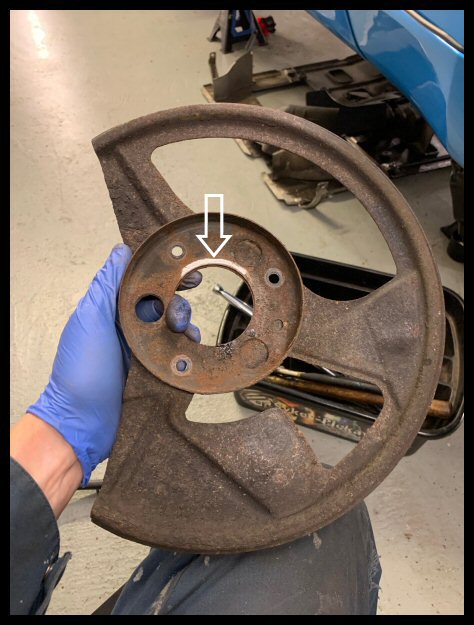
Wheels
Wheels can go back on. All the old balance weight stick-on pads remained from the last tyre change - that bugs me BIG time...

Also, alarmingly, some black overspray

Glue/paint/pads all removed with a selection of products. All polished with super resin, which should make future brake dust removal easier...

No refurb needed thankfully. Ready for reinstallation...

My neighbour popped over, and asked "when am I going to sort the wheels out?"
I said "what do you mean, sort them out?"
He replied "paint them silver like they should be"
He was being serious.
Those who know, know, as they say
Wheel nuts not looking so great...
Badly corroded and the hex corners are fracturing off. Replacements sorted from Cambridge OPC...
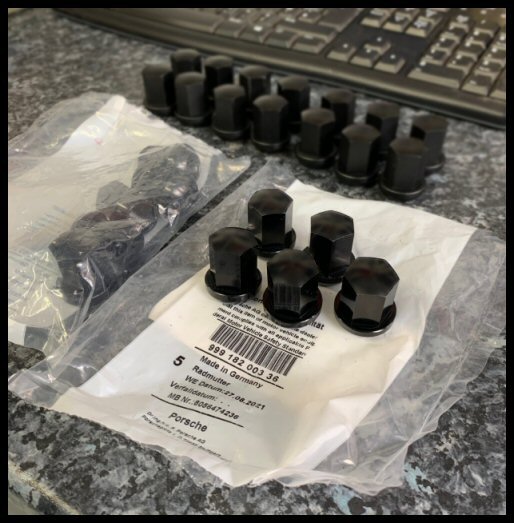
They're not cheap.. there's a small fortune there at £11 per nut
They are light as a feather. I think they are magnesium which would explain both weight and cost!
All re-fitted and torqued.
That's it for this month. Hopefully winter garage work is coming to a close, then we can tax.
Hope everyone enjoyed their Easter break. Mine was spent mostly in the garage
JKM
On the whole, she's really good and very solid for what is an M-reg car. Some of my other M-reg cars over the years have been swept up into a dustpan, sills n'all. So, on that note, i'm very grateful!
Everything needing a general tidy really...
No way to do that thoroughly without taking the side skirts off sadly. Got to bite that bullet...
The first step is just getting parts. I really struggle to find all the parts I need in yellow zinc. It's so representative of the era. It was common place at the time. Too expensive nowadays, plus I think it has questionable environmental credentials.
Even new bolts from Porsche don't have the original yellow zinc as they would have when new. Most parts are bright zinc plated (BZP) or this new water based, chromium-free coating called GEOMET...
Pictured above are the original 968 rear shock absorber bolts in zellow zinc, and their brand new OPC equivalent of today.
Annoyingly, this means buying everything in BZP or GEOMET (as per above) and then taking brand new parts to be stripped & re-plated in period fitting yellow zinc...
An expensive and time consuming process, but essential for trying to acheive that factory look. It just looks so "right".
Side Skirts
Here we go then...
Again, bracketry in a bad shape...
All looking very shabby...
Yet more drilled mudflap holes...
Real heart-in-the-mouth stuff popping off the shark fin skirts...
Some fixings still needed to be cut off. The stud clips break their captivity and even with plastic nuts they just turn and turn...
Anyway, all removed and no horror stories, spot welds all good and no major tin-worm. Having a clean-up behind the skirts with soapy water...
Unfortunately for the skirt rear mounting rods, a steel bolt passes through alloy suspension, and we all know how that goes...
New skirt mounting rods still available from Porsche...
Other sideskirt bracketry fabricated from scratch as required...
All zinc powder coated...
I promised myself that with the purchase price of the car, I had no manoeuvrability for paintwork.
Yet again, for every damn car I buy, I broke that promise :lol:
They were pretty shabby though to be fair...
Sideskirts off to paint then...
These were laser scanned for the correct tint of Riviera prior to stripping. This accommodates for paint fading over the years, if indeed its original paint. Probably isn't. All the horrific mud flap screw holes and careless jacking errors repaired. Painted clear over base...
With the skirts away at paint, a perfect time to get preserving. Everything solid, just cleaning and preservation required...
These are my chosen products, everyone has their favourites, but these are mine...
Bilt Hamber Hydrate 80, Lanoguard and Dynax-UC.
All trusted products and most importantly for me, they're clear. I'm never more sceptical than seeing a freshly black schutz'd car underneath. I never want to blamed for hiding stuff, so with the clear, everything is still to be seen.
After a good general going over with a wire wheel, all treated with Bilt Hamber Hydrate 80...
You've got to pay really close attention, because the car is suffering exactly the same as my Mk2 Golf. It's barely noticeable, but...
The underseal cracks (arrowed), and it becomes a water trap, with the rust brewing underneath...
There is no doubt, in three or four years, with winter use (if you're that way inclined), then that will need a welder.
Hopefully we have arrested that.
Clean up to bare metal...
...and treat...
Let that dry overnight. A sympathetic touch up of paint and then few wax coats.
For as long as it is a steel car that has lived all year round in the UK, there WILL be rust. It's a force that can't be eliminated. It does boil my blood when you see adverts of 30 year old, 120000 mile UK cars, with claims "zero rust". Don't believe it i'm afraid. Not one iota.
New yellow zinc speed fasteners fitted to the now wire cleaned/treated/waxed mounting brackets...
Sideskirts all returned from the paintshop. My thanks to the excellent team @ J.S Holmes of Wisbech St. Mary...
They're gorgeous...
Don't know whether to fit them, or hang them on the wall as art!
New clips installed and sorting the rubber gaskets...
Tactical and sparing dabs of clear silicone to prevent the gasket seals shifting on installation.
All fitted...
The front of the skirts have a cavity panel in the front wheel house. Yet again, mine were heavily stone blasted and with more unsightly mud flap holes (arrowed)...
Still available new, supplied and fitted...
Jacking Points
It didn't all go smoothly...
Sideskirt removal exposed the jacking points and I noticed this (nearside rear)...
That jacking point should be square within that dashed box, but the tiniest crack (circled) has made the jacking point into a squished parallelogram!
This needs to be sorted as it will only collapse further, plus peoples' jack pads may cause sideskirt damage. It had already.
Dissected to re-form into shape...
I must admit, I hadn't anticipated putting an angle grinder to my new purchase :shock:
All welded square & true...
Ready for rust preservation + paint.
Thing is with these jacking points, they still leave the side skirts really vulnerable. All it takes is one MoT jacking and your nice sideskirts are deformed and cracked again.
I purchased these jacking pads, which I think are actually re-purposed hockey pucks... no joke!
They have a dedicated T-post on top that is a 90' twist home, which is convenient.
They just give that extra bit of side skirt safety...
I'll be handing them to my MoT tester and he'll have a face of total bemusement i'm sure.
Rear Bumper
Full of stones!
A Club Sport weight saving right there
Corroded bracketry...
All blasted and zinc powdercoated...
All refitted with added longevity.
Fuel Tank Shield & Straps
All the 968's I looked at for sale, the fuel tank shield was crumbling real bad. Mine was no different, but hopefully on the cusp of saving. I believe this part is now discontinued.
Having to drill out the rounded-off rusty screws...
Just in time for some much needed TLC...
Yet more money spent at the powdercoaters dammit. Blasted, zinc primer and black powdercoat...
With a new stainless fuel pump clamp replacing the cable ties as found...
Foam perimeter gasket renewed to match OE...
Surrounding fuel tank heatshield clips a corroded mess. All renewed...
Much more presentable...
Exhaust
The car came with a stainless Cargraphic system, which needed a good clean...
It's a beautiful thing with a price tag in the history folder that made me choke.
In which case, it's a total travesty that something so beautiful be mounted with such corroded rubbish. More items off for powdercoat...
Hanger captive nuts repaired ready for blasting and zinc powdercoat...
...all sorted...
Saving these heatshields before they crumble away to nothing...
Rust treated...
VHT painted and oven baked...
Again, the previous keeper had kept the full standard exhaust system which I have safely stored. Out of pure curiosity I removed the stock (and somewhat corroded) tailpipe...
...and I was very happy to find out that the original, non-glamourous tailpipe is interchangeable with the aftermarket system. Sure enough, the Cargraphic website states each exhaust section is compatible with OE.
Standard tailpipe therefore painted VHT black and oven baked...
I now have a choice of tailpipe dependant on what the event demands...
I kind of like the original tailpipe for how utterly rubbish it is. Different times. If it was for today's Porsche lightweight track special, it would have four ginormous spud cannons out the back which could be carbon tipped for £2000 extra...
To the best of my research it's standard. It's so difficult to tell as the sales brochure is utter rubbish. You can only rely on period photos...
Transmission Oil
Again, in the very little I have driven the car last summer, she baulked a shift just the once. Either that was me getting used to a different clutch, or we have possible issues on the horizon.
From memory, my 944's were really sensitive to gear oil. They need the slippery GL5 capabilities for the diff crown gear, but the less slippery GL4 for the synchros.
I have no idea what the gearbox currently contains, so just like the coolant, best drain and refill for a known quantity. It's one less unknown then.
I used Castrol Transmax 75W/90 specifically designed for transaxles. It's GL4+ (the + meaning the ultimate compromise between that GL4 v. GL5 argument).
Drain plug in a right state. That's meant to be a hex drive believe it or not
New plugs (drain and fill) from Porsche...
Let's see how we get on with that.
Wheels
Wheels can go back on. All the old balance weight stick-on pads remained from the last tyre change - that bugs me BIG time...
Also, alarmingly, some black overspray
Glue/paint/pads all removed with a selection of products. All polished with super resin, which should make future brake dust removal easier...
No refurb needed thankfully. Ready for reinstallation...
My neighbour popped over, and asked "when am I going to sort the wheels out?"
I said "what do you mean, sort them out?"
He replied "paint them silver like they should be"
He was being serious.
Those who know, know, as they say
Wheel nuts not looking so great...
Badly corroded and the hex corners are fracturing off. Replacements sorted from Cambridge OPC...
They're not cheap.. there's a small fortune there at £11 per nut
They are light as a feather. I think they are magnesium which would explain both weight and cost!
All re-fitted and torqued.
That's it for this month. Hopefully winter garage work is coming to a close, then we can tax.
Hope everyone enjoyed their Easter break. Mine was spent mostly in the garage
JKM
Edited by jay-kay-em on Thursday 18th January 17:50
Absolutely love it and the framed photos is in keeping with your drive for presentability.
For the alloys, Gtechniq C5 would prove a superior protector that Super Resin. If you're keen on a polish, I've used Bilt Hamber Double Speed Wax in the past, with success.
You might also want to consider that product for the stainless exhaust tip, or better still, FinishKare 1000P.
For the alloys, Gtechniq C5 would prove a superior protector that Super Resin. If you're keen on a polish, I've used Bilt Hamber Double Speed Wax in the past, with success.
You might also want to consider that product for the stainless exhaust tip, or better still, FinishKare 1000P.

Great thread OP!
Brother ubbs had 4 944S2’s in the late 80’s early 90’s he also had a 968 which caught fire!
Woken up in the early hours with what seemed like somebody trying to start it, by time he’d got dressed and downstairs fire had taken hold.
Although a total loss somebody bought it and put it back on the road.
Gassing Station | Readers' Cars | Top of Page | What's New | My Stuff