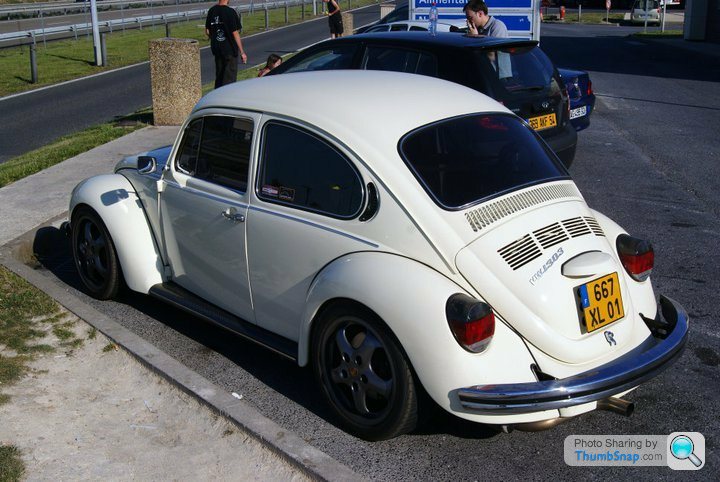
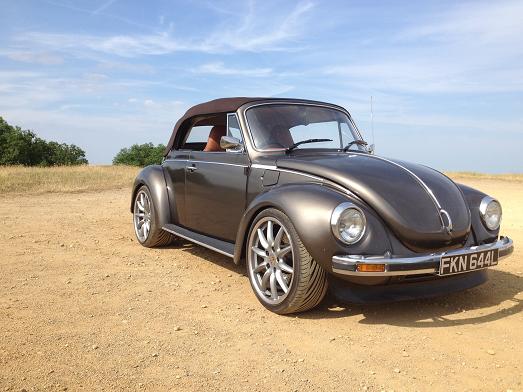
WRX RA powered VW 1303 beetle cabrio with a bit of Porsche
Discussion


Ricola, that's a tremendous job you're doing there. Ref' main bearing pic of supposed 'proper' rebuild, looks like the previous engine builder forgot to measure for bearing crush prior to assembly. It's really useful to balance this to get minimum crush as possible. Though by the looks of it you're already very experienced with internal micrometers  It'll be major hats-off to you with a reliable 400bhp in a Beetle.
PS are you going to ballast the very light front-end??
It'll be major hats-off to you with a reliable 400bhp in a Beetle.PS are you going to ballast the very light front-end??
ricola said:
Well from the last MOT on the brake rollers the weight distribution is 60/40 so similar to 911s. As for the bearing crush, it has worked to give the centre main a bit more clearance as it feeds both central big end bearings.
That's really good...though some fast 911 drivers would frontend ballast a little. Another interesting point...what brake MC diameter are you planning? Remember the 914 units were downgraded as they would outbreak any 911 in period. How does your CoG compare to 911s?Ref' centre main...that makes good sense.
Appreciate the other comments! Have to admit as much as I dislike fiestas that is one very impressive build.. Other cars I've had people might have a go but this is too subtle for most when on the move, all it takes is a quick squirt and I've left them for dead anyway.
Regarding master cylinder, I'm using a twin cylinder set-up with balance bar so you can't compare directly with single twin circuit types. They are both 5/8" (0.625"), I might try even smaller at some point to reduce the pedal efforts a bit more.
Regarding master cylinder, I'm using a twin cylinder set-up with balance bar so you can't compare directly with single twin circuit types. They are both 5/8" (0.625"), I might try even smaller at some point to reduce the pedal efforts a bit more.

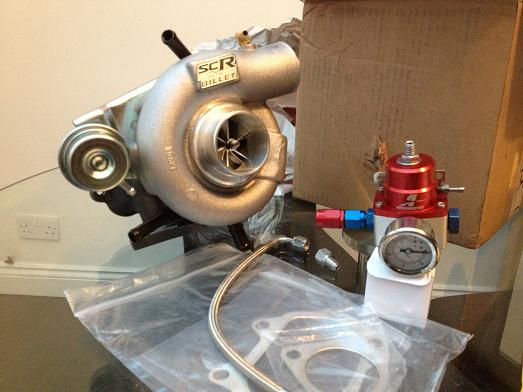
Shiney go-faster bits have arrived! Scooby Clinic SC46 billet turbo based on a Garrett ball bearing core, good for 460bhp on V-power and an Aeromotive fuel pressure regulator to go with an uprated fuel pump and parallel fuel rail conversion.
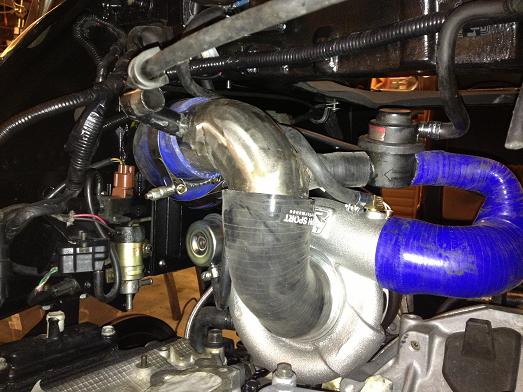
I've had to make a new intake to suit the front entry turbo, I could have gone under the inlet manifold but it would have lengthened the intake by a fair bit.
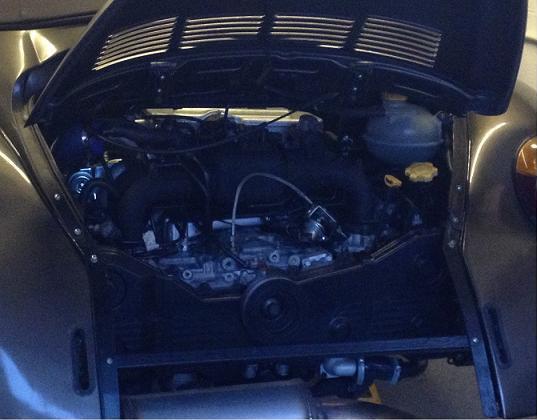
Engine back in the car and fired up for the first time, it sounds good! This is on the old map & injectors, mainly to get the oil system primed and make sure everything on the engine is good.
http://www.youtube.com/embed/rBhGtrmA_TE
More bits arriving soon are:
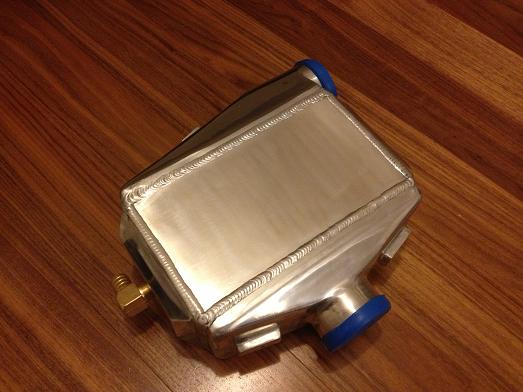
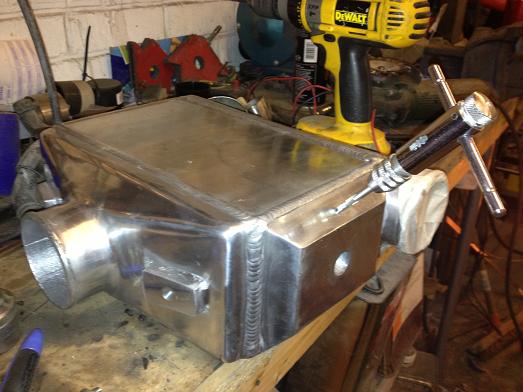
oil breather catch tank
inlet manifold thermal insulating spacers
HRC 310 lpm fuel pump
Then I'll be ready for the re-map!
I've had to make a new intake to suit the front entry turbo, I could have gone under the inlet manifold but it would have lengthened the intake by a fair bit.
Engine back in the car and fired up for the first time, it sounds good! This is on the old map & injectors, mainly to get the oil system primed and make sure everything on the engine is good.
http://www.youtube.com/embed/rBhGtrmA_TE
More bits arriving soon are:
oil breather catch tank
inlet manifold thermal insulating spacers
HRC 310 lpm fuel pump
Then I'll be ready for the re-map!

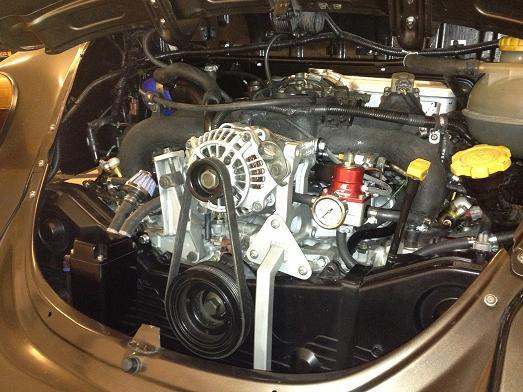
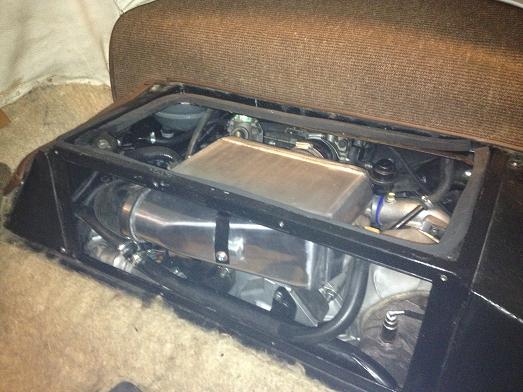
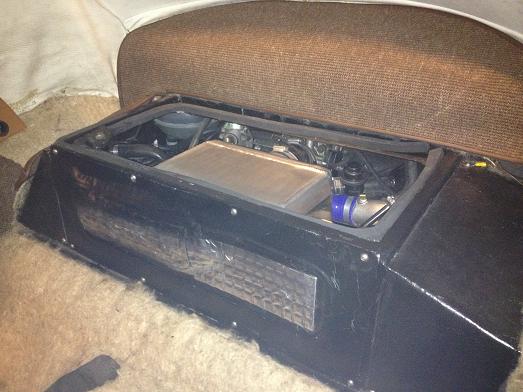
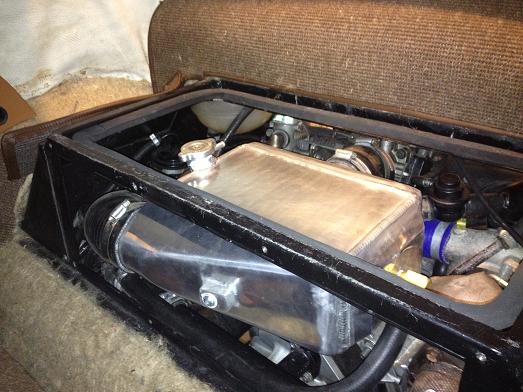
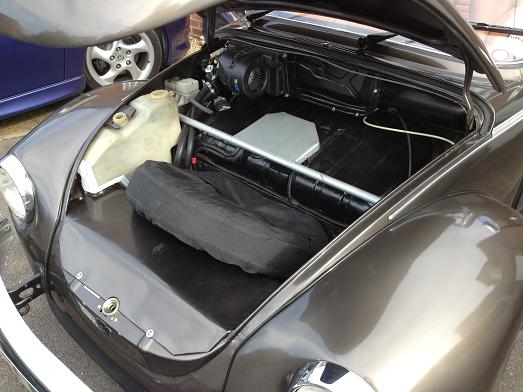
Oil breather tank hanging off the back, there wasn't much space anywhere else! I also made up a new bracket which supports both the oil pressure senders and the Aeromotive fuel pressure regulator
I was advised by my mapper that the old Legacy chargecooler would be limiting my performance so it was time to upgrade. I considered an air/air using enlarged ducts built into the rear wings but I don't really think I've got space for it. I eventually found a very good thread on using a frozenboost type 14 chargecooler. It is apparently good for 700 CFM / 600 BHP and one person reported that when running 22psi he sees a maximum of 10 degrees above ambiant but normally only about 5 degrees which is pretty efficient in my book!
2 weeks later and this arrived in the post:
I wasn't satisfied that the system would be working well without trapping air so I decided to drill and tap a bleed point. I drilled on a tilted table on my pillar drill very cautiously as I didn't want to wreck the core! Turns out the end tank isn't completely solid as it looks but cast and it hollowed out a bit with extra clearance to the air core so wasn't too bad to do. A small M6 bolt with O-ring will serve as a manual bleed.
The turbo pipe I made up to join to the chargecooler inlet. 2" going up to 2 1/2" with a fitting for the reciculating dump valve. I had off-cuts of stainless lying around from old exhaust system build so I'm sure it will do the job fine. The 2 1/2" end joins to the chargecooler with a 3" to 2 1/2" silicone reducer elbow.

You can see a strap supporting the weight of the chargecooler off the frame above via some rubber washers to isolate it. Just in sight is a filler cap from a Suzuki motorbike which has the correct size fittings for the water pipes.
Finally I had to some some re-shaping of the bulkead panel to clear the end tank.
Now it's ready for the running in map on an ESL daughterboard, just hope the recent snow doesn't delay things...
I was advised by my mapper that the old Legacy chargecooler would be limiting my performance so it was time to upgrade. I considered an air/air using enlarged ducts built into the rear wings but I don't really think I've got space for it. I eventually found a very good thread on using a frozenboost type 14 chargecooler. It is apparently good for 700 CFM / 600 BHP and one person reported that when running 22psi he sees a maximum of 10 degrees above ambiant but normally only about 5 degrees which is pretty efficient in my book!
2 weeks later and this arrived in the post:
I wasn't satisfied that the system would be working well without trapping air so I decided to drill and tap a bleed point. I drilled on a tilted table on my pillar drill very cautiously as I didn't want to wreck the core! Turns out the end tank isn't completely solid as it looks but cast and it hollowed out a bit with extra clearance to the air core so wasn't too bad to do. A small M6 bolt with O-ring will serve as a manual bleed.
The turbo pipe I made up to join to the chargecooler inlet. 2" going up to 2 1/2" with a fitting for the reciculating dump valve. I had off-cuts of stainless lying around from old exhaust system build so I'm sure it will do the job fine. The 2 1/2" end joins to the chargecooler with a 3" to 2 1/2" silicone reducer elbow.
You can see a strap supporting the weight of the chargecooler off the frame above via some rubber washers to isolate it. Just in sight is a filler cap from a Suzuki motorbike which has the correct size fittings for the water pipes.
Finally I had to some some re-shaping of the bulkead panel to clear the end tank.
Now it's ready for the running in map on an ESL daughterboard, just hope the recent snow doesn't delay things...
Update from the mapping session..
The engine runs really well, nice and smooth with very good early turbo spool. By the end of the run the new chargecooler was still stone cold so all in fairly happy! The downside is that the clutch can't take the torque, we were limited to just under 1 bar boost pressure which is fine for running in but I'll have to sort out an uprated one before getting the final map up to full boost done.
The engine runs really well, nice and smooth with very good early turbo spool. By the end of the run the new chargecooler was still stone cold so all in fairly happy! The downside is that the clutch can't take the torque, we were limited to just under 1 bar boost pressure which is fine for running in but I'll have to sort out an uprated one before getting the final map up to full boost done.
Bit of an update:
I made up a new bulkhead panel to properly clear the new chargecooler
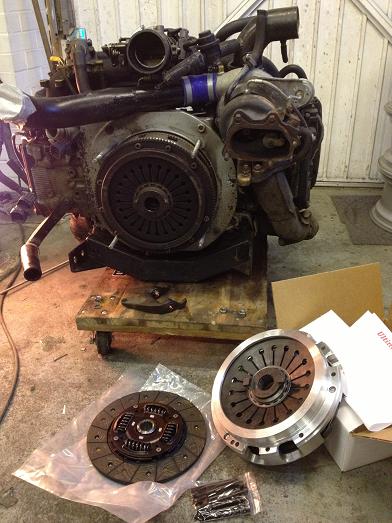
New stage 1 KEP clutch, this is rated to 550ft lbs torque so fine for my target level of about 450..

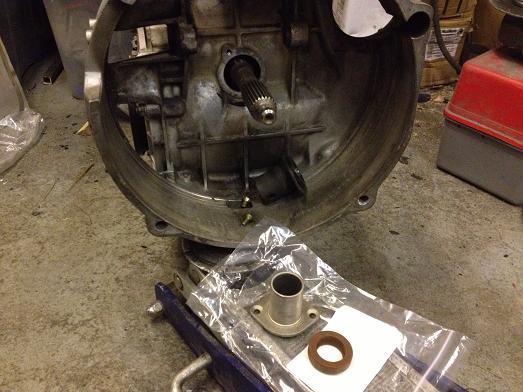
The release bearings changed to include a plastic liner, this meant that I needed to buy a new bearing guide tube from Porsche..
While the chargecooler was off again I thought I would take the opportunity to improve the mounting and filling system. Here is a new support bracket using a locost type suspension rubber bushing I had lying around
New filler neck welded to the chargecooler makes the pipework much neater and is obviously much easier to bleed and keep full. The filler neck was decent and came from Mishimoto, most others were pretty flimsy pressed items.
All fitted again, the chargecooler is much better mounted and easier to fill now.
I made up a new bulkhead panel to properly clear the new chargecooler
New stage 1 KEP clutch, this is rated to 550ft lbs torque so fine for my target level of about 450..
The release bearings changed to include a plastic liner, this meant that I needed to buy a new bearing guide tube from Porsche..
While the chargecooler was off again I thought I would take the opportunity to improve the mounting and filling system. Here is a new support bracket using a locost type suspension rubber bushing I had lying around
New filler neck welded to the chargecooler makes the pipework much neater and is obviously much easier to bleed and keep full. The filler neck was decent and came from Mishimoto, most others were pretty flimsy pressed items.
All fitted again, the chargecooler is much better mounted and easier to fill now.
A chargecooler is an intercooler which is cooled by a jacket of water/coolant rather than air like most turbo systems. The water has a far higher heat capacity so is better at cooling the intake charge, particularly when in my case I don't really have space for an air/air as they are bigger and need a lot of direct air flow.
ricola said:
A chargecooler is an intercooler which is cooled by a jacket of water/coolant rather than air like most turbo systems. The water has a far higher heat capacity so is better at cooling the intake charge, particularly when in my case I don't really have space for an air/air as they are bigger and need a lot of direct air flow.
Makes sense - cheers 
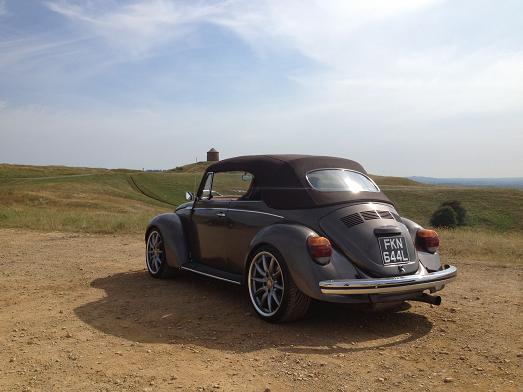
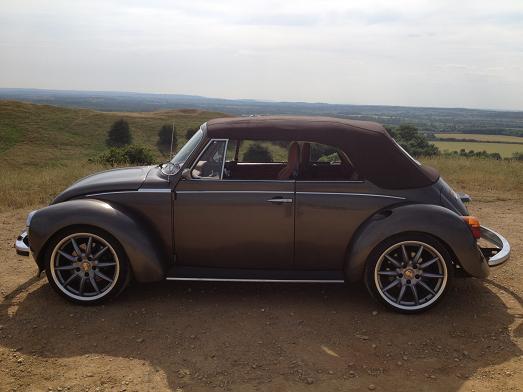
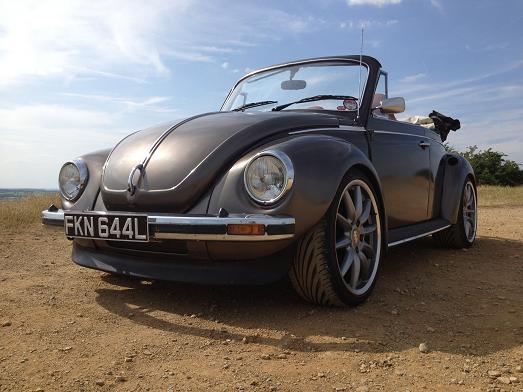
As the car is more or less done now I thought I'd post a bit of a summary of the final spec and some finished pictures (still waiting to get a proper photoshoot sorted!). In the mean time I've had it on the test track at work and got it up to an easy 150mph (GPS not speedo) and there was plenty more in it. Just need to give it a clean ready for a trip over to Spa next weekend..
Body
oMain body restored with new heater channels, strengtheners, bulkhead, etc etc
oSpare wheel well modified to take main radiator and charge-cooler radiator
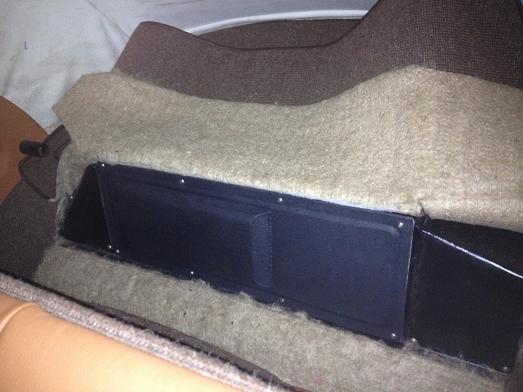
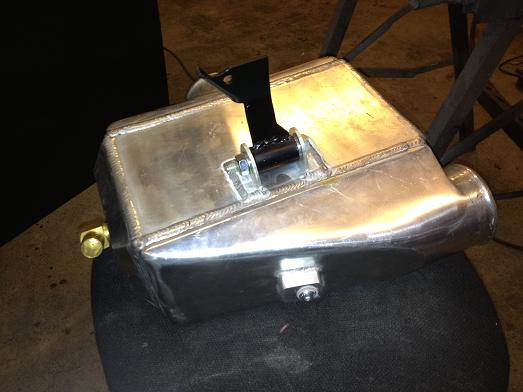
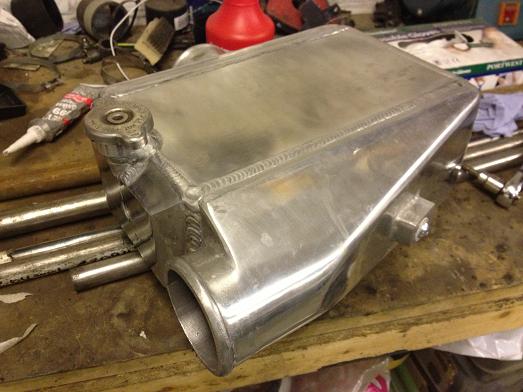
oFuel tank extended, baffled and fitted with internal up-rated fuel pump (HRC 310lpm)
oRear end removable on frame, VW bus inspection hatch above engine
oFront wings: 2” wider in fibreglass
oRear wings: 40mm wider in steel with forced cold air intake incorporated into left hand wing
oK&N panel air filter built in to inner wing, with water drain
oLengthened bumper irons with stock bumpers
oRepaint in original colour (Schwartz Metallic)
oGerman Sonnenland roof
•Chassis
oCustom framehorns, torsion housing central section removed
oCustom perimeter frame rails with one-off bead-rolled floors, finished in epoxy mastic 121.
oOBP reverse mounted pedal box with twin brake master cylinders for adjustable bias and hydraulic clutch under false floor
oFront: Kerscher coil-over struts, heavy duty anti-roll bar
oRear: IRS with Protech coil-over dampers and swing axle length torsion bars, 944 anti-roll bar
o19” Porsche Carrera Sport wheels, 10j rear, 8,5j front
oVredestein Ultrac Sessenta tyres, 265/30R19 & 235/35R19
oPorsche 911 (996) brembo brakes front & rear
oBraided hoses, 911 fluid reservoir.
oSpacesaver 996 spare wheel
•Powertrain
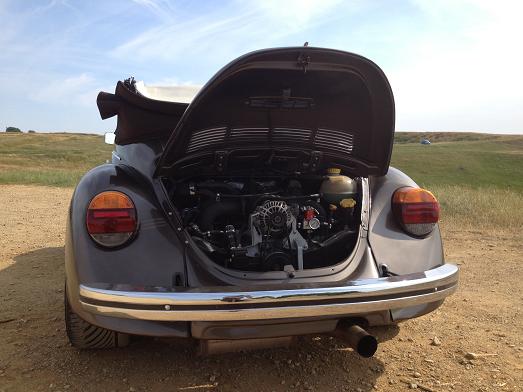
oRebuilt subaru EJ257 shortblock (2.5l STI), forged supertech pistons, rebuilt V4 sti heads, ARP 11mm head studs, external oil breather catch tank, shortened/extended sump with RCM baffle plate, Garrett SC46 turbo, ported headers with custom 2” crosspipe, 3” bellmouth from turbo back, magnaflow 3" muffler, Nismo 740cc injectors, ESL daughterboard mapped by Bob Rawle, Aeromotive FPR on reversed parallel fuel rails, new-age subaru coilpack conversion. Estimated 400-450bhp, 450ftlbs.
oCustom charge-cooler system with bosch water pump and Pace pre-rad, inlet manifold spacers/insulaters
oCooling system modified to external thermostat with Pace sierra cosworth radiator, fans controlled by ECU
o1989 Porsche 911 ‘G50 shortnose’ transaxle fitted with rebuilt 964 RS LSD (80/20). 930 CVs, aftermarket axles and drive flanges, KEP uprated Porsche stage 1 clutch (550ftlbs)
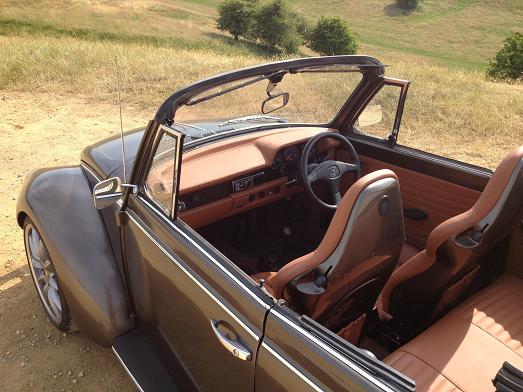
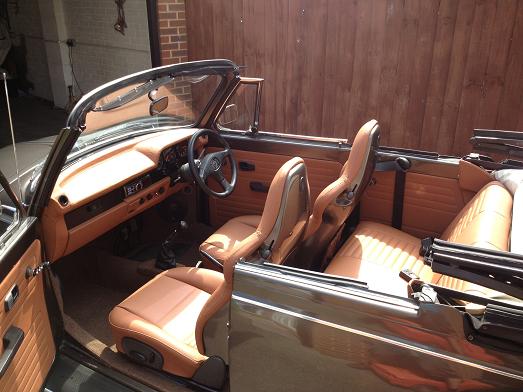
•Interior
•Square weave carpets
•Heated Porsche 996 sports seats and seatbelts
•Rear seat modified to clear transmission tunnel
•Dashboard widened to fit early Porsche 924 gauges with additional Stack Oil pressure and turbo pressure gauges. Mini switches.
•Seats and dash re-trimmed in saddle tan leather by Auto-trim, Leicester
•Alpine CDA-X001 head unit, Rainbow component speakers up front in one-off fibreglass foot well enclosures, pioneer rear speakers in kick panels
•One-off heater system built into stock duct system, stock dash controls with t25 fan switch & electronic Ford heater valve
Body
oMain body restored with new heater channels, strengtheners, bulkhead, etc etc
oSpare wheel well modified to take main radiator and charge-cooler radiator
oFuel tank extended, baffled and fitted with internal up-rated fuel pump (HRC 310lpm)
oRear end removable on frame, VW bus inspection hatch above engine
oFront wings: 2” wider in fibreglass
oRear wings: 40mm wider in steel with forced cold air intake incorporated into left hand wing
oK&N panel air filter built in to inner wing, with water drain
oLengthened bumper irons with stock bumpers
oRepaint in original colour (Schwartz Metallic)
oGerman Sonnenland roof
•Chassis
oCustom framehorns, torsion housing central section removed
oCustom perimeter frame rails with one-off bead-rolled floors, finished in epoxy mastic 121.
oOBP reverse mounted pedal box with twin brake master cylinders for adjustable bias and hydraulic clutch under false floor
oFront: Kerscher coil-over struts, heavy duty anti-roll bar
oRear: IRS with Protech coil-over dampers and swing axle length torsion bars, 944 anti-roll bar
o19” Porsche Carrera Sport wheels, 10j rear, 8,5j front
oVredestein Ultrac Sessenta tyres, 265/30R19 & 235/35R19
oPorsche 911 (996) brembo brakes front & rear
oBraided hoses, 911 fluid reservoir.
oSpacesaver 996 spare wheel
•Powertrain
oRebuilt subaru EJ257 shortblock (2.5l STI), forged supertech pistons, rebuilt V4 sti heads, ARP 11mm head studs, external oil breather catch tank, shortened/extended sump with RCM baffle plate, Garrett SC46 turbo, ported headers with custom 2” crosspipe, 3” bellmouth from turbo back, magnaflow 3" muffler, Nismo 740cc injectors, ESL daughterboard mapped by Bob Rawle, Aeromotive FPR on reversed parallel fuel rails, new-age subaru coilpack conversion. Estimated 400-450bhp, 450ftlbs.
oCustom charge-cooler system with bosch water pump and Pace pre-rad, inlet manifold spacers/insulaters
oCooling system modified to external thermostat with Pace sierra cosworth radiator, fans controlled by ECU
o1989 Porsche 911 ‘G50 shortnose’ transaxle fitted with rebuilt 964 RS LSD (80/20). 930 CVs, aftermarket axles and drive flanges, KEP uprated Porsche stage 1 clutch (550ftlbs)
•Interior
•Square weave carpets
•Heated Porsche 996 sports seats and seatbelts
•Rear seat modified to clear transmission tunnel
•Dashboard widened to fit early Porsche 924 gauges with additional Stack Oil pressure and turbo pressure gauges. Mini switches.
•Seats and dash re-trimmed in saddle tan leather by Auto-trim, Leicester
•Alpine CDA-X001 head unit, Rainbow component speakers up front in one-off fibreglass foot well enclosures, pioneer rear speakers in kick panels
•One-off heater system built into stock duct system, stock dash controls with t25 fan switch & electronic Ford heater valve
Gassing Station | Readers' Cars | Top of Page | What's New | My Stuff