Roof seal retaining channel properly fitting
Discussion


Hi
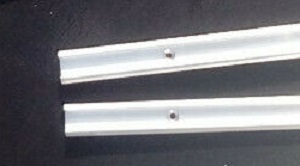
Next on my list is to properly sort out the seals on the roof. I have bought the new seals for tvr parts which have the improved stiffer T Section. The problem is that I can’t fit them into the roof channels because the screws that attach it to the roof are sitting proud, whereas the old softer seal would slide over the raised screws. I want to fix it properly and I can see that the screws are not countersunk properly, but the metal is too thin to allow these screws to be sunk in correctly. All my removing and refitting has also made the holes in the fibreglass too big.
So what are my options? I can drill new holes in the channel and try to countersink them properly and use different screws but I wouldn’t know which screws to use.
Alternatively I could replace the channels as they aren’t too expensive, but does anyone know if these are countersunk any differently? And if they come with screws?
Finally, the existing channels don’t have a spacer behind them but have various amounts of washers under different screws. I don’t think it needs the spacer and not sure it even needs the washers. Perhaps they were fitted to try and improve the seal previously. Can anyone confirm?
Any advice would be great as the car lives outside and now I’ve messed with it, I don’t think it’s all sealed as good as it was before (even though that wasnt great) but I need to fix it.
Thanks
With a bit of lube (washing up liquid) would the seal slide over some low profile head screws something like these?
failing that I'd go for countersunk screws and drill the holes in the channel as big as you dare without the screw pulling through. If you want to get clever you could try forming some countersinks in the channel by improvising a die and punch arrangement

All good ideas, the first one I tried using exactly those type of self tappers, and washing up liquid too, but the rubber is so rigid it wasnt enough. Once they’re finally in I’ll be grateful for the stiffness but it’s a pain right now!
I might try drilling some different holes in the existing channels. Actually using some sort of punch is not a bad idea, I’ll have to see if I can figure out a way to do that but I’d rather explore all my options before drilling more holes
I might try drilling some different holes in the existing channels. Actually using some sort of punch is not a bad idea, I’ll have to see if I can figure out a way to do that but I’d rather explore all my options before drilling more holes
If you can view this on a decent sized screen (not a phone) i'd say the holes are countersunk on these ones?
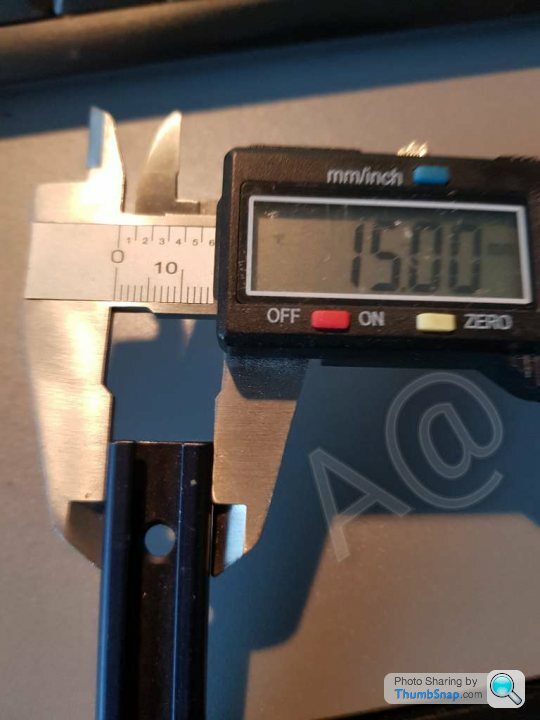
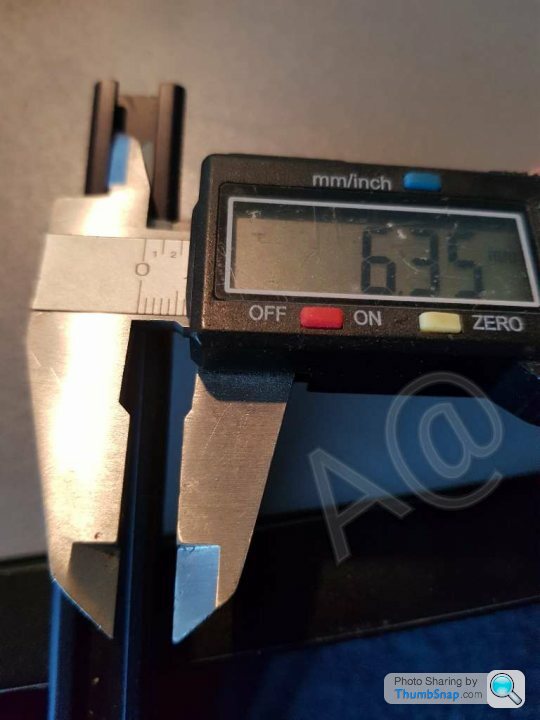
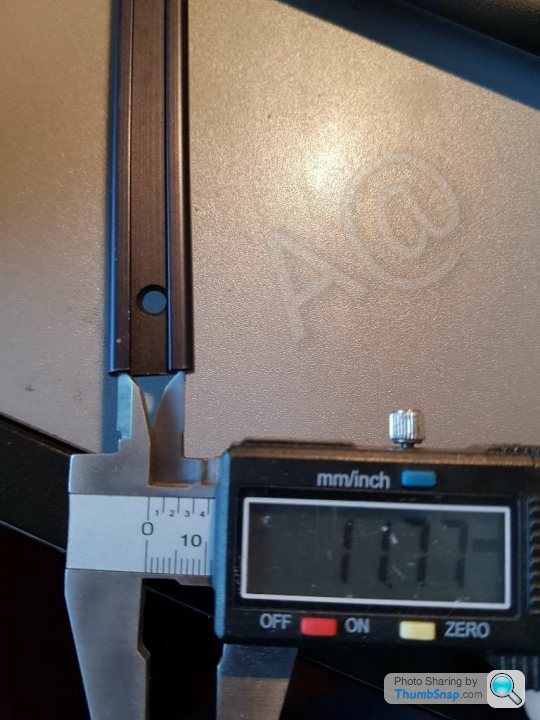
1.5mm, and 4mm S/S countersunk (they happen to 1" long but I cut them down to suit as I use them for other jobs that require 1") TBH I also have a pretty little modified counter sink tool that drops into that slot so that the edges are not caught (if I can find it). I would try rotating the strip end to end and see if the holes actually align (which I doubt they will and re drill if that is the case). A@
One more question regarding spacing. Looking at how I refitted the channel temporarily yesterday, I removed the washers at one end and now that end doesn't meet the window glass. So I assume the spacers are needed at that end unless I can adjust the glass well enough. Adding a flat spacer the whole length therefore wouldn't work as it wouldn't provide the "curve" at one end to follow the glass. Can you think of a better solution that some washers that might work better?
Thanks
Thanks


Sorry Mike, upgrading too...rather than anything different. From Mk1 adhered on to the hood and upgrading to the channel version on Griffs and Chims (changing the early Wedge seal to the later seal version too). Whilst production was on going, the channels and spacer strips were required for those cars and many times I needed to have take shorter versions and drill/countersink them, join them together to complete a job. A@
Gassing Station | Tuscan | Top of Page | What's New | My Stuff