Brake Pull After Calliper Rebuild
Discussion


I've recently rebuilt my AP CP 6600 callipers. Annoyingly having put everything back together the car pulls to the left under braking. Ive bled the system several times and have examined the rear drivers side calliper and it seems to be working perfectly.
The only thing I can see when testing the calliper with the pads removed is that the upper piston of the inner half of the drivers side front calliper is slightly lazy. It also takes a fair amount of effort to push it back in but it does go in. It also will come out a decent way when all of the other pistons are held in place.
Thee doesn't seem to be any air left in the calliper as fluid does come out if I release the bleed nipple.
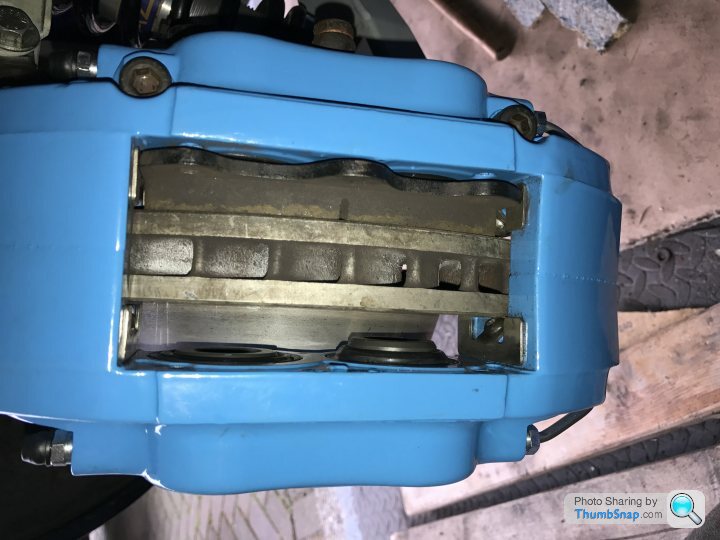
Theres some sample pics below. Not really sure where to go with this now, whether to pull the drivers side calliper apart again or work that upper piston.
Drivers side calliper inner half - The upper piston looks slightly lazy in comparison to the lower

Drivers side calliper outer half - This looks far more balanced

Passenger side calliper outer half
Passenger side calliper inner half

The only thing I can see when testing the calliper with the pads removed is that the upper piston of the inner half of the drivers side front calliper is slightly lazy. It also takes a fair amount of effort to push it back in but it does go in. It also will come out a decent way when all of the other pistons are held in place.
Thee doesn't seem to be any air left in the calliper as fluid does come out if I release the bleed nipple.
Theres some sample pics below. Not really sure where to go with this now, whether to pull the drivers side calliper apart again or work that upper piston.
Drivers side calliper inner half - The upper piston looks slightly lazy in comparison to the lower
Drivers side calliper outer half - This looks far more balanced
Passenger side calliper outer half
Passenger side calliper inner half
Edited by m4tti on Sunday 23 April 12:46
In every one of the pics it is the upper piston that is further in than the lower....... Coincidental? I doubt it.
I think you need to be looking elsewhere.
IIRC from when I had these, they are reversible, as in there are 4 holes in each caliper 2 are linked & 2 have bleed screws on.
You could therefore swap them completely over to double check. Either way, I think you need to be looking elsewhere.
I think you need to be looking elsewhere.
IIRC from when I had these, they are reversible, as in there are 4 holes in each caliper 2 are linked & 2 have bleed screws on.
You could therefore swap them completely over to double check. Either way, I think you need to be looking elsewhere.
paintman said:
Is there any valving in the system that in the event of a hose or pipe failure would cause the system to only operate partially which has been upset by the bleeding?
And has everything been connected up correctly?
It's a tvr so has about as much intelligence as a potatoe And has everything been connected up correctly?
Edited by paintman on Sunday 23 April 19:47

m4tti said:
paintman said:
Is there any valving in the system that in the event of a hose or pipe failure would cause the system to only operate partially which has been upset by the bleeding?
And has everything been connected up correctly?
It's a tvr so has about as much intelligence as a potatoe And has everything been connected up correctly?
Edited by paintman on Sunday 23 April 19:47
But the RRC does have a divided master cylinder reservoir & a shuttle valve so in the event of a failure in one part of the system - primary or secondary - the other will still work.
On mine the Primary circuit (describes as 'emergency brake') operates the lower pistons in the front calipers only & the secondary (described as 'service brake') operates the upper pistons in the front calipers & the rear caliper pistons. In normal use both operate.
If you've bled by the pump-the-pedal method possibly displaced the shuttle valve if fitted?
The factory manual for mine warns that when bleeding the brakes 'it is necessary to slacken off the brake failure warning system to prevent the shuttle valve restricting the hydraulic fluid flow' & it comes with a handy 'C' washer that's fitted when the warning switch is slackened off & ensures the shuttle valve isn't interfered with.
Shuttle valve discussed: http://www.panteraplace.com/page89.htm
I used a vacuum bleeder on these so I don't think there'll be any issue in the master cylinder area.
I've just spoken to the guys that I've bought all the parts from, BG developments.
Essentially the pistons will come out at different rates. The fact the bottoms come out before the tops is pure chance and on the test rig they can come out in any order. The important thing is the pistons do come out and aren't seized into the bore.
One thing they've suggested is I remove the rattle clips to make sure the pads are seating correctly. So I will be doing that.
The other small issue is i didn't label the pads on removal so can't gaurantee they went back exactly the same as they came out. BG have provided me a method of measuring the taper on the pad to return them to the caliper in a uniform fashion.
Ive also measured the disc temp after driving and all discs have a similar temp within one degree...
m4tti said:
One thing they've suggested is I remove the rattle clips to make sure the pads are seating correctly. So I will be doing that.
The other small issue is i didn't label the pads on removal so can't gaurantee they went back exactly the same as they came out. BG have provided me a method of measuring the taper on the pad to return them to the caliper in a uniform fashion.
The other small issue is i didn't label the pads on removal so can't gaurantee they went back exactly the same as they came out. BG have provided me a method of measuring the taper on the pad to return them to the caliper in a uniform fashion.
Good point, with mine using certain pads I actually used a grinder to take the edges off just to make sure they were slightly loose & therefore moved correctly.
Also a good point, with mine, there was a very slight machining error that meant for the first few hundred miles one pad was basically slightly un-square & would take longer to bed in and become fully effective.
E-bmw said:
Good point, with mine using certain pads I actually used a grinder to take the edges off just to make sure they were slightly loose & therefore moved correctly.
Also a good point, with mine, there was a very slight machining error that meant for the first few hundred miles one pad was basically slightly un-square & would take longer to bed in and become fully effective.
m4tti said:
The other small issue is i didn't label the pads on removal so can't gaurantee they went back exactly the same as they came out. BG have provided me a method of measuring the taper on the pad to return them to the caliper in a uniform fashion.
I've done this and it made a surprising amount of difference. I rubbed mine on wet and dry paper on a flat surface to get them somewhere flat but it still took quite a few miles to bed in again.I can also confirm perfectly free pistons will come out at different rates. With free movement of all you can stop one piston coming out and make another move just with finger force on the piston.
Gassing Station | Suspension, Brakes & Tyres | Top of Page | What's New | My Stuff